


I have always found that pumpkins make the easiest starting point for adding a bit of Halloween spirit without overdoing it.
Those evenings spent at the kitchen table with paint and glue turned into some of my most relaxed parts of the season.
I usually pick projects that can sit on a mantel or shelf without needing extra space or special lighting.
The key seems to be choosing ideas that still let the natural shape of the pumpkin show through.
It keeps things looking intentional instead of cluttered.
Style A Mixed Pumpkin Table Display

Mixing pumpkins in different colors, sizes, and textures creates a simple but eye-catching tabletop arrangement. The white striped ones, the mottled green squash, and the standard orange pumpkins all work together without needing extra props or carving.
Place the largest pumpkins at the back and layer smaller ones toward the front on any sturdy surface like a porch table or entry bench. Add a few stems of dried flowers in between if you have them, but keep the focus on the pumpkins themselves so the grouping stays easy to put together and take down.
Arrange Pumpkins Across The Mantel

A simple way to mark the mantel for Halloween is to line up pumpkins of different sizes and colors along the surface. Mixing smooth beige ones with mottled green and small orange varieties keeps the look varied without needing extra props. The arrangement draws the eye because the shapes and tones play off each other in a single row.
Start with the largest pumpkins at the ends or center, then fill gaps with smaller ones. Tuck a few stems of dried stems behind them if you have them, but keep the focus on the pumpkins themselves. This works on any mantel and takes only a few minutes to adjust until the grouping feels balanced.
Group Pumpkins On A Tray

A tray filled with pumpkins in different sizes and colors makes a quick Halloween display that feels put together without much effort. Orange, white, and striped pumpkins sit together with a few glass candle holders, and the whole setup stays simple while still reading as seasonal.
This works best on a coffee table or side table where people gather. Start with a shallow basket or tray, add four to six pumpkins, and tuck in a couple of low candles. The mix of shapes and shades does most of the work, so you do not need extra pieces to make it feel complete.
Layer Pumpkins Across An Entry Console

A simple way to use pumpkins for Halloween is to gather several in different sizes and colors and line them up on a console table. The mix of orange, pale green, and striped white ones creates interest without needing extra props or complicated setups. This approach keeps the focus on the pumpkins themselves.
Place the largest pumpkins toward the back and work smaller ones forward so every shape shows. You only need five or six pumpkins total, plus maybe a few leaves tucked in if you want a bit more color. The look works in an entryway or any spot that needs a quick seasonal update.
Create A Simple Pumpkin Porch Display

A collection of pumpkins in different sizes and muted colors makes a strong base for porch decor. Placing them on the ground, on a low stool, and tucked under a throw keeps the look relaxed while still feeling seasonal. The variety in shape and tone adds interest without needing extra props.
Start with three or four larger pumpkins on the floor and add smaller ones on a stool or step. Drape a light blanket over the stool to soften the arrangement and fill in any gaps with a basket of dried grasses behind it. This setup works well by a front door and can be changed out quickly once the season ends.
Group Neutral Pumpkins On A Console

A simple way to use pumpkins for Halloween is to gather several in soft neutral shades and set them together on a console or side table. The mix of sizes, stripes, and muted colors keeps the display interesting without needing bright orange or obvious spooky details.
Start with three or four larger pumpkins as the base, then tuck in a few smaller ones in front. This works well in an entryway or living room where you want seasonal decor that still feels calm. You can paint plain pumpkins with light washes of beige, gray, or off-white if you want more variety.
Layer Wood Strips Around A Pumpkin

One simple DIY project uses thin wood veneer or shavings to build a large curved leaf shape across part of the pumpkin. The layered strips add texture and a natural contrast to the smooth orange skin without covering the whole surface.
This works best on a medium or large pumpkin displayed on a plain stand or tabletop. Cut flexible wood pieces into narrow strips, glue them in overlapping rows, and shape them into a sweeping curve. Keep the rest of the pumpkin untouched so the wood detail stands out clearly.
Arrange Pumpkins Across Open Shelves

Filling open shelves with pumpkins of different sizes and colors creates an easy Halloween display that feels full without needing much else. The mix of white, orange, and smaller patterned pumpkins spread over several levels gives the arrangement weight and keeps it from looking sparse.
Start with larger pumpkins on the bottom shelves and work upward with smaller ones to build height. Add a couple of lanterns with battery candles between the pumpkins so the light hits the shapes at night. This works well in any room with open shelving and takes only a few minutes to adjust when you want a change.
Arrange Pumpkins Down The Center Of The Table

A simple row of pumpkins makes an easy and effective centerpiece for a dining table during Halloween season. Mixing sizes and colors keeps the look interesting without needing extra props or complicated setups.
Start with a few larger pumpkins as the base and fill in smaller ones around them. Add a couple of candles in between if you want a bit of light at night. This works well on longer tables and can be adjusted easily if your space is smaller.
Arrange Pumpkins Along A Console Table

A simple row of pumpkins in different sizes and colors turns an ordinary console into a quick Halloween display. The mix of orange, white striped, speckled green, and small yellow gourds creates enough variety to feel intentional while keeping the look calm and seasonal.
This works best in an entry or living area where the table already sits against a wall. Gather five to seven real or faux pumpkins, vary their heights, and leave a little breathing room between them so the shapes stay easy to notice.
Arrange Pumpkins On A Large Wooden Tray

A simple tray of pumpkins makes an easy focal point for a kitchen island. Different sizes and colors keep the look interesting without needing extra pieces or bright Halloween colors.
Place the tray on any flat surface and add just a few supporting items like small nuts or dried leaves if you want more texture. This works well in kitchens because it stays contained and can be swapped out quickly after the season ends.
Group Pumpkins Along The Mantel

A simple row of pumpkins in different sizes and colors turns a mantel into a clear Halloween focal point. The mix of white and orange ones keeps it from looking too matchy while the lit candles add a soft glow that reads as seasonal without extra props.
Place the largest pumpkins first to set the scale, then tuck smaller ones and a few candles in between. Use whatever you already have or pick up a few plain ones to paint or leave natural. This setup works on any mantel and takes only a few minutes to arrange each year.
Group Pumpkins On A Tray Centerpiece

A tray filled with pumpkins in soft white, sage, and blush tones makes a simple but effective Halloween table display. The variety of sizes and shapes keeps the look interesting without needing bright colors or bold patterns.
Place the tray on a coffee table or dining table where it can be seen from the seating area. Use whatever pumpkins you have on hand and add just a few sprigs of dried stems or greenery to fill small gaps. This setup works well if you want a calm Halloween look that still feels seasonal.
Arrange Pumpkins Along A Console Table

A long console works well for a pumpkin display because it gives you room to line up different sizes and colors without crowding anything. Mixing bright orange pumpkins with white, green, and striped ones creates enough variety to keep the eye moving down the table.
Start with the biggest pumpkins at the ends and work smaller ones toward the middle. Add a few candles in between so the display stays simple but still feels finished. This setup works in an entry or hallway where people pass by often.
Arrange Pumpkins Along A Bench

Mixing orange, white, and striped pumpkins on a bench gives an easy seasonal display that still feels festive. The different sizes and shapes keep the arrangement interesting without needing extra props or bright colors.
Gather pumpkins from a market or garden and line them up in a loose row. Add a couple on the ground in front to stretch the look across the space. This works well on a porch or entry where people pass by often.
Make A Pumpkin Vase Centerpiece

Hollowing out a pumpkin and turning it into a vase gives you an easy seasonal centerpiece that works right on the dining table. The thick shell holds water or a liner well enough for fresh cuttings or hardy plants, and the round shape keeps the arrangement compact without taking over the whole surface. A few sprigs of greenery and some textural stems are all it needs to look finished.
This idea suits both indoor dinners and outdoor tables since the pumpkin itself provides the main color and form. Choose a firm pumpkin, cut a wide opening at the top, and add a small container inside if you want to keep things neat. Swap the contents as the season changes or let the arrangement dry for a longer lasting version.
Create A Pumpkin Vase Centerpiece

A hollowed pumpkin makes an easy and pretty vase for seasonal flowers. The soft pink color keeps the look light while still reading as Halloween decor instead of plain fall styling.
Pick a pumpkin that sits flat, cut a wide opening at the top, and drop in a small container or floral foam. Add roses, astilbe, or any blooms you like. Set it on a console or side table with a few smaller pumpkins around it to finish the vignette.
Display Pumpkins Across Open Shelves
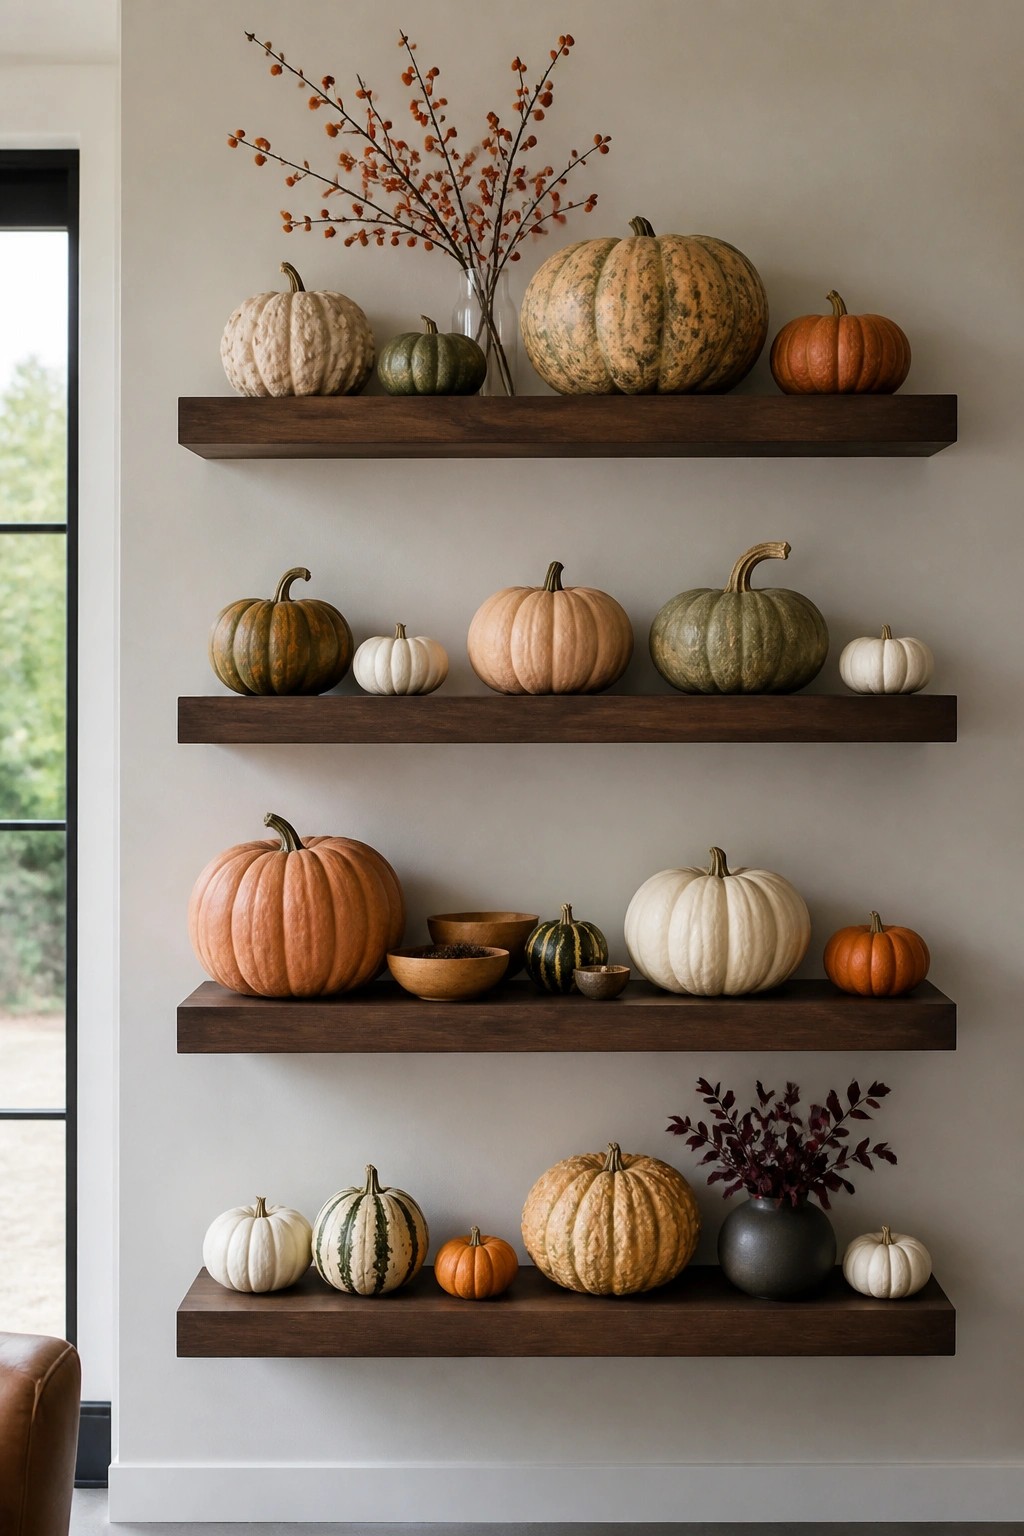
Grouping pumpkins of different sizes, shapes, and colors on floating shelves creates an easy seasonal display that feels collected rather than cluttered. The mix of smooth, ribbed, and speckled varieties adds interest without needing extra props or bright colors.
This works well in any room with wall shelves, since you can spread the pumpkins out over multiple levels and tuck in a few small wooden bowls or branches for balance. Keep the rest of the space simple so the pumpkins stay the focus.
Group Pumpkins Down The Dining Table
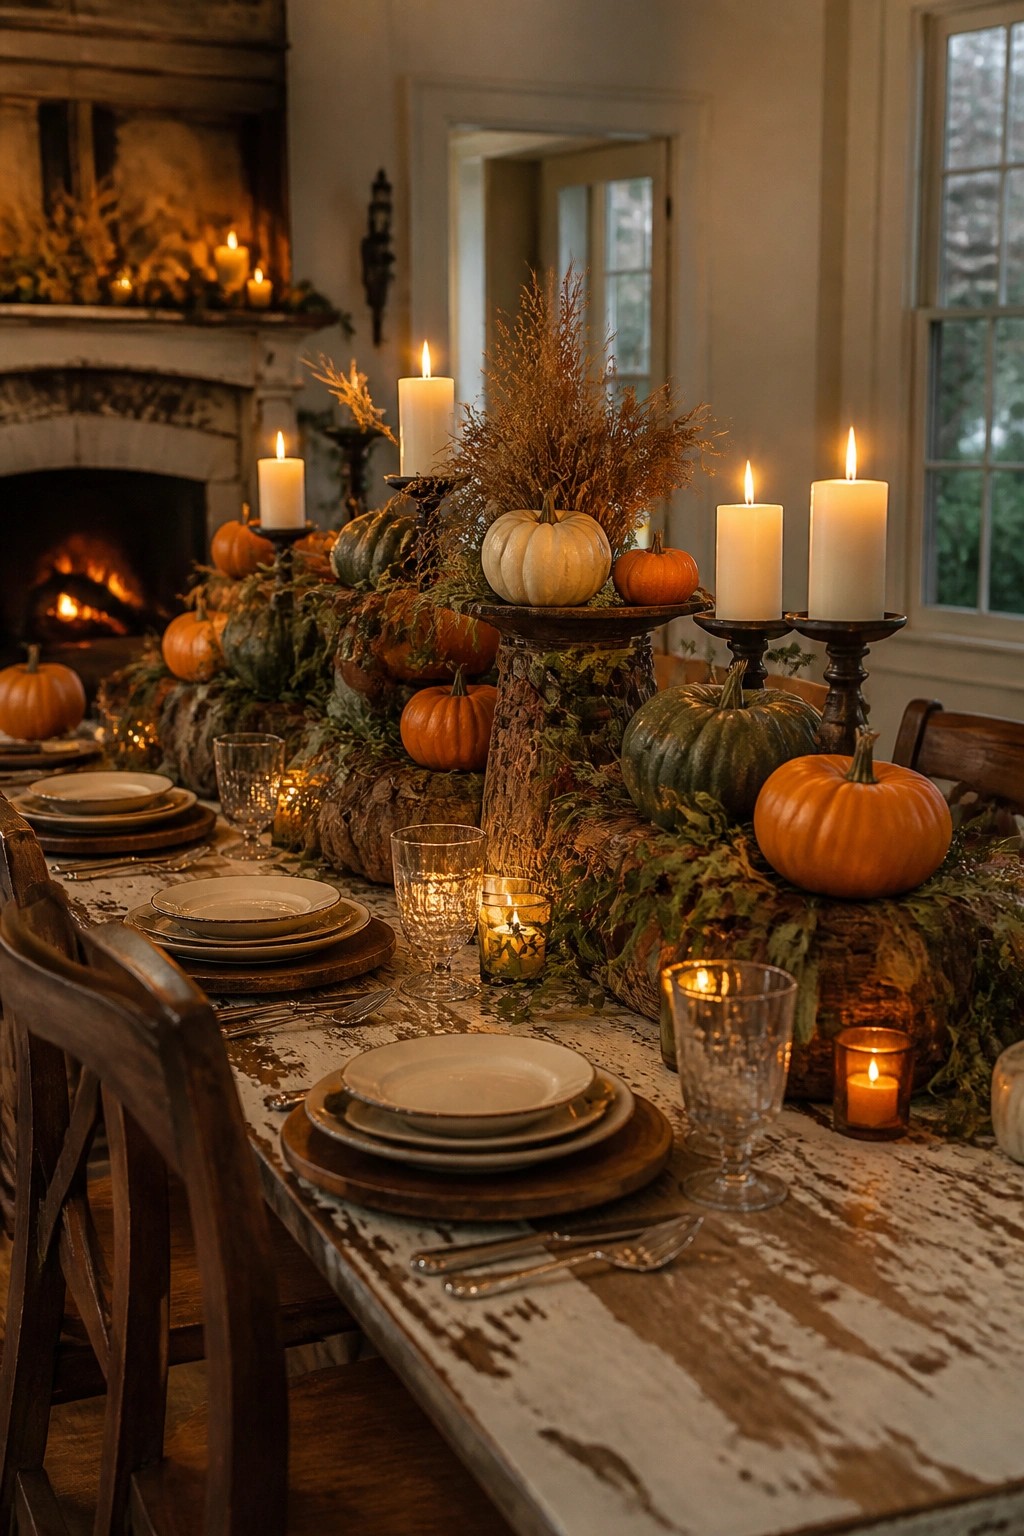
A long row of pumpkins mixed with candles and dried stems makes a simple but effective Halloween tablescape. The mix of orange, green, and white pumpkins keeps the look interesting without needing extra props or bright colors.
Set this up by placing pumpkins of different sizes in a loose line down the center of the table. Tuck in a few pillar candles and small glass votives between them. This works best on a longer table where the pumpkins can stretch from one end to the other.
Arrange Pumpkins Across The Mantel

A simple way to mark the mantel for Halloween is to line up pumpkins of different sizes and colors in one long row. Mixing white, pale orange, and striped varieties keeps the look interesting without needing extra props or bright colors. The dried stems and branches in a dark vase add height at the back so the arrangement feels full rather than flat.
Start with the largest pumpkins toward the center or one end, then tuck smaller ones in the gaps. Leave a little space between them so each shape stands out. This setup works on any mantel you already have and can be changed in minutes when you want to swap in new pumpkins later.
Carve A Pumpkin Into A Glowing House

A large pumpkin carved with a doorway and small window creates a miniature house that glows from within once a candle is placed inside. The succulents and moss added across the top turn the surface into a living roof and make the whole piece feel more like a tiny cottage than a standard jack o lantern.
This idea works best on porch steps or a front entry where the light can show after dark. Start with one firm pumpkin, cut a simple opening, tuck in a battery candle, and finish with a few small plants or moss scraps. The rest of the display can stay simple with just a few smaller pumpkins nearby.
Frequently Asked Questions
Q: What happens if the glue does not stick well to the pumpkin? A: Wipe the surface clean first with a damp cloth. Then let it dry completely before you try again. A light sanding helps the glue grab better on smooth skins.
Q: How do I clean up after a messy carving session? A: Keep a bowl of soapy water nearby for quick rinses. Paper towels handle most of the pulp and seeds. Sweep the floor right away so nothing dries and sticks.
Q: Are these safe if I have pets around? A: Skip the small parts that could get chewed off. Place everything up high or in a closed room during the first night.