


Planning Halloween snacks does not have to be complicated. These finger food ideas focus on recipes that are straightforward to prepare and serve. Each one uses common ingredients and simple steps that fit into a busy schedule. They work well for parties with kids or adults. You will find options that can be made ahead or put together quickly.
Helpful Tips for Halloween Finger Foods
A few simple steps keep your finger foods easy to make and fun to serve at a party.
Prep Components Early
Chop vegetables, mix dips, and bake bases like pastry shells the day before. This cuts down on last minute work when guests arrive.
Keep Bites Truly Small
Cut or shape every item so it fits in one hand without dripping. Guests move around more during Halloween parties, so messy pieces get left behind.
Use Dark or Bright Platters
Place foods on black trays or orange napkins. The contrast makes colors pop and signals the theme without extra decorations.
Offer One Nut Free Option
Many kids and adults have nut allergies. Make at least one savory bite using seeds or cheese instead so everyone can grab something.
Mummy Jalapeño Poppers
These mummy jalapeño poppers turn a classic appetizer into a lighthearted Halloween snack. The strips of dough wrap around the peppers like bandages, giving them a playful look that stands out on any snack table. Inside, the creamy cheese filling offers a nice contrast to the pepper heat and flaky crust.
They fit well at parties or casual get-togethers where guests want easy finger foods. The balance of spice and richness makes them appealing without overwhelming the palate.
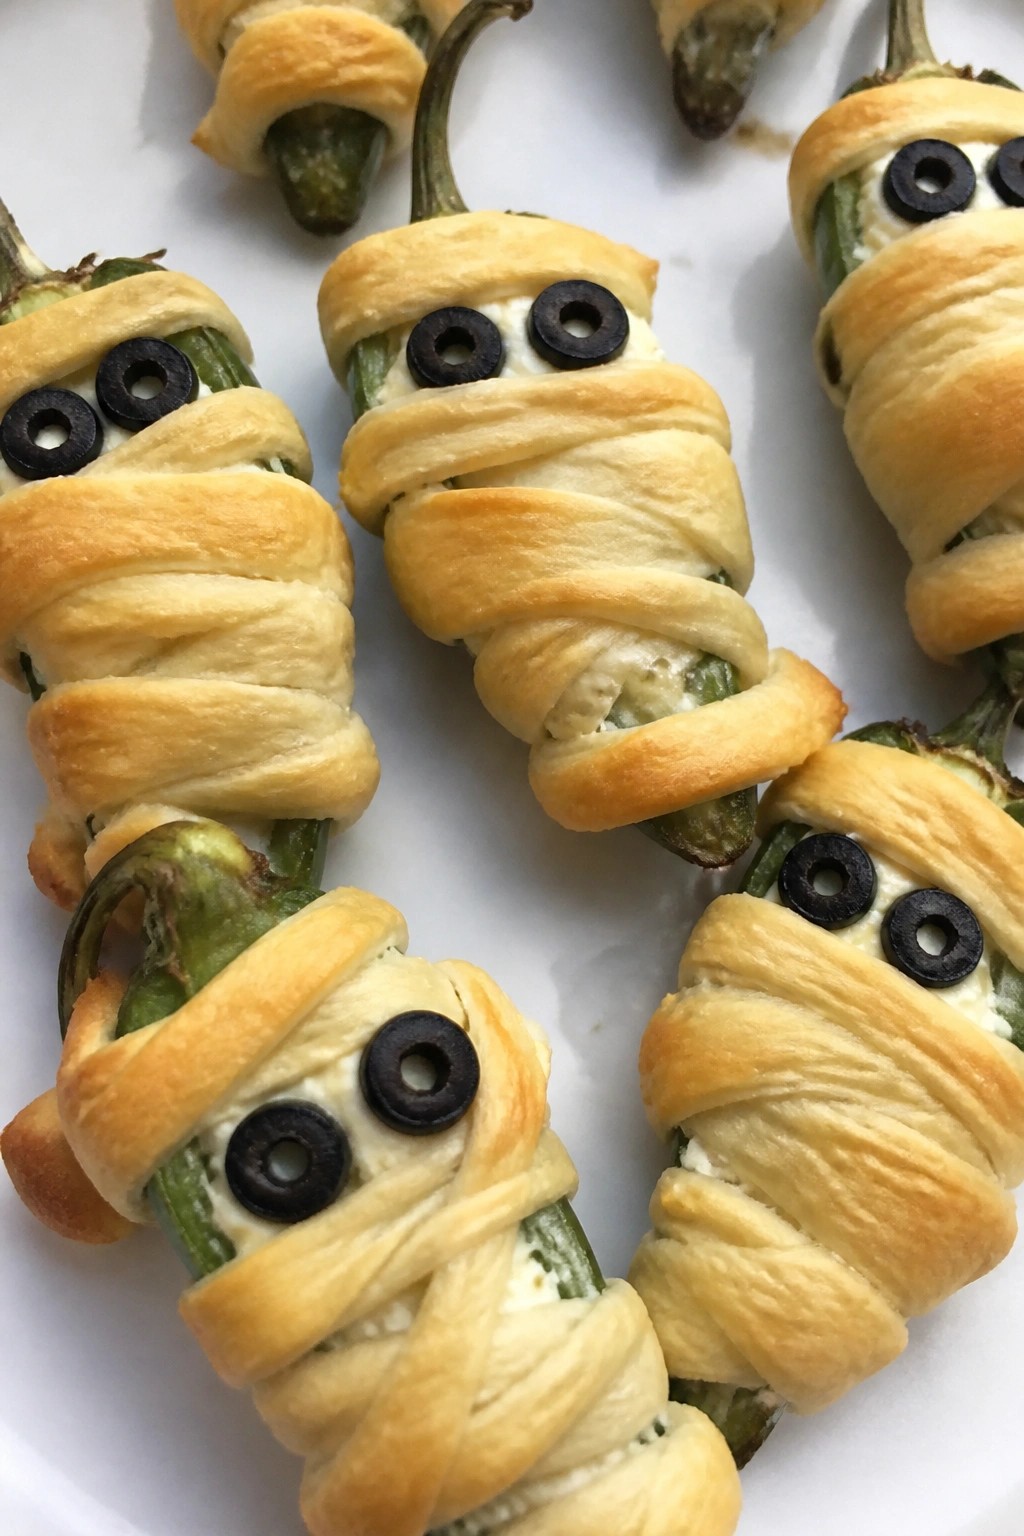
Serves 4 people.
Ingredients
- 8 large jalapeño peppers
- 4 ounces cream cheese, softened
- 1/2 cup shredded cheddar cheese
- 1 can crescent roll dough
- 16 black olive slices
- 1/4 teaspoon garlic powder
- 1/4 teaspoon salt
Instructions
- Preheat the oven to 375°F and line a baking sheet with parchment paper. Halve the jalapeños lengthwise and remove the seeds and membranes.
- In a mixing bowl, combine the cream cheese, cheddar cheese, garlic powder, and salt until smooth.
- Spoon the cheese mixture into each jalapeño half and press the halves back together.
- Unroll the crescent dough and cut it into thin strips. Wrap the strips around each stuffed jalapeño, leaving small gaps for the mummy effect.
- Place two black olive slices on each popper to form eyes. Arrange the poppers on the baking sheet.
- Bake for 15 to 18 minutes until the dough turns golden and the filling is hot.
Extra Tips
Use room-temperature cream cheese so it mixes evenly and stays creamy after baking. If the jalapeños vary in size, adjust the dough strips to keep the wrapping light and avoid soggy spots. These taste best served warm right after baking. Course: Appetizer Cuisine: American Equipment: Baking sheet, Mixing bowl, Knife
Ghostly Caprese Skewers
These Ghostly Caprese Skewers turn a classic salad into a fun Halloween finger food. The mozzarella balls become little ghosts with olive eyes, while the tomatoes and basil keep the flavors bright and familiar. They come together quickly and add a playful touch to any party spread.
They suit a casual gathering or kids event where you want something light and fresh. The creamy cheese pairs with juicy tomatoes and a touch of balsamic for balance.

Serves 4 people.
Ingredients
- 12 cherry tomatoes
- 12 bocconcini mozzarella balls
- 12 fresh basil leaves
- 24 thin black olive slices
- 1/4 cup balsamic glaze
- 12 small wooden skewers
Instructions
- Place one cherry tomato on each wooden skewer near the tip.
- Add one basil leaf right after the tomato.
- Thread one bocconcini mozzarella ball onto the skewer after the basil.
- Press two black olive slices onto the front of each mozzarella ball to form eyes.
- Arrange the finished skewers on a platter and drizzle the balsamic glaze over the top just before serving.
Extra Tips
Make the skewers a few hours ahead and cover them loosely in the fridge, then add the balsamic glaze right before guests arrive so the cheese stays firm. If the olive slices slide, dab a tiny bit of the glaze on the back to help them stick. You can swap the bocconcini for larger mozzarella cut into rounds if that is what you have on hand. Course: Appetizer Cuisine: Italian Equipment: Wooden Skewers, Serving Platter
Spiderweb Deviled Eggs
These spiderweb deviled eggs add a fun Halloween touch to any appetizer spread. They work well for parties or casual gatherings where guests want something easy to pick up. The creamy filling pairs with the classic egg white for a smooth bite that feels familiar but looks festive.
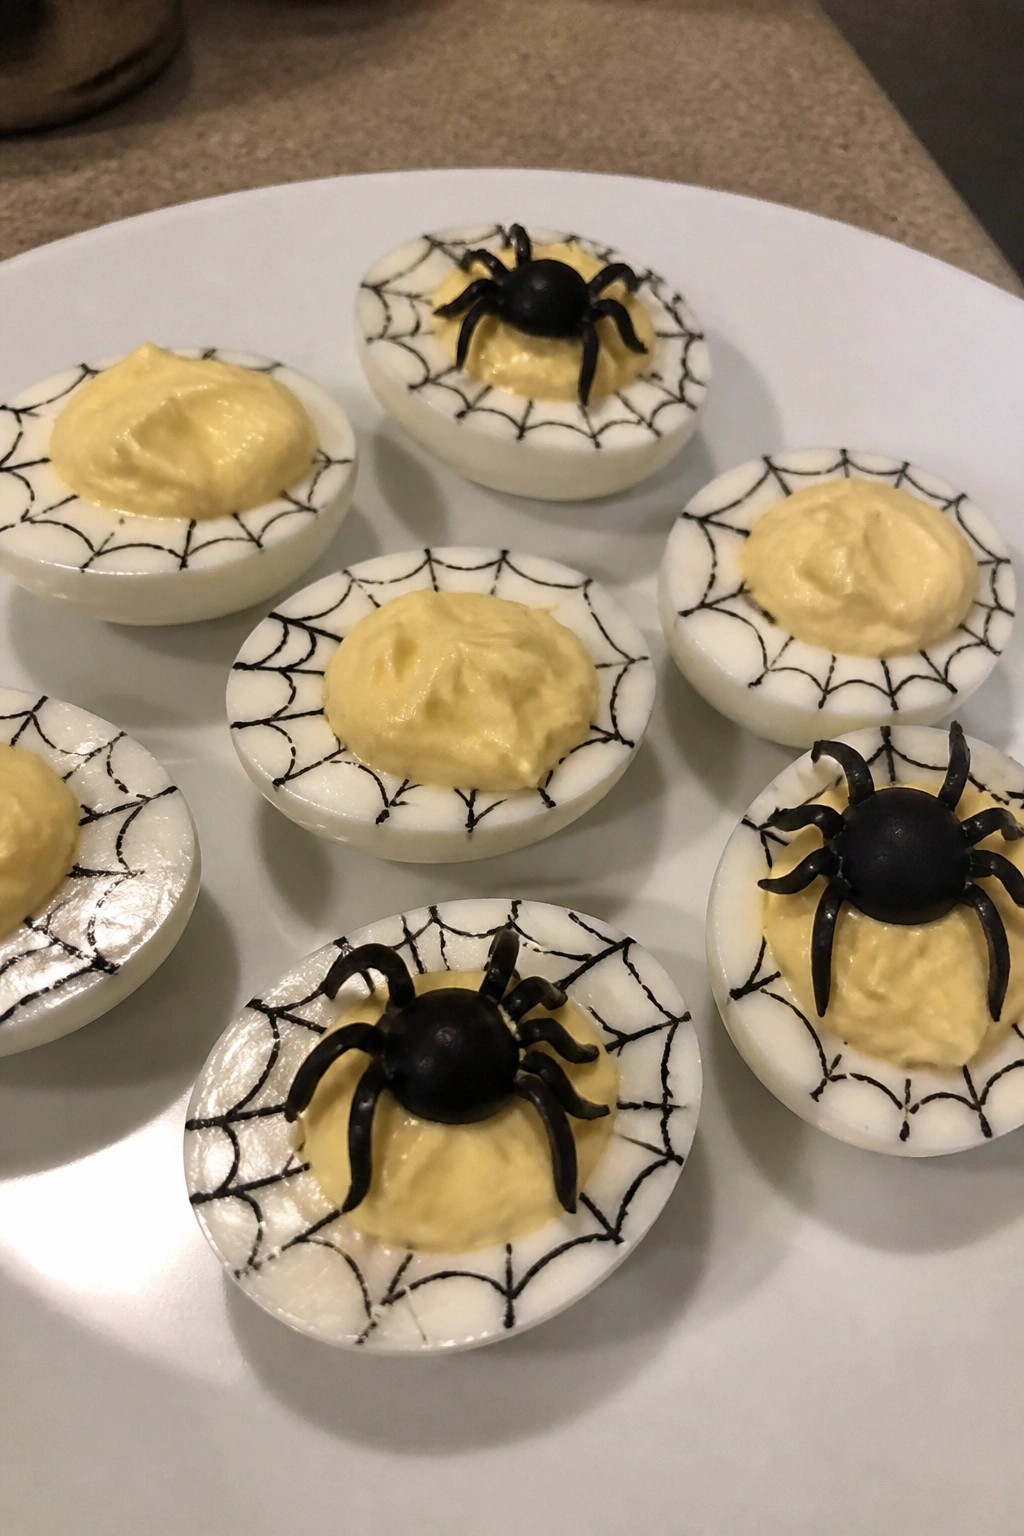
Serves 4 people.
Ingredients
- 6 large eggs
- 1/4 cup mayonnaise
- 1 teaspoon yellow mustard
- 1/2 teaspoon apple cider vinegar
- 1/4 teaspoon salt
- 1/8 teaspoon black pepper
- 12 black olives
- Black food coloring
Instructions
- Place the eggs in a large pot and cover them with water. Bring the water to a boil, then turn off the heat and let the eggs sit covered for 12 minutes.
- Drain the hot water and run cold water over the eggs until they cool. Peel the eggs and slice each one in half lengthwise.
- Remove the yolks and place them in a mixing bowl. Mash the yolks with a fork until smooth.
- Add the mayonnaise, yellow mustard, apple cider vinegar, salt, and black pepper to the yolks. Stir until the mixture is creamy and well combined.
- Spoon or pipe the yolk mixture back into the egg white halves.
- Slice six of the black olives in half to form spider bodies and cut the remaining olives into thin strips for legs. Place one olive half on each filled egg and arrange the strips as legs.
- Dip a toothpick into the black food coloring and draw small circles on the filling, then add lines from the center outward to create a web pattern on each egg.
Extra Tips
Make the eggs a day ahead and store them covered in the fridge, then add the olive spiders and web design just before serving so the colors stay sharp. If you want less color on your hands, wear gloves when handling the food coloring. The vinegar keeps the filling from tasting too heavy, so skip it only if you need a milder flavor. Course: Appetizer Cuisine: American Equipment: Large pot, Mixing bowl, Knife, Toothpick
Vampire Meatball Sliders
These sliders turn classic meatballs into a playful Halloween finger food. The garlic in the meat mixture gives them a bold flavor that pairs well with the rich tomato sauce. They work well for parties because they are easy to eat in one or two bites and hold up on a platter without much fuss.
The finished sliders have tender meatballs tucked into soft buns with melted cheese on top. The red sauce adds color that fits the theme while keeping the overall taste savory and balanced.

Serves 4 people.
Ingredients
- 1 lb ground beef
- 1/2 cup breadcrumbs
- 1 large egg
- 3 cloves garlic, minced
- 1 tsp dried oregano
- 1/2 tsp salt
- 1/4 tsp black pepper
- 2 cups marinara sauce
- 8 slider buns
- 4 oz fresh mozzarella, sliced
- 2 tbsp chopped fresh parsley
Instructions
- In a mixing bowl, combine the ground beef, breadcrumbs, egg, 2 cloves of minced garlic, oregano, salt, and black pepper. Mix until evenly blended, then form the mixture into 8 small meatballs.
- Heat a large skillet over medium heat. Add the meatballs and cook, turning occasionally, until browned on all sides and cooked through.
- Pour the marinara sauce into the skillet with the meatballs. Add the remaining clove of minced garlic and stir gently. Let the mixture simmer for 5 minutes so the meatballs absorb some sauce.
- While the meatballs simmer, place the slider buns on a baking sheet and open them. Add one meatball and a spoonful of sauce to each bottom bun.
- Top each meatball with a slice of mozzarella. Place the baking sheet under the broiler for 1 to 2 minutes until the cheese melts. Remove from the oven, sprinkle with chopped parsley, and add the top buns.
Extra Tips
Use fresh mozzarella slices rather than shredded cheese so it melts evenly without sliding off the meatballs. If you prepare the meatballs ahead, keep them in the sauce on low heat until you are ready to assemble so the buns stay firm. Leftovers reheat best in a covered skillet with a splash of extra sauce to prevent drying out. Course: Appetizer Cuisine: Italian Equipment: Mixing Bowl, Large Skillet, Baking Sheet
Witch Broom Pretzel Rods
These witch broom pretzel rods bring a playful touch to any Halloween spread. They combine crunchy pretzels with mild cheese for a simple finger food that guests can grab without plates or utensils.
They fit well at casual parties or school events where you need something quick to prepare. The finished brooms have a lightly salty crunch from the pretzel paired with the soft texture of cheese strips.
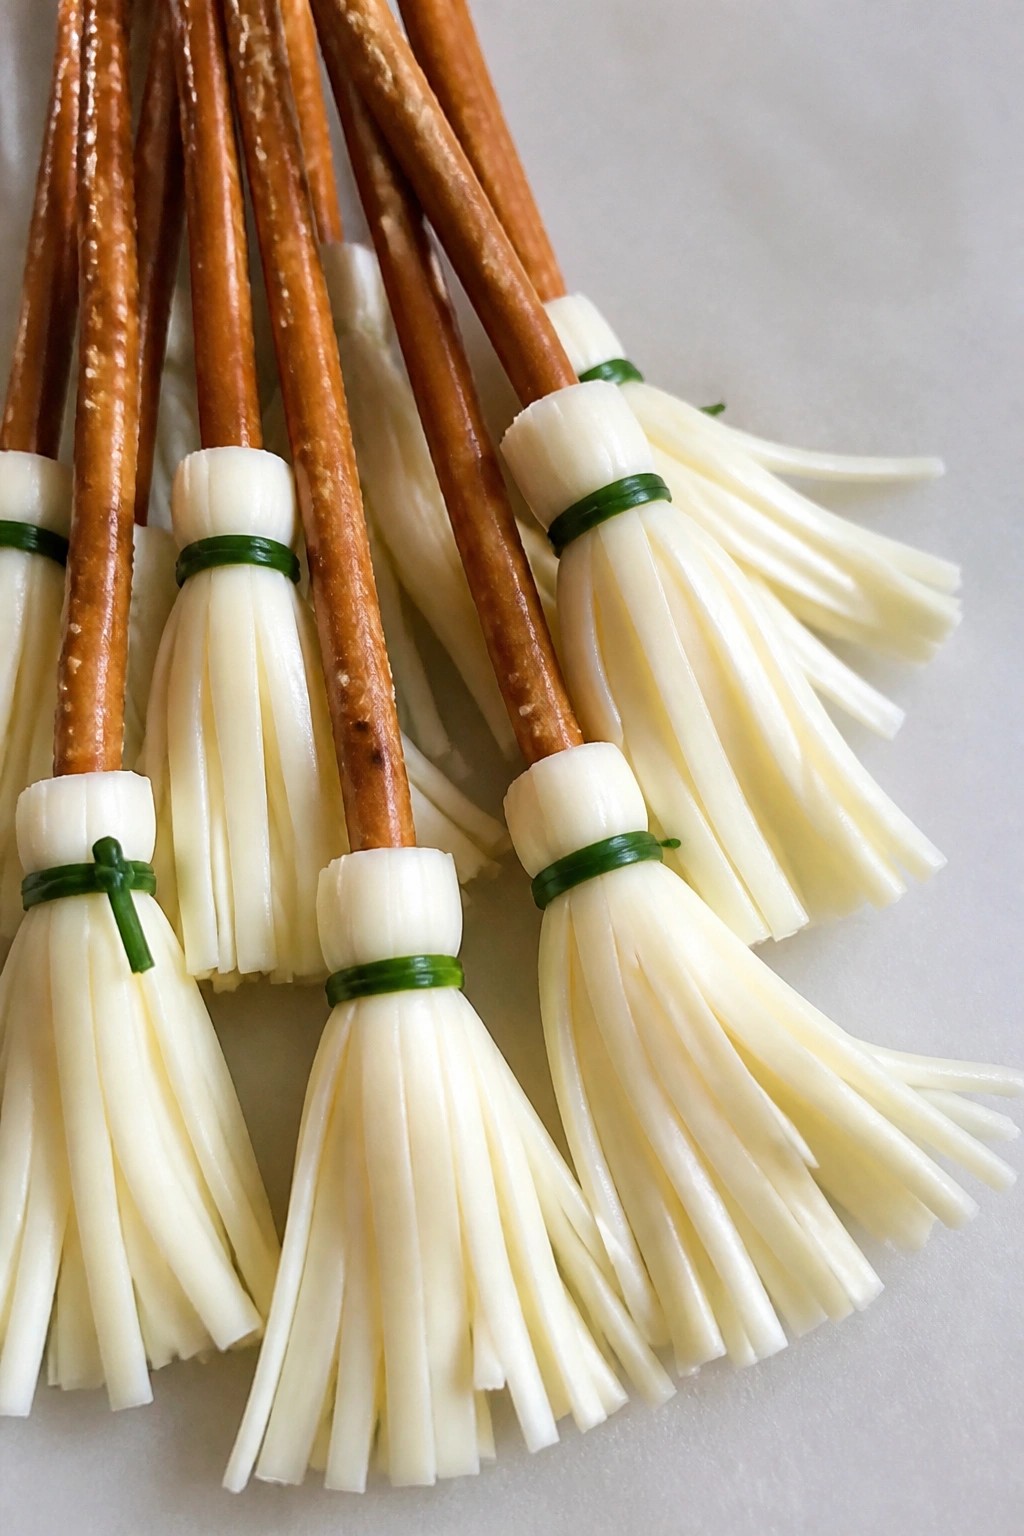
Serves 4 people.
Ingredients
- 12 pretzel rods
- 6 string cheese sticks
- 12 fresh chives
Instructions
- Unwrap each string cheese stick and pull it apart lengthwise into thin strips to form the broom bristles.
- Gather several cheese strips and press them against one end of a pretzel rod so the strips fan out slightly.
- Wrap one chive around the cheese strips and pretzel rod, then tie it snugly to hold the bristles in place.
- Repeat the process with the remaining pretzel rods, cheese strips, and chives until all twelve brooms are assembled.
Extra Tips
Chill the finished brooms for ten minutes before serving so the cheese strips hold their shape. If you want a stronger onion note, swap the chives for thin green onion tops. These do not store well once assembled, so make them the same day you plan to serve them. Course: Snack Cuisine: American Equipment: Cutting Board, Knife
Bloody Mary Tomato Bites
These bites capture the bold flavors of a classic Bloody Mary in a neat, handheld form. They work well at Halloween gatherings where guests want something savory and a little spicy without needing a plate. The tomatoes stay juicy while the creamy filling adds tang and a touch of heat, finished with crisp celery for contrast.
They suit a cocktail-style spread or as part of a larger finger food table. The seasoning stays balanced so the tomato flavor remains front and center.
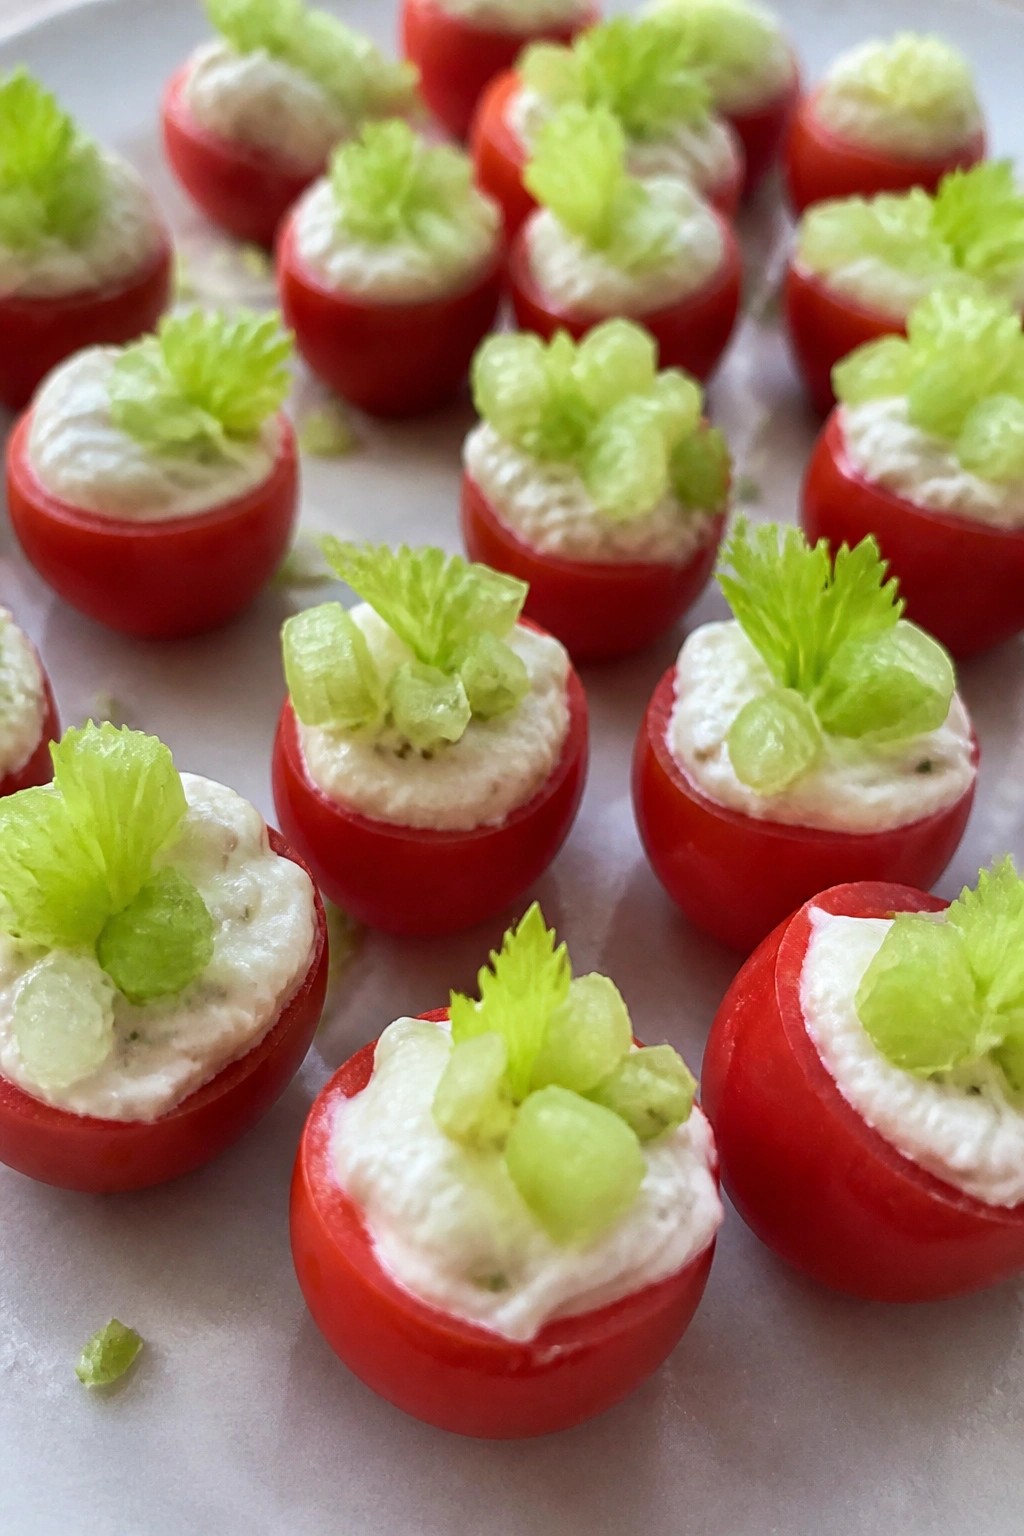
Serves 4 people.
Ingredients
- 20 cherry tomatoes
- 4 ounces cream cheese, softened
- 1 tablespoon prepared horseradish
- 1 teaspoon Worcestershire sauce
- 1/2 teaspoon celery salt
- 1/4 teaspoon hot sauce
- 2 celery stalks, finely diced
- 12 small celery leaves
Instructions
- Cut each cherry tomato in half crosswise and gently scoop out a small portion of the seeds with a spoon to create space for filling.
- Place the cream cheese in a mixing bowl and add the horseradish, Worcestershire sauce, celery salt, and hot sauce. Stir until the mixture is smooth and evenly combined.
- Spoon or pipe a small amount of the cream cheese mixture into each tomato half, filling it just to the top without overflowing.
- Sprinkle a few pieces of the finely diced celery over the filling on each tomato half.
- Top each bite with one small celery leaf and arrange on a serving platter.
Extra Tips
Chill the filled tomatoes for 20 minutes before serving so the cream cheese firms up and holds its shape. If you want less heat, reduce the hot sauce by half. The bites taste best the day they are made, but you can mix the filling up to a day ahead and store it covered in the refrigerator. Course: Appetizer Cuisine: American Equipment: Mixing Bowl, Sharp Knife, Spoon
Monster Stuffed Mushroom Caps
These Monster Stuffed Mushroom Caps turn ordinary mushrooms into a playful Halloween bite. The creamy spinach filling gives them a bright green tint that fits the theme, while the tender caps stay easy to pick up with your fingers at any party.
They work well for casual gatherings or kids’ events because they require no utensils. The garlic and cheese add a savory, comforting flavor that balances the earthy mushrooms without overpowering them.

Serves 4 people.
Ingredients
- 16 large button mushrooms
- 10 oz frozen spinach, thawed and squeezed dry
- 4 oz cream cheese, softened
- 1/2 cup shredded mozzarella cheese
- 2 garlic cloves, minced
- 1 tablespoon olive oil
- 1/4 teaspoon salt
- 1/4 teaspoon black pepper
- 16 black olives, sliced into rounds
Instructions
- Preheat the oven to 375 degrees and line a baking sheet with parchment paper.
- Remove the stems from the mushrooms and place the caps on the baking sheet. Brush the outside of each cap lightly with olive oil.
- In a mixing bowl, combine the spinach, cream cheese, mozzarella, garlic, salt, and pepper. Stir until the mixture is smooth and evenly blended.
- Spoon the filling into each mushroom cap, pressing it down gently to fill the cavity completely.
- Top each filled cap with two olive slices to create eyes.
- Bake for 18 to 20 minutes until the mushrooms are tender and the filling is hot and lightly browned on top. Serve warm.
Extra Tips
Squeeze the spinach very dry before mixing so the filling stays thick and does not leak during baking. You can stuff the mushrooms up to a day ahead and keep them covered in the fridge, then add the olive eyes and bake right before serving. If you want a stronger green color, add a small handful of fresh parsley to the filling. Course: Appetizer Cuisine: American Equipment: Baking Sheet, Mixing Bowl, Pastry Brush
Pumpkin-Shaped Cheese Ball Bites
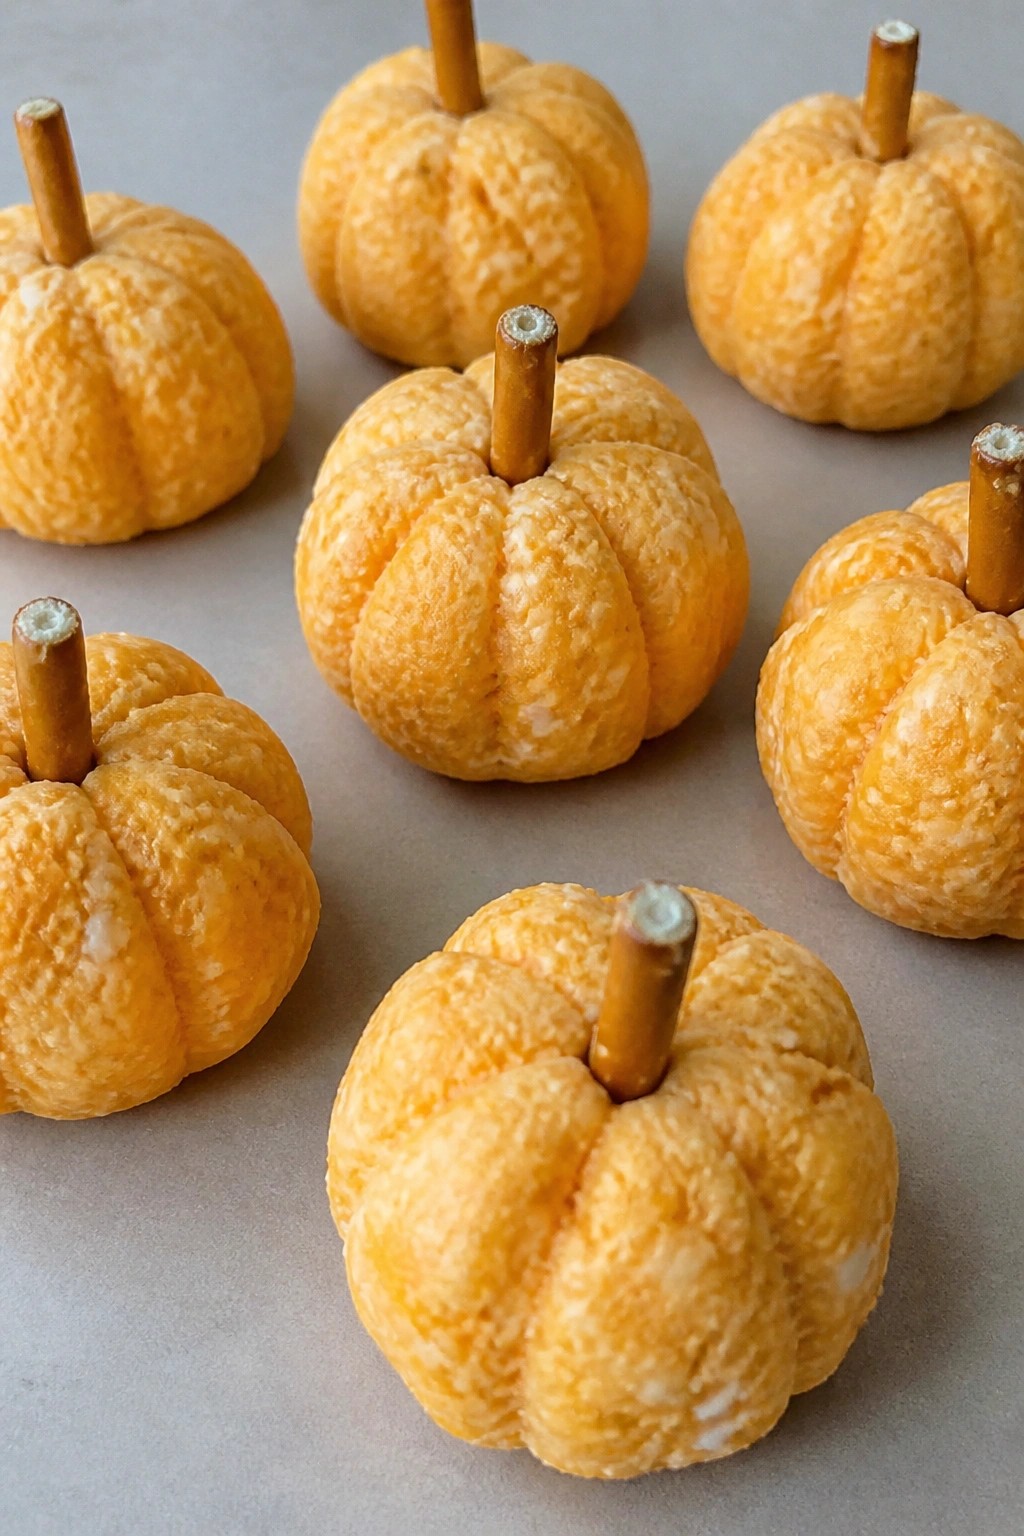
These pumpkin-shaped cheese ball bites turn a classic cheese ball into small, grab-and-go snacks that fit right into a Halloween spread. They work well for parties where guests mingle and want something easy to eat while chatting.
The bites combine creamy cheese with a light smoky seasoning and a crisp pretzel stem on top. The result gives a smooth interior with a bit of crunch from the stem and a mild savory taste that pairs with crackers or vegetables.
Serves 4 people.
Ingredients
- 8 ounces cream cheese, softened
- 1 1/2 cups shredded cheddar cheese
- 1 teaspoon garlic powder
- 1/2 teaspoon paprika
- 1/4 teaspoon onion powder
- 1/4 teaspoon salt
- 12 small pretzel sticks
Instructions
- Place the softened cream cheese, shredded cheddar cheese, garlic powder, paprika, onion powder, and salt in a mixing bowl. Stir until the mixture is evenly combined and smooth.
- Divide the mixture into 12 equal portions and roll each one into a small ball with your hands.
- Use the back of a spoon or a toothpick to gently press vertical lines around each ball to create a pumpkin shape.
- Insert one pretzel stick into the top center of each ball to act as the stem.
- Place the finished bites on a plate and chill them for at least 20 minutes before serving.
Extra Tips
Chill the mixture for 10 minutes before shaping if it feels too soft to hold lines. The bites taste best served with simple crackers or celery sticks so the cheese flavor stays front and center. Store any leftovers in an airtight container in the refrigerator for up to two days and let them sit at room temperature for a few minutes before serving again. Course: Appetizer Cuisine: American Equipment: Mixing Bowl, Spoon, Plate
Creepy Crawler Veggie Sushi Rolls
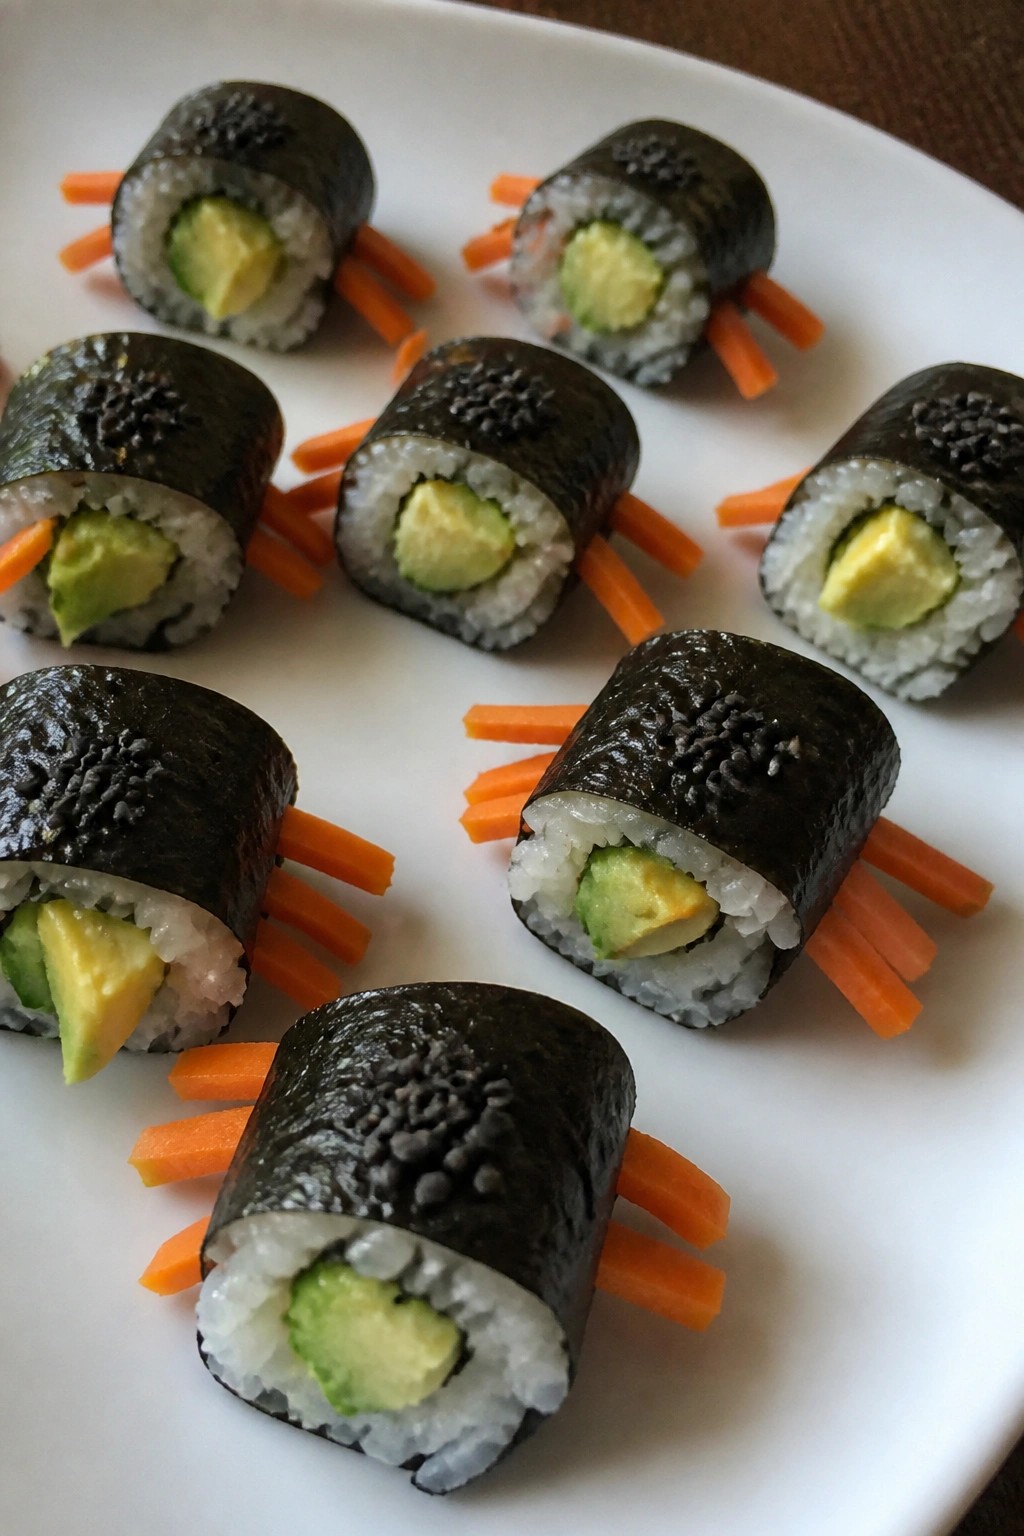
These Creepy Crawler Veggie Sushi Rolls turn standard veggie sushi into a Halloween finger food with thin carrot strips that extend slightly from the rolls like tiny legs. The combination of seasoned rice, crisp cucumber, and creamy avocado gives each bite a fresh texture and mild flavor that guests enjoy without feeling heavy.
The rolls work well for parties because they can be made ahead and sliced into bite-size pieces. They stay neat on a platter and pair easily with simple dips.
Serves 4 people.
Ingredients
- 1 cup sushi rice, cooked and cooled
- 4 nori sheets
- 1 large cucumber, cut into thin strips
- 2 medium carrots, cut into thin strips
- 1 ripe avocado, sliced
- 2 tablespoons rice vinegar
- 1 teaspoon sugar
- 1/2 teaspoon salt
- Black sesame seeds for garnish
- Soy sauce for serving
Instructions
- Mix the rice vinegar, sugar, and salt in a bowl, then fold the mixture into the cooled sushi rice until evenly coated.
- Place one nori sheet on a bamboo mat with the shiny side down. Spread a thin layer of seasoned rice over the nori, leaving a small border at the top edge.
- Arrange cucumber strips, carrot strips, and avocado slices in a line across the center of the rice.
- Roll the sushi tightly from the bottom edge, pressing gently as you go to keep the shape firm. Repeat with the remaining nori sheets and fillings.
- Use a sharp knife to slice each roll into six pieces. Sprinkle black sesame seeds over the tops and serve with soy sauce on the side.
Extra Tips
Let the carrot strips extend just a little beyond the edges of the roll before slicing so they resemble crawler legs once cut. If the rice feels too sticky while rolling, keep a small bowl of water nearby to dampen your fingers. These rolls hold their shape best when chilled for 15 minutes before slicing. Course: Appetizer Cuisine: Asian Equipment: Bamboo sushi mat, Mixing bowl, Sharp knife
Bat Wing Chicken Wings
These chicken wings get a dark, sticky glaze that gives them a dramatic look perfect for a Halloween spread. They work well as a savory finger food at parties because they stay crisp on the outside while staying juicy inside. The flavor is a balance of salty, sweet, and garlicky with a slight crunch from sesame seeds.
The wings are simple to prepare ahead and bake right before guests arrive. They pair nicely with cool dips and other spooky snacks on the table.

Serves 4 people.
Ingredients
- 2 pounds chicken wings, split at the joints
- 1/4 cup balsamic vinegar
- 2 tablespoons soy sauce
- 2 tablespoons honey
- 3 cloves garlic, minced
- 1 tablespoon olive oil
- 1 teaspoon black sesame seeds
- 1/2 teaspoon salt
- 1/4 teaspoon black pepper
Instructions
- Preheat the oven to 400 degrees F and line a baking sheet with parchment paper.
- In a large bowl, combine the balsamic vinegar, soy sauce, honey, minced garlic, olive oil, salt, and black pepper. Stir until the honey dissolves.
- Add the chicken wings to the bowl and toss until every piece is coated in the glaze.
- Arrange the wings in a single layer on the prepared baking sheet. Sprinkle the black sesame seeds evenly over the top.
- Bake for 35 to 40 minutes, turning the wings once halfway through, until the skin is crisp and the glaze has thickened.
Extra Tips
For extra crisp skin, pat the wings dry with paper towels before tossing them in the glaze. If you want to make them ahead, coat the wings and store them covered in the fridge for up to 4 hours before baking. Leftovers reheat well in a 350 degree F oven for 10 minutes to bring back the crunch. Course: Appetizer Cuisine: American Equipment: Baking sheet, Mixing bowl, Parchment paper
Graveyard Layered Taco Dip with Chips
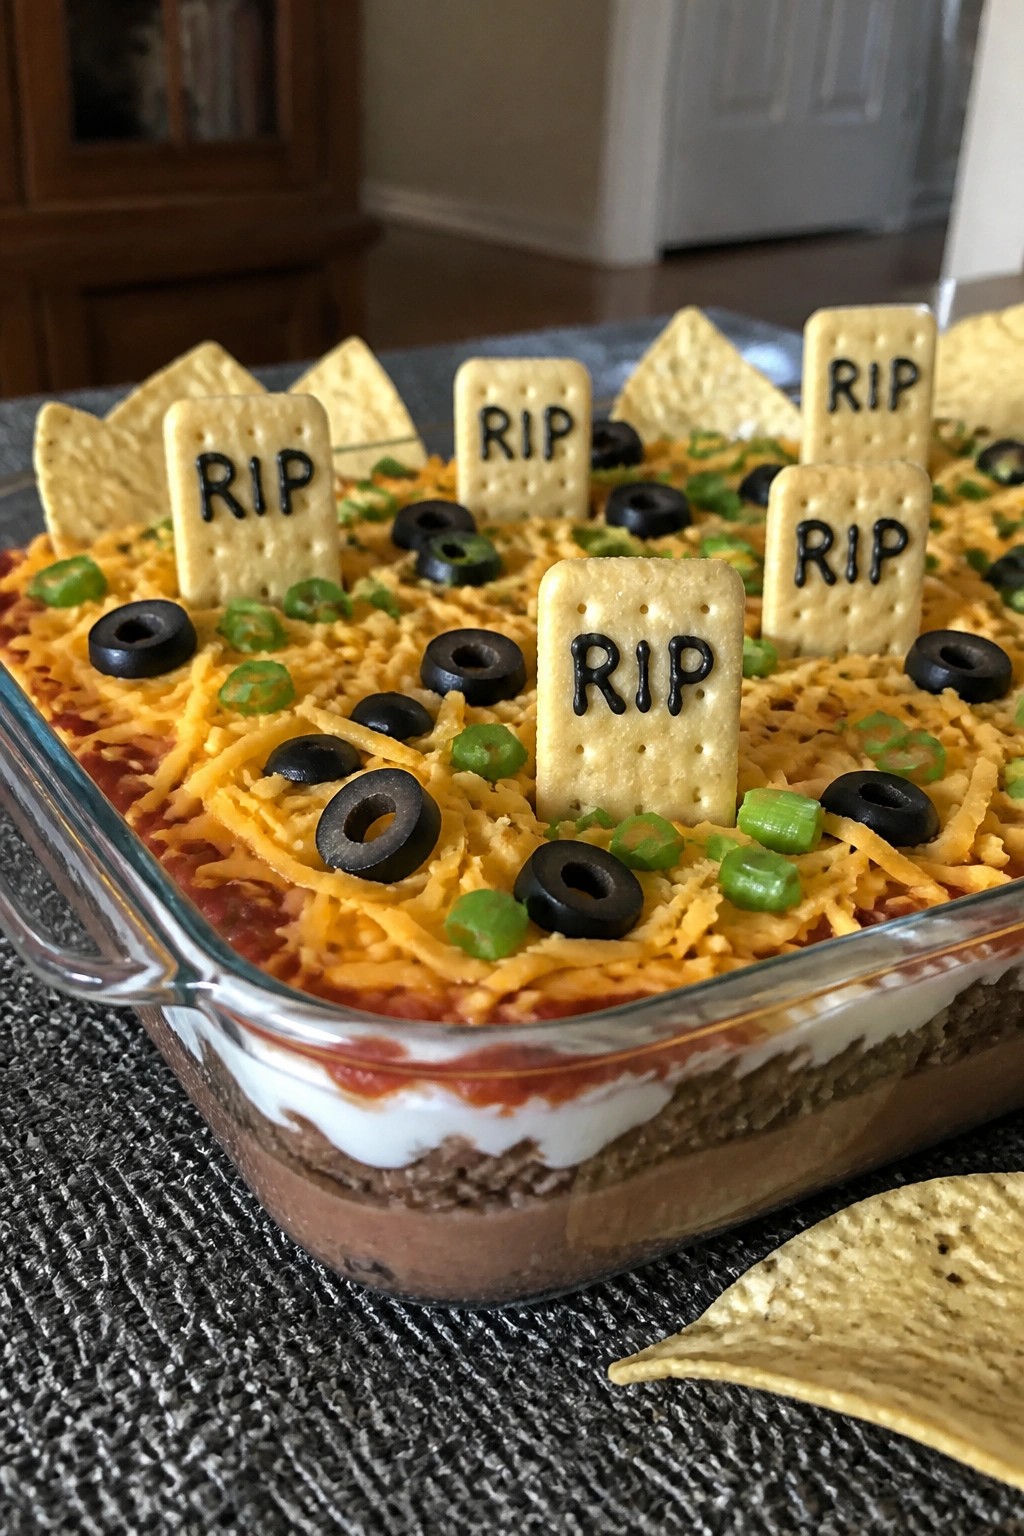
This graveyard layered taco dip turns a classic party favorite into a fun Halloween centerpiece. The hearty layers of beans, seasoned meat, and cheese make it filling enough to stand out among finger foods at any gathering. Guests enjoy scooping it up with chips for a mix of creamy, savory, and crunchy bites.
The spooky presentation comes from simple toppings arranged to look like a graveyard scene on top. It works well for potlucks or home parties where you need something that can sit out for a while without much fuss.
Serves 4 people.
Ingredients
- 1 can (16 oz) refried beans
- 1 lb ground beef
- 2 tablespoons taco seasoning
- 1 cup sour cream
- 1 cup salsa
- 1 1/2 cups shredded cheddar cheese
- 1/2 cup sliced black olives
- 1/4 cup chopped green onions
- 6 rectangular crackers
- Tortilla chips for serving
Instructions
- Brown the ground beef in a skillet over medium heat, breaking it up as it cooks. Stir in the taco seasoning and cook for 2 more minutes until the meat is fully seasoned. Set aside to cool slightly.
- Spread the refried beans evenly across the bottom of an 8×8 serving dish to form the first layer.
- Spread the sour cream over the beans in an even layer.
- Spoon the salsa over the sour cream and spread it gently to cover.
- Add the cooked ground beef as the next layer and smooth it out.
- Sprinkle the shredded cheddar cheese over the meat to cover the surface completely.
- Scatter the sliced black olives across the cheese to create a dark top layer. Place the rectangular crackers upright in the dip to stand as gravestones. Finish by sprinkling the chopped green onions around the crackers.
Extra Tips
Press the crackers in just before serving so they stay crisp. If you want stronger gravestone shapes, choose crackers with a flat edge that stand easily. Leftovers keep in the fridge for one day, though the cracker decoration should be added fresh each time. Course: Appetizer Cuisine: Mexican Equipment: Skillet, 8×8 serving dish, Spoon