


Hosting a Halloween party can feel overwhelming when you still need to plan the food.
These recipes focus on simple finger foods that come together with everyday ingredients.
You can make most of them ahead so you are not stuck in the kitchen the day of the event.
Each idea is designed to be easy to serve and low on cleanup.
The list below gives you realistic options that work for a relaxed gathering.
Helpful Tips Before You Start
A little planning keeps the party relaxed and the food simple to serve.
Shop for versatile bases
Stock up on items like tortillas, bread, and cream cheese that work across multiple recipes.
Prep components ahead
Chop veggies and cook any fillings the day before so you only assemble on the day of the party.
Keep everything bite sized
Small portions are easier for guests to grab with one hand while they mingle.
Label any spicy or nutty items
Clear tags prevent surprises for kids and guests with allergies.
Mummy-Wrapped Sausage Bites
These sausage bites bring a playful touch to any Halloween spread. The flaky dough strips wrap around savory sausages to create a fun mummy look that guests of all ages enjoy. They work well as a quick finger food for parties since they bake in one pan and need little hands-on time.
The texture combines a crisp outer layer with juicy sausage inside. A light touch of mustard adds just enough tang without overpowering the simple flavors.

Serves 4 people.
Ingredients
- 12 cocktail sausages
- 1 can (8 ounces) refrigerated crescent roll dough
- 2 tablespoons yellow mustard
Instructions
- Preheat the oven to 375 degrees and line a baking sheet with parchment paper.
- Unroll the crescent dough on a cutting board and press the seams together to form one sheet.
- Cut the dough into thin strips about half an inch wide.
- Wrap each cocktail sausage with one or two dough strips, leaving small gaps so the sausage shows through like mummy bandages.
- Place the wrapped sausages on the prepared baking sheet.
- Bake for 12 to 15 minutes until the dough turns golden brown.
- Remove from the oven and let cool for two minutes.
- Use a small spoon or toothpick to add two dots of yellow mustard on each sausage bite for eyes.
Extra Tips
Cut the dough strips slightly uneven so the mummy wraps look more natural after baking. Serve the bites warm with any leftover mustard on the side for dipping. If you need to make them ahead, wrap the sausages and keep them covered in the fridge for up to four hours before baking. Course: Appetizer Cuisine: American Equipment: Baking Sheet, Oven, Cutting Board, Knife
Spooky Eyeball Caprese Skewers
These skewers turn the classic Caprese combination into a simple Halloween finger food. They come together fast with no cooking required, making them a good choice for last-minute party prep.
Each skewer delivers juicy tomato, creamy mozzarella, and fresh basil, finished with a light balsamic drizzle. The olive accents on the cheese give them a playful eyeball look that fits right in with other spooky snacks.

Serves 4 people.
Ingredients
- 12 cherry tomatoes
- 12 bocconcini mozzarella balls
- 12 pitted black olives
- 24 fresh basil leaves
- 2 tablespoons balsamic glaze
- 1 tablespoon olive oil
- Salt and pepper to taste
- 12 small wooden skewers
Instructions
- Slice each black olive in half to create flat circles. Press one olive half gently into the center of each mozzarella ball to form the eyeball.
- Thread the ingredients onto each skewer in this order: one cherry tomato, one basil leaf, one prepared mozzarella eyeball, and one more basil leaf.
- Arrange the finished skewers on a serving platter.
- Drizzle the olive oil and balsamic glaze evenly over the skewers.
- Sprinkle lightly with salt and pepper just before serving.
Extra Tips
Assemble the skewers up to two hours ahead and keep them covered in the fridge, then add the oil and balsamic glaze right before guests arrive so the basil stays bright. If you run short on time, use pre-sliced olives to speed up the eyeball step. These taste best at room temperature, so remove them from the fridge about fifteen minutes before serving. Course: Appetizer Cuisine: Italian Equipment: Wooden skewers, Serving platter
Bat Wing Buffalo Chicken Drummettes
These bat wing buffalo chicken drummettes turn a classic party snack into a fitting Halloween finger food. They work well for a stress-free gathering because they bake in one pan and stay easy to pick up and eat while mingling.
The drummettes turn out crispy on the outside and juicy inside, with a tangy buffalo coating that adds heat without much work.

Serves 4 people.
Ingredients
- 2 pounds chicken drummettes
- 1 teaspoon garlic powder
- 1/2 teaspoon salt
- 1/4 teaspoon black pepper
- 1/4 cup unsalted butter
- 1/2 cup buffalo hot sauce
- Blue cheese dressing for serving
Instructions
- Preheat the oven to 400 degrees F and line a baking sheet with parchment paper.
- Place the chicken drummettes in a large bowl and sprinkle them with garlic powder, salt, and black pepper. Toss to coat evenly.
- Arrange the seasoned drummettes in a single layer on the prepared baking sheet.
- Bake for 25 to 30 minutes until the skin is golden and the internal temperature reaches 165 degrees F.
- While the chicken bakes, melt the butter in a small saucepan over low heat, then stir in the buffalo hot sauce until combined.
- Transfer the baked drummettes to a clean bowl, pour the buffalo mixture over them, and toss until fully coated.
- Serve right away with blue cheese dressing on the side.
Extra Tips
Arrange the coated drummettes on a dark platter to highlight the bat wing look. If you want less heat, use a mild buffalo sauce. Leftovers keep in an airtight container in the fridge for up to two days and reheat well in a 350 degree F oven for 10 minutes to restore crispness. Course: Appetizer Cuisine: American Equipment: Baking Sheet, Large Bowl, Small Saucepan
Witch Broom Pretzel Sticks with Cheese
These witch broom snacks bring a fun Halloween touch to any party spread without much effort. They work well for a last-minute appetizer table or as a quick bite kids can help assemble. The mix of salty pretzel crunch and mild cheese gives a simple, satisfying snack that holds up during a gathering.

Serves 4 people.
Ingredients
- 12 pretzel rods
- 4 string cheese sticks
- 12 fresh chives
Instructions
- Lay a string cheese stick on a cutting board and slice thin strips into one end, stopping about halfway down to create broom bristles.
- Insert the end of one pretzel rod into the uncut top of the cheese so it sits securely as the broom handle.
- Wrap one chive around the top of the cheese where it meets the pretzel and tie it gently to hold the pieces together.
- Repeat with the remaining string cheese sticks, pretzel rods, and chives until you have 12 brooms.
- Arrange the finished brooms on a serving plate with the fringed cheese ends facing up.
Extra Tips
Slice the cheese while it is still cold so the strips hold their shape better. If a chive feels stiff, run it under warm water for a few seconds to make it easier to tie. These are best assembled shortly before serving so the pretzels stay crisp. Course: Appetizer Cuisine: American Equipment: Cutting board, Knife
Ghostly Parmesan Puff Pastry Bites
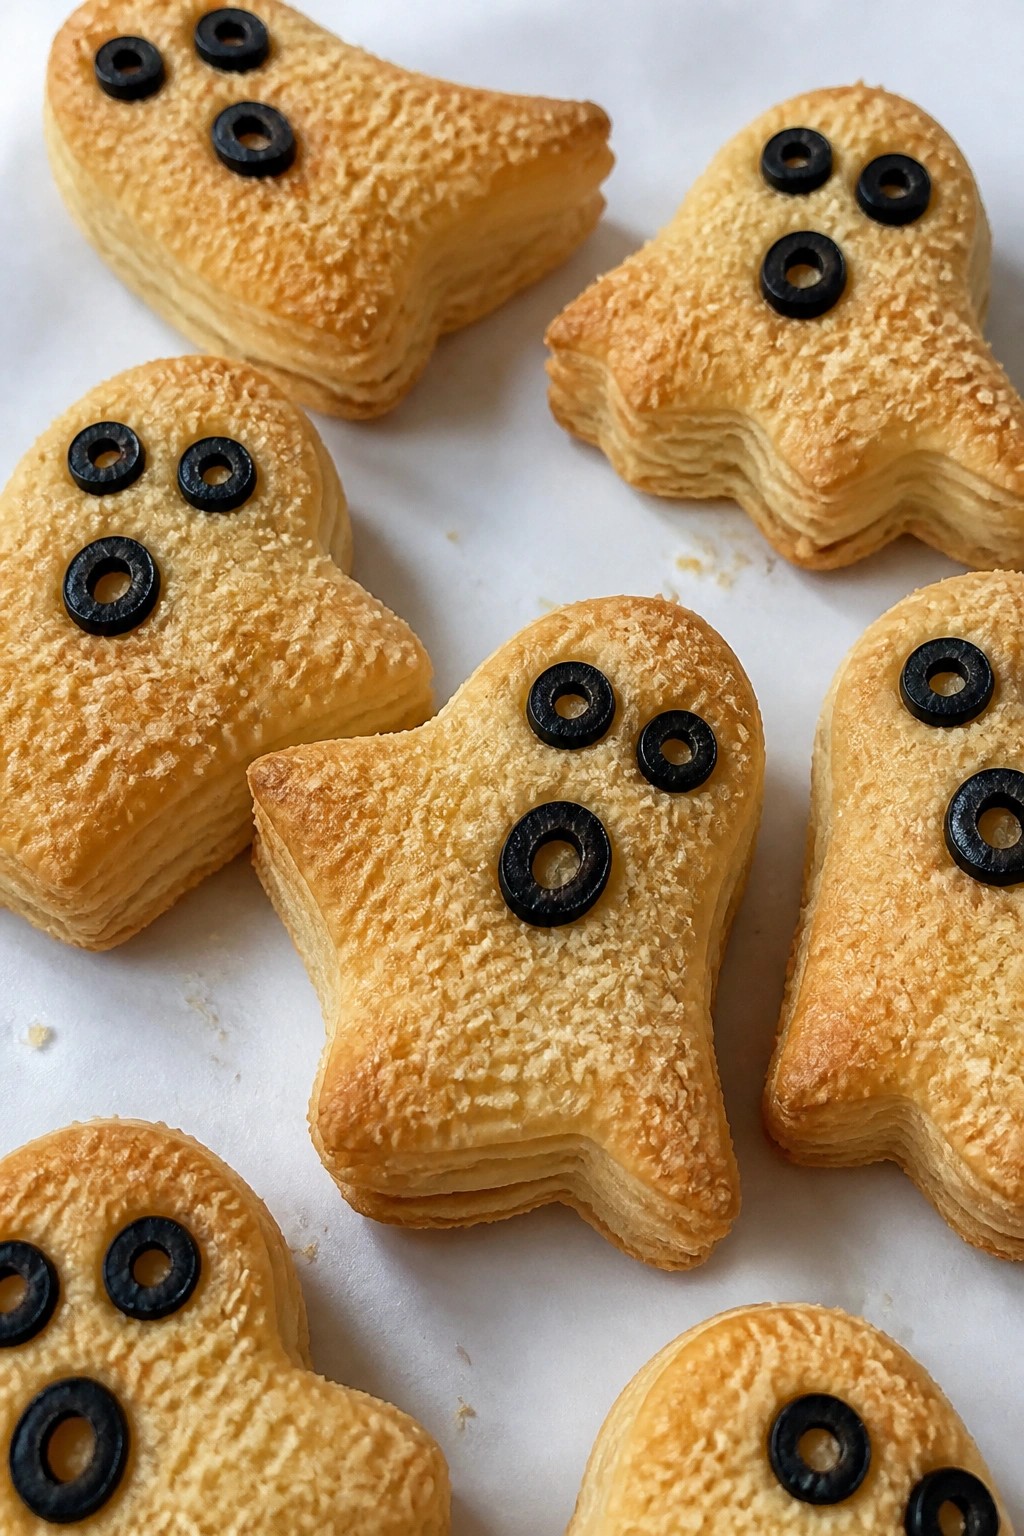
These Ghostly Parmesan Puff Pastry Bites turn store-bought dough into a simple party snack that looks festive without extra work. The flaky layers and sharp cheese flavor make them easy to enjoy by hand while mingling.
They work well for a Halloween spread because the ghost shapes add a light spooky touch and the bites stay crisp after baking. Guests can grab a few without needing plates or forks.
Serves 4 people.
Ingredients
- 1 sheet puff pastry, thawed
- ½ cup grated Parmesan cheese
- 1 large egg
- 1 tablespoon water
- 16 thin black olive slices
Instructions
- Heat the oven to 400°F and line a baking sheet with parchment paper.
- Unfold the puff pastry on a lightly floured surface and cut out 8 ghost shapes with a sharp knife or small cutter.
- Place the shapes on the prepared baking sheet, leaving space between each one.
- Beat the egg with the water in a small bowl to make an egg wash. Brush the top of each ghost lightly with the wash.
- Sprinkle the grated Parmesan cheese evenly over the ghosts, then press two olive slices onto each one as eyes.
- Bake for 12 to 15 minutes until the pastry is puffed and golden brown. Let the bites cool for a few minutes before serving.
Extra Tips
Use a light hand with the Parmesan so it melts into the pastry instead of burning. If you want to prepare them ahead, cut and top the ghosts, then freeze them on the tray before baking straight from frozen and adding 2 extra minutes to the cook time. Course: Appetizer Cuisine: American Equipment: Baking sheet, Parchment paper, Pastry brush, Sharp knife
Pumpkin-Shaped Stuffed Mushroom Caps
These stuffed mushrooms turn into festive pumpkins that fit right into a Halloween spread. They make an easy finger food that guests can pick up without any fuss at a party.
The orange-tinted cheese filling bakes inside tender mushroom caps for a creamy, savory bite. A green onion stem on top completes the pumpkin look while adding a mild onion note.

Serves 4 people.
Ingredients
- 16 large button mushrooms
- 8 oz cream cheese, softened
- 1 cup shredded orange cheddar cheese
- 1 teaspoon smoked paprika
- 2 garlic cloves, minced
- 1/4 teaspoon salt
- 1/4 teaspoon black pepper
- 4 green onions, cut into 2-inch pieces
Instructions
- Preheat the oven to 375 degrees and line a baking sheet with parchment paper.
- Wipe the mushrooms clean with a damp cloth and gently twist out the stems to create space for filling.
- In a mixing bowl, combine the cream cheese, cheddar cheese, smoked paprika, minced garlic, salt, and black pepper until smooth and evenly colored.
- Spoon the filling into each mushroom cap, mounding it slightly on top.
- Place the filled caps on the baking sheet and bake for 18 to 20 minutes until the mushrooms soften and the filling turns lightly golden.
- Remove from the oven and press one green onion piece into the center of each cap to form a stem.
Extra Tips
Press the green onion stems in while the mushrooms are still warm so they stick firmly in place. For a stronger pumpkin color, add an extra pinch of paprika to the filling before stuffing. These reheat well in a 350-degree oven for five minutes if made ahead. Course: Appetizer Cuisine: American Equipment: Baking Sheet, Mixing Bowl, Parchment Paper
Monster Mouth Apple and Cheese Slices
These apple and cheese slices come together quickly with no baking required. They give kids and adults a crisp, slightly sweet bite with a creamy layer and a fun crunch from the cheese pieces. The shape makes them stand out on a party table without extra effort.
This snack works well for last-minute Halloween prep because everything can be assembled right before guests arrive. The red apple skin creates the look of open mouths while the cheese adds a mild, savory note that balances the fruit.

Serves 4 people.
Ingredients
- 2 large red apples
- ½ cup cream cheese, softened
- 8 slices cheddar cheese
Instructions
- Core the apples and cut each one into 8 wedges to make 16 pieces total.
- Spread a thin layer of cream cheese on the cut side of each apple wedge.
- Cut each cheddar slice into 4 small rectangles to create tooth shapes.
- Press the cheese rectangles into the cream cheese in a single row along the edge of each apple wedge so they resemble teeth.
- Arrange the finished wedges on a serving plate with the cheese side facing up.
Extra Tips
Cut the cheese rectangles slightly uneven so the teeth look more natural. Red apples give the best contrast against the white cream cheese. If the cream cheese feels too firm, let it sit at room temperature for 10 minutes before spreading. These slices are best eaten the same day they are made. Course: Snack Cuisine: American Equipment: Knife, Cutting Board, Small Bowl
Spiderweb Quesadilla Triangles
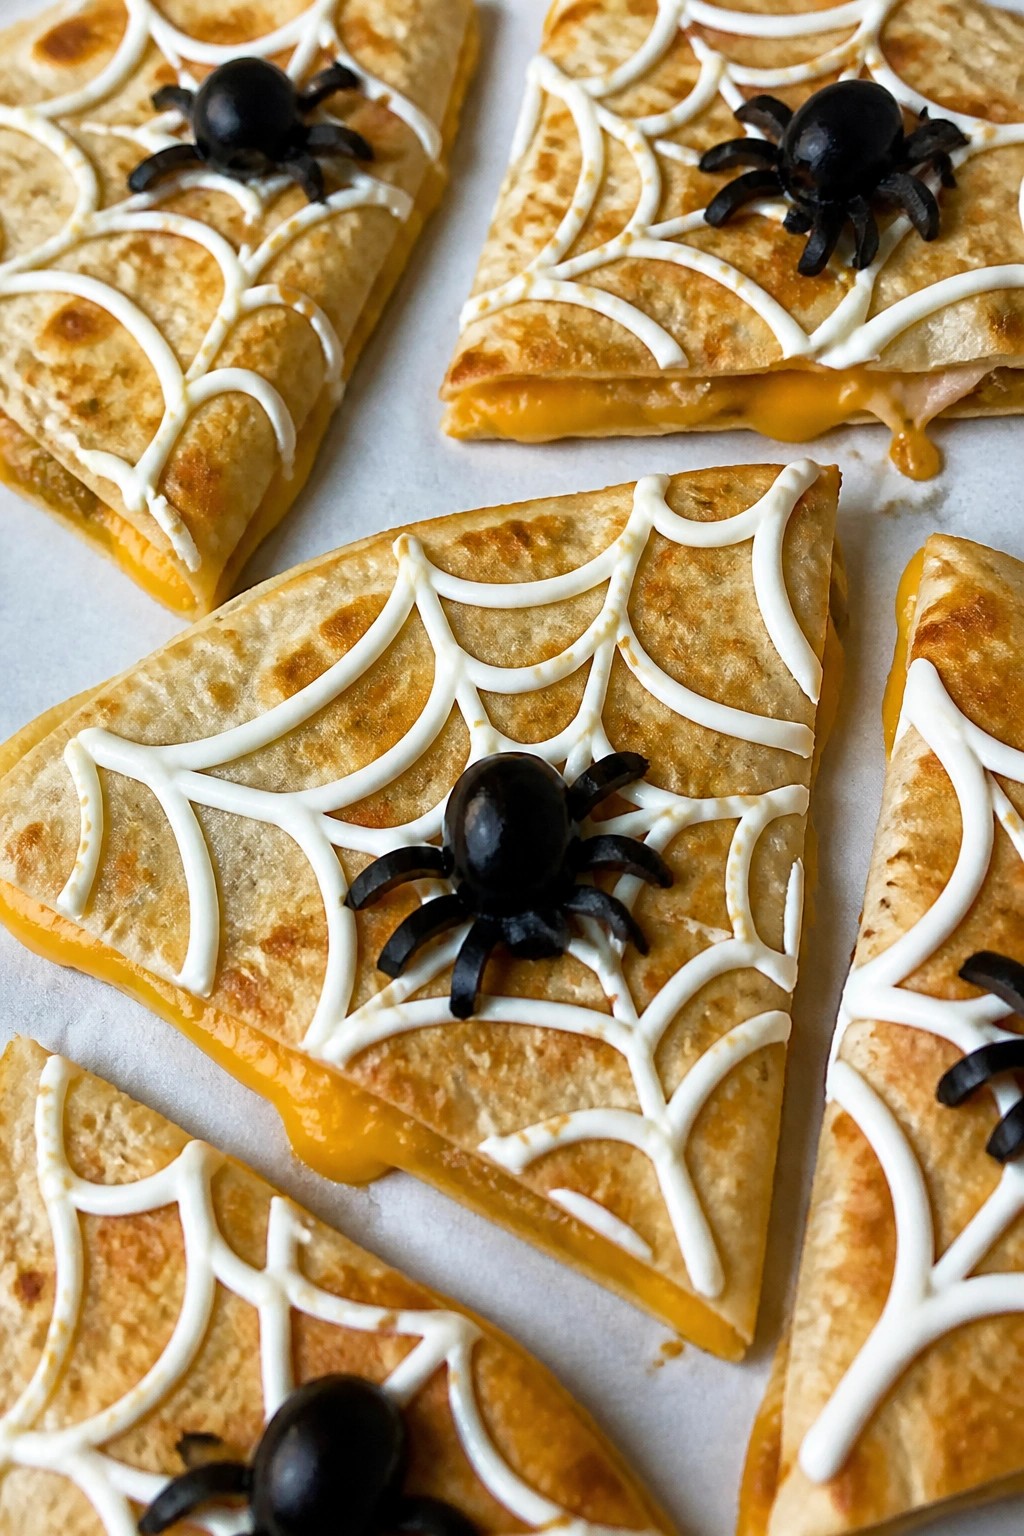
These Spiderweb Quesadilla Triangles turn a simple cheese quesadilla into a fun party bite. They come together quickly on the stove and look festive without extra effort. The result is a crispy tortilla shell with gooey cheese inside and a creamy sour cream web on top.
This recipe serves 4 people. – 8 (8-inch) flour tortillas – 2 cups shredded cheddar cheese – 1/2 cup sour cream – 8 black olives
### Instructions 1. Lay one tortilla on a clean surface and sprinkle 1/2 cup shredded cheddar cheese evenly over it. Top with a second tortilla and press gently to seal. 2. Heat a large skillet over medium heat. Place the filled tortilla in the skillet and cook for 2 to 3 minutes until the bottom is golden and the cheese begins to melt. 3. Flip the quesadilla and cook for another 2 minutes until both sides are crisp and the cheese is fully melted. Remove to a cutting board and repeat with the remaining tortillas and cheese. 4. Let the quesadillas cool for 1 minute, then cut each one into 4 triangles. 5. Spoon the sour cream into a small zip-top bag and snip off one corner. Pipe concentric circles on each triangle, then drag a knife from the center outward to create a web pattern. 6. Slice each black olive into thin rounds and place two or three slices on each triangle to form spiders.
### Extra Tips Pipe the sour cream right before serving so the web stays sharp. If you need to make these ahead, cook and cut the quesadillas earlier in the day, then add the sour cream design and olives just before guests arrive. A nonstick skillet helps keep the tortillas crisp without extra oil.
Serves 4 people.
Instructions
- Lay one tortilla on a clean surface and sprinkle 1/2 cup shredded cheddar cheese evenly over it. Top with a second tortilla and press gently to seal.
- Heat a large skillet over medium heat. Place the filled tortilla in the skillet and cook for 2 to 3 minutes until the bottom is golden and the cheese begins to melt.
- Flip the quesadilla and cook for another 2 minutes until both sides are crisp and the cheese is fully melted. Remove to a cutting board and repeat with the remaining tortillas and cheese.
- Let the quesadillas cool for 1 minute, then cut each one into 4 triangles.
- Spoon the sour cream into a small zip-top bag and snip off one corner. Pipe concentric circles on each triangle, then drag a knife from the center outward to create a web pattern.
- Slice each black olive into thin rounds and place two or three slices on each triangle to form spiders.
Extra Tips
Pipe the sour cream right before serving so the web stays sharp. If you need to make these ahead, cook and cut the quesadillas earlier in the day, then add the sour cream design and olives just before guests arrive. A nonstick skillet helps keep the tortillas crisp without extra oil.
Skeleton Bone Breadstick Dippers
These breadsticks turn store-bought dough into playful skeleton bones that fit right into a Halloween spread. They bake up golden and crisp on the outside with a soft center, then pair with a simple marinara dip for easy grabbing at a party table.
The recipe keeps things straightforward so you can focus on other dishes. Kids and adults both enjoy the bone shape, and the garlic-Parmesan coating adds savory flavor without extra work.

Serves 4 people.
Ingredients
- 1 package (8 oz) refrigerated breadstick dough
- 1 tablespoon olive oil
- 1/4 cup grated Parmesan cheese
- 1 teaspoon garlic powder
- 1/2 teaspoon dried oregano
- 1 cup marinara sauce
Instructions
- Preheat the oven to 375°F and line a baking sheet with parchment paper.
- Separate the breadstick dough into 8 strips. Gently tie a loose knot at each end of every strip to create a bone shape.
- Place the shaped dough on the prepared baking sheet. Brush each piece lightly with olive oil.
- In a small bowl, stir together the Parmesan cheese, garlic powder, and oregano. Sprinkle the mixture evenly over the breadsticks.
- Bake for 12 to 15 minutes until the breadsticks turn golden brown.
- Warm the marinara sauce in a small saucepan or microwave. Serve it alongside the breadsticks for dipping.
Extra Tips
Shape the knots loosely so the ends look more like bone joints after baking. If the dough feels sticky, dust your hands lightly with flour before handling. The breadsticks taste best served warm, but they can be baked ahead and reheated at 300°F for 5 minutes to restore crispness. Course: Appetizer Cuisine: American Equipment: Baking Sheet, Pastry Brush, Small Bowl
Frankenstein Veggie Pinwheel Wraps
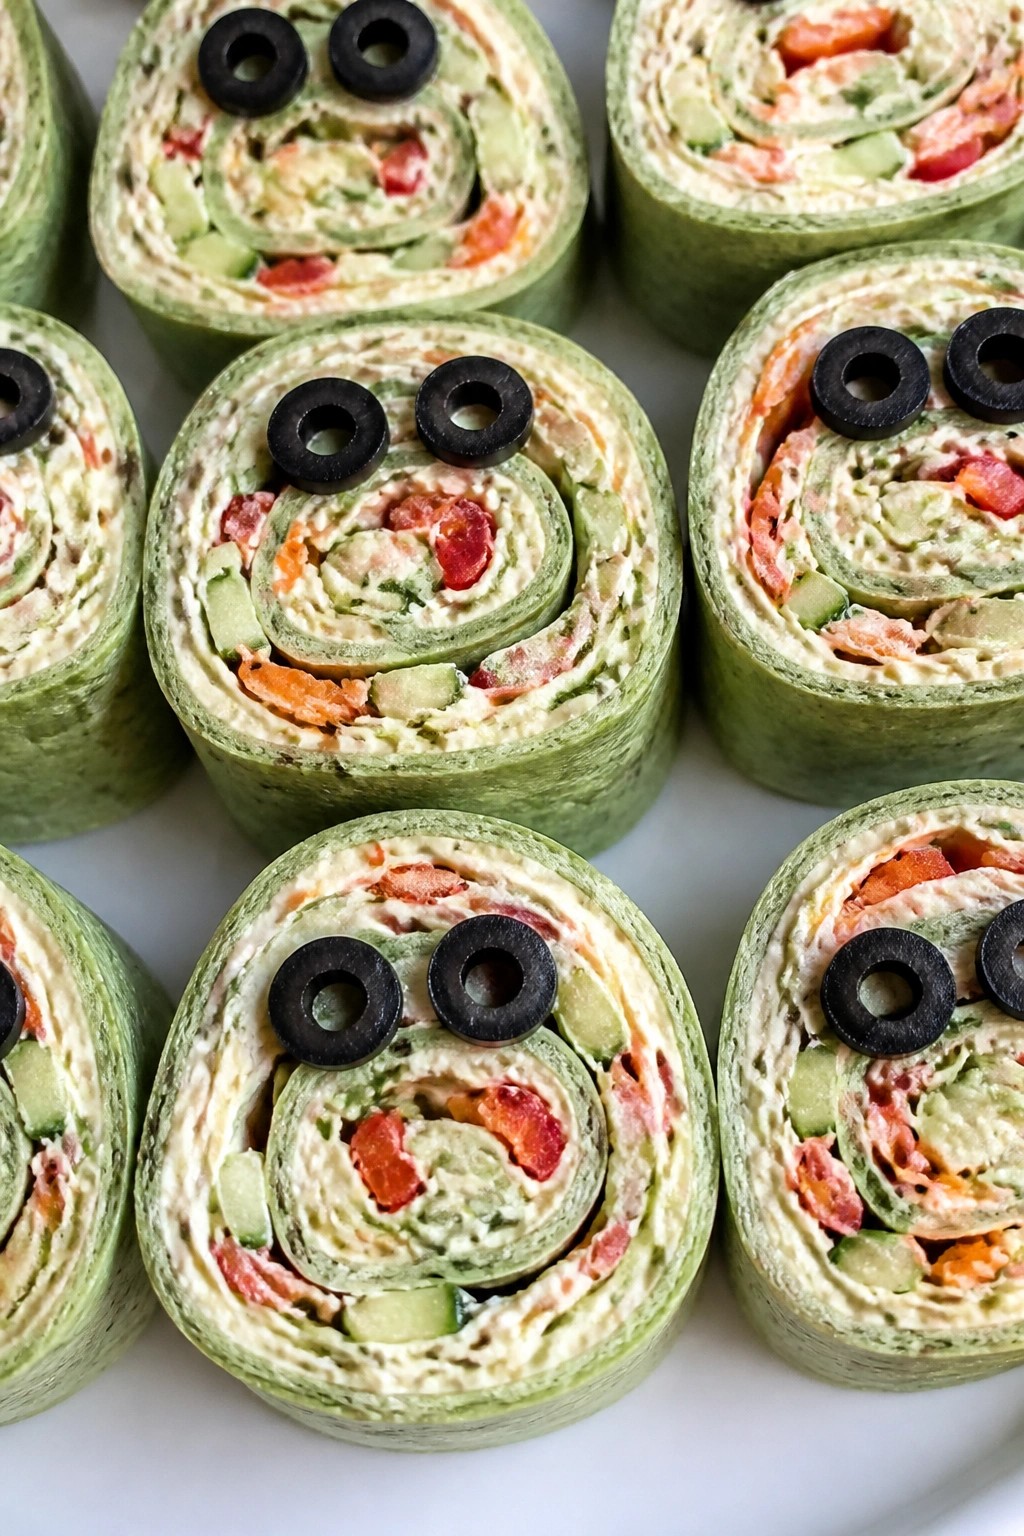
These Frankenstein Veggie Pinwheel Wraps add a fun, monster-themed element to any Halloween party table. The spinach tortillas create a natural green base, while the mix of creamy filling and crunchy vegetables keeps them light yet satisfying. They work well as a make-ahead option that travels easily to potlucks or school events.
The flavor is mild and fresh, with a soft cream cheese spread balanced by crisp veggie strips. Kids enjoy the playful look, and adults appreciate the simple, no-cook prep.
Serves 4 people.
Ingredients
- 4 large spinach tortillas
- 8 ounces cream cheese, softened
- 1 teaspoon garlic powder
- 1 cup shredded carrots
- 1 cucumber, cut into thin strips
- 1 red bell pepper, cut into thin strips
- 1/2 cup sliced black olives
- Salt and pepper to taste
Instructions
- Place the softened cream cheese in a mixing bowl and stir in the garlic powder along with salt and pepper until smooth.
- Lay one spinach tortilla on a flat surface and spread a quarter of the cream cheese mixture evenly across it, leaving a small border at the edges.
- Scatter a portion of the shredded carrots, cucumber strips, and red bell pepper strips over the cream cheese layer.
- Sprinkle a few sliced black olives across the vegetables for added flavor inside the roll.
- Roll the tortilla tightly from one end to the other, pressing gently to keep the filling in place. Repeat with the remaining tortillas and ingredients.
- Slice each rolled tortilla into 1-inch pinwheels. Use the remaining black olive slices to press two small pieces onto the sides of each pinwheel to create the Frankenstein bolt look.
Extra Tips
Chill the rolled tortillas for 15 minutes before slicing to help the pinwheels hold their shape and show clean layers. If the cream cheese feels too thick to spread, let it sit at room temperature a bit longer. These taste best the same day but can be wrapped tightly and stored in the fridge for up to one day. Course: Appetizer Cuisine: American Equipment: Mixing bowl, knife, cutting board
Bloody Vampire Bite Meatball Skewers
These skewers give classic meatballs a Halloween twist with a pool of red sauce that looks like fresh bites. They work well for parties because guests can grab one and keep moving without needing a plate. The meatballs turn out tender with a light crust from baking, while the marinara brings a simple tomato taste that balances the seasoned beef.
The recipe keeps prep straightforward and uses one bowl for mixing, so cleanup stays minimal. It suits a stress-free spread since the meatballs hold up at room temperature for a while and pair easily with other finger foods.

Serves 4 people.
Ingredients
- 1 lb ground beef
- ½ cup breadcrumbs
- 1 large egg
- ¼ cup grated Parmesan cheese
- 2 garlic cloves, minced
- 1 tsp Italian seasoning
- ½ tsp salt
- ¼ tsp black pepper
- 1 cup marinara sauce
- 12 wooden skewers
Instructions
- Preheat the oven to 400°F and line a baking sheet with parchment paper.
- In a mixing bowl, combine the ground beef, breadcrumbs, egg, Parmesan cheese, minced garlic, Italian seasoning, salt, and black pepper until evenly mixed.
- Shape the mixture into 1-inch meatballs and place them on the prepared baking sheet.
- Bake the meatballs for 18 minutes until they reach an internal temperature of 160°F.
- Remove the meatballs from the oven and let them rest for 3 minutes.
- Thread 3 meatballs onto each wooden skewer.
- Arrange the skewers on a platter and serve with the marinara sauce for dipping or light drizzling.
Extra Tips
Bake the meatballs a few hours ahead and reheat them in a 350°F oven for 8 minutes before threading onto skewers. Add a little extra marinara on the platter if you want more visible red pooling around the edges. Swap ground turkey for the beef if you prefer a lighter flavor, but keep the same mix and bake time. Course: Appetizer Cuisine: American Equipment: Mixing Bowl, Baking Sheet, Wooden Skewers
Graveyard Taco Salad Cups
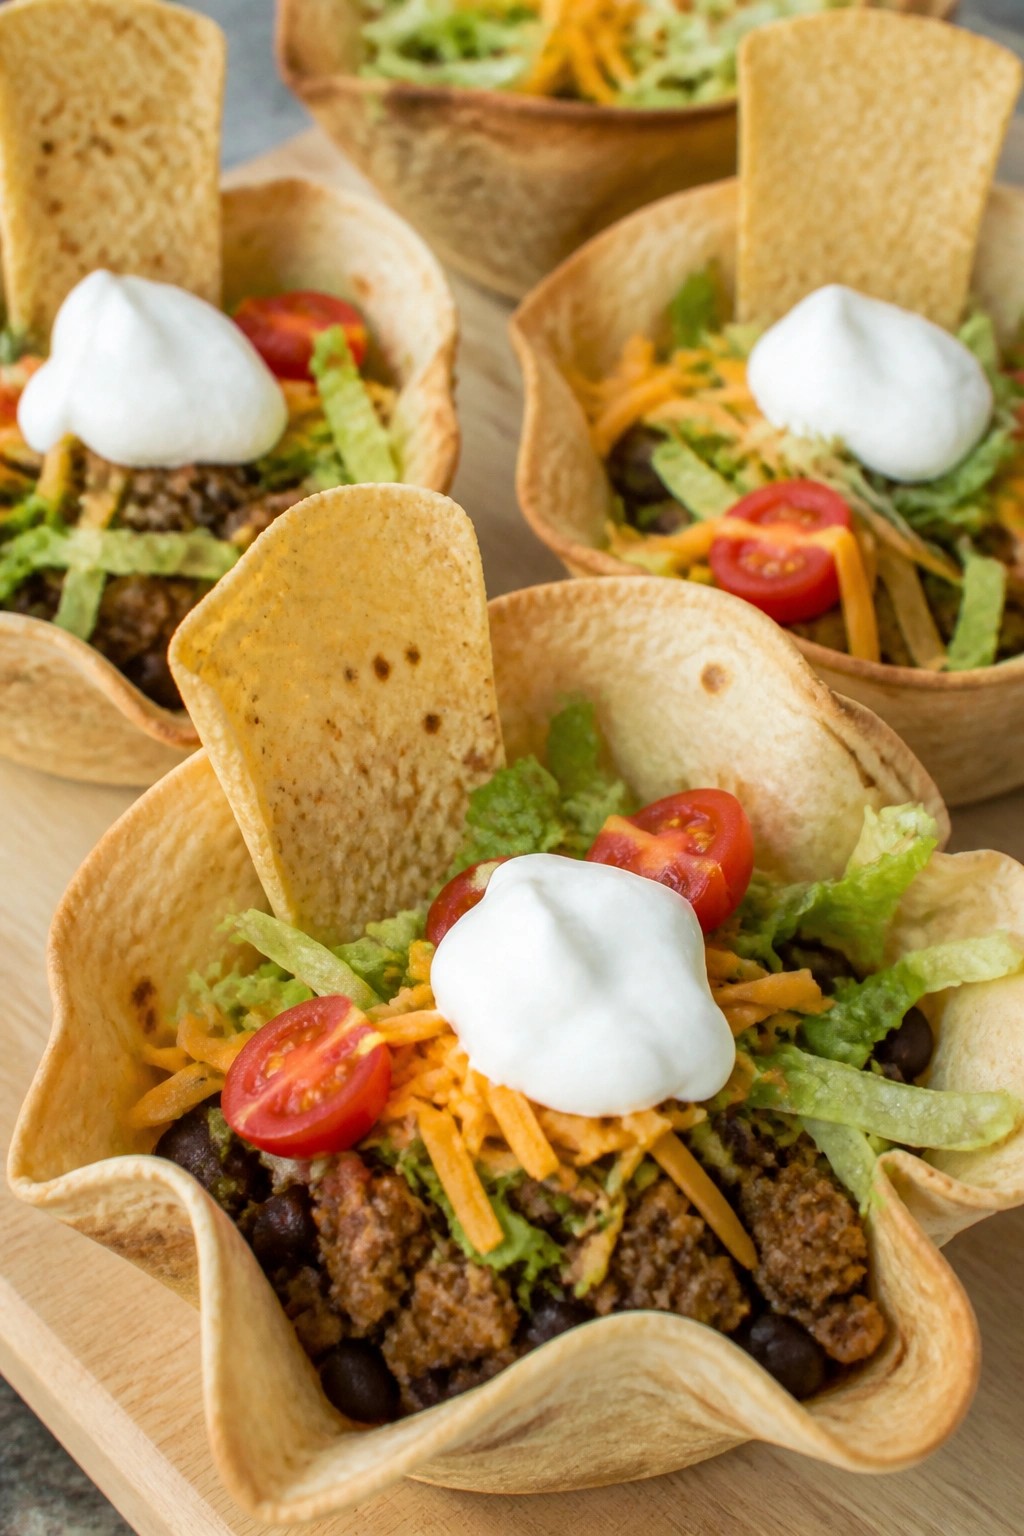
These individual taco salad cups bring a playful graveyard theme to your Halloween spread. Each cup holds seasoned beef and fresh toppings, with tortilla chips standing upright like tombstones. They work well as handheld bites at a party table and deliver the familiar taco flavors people expect.
The texture mixes crisp tortilla shells with cool, crunchy vegetables and warm spiced meat. They assemble quickly once the components are ready, making them practical for a busy host.
Serves 4 people.
Ingredients
- 4 (6-inch) flour tortillas
- 1 tablespoon olive oil
- 1 pound ground beef
- 2 tablespoons taco seasoning
- 1 cup canned black beans, drained and rinsed
- 2 cups shredded romaine lettuce
- 1 cup cherry tomatoes, halved
- 1 cup shredded cheddar cheese
- 1/2 cup sour cream
- 8 rectangular tortilla chips
Instructions
- Preheat the oven to 375°F. Brush both sides of each flour tortilla lightly with olive oil. Press each tortilla into a muffin tin cup to form a shell shape. Bake for 10 minutes until the edges turn golden and crisp. Remove the shells and let them cool in the tin for 5 minutes before lifting them out.
- Heat a large skillet over medium heat. Add the ground beef and cook until browned, breaking it up with a spoon. Stir in the taco seasoning and cook for 1 minute. Add the black beans and stir until heated through, about 2 minutes. Remove from heat.
- Place the cooled tortilla cups on a serving tray. Divide the beef and bean mixture evenly among the four cups. Top each with shredded romaine lettuce, halved cherry tomatoes, and shredded cheddar cheese. Add a dollop of sour cream to each cup. Insert two rectangular tortilla chips upright into the filling of each cup to resemble tombstones.
Extra Tips
Press the tortilla shells firmly into the muffin tin so they hold their shape after baking. Use sturdy rectangular chips that stand without breaking. If making ahead, prepare the meat mixture and shells separately, then assemble just before guests arrive to keep the lettuce crisp. Course: Appetizer Cuisine: Mexican Equipment: Muffin tin, Large skillet, Baking sheet
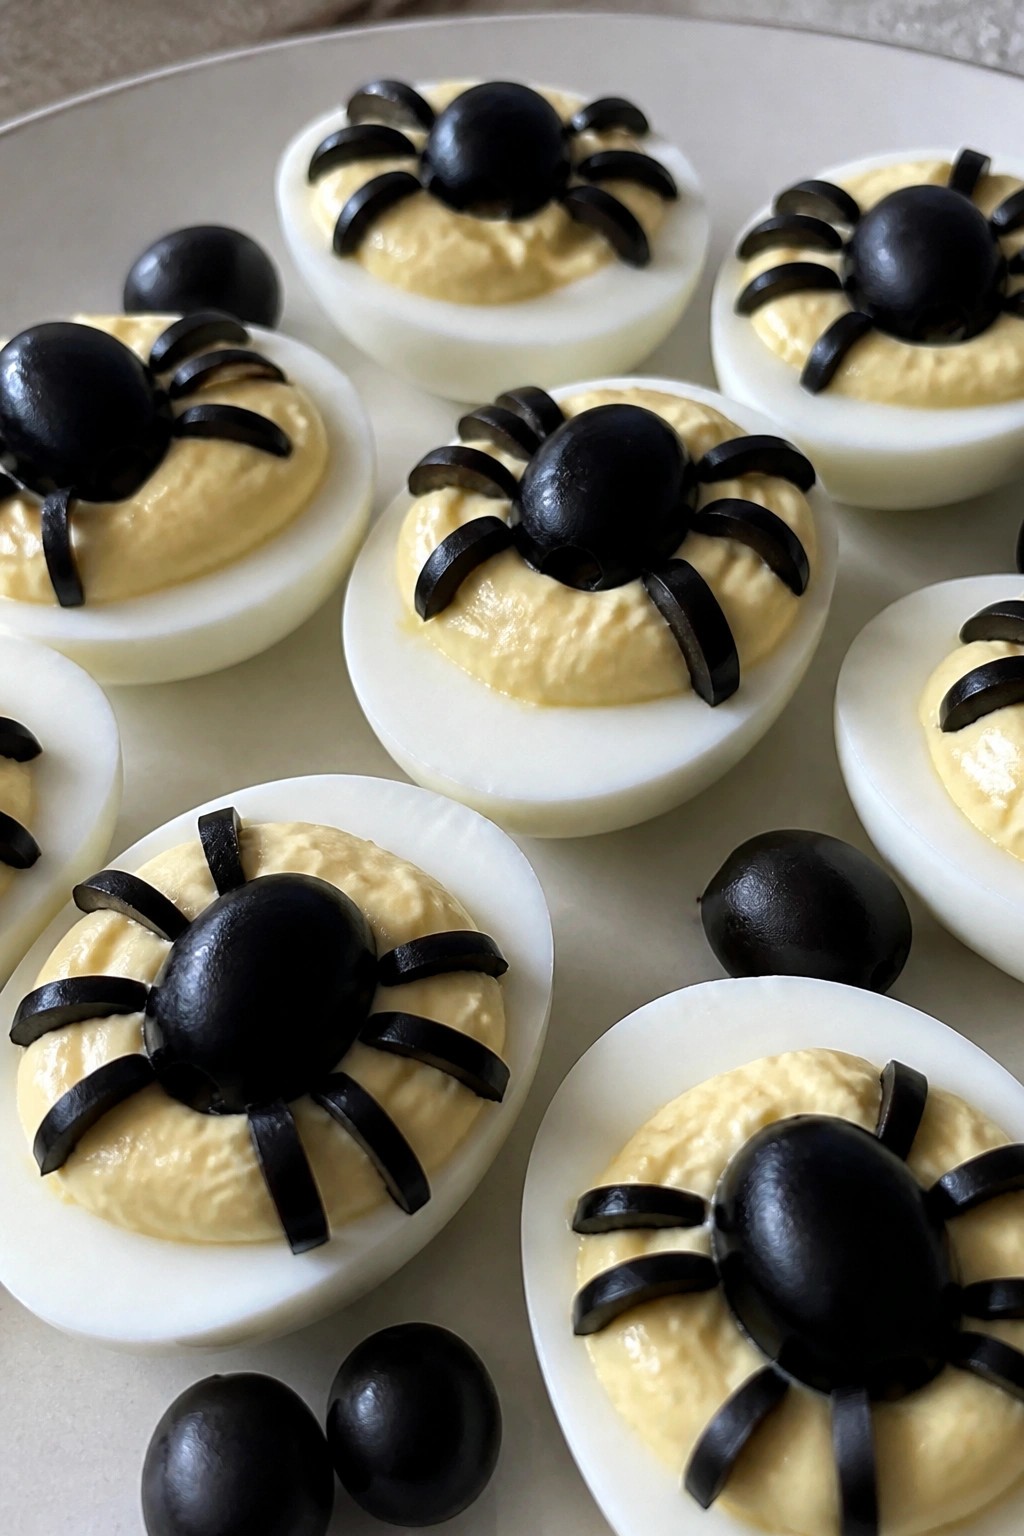
Creepy Crawler Deviled Egg Boats
These deviled egg boats bring a simple Halloween twist to a classic appetizer. Hard-boiled eggs are halved and filled with a creamy yolk mixture, then topped with olive spiders that look like they are crawling across the surface. They come together quickly and work well as a make-ahead finger food for parties.
The texture is smooth from the filling with a slight crunch from the olive pieces. The flavor stays mild and familiar with just enough seasoning to keep guests reaching for another.
Serves 4 people.
Ingredients
- 8 large eggs
- 1/4 cup mayonnaise
- 1 tablespoon yellow mustard
- 1/4 teaspoon salt
- 1/4 teaspoon black pepper
- 1/2 teaspoon paprika
- 12 pitted black olives
Instructions
- Place the eggs in a large pot and cover them with water. Bring the water to a boil over medium-high heat, then reduce to a simmer for 10 minutes.
- Drain the hot water and transfer the eggs to a bowl of ice water. Let them cool for 5 minutes before peeling.
- Slice each egg in half lengthwise. Gently remove the yolks and place them in a mixing bowl. Arrange the egg white halves on a serving plate.
- Mash the yolks with a fork. Add the mayonnaise, yellow mustard, salt, and black pepper. Stir until the mixture is smooth.
- Spoon or pipe the yolk mixture back into the egg white halves.
- Cut 4 olives in half lengthwise to form the spider bodies. Slice the remaining olives into thin strips to use as legs.
- Place one olive half on top of each filled egg. Arrange 6 olive strips around each body to create legs. Finish with a light sprinkle of paprika over each boat.
Extra Tips
Make the spiders right before serving so the olive legs stay in place. If you prepare the eggs ahead, store the filled whites and the olive pieces separately in the fridge and assemble just before guests arrive. Use a small spoon to adjust the legs if they shift during transport to the table. Course: Appetizer Cuisine: American Equipment: Large pot, Mixing bowl, Knife
Jack-o’-Lantern Mini Bell Pepper Poppers
These mini bell pepper poppers bring a playful Halloween touch to any party spread. Guests enjoy the bright orange peppers carved with simple faces and filled with a creamy cheese mixture. They work well as a make-ahead finger food that requires little last-minute work.
The result offers a crisp pepper shell against a smooth, savory filling with mild garlic and paprika notes. The recipe keeps things straightforward so you can focus on other party details.

Serves 4 people.
Ingredients
- 12 mini orange bell peppers
- 8 ounces cream cheese, softened
- 1 cup shredded cheddar cheese
- 1 teaspoon garlic powder
- 1/2 teaspoon smoked paprika
- 2 tablespoons chopped chives
- Salt and black pepper to taste
Instructions
- Preheat the oven to 375 degrees and line a baking sheet with parchment paper.
- Slice the tops off each mini bell pepper and remove the seeds and membranes with a small spoon or knife.
- Use a sharp paring knife to carve simple jack-o’-lantern faces into one side of each pepper.
- In a mixing bowl, combine the softened cream cheese, shredded cheddar cheese, garlic powder, smoked paprika, chopped chives, salt, and black pepper. Stir until the mixture is smooth and evenly blended.
- Spoon or pipe the cheese filling into each carved pepper until it reaches just below the top edge.
- Place the filled peppers on the prepared baking sheet and bake for 12 to 15 minutes until the peppers soften slightly and the filling is warm.
- Remove from the oven and let cool for a few minutes before transferring to a serving platter.
Extra Tips
Chill the filled peppers for 30 minutes before baking if you want firmer cheese centers. Swap the cheddar for pepper jack if you prefer a bit more heat in the filling. Leftovers store in an airtight container in the refrigerator for up to two days and reheat well in a 350-degree oven for five minutes. Course: Appetizer Cuisine: American Equipment: Baking sheet, Mixing bowl, Paring knife
Witch Finger Green Bean Bundles
These bundles turn simple green beans into a playful party bite that fits right into a Halloween spread. The prosciutto wraps create a finger-like shape while the almond pieces act as nails for a quick visual effect. They stay crisp after baking and pair well with other savory snacks on the table.
The flavor is light and savory with a touch of salt from the prosciutto and a mild garlic note. They work as an easy make-ahead option that guests can pick up without plates or utensils.

Serves 4 people.
Ingredients
- 12 oz fresh green beans, trimmed
- 8 thin slices prosciutto
- 16 whole almonds
- 2 tbsp olive oil
- 1/2 tsp garlic powder
- 1/4 tsp salt
- 1/4 tsp black pepper
Instructions
- Preheat the oven to 400 degrees and line a baking sheet with parchment paper.
- Bring a large pot of water to a boil and add the green beans. Cook for 3 minutes, then drain and rinse under cold water to stop the cooking.
- Pat the green beans dry and divide them into 8 equal bundles.
- Lay one slice of prosciutto flat and place a bundle of green beans at one end. Roll the prosciutto around the center of the bundle to hold it together.
- Place each wrapped bundle on the prepared baking sheet. Brush lightly with olive oil and sprinkle with garlic powder, salt, and black pepper.
- Press one almond into the end of each bundle to resemble a fingernail. Bake for 12 to 15 minutes until the prosciutto is crisp and the beans are tender.
Extra Tips
If the almonds do not stay in place after baking, add a small dab of softened cream cheese under each one before the oven step. These bundles taste best served warm but can be reheated on a baking sheet at 350 degrees for 5 minutes to restore crispness. Use thin prosciutto so it does not overpower the green beans. Course: Appetizer Cuisine: American Equipment: Baking sheet, Large pot, Parchment paper