


Planning snacks for a Halloween party does not have to be complicated. This list has 13 straightforward ideas that come together fast. Most use common ingredients and basic steps. You can mix and match them to suit your crowd. These options should make your spread look festive with little effort.
Helpful Tips Before You Start
A little planning keeps these snacks simple to pull together for your party.
Shop with a list
Focus on items that work across multiple snacks like tortillas, cheese, and fruit. This cuts down on extra trips and waste.
Prep what you can ahead
Chop vegetables or mix dips the day before so assembly goes faster on the day of the party.
Use cookie cutters for shapes
Press cutters into bread, cheese, or sandwiches to create quick Halloween themes without complicated steps.
Set up a display area early
Clear space on your table or counter and arrange serving plates before the snacks are ready. This avoids last minute crowding.
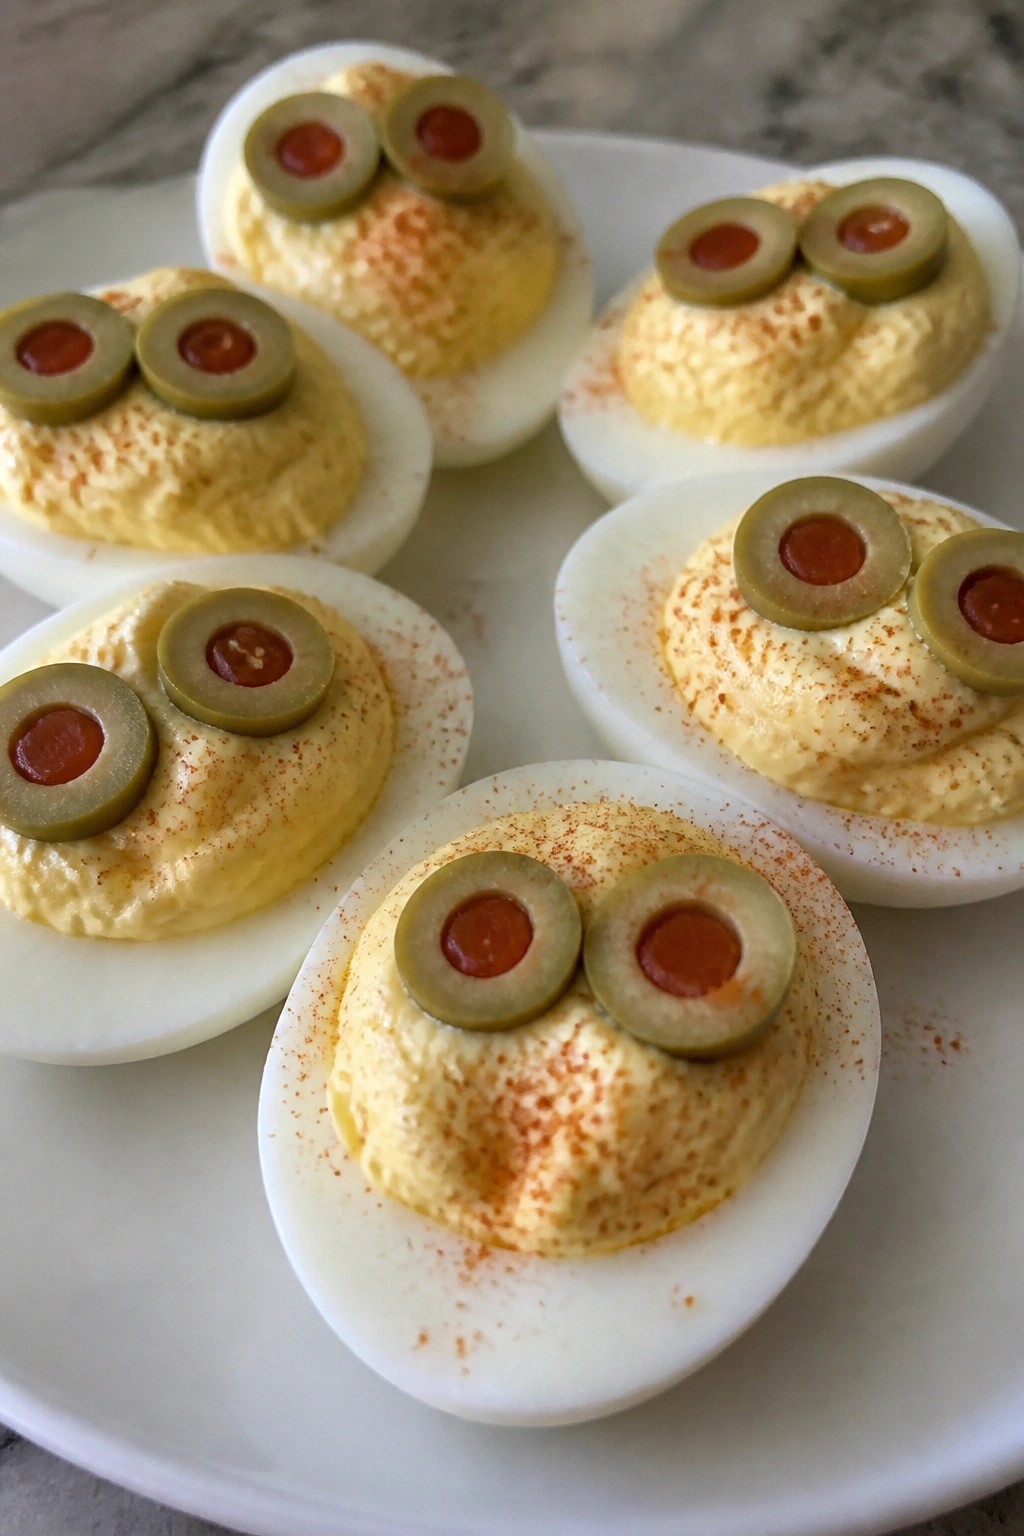
Olive-Eyed Deviled Eggs
These deviled eggs bring a simple spooky touch to a Halloween party table. Olive slices sit on top like eyes and give each piece a fun face that guests notice right away.
The filling stays creamy and lightly tangy, which balances the salty bite from the olives. They come together with basic ingredients and look right at home next to other snacks on the spread.
Serves 4 people.
Ingredients
- 4 large eggs
- 2 tablespoons mayonnaise
- 1 teaspoon yellow mustard
- 1 teaspoon white vinegar
- 1/4 teaspoon salt
- 1/8 teaspoon black pepper
- 8 pimento-stuffed green olives
- 1/4 teaspoon paprika
Instructions
- Place the eggs in a pot and cover them with cold water. Bring the water to a boil over medium heat and let the eggs cook for 10 minutes.
- Drain the hot water and move the eggs into a bowl of ice water. Let them cool for 5 minutes, then peel off the shells.
- Slice each egg in half lengthwise. Gently scoop the yolks into a mixing bowl and set the whites aside on a plate.
- Mash the yolks with a fork until they break down. Add the mayonnaise, mustard, vinegar, salt, and black pepper. Stir until the mixture is smooth.
- Spoon or pipe the yolk mixture back into the hollows of the egg whites.
- Cut each olive into thin rounds. Set two rounds on top of each filled egg half to form eyes.
- Finish by dusting the tops lightly with paprika.
Extra Tips
Make the eggs a few hours ahead and keep them covered in the fridge so the olives stay bright. The pimentos inside the olives act as ready-made pupils, so no extra work is needed there. If the filling feels too thick after mixing, add a few drops of vinegar to loosen it without changing the flavor. Course: Appetizer Cuisine: American Equipment: Pot, Mixing Bowl, Fork
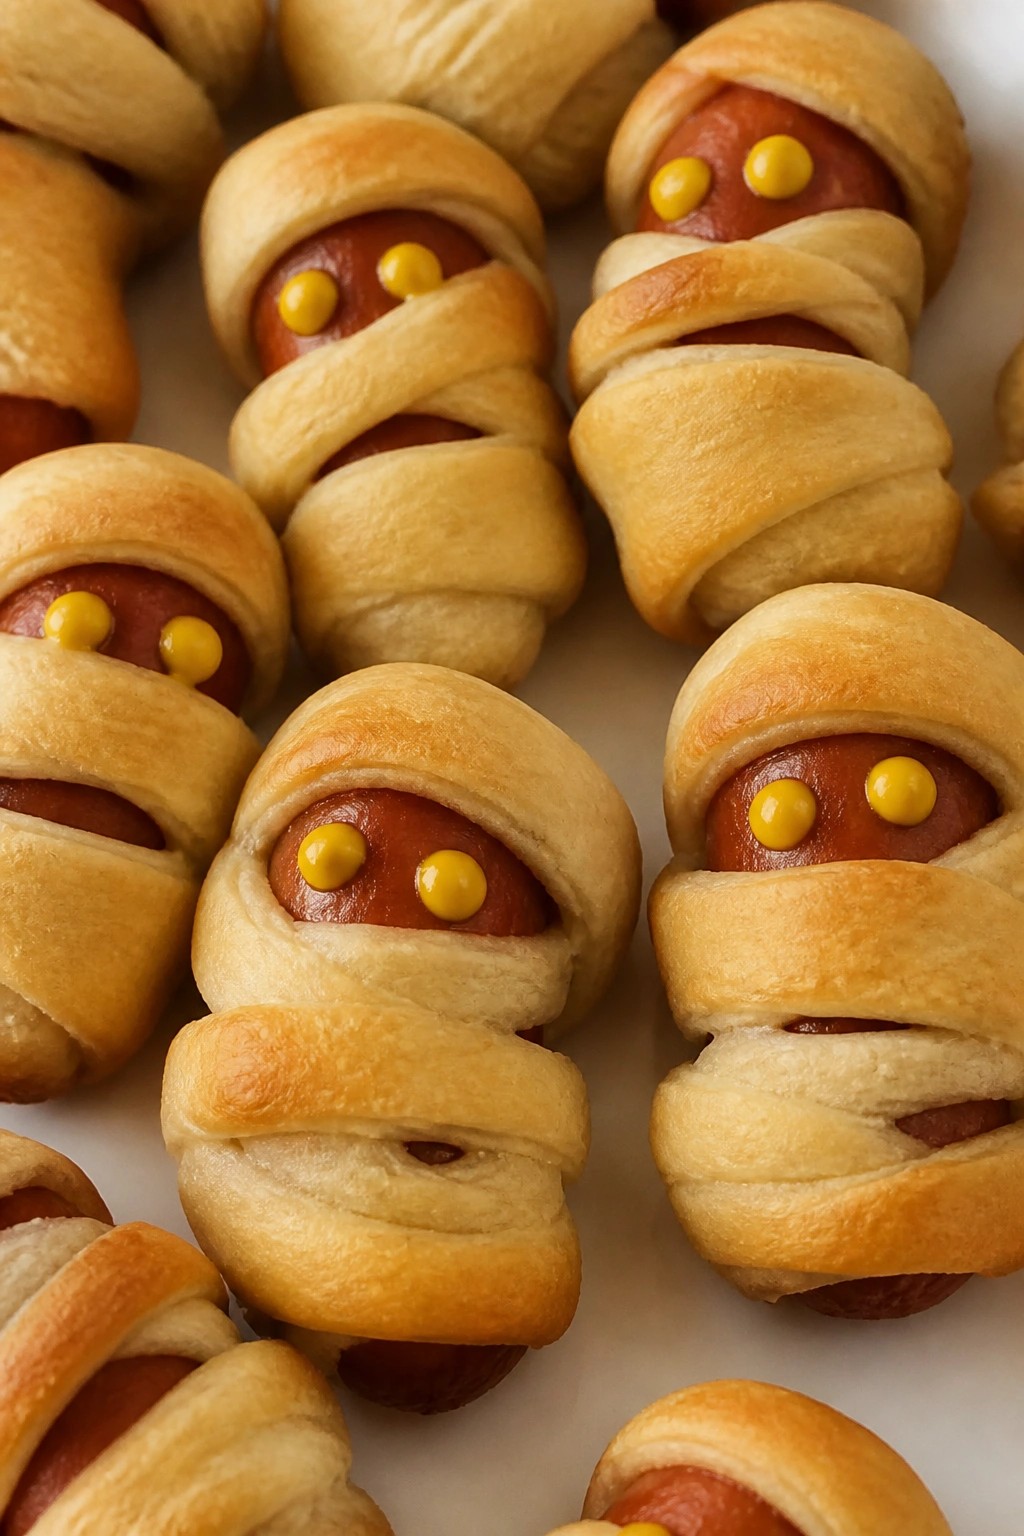
Mummy Wrapped Sausage Bites
These mummy wrapped sausage bites bring a playful touch to any Halloween spread. They come together quickly with just a few ingredients and bake up fast, making them ideal for busy party prep. The savory sausages stay juicy inside while the dough turns lightly crisp on the outside.
A small amount of mustard gives the bites a gentle tang that balances the richness of the meat and pastry. The simple design makes them easy for guests to grab and enjoy without extra utensils.
Serves 4 people.
Ingredients
- 8 cocktail sausages
- 1 can crescent roll dough
- 2 teaspoons yellow mustard
Instructions
- Preheat the oven to 375°F and line a baking sheet with parchment paper. Unroll the crescent roll dough on a clean surface.
- Cut the dough into 16 thin strips. Wrap two strips around each cocktail sausage, leaving small gaps near the top for the eyes and overlapping slightly to hold the strips in place.
- Arrange the wrapped sausages on the prepared baking sheet. Bake for 12 to 15 minutes until the dough is golden and puffed.
- Remove the bites from the oven and let them cool for 2 minutes. Use a small dab of yellow mustard on each gap to create the mummy eyes.
Extra Tips
Wrap the dough strips snugly but not too tight so the sausages do not burst during baking. If you want to prepare them ahead, assemble the mummies and keep them covered in the refrigerator for up to four hours before baking. Serve them warm with any leftover mustard on the side for dipping. Course: Appetizer Cuisine: American Equipment: Baking sheet, Knife
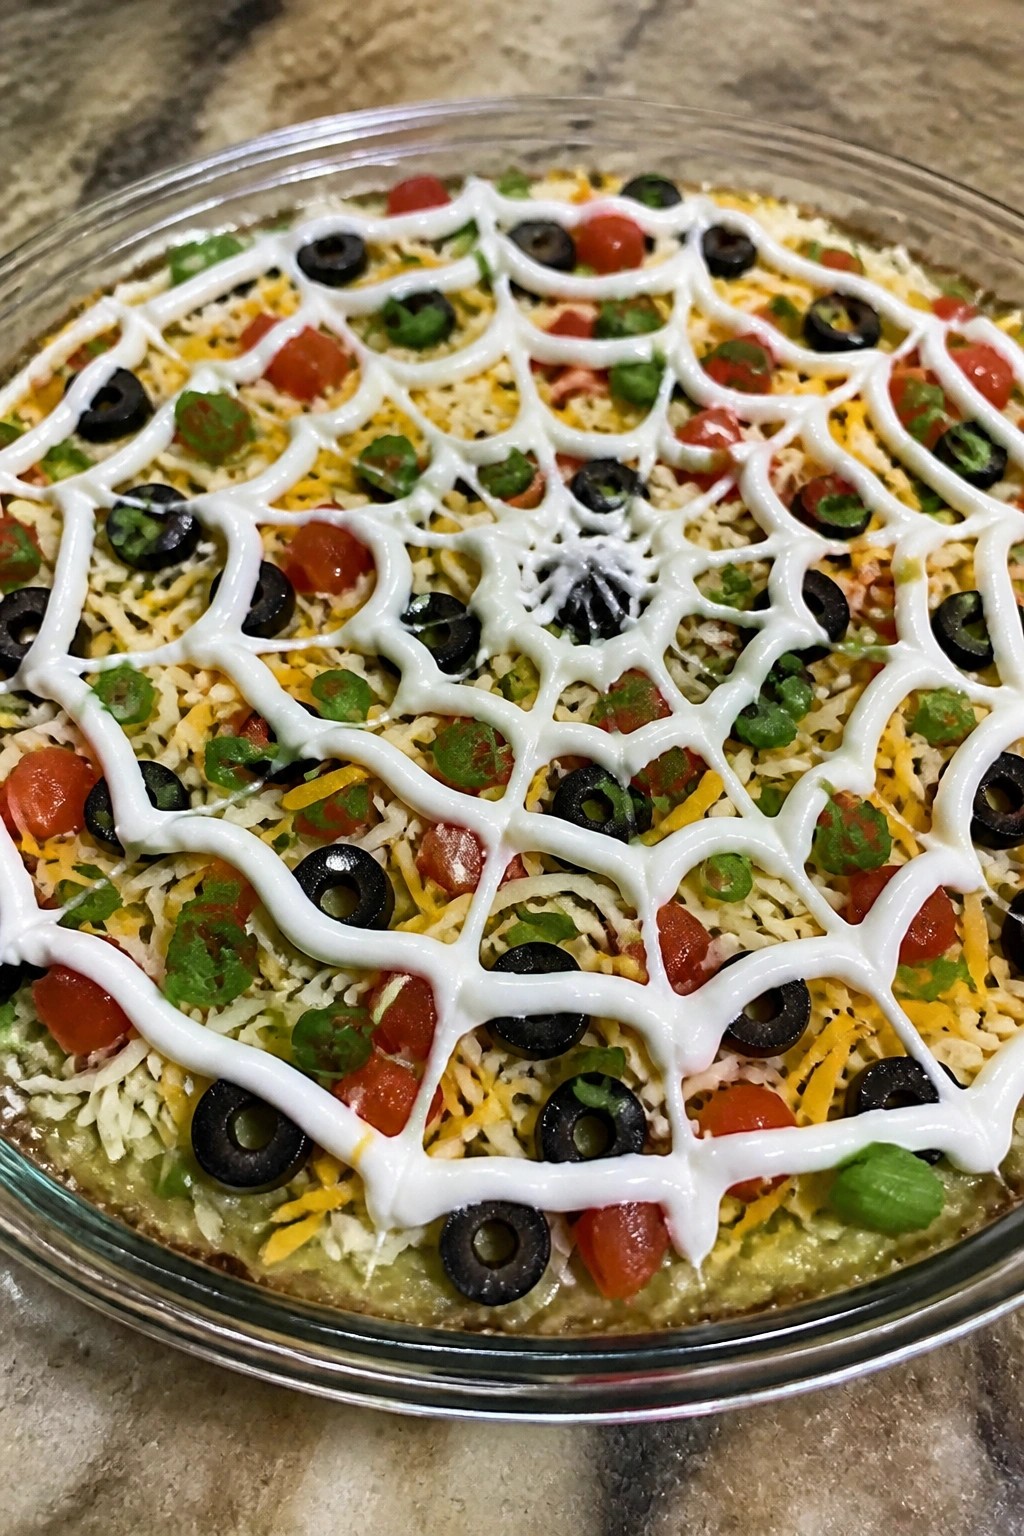
Spiderweb Seven-Layer Dip
This spiderweb seven-layer dip brings a simple Halloween twist to a classic party favorite. It layers familiar Mexican-inspired ingredients in a shallow dish and finishes with a sour cream web on top, making it easy to assemble for gatherings. The dip works well as a make-ahead option that holds up during an evening of snacking.
The texture stays creamy from the beans and guacamole while the fresh toppings add a bit of crunch and brightness. Guests can scoop it with tortilla chips for a balanced bite that feels festive without extra fuss.
Serves 4 people.
Ingredients
- 1 (16 oz) can refried beans
- 1 cup prepared guacamole
- 1 1/2 cups sour cream, divided
- 1 cup shredded Mexican cheese blend
- 1/2 cup diced tomatoes
- 1/4 cup sliced black olives
- 2 tablespoons chopped green onions
- Tortilla chips, for serving
Instructions
- Spread the refried beans evenly across the bottom of a 9-inch pie plate or shallow serving dish.
- Spoon the guacamole over the beans and smooth it into an even layer.
- Sprinkle the shredded cheese on top of the guacamole.
- Mix 1 cup of the sour cream with a pinch of salt if desired, then spread it over the cheese layer.
- Scatter the diced tomatoes evenly across the sour cream.
- Add the sliced black olives and chopped green onions as the next layers.
- Place the remaining 1/2 cup sour cream in a small zip-top bag, snip off one corner, and pipe concentric circles on top. Drag a toothpick from the center outward to form a web pattern.
- Serve with tortilla chips for dipping.
Extra Tips
Make the dip up to a day ahead and add the sour cream web right before guests arrive so the pattern stays sharp. If you want less heat, swap mild salsa for the diced tomatoes. Leftovers keep in the fridge for one day, though the web may soften slightly. Course: Appetizer Cuisine: American Equipment: Pie plate, Mixing bowl, Zip-top bag
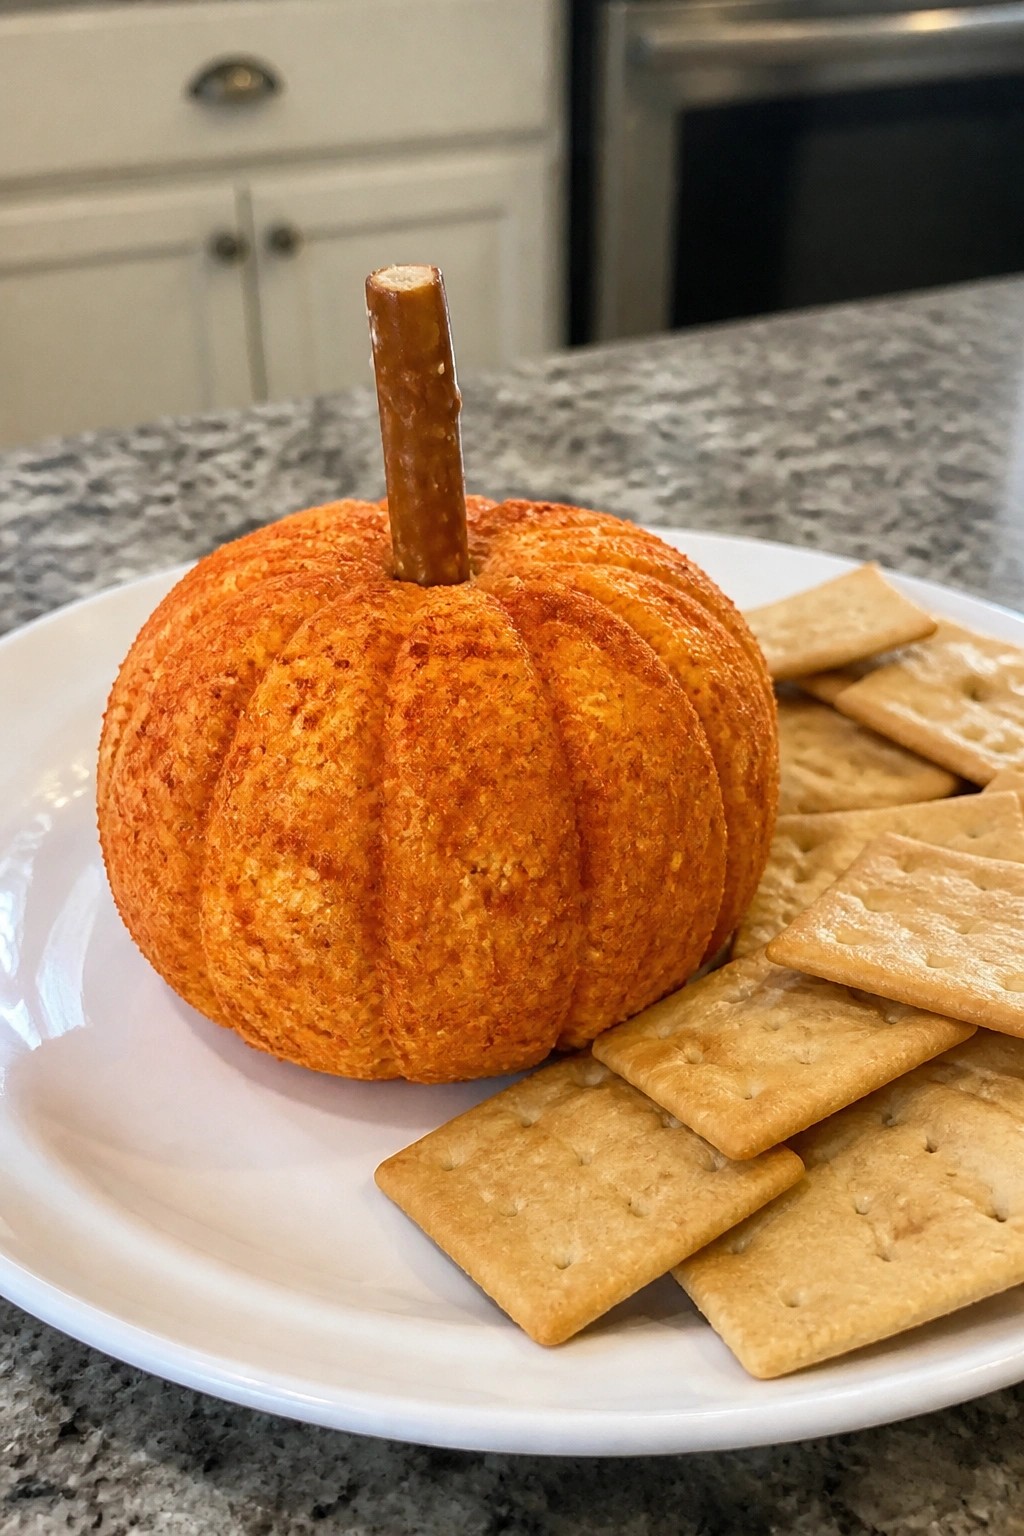
Pumpkin-Shaped Cheese Ball with Crackers
This cheese ball brings a festive touch to any Halloween spread. The bright orange color and simple stem make it look like a mini pumpkin without extra tools or effort. It pairs well with crackers for an easy snack that guests can grab while mingling.
The flavor stays mild and creamy with a light smoky note from paprika. The texture is soft enough to spread yet firm enough to hold its shape after chilling. It works best at parties where you need one make-ahead item that still looks themed.
Serves 4 people.
Ingredients
- 8 ounces cream cheese, softened
- 2 cups shredded cheddar cheese
- 1 teaspoon paprika
- 1/2 teaspoon garlic powder
- 1 pretzel rod
- 20 crackers
Instructions
- Place the cream cheese, cheddar cheese, paprika, and garlic powder in a mixing bowl. Stir until the mixture is evenly combined and smooth.
- Lay a sheet of plastic wrap on the counter. Scoop the cheese mixture onto the wrap and shape it into a round ball with your hands.
- Sprinkle the remaining paprika over the ball and roll it gently until the surface is fully coated in orange color.
- Use a butter knife to draw a few shallow vertical lines around the ball to mimic pumpkin ridges.
- Insert the pretzel rod into the top center to create a stem. Wrap the cheese ball and chill it for at least one hour so it firms up.
- Unwrap the cheese ball and place it on a serving plate with the crackers arranged around the base.
Extra Tips
Chill the cheese ball longer if your kitchen is warm so the ridges stay defined. You can swap the pretzel rod for a celery stick if you prefer a fresher stem flavor. Leftovers keep in the fridge for two days when wrapped tightly, though the crackers should stay separate until serving. Course: Appetizer Cuisine: American Equipment: Mixing Bowl, Plastic Wrap, Serving Plate
Ghost-Shaped Sugar Cookies
These ghost-shaped sugar cookies add a lighthearted touch to any Halloween snack table. They come together with basic pantry items and give you a chance to involve family members in the decorating step.
The finished cookies taste sweet and buttery with a soft center and slight crisp at the edges. White icing gives them their ghost look while mini chocolate chips create simple faces.

Serves 4 people.
Ingredients
- 1 1/2 cups all-purpose flour
- 1/2 cup unsalted butter, softened
- 1/2 cup granulated sugar
- 1 large egg
- 1 teaspoon vanilla extract
- 1/2 teaspoon baking powder
- 1/4 teaspoon salt
- 1 cup powdered sugar
- 2 tablespoons milk
- Mini chocolate chips
Instructions
- Whisk the flour, baking powder, and salt together in a bowl and set aside.
- In a separate bowl, beat the softened butter and granulated sugar until light and fluffy. Add the egg and vanilla extract and mix until smooth.
- Stir the dry ingredients into the butter mixture until a dough forms. Cover and chill the dough for 30 minutes.
- Heat the oven to 350 degrees and line a baking sheet with parchment paper. Roll the dough out on a lightly floured surface to about 1/4 inch thick.
- Cut out ghost shapes using a cookie cutter and place them on the prepared baking sheet. Bake for 8 to 10 minutes until the edges turn lightly golden.
- Remove the cookies from the oven and let them cool completely on the baking sheet.
- Stir the powdered sugar and milk together until smooth to make the icing. Spread the icing over each cooled cookie and press two mini chocolate chips into the icing for eyes.
Extra Tips
Chill the dough well so the ghosts keep their shape during baking. If the icing feels too thick, add a few drops more milk until it spreads easily. Store finished cookies in a single layer in an airtight container to keep the icing from smearing. Course: Snack Cuisine: American Equipment: Mixing Bowls, Baking Sheet, Rolling Pin, Ghost-Shaped Cookie Cutter
Witch Broom Pretzel Rods
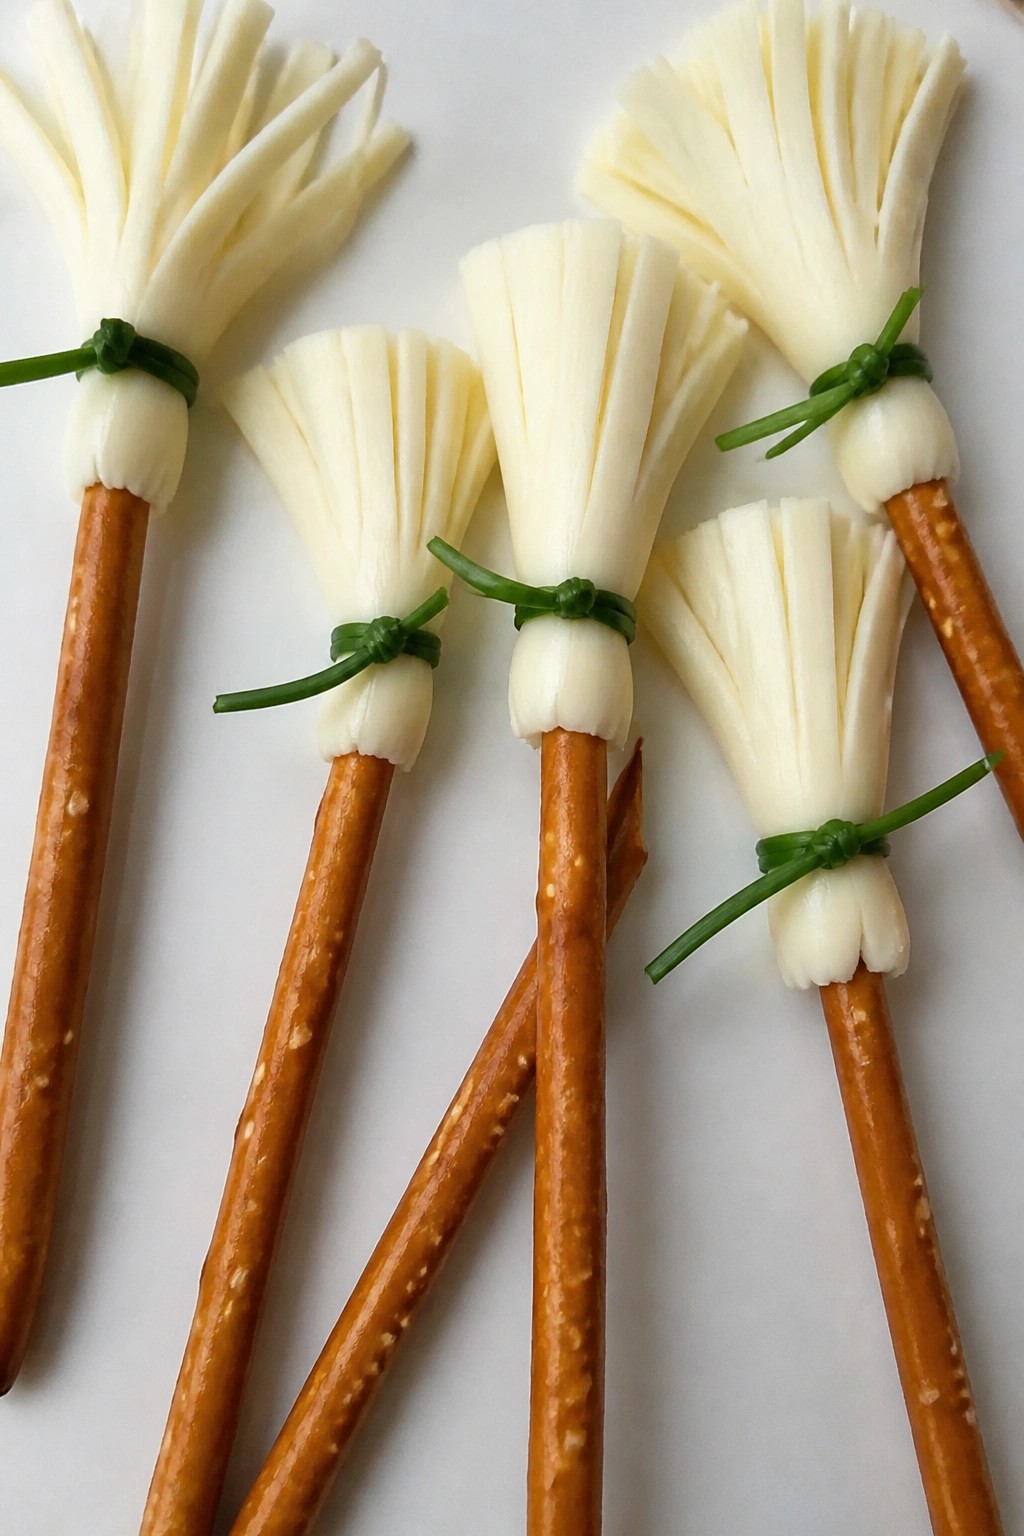
These witch broom pretzel rods bring a simple, playful element to a Halloween table. They come together fast with basic ingredients and give guests something to nibble while they mingle. The mix of salty pretzel and mild cheese works well for both kids and adults.
The finished snacks have a crunchy base and a soft, slightly chewy top. They fit easily into a larger spread of finger foods without needing much space or extra plates.
Serves 4 people.
Ingredients
- 12 pretzel rods
- 4 string cheese sticks
- 12 fresh chives
Instructions
- Unwrap the string cheese sticks and slice each one lengthwise into three or four thin strips.
- Gather three or four cheese strips together and press them against one end of a pretzel rod to form the broom head.
- Wrap one chive around the top of the cheese strips and tie it gently to hold the strips in place against the pretzel.
- Repeat with the remaining pretzel rods, cheese strips, and chives until all twelve brooms are assembled.
Extra Tips
Keep the string cheese cold until you slice it so the strips stay neat. If a chive feels too stiff, run it under warm water for a few seconds to make it easier to tie. These brooms taste best the same day they are made. Course: Snack Cuisine: American Equipment: Knife, Cutting board
Bat Wing Puff Pastry Pockets
These puff pastry pockets work well for a Halloween party spread because they come together with store-bought dough and need little hands-on time. The finished pockets have a flaky, golden crust around a creamy, savory center that feels substantial without much effort.
They suit a snack table where guests want something warm and handheld. The dark filling gives them a subtle bat-wing look once the pastry is shaped and baked.

Serves 4 people.
Ingredients
- 2 sheets frozen puff pastry, thawed
- 8 ounces cream cheese, softened
- 1/2 cup chopped black olives
- 1 teaspoon garlic powder
- 1 egg
- 1 tablespoon water
Instructions
- Heat the oven to 400 degrees and line a baking sheet with parchment paper.
- In a mixing bowl, stir together the cream cheese, chopped black olives, and garlic powder until evenly combined.
- Unfold each puff pastry sheet on a lightly floured surface and cut each sheet into four rectangles.
- Spoon about 2 tablespoons of filling onto one half of each rectangle, leaving a border around the edges.
- Fold the empty half over the filling and press the edges firmly with a fork to seal.
- Use a sharp knife to cut three small slits on each side of the sealed pocket to form a simple wing shape.
- Beat the egg with the water in a small bowl. Brush the tops of the pockets with the egg wash.
- Place the pockets on the prepared baking sheet and bake for 15 to 18 minutes until the pastry is puffed and golden.
Extra Tips
Let the pockets cool for a few minutes before serving so the filling sets slightly. You can assemble them ahead, keep them covered in the fridge, and bake right before guests arrive. If you want a stronger olive flavor, add an extra tablespoon of chopped olives to the filling before sealing. Course: Appetizer Cuisine: American Equipment: Baking sheet, Mixing bowl, Pastry brush, Knife
Candy Corn Layered Jello Cups
These layered cups bring the classic candy corn look to the table with simple gelatin layers in yellow, orange, and white. They work well for Halloween parties or casual get-togethers where you want something colorful but still easy to prepare ahead.
The finished cups have a firm yet jiggly texture with bright citrus notes from the bottom layers and a mild creamy finish on top. Clear cups show off the stripes, making them a quick visual hit for a snack spread.

Serves 4 people.
Ingredients
- 1 package (3 oz) lemon gelatin
- 1 package (3 oz) orange gelatin
- 2 envelopes unflavored gelatin
- 1 can (14 oz) sweetened condensed milk
- 4 cups boiling water, divided
- 2 cups cold water, divided
- 4 clear plastic cups
Instructions
- Place the lemon gelatin in a medium bowl and add 1 cup boiling water. Stir until fully dissolved, then mix in 1 cup cold water. Divide evenly among the 4 cups and chill for 30 minutes until set.
- In a clean bowl, sprinkle 1 envelope unflavored gelatin over 1/4 cup cold water and let it sit for 1 minute. Add 1 cup boiling water and stir until dissolved. Mix in half the can of sweetened condensed milk. Let the mixture cool to room temperature, then pour evenly over the yellow layer in each cup. Chill for 30 minutes.
- Repeat the lemon gelatin step with the orange gelatin package using the remaining boiling and cold water. Pour the orange mixture over the white layer in each cup and chill until fully set, about 1 hour.
Extra Tips
Chill the cups fully before serving so the layers stay distinct when guests pick them up. If the white layer starts to set too quickly while cooling, place the bowl in a larger bowl of warm water and stir to keep it pourable. Leftovers keep covered in the refrigerator for up to 2 days without the layers bleeding. Course: Snack Cuisine: American Equipment: Mixing Bowls, Whisk, Measuring Cups, Clear Plastic Cups
Monster Green Guacamole Cups
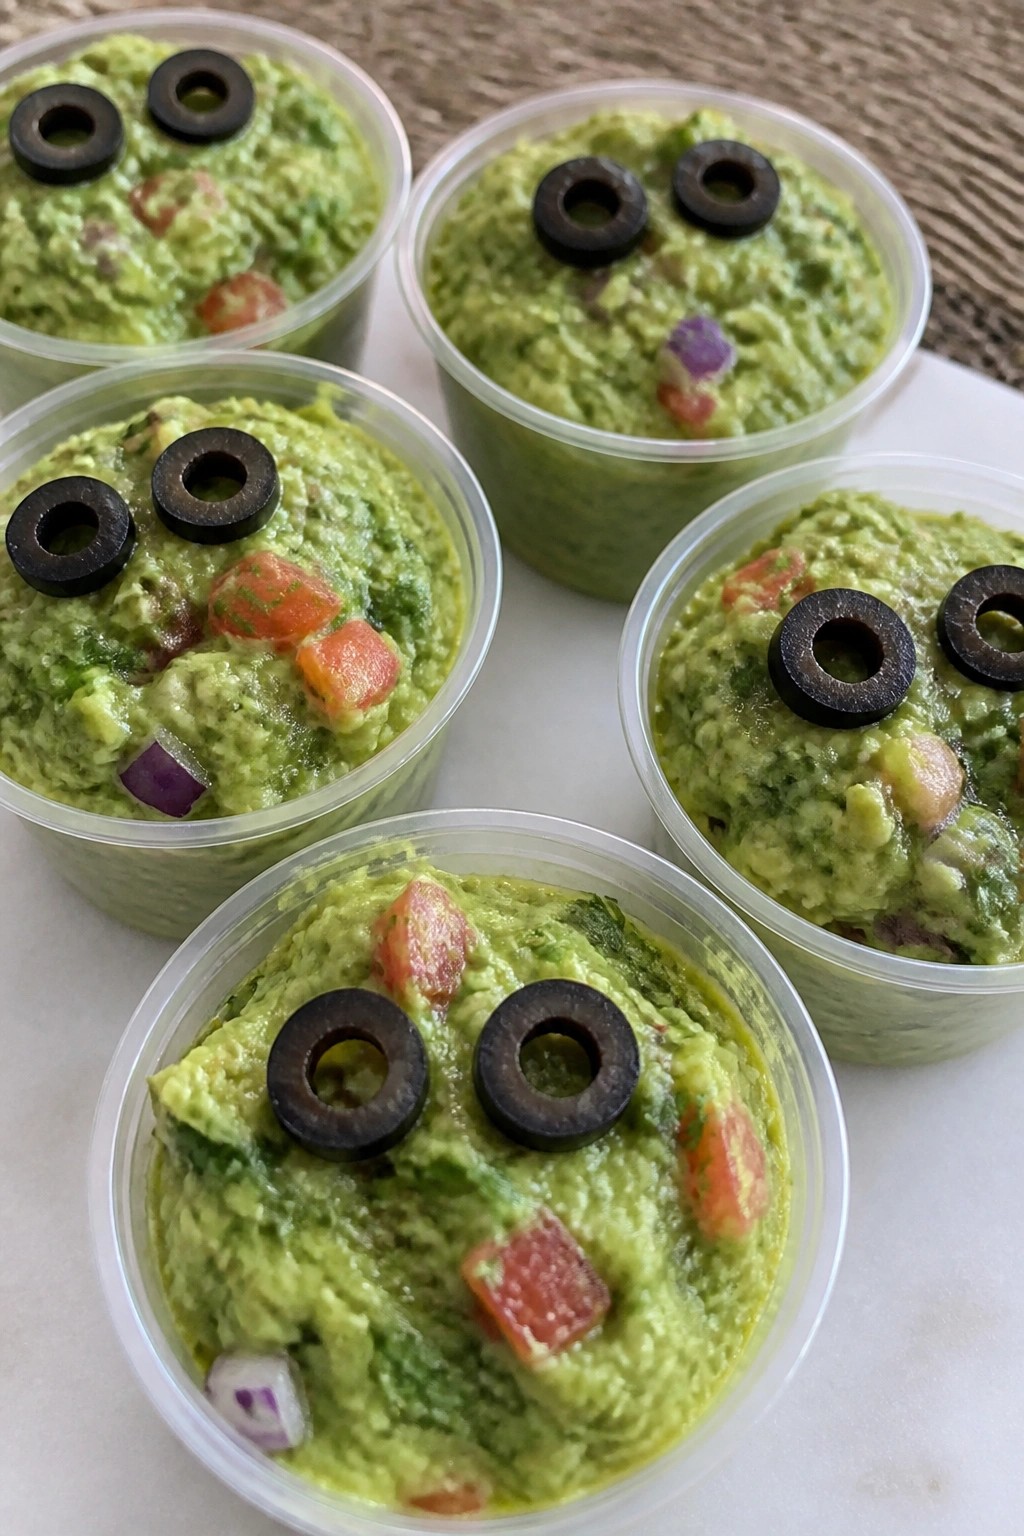
These Monster Green Guacamole Cups turn a classic dip into a simple party snack with built-in Halloween flair. The individual servings make them easy to set out on a spread, and the bright green color fits right in with other spooky bites. Each cup offers a creamy base with fresh, tangy notes from lime and herbs.
Serves 4 people.
Ingredients
- 3 ripe avocados
- 2 tablespoons lime juice
- 1/4 cup finely diced red onion
- 1 small tomato, diced
- 3 tablespoons chopped fresh cilantro
- 1/2 teaspoon salt
- 1/4 teaspoon garlic powder
- 8 black olives, halved
- Tortilla chips, for serving
Instructions
- Cut the avocados in half, remove the pits, and scoop the flesh into a mixing bowl. Mash with a fork until mostly smooth but still slightly chunky.
- Add the lime juice, red onion, tomato, cilantro, salt, and garlic powder to the bowl. Stir until the ingredients are evenly combined.
- Spoon the guacamole into four small serving cups, filling each about three-quarters full.
- Press two olive halves onto the surface of each cup to form eyes. Add tortilla chips on the side or standing upright in the guacamole for dipping.
Extra Tips
Make the guacamole no more than a few hours ahead so the color stays bright. If you want a milder onion taste, rinse the diced pieces in cold water before adding them. Keep a few extra olive halves nearby in case any shift during transport to the table. Course: Appetizer Cuisine: Mexican Equipment: Mixing Bowl, Knife, Spoon
Jack-o’-Lantern Stuffed Mini Peppers
These stuffed mini peppers bring a playful touch to any Halloween spread. The bright orange peppers get carved with simple faces, then filled with a creamy cheese mixture that stays cool and fresh. They work well for parties because they require no cooking and can be made ahead.
The result is a crisp pepper shell with a smooth, tangy filling that balances mild sweetness from the peppers. Kids and adults both enjoy the light bite and festive look.

Serves 4 people.
Ingredients
- 12 mini orange bell peppers
- 8 ounces cream cheese, softened
- 1 cup shredded cheddar cheese
- 2 tablespoons chopped fresh chives
- 1/2 teaspoon paprika
- 1/4 teaspoon garlic powder
- Salt and black pepper to taste
Instructions
- Rinse the mini peppers and pat them dry. Use a small sharp knife to cut jack-o’-lantern faces into one side of each pepper, removing the seeds and membranes through the carved openings.
- Place the cream cheese in a mixing bowl and mash it with a fork until smooth. Add the shredded cheddar cheese, chopped chives, paprika, garlic powder, salt, and black pepper.
- Stir the mixture until the cheddar and seasonings are evenly distributed throughout the cream cheese.
- Spoon the filling into each carved pepper, pressing gently to fill the cavity without tearing the faces. Arrange the stuffed peppers on a serving plate.
Extra Tips
Chill the filled peppers for at least 30 minutes before serving so the cheese firms up and holds its shape. Use a small spoon or piping bag for neater filling if the carved openings are narrow. The chives add a mild onion note that pairs well with the paprika, but you can swap in green onion tops if needed. Course: Appetizer Cuisine: American Equipment: Mixing bowl, Sharp knife, Spoon
Graveyard Brownie Dirt Cups
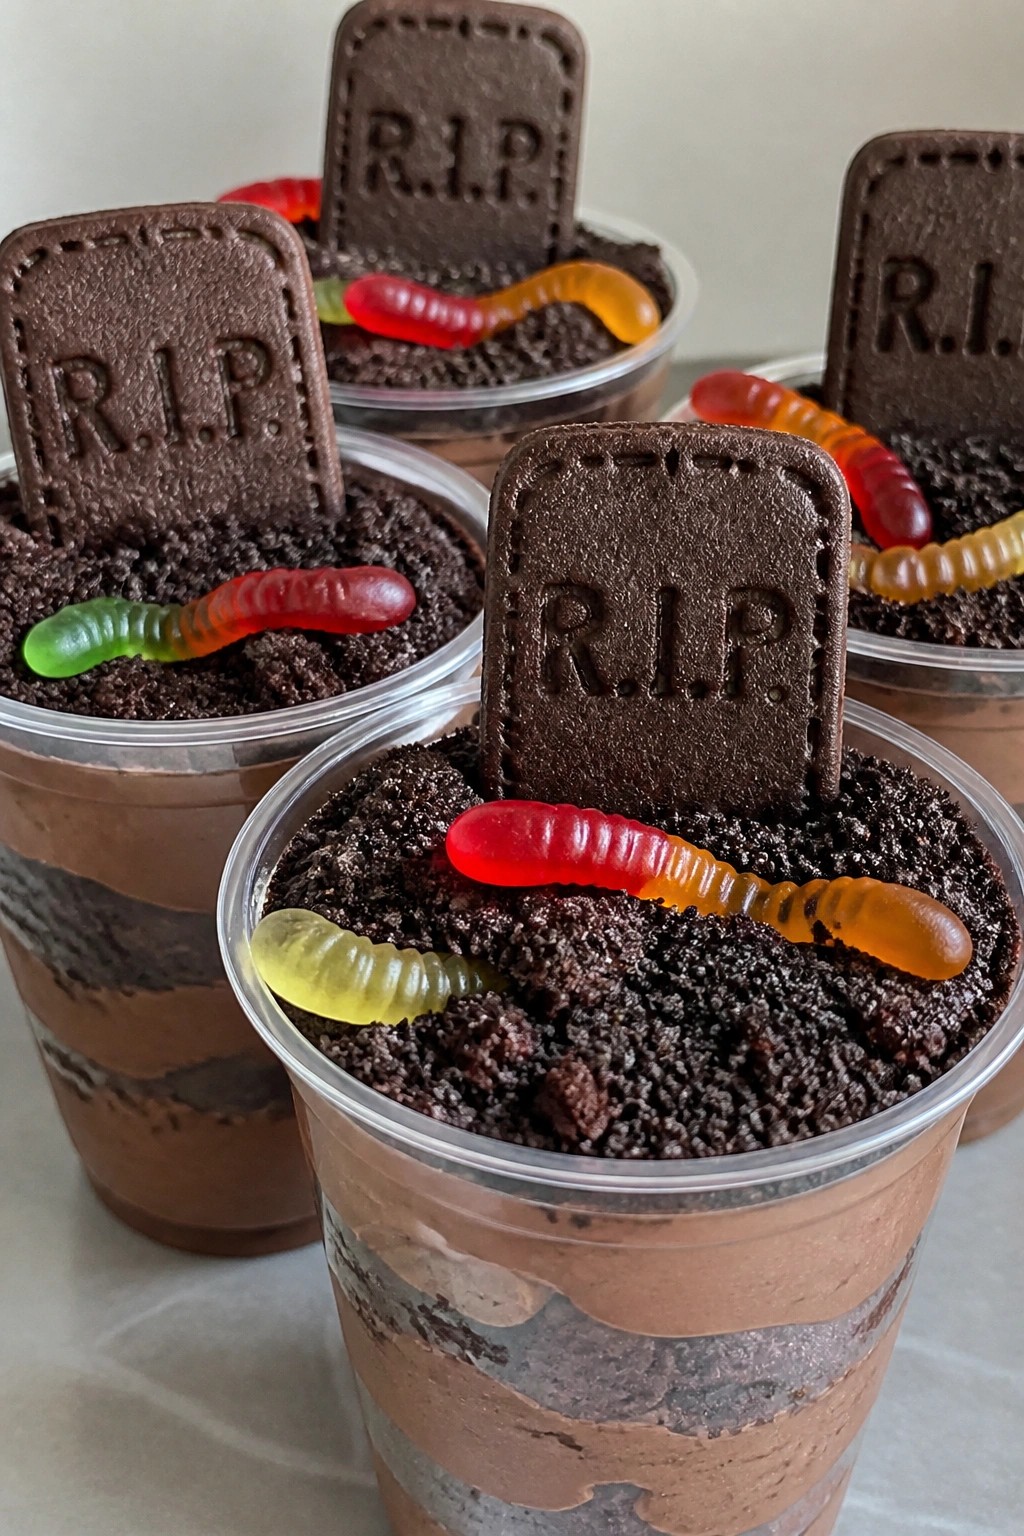
These cups turn simple chocolate layers into a Halloween party snack that looks like a mini graveyard. They work well for kid-friendly gatherings or casual get-togethers because they come together quickly and require no fancy skills. Each serving gives a rich chocolate taste with creamy pudding, soft brownie pieces, and crunchy cookie bits.
Serves 4 people.
Ingredients
- 4 brownies, crumbled
- 1 (3.9 oz) package instant chocolate pudding mix
- 2 cups cold milk
- 20 chocolate sandwich cookies, crushed
- 4 rectangular chocolate cookies
- 8 gummy worms
Instructions
- Whisk the pudding mix and cold milk in a bowl until smooth. Let it set for five minutes.
- Place a layer of crumbled brownies in the bottom of each of four clear cups.
- Spoon a layer of chocolate pudding over the brownies in each cup.
- Sprinkle a layer of crushed chocolate sandwich cookies on top of the pudding to create the dirt effect.
- Repeat the brownie, pudding, and cookie layers once more in each cup.
- Push one rectangular chocolate cookie upright into the back of each cup to stand as a tombstone.
- Tuck two gummy worms into the top cookie layer of each cup so they appear to crawl out.
Extra Tips
Press the rectangular cookies firmly into the back edge of each cup right after the final cookie layer so they stay upright. If the pudding feels too thick after setting, stir in a splash of milk before layering. Store assembled cups in the refrigerator and add the gummy worms just before serving to keep them from drying out. Course: Dessert Cuisine: American Equipment: Mixing bowl, whisk, 4 clear cups
Bloody Red Candy Popcorn
This bloody red candy popcorn adds a bright splash of color to a Halloween snack table. It comes together with basic pantry items and gives guests something crunchy and sweet to grab between other bites.
The finished popcorn has a glossy red candy shell that sets firm while keeping the kernels light and crisp. It works well for parties because it travels easily and holds up for hours without getting soggy.

Serves 4 people.
Ingredients
- 8 cups popped popcorn
- ¾ cup granulated sugar
- ⅓ cup light corn syrup
- 3 tablespoons unsalted butter
- 1 tablespoon red food coloring
- ½ teaspoon vanilla extract
- ¼ teaspoon salt
Instructions
- Preheat the oven to 250°F and line a baking sheet with parchment paper.
- Place the popped popcorn in a large bowl and set it aside.
- Combine the sugar, corn syrup, and butter in a medium saucepan. Cook over medium heat, stirring often, until the mixture reaches a full boil.
- Remove the pan from the heat and stir in the red food coloring, vanilla extract, and salt until the color is uniform.
- Pour the hot candy mixture over the popcorn and toss quickly with a spatula until every piece is coated.
- Spread the coated popcorn in a single layer on the prepared baking sheet.
- Bake for 30 minutes, stirring once halfway through to keep the coating even.
- Remove from the oven and let the popcorn cool completely on the sheet before breaking it into clusters.
Extra Tips
Stir the popcorn as soon as the candy mixture hits it so the color stays bright and even. If you want a deeper shade, stir in one extra teaspoon of red food coloring before pouring. Once cooled, store the clusters in an airtight container at room temperature; they stay crunchy for up to three days. Course: Snack Cuisine: American Equipment: Large bowl, Medium saucepan, Baking sheet
Skeleton Bone Breadsticks with Marinara
These skeleton bone breadsticks bring a playful Halloween touch to any party table. They use everyday dough and turn into crisp, golden sticks that look like bones once shaped and baked.
The finished breadsticks offer a savory garlic and herb taste with a light crunch on the outside. They work best as finger food alongside a bowl of marinara for dipping during a casual gathering.

Serves 4 people.
Ingredients
- 1 (13.8-ounce) tube refrigerated pizza dough
- 2 tablespoons olive oil
- 1 teaspoon garlic powder
- 1/2 teaspoon dried oregano
- 1/4 cup grated Parmesan cheese
- 1 cup marinara sauce
Instructions
- Preheat the oven to 400°F and line a baking sheet with parchment paper.
- Unroll the pizza dough on a lightly floured surface and cut it into 8 equal strips.
- Shape each strip into a bone by gently rolling and pinching the ends to create thicker knobs while leaving the middle thinner.
- Place the shaped dough pieces on the prepared baking sheet and brush each one evenly with olive oil.
- Sprinkle the garlic powder, oregano, and Parmesan cheese over the tops of the breadsticks.
- Bake for 10 to 12 minutes until the breadsticks turn golden brown.
- Warm the marinara sauce in a small saucepan or microwave and serve it alongside the breadsticks for dipping.
Extra Tips
Arrange the baked breadsticks in a loose circle on a dark platter so the bone shapes stand out. If the dough feels too sticky while shaping, dust your hands lightly with flour. Leftovers can be stored in an airtight container and reheated in a 350°F oven for a few minutes to restore crispness. Course: Appetizer Cuisine: Italian Equipment: Baking Sheet, Pastry Brush, Small Saucepan