


Halloween can sneak up fast when you have a busy schedule. These treats are all simple to put together with basic ingredients. I focused on ideas that take minimal time and effort. You will find options for both kids and adults in the list below.
Helpful Tips Before You Start
These pointers will help you finish the treats without extra steps or delays.
Recommended Products

Pack includes 3 sets of marshmallow ghost candies

Halloween marshmallow candies shaped like white ghosts

FOUR FESTIVE HALLOWEEN SHAPES Includes Skulls, Monsters, Pumpkins, and Ghosts—perfect for spooky snacking and decorating.
Set Up One Station
Place all ingredients and tools on the counter before you start. This keeps the process moving without constant searching.
Pick No Bake Recipes First
Many Halloween treats need only melting, mixing, or assembling. Skip the oven to cut total time in half.
Use Store Bought Bases
Start with cookies, brownies, or pretzels from the store. They let you focus on quick decorations instead of baking from scratch.
Keep Decorations Ready
Measure out sprinkles, candy eyes, and melted chocolate in small bowls ahead of time. Easy access speeds up the final steps.
Make Similar Treats Together
Group recipes that share steps like dipping or drizzling. You finish several items with less cleanup.
Ghostly Marshmallow Pops
These Ghostly Marshmallow Pops come together fast with minimal tools and make a cute addition to any Halloween spread. Kids can help with the dipping and face drawing, which keeps the process simple and low stress.
The finished pops have a soft, chewy center inside a thin white chocolate shell. The black icing faces give them a friendly ghost look that travels well to parties or school events.

Serves 4 people.
Recommended Products

Complete Halloween Cookie Decorating Kit – Includes everything you need: 1 Oreo mold, spooky sprinkle mix, 18 candy eyeballs, 12 candy triangles, 6 candy monster teeth, and piping bags for easy decorating.

10 cookies to a kit

Small Halloween Gingerbread Cookie House Kit- Finished product measures approximately 2.75 L x 2.75 W x 3 H inches
Ingredients
- 8 large marshmallows
- 8 lollipop sticks
- 12 ounces white chocolate chips
- 1 tablespoon coconut oil
- Black decorating icing
Instructions
- Push one lollipop stick into the center of each marshmallow until it feels secure.
- Place the white chocolate chips and coconut oil in a microwave-safe bowl. Heat in 30-second bursts, stirring between each, until the mixture is smooth.
- Dip each marshmallow into the melted chocolate, turning to coat all sides. Let excess chocolate drip back into the bowl.
- Set the coated pops on a sheet of wax paper. Allow the chocolate to harden at room temperature.
- Once the coating is firm, use the black decorating icing to draw simple eyes and a mouth on each pop.
Extra Tips
Draw the faces only after the chocolate has fully set so the lines stay crisp. If the chocolate thickens while you work, warm it for a few seconds and stir to loosen it again. Store the finished pops in an airtight container at room temperature for up to two days. Course: Dessert Cuisine: American Equipment: Microwave-safe bowl, Lollipop sticks, Wax paper
No-Bake Pumpkin Spice Truffles
These truffles mix up quickly with pantry staples and need no baking. They work well for last-minute Halloween gatherings or as a simple make-ahead treat to keep in the fridge. The result is a creamy center with warm pumpkin spice notes and a smooth white chocolate shell.

Serves 4 people.
Recommended Products

【What are included】You will receive 48pcs witch hat cupcake toppers in this package which are all printed on both sides. The colorful witch hat are bright enough to catch the first sight to your guest. To bring a more glamorous color to your Halloween party.

Premium Material: These realistic witch hat cupcake toppers are made of wafer rice paper, it is completely edible, eco-friendly but not delicious. They are virtually tasteless, not sweet at all and are sugar free, very safe to put them on cakes, cupcakes, ice cream, fruits, pie, dessert, cheese or any dish and food appetizer you want to decorate.
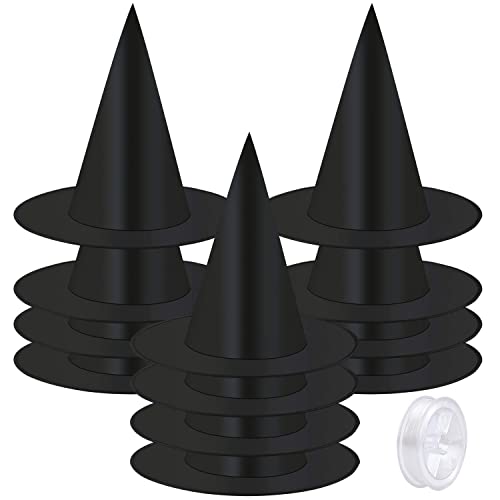
Quantity and size: each pack contains 12 black witch hats, 1 roll of nylon hanging rope; the height of the witch hat is about 34 cm/13.3 inches, the diameter of the wizard hat is about 38 cm/15 inches, and the length of hanging rope is 100 m, and the diameter is 0.6 mm
Ingredients
- 1/2 cup pumpkin puree
- 8 ounces cream cheese, softened
- 1 teaspoon vanilla extract
- 1 teaspoon pumpkin pie spice
- 1/2 cup powdered sugar
- 1 1/2 cups graham cracker crumbs
- 8 ounces white chocolate, melted
- 2 tablespoons orange sprinkles
Instructions
- Combine the pumpkin puree, cream cheese, vanilla extract, pumpkin pie spice, and powdered sugar in a mixing bowl until smooth.
- Stir in the graham cracker crumbs until the mixture holds together.
- Scoop the mixture and roll it into 12 small balls. Place the balls on a baking sheet lined with parchment paper.
- Dip each ball into the melted white chocolate to coat it evenly. Return the coated truffles to the baking sheet.
- Sprinkle the tops with orange sprinkles while the chocolate is still wet.
- Chill the truffles in the refrigerator for 30 minutes until the coating sets.
Extra Tips
If the mixture feels too soft to roll, add a few extra graham cracker crumbs. Store the finished truffles in an airtight container in the fridge for up to three days. The white chocolate coating keeps them from sticking together once chilled. Course: Dessert Cuisine: American Equipment: Mixing Bowl, Baking Sheet
Spiderweb Chocolate Bark
This spiderweb chocolate bark gives you a festive Halloween look with very little effort. It comes together fast when you need something sweet for a party or to hand out to kids. The dark chocolate base stays crisp while the white chocolate web adds a light contrast in both color and taste.
This recipe serves 4 people. – 8 ounces semisweet chocolate chips – 4 ounces white chocolate chips – 1 teaspoon coconut oil
### Instructions 1. Line a baking sheet with parchment paper and set it aside. 2. Place the semisweet chocolate chips and coconut oil in a microwave-safe bowl. Heat in 30-second bursts, stirring after each, until fully melted and smooth. 3. Pour the melted chocolate onto the parchment and spread it into a thin, even rectangle about 8 by 10 inches. 4. Place the white chocolate chips in a separate microwave-safe bowl. Heat in 20-second bursts, stirring after each, until melted and smooth. 5. Spoon the white chocolate into a zip-top bag, snip off one corner, and pipe concentric circles over the dark chocolate. Use a toothpick to drag lines from the center outward to form a web pattern. 6. Let the bark sit at room temperature until fully set, then break it into pieces by hand.
### Extra Tips Work with the white chocolate while the dark layer is still slightly soft so the web lines stay clean. Break the bark into irregular shards rather than neat squares to keep the spooky look. Store pieces in an airtight container at cool room temperature for up to three days.
Course: Dessert Cuisine: American Equipment: Microwave-safe bowls, Baking sheet, Parchment paper, Zip-top bag, Toothpick
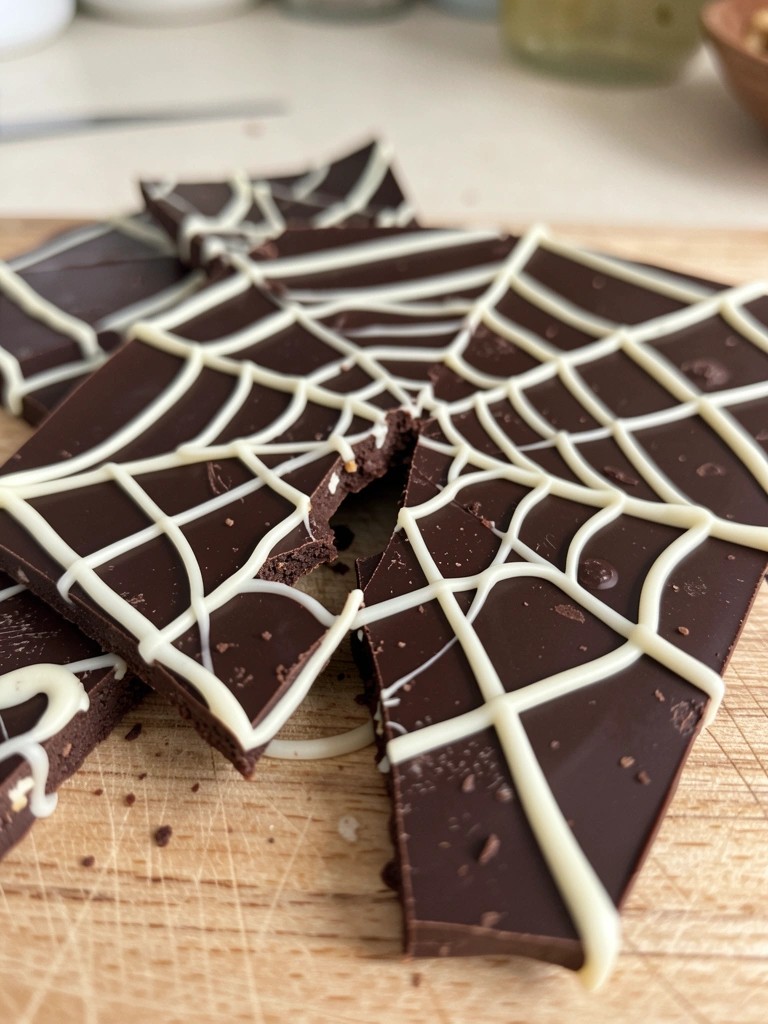
Serves 4 people.
Instructions
- Line a baking sheet with parchment paper and set it aside.
- Place the semisweet chocolate chips and coconut oil in a microwave-safe bowl. Heat in 30-second bursts, stirring after each, until fully melted and smooth.
- Pour the melted chocolate onto the parchment and spread it into a thin, even rectangle about 8 by 10 inches.
- Place the white chocolate chips in a separate microwave-safe bowl. Heat in 20-second bursts, stirring after each, until melted and smooth.
- Spoon the white chocolate into a zip-top bag, snip off one corner, and pipe concentric circles over the dark chocolate. Use a toothpick to drag lines from the center outward to form a web pattern.
- Let the bark sit at room temperature until fully set, then break it into pieces by hand.
Extra Tips
Work with the white chocolate while the dark layer is still slightly soft so the web lines stay clean. Break the bark into irregular shards rather than neat squares to keep the spooky look. Store pieces in an airtight container at cool room temperature for up to three days. Course: Dessert Cuisine: American Equipment: Microwave-safe bowls, Baking sheet, Parchment paper, Zip-top bag, Toothpick
Mummy Pretzel Rods
These mummy pretzel rods make a quick Halloween snack that requires no baking and little hands-on time. They work well for last-minute party prep or an easy kitchen activity with kids.
The result is a crunchy pretzel stick coated in sweet white chocolate with a fun wrapped appearance and candy eyes on top.

Serves 4 people.
Ingredients
- 12 pretzel rods
- 1 cup white candy melts
- 24 small candy eyes
Instructions
- Line a baking sheet with parchment paper and arrange the pretzel rods in a single layer.
- Place the white candy melts in a microwave-safe bowl. Heat in 30-second intervals, stirring after each, until the candy melts are smooth and fully melted.
- Drizzle the melted candy melts over the pretzel rods using a spoon or piping bag in a zigzag pattern to create the look of mummy bandages.
- Press two candy eyes onto each pretzel rod while the chocolate is still soft.
- Let the pretzel rods sit at room temperature until the chocolate hardens completely.
Extra Tips
Work with a few pretzels at a time when adding the eyes so the chocolate stays soft enough to hold them in place. Store any leftovers in an airtight container at room temperature for up to one week. Course: Snack Cuisine: American Equipment: Baking sheet, Parchment paper, Microwave-safe bowl
Witch Hat Brownie Bites
These Witch Hat Brownie Bites turn a basic brownie mix into a quick Halloween snack. They work well for last-minute party trays or a fun kitchen project with kids. The result is a fudgy chocolate bite topped with a pointed hat shape.
The texture stays moist in the center with a slight chew at the edges. A small amount of green frosting holds everything together and adds a pop of color without extra work.

Serves 4 people.
Ingredients
- 1 box (18 oz) brownie mix
- 2 eggs
- 1/2 cup vegetable oil
- 1/4 cup water
- 12 chocolate kiss candies
- 2 tablespoons green frosting
Instructions
- Preheat the oven to 350 degrees and line a mini muffin tin with paper liners.
- Combine the brownie mix, eggs, vegetable oil, and water in a mixing bowl until smooth.
- Spoon the batter into the prepared mini muffin cups, filling each about two-thirds full.
- Bake for 12 to 15 minutes until a toothpick comes out with a few moist crumbs.
- Remove the brownie bites from the oven and let them cool completely in the tin.
- Place a small dot of green frosting on top of each cooled brownie bite.
- Press one chocolate kiss candy onto the frosting on each bite to form the hat.
Extra Tips
Let the brownie bites cool fully before adding the kisses so the frosting sets and holds the shape. If the frosting feels too stiff, warm it slightly in the microwave for five seconds. Store leftovers in an airtight container at room temperature for up to two days. Course: Dessert Cuisine: American Equipment: Mixing Bowl, Mini Muffin Tin, Oven
Candy Corn Fudge Squares
Candy corn fudge squares offer a quick no-bake option that fits right into busy Halloween schedules. The white chocolate base stays creamy while the candy corn adds chewy texture and bright color throughout each piece. They come together fast and slice cleanly once chilled.
These squares suit last-minute gatherings or after-school snacks. They deliver familiar sweet flavors with a playful Halloween touch that needs little decoration.

Serves 4 people.
Ingredients
- 1 cup white chocolate chips
- 1/2 cup sweetened condensed milk
- 2 tablespoons unsalted butter
- 1 teaspoon vanilla extract
- Pinch of salt
- 3/4 cup candy corn, chopped and divided
Instructions
- Line a small square baking pan with parchment paper for easy removal later.
- Combine the white chocolate chips, sweetened condensed milk, and butter in a saucepan over low heat.
- Stir the mixture constantly until the chocolate melts and the ingredients form a smooth, thick base.
- Remove the pan from heat and stir in the vanilla extract, salt, and half of the chopped candy corn until evenly distributed.
- Spread the mixture into the prepared pan and press the remaining candy corn pieces gently across the top.
- Refrigerate the fudge for at least one hour until it firms completely, then cut into squares.
Extra Tips
Chop the candy corn into smaller bits before mixing so the pieces stay suspended in the fudge instead of sinking. If the white chocolate starts to seize during melting, lower the heat further and stir more slowly. Store leftovers in an airtight container in the fridge to keep the texture firm. Course: Dessert Cuisine: American Equipment: Saucepan, Mixing Bowl, Square Baking Pan
Monster Cookie Dough Dip
This dip turns the classic monster cookie flavors into a no-bake treat that comes together in minutes. It works well for last-minute Halloween parties, movie nights, or when you need something sweet without turning on the oven. The result tastes like edible cookie dough but stays light enough for dipping.
The texture stays thick and creamy with chewy oats and pops of chocolate and candy. It feels festive without extra steps, and the colorful mix makes it stand out on a snack table.

Serves 4 people.
Ingredients
- 4 oz cream cheese, softened
- 1/4 cup creamy peanut butter
- 1/4 cup brown sugar
- 1/2 teaspoon vanilla extract
- 1/2 cup quick oats
- 1/4 cup mini chocolate chips
- 1/4 cup M&M’s candies
- Candy eyes for garnish
Instructions
- Place the softened cream cheese and peanut butter in a mixing bowl. Beat them together until smooth and fully combined.
- Add the brown sugar and vanilla extract. Mix again until the sugar dissolves and the mixture looks creamy.
- Stir in the quick oats and mini chocolate chips until they are evenly spread throughout the dip.
- Fold in the M&M’s candies gently to avoid breaking them.
- Transfer the dip to a serving bowl and press candy eyes on top for a monster look.
Extra Tips
Chill the dip for 15 minutes if you want a firmer texture for scooping. Serve it with pretzel sticks or apple slices to balance the sweetness. Leftovers keep in the fridge for two days in a covered container. Course: Dessert Cuisine: American Equipment: Mixing Bowl, Electric Mixer
Black Cat Oreo Balls
These Oreo balls turn a simple cookie and cream cheese mix into a fun Halloween treat with a black chocolate coating and candy eyes. They come together fast with no baking required, making them handy for last-minute parties or school events. The inside stays creamy and rich while the outside sets into a smooth, slightly crisp shell.

Serves 4 people.
Ingredients
- 12 Oreo cookies
- 4 ounces cream cheese, softened
- 8 ounces black candy melts
- 16 candy eyes
Instructions
- Place the Oreo cookies in a zip-top bag and crush them into fine crumbs with a rolling pin.
- Transfer the crumbs to a mixing bowl and add the softened cream cheese. Stir until the mixture forms a thick, even dough.
- Scoop out portions and roll them into 8 smooth balls. Place the balls on a parchment-lined baking sheet and chill for 15 minutes.
- Melt the black candy melts in a microwave-safe bowl in 30-second bursts, stirring between each until smooth.
- Dip each chilled ball into the melted candy melts using a fork, letting excess drip off, then return it to the baking sheet.
- Immediately press two candy eyes onto each ball before the coating sets.
Extra Tips
Chill the balls longer if your kitchen is warm so they hold their shape during dipping. Use a toothpick to add tiny dots of extra melted candy melts if you want to create whiskers after the eyes are set. Store leftovers in an airtight container in the fridge for up to three days. Course: Dessert Cuisine: American Equipment: Mixing bowl, Baking sheet, Microwave-safe bowl
Spooky Popcorn Mix
This popcorn mix comes together in minutes and makes a good choice for last-minute Halloween parties or movie nights. It balances sweet candy with salty crunch in every handful.
The light popcorn base lets the chocolate drizzle and chewy candy corn stand out without much effort. Kids and adults both reach for it at gatherings.

Serves 4 people.
Ingredients
- 1 bag microwave popcorn (about 10 cups popped)
- 1 cup candy corn
- 1/2 cup pretzel pieces
- 1/2 cup chocolate chips
- 2 tablespoons Halloween sprinkles
- 1/4 teaspoon sea salt
Instructions
- Pop the microwave popcorn according to the package directions and pour it into a large bowl. Remove any unpopped kernels.
- Place the chocolate chips in a microwave-safe bowl and heat in 20-second bursts, stirring between each, until fully melted.
- Drizzle the melted chocolate over the popcorn and toss gently to coat most pieces.
- Add the candy corn, pretzel pieces, sea salt, and Halloween sprinkles. Toss again until everything is evenly distributed.
Extra Tips
Let the chocolate set for a few minutes before serving so the mix stays less sticky. Swap the sprinkles for crushed sandwich cookies if you want a darker look. Store leftovers in an airtight container at room temperature for up to two days. Course: Snack Cuisine: American Equipment: Microwave, Large Bowl, Microwave-safe Bowl
Pumpkin Patch Dirt Cups
These no-bake cups bring a fun Halloween twist to classic dirt pudding. They come together quickly with pantry staples and make a great activity for kids or a last-minute party treat. The result is creamy chocolate pudding layered with crunchy cookie crumbs and finished with candy pumpkins on top.
The texture combines smooth pudding with a sandy cookie layer that mimics garden dirt. Each serving stays light enough for dessert after a meal but still feels festive.

Serves 4 people.
Ingredients
- 1 package (3.9 oz) instant chocolate pudding mix
- 2 cups cold milk
- 20 chocolate sandwich cookies
- 1 container (8 oz) whipped topping, thawed
- 12 small candy pumpkins
Instructions
- Pour the cold milk into a mixing bowl and add the instant chocolate pudding mix. Whisk for two minutes until the mixture thickens.
- Place the chocolate sandwich cookies in a zip-top bag and crush them with a rolling pin until they form fine crumbs.
- Spoon a layer of pudding into the bottom of four clear cups. Add a layer of cookie crumbs on top. Repeat the layers once more.
- Finish each cup with a dollop of whipped topping. Press three candy pumpkins gently into the topping on each cup to create the pumpkin patch look.
Extra Tips
Crush the cookies just before assembling so they stay crisp. Clear plastic cups show the layers best. If you make these ahead, cover and refrigerate for up to four hours; add the candy pumpkins right before serving so they do not sink. Course: Dessert Cuisine: American Equipment: Mixing bowl, Whisk, Rolling pin, Clear cups
Bat Wing Chocolate Pretzels
These chocolate-coated pretzels give a fun bat wing shape that fits right into a quick Halloween spread. They come together with basic pantry items and look festive without much effort. The result is a crisp pretzel base with a smooth chocolate shell and a bit of crunch from the topping.
They work well for last-minute party trays or after-school snacks during the holiday week. The flavor stays balanced with sweet chocolate against the salty pretzel, and the texture stays light and snappy once set.

Serves 4 people.
Ingredients
- 12 pretzel twists
- 1 cup semi-sweet chocolate chips
- 1 tablespoon coconut oil
- 2 tablespoons black sanding sugar
- 8 candy eyeballs
Instructions
- Line a baking sheet with parchment paper and set it aside.
- Place the chocolate chips and coconut oil in a microwave-safe bowl. Heat in 30-second bursts, stirring after each, until the mixture is smooth and fully melted.
- Dip each pretzel twist into the melted chocolate, turning to coat both sides evenly. Let excess chocolate drip back into the bowl.
- Place the coated pretzels on the prepared baking sheet. While the chocolate is still soft, sprinkle black sanding sugar over the top of each piece and press two candy eyeballs into the center.
- Let the pretzels sit at room temperature until the chocolate firms up completely.
Extra Tips
Work in small batches when dipping so the chocolate stays at the right consistency. If the sanding sugar does not stick well, add it right after dipping before the surface sets. Store leftovers in an airtight container at room temperature for up to two days to keep the pretzels crisp. Course: Snack Cuisine: American Equipment: Microwave-safe bowl, Baking sheet, Parchment paper
Halloween Sprinkle Rice Krispie Squares
These Halloween Sprinkle Rice Krispie Squares deliver a fast, no-bake treat that fits right into busy October days. Kids and adults both enjoy the mix of crispy cereal, gooey marshmallow, and bright sprinkles scattered throughout each square.

Serves 4 people.
Ingredients
- 3 tablespoons butter
- 4 cups mini marshmallows
- 6 cups Rice Krispies cereal
- 1/4 cup Halloween sprinkles
- 2 tablespoons Halloween sprinkles
Instructions
- Melt the butter in a large saucepan over medium heat.
- Add the mini marshmallows and stir until they are fully melted and smooth.
- Remove the pan from the heat. Stir in the Rice Krispies cereal until evenly coated.
- Add the 1/4 cup Halloween sprinkles and fold gently to distribute them without crushing.
- Press the mixture firmly into an 8-inch square pan lined with parchment paper.
- Sprinkle the remaining 2 tablespoons of Halloween sprinkles over the top and press lightly to help them stick.
- Let the squares cool at room temperature for 30 minutes, then cut into four pieces.
Extra Tips
Press the warm mixture firmly into the pan so the squares hold together once cooled. If the sprinkles start to bleed color, fold them in quickly and stop stirring. Store leftovers in an airtight container at room temperature for up to two days to keep the cereal crisp. Course: Dessert Cuisine: American Equipment: Large saucepan, Mixing spoon, 8-inch square pan, Parchment paper
Orange Creamsicle Jello Cups
These cups give you the bright citrus taste of a creamsicle in a fun, jiggly form that comes together with almost no effort. They work well for last-minute Halloween gatherings or after-school snacks because the prep is quick and the chilling does most of the work.
The finished treat has a smooth orange base with a light creamy swirl that tastes like vanilla ice cream on a stick. Kids and adults both reach for them, and the clear cups show off the cheerful color.

Serves 4 people.
Ingredients
- 1 package (3 oz) orange gelatin
- 1 cup boiling water
- 1 cup cold water
- 1/2 teaspoon vanilla extract
- 8 ounces whipped topping
- 4 clear cups
Instructions
- Pour the orange gelatin into a mixing bowl and add the boiling water. Stir until the gelatin is fully dissolved.
- Add the cold water and vanilla extract to the bowl. Stir until the mixture is smooth and evenly combined.
- Let the mixture cool for about 10 minutes, then gently fold in the whipped topping until no large streaks remain.
- Divide the mixture evenly among the four clear cups.
- Place the cups in the refrigerator and chill for at least two hours, or until the jello is set.
Extra Tips
Fold the whipped topping in gently so the mixture stays light and creamy rather than deflating. If you want a stronger orange flavor, swap the cold water for cold orange juice. These cups keep well in the fridge for up to two days if you cover them with plastic wrap. Course: Dessert Cuisine: American Equipment: Mixing Bowl, Whisk, Refrigerator
Skull-Shaped Shortbread Bites
These skull-shaped shortbread bites bring a quick spooky element to any Halloween gathering. They use simple ingredients you likely have on hand and require little hands-on time. The cookies bake up with a buttery flavor and a light, crumbly texture that holds its shape well.
They work well as a last-minute addition to a party table or as an afternoon project with kids. The neutral taste pairs easily with coffee or milk.

Serves 4 people.
Ingredients
- 1 cup all-purpose flour
- ½ cup unsalted butter, softened
- ¼ cup granulated sugar
- ½ teaspoon vanilla extract
- ¼ teaspoon salt
- 2 tablespoons powdered sugar
Instructions
- Preheat the oven to 350 degrees and line a baking sheet with parchment paper.
- In a mixing bowl, cream the softened butter and granulated sugar until smooth.
- Stir in the vanilla extract.
- Add the flour and salt to the bowl and mix until a soft dough forms.
- Roll the dough out on a lightly floured surface to about ¼ inch thick.
- Use a small skull-shaped cookie cutter to cut out shapes and place them on the prepared baking sheet.
- Bake until the edges turn lightly golden.
- Remove from the oven and let the bites cool completely on the sheet.
- Dust the cooled bites with powdered sugar before serving.
Extra Tips
Chill the dough for 15 minutes before rolling if it feels too soft to hold clean skull outlines. Store any leftovers in an airtight container at room temperature for up to three days. Course: Dessert Cuisine: American Equipment: Mixing Bowl, Baking Sheet, Skull-shaped cookie cutter