


Baking cookies with kids for Halloween does not have to be complicated. These recipes use basic ingredients and steps that work in a regular kitchen. You will find options that let children help with mixing and decorating. Each idea includes practical tips to keep the process manageable. The designs focus on shapes and colors that are easy for small hands.
Helpful Tips Before You Start
A bit of planning keeps the decorating session fun and organized for kids.
Set Up Individual Stations
Place each child at their own spot with a small plate of cookies, a few icing colors, and their own set of sprinkles. This cuts down on reaching and spills.
Choose No-Bake or Quick-Bake Bases
Use store-bought sugar cookies or slice-and-bake dough so the focus stays on decorating instead of long baking times.
Keep Cleanup Supplies Close
Set out a bowl of wet wipes and a trash bin within arm’s reach. Kids can clean their hands between colors without leaving the table.
Offer Simple Tools They Can Handle
Provide small spoons for spreading icing and squeeze bottles filled with thin royal icing. These are easier for small hands than piping bags.
Let Them Work at Their Own Pace
Give kids a mix of cookie shapes and let them pick their own designs. Avoid correcting their choices so the activity stays relaxed.
Spiced Pumpkin Sugar Cookies
These spiced pumpkin sugar cookies add a cozy twist to Halloween baking with their soft centers and gentle spice blend. Kids enjoy cutting the dough into festive shapes and decorating them with icing and sprinkles afterward.
The pumpkin keeps the cookies tender while the cinnamon, nutmeg, and ginger give just enough warmth without overpowering young palates.

Serves 4 people.
Ingredients
- 1 1/2 cups all-purpose flour
- 1/2 cup pumpkin puree
- 1/2 cup granulated sugar
- 1/4 cup unsalted butter, softened
- 1 large egg
- 1 teaspoon vanilla extract
- 1 teaspoon baking powder
- 1/2 teaspoon ground cinnamon
- 1/4 teaspoon ground nutmeg
- 1/4 teaspoon ground ginger
- 1/4 teaspoon salt
Instructions
- Preheat the oven to 350°F and line a baking sheet with parchment paper.
- In a medium bowl, whisk together the flour, baking powder, cinnamon, nutmeg, ginger, and salt.
- In a separate bowl, beat the softened butter and sugar until light and fluffy.
- Add the pumpkin puree, egg, and vanilla extract to the butter mixture and stir until smooth.
- Gradually mix the dry ingredients into the wet ingredients until a soft dough forms.
- Roll the dough out on a lightly floured surface to about 1/4 inch thick.
- Cut the dough into Halloween shapes using cookie cutters and place the shapes on the prepared baking sheet.
- Bake for 10 to 12 minutes until the edges are lightly golden.
- Let the cookies cool on the baking sheet for 5 minutes before moving them to a wire rack to cool completely.
Extra Tips
Chill the dough for 30 minutes if it feels too soft to roll cleanly. The pumpkin flavor pairs well with simple orange or green icing for Halloween designs, and the cookies stay soft for several days when stored in an airtight container at room temperature. Course: Dessert Cuisine: American Equipment: Mixing Bowls, Baking Sheet, Rolling Pin, Cookie Cutters
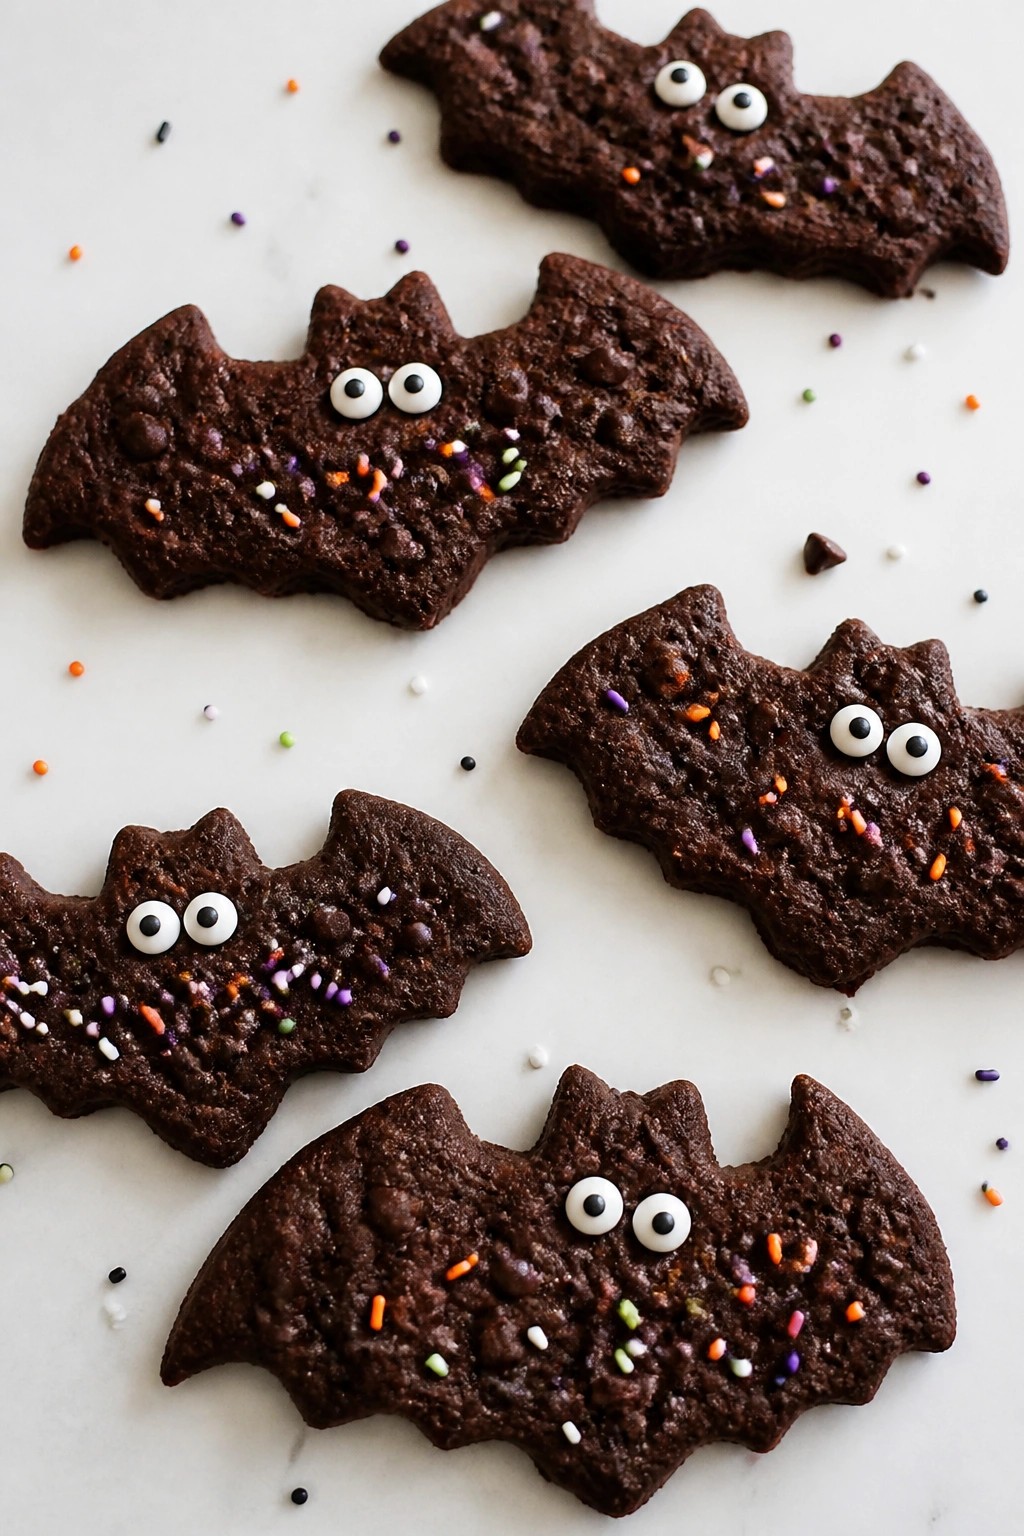
Double Chocolate Bat Cookies
Double chocolate bat cookies make a fun choice for Halloween baking with kids. They fit well for an afternoon activity or a party treat where children can cut and decorate their own bats.
The cookies offer a rich chocolate flavor with a soft, slightly chewy texture from the cocoa and chips. Kids enjoy pressing candy eyes and sprinkles onto the finished bats for a playful look.
Serves 4 people.
Ingredients
- 1 cup all-purpose flour
- 1/2 cup cocoa powder
- 1/2 cup butter, softened
- 1/2 cup sugar
- 1 egg
- 1 teaspoon vanilla extract
- 1/2 teaspoon baking soda
- 1/4 teaspoon salt
- 3/4 cup chocolate chips
- 1/4 cup candy eyes
- Assorted sprinkles
Instructions
- Preheat the oven to 350 degrees and line a baking sheet with parchment paper.
- Stir together the flour, cocoa powder, baking soda, and salt in a bowl.
- Cream the butter and sugar until smooth, then mix in the egg and vanilla extract.
- Add the dry ingredients to the wet mixture and combine until a dough forms.
- Stir in 1/2 cup of the chocolate chips.
- Roll the dough to about 1/4 inch thick on a lightly floured surface.
- Cut out bat shapes with a cookie cutter and place them on the baking sheet.
- Bake for 8 to 10 minutes until the edges are set.
- Let the cookies cool completely on the sheet.
- Melt the remaining 1/4 cup chocolate chips and use it to attach the candy eyes and sprinkles.
Extra Tips
Chill the dough for 20 minutes before rolling if it feels too soft to hold bat shapes. The melted chocolate chips work well as edible glue for the candy eyes and sprinkles without adding extra ingredients. Course: Dessert Cuisine: American Equipment: Mixing Bowl, Baking Sheet, Parchment Paper, Rolling Pin, Cookie Cutter
Gingerbread Haunted House Cookies
These gingerbread haunted house cookies give kids a hands-on way to create their own spooky treats. The spiced dough holds its shape well during baking, which makes it easy to cut out house outlines and add details later. The warm ginger and molasses flavor pairs nicely with sweet icing and simple candy decorations.
The cookies turn out crisp on the edges with a slightly chewy center. They work well for a Halloween party activity or a quiet afternoon project at home.

Serves 4 people.
Ingredients
- 2 cups all-purpose flour
- 1 teaspoon ground ginger
- 1 teaspoon ground cinnamon
- 1/2 teaspoon baking soda
- 1/4 teaspoon salt
- 1/2 cup unsalted butter, softened
- 1/2 cup brown sugar
- 1/4 cup molasses
- 1 large egg
- 1 cup powdered sugar
- 2 tablespoons milk
- Black food coloring
- 1/2 cup assorted candies such as candy corn and chocolate pieces
Instructions
- Preheat the oven to 350 degrees and line a baking sheet with parchment paper.
- In a mixing bowl, whisk together the flour, ginger, cinnamon, baking soda, and salt.
- In a separate bowl, beat the butter and brown sugar until light. Add the molasses and egg, then mix until smooth.
- Stir the dry ingredients into the wet mixture until a dough forms. Divide the dough in half and roll each portion to 1/4-inch thickness on a lightly floured surface.
- Cut the dough into house shapes using cookie cutters. Place the shapes on the prepared baking sheet.
- Bake for 8 to 10 minutes until the edges are firm. Let the cookies cool completely on the sheet.
- In a small bowl, stir the powdered sugar with milk until smooth. Add black food coloring to reach the desired shade.
- Pipe the icing onto the cooled cookies to outline windows and doors. Press candies onto the wet icing to finish the haunted house designs.
Extra Tips
Roll the dough evenly so the houses bake at the same rate and hold their shape for decorating. If the icing feels too thick, add a few drops of milk. Store finished cookies in an airtight container at room temperature for up to three days. Course: Dessert Cuisine: American Equipment: Mixing Bowls, Baking Sheet, Rolling Pin, Cookie Cutters
Vanilla Bean Ghost Cutouts
These cutout cookies bring a gentle vanilla bean flavor to classic sugar cookie dough. The finished cookies have a soft, slightly crisp edge that holds up well to icing and kid-led decorating. They work nicely for an afternoon Halloween activity or a simple treat to send to school.
This recipe serves 4 people. – 1 1/2 cups all-purpose flour – 1/2 cup unsalted butter, softened – 1/2 cup granulated sugar – 1 large egg – 1 vanilla bean, seeds scraped – 1 teaspoon baking powder – 1/4 teaspoon salt – 1 cup powdered sugar – 2 tablespoons milk – Black candy eyes or sprinkles
### Instructions 1. Cream the softened butter and granulated sugar in a mixing bowl until light. Add the egg and vanilla bean seeds and mix until combined. 2. Whisk the flour, baking powder, and salt in a separate bowl. Gradually stir the dry mixture into the wet ingredients until a soft dough forms. 3. Shape the dough into a disk, wrap it, and chill for 30 minutes. 4. Heat the oven to 350°F and line a baking sheet with parchment. Roll the dough to 1/4-inch thickness on a lightly floured surface. 5. Cut the dough into ghost shapes with a cookie cutter and place the cutouts on the prepared sheet. Bake for 10 to 12 minutes until the edges are lightly golden. Cool completely on a wire rack. 6. Stir the powdered sugar and milk together until smooth. Spread the icing over the cooled ghosts and add black candy eyes or sprinkles while the icing is still wet.
### Extra Tips Chill the cutouts for 10 minutes before baking if the dough feels soft after rolling. The icing sets firm enough to stack once dry, so the cookies travel well in a lunchbox or treat bag. For a milder vanilla taste, use half the seeds from the bean and save the rest for another batch.

Serves 4 people.
Instructions
- Cream the softened butter and granulated sugar in a mixing bowl until light. Add the egg and vanilla bean seeds and mix until combined.
- Whisk the flour, baking powder, and salt in a separate bowl. Gradually stir the dry mixture into the wet ingredients until a soft dough forms.
- Shape the dough into a disk, wrap it, and chill for 30 minutes.
- Heat the oven to 350°F and line a baking sheet with parchment. Roll the dough to 1/4-inch thickness on a lightly floured surface.
- Cut the dough into ghost shapes with a cookie cutter and place the cutouts on the prepared sheet. Bake for 10 to 12 minutes until the edges are lightly golden. Cool completely on a wire rack.
- Stir the powdered sugar and milk together until smooth. Spread the icing over the cooled ghosts and add black candy eyes or sprinkles while the icing is still wet.
Extra Tips
Chill the cutouts for 10 minutes before baking if the dough feels soft after rolling. The icing sets firm enough to stack once dry, so the cookies travel well in a lunchbox or treat bag. For a milder vanilla taste, use half the seeds from the bean and save the rest for another batch.
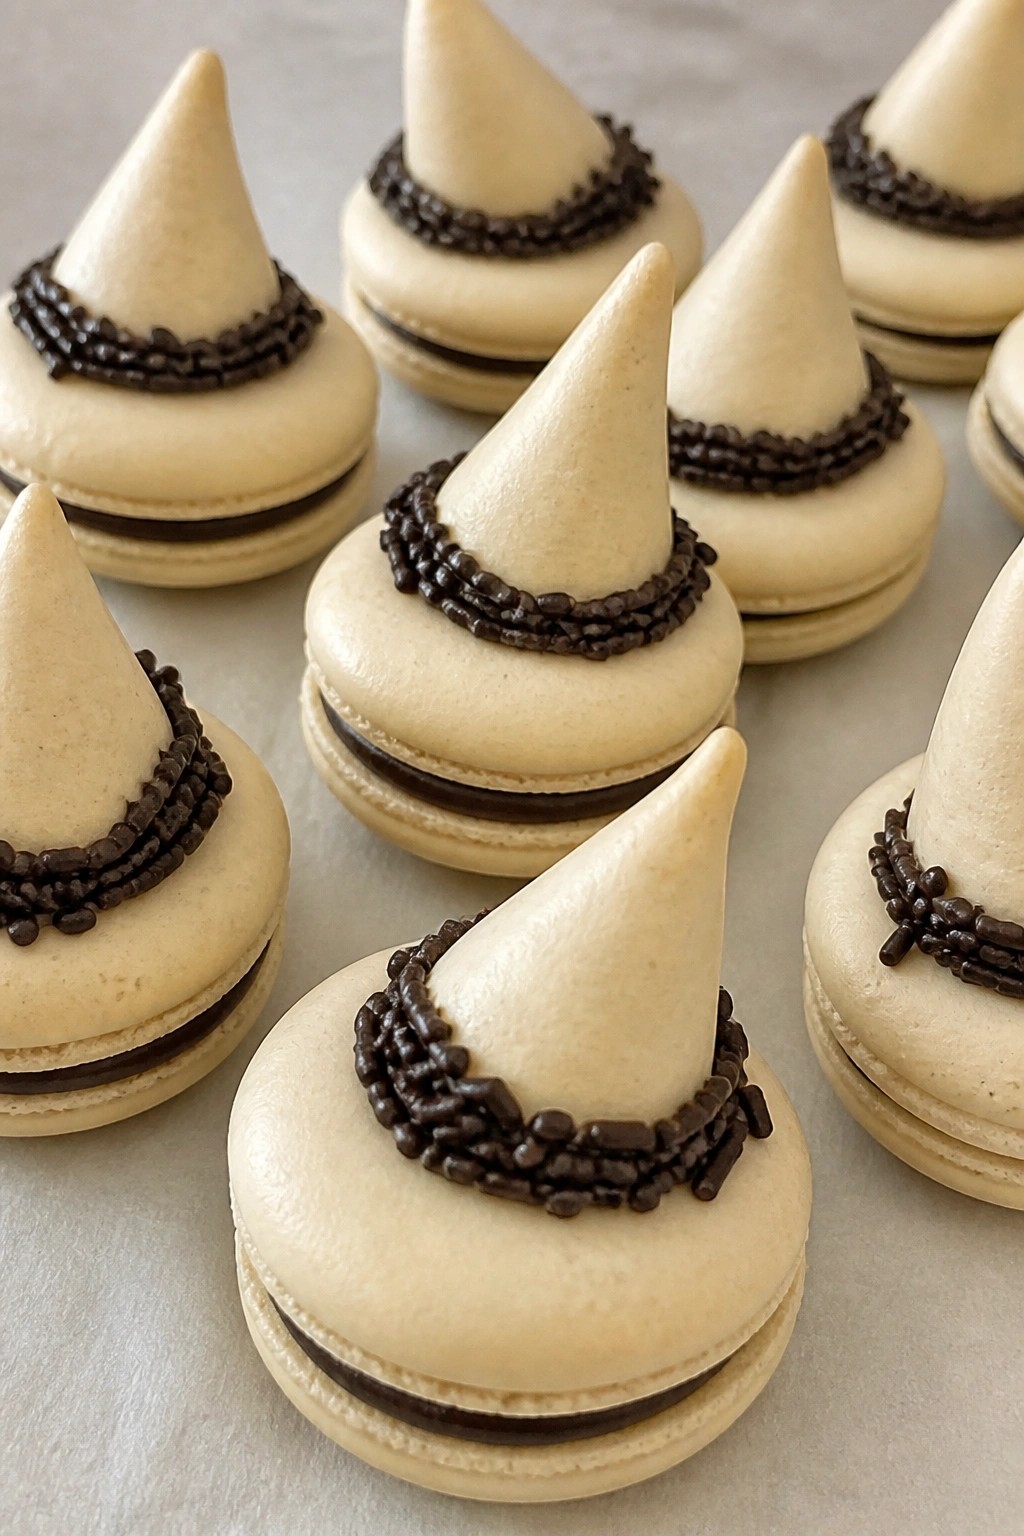
Almond Witch Hat Macarons
These macarons give kids a simple way to create witch hat shapes for Halloween. The almond shells bake up crisp on the outside with a soft center, and a chocolate filling adds a rich contrast that holds the decorations in place. They suit an afternoon baking session before a party or school event.
The mild almond flavor keeps the cookies from tasting too sweet, so children can focus on the fun of adding hat details with basic toppings.
Serves 4 people.
Ingredients
- 100g almond flour
- 100g powdered sugar
- 2 large egg whites
- 50g granulated sugar
- 1 tsp almond extract
- 100g dark chocolate chips
- Black sprinkles
Instructions
- Preheat the oven to 300°F and line two baking sheets with parchment paper.
- Sift the almond flour and powdered sugar together into a bowl and set aside.
- In a separate bowl, beat the egg whites until foamy, then slowly add the granulated sugar while beating until stiff peaks form.
- Fold the almond flour mixture and almond extract into the egg whites until the batter flows smoothly off the spatula.
- Pipe the batter into small circles on the prepared sheets to form the hat brims.
- Bake for 15 minutes, then let the shells cool completely on the sheets.
- Melt the dark chocolate chips in a microwave-safe bowl, stirring until smooth.
- Spread a thin layer of melted chocolate on the flat side of half the shells and sandwich with the remaining shells.
- Use any remaining chocolate to attach black sprinkles as the pointed hat tops.
Extra Tips
Pipe the shells slightly thicker on one side if you want an easier base for the sprinkle hat point. Melt the chocolate in short bursts to avoid overheating, and work quickly once it is smooth so the sprinkles stick before it sets. Store finished macarons in an airtight container at room temperature for up to two days. Course: Dessert Cuisine: French Equipment: Mixing bowls, Electric mixer, Piping bag, Baking sheets
Lemon Zest Mummy Shortbread
These lemon zest mummy shortbread cookies bring a bright citrus note to Halloween baking. Kids can help roll the dough and add the icing bandages, making it a good choice for an afternoon activity before trick-or-treating. The cookies bake up crisp at the edges with a tender center and carry a clean lemon flavor that pairs well with the sweet white icing.
The mummy design keeps the decoration simple. Horizontal lines of icing create the bandage look, and a pair of chocolate chip eyes finishes each cookie. The shortbread holds its shape during baking, so the rectangles stay neat for decorating.

Serves 4 people.
Ingredients
- 1 cup all-purpose flour
- 1/2 cup unsalted butter, softened
- 1/4 cup granulated sugar
- Zest of 1 lemon
- 1/4 teaspoon salt
- 1 cup powdered sugar
- 2 tablespoons milk
- 8 mini chocolate chips
Instructions
- Heat the oven to 350 degrees and line a baking sheet with parchment paper.
- In a mixing bowl, beat the softened butter and granulated sugar until smooth.
- Stir in the lemon zest and salt.
- Add the flour and mix until a soft dough forms.
- Roll the dough to 1/4-inch thickness on a lightly floured surface.
- Cut the dough into 8 rectangles and place them on the baking sheet.
- Bake for 12 to 14 minutes until the edges turn light golden.
- Let the cookies cool completely on the baking sheet.
- Mix the powdered sugar and milk in a small bowl until smooth.
- Spoon the icing into a piping bag or zip-top bag with one corner snipped.
- Pipe horizontal lines across each cookie to resemble bandages.
- Press two mini chocolate chips onto each cookie for eyes.
Extra Tips
Use room-temperature butter so the dough comes together without extra liquid. If the icing feels too thick, add milk one drop at a time until it flows easily from the bag. Store cooled cookies in an airtight container at room temperature for up to three days. The lemon flavor stays bright and the icing sets firm, so the mummies travel well in lunch boxes or treat bags. Course: Dessert Cuisine: American Equipment: Mixing Bowl, Baking Sheet, Piping Bag
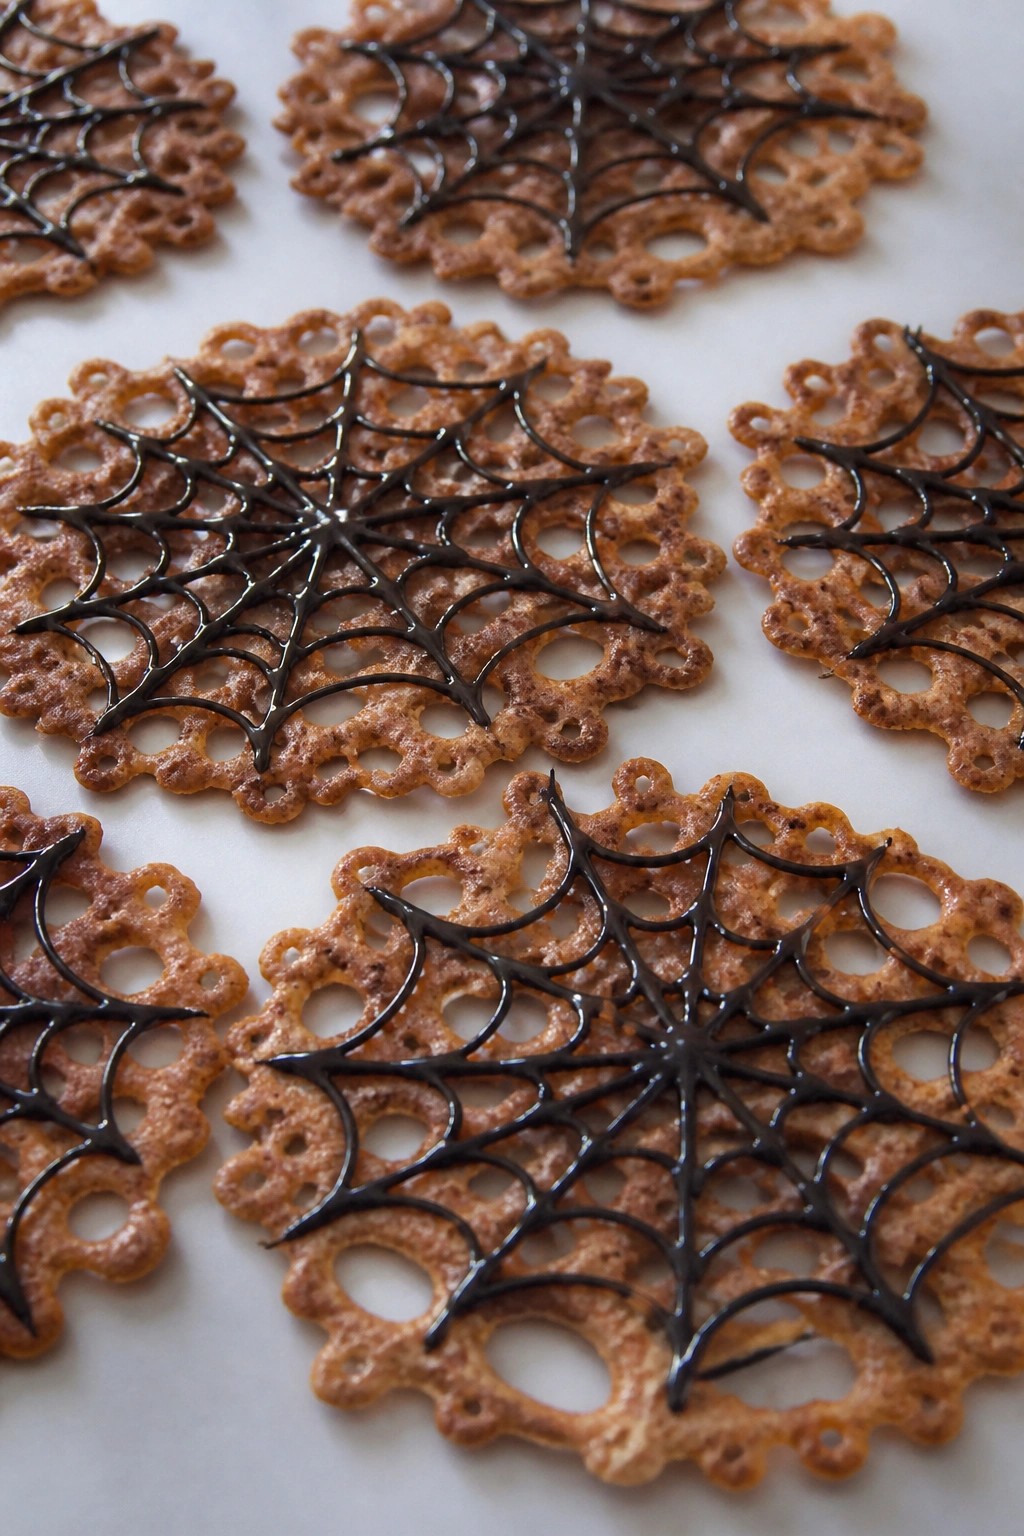
Cinnamon Spiderweb Lace Cookies
These cinnamon spiderweb lace cookies offer a light, crispy treat that fits right into a Halloween cookie decorating session. The thin edges create a natural web-like base, while the cinnamon adds a warm note that kids recognize from other fall snacks.
The recipe keeps the process simple so young helpers can focus on the fun part of piping spiderweb designs. Once baked, the cookies stay delicate enough for easy icing work without much risk of breakage.
Serves 4 people.
Ingredients
- 4 tablespoons unsalted butter
- 1/4 cup packed brown sugar
- 2 tablespoons light corn syrup
- 1/3 cup all-purpose flour
- 1 teaspoon ground cinnamon
- 1/4 teaspoon vanilla extract
- 1/2 cup powdered sugar
- 1 to 2 tablespoons milk
- Black gel food coloring
Instructions
- Preheat the oven to 350 degrees and line a baking sheet with parchment paper.
- In a small saucepan, melt the butter with the brown sugar and corn syrup over medium heat, stirring until smooth.
- Remove the pan from heat and stir in the flour, cinnamon, and vanilla extract until the mixture forms a thin batter.
- Drop teaspoon-sized amounts of batter onto the prepared baking sheet, spacing them well apart to allow spreading.
- Bake for 8 to 10 minutes until the edges turn golden and lacy.
- Let the cookies cool completely on the baking sheet before moving them.
- In a small bowl, mix the powdered sugar with enough milk to reach a pipeable consistency, then stir in black gel food coloring.
- Transfer the icing to a piping bag fitted with a small tip and pipe spiderweb patterns on each cooled cookie.
Extra Tips
Work quickly when piping because the thin cookies can crack if handled too much. Add the black coloring a little at a time so the icing stays smooth for fine web lines. Keep finished cookies in a single layer in an airtight container to maintain their crisp texture. Course: Dessert Cuisine: American Equipment: Saucepan, Baking Sheet, Piping Bag
Oatmeal Monster Paw Cookies
These oatmeal cookies turn into monster paws with a few simple steps. Kids can press chocolate chips into the dough to mark the pads and toes, making each cookie look ready for Halloween. The result is a chewy oatmeal base with sweet chocolate spots that hold up well during decorating sessions at home or parties.
The cookies work best when you need a hands-on activity that still produces something tasty to eat. Oats give a hearty chew while the chocolate adds just enough sweetness without overpowering the flavor.

Serves 4 people.
Ingredients
- 1 1/2 cups rolled oats
- 1 cup all-purpose flour
- 1/2 cup unsalted butter, softened
- 3/4 cup brown sugar
- 1 large egg
- 1 teaspoon vanilla extract
- 1/2 teaspoon baking soda
- 1/4 teaspoon salt
- 1/2 cup dark chocolate chips
Instructions
- Heat the oven to 350 degrees and line a baking sheet with parchment paper.
- In a mixing bowl, beat the softened butter and brown sugar together until smooth.
- Add the egg and vanilla extract, then stir until combined.
- In the same bowl, mix in the rolled oats, flour, baking soda, and salt until a dough forms.
- Scoop the dough into eight portions and place them on the baking sheet. Flatten each one slightly into a round paw shape.
- Press dark chocolate chips into the surface of each cookie to form the paw pads and toe marks.
- Bake for 10 to 12 minutes until the edges turn light golden.
- Let the cookies cool on the sheet for five minutes before moving them to a wire rack.
Extra Tips
Press the chocolate chips in firmly so they stay put once the cookies cool. If the dough feels too sticky to shape, chill it for ten minutes first. These cookies stay chewy for two days when stored in an airtight container at room temperature. Course: Dessert Cuisine: American Equipment: Mixing Bowl, Baking Sheet, Parchment Paper, Wire Rack
Red Velvet Skeleton Bones
These red velvet skeleton bones give kids a chance to shape dough into fun bone forms and add their own icing designs. The cookies bring a mild cocoa taste with a soft center and slight crunch at the edges. They suit Halloween parties or weekend baking sessions when you want a hands-on activity.
The bright red color shows through after baking and creates a good base for white icing details that highlight the skeleton theme. Kids can work together to pipe simple lines and shapes without needing advanced skills.

Serves 4 people.
Ingredients
- 2 cups all-purpose flour
- 1/4 cup unsweetened cocoa powder
- 1 teaspoon baking soda
- 1/2 teaspoon salt
- 1/2 cup unsalted butter, softened
- 1 cup granulated sugar
- 1 large egg
- 2 tablespoons red food coloring
- 1 teaspoon vanilla extract
- 1 cup powdered sugar
- 3 tablespoons milk
Instructions
- Heat the oven to 350 degrees and line a baking sheet with parchment paper.
- Stir together the flour, cocoa powder, baking soda, and salt in a medium bowl.
- In a large bowl, beat the butter and granulated sugar until light and fluffy.
- Add the egg, red food coloring, and vanilla extract to the butter mixture and mix well.
- Gradually combine the dry ingredients with the wet ingredients until a dough forms.
- Divide the dough into 8 equal pieces and roll each into a bone shape with rounded ends.
- Place the shaped cookies on the prepared baking sheet and bake for 10 to 12 minutes.
- Remove the cookies from the oven and let them cool completely on the sheet.
- Whisk the powdered sugar and milk in a small bowl until smooth.
- Transfer the icing to a piping bag or zip-top bag with one corner snipped and pipe skeleton designs on each cooled cookie.
Extra Tips
Roll the dough pieces slightly thicker in the middle for sturdier bone shapes that hold up during decorating. If the icing feels too thick for small hands, add a few drops more milk to loosen it. Store any leftover cookies in an airtight container at room temperature for up to three days. Course: Dessert Cuisine: American Equipment: Mixing Bowl, Baking Sheet, Piping Bag
Peanut Butter Pumpkin Patch Thumbprints
These thumbprint cookies combine a soft peanut butter base with a bright orange filling that looks like pumpkins sitting in a patch. Kids enjoy pressing the centers and adding simple green details on top. The result is a chewy cookie with a sweet, creamy bite that works well for an afternoon baking session or a classroom treat.
The peanut butter flavor stays front and center while the orange filling adds color and a mild sweetness. A few lines of green icing turn the finished cookies into a mini pumpkin patch without extra fuss.

Serves 4 people.
Ingredients
- ½ cup creamy peanut butter
- ¼ cup unsalted butter, softened
- ½ cup granulated sugar
- 1 large egg yolk
- ½ teaspoon vanilla extract
- 1 cup all-purpose flour
- ¼ teaspoon baking soda
- ¼ teaspoon salt
- ½ cup orange candy melts
- 2 tablespoons green icing
- 12 small green candy pieces
Instructions
- Preheat the oven to 350°F and line a baking sheet with parchment paper.
- In a mixing bowl, beat the peanut butter, softened butter, and sugar until smooth. Add the egg yolk and vanilla extract, then mix until combined.
- Stir in the flour, baking soda, and salt until a soft dough forms. Roll the dough into 12 small balls and place them on the baking sheet.
- Use your thumb or the back of a teaspoon to press a shallow indent into the center of each ball. Bake for 10 to 12 minutes until the edges are lightly golden. Let the cookies cool on the sheet for 5 minutes, then move them to a wire rack.
- Melt the orange candy melts in a microwave-safe bowl in 20-second bursts, stirring between each round. Spoon a small amount into each thumbprint to create the pumpkin centers. Pipe thin lines of green icing across the tops to look like vines. Place one green candy piece at the end of each line as a stem. Allow the icing and melts to set before serving.
Extra Tips
Let the cookies cool fully before adding the candy melts so the centers stay neat. If the dough feels sticky while rolling, chill it for 10 minutes. Store leftovers in an airtight container at room temperature for up to three days. Course: Dessert Cuisine: American Equipment: Mixing Bowl, Baking Sheet, Microwave
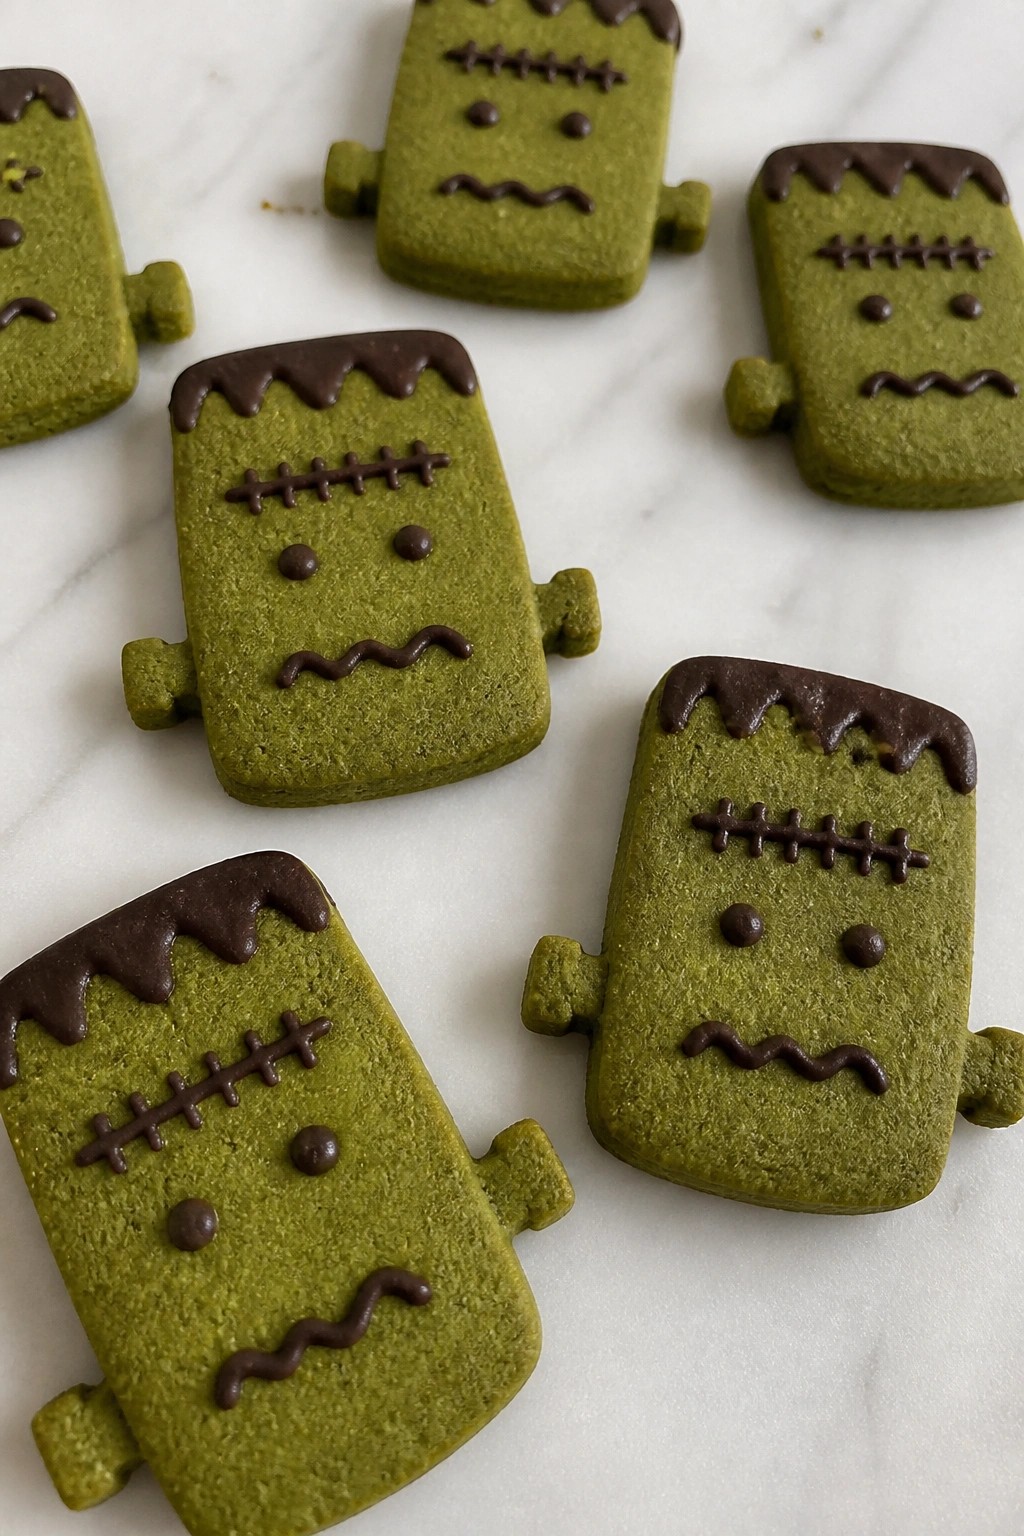
Matcha Green Frankenstein Cutouts
These matcha green cutouts give kids a fun base for creating their own Frankenstein faces at Halloween. The dough bakes into crisp edges with a soft center and carries a mild earthy note from the matcha that pairs well with sweet icing.
The natural green color stands out without extra dye, making the cookies easy to turn into monsters with simple decorations.
Serves 4 people.
Ingredients
- 1 1/2 cups all-purpose flour
- 1/2 cup unsalted butter, softened
- 1/2 cup granulated sugar
- 1 large egg
- 2 tablespoons matcha powder
- 1 teaspoon vanilla extract
- 1/2 teaspoon baking powder
- 1/4 teaspoon salt
Instructions
- Beat the softened butter and sugar together in a mixing bowl until light and fluffy.
- Add the egg and vanilla extract, then mix until fully combined.
- In a separate bowl, whisk the flour, matcha powder, baking powder, and salt.
- Gradually stir the dry mixture into the wet mixture until a smooth dough forms.
- Shape the dough into a disk, wrap it, and chill in the refrigerator for 30 minutes.
- Heat the oven to 350 degrees F and line a baking sheet with parchment paper.
- Roll the chilled dough to 1/4-inch thickness on a lightly floured surface.
- Cut out shapes with Frankenstein cookie cutters and place them on the baking sheet.
- Bake for 10 to 12 minutes until the edges are set. Cool on the sheet for 5 minutes before moving to a wire rack.
Extra Tips
Use a good-quality culinary matcha to keep the color bright and avoid bitterness. Once cooled, the cookies hold royal icing well for kids to add hair, scars, and bolts. Store leftovers in an airtight container at room temperature for up to five days. Course: Dessert Cuisine: American Equipment: Mixing Bowl, Baking Sheet, Rolling Pin, Cookie Cutters
Caramel Apple Scarecrow Cookies
These cookies bring caramel apple flavors to a simple Halloween treat that kids can decorate themselves. The soft base holds chewy bits of caramel and apple, while easy toppings turn each cookie into a scarecrow face.
The finished cookies taste sweet and slightly tangy with a hint of buttery caramel. They work well for an afternoon activity or as a party favor that travels easily.

Serves 4 people.
Ingredients
- 1 1/4 cups all-purpose flour
- 1/2 teaspoon baking powder
- 1/4 teaspoon salt
- 1/2 cup unsalted butter, softened
- 1/2 cup granulated sugar
- 1 large egg
- 1 teaspoon vanilla extract
- 1/2 cup caramel bits
- 1/3 cup chopped dried apples
- 1/4 cup caramel sauce
- 8 candy eyes
- 8 thin pretzel sticks
- 1/4 cup candy corn pieces
Instructions
- Preheat the oven to 350 degrees and line a baking sheet with parchment paper.
- Mix the flour, baking powder, and salt in a bowl. Set the dry mix aside.
- Beat the butter and sugar until light, then add the egg and vanilla. Stir until smooth.
- Add the dry mix to the wet ingredients and combine. Fold in the caramel bits and chopped dried apples.
- Scoop the dough into 8 portions and place them on the baking sheet. Bake for 10 to 12 minutes until the edges turn light golden. Cool the cookies completely on a rack.
- Drizzle caramel sauce over each cookie. Press two candy eyes near the top, add a pretzel stick on each side for arms, and arrange candy corn pieces to form a hat shape.
Extra Tips
Use a small spoon to control the caramel drizzle so it does not run off the edges. If the caramel sauce thickens, warm it briefly in the microwave for easier pouring. Store cooled cookies in a single layer inside an airtight container to keep the candy decorations from sticking. Course: Dessert Cuisine: American Equipment: Mixing Bowl, Baking Sheet, Oven
Black Cocoa Graveyard Cookies
These black cocoa graveyard cookies give kids a dark, dramatic base to turn into a mini Halloween scene. The deep chocolate flavor pairs well with simple decorations, and the cookies hold their shape after baking so little hands can add details without frustration.
They work well for an afternoon activity before a party or as a make-ahead treat for the week of Halloween. The texture stays crisp around the edges with a slightly tender center.
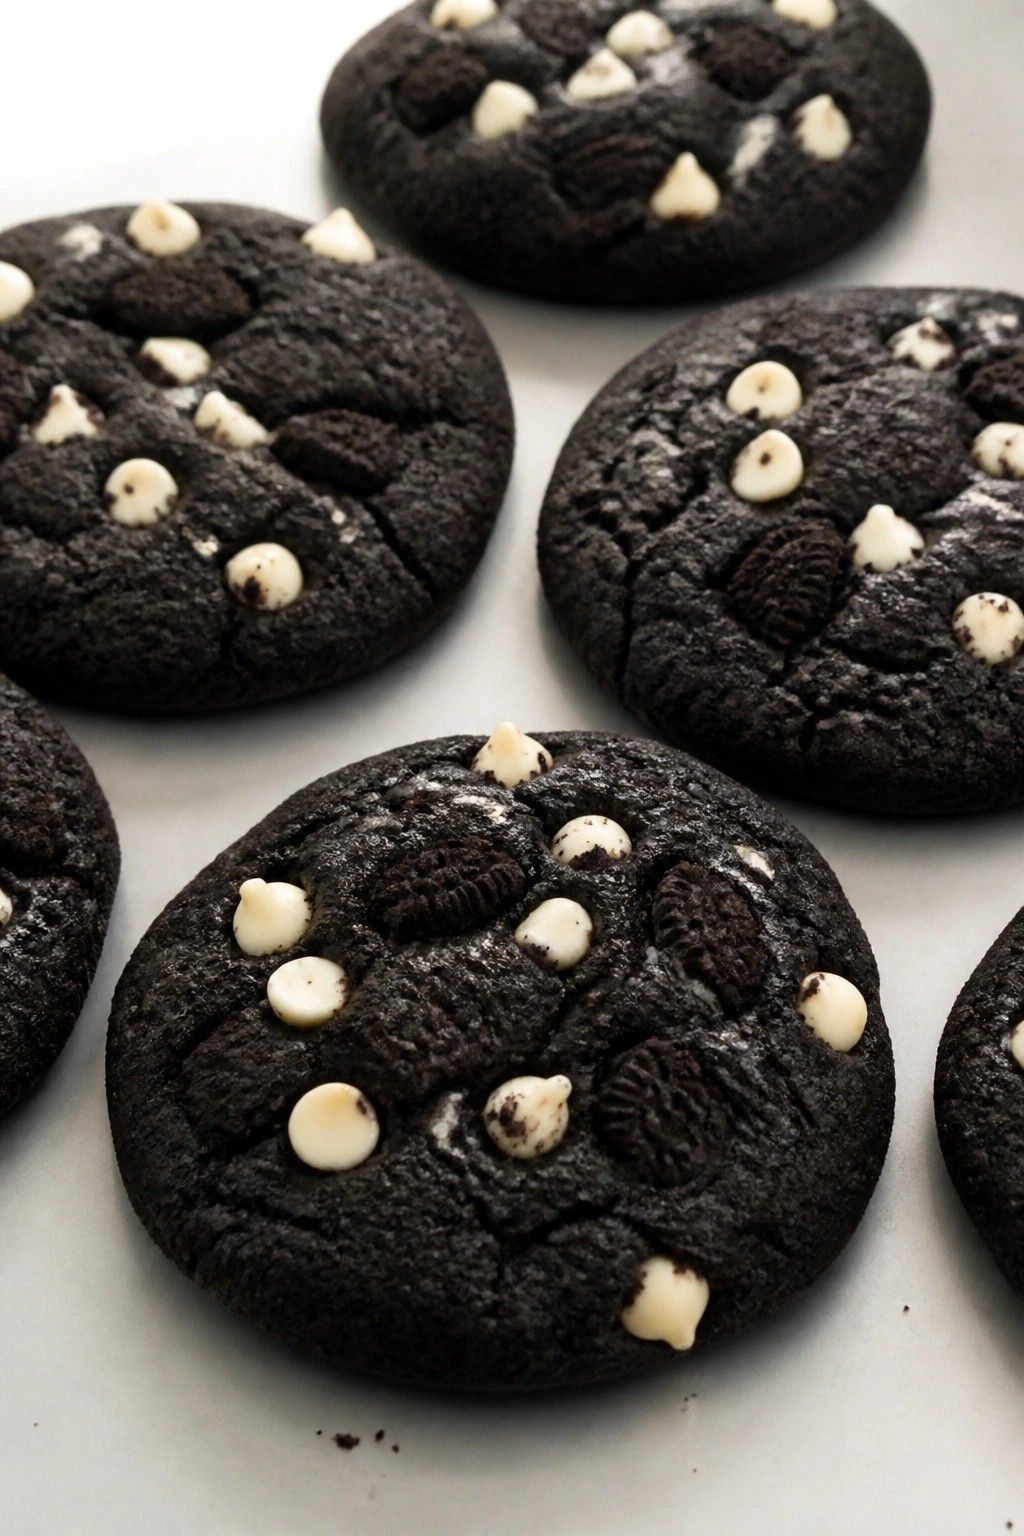
Serves 4 people.
Ingredients
- 1 cup all-purpose flour
- 1/2 cup black cocoa powder
- 1/2 teaspoon baking soda
- 1/4 teaspoon salt
- 1/2 cup unsalted butter, softened
- 3/4 cup sugar
- 1 large egg
- 1 teaspoon vanilla extract
- 1/2 cup crushed chocolate sandwich cookies
- 2 tablespoons white chocolate chips
Instructions
- Heat the oven to 350 degrees and line a baking sheet with parchment paper.
- Whisk the flour, black cocoa powder, baking soda, and salt in a bowl until evenly mixed.
- In a second bowl, beat the butter and sugar until light and fluffy, then add the egg and vanilla and mix until smooth.
- Stir the dry ingredients into the wet mixture until a dough forms.
- Scoop the dough into 8 portions and place them on the baking sheet, then press a few crushed chocolate sandwich cookies into the top of each cookie.
- Bake for 10 to 12 minutes until the edges are set, then let the cookies cool on the sheet for 5 minutes before moving them to a rack.
- Melt the white chocolate chips in a small bowl, spoon the melted chocolate into a zip-top bag, snip a tiny corner, and pipe simple tombstone shapes or letters on the cooled cookies.
Extra Tips
Press the crushed cookies into the dough right before baking so they stick without sinking. If the white chocolate sets too quickly while piping, warm the bag briefly in your hands. Store cooled cookies in an airtight container at room temperature for up to three days. Course: Dessert Cuisine: American Equipment: Mixing Bowl, Baking Sheet, Piping Bag