

Halloween parties for kids often call for snacks that are simple to prepare and easy to handle. Finger foods can cut down on cleanup while keeping things fun for little ones. This list shares 14 recipe ideas that rely on everyday ingredients and straightforward steps. Each one focuses on bites that children can pick up without extra utensils. You can use these for school events, family gatherings, or quick treats at home.
Helpful Tips Before You Start
These tips will help you prepare Halloween finger foods that stay simple and easy for kids to handle.
Pick sturdy bases
Use crackers, toast strips, or cucumber rounds that support toppings without falling apart. This keeps snacks from crumbling in small hands.
Keep portions small
Cut everything into two-bite sizes so kids can grab and eat without needing a plate or fork. Smaller pieces also reduce waste at parties.
Skip messy sauces
Choose dry toppings like cheese slices or cream cheese spreads instead of dips or glazes. Dry items travel better from tray to mouth.
Add quick shapes
Press cookie cutters into cheese or sandwiches for pumpkins or ghosts. The shapes add fun without extra steps or ingredients.
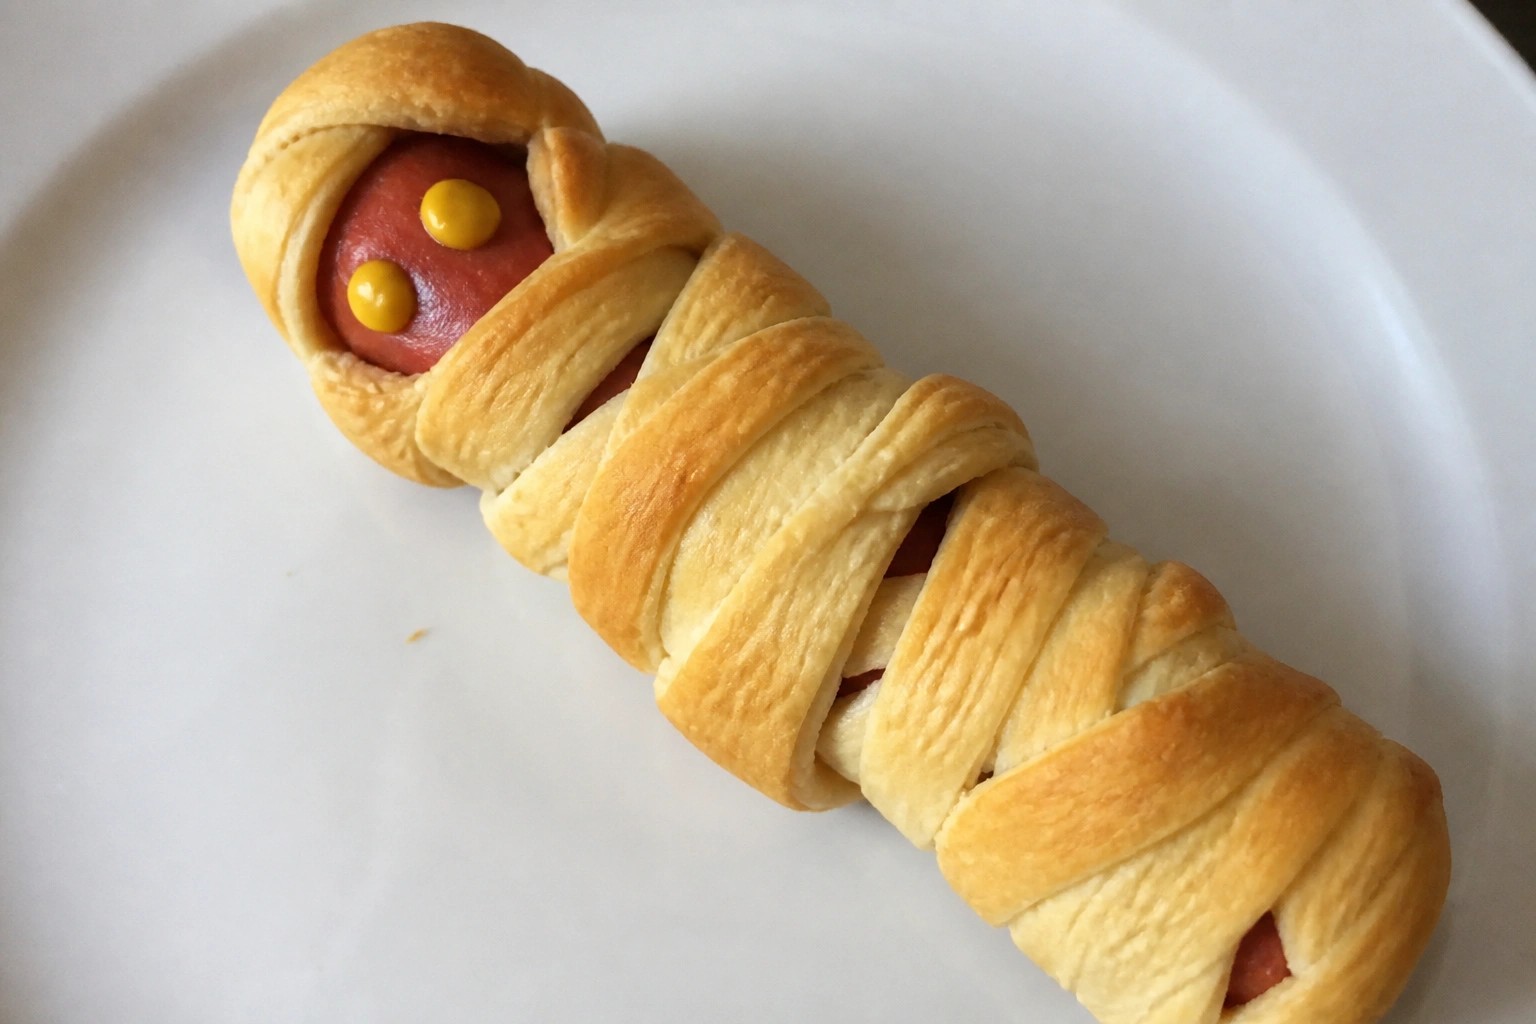
Mummy Hot Dogs
Mummy hot dogs give kids a playful twist on a familiar favorite. They work well for Halloween parties or quick after school snacks because they are simple to pick up and eat without much mess.
The flaky dough wraps around the hot dog to create a light crunch while the sausage stays juicy inside. Mild flavors keep the focus on the fun presentation.

Serves 4 people.
Ingredients
- 8 hot dogs
- 1 can (8 ounces) refrigerated crescent roll dough
- 2 tablespoons yellow mustard
Instructions
- Preheat the oven to 375 degrees F. Unroll the crescent roll dough on a clean surface.
- Cut the dough into thin strips about half an inch wide.
- Wrap the strips around each hot dog in a crisscross pattern to look like mummy bandages. Leave a small section near one end uncovered for the face.
- Place the wrapped hot dogs on a baking sheet with the uncovered section facing up.
- Bake for 12 to 15 minutes until the dough turns golden brown.
- Remove from the oven and let cool for a few minutes. Dot the mustard on the uncovered section to make eyes.
Extra Tips
Leave a clear space at the top of each hot dog when wrapping so the mustard eyes stand out. These taste best served warm right after baking. You can assemble them a few hours ahead and keep them covered in the fridge until ready to bake. Course: Appetizer Cuisine: American Equipment: Baking sheet
Spiderweb Mini Pizzas
These mini pizzas bring a simple Halloween twist to a kid favorite. English muffins make them easy to hold and eat without mess. The spiderweb design comes from sauce lines on melted cheese, giving a fun look while keeping the taste familiar with tomato and gooey mozzarella.
This version works well for parties or weeknight dinners when you want something quick and festive. The texture stays crisp on the edges with a soft, cheesy center.

Serves 4 people.
Ingredients
- 4 English muffins, split in half
- 1 cup pizza sauce, divided
- 2 cups shredded mozzarella cheese
- 8 black olives
Instructions
- Preheat the oven to 400 degrees F and line a baking sheet with parchment paper.
- Place the English muffin halves cut side up on the baking sheet.
- Spread 3/4 cup of the pizza sauce evenly over the muffin halves.
- Sprinkle the shredded mozzarella cheese over the sauce on each half.
- Spoon the remaining 1/4 cup pizza sauce into a small zip-top bag and snip off one corner.
- Pipe the sauce in three or four concentric circles on each pizza, then drag a toothpick from the center outward to form the web pattern.
- Slice the black olives in half and place one half in the center of each web as a spider body, adding thin slices around it for legs.
- Bake for 8 to 10 minutes until the cheese melts and the edges turn golden.
Extra Tips
Pipe the sauce slowly so the web lines stay thin and clear against the cheese. If the olives slide, press them gently into the cheese before baking. Leftovers reheat best in a toaster oven to keep the crust crisp. Course: Appetizer Cuisine: American Equipment: Baking Sheet, Oven, Zip-top bag
Cheese Witch Finger Breadsticks
These breadsticks turn regular dough into spooky witch fingers that kids can grab and eat without any mess. They work well for a Halloween party spread or an easy after-school snack when you want something themed but still simple to make.
The finished breadsticks have a soft, cheesy center with a lightly browned crust. Each one gets a mozzarella "bone" inside and an almond sliver for the nail, so the shape stays clear once baked.

Serves 4 people.
Ingredients
- 1 package (13.8 oz) refrigerated pizza crust
- 8 mozzarella string cheese sticks
- 2 tablespoons butter, melted
- 1/2 teaspoon garlic powder
- 1/4 cup grated Parmesan cheese
- 16 sliced almonds
Instructions
- Heat the oven to 400 degrees and line a baking sheet with parchment paper.
- Unroll the pizza crust on a lightly floured surface and cut it into 8 long strips.
- Place one mozzarella string cheese stick along each strip, then wrap the dough around the cheese and pinch the seams closed to form a finger shape.
- Use a knife to make two or three shallow cuts across the middle of each finger to create knuckle lines.
- Press one sliced almond onto the tip of each finger to make the fingernail.
- Brush the tops with melted butter and sprinkle with garlic powder and Parmesan cheese.
- Bake for 12 to 15 minutes until the dough is golden and the cheese inside is soft.
- Let the breadsticks cool for a few minutes before serving.
Extra Tips
Shape the dough a little longer than the cheese sticks so the ends stay sealed. If the almonds slide off during baking, press them in again right after the breadsticks come out of the oven while the surface is still soft. Course: Appetizer Cuisine: American Equipment: Baking sheet, Parchment paper, Pastry brush
Eyeball Turkey Meatball Skewers
These skewers turn ground turkey meatballs into fun Halloween eyeballs that kids can grab and eat without fuss. They work well at parties or weeknight dinners because everything stays on the stick and the mild flavors appeal to young eaters. The meatballs stay tender inside with a light herb taste while the mozzarella and olive add a creamy and salty finish.

Serves 4 people.
Ingredients
- 1 pound ground turkey
- ½ cup plain breadcrumbs
- 1 large egg
- 1 clove garlic, minced
- 1 teaspoon dried oregano
- ½ teaspoon salt
- ¼ teaspoon black pepper
- 12 bocconcini mozzarella balls
- 12 black olives, halved
- 8 wooden skewers
Instructions
- Preheat the oven to 400°F and line a baking sheet with parchment paper.
- In a mixing bowl, combine the ground turkey, breadcrumbs, egg, minced garlic, oregano, salt, and black pepper. Mix until evenly blended.
- Shape the mixture into 12 meatballs and place them on the prepared baking sheet.
- Bake the meatballs for 18 minutes until cooked through and lightly browned.
- Remove the meatballs from the oven. Press one bocconcini mozzarella ball onto the top of each meatball, then add one olive half in the center to create the eyeball look.
- Thread three finished meatballs onto each wooden skewer and serve warm.
Extra Tips
Bake the meatballs ahead and keep them covered in the fridge, then add the cheese and olives right before skewering so they stay fresh. If you need a milder olive taste, use fewer halves or swap in a small slice of black olive on top instead. These skewers pair best with a simple bowl of marinara on the side for dipping. Course: Appetizer Cuisine: American Equipment: Mixing Bowl, Baking Sheet, Wooden Skewers
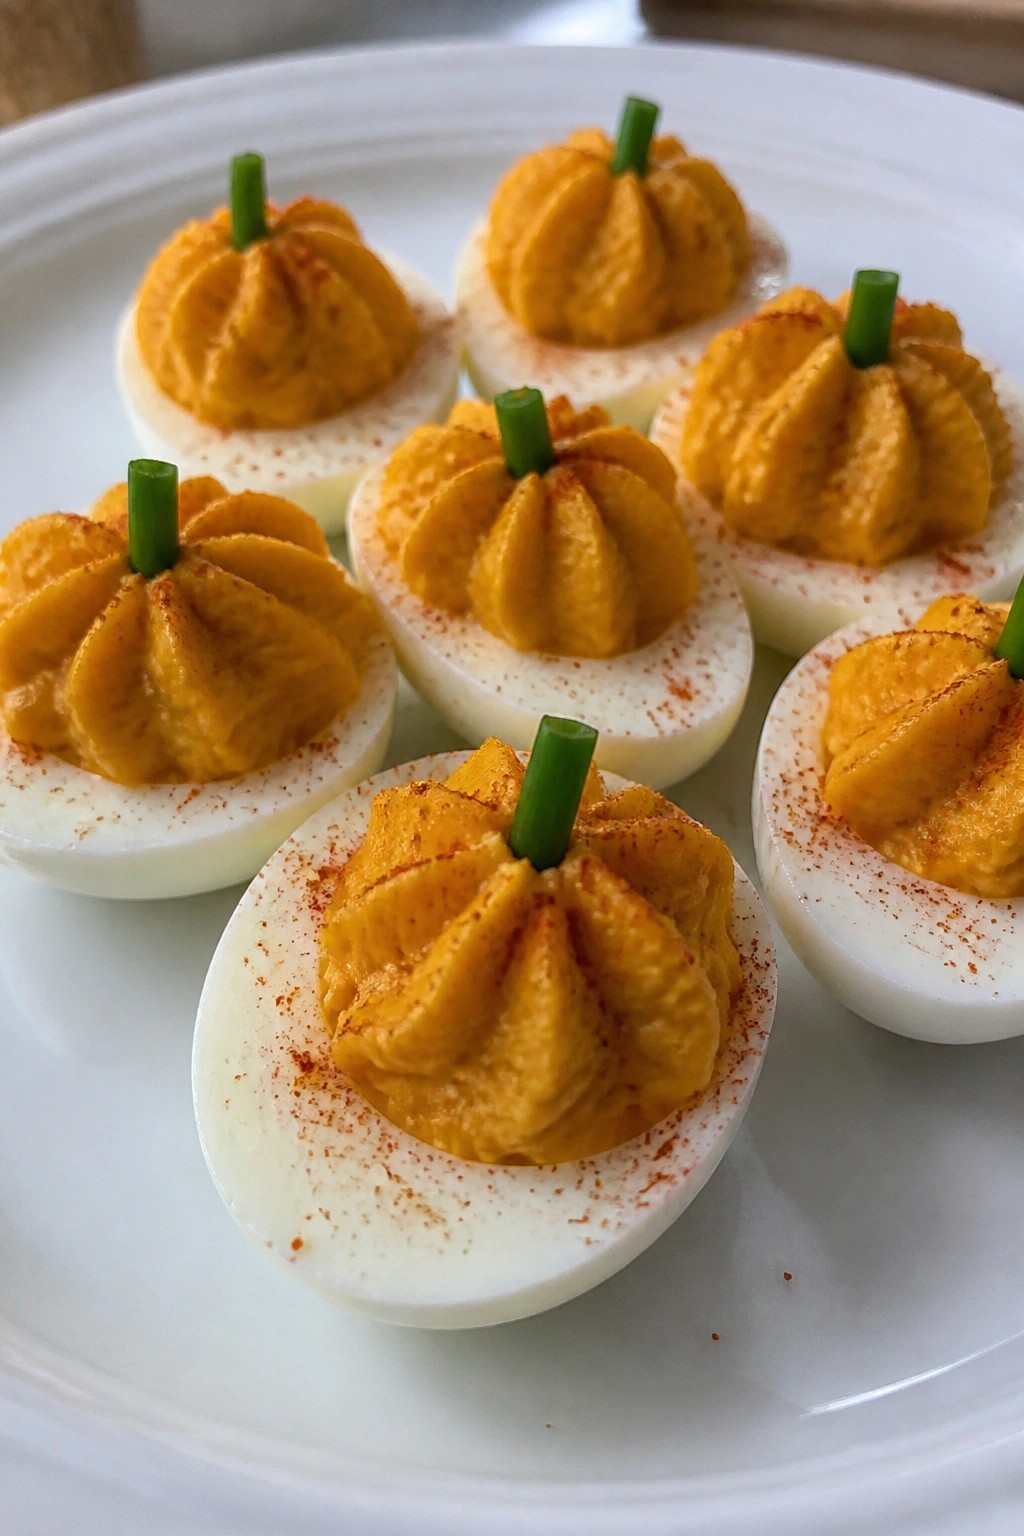
Pumpkin Deviled Eggs
These pumpkin deviled eggs give a simple snack a fun Halloween look. The orange filling stands out on a plate, and the small size makes them easy for kids to grab with their fingers.
The eggs stay creamy and mild. The pumpkin adds color and a light sweetness that pairs with the mustard without being too strong for young eaters.
Serves 4 people.
Ingredients
- 4 large eggs
- 3 tablespoons canned pumpkin puree
- 2 tablespoons mayonnaise
- 1 teaspoon yellow mustard
- 1/4 teaspoon salt
- 1/4 teaspoon black pepper
- Paprika, for garnish
- 4 green onion tops, cut into 1-inch pieces
Instructions
- Place the eggs in a pot and cover them with water. Bring the water to a boil, then turn off the heat and let the eggs sit for 12 minutes.
- Drain the hot water and run cold water over the eggs until they cool enough to handle. Peel off the shells.
- Slice each egg in half lengthwise and scoop the yolks into a mixing bowl. Set the whites aside on a plate.
- Add the pumpkin puree, mayonnaise, mustard, salt, and black pepper to the yolks. Mash and stir until the mixture is smooth.
- Spoon or pipe the filling back into the egg whites. Dust the tops lightly with paprika.
- Press one piece of green onion into the top of each filled egg to look like a stem.
Extra Tips
Make the eggs a few hours ahead and keep them covered in the fridge so the filling stays firm. If the pumpkin mixture seems too thick, stir in a small drop of water before filling the whites. The green onion pieces give a mild onion flavor that matches the creamy filling. Course: Appetizer Cuisine: American Equipment: Pot, Mixing Bowl, Knife
Bat Wing Chicken Tenders
These chicken tenders get their name from a simple dark marinade that turns the meat a deep color before breading and frying. Kids like the familiar crispy coating and mild flavor, and the shape makes them easy to pick up at parties or weeknight dinners.
The result is a crunchy outside with juicy meat inside. They work well as a main bite for Halloween gatherings or as an after-school snack that feels a little festive without extra work.

Serves 4 people.
Ingredients
- 1 pound chicken tenders
- 1/2 cup soy sauce
- 1 tablespoon olive oil
- 1 teaspoon garlic powder
- 1 cup plain breadcrumbs
- 1/2 teaspoon black pepper
- Vegetable oil for frying
Instructions
- Place the chicken tenders in a bowl and pour the soy sauce, olive oil, and garlic powder over them. Stir to coat evenly and let the mixture sit for 10 minutes.
- Place the breadcrumbs and black pepper in a shallow dish and stir to combine.
- Remove each tender from the marinade and press it into the breadcrumb mixture until fully coated on all sides.
- Heat 1/2 inch of vegetable oil in a large skillet over medium heat until shimmering.
- Add the coated tenders in a single layer and cook for 4 to 5 minutes per side until golden and cooked through.
- Transfer the cooked tenders to a paper-towel-lined plate to drain any excess oil before serving.
Extra Tips
Let the tenders rest a few minutes after frying so the coating stays crisp. If you want a milder color, shorten the marinade time to five minutes. Leftovers reheat well in a 350-degree oven for five minutes to restore crunch. Course: Appetizer Cuisine: American Equipment: Mixing bowl, Large skillet, Shallow dish
Ghostly Banana Pops with Chocolate Dip
These banana pops give kids a fun Halloween treat they can hold and eat without much mess. The white coating turns each banana into a simple ghost shape while the separate chocolate dip adds a rich contrast that feels like a special touch for the holiday.
The texture stays soft and creamy from the frozen banana against the crisp chocolate shell. It works well for parties or after-school snacks because everything can be prepared ahead and served straight from the freezer.

Serves 4 people.
Ingredients
- 4 ripe bananas
- 8 popsicle sticks
- 1 cup white chocolate chips
- 2 tablespoons coconut oil, divided
- 1/2 cup semisweet chocolate chips
- 16 mini chocolate chips
Instructions
- Peel the bananas and cut each one in half crosswise. Insert a popsicle stick into the cut end of each piece and place them on a parchment-lined baking sheet.
- Combine the white chocolate chips with 1 tablespoon of coconut oil in a microwave-safe bowl. Heat in 20-second bursts, stirring between each, until fully melted and smooth.
- Dip each banana pop into the melted white chocolate to coat the fruit. Return the pops to the baking sheet and immediately press two mini chocolate chips into the coating to form eyes on each ghost.
- Place the sheet in the freezer for at least 30 minutes so the coating sets firmly.
- In a clean microwave-safe bowl, melt the semisweet chocolate chips with the remaining tablespoon of coconut oil using the same method as before. Stir until glossy and pour into a small serving bowl.
Extra Tips
Freeze the pops on the sheet first so they do not touch and stick together. If the white chocolate thickens while you work, warm it for a few seconds to loosen it again. The semisweet chocolate dip stays fluid at room temperature for easy dunking. Course: Snack Cuisine: American Equipment: Baking sheet, Parchment paper, Microwave-safe bowls
Monster Mouth Apple Slices
These apple slices work well as a quick Halloween snack because they require no baking and come together in minutes. Kids enjoy the playful look of the open mouths while parents appreciate the fresh fruit base that balances the creamy and chewy add-ins.
The finished bites give a mix of crisp apple, smooth peanut butter, and soft marshmallow texture that holds up well on a party table.

Serves 4 people.
Ingredients
- 2 large apples
- 1/4 cup creamy peanut butter
- 1/2 cup mini marshmallows
Instructions
- Wash the apples and cut each one into 8 wedges, removing the core from every piece.
- Spread a thin layer of peanut butter on one cut side of 8 apple wedges.
- Press 4 to 6 mini marshmallows into the peanut butter on each wedge so they stand up like teeth.
- Arrange the finished wedges on a serving plate with the marshmallow side facing up.
Extra Tips
Choose firm apples so the wedges stay crisp after the peanut butter is added. If you need to prepare these ahead, keep the apple wedges in a bowl of lemon water until assembly to slow browning. Skip the top wedge so the mouths stay open and visible. Course: Snack Cuisine: American Equipment: Knife, Cutting board, Spoon
Skeleton Pretzel Bones with Cheese
These skeleton pretzel bones with cheese give kids a playful way to enjoy a classic snack at Halloween parties. The long pretzel rods stand in as bones while the warm cheese dip keeps everything easy to grab and eat with little mess. The result is a crunchy base against a smooth, savory cheese coating that holds up well on a snack table.
The flavor stays mild and familiar, so even picky eaters reach for seconds. It fits right into a spread of finger foods without needing plates or utensils.

Serves 4 people.
Ingredients
- 12 pretzel rods
- 2 cups shredded mozzarella cheese
- 1/2 cup milk
- 1 tablespoon butter
- 1/2 teaspoon salt
Instructions
- Place the shredded mozzarella cheese, milk, butter, and salt in a small saucepan.
- Heat the pan over medium-low heat while stirring often until the cheese melts into a smooth sauce.
- Remove the pan from the heat once the sauce reaches a pourable consistency.
- Arrange the pretzel rods on a serving plate.
- Pour the cheese sauce into a small bowl and set it beside the pretzels for dipping.
Extra Tips
Keep the cheese sauce warm in a small slow cooker on the lowest setting if the snack table will stay out for more than 30 minutes. Stir in a splash of extra milk if the sauce thickens while sitting. Swap mozzarella for mild cheddar if you want a slightly sharper flavor without changing the texture. Course: Appetizer Cuisine: American Equipment: Saucepan, Serving plate, Small bowl
Candy Corn Veggie Skewers
These skewers turn simple vegetables into a playful treat that fits right into a Halloween spread. Kids can grab one and eat it without any fuss, while the layered colors give a nod to classic candy corn. The result is a fresh, crunchy bite that feels light and fun.
They work well as an easy addition to a party table or an after-school snack. The mild vegetables pair nicely with a simple dip if you want one.

Serves 4 people.
Ingredients
- 12 cauliflower florets
- 12 carrot chunks
- 12 yellow bell pepper chunks
- 12 wooden skewers
Instructions
- Rinse the cauliflower florets, carrot chunks, and yellow bell pepper chunks under cool water and pat them dry with a clean towel.
- Slide one cauliflower floret onto each skewer near the bottom to create the white section.
- Add one carrot chunk above the cauliflower on each skewer to form the orange middle layer.
- Place one yellow bell pepper chunk at the top of each skewer to finish the yellow section.
- Repeat with the remaining pieces until all skewers are assembled.
- Arrange the skewers on a serving plate.
Extra Tips
Line up the vegetables tightly on the skewer so the colors stay distinct and the pieces do not slide. If a child prefers a milder flavor, serve the skewers with a small bowl of ranch on the side for dipping. These hold up best when made the same day and kept covered in the fridge until ready to serve. Course: Appetizer Cuisine: American Equipment: Wooden skewers, Cutting board, Knife
Frankenstein Brownie Bites
These brownie bites turn a simple chocolate treat into a fun Halloween snack that kids can grab and eat without any fuss. They work well for parties or after-school snacks because they stay neat in small hands and deliver a fudgy center with a sweet green coating on top.
The finished bites have a rich brownie base, a smooth candy layer, and a few crunchy accents from the pretzels. Kids enjoy the playful face details while parents appreciate how quick they come together with basic pantry items.

Serves 4 people.
Ingredients
- 8 prepared brownie bites
- 1 cup green candy melts
- 16 edible candy eyes
- 1/4 cup mini chocolate chips
- 8 small pretzel sticks
Instructions
- Place the green candy melts in a microwave-safe bowl and heat in 20-second bursts, stirring between each, until fully melted and smooth.
- Dip the top of each brownie bite into the melted candy or use a spoon to spread a thin layer across the surface.
- Press two candy eyes gently into the green coating on each bite while it is still soft.
- Add a few mini chocolate chips above the eyes to form hair and one or two below to suggest a mouth.
- Insert one pretzel stick into each side of the brownie bite to act as the neck bolts.
- Set the finished bites on a tray and let the candy coating firm up at room temperature before serving.
Extra Tips
Let the candy coating set completely before moving the bites into a container so the faces stay intact. If the candy thickens while you work, warm it for a few seconds to loosen it again. Store any leftovers in an airtight container at room temperature for up to two days. Course: Dessert Cuisine: American Equipment: Microwave-safe bowl, Spoon, Baking tray
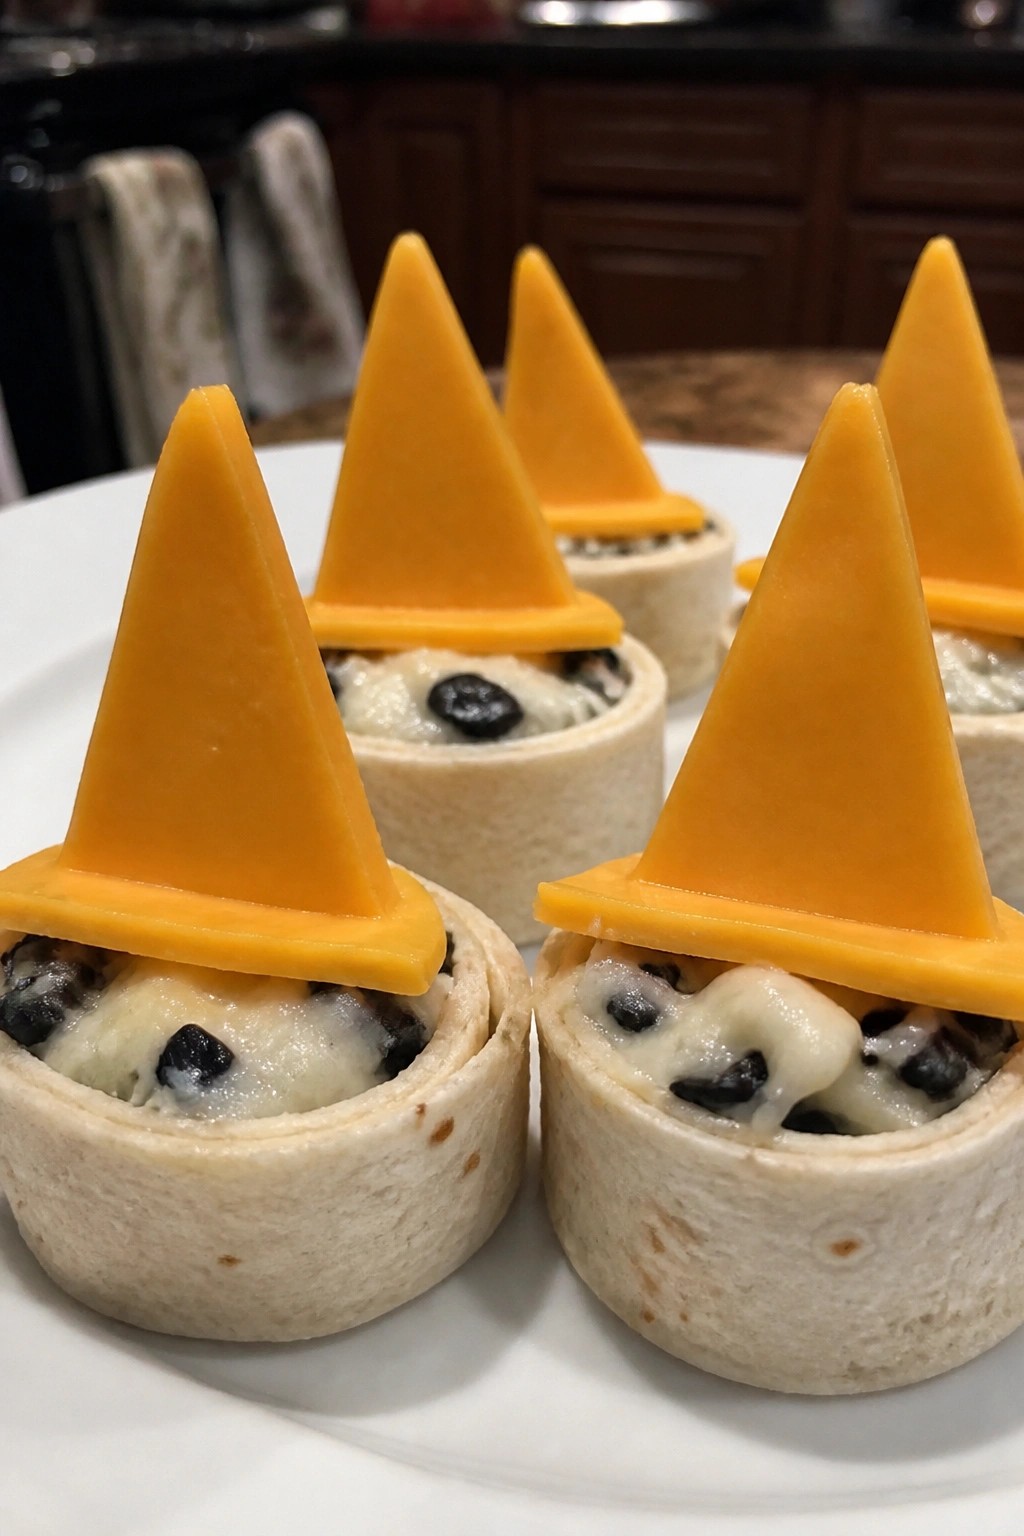
Witch Hat Tortilla Roll-Ups
These Witch Hat Tortilla Roll-Ups turn a basic tortilla snack into a fun Halloween treat. Kids can pick them up easily with one hand, and the shape adds a playful touch to any party table. The soft tortilla wraps around a creamy, savory filling that stays neat while eating.
The flavor comes from cream cheese mixed with salty olives and a light garlic note, finished with melted cheese inside and a simple cheddar hat on top.
Serves 4 people.
Ingredients
- 4 large flour tortillas
- 8 ounces cream cheese, softened
- ½ cup chopped black olives
- 1 teaspoon garlic powder
- 1 cup shredded mozzarella cheese
- 4 slices cheddar cheese
Instructions
- Place the softened cream cheese in a bowl and stir in the chopped black olives and garlic powder until evenly combined.
- Lay one flour tortilla flat and spread about one-quarter of the cream cheese mixture across the entire surface.
- Sprinkle one-quarter of the shredded mozzarella cheese over the cream cheese layer.
- Roll the tortilla tightly from one edge to the other, then repeat the process with the remaining tortillas.
- Slice each rolled tortilla into four even pieces and set them upright on a serving plate.
- Cut each cheddar slice into a triangle and place one triangle on top of each roll-up piece to form the witch hat.
Extra Tips
Cut the cheddar triangles right before serving so they stay neat on the roll-ups. If the cream cheese mixture feels too thick to spread, let it sit at room temperature for a few more minutes. These roll-ups hold up well if made a few hours ahead and kept covered in the fridge, though add the cheese hats just before guests arrive. Course: Appetizer Cuisine: American Equipment: Mixing bowl, Knife, Cutting board
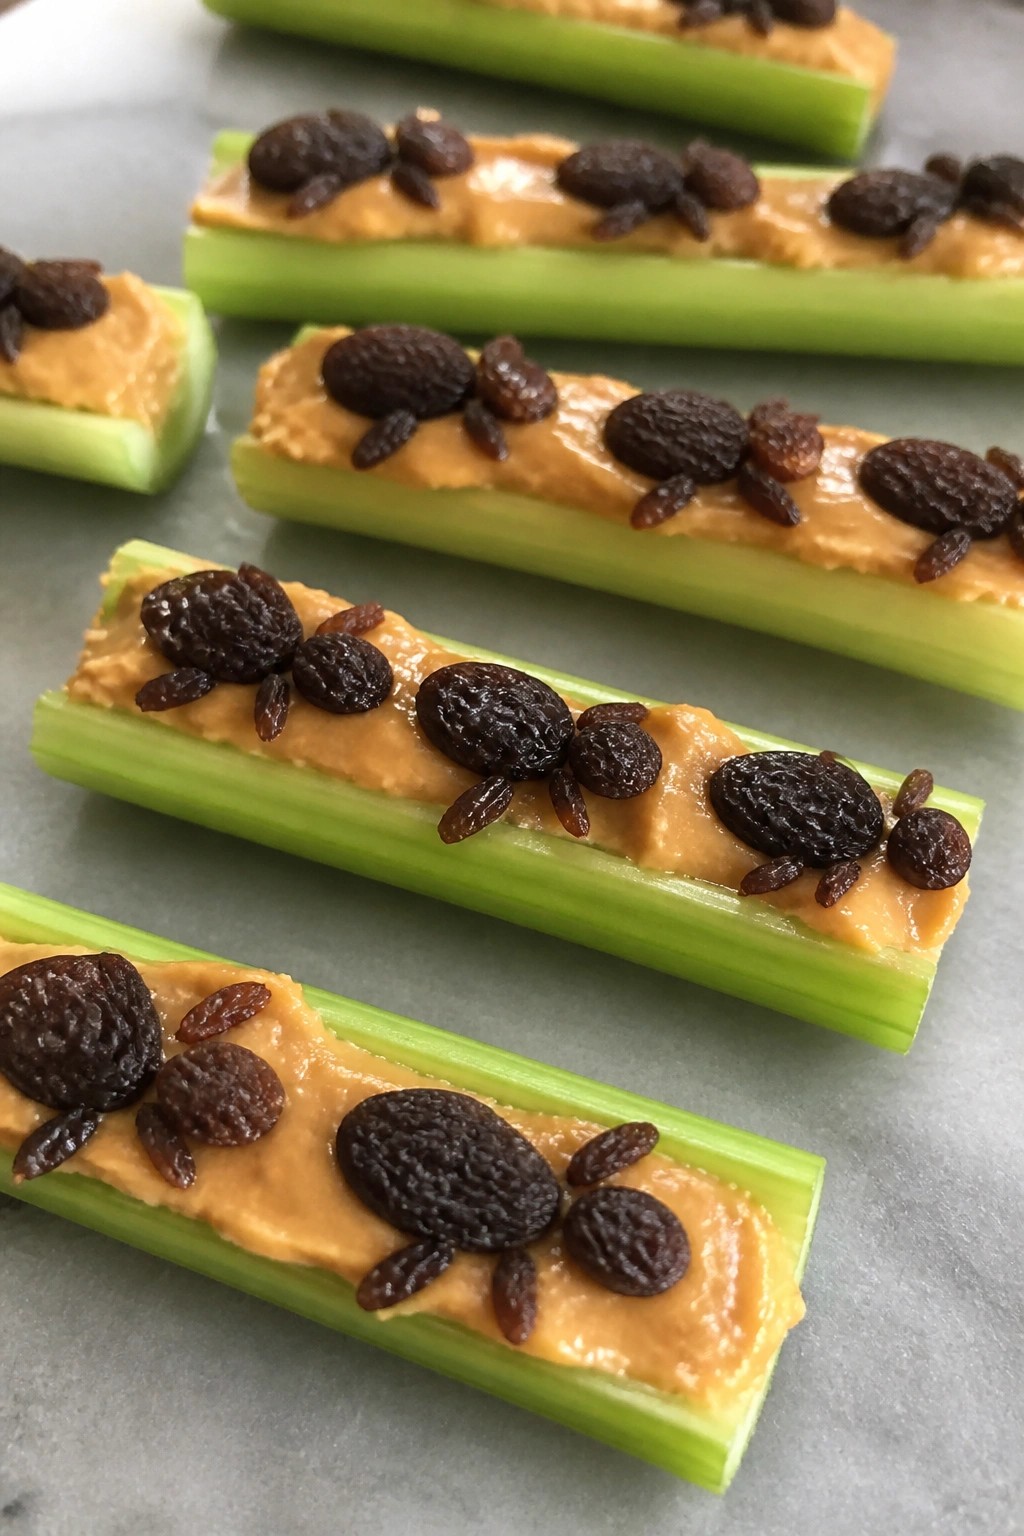
Creepy Crawler Ants on a Log
This version of ants on a log keeps the familiar crunch and creaminess kids enjoy while adding a playful Halloween twist. The raisins act as creepy crawlers marching across the peanut butter filled celery. It works well for parties or after school snacks because it requires no cooking and travels easily.
Serves 4 people.
Ingredients
- 4 large celery stalks, cut into 3 inch pieces (12 pieces total)
- 1/2 cup creamy peanut butter
- 1/4 cup raisins
Instructions
- Rinse the celery stalks under cool water and pat them dry with a clean towel.
- Cut each stalk into three equal pieces and arrange them on a serving plate with the curved side up.
- Use a butter knife or small spoon to fill the groove of each celery piece with peanut butter.
- Press three to five raisins into the peanut butter on each piece so they look like ants crawling along the log.
Extra Tips
Choose smaller raisins so they sit neatly without rolling off. If the peanut butter is too thick, stir in a teaspoon of honey to make spreading easier. These are best assembled right before serving to keep the celery crisp. Course: Snack Cuisine: American Equipment: Knife, Cutting board, Butter knife
Jack-o’-Lantern Stuffed Mini Peppers
These mini peppers get carved into jack-o’-lantern faces and filled with a mild cheese mixture that kids can grab and eat in one or two bites. They work well at Halloween parties or as an afternoon snack before trick-or-treating because they need no utensils and hold up on a platter.
The orange peppers give them a pumpkin look while the filling stays creamy against the crisp pepper shell. The flavor is simple and savory without being too strong for young eaters.

Serves 4 people.
Ingredients
- 12 mini orange bell peppers
- 8 oz cream cheese, softened
- 1 cup shredded cheddar cheese
- 1/2 tsp garlic powder
- 1/4 tsp salt
- 1/4 tsp black pepper
Instructions
- Slice the tops off each mini pepper and scoop out the seeds and membranes with a small spoon. Use a paring knife to cut simple jack-o’-lantern faces into one side of each pepper.
- Place the cream cheese in a mixing bowl and add the shredded cheddar cheese, garlic powder, salt, and black pepper. Stir until the mixture is smooth and evenly combined.
- Spoon the cheese filling into each carved pepper, pressing gently so the filling reaches the bottom without tearing the faces.
- Set the stuffed peppers on a serving plate with the carved sides facing up.
Extra Tips
Use room-temperature cream cheese so the filling mixes without lumps. Stuff the peppers no more than a few hours before serving to keep the shells crisp. Leftover peppers can be stored in a covered container in the fridge for one day. Course: Appetizer Cuisine: American Equipment: Mixing bowl, Paring knife, Spoon