


Halloween parties need snacks that kids will actually eat without much fuss. These recipes use simple ingredients and basic steps to create fun shapes and flavors. You can make most of them ahead of time for school events or family get-togethers. Each one focuses on tastes children already like while adding a light Halloween touch. The list includes both savory and sweet options to fit what you have on hand.
Helpful Tips Before You Start
These tips will help the appetizers turn out cute and appealing to kids without extra stress.
Recommended Products

Complete Halloween Craft Kit: includes 10pcs 50mm googly eyes and 5 rolls of gauze (4.8cm x 600cm); Easy to wrap and stick—create creepy, funny pumpkins in minutes for indoor or outdoor Halloween decorations

【25PCS Professional Pumpkin Carving Kit with Hammer】The package includes Hammer X 1, Pumpkin scooper X 1, Carving Knife X 1, Stainless Steel Carving Molds Tools X 22. The different specifications of craving molds will create over 1000 patterns interesting Halloween pumpkin designs.

HALLOWEEN THEMED PACKAGING: This festive bag contains 56 count Mini Cheese Balls, perfect for the Halloween season.
Involve Kids in Assembly
Let them place eyes or draw faces with cheese or veggies. Hands-on help makes them more likely to eat the finished snacks.
Use Cookie Cutters for Shapes
Keep a set of small cutters nearby for bread, cheese, or fruit. They create clean edges fast and keep designs simple.
Prep Components Ahead
Chop veggies, slice meats, and mix dips the day before. This leaves only quick assembly on the day you serve.
Make a Small Test Version First
Try one appetizer with your kids before making all thirteen. You can tweak flavors or skip items they reject.
Adorable Mummy Pigs in a Blanket
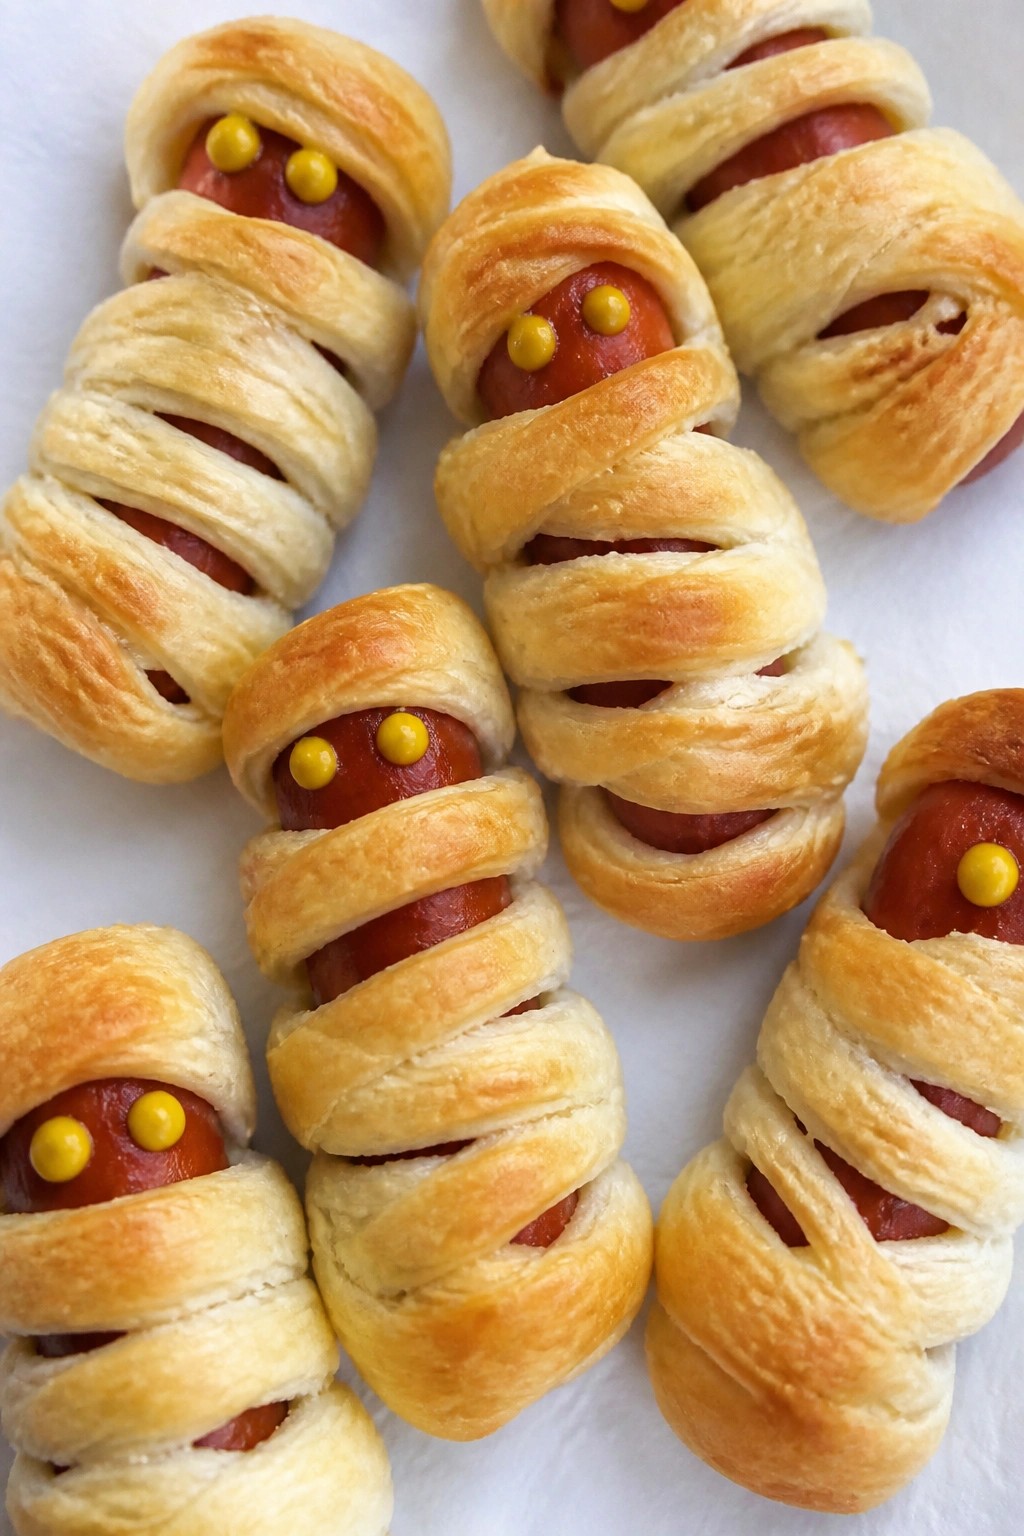
These mummy pigs in a blanket turn classic pigs in a blanket into a fun Halloween snack. Kids enjoy the playful look and the familiar taste of sausage wrapped in flaky dough. They work well for parties, lunch boxes, or a simple weeknight treat before trick-or-treating.
The finished bites have a golden, crisp exterior with a savory, juicy center. Thin strips of dough create the mummy wrap effect while leaving space for simple mustard eyes.
Serves 4 people.
Recommended Products

Large Halloween Gatherings: Each set comes with 300 paper hot dog trays, enough volume to serve big Halloween trick or treat events, haunted house gatherings, birthday parties and family holiday feasts. The abundant supply keeps food service running smoothly for both home use and commercial food booths, and allows easy sharing with staff or party guests

Enough for Needs: each package comes with an impressive count of 60 pieces of disposable Halloween food trays; This generous number is ideal to cater to large gatherings, parties, events or daily use, and allow you to share them with other people who need them

In One Kit: these items in one hot dog party supplies set includes a 165.4 x 29.5 inch plastic table skirt, a 19.7 x 47.2 inch polyester banner with iron rings, 50 printed hot dog boxes, 30 cutlery sets (forks+knives), 20 clear mousse cups, 24 paper food picks, and 5 ice tongs; It is an ideal choice for creating a professional hot dog stand for Halloween carnivals or backyard BBQ
Ingredients
- 1 can (8 oz) refrigerated crescent roll dough
- 12 cocktail sausages
- 1 large egg
- 1 tablespoon water
- 2 tablespoons yellow mustard
Instructions
- Preheat the oven to 375°F and line a baking sheet with parchment paper.
- Unroll the crescent dough on a lightly floured surface and press the seams together to form one sheet.
- Cut the dough into 24 thin strips, each about ¼ inch wide.
- Wrap two strips around each cocktail sausage in a crisscross pattern, leaving a small gap near one end for the eyes.
- Place the wrapped sausages on the prepared baking sheet.
- Whisk the egg and water together in a small bowl, then brush the mixture lightly over the dough.
- Bake for 12 to 15 minutes until the dough is golden brown.
- Remove from the oven and let cool for 2 minutes. Use a toothpick to dot small mustard eyes in the open spaces on each sausage.
Extra Tips
Make the dough strips as even as possible so the mummies bake uniformly. Yellow mustard works best for the eyes because it shows up clearly against the golden dough. Serve warm with extra mustard on the side for dipping. Leftovers can be stored in an airtight container in the fridge for up to two days and reheated in a 350°F oven for five minutes to restore crispness. Course: Appetizer Cuisine: American Equipment: Baking sheet, Parchment paper, Knife, Small bowl, Pastry brush, Toothpick
Spooky Spider Deviled Eggs
These deviled eggs turn a classic snack into a fun Halloween bite that kids enjoy making and eating. The olive spiders on top give them a playful look without any complicated steps. They work well for school parties or a quick family gathering before trick-or-treating.
The eggs stay creamy from the mayonnaise and mustard filling, with a light smoky note from paprika. Kids like the familiar taste, while the spider detail makes them feel special for the holiday.

Serves 4 people.
Ingredients
- 4 large eggs
- 2 tablespoons mayonnaise
- 1 teaspoon yellow mustard
- 1/4 teaspoon salt
- 1/4 teaspoon paprika
- 8 black olives
Instructions
- Place the eggs in a pot and cover with water. Bring to a boil, then remove from heat, cover, and let sit for 10 minutes.
- Drain the eggs and run them under cold water until cool enough to handle. Peel off the shells.
- Slice each egg in half lengthwise. Scoop the yolks into a mixing bowl and set the whites aside on a plate.
- Add the mayonnaise, mustard, and salt to the yolks. Mash until smooth.
- Spoon the yolk mixture back into the egg white halves.
- Cut four olives in half for the spider bodies. Slice the remaining olives into thin strips for the legs. Place one olive half on each egg and arrange four strips on each side to form legs.
- Lightly sprinkle paprika over the tops before serving.
Extra Tips
Make the spiders right before serving so the olive legs stay in place. If you want less paprika flavor, dust it on only a few eggs and leave the rest plain. These eggs can be assembled up to two hours ahead and kept covered in the fridge. Course: Appetizer Cuisine: American Equipment: Pot, Mixing Bowl, Knife
Cute Pumpkin Cheese Balls with Crackers
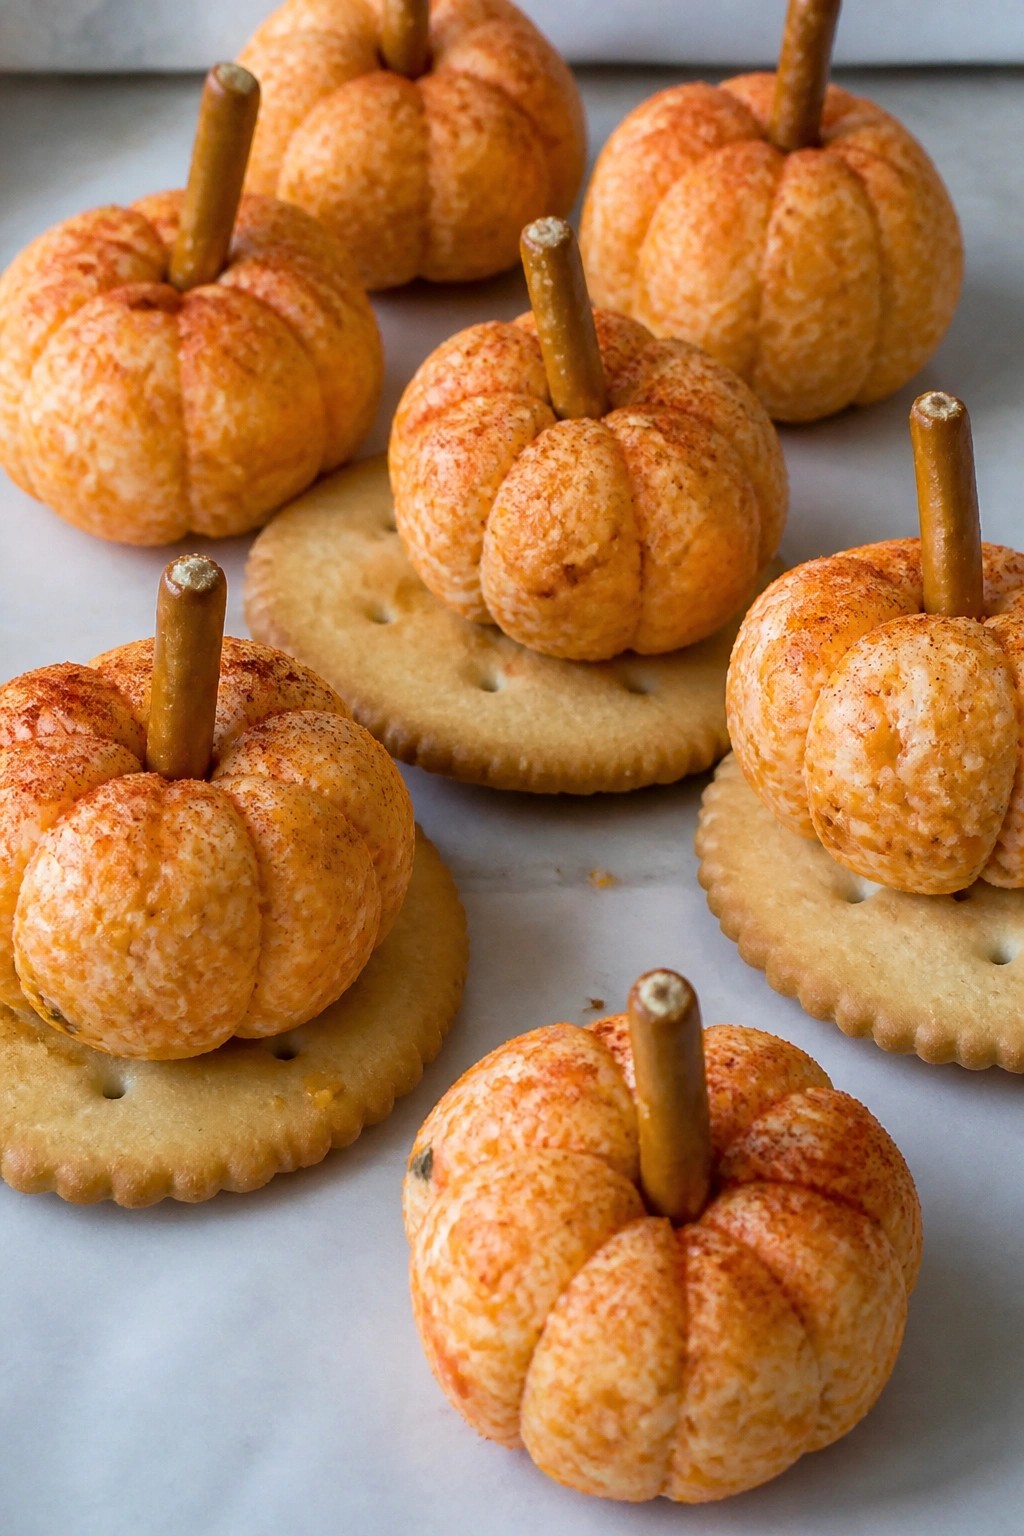
These cheese balls take the shape of small pumpkins and add a playful touch to any Halloween table. Kids enjoy rolling the mixture and adding the stems, so the task feels more like play than work. They fit well at afternoon gatherings or as part of a larger snack spread.
The blend of soft cream cheese and sharp cheddar creates a smooth, spreadable bite that stays light next to crisp crackers. A touch of paprika adds color and a mild savory note without overpowering young palates.
Serves 4 people.
Ingredients
- 8 ounces cream cheese, softened
- 1 1/2 cups shredded cheddar cheese
- 1/2 teaspoon paprika
- 1/4 teaspoon garlic powder
- 8 pretzel sticks
- 20 round crackers
Instructions
- Place the softened cream cheese, shredded cheddar cheese, paprika, and garlic powder in a mixing bowl. Stir until the mixture is evenly combined and holds together.
- Divide the cheese mixture into eight equal portions. Roll each portion between your palms to form a smooth ball.
- Insert one pretzel stick into the top of each ball to serve as a stem. Press gently so the pretzel stays in place.
- Arrange the cheese balls on a plate with the round crackers and serve right away.
Extra Tips
Chill the formed cheese balls for 15 minutes before adding the pretzels if the mixture feels soft. Swap the round crackers for any sturdy cracker you have on hand, but avoid flavored varieties that may clash with the mild cheese taste. Leftovers keep in an airtight container in the fridge for one day. Course: Appetizer Cuisine: American Equipment: Mixing Bowl, Plate
Monster Eyeball Caprese Skewers
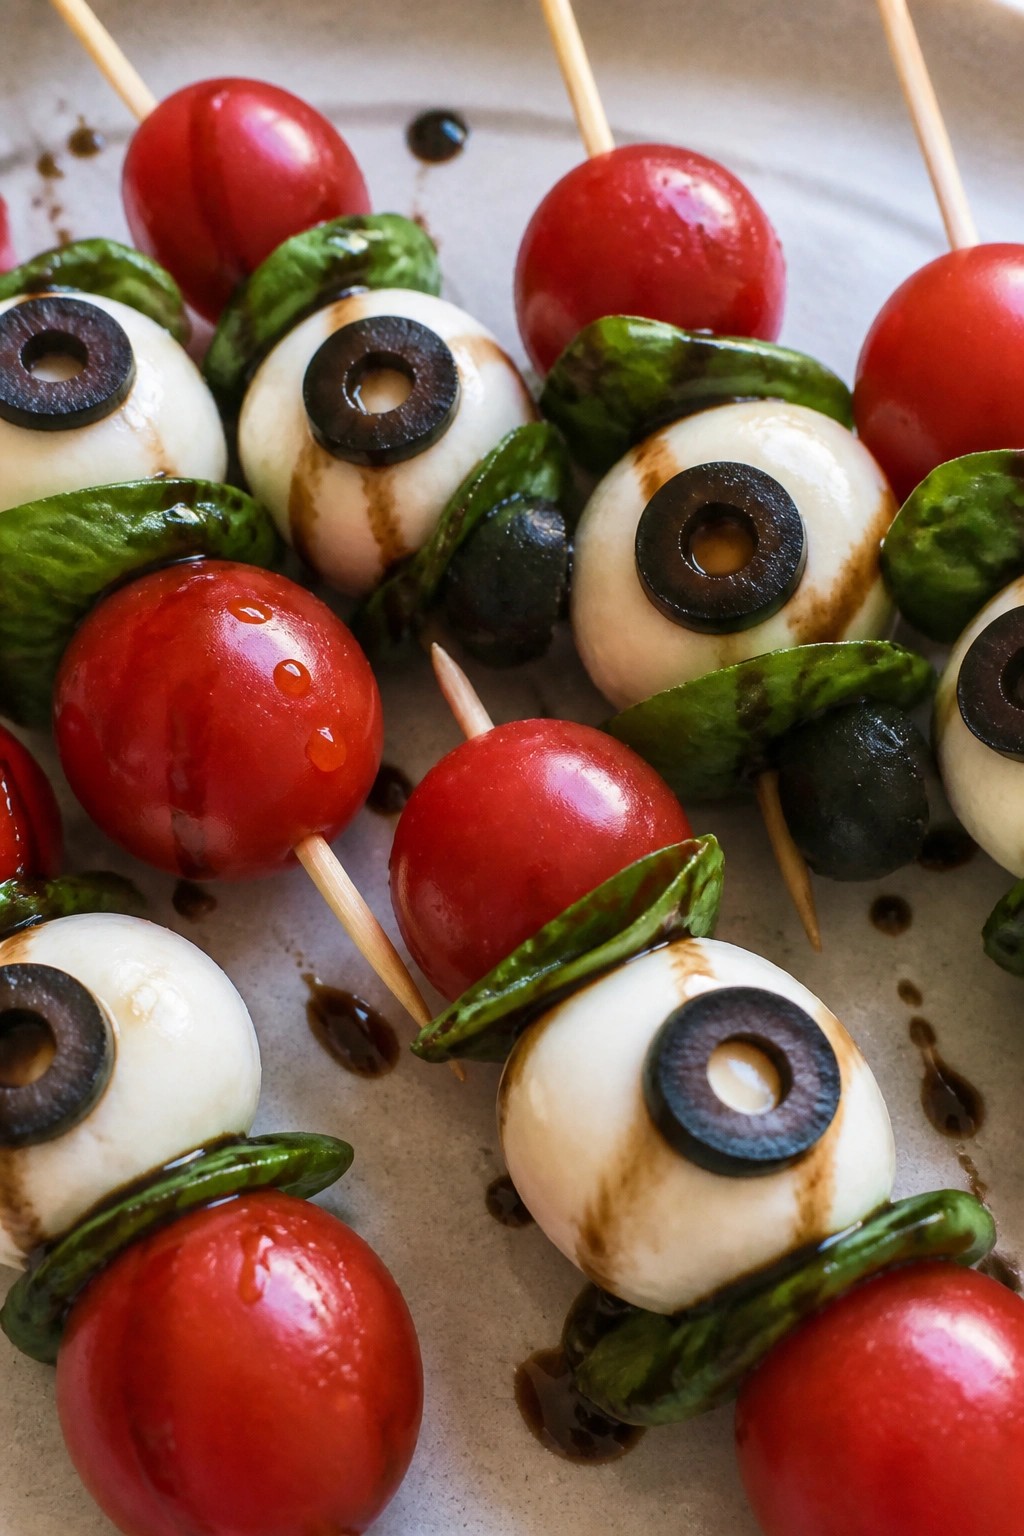
These skewers turn a classic Caprese into a fun Halloween snack that kids actually want to eat. The mozzarella balls act as eyeballs with olive pupils on top, making them look playful without any extra fuss. They work well for classroom parties or a quick after-school treat before trick-or-treating.
The flavor stays light and fresh with creamy mozzarella, juicy tomatoes, and a hint of basil. A drizzle of balsamic glaze adds just enough tang to balance the richness.
Serves 4 people.
Ingredients
- 12 cherry tomatoes
- 12 bocconcini mozzarella balls
- 12 fresh basil leaves
- 4 black olives, sliced into thin rounds
- 2 tablespoons balsamic glaze
- 12 wooden skewers
Instructions
- Thread one cherry tomato onto each wooden skewer, pushing it near the top.
- Add one basil leaf right after the tomato on each skewer.
- Place one bocconcini mozzarella ball next on each skewer to form the eyeball.
- Press one black olive round gently onto the front of each mozzarella ball to create the pupil.
- Arrange the finished skewers on a serving plate and drizzle the balsamic glaze lightly over the tops just before serving.
Extra Tips
Make these right before serving so the basil stays bright and the mozzarella does not dry out. If you need to prep ahead, assemble the skewers without the olive pupils and add those plus the glaze at the last minute. You can swap the balsamic glaze for a few drops of balsamic vinegar if that is what you have on hand. Course: Appetizer Cuisine: Italian Equipment: Wooden skewers, Small knife, Serving platter
Witch Broomstick Pretzels with Cheese Dip
These witch broomstick pretzels bring a simple, playful touch to Halloween gatherings. Kids like the broom shape, and the recipe uses everyday items to create something they will actually eat. The pretzels stay crisp while the cheese dip adds a creamy, savory contrast that balances the saltiness.
The snack works well for classroom parties or small family events because it requires little cooking. Each broom delivers a crunchy texture from the pretzel paired with mild cheddar flavor in both the bristles and the dip.

Serves 4 people.
Ingredients
- 12 pretzel rods
- 4 slices cheddar cheese
- 12 fresh chives
- 8 ounces cream cheese, softened
- 1 cup shredded cheddar cheese
- 1/4 cup milk
- 1/2 teaspoon garlic powder
- 1/4 teaspoon salt
Instructions
- Lay the cheddar cheese slices on a cutting board and cut each slice into thin strips about 2 inches long to form the broom bristles.
- Take one pretzel rod and place 4 or 5 cheese strips at one end so they fan out like bristles. Wrap one chive around the strips and the pretzel to secure them, then tie gently.
- Repeat the process with the remaining pretzel rods, cheese strips, and chives until all 12 brooms are assembled.
- Place the softened cream cheese, shredded cheddar cheese, milk, garlic powder, and salt in a microwave-safe bowl. Stir to combine, then microwave in 20-second bursts, stirring between each, until the mixture is smooth and fully melted.
- Transfer the cheese dip to a small serving bowl and arrange the finished witch broomstick pretzels around it.
Extra Tips
Make the brooms a few hours ahead and keep them on a tray covered with plastic wrap so the cheese stays fresh. If the dip thickens after cooling, stir in a splash of milk before serving to loosen it. Use regular pretzel rods rather than thin sticks so the cheese strips have enough surface to attach. Course: Appetizer Cuisine: American Equipment: Cutting Board, Knife, Microwave-Safe Bowl
Bat-Shaped Mini Pepperoni Pizzas
These mini pizzas are cut into bat shapes before baking, which makes them a fun addition to a Halloween spread. Kids enjoy the familiar cheese and pepperoni flavors while the shape adds a playful touch without extra work.
The crust stays crisp on the edges and the toppings melt together into a simple savory bite. They work well as a starter at a party or as a quick weeknight option during the holiday week.

Serves 4 people.
Ingredients
- 1 pound refrigerated pizza dough
- ¾ cup pizza sauce
- 1½ cups shredded mozzarella cheese
- 24 slices pepperoni
Instructions
- Heat the oven to 425°F and line a baking sheet with parchment paper.
- Roll the pizza dough to about ¼-inch thickness on a lightly floured surface.
- Use a bat-shaped cookie cutter to cut out 8 shapes and place them on the prepared baking sheet.
- Spread about 1 tablespoon of pizza sauce on each bat shape, leaving a small border around the edges.
- Sprinkle shredded mozzarella cheese evenly over the sauce on each piece.
- Top each pizza with 3 pepperoni slices.
- Bake for 10 to 12 minutes until the crust is golden and the cheese is melted and bubbly.
Extra Tips
Roll the dough evenly so the bat shapes bake at the same rate. If the dough springs back while cutting, let it rest for a few minutes before trying again. These pizzas reheat well in a toaster oven for 3 minutes if made ahead. Course: Appetizer Cuisine: American Equipment: Baking sheet, Rolling pin, Bat-shaped cookie cutter
Graveyard Layered Taco Dip Cups
These Graveyard Layered Taco Dip Cups turn a familiar taco dip into a simple Halloween snack that kids can help assemble. Served in clear cups, the layers show up nicely and the top gets a quick graveyard look with crushed chips and upright crackers.
The combination of creamy beans, seasoned beef, and cool toppings gives a balanced taco taste with a bit of crunch from the chips on top. It works well for parties or after-school snacks during October.

Serves 4 people.
Ingredients
- 1 can (16 oz) refried beans
- 8 oz ground beef
- 1 tablespoon taco seasoning
- 1 cup sour cream
- 1/2 cup salsa
- 1 cup shredded Mexican cheese blend
- 1 cup crushed tortilla chips
- 4 rectangular crackers
- 2 tablespoons chopped green onions
Instructions
- Cook the ground beef in a skillet over medium heat until browned. Drain any excess fat, then stir in the taco seasoning and set the meat aside to cool slightly.
- Divide the refried beans evenly among four clear cups, spreading them into an even layer at the bottom of each cup.
- Spoon the cooked beef over the beans in each cup, pressing it down gently to create a flat layer.
- Add a layer of sour cream to each cup, followed by a spoonful of salsa and a sprinkle of shredded cheese.
- Top each cup with crushed tortilla chips to resemble dirt. Press one rectangular cracker upright into the chips in each cup to stand as a tombstone.
- Scatter the chopped green onions around the crackers for a finishing touch.
Extra Tips
Prepare the meat and bean layers earlier in the day and store the cups covered in the fridge. Add the crushed tortilla chips and crackers right before serving so they stay crisp. If you need more tombstones, break extra crackers in half rather than adding new ingredients. Course: Appetizer Cuisine: Mexican Equipment: Skillet, Mixing Bowl, 4 Clear Serving Cups
Frankenstein Zucchini Fritters with Ranch
These zucchini fritters get shaped into little green heads with olive details to look like Frankenstein. Kids enjoy helping with the decorating step, and the crispy edges pair well with cool ranch for dipping. They work nicely as a fun starter before trick-or-treating or at a small Halloween gathering.
The texture stays light inside with a golden crust outside. The mild zucchini flavor comes through without overpowering the ranch, so even picky eaters tend to try them.

Serves 4 people.
Ingredients
- 2 medium zucchinis, grated and squeezed dry
- 1 large egg
- 1/2 cup all-purpose flour
- 1/4 cup grated Parmesan cheese
- 1/2 teaspoon salt
- 1/4 teaspoon black pepper
- 2 tablespoons olive oil
- 1/2 cup ranch dressing
- 8 black olive slices
Instructions
- Grate the zucchinis and squeeze out as much liquid as possible in a clean towel. Place the zucchini in a mixing bowl and add the egg, flour, Parmesan, salt, and pepper. Stir until a thick batter forms.
- Heat the olive oil in a skillet over medium heat. Scoop about 1/4 cup of batter for each fritter and shape it into a small rectangle on the skillet. Flatten slightly so it cooks evenly.
- Cook the fritters for 3 to 4 minutes per side until both sides turn golden brown. Remove them to a paper towel-lined plate.
- Once the fritters cool slightly, use the black olive slices to add two eyes and a mouth on each one to create the Frankenstein face. Serve the fritters warm with ranch dressing on the side for dipping.
Extra Tips
Squeeze the zucchini well so the fritters hold their shape and stay crisp. If the batter feels too loose, add an extra tablespoon of flour before shaping. These taste best right after frying, but you can keep them warm in a low oven for 10 minutes if needed. Course: Appetizer Cuisine: American Equipment: Box grater, Mixing bowl, Skillet
Skeleton Bone Parmesan Breadsticks
These Skeleton Bone Parmesan Breadsticks bring a playful Halloween element to the table by shaping simple dough into bone forms. Kids like the hands-on twisting step, and the result is a savory snack with a crisp exterior and soft inside that fits right into a party spread.
The garlic and parmesan coating adds familiar flavor without being too bold for young eaters. They work well as a starter before a meal or as finger food during an October gathering.

Serves 4 people.
Ingredients
- 1 package (11 ounces) refrigerated breadstick dough
- 2 tablespoons butter, melted
- 1/4 cup grated Parmesan cheese
- 1 teaspoon garlic powder
- 1/2 teaspoon Italian seasoning
Instructions
- Preheat the oven to 375°F and line a baking sheet with parchment paper.
- Unroll the breadstick dough and separate it into individual strips. Gently twist and stretch each strip so the middle is thinner and the ends are slightly thicker to create a bone shape.
- Arrange the shaped pieces on the prepared baking sheet, leaving space between them.
- Brush the tops of each breadstick with the melted butter.
- In a small bowl, stir together the Parmesan cheese, garlic powder, and Italian seasoning. Sprinkle the mixture evenly over the buttered breadsticks.
- Bake for 12 to 15 minutes until the breadsticks are golden brown.
- Remove from the oven and let them cool for a few minutes before serving.
Extra Tips
Twist the dough firmly so the bone shape holds during baking. If the Parmesan mixture clumps, press it lightly onto the buttered surface. Leftovers can be stored in an airtight container and reheated briefly in a 350°F oven to restore crispness. Serve with a small bowl of marinara on the side for dipping. Course: Appetizer Cuisine: American Equipment: Baking sheet, Pastry brush, Mixing bowl
Ghostly Stuffed Cherry Tomato Bites
These cherry tomato bites turn a simple snack into a fun Halloween starter that kids enjoy making and eating. The white filling gives each tomato a ghost-like appearance while the juicy tomato shells stay crisp and fresh. They work well on a party platter or as a quick afternoon treat before trick-or-treating.
The flavor is mild and creamy with a light savory note from garlic and herbs. Kids like the pop of the tomato against the smooth filling, and the olive faces add a playful touch without any strong tastes.

Serves 4 people.
Ingredients
- 16 cherry tomatoes
- 8 ounces cream cheese, softened
- 1/4 cup shredded mozzarella cheese
- 1/2 teaspoon garlic powder
- 1/2 teaspoon dried Italian seasoning
- 1/4 teaspoon salt
- 1/8 teaspoon black pepper
- 4 black olives, sliced into small pieces
Instructions
- Cut a thin slice off the top of each cherry tomato and gently scoop out the seeds and pulp with a small spoon. Set the tomatoes upside down on a plate to drain for a few minutes.
- Place the cream cheese in a mixing bowl and stir in the shredded mozzarella, garlic powder, Italian seasoning, salt, and pepper until the mixture is smooth and evenly combined.
- Spoon or pipe the cheese mixture into each hollowed tomato until it reaches the top. Wipe any excess from the edges.
- Press two or three small olive pieces onto the front of each filled tomato to create simple ghost faces. Arrange the tomatoes on a serving plate.
Extra Tips
Make these up to two hours ahead and keep them covered in the fridge so the filling stays firm. If the tomatoes roll on the plate, slice a tiny bit off the bottom of each one to create a flat base. Use a zip-top bag with one corner snipped off for quick piping if you do not have a pastry bag. Course: Appetizer Cuisine: American Equipment: Mixing Bowl, Sharp Knife, Spoon, Plate
Mummy Jalapeño Poppers with Cream Cheese
These mummy jalapeño poppers turn a classic appetizer into a fun Halloween snack. Kids enjoy the playful look while adults appreciate the creamy filling inside a crisp wrapper. They work well at parties or as a quick bite before trick-or-treating.
The texture balances soft cream cheese with flaky dough and a mild pepper bite. The finished poppers look like little wrapped mummies, which makes them easy to serve and fun to eat.

Serves 4 people.
Ingredients
- 8 medium jalapeño peppers
- 8 ounces cream cheese, softened
- 1 can (8 ounces) refrigerated crescent roll dough
- 16 thin black olive slices
Instructions
- Preheat the oven to 375 degrees and line a baking sheet with parchment paper.
- Slice each jalapeño in half lengthwise and remove the seeds and membranes.
- Fill each jalapeño half with about 1 tablespoon of the softened cream cheese.
- Unroll the crescent dough and cut it into thin strips about 1/4 inch wide.
- Wrap the dough strips around each stuffed jalapeño, leaving small gaps to create a mummy bandage effect.
- Place the wrapped poppers on the baking sheet and add two olive slices to each one as eyes.
- Bake for 12 to 15 minutes until the dough is golden brown.
- Let the poppers cool for a few minutes before serving.
Extra Tips
Mix a little of the cream cheese with a pinch of salt if you want extra flavor in the filling. Use room-temperature cream cheese so it spreads evenly without tearing the pepper. For milder heat, choose larger jalapeños and remove all the white ribs inside. Course: Appetizer Cuisine: American Equipment: Baking sheet, Knife, Mixing bowl
Pumpkin Patch Mini Sausage Quiches
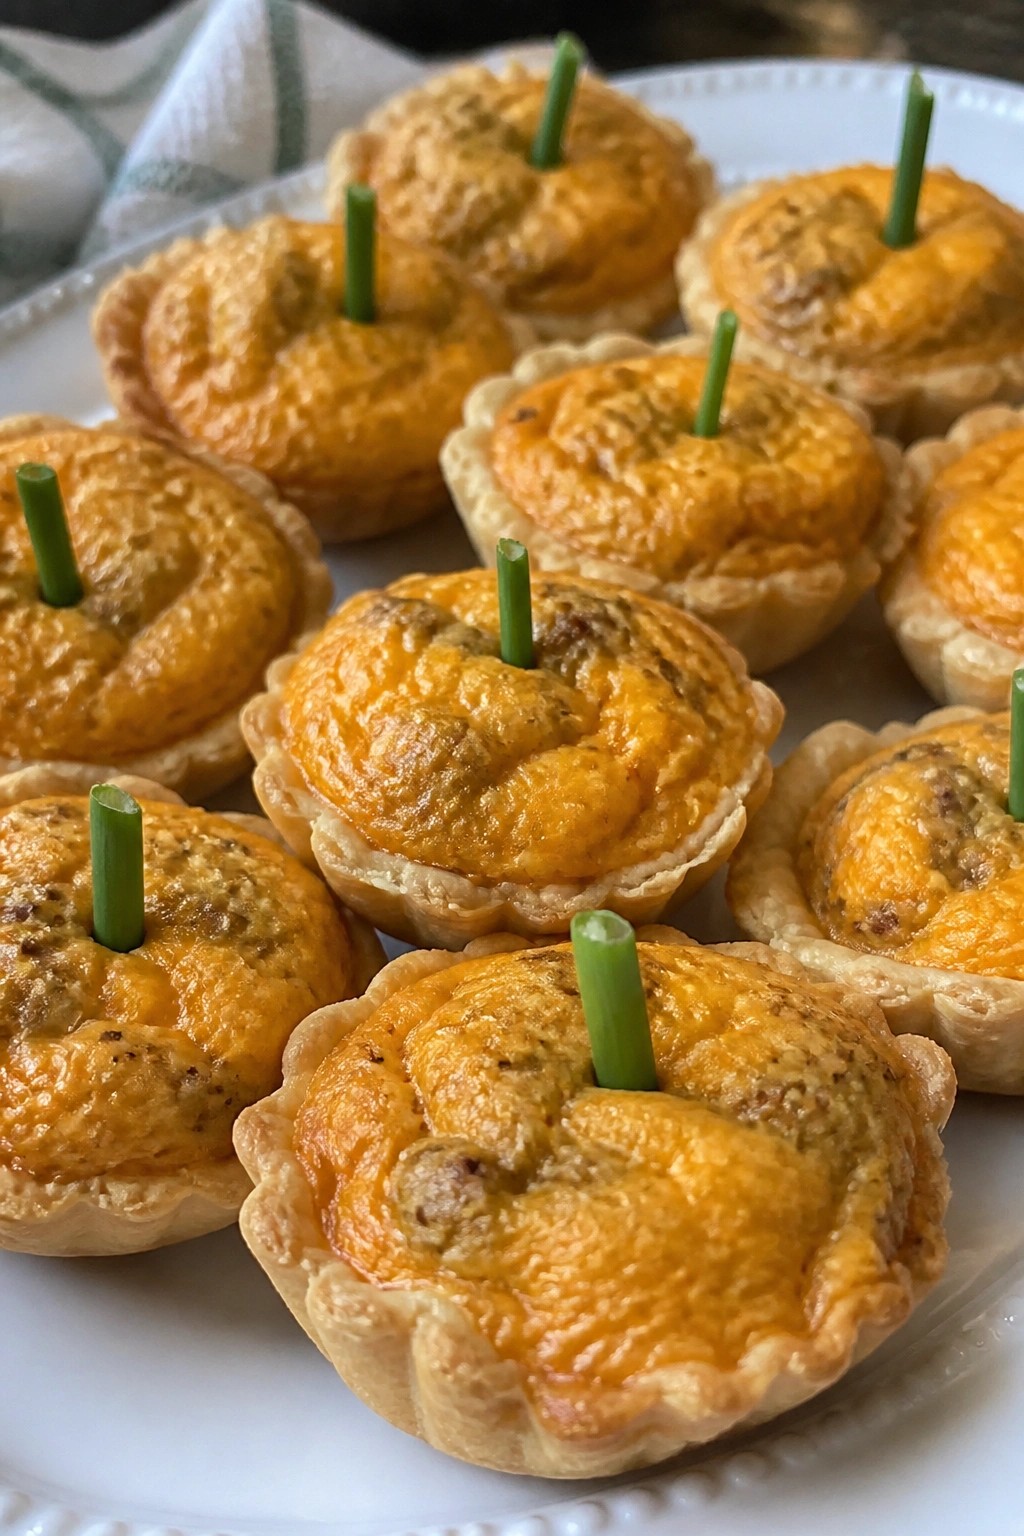
These mini quiches turn simple sausage and egg filling into a fun Halloween snack that kids actually want to eat. The orange cheddar gives each one a pumpkin color, while a chive stem on top completes the patch look when they are served together on a platter.
They work well for a party because they are bite-sized and hold up at room temperature. The flaky crust and savory sausage-cheese center give them a familiar taste that feels like breakfast but looks festive.
Serves 4 people.
Ingredients
- 1 package refrigerated pie crusts (2 crusts)
- 8 ounces breakfast sausage, cooked and crumbled
- 4 large eggs
- 1/2 cup milk
- 1 cup shredded cheddar cheese
- 1/4 teaspoon salt
- 1/4 teaspoon black pepper
- 2 tablespoons chopped chives
Instructions
- Preheat the oven to 375°F and lightly grease a 24-cup mini muffin tin.
- Roll out both pie crusts on a lightly floured surface and cut 24 circles with a 2-inch round cutter. Press each circle into a muffin cup.
- In a skillet over medium heat, cook the sausage until browned, then drain and set aside.
- In a mixing bowl, whisk together the eggs, milk, salt, and pepper until smooth.
- Spoon a small amount of cooked sausage into each crust cup, then top with a pinch of cheddar cheese.
- Pour the egg mixture over the sausage and cheese, filling each cup almost to the top.
- Bake for 18 to 20 minutes until the centers are set and the edges are golden.
- Remove from the oven and let cool for 5 minutes in the tin. Sprinkle a few pieces of chopped chives on top of each quiche to form the pumpkin stems.
Extra Tips
Arrange the quiches close together on a green plate so the chive stems look like a small pumpkin patch. Use sharp cheddar for brighter color if you want the pumpkin effect to stand out more. Leftovers reheat well in a 300°F oven for 8 minutes to keep the crust crisp. Course: Appetizer Cuisine: American Equipment: Mini muffin tin, Skillet, Mixing bowl, Round cutter
Creepy Crawler Ants-on-a-Log Celery Boats
These celery boats give the classic ants-on-a-log snack a Halloween twist that kids enjoy making and eating. The simple combination feels fun without extra fuss, and it works well for after-school snacks or party platters.
The result offers a crisp celery base, smooth peanut butter, and chewy raisins that look like tiny crawlers. It stays light while still feeling like a treat.
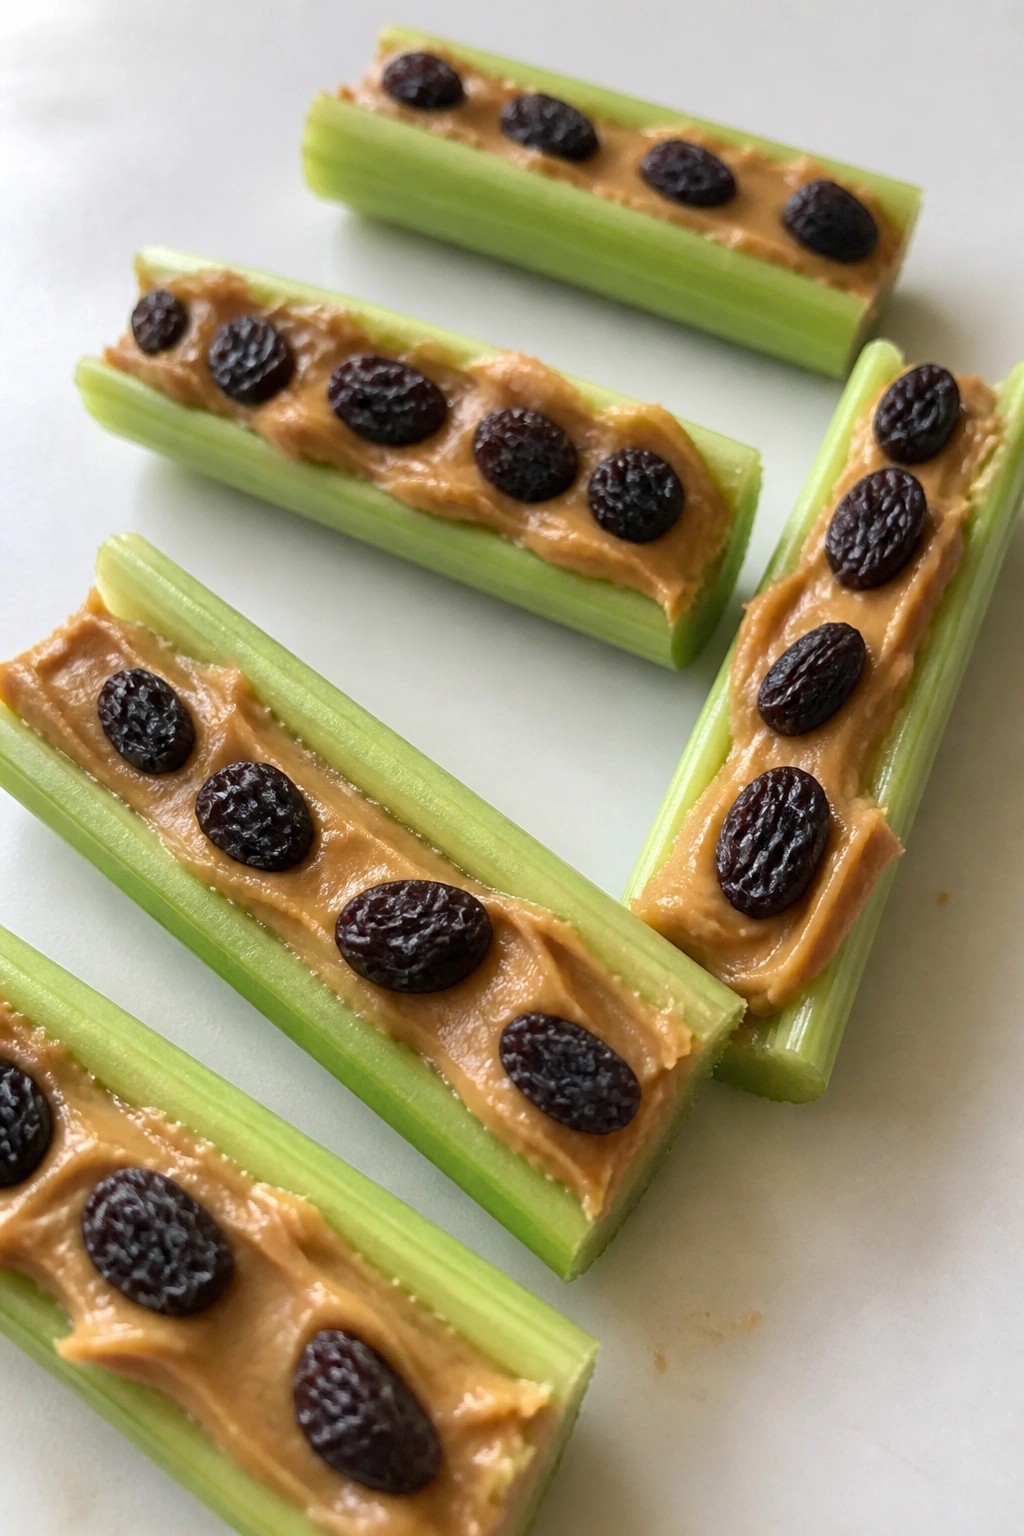
Serves 4 people.
Ingredients
- 4 celery stalks
- 1/2 cup peanut butter
- 1/4 cup raisins
Instructions
- Rinse the celery stalks under cold water and pat them dry with a clean towel.
- Trim the ends and cut each stalk into three-inch lengths to form the boats.
- Use a knife or spoon to fill the groove of each celery piece with peanut butter.
- Press the raisins into the peanut butter in a line so they look like ants crawling across the log.
Extra Tips
Use creamy peanut butter so it spreads evenly without tearing the celery. Arrange the raisins close together for a stronger crawler look. These boats hold up well if assembled a few hours ahead and kept covered in the fridge. Course: Appetizer Cuisine: American Equipment: Knife, Cutting board, Spoon