

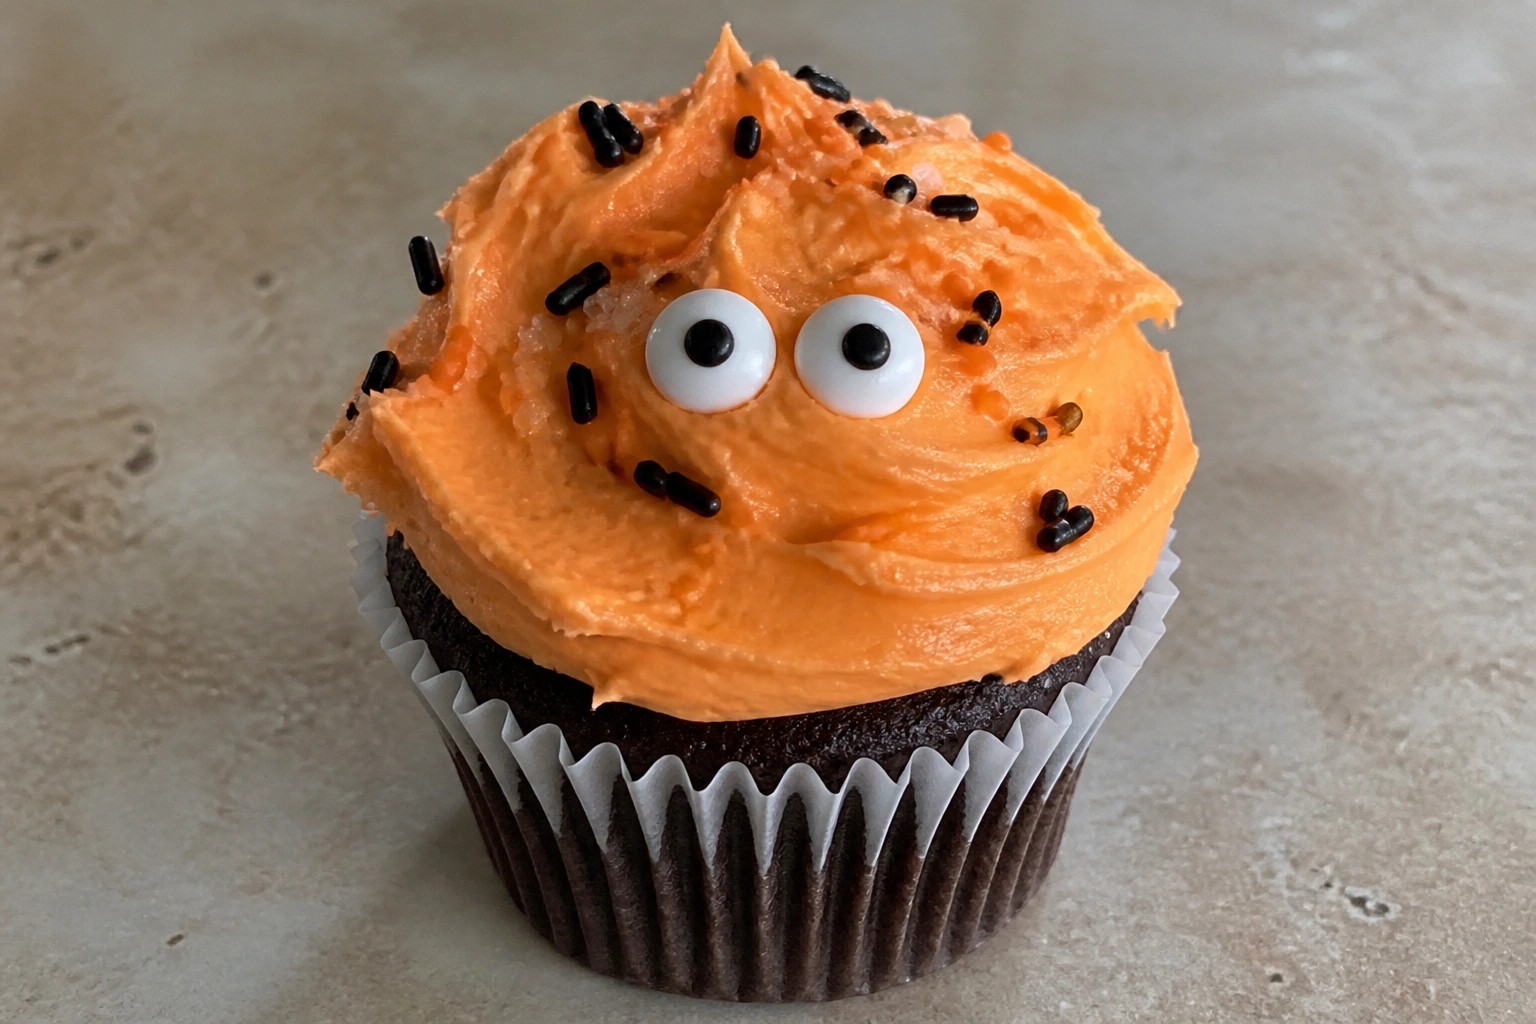
Halloween cupcakes do not have to take a lot of time if you are busy. These 11 ideas keep things simple with easy steps and common ingredients. You can make them ahead or on the day you need them. Some use ready made frosting while others add quick touches. They work well for school events or small gatherings at home.
Helpful Tips Before You Start
These tips will help you make Halloween cupcakes fast without extra stress.
Recommended Products

Various styles - There are 3 patterns in total, spiderweb, castle and witch, which provides your Halloween party with multiple choices

Variety of Designs: Includes 64 paper cupcake wrappers and 100 cupcake toppers, featuring 8 wrapper designs and 10 unique Halloween-themed topper designs

Material: Made of high-quality glitter cardboard and food-grade wooden sticks, it is safe and harmless, and can be used directly without assembly. You can adjust the suitable height to show better effects.
Start with a Box Mix
Use a boxed cake mix as your base. It saves mixing time and still gives reliable results for decorating.
Gather Supplies First
Set out candies, sprinkles, and any cutters before you bake. This keeps the process moving once the cupcakes are ready.
Cool Them Fully
Let cupcakes sit at room temperature for 20 to 30 minutes after baking. Warm tops will ruin frosting and decorations.
Pick One Frosting Batch
Make a single batch of vanilla buttercream and split it into two colors. It works across many designs and limits cleanup.
Use Store-Bought Frosting When Needed
Keep a can of white frosting on hand for quick fixes. It works well for busy days when you run short on time.
Pumpkin Spice Ghost Cupcakes
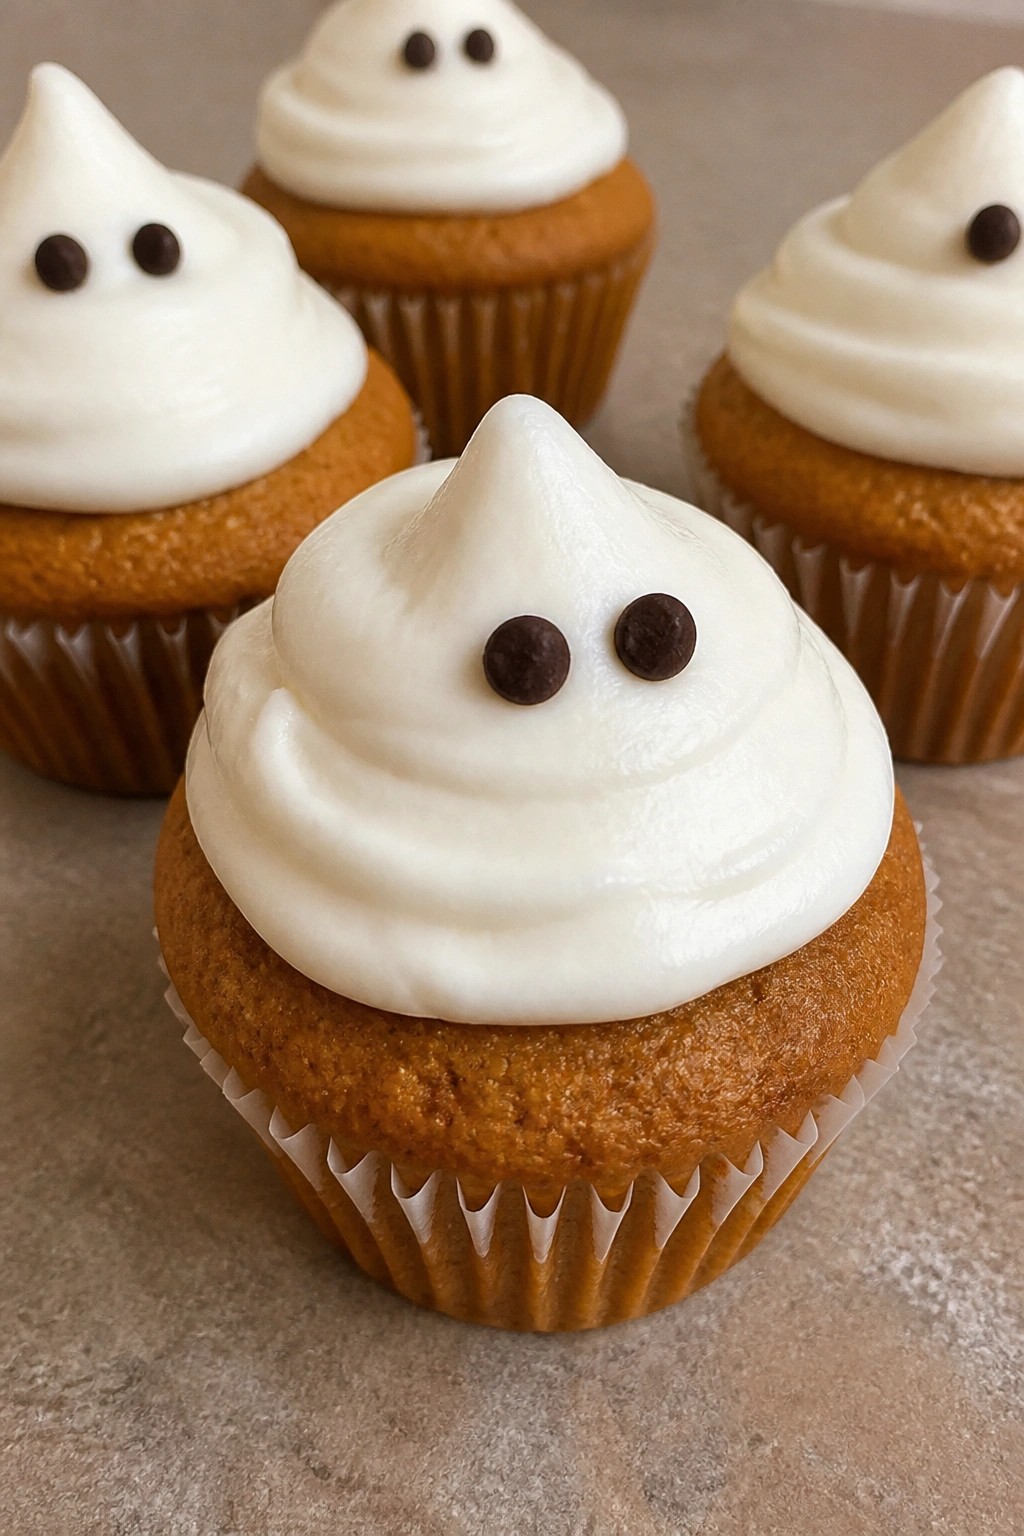
These Pumpkin Spice Ghost Cupcakes offer a quick way to add a playful Halloween touch to a classic fall flavor. The moist cake carries warm spices and pumpkin, while the simple white frosting lets you create ghost shapes without fancy tools. They suit busy weeknights or last-minute gatherings when you need something festive but low effort.
The texture stays light and tender, with a creamy topping that contrasts the soft crumb. Chocolate chip eyes give the ghosts a friendly look that appeals to all ages.
Serves 4 people.
Ingredients
- 1 cup all-purpose flour
- 1/2 teaspoon baking powder
- 1 teaspoon pumpkin pie spice
- 1/4 teaspoon salt
- 1/2 cup pumpkin puree
- 1/4 cup vegetable oil
- 1/2 cup granulated sugar
- 1 large egg
- 1 teaspoon vanilla extract
- 1/2 cup unsalted butter, softened
- 1 cup powdered sugar
- Chocolate chips for eyes
Instructions
- Preheat the oven to 350°F and line a cupcake pan with 4 paper liners.
- In a mixing bowl, whisk together the flour, baking powder, pumpkin pie spice, and salt.
- In a second bowl, stir the pumpkin puree, vegetable oil, granulated sugar, egg, and 1/2 teaspoon of the vanilla extract until smooth.
- Pour the wet mixture into the dry ingredients and stir gently until just combined.
- Divide the batter evenly among the 4 liners and bake for 18 to 20 minutes, or until a toothpick comes out clean. Let the cupcakes cool completely.
- While the cupcakes cool, beat the softened butter with the powdered sugar and remaining 1/2 teaspoon vanilla extract until light and fluffy.
- Pipe or spread the frosting on each cooled cupcake to form ghost shapes, then press two chocolate chips into each ghost for eyes.
Extra Tips
Pipe the frosting in short upward strokes to keep the ghosts from looking too flat, and use slightly chilled cupcakes so the frosting holds its shape better. The recipe works well made a day ahead; store the unfrosted cupcakes in an airtight container and add the ghosts just before serving. Course: Dessert Cuisine: American Equipment: Mixing Bowl, Cupcake Pan, Oven
Chocolate Spiderweb Cupcakes
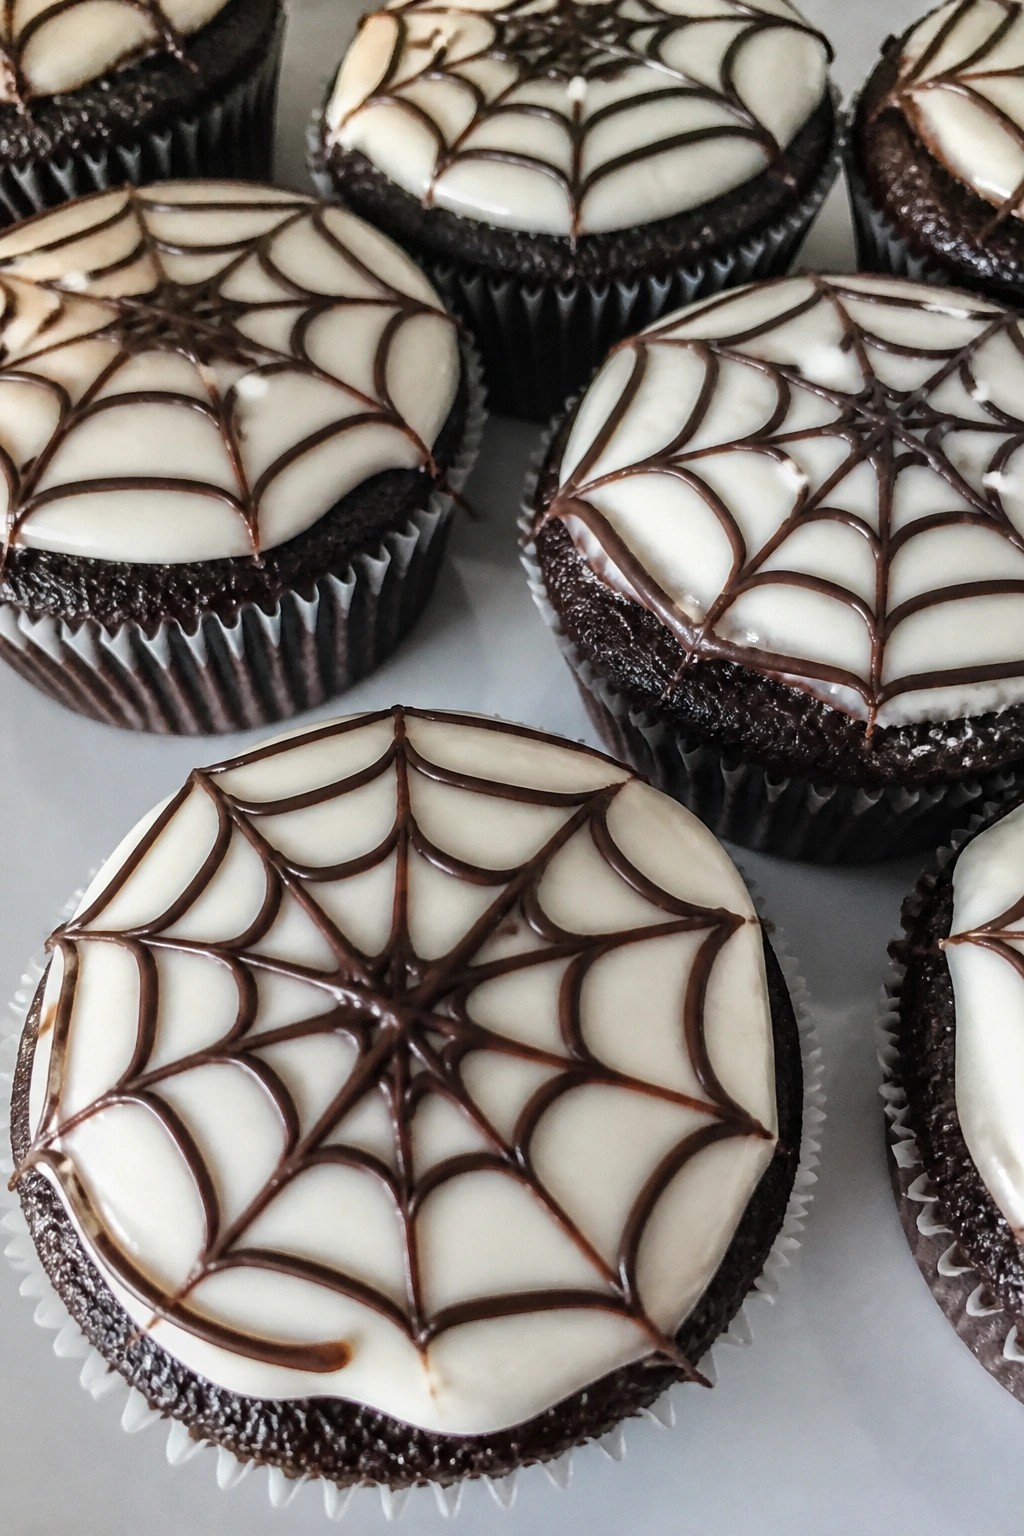
These chocolate cupcakes get a festive Halloween twist with a simple spiderweb design on top. They come together quickly with pantry staples and make a fun addition to any October gathering. The rich chocolate base pairs well with smooth white frosting and a few easy piped lines.
The recipe keeps things straightforward for busy bakers who still want a themed treat. Each cupcake offers a moist crumb and balanced sweetness without extra fuss.
Serves 4 people.
Recommended Products

Includes small candy eyeballs to decorate 24 to 36 desserts

Halloween Night Delights - Celebrate the spooky season with an assortment of yummy gummy candies in spine-chilling designs. Our gummies include vampire fangs, feet, candy skulls and eyeballs! - choose your favorite or simply purchase all 4 variety packs and enjoy them at the same time.

Package included: Includes 45pcs edible cupcake toppers with a box,very lightweight, portable and easy to store and carry.Sufficient quantity can meet your different decoration needs.The size is 1.77inch. It is completely edible but not delicious,so pretty tasteless (Not Sweet)
Ingredients
- ½ cup all-purpose flour
- ¼ cup unsweetened cocoa powder
- ½ teaspoon baking soda
- ¼ teaspoon salt
- ½ cup sugar
- 1 large egg
- ¼ cup vegetable oil
- ¼ cup milk
- ½ teaspoon vanilla extract
- 1 cup powdered sugar
- 2 tablespoons unsalted butter, softened
- 1 tablespoon milk
- ¼ cup semisweet chocolate chips
Instructions
- Preheat the oven to 350°F and line a muffin tin with four cupcake liners.
- In a medium bowl, whisk together the flour, cocoa powder, baking soda, salt, and sugar.
- Add the egg, oil, milk, and vanilla extract to the dry ingredients. Stir until the batter is smooth and no dry streaks remain.
- Divide the batter evenly among the four liners. Bake for 18 to 20 minutes, or until a toothpick inserted in the center comes out clean. Let the cupcakes cool completely on a wire rack.
- While the cupcakes cool, make the frosting. Beat the powdered sugar, softened butter, and 1 tablespoon milk in a small bowl until light and spreadable.
- Melt the chocolate chips in the microwave in 20-second bursts, stirring between each until smooth. Spoon the melted chocolate into a small zip-top bag and snip off one corner.
- Spread a thin layer of white frosting over each cooled cupcake. Pipe three or four concentric circles of melted chocolate on top of the frosting. Drag a toothpick from the center outward in straight lines to create the spiderweb pattern. Let the chocolate set for a few minutes before serving.
Extra Tips
Use room-temperature butter so the frosting whips up without lumps. If the melted chocolate thickens while you work, warm it for five seconds in the microwave. Store any leftover cupcakes in an airtight container at room temperature for up to two days. Course: Dessert Cuisine: American Equipment: Mixing Bowl, Muffin Tin, Wire Rack, Piping Bag or Zip-top Bag
Red Velvet Monster Eye Cupcakes
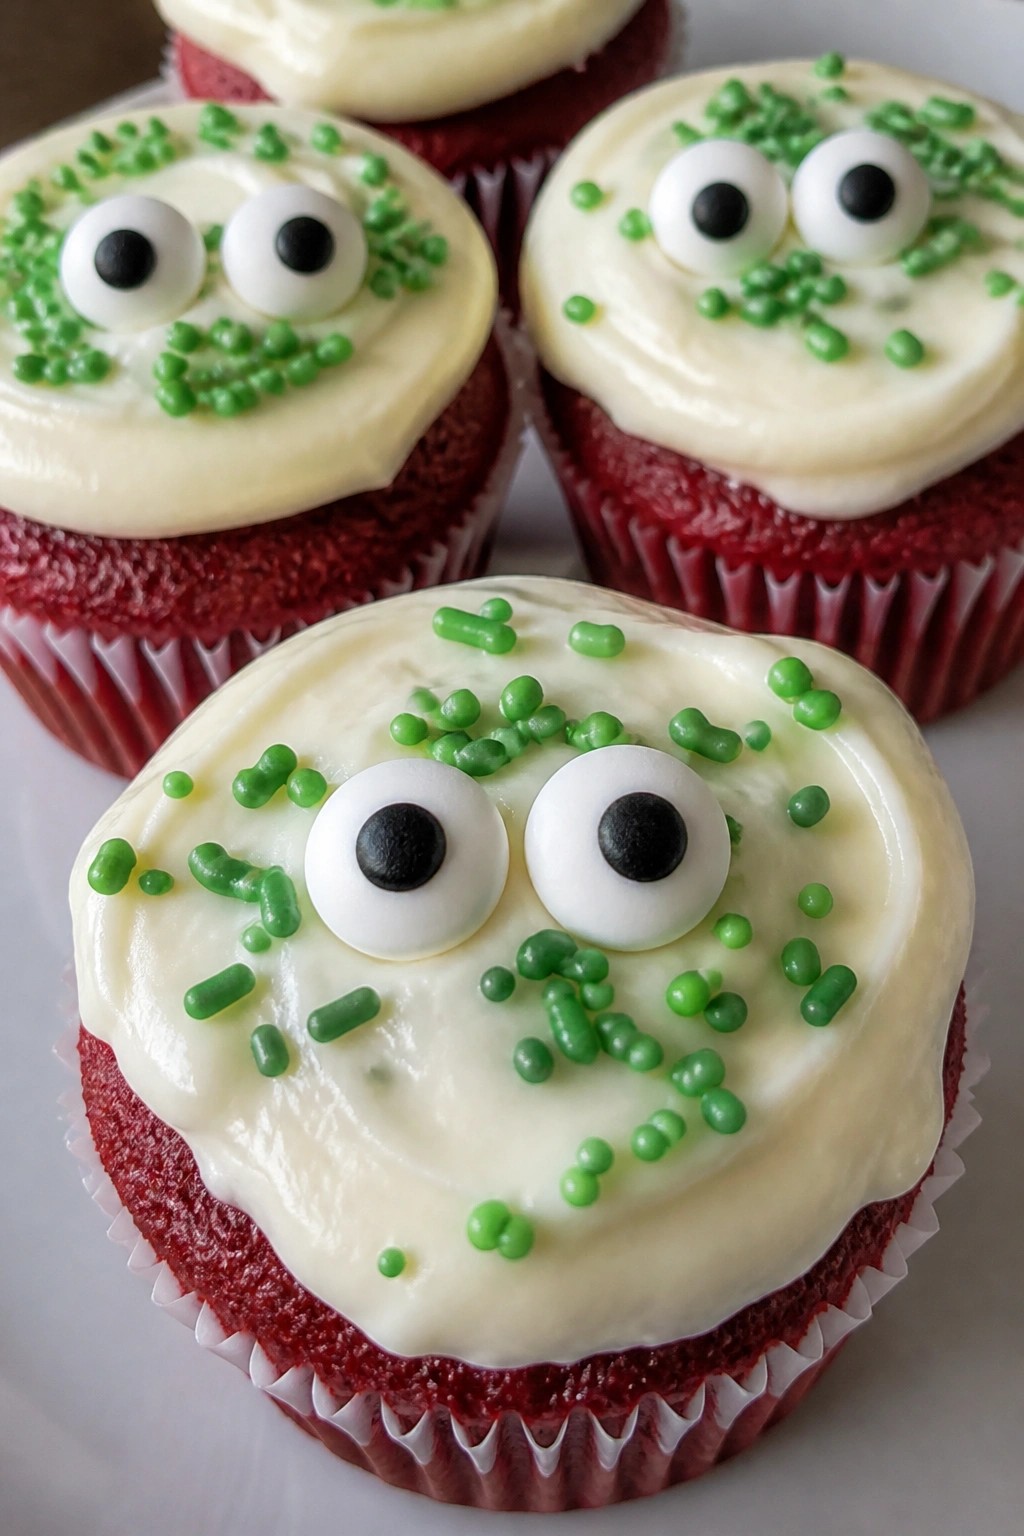
These red velvet cupcakes bring a simple Halloween twist with bright red cake, tangy cream cheese frosting, and candy eyes on top. They work well for last-minute parties or school events when you need something quick that still looks themed. The moist crumb pairs with smooth frosting for a balanced bite that feels festive without extra fuss.
Serves 4 people.
Recommended Products

【Halloween Pumpkin decorating kit】- Each pack include 40 sheets Halloween pumpkin decorating stickers, each sheet can make 2 pumpkin faces total 80 Halloween Pumpkin Decorating Faces.

🎃【VALUE PACK】30 sheets 6"x 4" small pumpkin decorating craft kit, each sheet have 2 face pumpkin expression stickers, 60 pumpkin expression stickers in total, 20 different face designs. great for halloween party, decoration pumpkins.

11.31 oz Complete Decorating Kit – Everything you need in one box: 3 squeeze frosting tubes (3 oz each in Orange, Black, White), 4 decorating nozzles, and a 2 oz Halloween sprinkle mix with candy eyeballs.
Ingredients
- 1 cup red velvet cake mix
- 1 large egg
- ¼ cup vegetable oil
- ½ cup water
- ½ cup cream cheese frosting
- 4 large candy eyeballs
- 2 tablespoons green sprinkles
Instructions
- Preheat the oven to 350°F and line a cupcake pan with 4 paper liners.
- In a mixing bowl, combine the red velvet cake mix, egg, vegetable oil, and water. Stir until the batter is smooth and no dry streaks remain.
- Divide the batter evenly among the 4 liners, filling each about two-thirds full.
- Bake for 18 to 20 minutes, or until a toothpick inserted in the center comes out clean. Let the cupcakes cool completely in the pan.
- Spread or pipe the cream cheese frosting over each cooled cupcake.
- Press one candy eyeball into the center of the frosting on each cupcake. Scatter green sprinkles around the edges for color.
Extra Tips
Use a zip-top bag with one corner snipped off if you do not have a piping bag for the frosting. The green sprinkles add a monster-like pop against the red cake, but you can swap them for black sanding sugar if you prefer a different look. Store finished cupcakes in an airtight container at room temperature for up to two days. Course: Dessert Cuisine: American Equipment: Mixing bowl, cupcake pan, oven
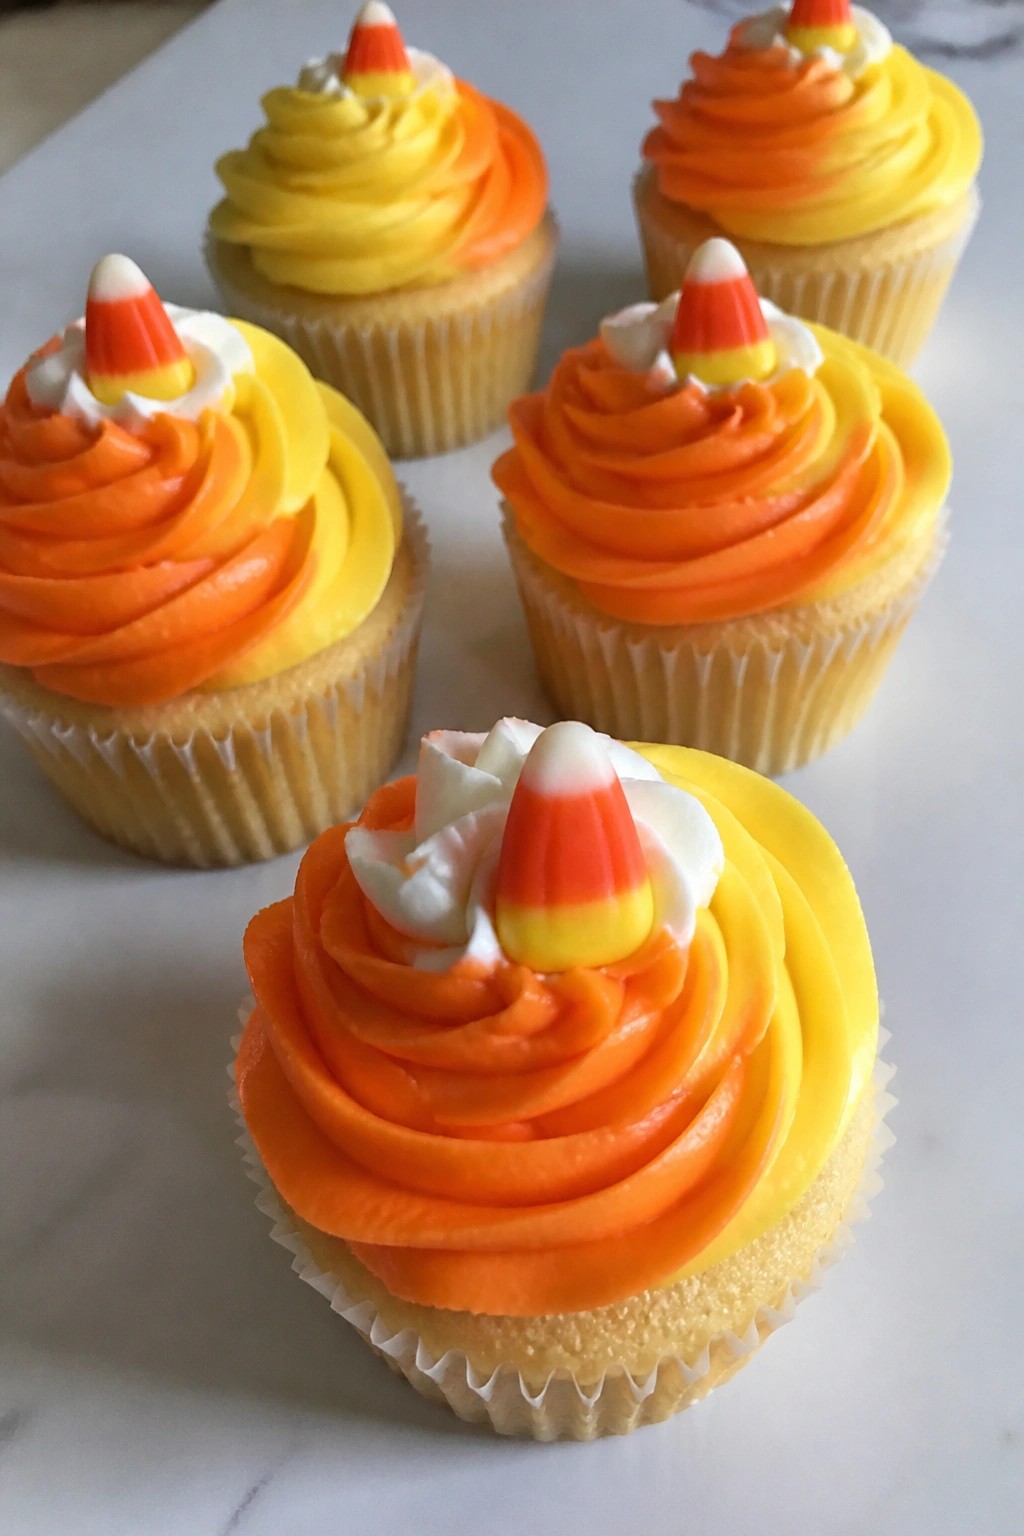
Candy Corn Swirl Cupcakes
These cupcakes bring a fun Halloween touch with minimal effort. The vanilla base stays simple while the frosting gets divided and tinted to create a quick candy corn look. They work well for last-minute parties or school events when you want something festive without extra steps.
The flavor stays light and sweet with a soft crumb and smooth buttercream on top. The colored frosting swirls give the visual pop of candy corn without needing extra decorations or complicated techniques.
Serves 4 people.
Ingredients
- ¾ cup all-purpose flour
- ½ cup granulated sugar
- ¼ cup unsalted butter, softened
- 1 large egg
- ½ cup milk
- 1 teaspoon baking powder
- 1 teaspoon vanilla extract
- ½ cup unsalted butter, softened
- 1 ½ cups powdered sugar
- Yellow food coloring
- Orange food coloring
- 12 candy corn pieces
Instructions
- Preheat the oven to 350°F and line a muffin tin with 4 paper liners.
- In a mixing bowl, cream the ¼ cup softened butter with the granulated sugar until light. Add the egg and vanilla extract, then mix until combined.
- Stir in the flour, baking powder, and milk until the batter is smooth. Divide the batter evenly among the 4 liners.
- Bake for 18 minutes or until a toothpick comes out clean. Let the cupcakes cool completely in the tin.
- While the cupcakes cool, beat the ½ cup softened butter with the powdered sugar until creamy. Divide the frosting into three small bowls.
- Leave one bowl white. Tint the second bowl yellow and the third bowl orange with a few drops of food coloring.
- Spoon the three colors side by side into a piping bag fitted with a large tip. Pipe a swirl onto each cooled cupcake so the colors blend together like candy corn.
- Top each cupcake with three candy corn pieces.
Extra Tips
Pipe the frosting in one steady motion to keep the color bands distinct. If the buttercream feels too stiff, add a teaspoon of milk to loosen it before coloring. Store any leftovers in an airtight container at room temperature for up to two days. Course: Dessert Cuisine: American Equipment: Mixing Bowls, Muffin Tin, Piping Bag
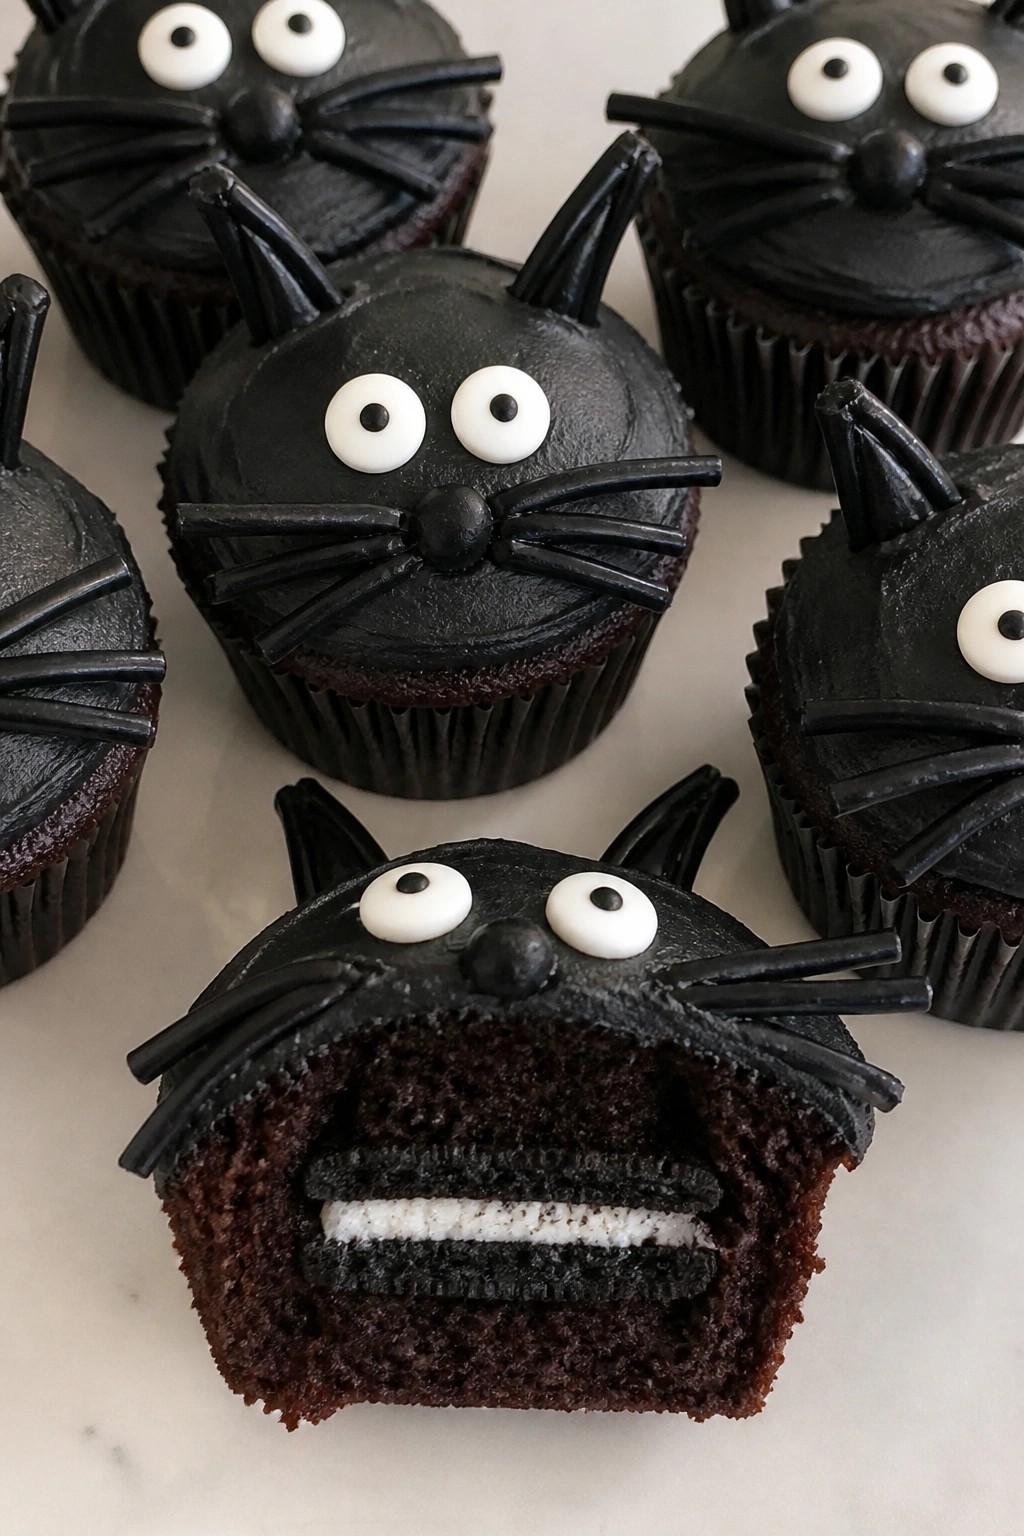
Black Cat Oreo-Stuffed Cupcakes
These cupcakes hide a whole Oreo inside each one for a fun surprise that kids and adults both enjoy. They come together fast with a cake mix base, so they fit easily into a busy day when you need a quick Halloween treat.
The finished cupcakes have rich chocolate flavor with a crisp cookie center and smooth black frosting on top. Simple candy details turn them into black cats without much extra work.
Serves 4 people.
Ingredients
- 8 Oreo cookies
- 1 1/2 cups chocolate cake batter
- 1 cup black frosting
- 8 candy eyes
- 12 thin strips black licorice
Instructions
- Preheat the oven to 350 degrees and line a muffin tin with four paper liners.
- Place one Oreo cookie in the bottom of each liner. Spoon the chocolate cake batter evenly over the cookies until the liners are about two-thirds full.
- Bake for 18 to 20 minutes until a toothpick inserted in the center comes out clean. Let the cupcakes cool completely in the tin.
- Spread a layer of black frosting over each cooled cupcake.
- Press two candy eyes into the frosting on each cupcake. Add three licorice strips on each side of the face to form whiskers. Use the remaining Oreo cookies, halved, to make ears by pressing two halves into the top of the frosting on each cupcake.
Extra Tips
Press the ear pieces in at a slight angle so they stand up and look more cat-like. If your frosting feels too soft to hold the decorations, chill the frosted cupcakes for ten minutes before adding the eyes, whiskers, and ears. Store any leftovers in an airtight container at room temperature for up to two days. Course: Dessert Cuisine: American Equipment: Muffin tin, Mixing bowl, Oven
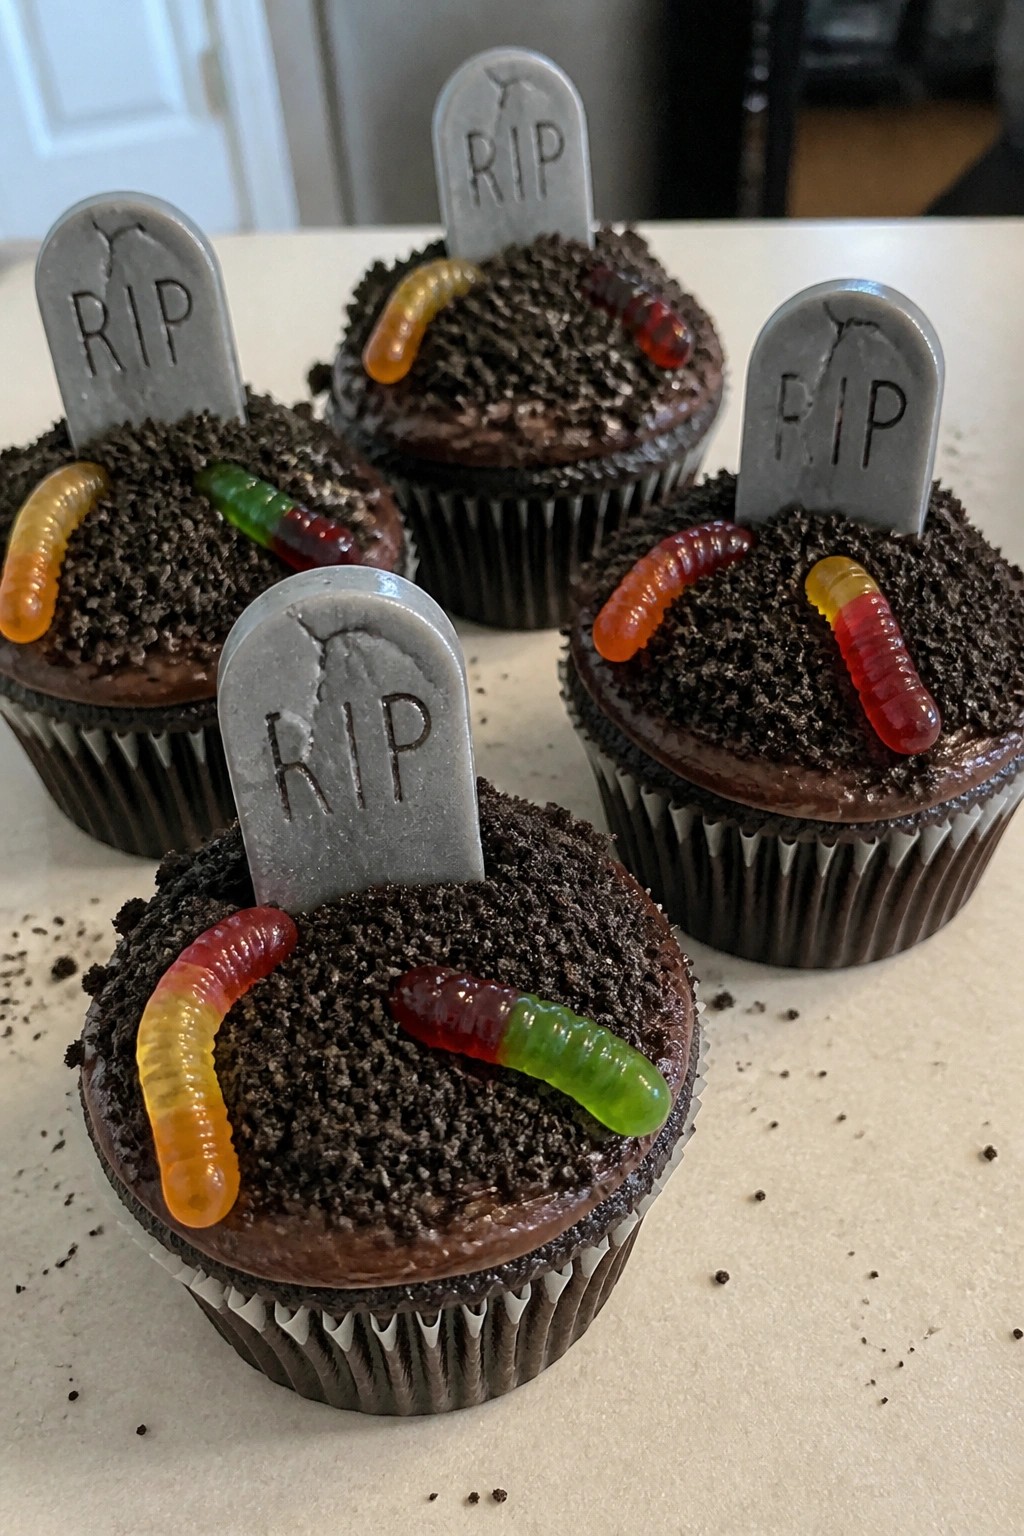
Graveyard Dirt Pudding Cupcakes
These Graveyard Dirt Pudding Cupcakes bring a fun Halloween twist to classic chocolate treats. Busy bakers can pull them together quickly with a few shortcuts, and the mix of moist cake, creamy pudding, and crunchy cookie topping makes them a hit at parties or family nights. Kids especially enjoy the playful graveyard details.
The flavor is rich chocolate with a smooth pudding layer and a satisfying crunch from the cookie crumbs. It feels like a pudding cup in cupcake form, which keeps things simple yet festive.
Serves 4 people.
Ingredients
- 4 baked chocolate cupcakes, cooled
- 1 package instant chocolate pudding mix
- 2 cups milk
- 10 chocolate sandwich cookies
- 4 gummy worms
- 4 candy tombstones
Instructions
- Prepare the chocolate pudding by whisking the instant pudding mix with the milk in a mixing bowl until it thickens, about two minutes.
- Place the chocolate sandwich cookies in a zip-top bag and crush them with a rolling pin until they resemble fine dirt.
- Spoon or pipe a layer of prepared pudding onto each cooled cupcake.
- Sprinkle the crushed cookies evenly over the pudding on each cupcake to create the dirt effect.
- Press one gummy worm and one candy tombstone gently into the cookie crumbs on top of each cupcake.
Extra Tips
Crush the cookies right before assembly so they stay crisp on the pudding. If you want to make these ahead, store the undecorated cupcakes and add the pudding, crumbs, and decorations just before serving to keep the texture right. Course: Dessert Cuisine: American Equipment: Mixing bowl, Whisk, Spoon
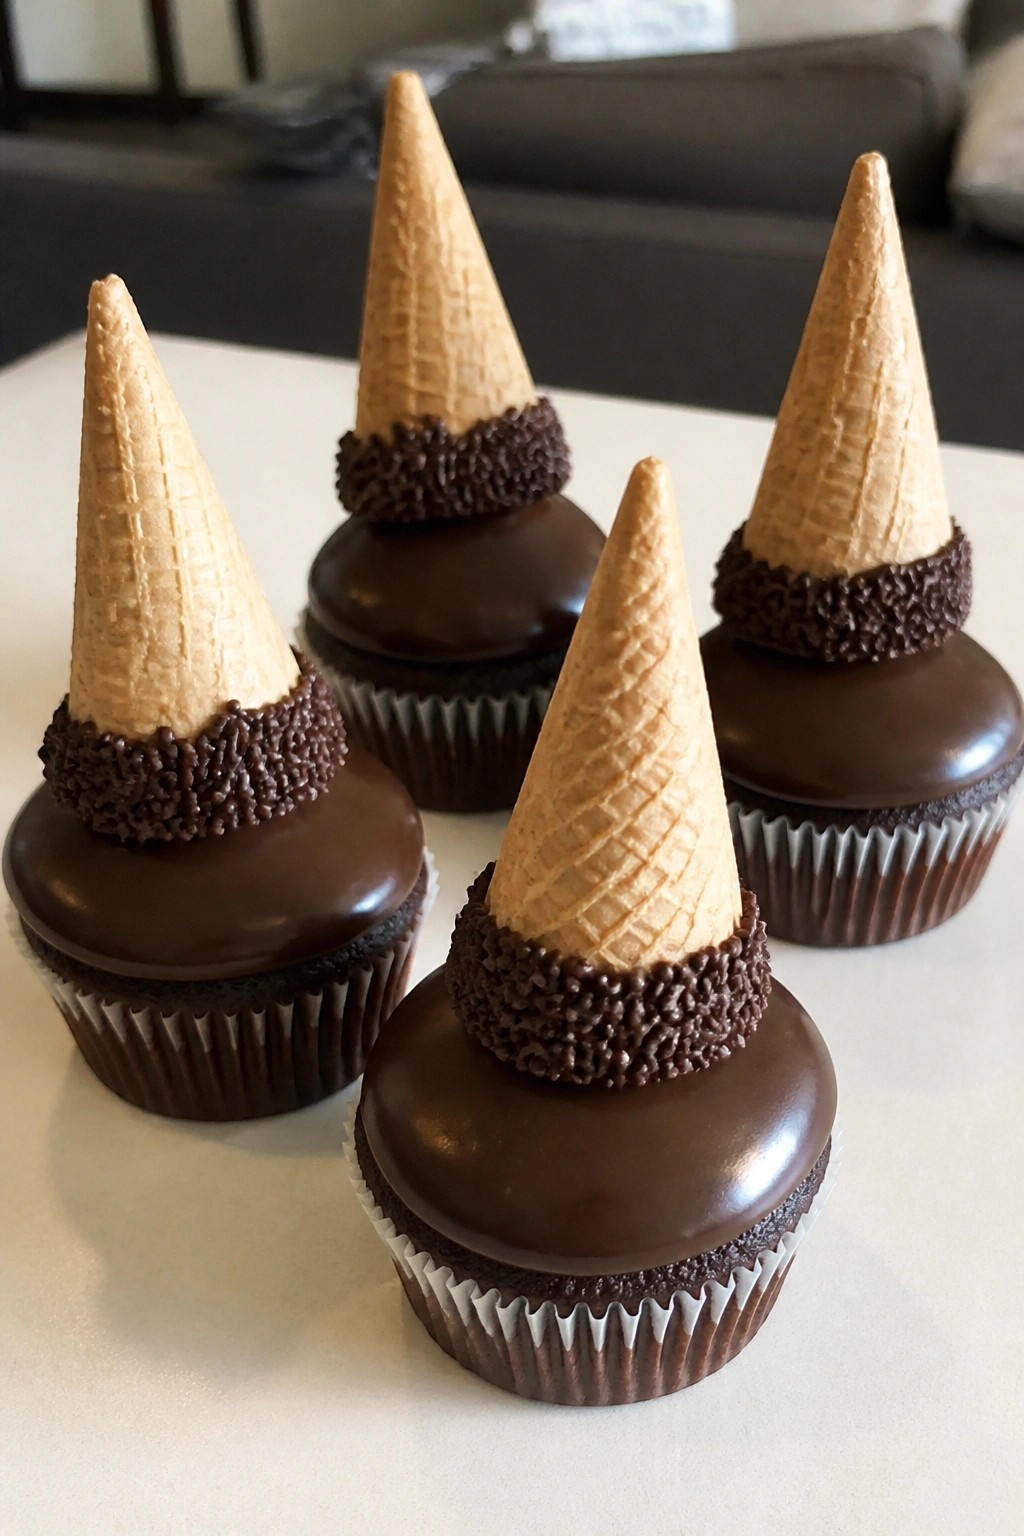
Witch Hat Ganache Cupcakes
These Witch Hat Ganache Cupcakes bring a playful Halloween touch without much fuss. The smooth chocolate ganache sets quickly on the cupcakes, and the cone tops create a clear hat shape that holds up well for parties or school events. The result is a rich chocolate flavor with a firm yet creamy texture that feels satisfying without being heavy.
This recipe works best when you already have cupcakes baked or use a simple boxed mix. The ganache comes together fast on the stove, and the cones add height and fun with minimal extra work.
Serves 4 people.
Ingredients
- 4 chocolate cupcakes, baked and cooled
- 1 cup semisweet chocolate chips
- 1/2 cup heavy cream
- 4 sugar cones
- 2 tablespoons chocolate sprinkles
Instructions
- Place the chocolate chips in a heatproof bowl. Heat the heavy cream in a small saucepan over medium heat until it just begins to steam, then pour it over the chips. Let the mixture sit for one minute before stirring until smooth and glossy.
- Spoon a layer of ganache over each cooled cupcake and spread it gently to the edges. This creates the base of the witch hat.
- Dip the open end of each sugar cone lightly into the remaining ganache, then set one cone point-up on top of each cupcake. The ganache helps the cone stay in place.
- While the ganache is still soft, sprinkle a small band of chocolate sprinkles around the base of each cone to form the hat band. Let the cupcakes sit at room temperature until the ganache firms up.
Extra Tips
Use room-temperature cupcakes so the ganache spreads evenly without cracking the surface. If the ganache thickens too much while you work, warm it gently over low heat with a splash of extra cream. Store finished cupcakes in a single layer in an airtight container at room temperature for up to two days. Course: Dessert Cuisine: American Equipment: Mixing Bowl, Small Saucepan, Spoon
Bloody Vanilla Skeleton Cupcakes
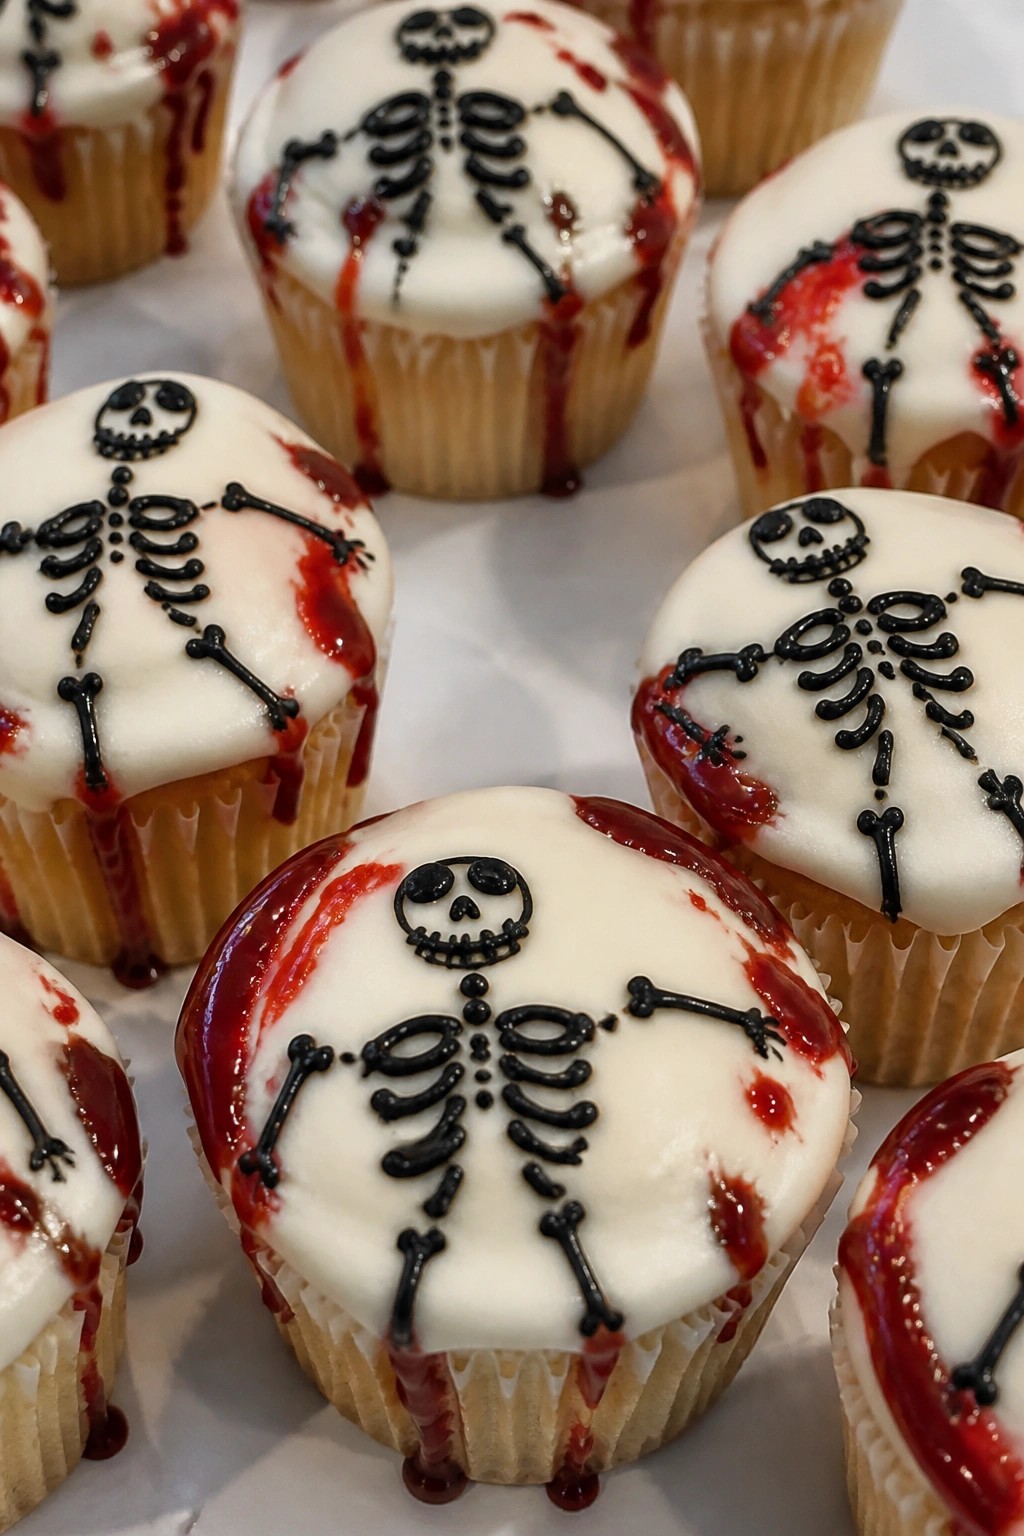
These Bloody Vanilla Skeleton Cupcakes turn a basic vanilla recipe into a quick Halloween treat. They suit busy schedules since the batter mixes in one bowl and the decorations stay simple. Each cupcake offers a soft crumb with clear vanilla flavor and a light layer of sweet frosting that holds the skeleton details and red drips.
Serves 4 people.
Ingredients
- ½ cup all-purpose flour
- ¼ cup granulated sugar
- ¼ cup unsalted butter, softened
- 1 egg
- 1 teaspoon vanilla extract
- ¼ cup milk
- ½ teaspoon baking powder
- ½ cup powdered sugar
- 2 tablespoons unsalted butter, softened
- 1 tablespoon milk
- 2 tablespoons strawberry preserves
- Black decorating gel
Instructions
- Heat the oven to 350°F and line a cupcake pan with four paper liners.
- In a mixing bowl, beat the softened butter and granulated sugar until light. Add the egg and vanilla extract, then mix until smooth.
- Stir in the flour, baking powder, and milk until just combined. Divide the batter evenly among the four liners.
- Bake for 15 to 18 minutes until a toothpick comes out clean. Cool the cupcakes completely on a wire rack.
- While the cupcakes cool, make the frosting by beating the powdered sugar, softened butter, and milk until creamy.
- Spread the frosting over each cooled cupcake. Pipe simple skeleton bones and a skull face using the black decorating gel.
- Spoon a small amount of strawberry preserves near the top of each cupcake and let it drip down the sides to create the bloody effect.
Extra Tips
Warm the strawberry preserves for a few seconds in the microwave so they flow easily for the drip effect. If the frosting feels too thick, add a few drops more milk. Store any leftovers in an airtight container at room temperature for one day. Course: Dessert Cuisine: American Equipment: Mixing Bowl, Cupcake Pan, Oven
Bat Wing Dark Chocolate Cupcakes
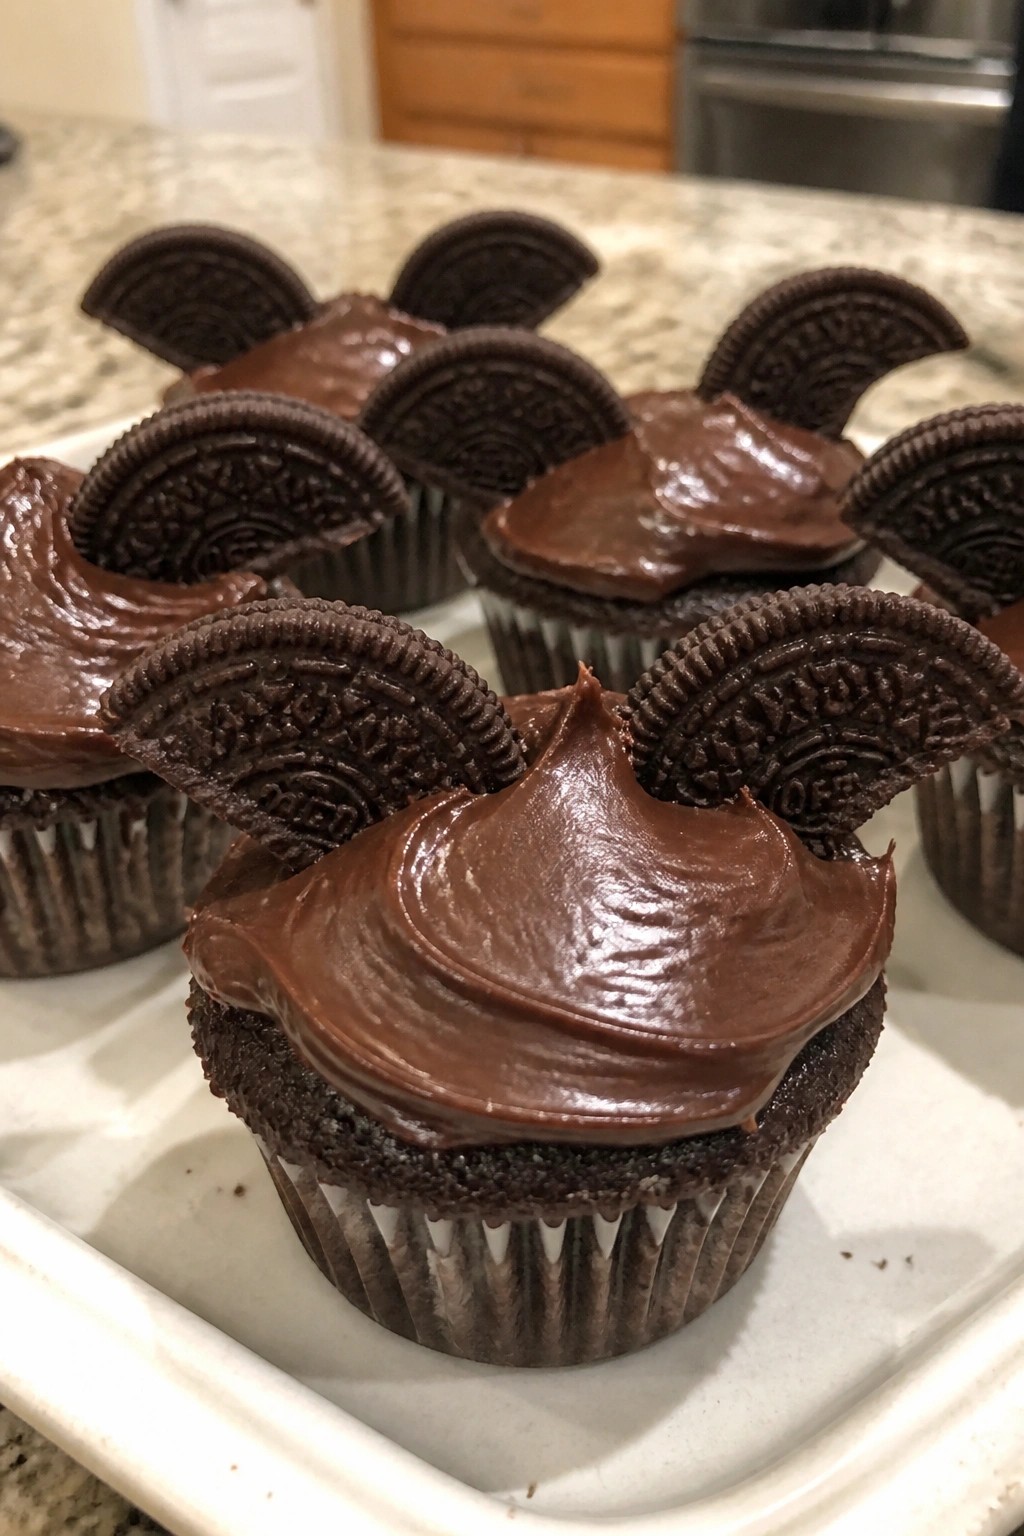
These dark chocolate cupcakes bring a simple Halloween touch without extra fuss. They work well for busy weeknights or last-minute parties when you want something themed but still quick to put together. The cupcakes turn out moist with a rich cocoa taste that pairs nicely with the smooth chocolate topping.
The bat wings come from halved chocolate sandwich cookies pressed into the frosting. This keeps the steps minimal while giving a clear spooky detail that fits the season.
Serves 4 people.
Ingredients
- 1/2 cup all-purpose flour
- 1/4 cup dark cocoa powder
- 1/2 cup granulated sugar
- 1 teaspoon baking powder
- 1/4 teaspoon salt
- 1 large egg
- 1/4 cup vegetable oil
- 1/2 cup milk
- 1/2 cup dark chocolate chips
- 2 tablespoons butter
- 4 chocolate sandwich cookies
Instructions
- Preheat the oven to 350 degrees and line a cupcake pan with 4 paper liners.
- In a mixing bowl, stir together the flour, dark cocoa powder, sugar, baking powder, and salt until evenly combined.
- Add the egg, vegetable oil, and milk to the dry ingredients. Mix until the batter is smooth and no dry streaks remain.
- Divide the batter evenly among the 4 liners and bake for 18 to 20 minutes, until a toothpick inserted in the center comes out clean. Let the cupcakes cool completely in the pan.
- While the cupcakes cool, melt the dark chocolate chips and butter together in a small bowl until smooth, then let the mixture thicken slightly into a spreadable frosting.
- Spread the frosting over each cooled cupcake. Split each chocolate sandwich cookie in half and press the halves into the frosting to form bat wings.
Extra Tips
Let the frosting cool just enough to hold its shape before adding the cookie wings so they stay upright. If you prefer a less sweet topping, reduce the chocolate chips by a couple of tablespoons. Store any leftovers in an airtight container at room temperature for up to two days. Course: Dessert Cuisine: American Equipment: Mixing Bowl, Cupcake Pan, Oven
Caramel Apple Harvest Cupcakes
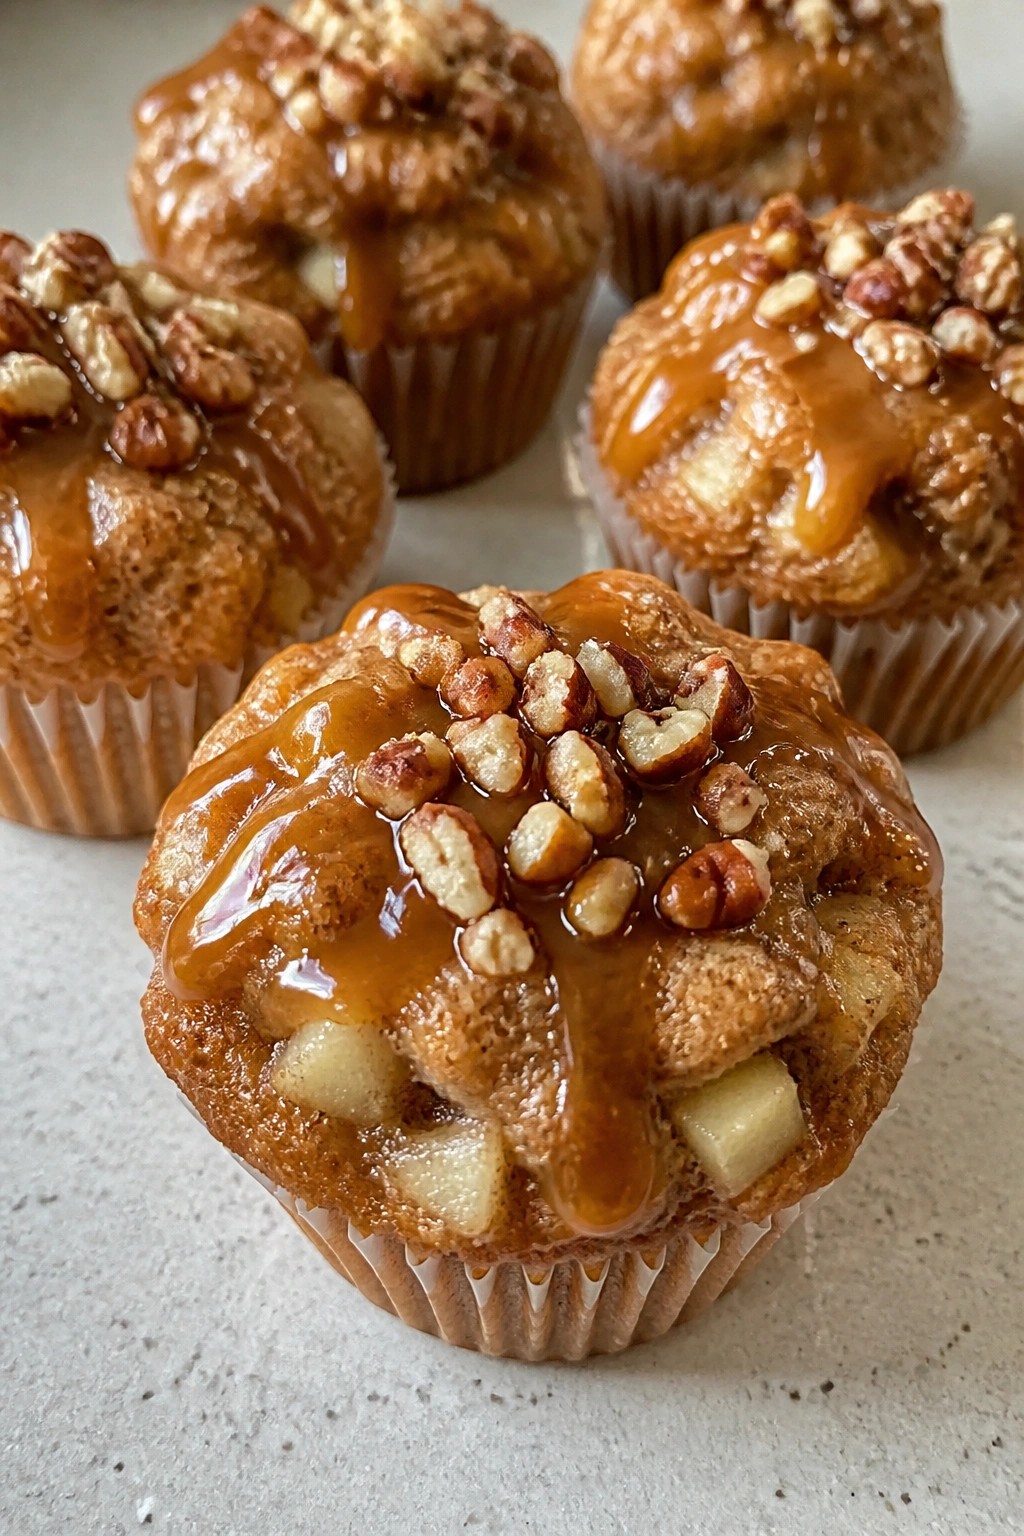
These Caramel Apple Harvest Cupcakes combine tart apple pieces with warm cinnamon and a sticky caramel finish. They suit busy bakers who want a quick Halloween treat that still feels seasonal and fun for small gatherings.
The cupcakes bake up moist with tender fruit throughout and a light crunch from the nuts on top. The caramel adds a sweet harvest note without extra steps.
Serves 4 people.
Ingredients
- 1 cup all-purpose flour
- 1/2 cup granulated sugar
- 1 teaspoon baking powder
- 1/2 teaspoon ground cinnamon
- 1/4 cup unsalted butter, softened
- 1 large egg
- 1/2 cup milk
- 1 medium apple, peeled and diced
- 1/2 cup caramel sauce
- 2 tablespoons chopped pecans
Instructions
- Preheat the oven to 350°F and line a muffin tin with 4 cupcake liners.
- In a mixing bowl, whisk the flour, sugar, baking powder, and cinnamon until evenly blended.
- Add the softened butter, egg, and milk to the dry ingredients. Stir until the batter is smooth and no dry streaks remain.
- Fold the diced apple into the batter until the pieces are distributed throughout.
- Spoon the batter evenly into the 4 prepared liners.
- Bake for 18 to 20 minutes, or until a toothpick inserted in the center comes out clean.
- Remove the cupcakes from the oven and let them cool completely in the tin.
- Drizzle the cooled cupcakes with caramel sauce and sprinkle with chopped pecans before serving.
Extra Tips
Dice the apple into small pieces so it softens fully during baking and does not weigh down the cupcakes. Warm the caramel sauce for a few seconds in the microwave if it feels too thick to drizzle smoothly. Store leftovers in an airtight container at room temperature for up to two days. Course: Dessert Cuisine: American Equipment: Mixing Bowl, Muffin Tin, Whisk
Gummy Worm Mudslide Cupcakes
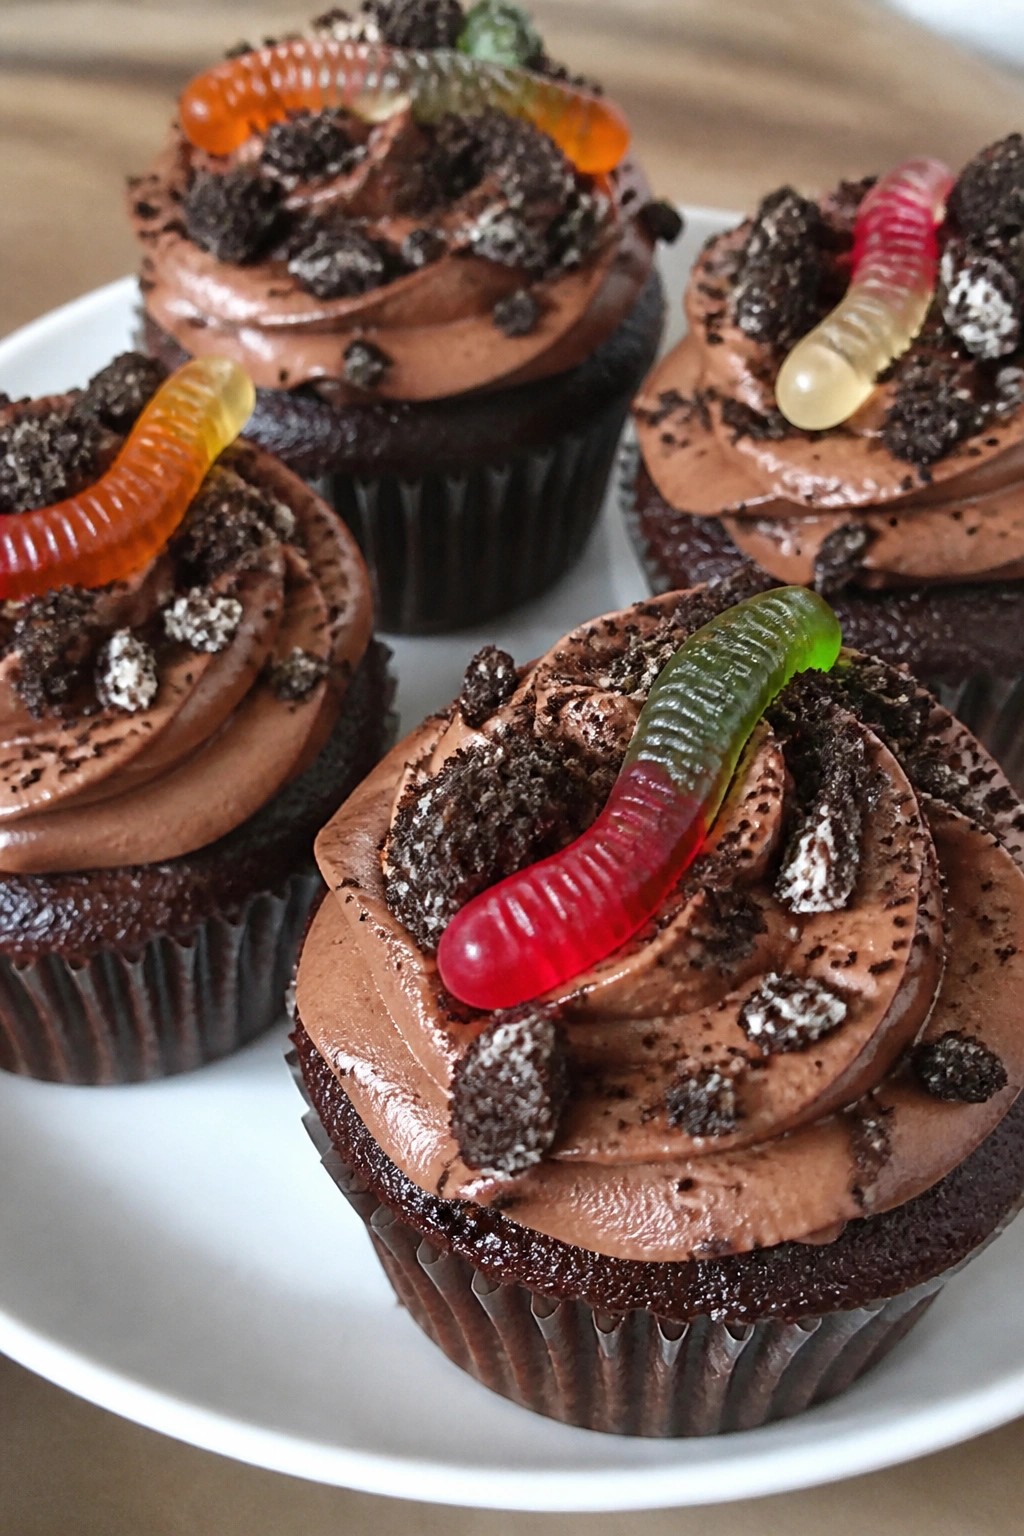
These cupcakes bring a fun Halloween twist with chocolate and coffee flavors that taste like a mudslide cocktail. The crushed cookie topping gives them a dirt-like look, and the gummy worms add a playful touch that kids and adults both enjoy. They come together quickly with simple steps, making them a good choice for busy weeknights or last-minute parties.
The moist chocolate base gets a boost from cooled coffee, while the frosting stays rich and smooth. Gummy worms on top complete the muddy effect without extra work.
Serves 4 people.
Ingredients
- 1/2 cup all-purpose flour
- 1/4 cup unsweetened cocoa powder
- 1/2 teaspoon baking soda
- 1/4 cup granulated sugar
- 1/4 cup milk
- 2 tablespoons vegetable oil
- 1/2 teaspoon vanilla extract
- 1/4 cup brewed coffee, cooled
- 1/2 cup chocolate buttercream frosting
- 1/4 cup crushed chocolate sandwich cookies
- 8 gummy worms
Instructions
- Preheat the oven to 350 degrees F and line a muffin tin with 4 paper liners.
- In a mixing bowl, stir together the flour, cocoa powder, baking soda, and sugar.
- Add the milk, oil, vanilla extract, and cooled coffee to the dry ingredients. Mix until the batter is smooth and free of lumps.
- Divide the batter evenly among the 4 liners, filling each about two-thirds full.
- Bake for 15 to 18 minutes, or until a toothpick inserted in the center comes out clean. Let the cupcakes cool completely in the tin.
- Spread the chocolate buttercream frosting over each cooled cupcake.
- Sprinkle the crushed chocolate sandwich cookies over the frosting to create a dirt effect.
- Place 2 gummy worms on top of each cupcake, pressing them lightly into the cookie crumbs.
Extra Tips
Use room-temperature coffee so it blends evenly into the batter without curdling the milk. If the frosting feels too thick, add a teaspoon of milk to loosen it for smoother spreading. Store any leftovers in an airtight container at room temperature for up to two days to keep the cookie topping crisp. Course: Dessert Cuisine: American Equipment: Mixing Bowl, Muffin Tin, Oven