

Hosting a Halloween party means needing snacks that feed a lot of people without much fuss. These finger food recipes add a spooky element while staying simple to prepare. Most use common ingredients and can be made in advance. You will find complete steps for each one so you can pick what works for your crowd. They are designed to look fun but still taste good to everyone.
Helpful Tips Before You Start
A little planning keeps the prep manageable when you are making a large batch of finger foods.
Prep Components Ahead
Mix fillings or shape bases the day before. Store them in the fridge so you only need to assemble and bake or chill on the day of the party.
Keep Everything Bite Sized
Cut or form each item into one or two bite portions. This makes them easy to pick up and eat while guests stand and talk.
Use Simple Visual Tricks
Add eyes with olive slices or draw lines with sauce to create a spooky look. These details take little time but make the tray feel themed.
Set Up Self Serve Areas
Place foods on several platters around the room with small labels. Guests can grab what they want without crowding one table.
Check Temperatures Early
Test how long each item stays good at room temperature. Swap in fresh trays from the fridge or oven so nothing sits out too long.
Mummy Jalapeño Poppers
These mummy jalapeño poppers turn a classic party snack into a Halloween-themed finger food. They suit crowds at spooky gatherings where guests want something easy to pick up and eat while mingling.
The creamy filling balances the heat from the peppers, while the dough strips create a flaky outer layer. Olive slices add simple eyes for the mummy look.

Serves 4 people.
Ingredients
- 8 large jalapeño peppers
- 4 ounces cream cheese, softened
- ½ cup shredded cheddar cheese
- 1 teaspoon garlic powder
- 1 package refrigerated crescent roll dough
- 16 black olive slices
Instructions
- Preheat the oven to 375 degrees and line a baking sheet with parchment paper.
- Cut each jalapeño pepper in half lengthwise and remove the seeds and membranes.
- Mix the cream cheese, cheddar cheese, and garlic powder in a bowl until smooth.
- Spoon the cheese mixture into each jalapeño half.
- Unroll the crescent roll dough and cut it into thin strips.
- Wrap the dough strips around each stuffed jalapeño to resemble mummy bandages, leaving space for the eyes.
- Place two olive slices on each popper as eyes.
- Arrange the poppers on the baking sheet and bake for 15 to 18 minutes until the dough turns golden.
Extra Tips
Leave small gaps in the dough wrapping so the olive eyes stand out clearly after baking. Use gloves when handling the jalapeños to avoid skin irritation from the peppers. These taste best served warm right after baking. Course: Appetizer Cuisine: American Equipment: Baking sheet, Mixing bowl, Knife
Spiderweb Seven-Layer Dip Cups
These individual dip cups turn a classic party dip into a grab-and-go option for Halloween gatherings. Each cup layers familiar Tex-Mex flavors in clear glasses so guests can see the stripes, while the sour cream spiderweb on top adds a quick spooky detail without extra work. The result is creamy, savory, and a little crunchy when scooped with chips.
The recipe works well for small crowds or as part of a larger spread because the portions stay neat and require no plates. Black olives double as both a layer and spider accents, keeping the look simple yet themed.

Serves 4 people.
Ingredients
- 1 can (16 oz) refried beans
- 1 teaspoon taco seasoning
- 1 cup guacamole
- 1 cup sour cream, divided
- 1 cup shredded cheddar cheese
- 1/2 cup diced tomatoes
- 1/4 cup sliced black olives
- 2 tablespoons chopped green onions
Instructions
- Mix the refried beans with taco seasoning in a bowl until evenly combined. Spoon an even layer of the seasoned beans into the bottom of four small clear cups.
- Add a layer of guacamole over the beans in each cup, spreading it gently to keep the layers distinct. Reserve two tablespoons of sour cream for the spiderweb design, then spread the remaining sour cream over the guacamole.
- Sprinkle shredded cheddar cheese evenly over the sour cream layer in each cup. Top the cheese with diced tomatoes, followed by sliced black olives and chopped green onions.
- Place the reserved sour cream in a small zip-top bag, snip a tiny corner, and pipe three or four concentric circles on top of each cup. Drag a toothpick from the center outward through the circles to form the spiderweb pattern. Add two olive slices to each web to create a simple spider.
Extra Tips
Prepare the cups up to four hours ahead and keep them covered in the refrigerator so the sour cream web stays neat. If the guacamole browns slightly on the edges, a thin extra layer of sour cream hides it. Serve with sturdy tortilla chips on the side for scooping. Course: Appetizer Cuisine: American Equipment: Mixing bowl, Small zip-top bag, Clear cups, Toothpick
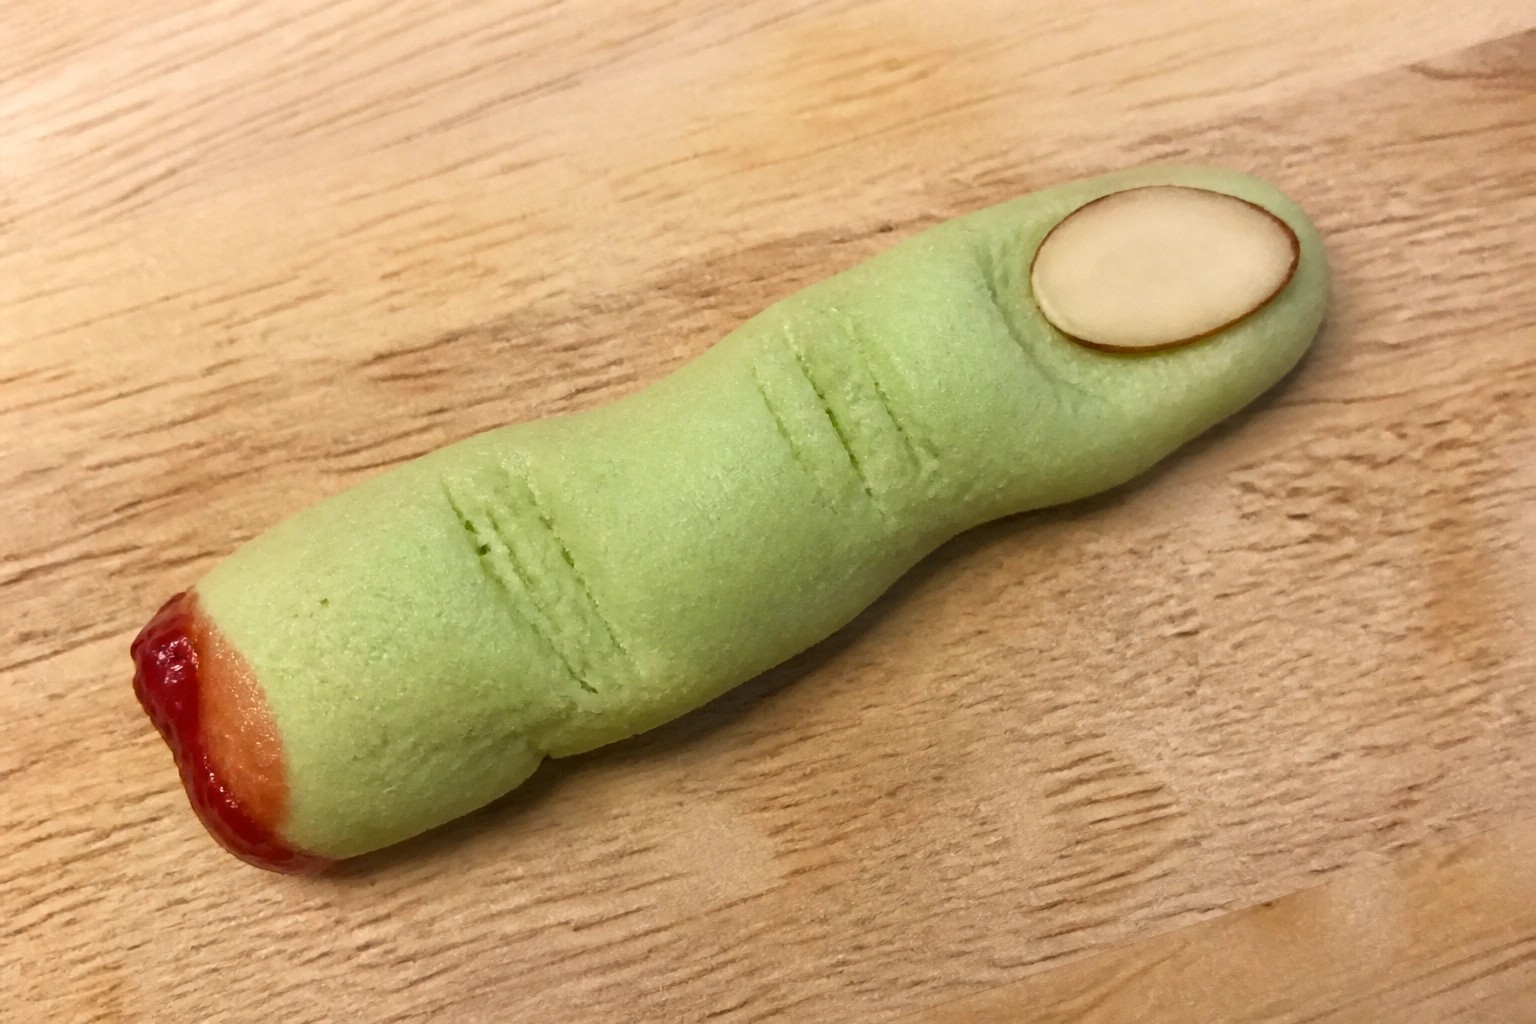
Witch Finger Pretzel Rods
These Witch Finger Pretzel Rods give a crunchy base with a sweet green coating and an almond "nail" on top. They come together quickly and look right at home on a Halloween snack table.
They work well for small gatherings or as one item in a bigger spread. The finished rods stay crisp under the coating and give a light chocolate flavor with a touch of salt.

Serves 4 people.
Ingredients
- 12 pretzel rods
- 10 ounces green candy melts
- 12 whole almonds
- 2 tablespoons red gel icing
Instructions
- Line a baking sheet with parchment paper and set it aside.
- Place the green candy melts in a microwave-safe bowl and heat in 30-second bursts, stirring after each, until fully melted and smooth.
- Dip each pretzel rod into the melted candy, leaving about one inch uncoated at the bottom to act as the "knuckle" area. Let excess coating drip back into the bowl.
- Place the coated pretzel on the prepared baking sheet. Press one almond onto the tip to form the fingernail.
- Use a toothpick to lightly score two lines across the knuckle area for texture.
- Repeat with the remaining pretzels, then let them set at room temperature until the coating is firm.
- Pipe a small amount of red gel icing around the base of each almond and along the scored lines to create a bloody effect.
Extra Tips
If the candy melts thicken while you work, warm them for 10 seconds and stir again. Store finished rods in an airtight container at room temperature for up to two days. Skip the red gel if you prefer a milder look. Course: Appetizer Cuisine: American Equipment: Microwave-safe bowl, Baking sheet, Parchment paper
Eyeball Turkey Meatball Skewers
These skewers turn simple turkey meatballs into a fun party bite with built-in spooky details. The meatballs stay light and savory while the olive and cheese toppings create an easy eyeball effect that fits right into a Halloween spread. They work well as a handheld option when guests are moving around.
The flavor stays mild with herbs and garlic so they appeal to a crowd without being too heavy. Texture comes from a lightly seared outside and tender center, making them easy to eat off a skewer.

Serves 4 people.
Ingredients
- 1 pound ground turkey
- ½ cup panko breadcrumbs
- 1 large egg
- 2 teaspoons Italian seasoning
- ½ teaspoon salt
- ¼ teaspoon black pepper
- 2 tablespoons olive oil
- 12 small fresh mozzarella balls
- 12 pitted black olives, halved
- 12 wooden skewers
Instructions
- Mix the ground turkey, panko breadcrumbs, egg, Italian seasoning, salt, and black pepper in a bowl until evenly combined. Shape the mixture into 12 meatballs about 1 ½ inches wide.
- Heat the olive oil in a large skillet over medium heat. Add the meatballs and cook, turning occasionally, until browned on all sides and cooked through, about 10 minutes.
- Remove the meatballs from the skillet and let them cool for 2 minutes. Press one mozzarella ball onto the top of each meatball. Place one olive half, cut side down, in the center of each mozzarella ball to form the eyeball.
- Thread three finished meatballs onto each wooden skewer. Arrange the skewers on a platter for serving.
Extra Tips
Make the meatballs a day ahead and store them in the fridge, then add the mozzarella and olives right before skewering so the cheese stays fresh. If the meatballs feel too soft to hold shape, chill the formed balls for 15 minutes before cooking. Skip extra sauce on top because it can hide the eyeball detail. Course: Appetizer Cuisine: American Equipment: Mixing bowl, Large skillet, Wooden skewers
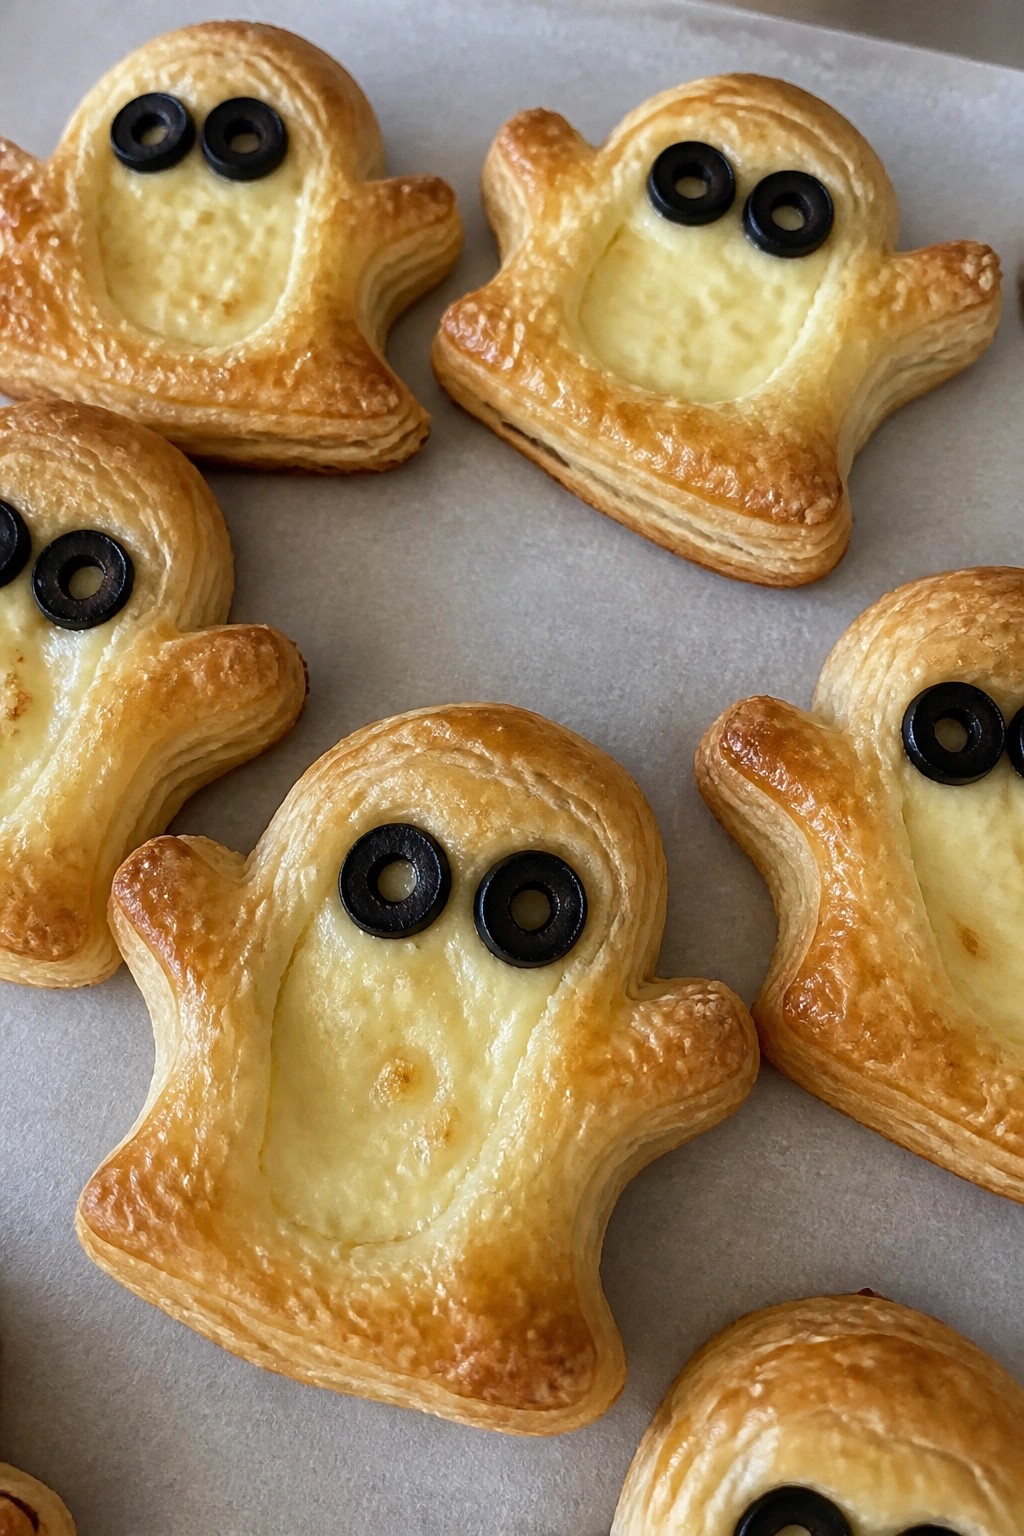
Ghostly Cheese Puff Pastries
These Ghostly Cheese Puff Pastries add a playful touch to any Halloween table. They work well as finger foods because each piece is small enough to grab and eat in a few bites. The buttery layers stay crisp while the cheese center stays soft and creamy.
The mild filling keeps things simple so the focus stays on the ghost shapes. Black olive eyes give each pastry a clear face without extra steps.
Serves 4 people.
Ingredients
- 1 sheet frozen puff pastry, thawed
- 4 ounces cream cheese, softened
- 1/2 cup shredded mozzarella cheese
- 1 egg
- 8 black olives, sliced
Instructions
- Preheat the oven to 400 degrees and line a baking sheet with parchment paper.
- Mix the cream cheese and mozzarella cheese in a bowl until smooth.
- Unfold the puff pastry sheet on a lightly floured surface and cut out eight ghost shapes with a sharp knife or cutter.
- Place a spoonful of the cheese mixture in the center of four ghost shapes. Top each with a second ghost shape and press the edges firmly to seal.
- Beat the egg and brush it lightly over the top of each pastry.
- Add two olive slices to each pastry to form eyes.
- Transfer the pastries to the baking sheet and bake for 15 to 18 minutes until golden and puffed.
Extra Tips
Let the pastries cool for a few minutes before moving them so the cheese sets slightly and does not ooze out. If you want to prepare them ahead, assemble and seal the shapes, then refrigerate them on the tray until you are ready to brush, add eyes, and bake. Use a thin layer of filling to avoid leaks during baking. Course: Appetizer Cuisine: American Equipment: Baking sheet, Mixing bowl, Knife or cookie cutter
Bat Wing BBQ Chicken Drumettes
These drumettes bring a simple spooky touch to any Halloween spread. The dark BBQ coating gives them a bat-wing look while delivering smoky, slightly sweet flavor that works well as a handheld bite at parties.
They come out with crispy edges and juicy meat inside. Serve them hot so guests can grab a few without needing plates or forks.

Serves 4 people.
Ingredients
- 12 chicken drumettes
- 1 cup BBQ sauce
- 2 tablespoons olive oil
- 1 teaspoon smoked paprika
- 1 teaspoon garlic powder
- ½ teaspoon salt
- ¼ teaspoon black pepper
Instructions
- Heat the oven to 400°F and line a baking sheet with parchment paper.
- In a large bowl, stir together the olive oil, smoked paprika, garlic powder, salt, and black pepper.
- Add the chicken drumettes to the bowl and toss until each piece is evenly coated with the spice mixture.
- Arrange the drumettes in a single layer on the prepared baking sheet.
- Bake for 25 minutes, then remove the sheet from the oven.
- Brush each drumette generously with BBQ sauce and return the sheet to the oven.
- Bake for another 10 minutes until the sauce looks sticky and the edges start to darken.
Extra Tips
Arrange the finished drumettes on a dark platter with the meaty ends pointing outward so they resemble small bat wings. If you want to make them ahead, coat the drumettes in the oil and spices the night before and keep them covered in the fridge. Leftovers reheat best in a 350°F oven for 8 minutes to keep the skin crisp rather than using a microwave. Course: Appetizer Cuisine: American Equipment: Baking sheet, Large bowl, Pastry brush
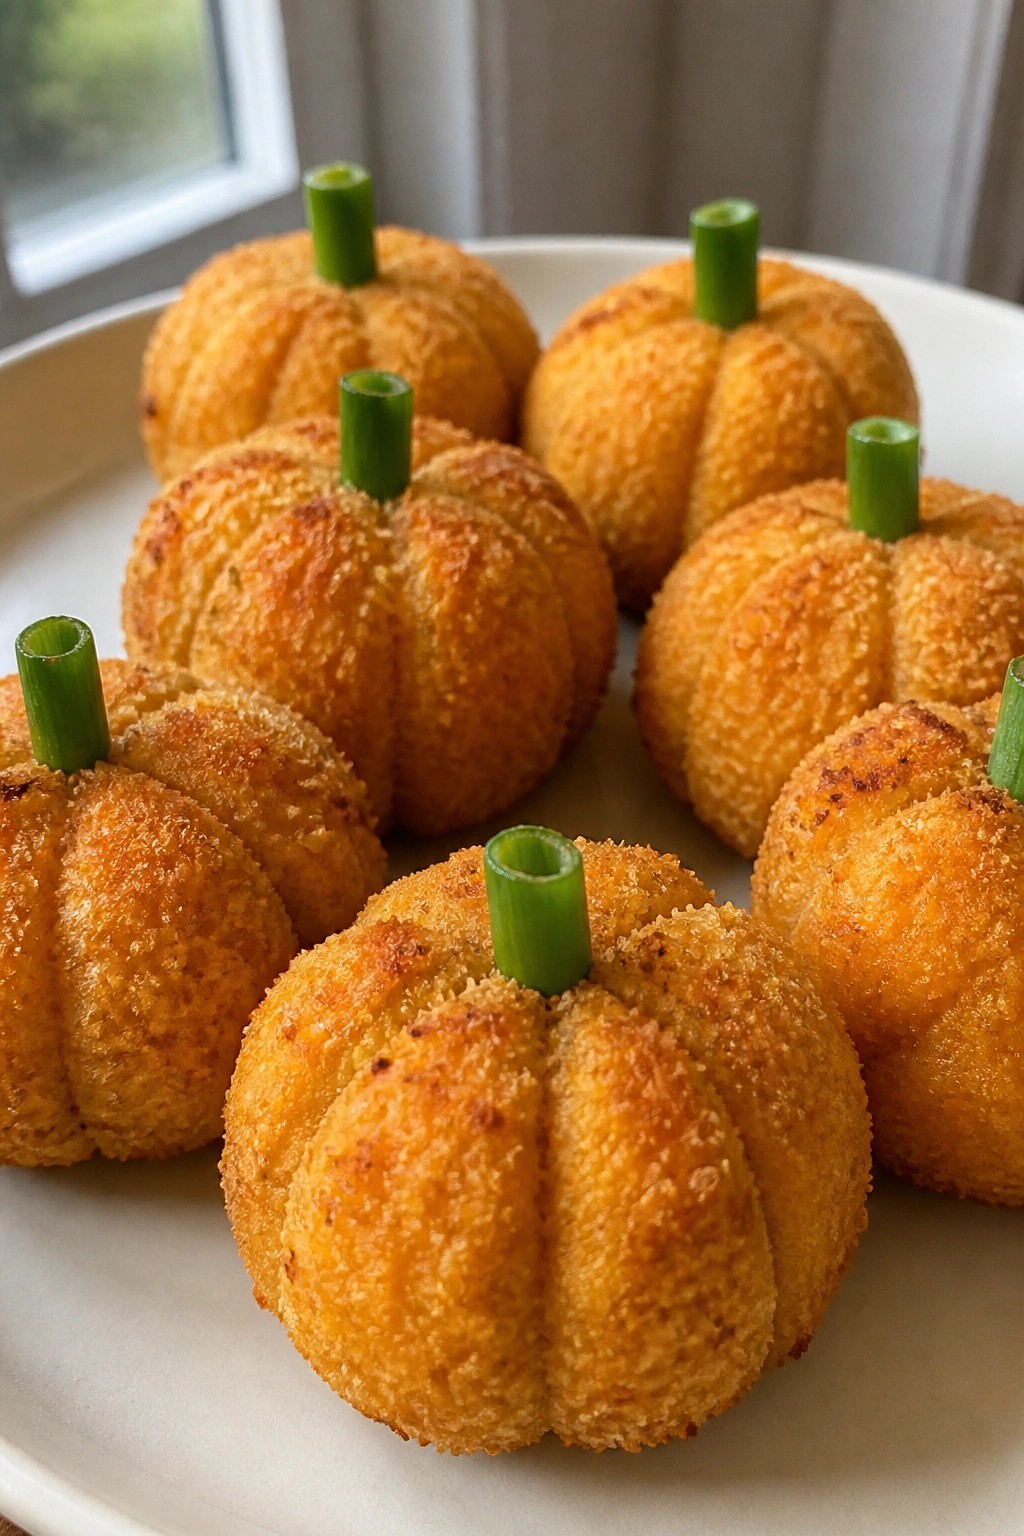
Pumpkin-Shaped Buffalo Chicken Bites
These bites turn classic buffalo chicken into a fun party snack that fits right into a Halloween spread. The ground chicken mixture gets plenty of heat from the sauce and stays moist with cheddar mixed in, while the green onion stems give each one a pumpkin look. They work well as handheld food for crowds and hold their shape after baking.
They bring a spicy, savory flavor with a bit of crunch on the outside from the panko coating. The orange tint from the cheese helps the pumpkin shape stand out on a platter without extra coloring.
Serves 4 people.
Ingredients
- 1 lb ground chicken
- 1/2 cup buffalo sauce
- 3/4 cup shredded cheddar cheese
- 1 large egg
- 1/2 cup panko breadcrumbs
- 4 green onions
- 1 tbsp olive oil
- 1/2 tsp salt
- 1/4 tsp black pepper
Instructions
- Preheat the oven to 400 degrees and line a baking sheet with parchment paper.
- Chop the white parts of the green onions and set the green tops aside for stems.
- In a mixing bowl, combine the ground chicken, buffalo sauce, cheddar cheese, egg, panko breadcrumbs, chopped green onion, salt, and pepper.
- Mix until the ingredients are evenly distributed.
- Divide the mixture into 12 portions and roll each into a ball.
- Use a small knife to score shallow vertical lines around each ball to create a pumpkin shape.
- Cut the green onion tops into 12 short pieces and press one into the top of each ball as a stem.
- Place the shaped bites on the baking sheet and brush lightly with olive oil.
- Bake for 18 to 20 minutes until the internal temperature reaches 165 degrees and the outsides are lightly browned.
Extra Tips
Score the lines gently so the bites keep their round form while still showing the ridges. If the mixture feels too wet to hold shape, add one extra tablespoon of panko before forming. Leftovers store in an airtight container in the fridge for up to two days and reheat best in a 350-degree oven for 8 minutes to keep the coating crisp. Course: Appetizer Cuisine: American Equipment: Mixing Bowl, Baking Sheet
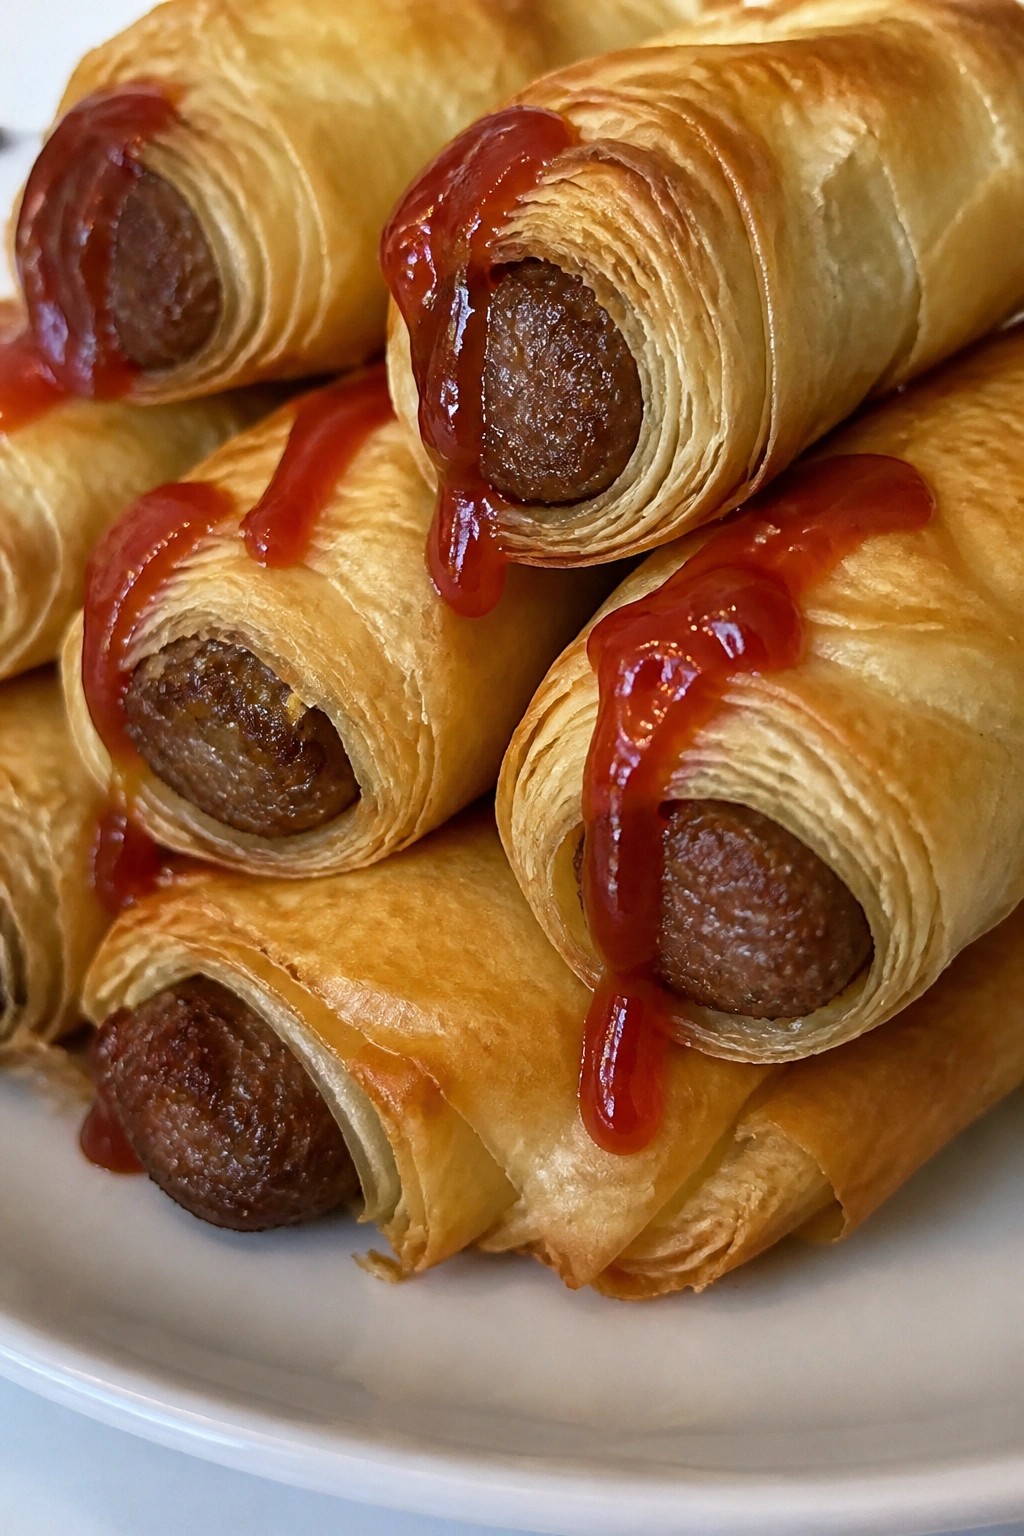
Bloody Sausage Phyllo Rolls
These rolls turn simple sausages into a spooky party snack. The flaky phyllo wraps around savory links, and a drizzle of ketchup creates the bloody effect that fits right into a Halloween spread. They work well for crowds because they stay crisp after baking and require little hands-on time once assembled.
The texture combines crunchy layers outside with juicy sausage inside. A side of ketchup adds tangy flavor that balances the richness. Guests can grab them easily while mingling.
Serves 4 people.
Ingredients
- 8 breakfast sausage links
- 8 sheets phyllo dough, thawed
- 1/4 cup butter, melted
- 1/2 cup ketchup
Instructions
- Preheat the oven to 375 degrees and line a baking sheet with parchment paper.
- Cook the sausage links in a skillet over medium heat until browned and cooked through. Drain on paper towels and let them cool slightly.
- Lay one sheet of phyllo dough on a clean surface and brush it lightly with melted butter. Place one sausage link at one end and roll it tightly in the phyllo.
- Repeat with the remaining sausages and phyllo sheets. Arrange the rolls seam-side down on the baking sheet.
- Brush the tops of the rolls with any remaining melted butter. Bake for 15 to 18 minutes until the phyllo turns golden and crisp.
- Transfer the rolls to a serving plate and drizzle or serve with ketchup on the side.
Extra Tips
Brush the phyllo evenly but not too heavily so the layers stay light and flaky rather than soggy. Prepare the rolls up to the baking step a few hours ahead and keep them covered in the fridge. Warm them just before guests arrive so they stay crisp. Use a squeeze bottle for the ketchup if you want neater bloody lines on each roll. Course: Appetizer Cuisine: American Equipment: Baking Sheet, Skillet, Pastry Brush, Oven
Creepy Crawler Veggie Sushi Rolls
These veggie sushi rolls stand out at Halloween parties because the vegetable strips peek out like insect legs from the nori wrap. They work well as finger foods since each roll can be picked up easily and eaten in a bite or two.
The finished rolls have a mix of sticky rice, crisp vegetables, and creamy avocado. The mild flavors come through without overpowering other party snacks.

Serves 4 people.
Ingredients
- 1 cup sushi rice
- 2 nori sheets
- 1 cucumber, cut into thin strips
- 2 carrots, cut into thin strips
- 1 avocado, sliced
- 1 red bell pepper, cut into thin strips
- 1 tablespoon black sesame seeds
- Soy sauce, for serving
Instructions
- Rinse the sushi rice under cold water until the water runs clear. Cook the rice according to package directions and let it cool to room temperature.
- Place one nori sheet on a bamboo mat with the shiny side down. Spread half the cooled rice evenly over the nori, leaving a 1-inch border at the top.
- Arrange strips of cucumber, carrot, avocado, and red bell pepper in a line across the center of the rice.
- Roll the sushi tightly from the bottom edge, pressing gently as you go. Seal the top edge with a little water.
- Repeat with the second nori sheet and remaining rice and vegetables.
- Use a sharp knife to slice each roll into 6 to 8 pieces. Sprinkle black sesame seeds on top of each piece to form small dots that resemble eyes.
- Serve the rolls with soy sauce on the side.
Extra Tips
Slice the vegetables into uniform thin strips so they stay in place during rolling and give the rolls a consistent crawler shape. If the rice feels too sticky, wet the knife between cuts to keep the slices clean. These rolls taste best the day they are made, but leftovers can be stored in an airtight container in the fridge for up to one day. Course: Appetizer Cuisine: Asian Equipment: Bamboo sushi mat, Sharp knife, Mixing bowl
Frankenstein Avocado Toast Bites
These Frankenstein Avocado Toast Bites bring a lighthearted Halloween touch to any party table. They work well as a quick finger food option when you need something green and simple that still feels themed for the occasion. The creamy avocado spread sits on crisp toast, with easy olive and nori details that give each bite a monster face.
The flavor stays mild and fresh, with a bit of tang from lemon and a pleasant crunch from the bread base. Guests can pick them up without utensils, making them practical for mingling crowds.

Serves 4 people.
Ingredients
- 4 slices whole wheat bread
- 2 ripe avocados
- 1 tablespoon lemon juice
- 1/2 teaspoon salt
- 1/4 teaspoon black pepper
- 8 black olives, halved
- 1 sheet nori, cut into thin strips
- 2 tablespoons chopped chives
Instructions
- Toast the four slices of bread until they reach a light golden color and feel crisp.
- Cut each toasted slice into three small rectangles to create 12 bites total.
- Mash the avocados in a bowl with the lemon juice, salt, and black pepper until the mixture is mostly smooth with a few small chunks.
- Spread the avocado mixture evenly across the top of each bread rectangle.
- Place two olive halves on each bite to form eyes.
- Lay one nori strip across the top edge of each bite to create hair.
- Add a few chive pieces vertically below the eyes on each bite to form stitches.
Extra Tips
Use bread slices that are at least one inch thick so the bites hold their shape after cutting. Make the nori strips and olive halves ahead of time and keep them in small bowls for quick assembly right before serving. If the avocado mixture starts to brown, stir in a little extra lemon juice to keep the color bright. Course: Appetizer Cuisine: American Equipment: Toaster, Mixing bowl, Knife
Skeleton Bone Carrot Sticks with Ranch Dip
These carrot sticks get cut into simple bone shapes that fit right into a Halloween spread. They bring crunch and a cool look without needing much time or special tools. The homemade ranch stays thick enough to cling to each piece and adds a creamy contrast that balances the fresh carrots.
This works well for parties where guests grab food while moving around. The mild herb flavor in the dip keeps things light next to heavier snacks on the table.

Serves 4 people.
Ingredients
- 8 medium carrots
- 1/2 cup mayonnaise
- 1/2 cup sour cream
- 1 tablespoon dried dill
- 1 teaspoon garlic powder
- 1 teaspoon onion powder
- 1/2 teaspoon salt
- 1/4 teaspoon black pepper
Instructions
- Peel the carrots and trim off the ends.
- Cut each carrot into 4 to 5 inch lengths. Shape the ends wider to form simple bone outlines.
- Place the cut carrots in a bowl of cold water while you prepare the dip.
- In a mixing bowl, combine the mayonnaise, sour cream, dried dill, garlic powder, onion powder, salt, and black pepper.
- Stir the dip until smooth and evenly mixed.
- Drain the carrot sticks and pat them dry with a towel.
- Arrange the sticks on a platter and serve with the ranch dip in a small bowl beside them.
Extra Tips
Cut the carrot ends slightly rounded so they hold the dip better without slipping. Mix the ranch a few hours ahead and keep it covered in the fridge to let the flavors settle. If the dip thickens too much, stir in a teaspoon of water before serving. Course: Appetizer Cuisine: American Equipment: Vegetable peeler, Sharp knife, Mixing bowl
Vampire Bite Caprese Skewers
These skewers turn a classic Caprese salad into a simple party bite that fits right into a Halloween spread. The red tomatoes and dark balsamic drizzle give a subtle nod to the theme while the fresh ingredients keep everything light and easy to eat by hand.
They work well for casual gatherings where guests want something quick and familiar. The combination of juicy tomato, creamy mozzarella, and basil stays bright with a touch of tangy sweetness from the glaze.

Serves 4 people.
Ingredients
- 12 wooden skewers
- 24 cherry tomatoes
- 12 bocconcini mozzarella balls
- 12 fresh basil leaves
- 2 tablespoons olive oil
- 1/4 cup balsamic vinegar
- Salt and black pepper to taste
Instructions
- Thread two cherry tomatoes, one mozzarella ball, and one basil leaf onto each skewer in this order: tomato, mozzarella, basil, tomato.
- Place the skewers on a serving plate and drizzle them lightly with olive oil. Sprinkle with salt and black pepper.
- Pour the balsamic vinegar into a small saucepan and heat over medium heat. Simmer for 4 to 5 minutes until it thickens slightly into a glaze.
- Remove the pan from heat and let the glaze cool for one minute. Drizzle it over the skewers to create a red effect across the tomatoes.
Extra Tips
Make the balsamic glaze ahead and store it in a small jar at room temperature so it stays pourable. If the glaze thickens too much before serving, warm it gently for a few seconds. Skip the glaze if you prefer a milder flavor and just finish with extra olive oil and fresh cracked pepper instead. Course: Appetizer Cuisine: Italian Equipment: Wooden skewers, Small saucepan, Serving plate
Haunted House Sliders with Pickle Eyes
These sliders bring a simple spooky touch to any Halloween spread. The beef patties sit on soft buns with melted cheese, while pickle slices on top create the look of eyes peering from a haunted house. They work well as a make-ahead party bite that guests can grab without plates or forks.
The flavor stays classic with savory beef, sharp cheese, and a touch of creamy mayonnaise. The pickles add a crisp, tangy bite that balances the richness and gives each slider its Halloween detail.

Serves 4 people.
Ingredients
- 1 lb ground beef
- Salt and pepper to taste
- 2 tablespoons vegetable oil
- 8 slider buns
- 8 slices cheddar cheese
- 16 dill pickle slices
- 1/4 cup mayonnaise
Instructions
- Season the ground beef with salt and pepper, then divide and shape it into 8 small patties that fit the slider buns.
- Heat the vegetable oil in a large skillet over medium heat. Add the patties and cook for 3 to 4 minutes per side until browned and cooked through.
- Place one slice of cheddar cheese on each patty during the last minute of cooking so it melts.
- Spread mayonnaise on the bottom half of each slider bun. Set a cooked patty on top.
- Add the top bun and place two dill pickle slices on each one to form the eyes.
Extra Tips
Toast the buns lightly before assembly if you want extra structure for the pickles to sit on. You can shape the patties ahead and keep them chilled until you are ready to cook. Leftovers reheat best in a low oven so the buns stay soft and the cheese does not overcook. Course: Appetizer Cuisine: American Equipment: Large skillet, Mixing bowl, Spatula