

Planning a Halloween party means finding food that looks fun but stays simple to make. I gathered these ideas to give you practical options that work for different group sizes. Most use ingredients you can find at a regular store and come together without much fuss. You will see both sweet treats and savory bites that fit a busy schedule. Each recipe includes steps to help you get everything ready on time.
Helpful Tips Before You Start
A little planning makes it easier to pull off multiple spooky dishes without last minute stress.
Choose recipes with overlap
Pick a few items that share ingredients like cream cheese or black olives. This cuts down on shopping and prep time.
Make components in advance
Assemble dips, doughs, and cut vegetables the day before. Store them covered in the fridge so you only need to finish and plate on party day.
Keep shapes simple
Use round cutters or a melon baller for eyes and skulls. These tools create clear Halloween details faster than freehand work.
Set up a small test batch
Cook one version of any new recipe first. This confirms timing and portion size before you scale up for the full crowd.
Add one low effort savory option
Include at least one quick tray like stuffed peppers or cheese cubes. It balances the sweets and gives guests something to snack on while other dishes finish.
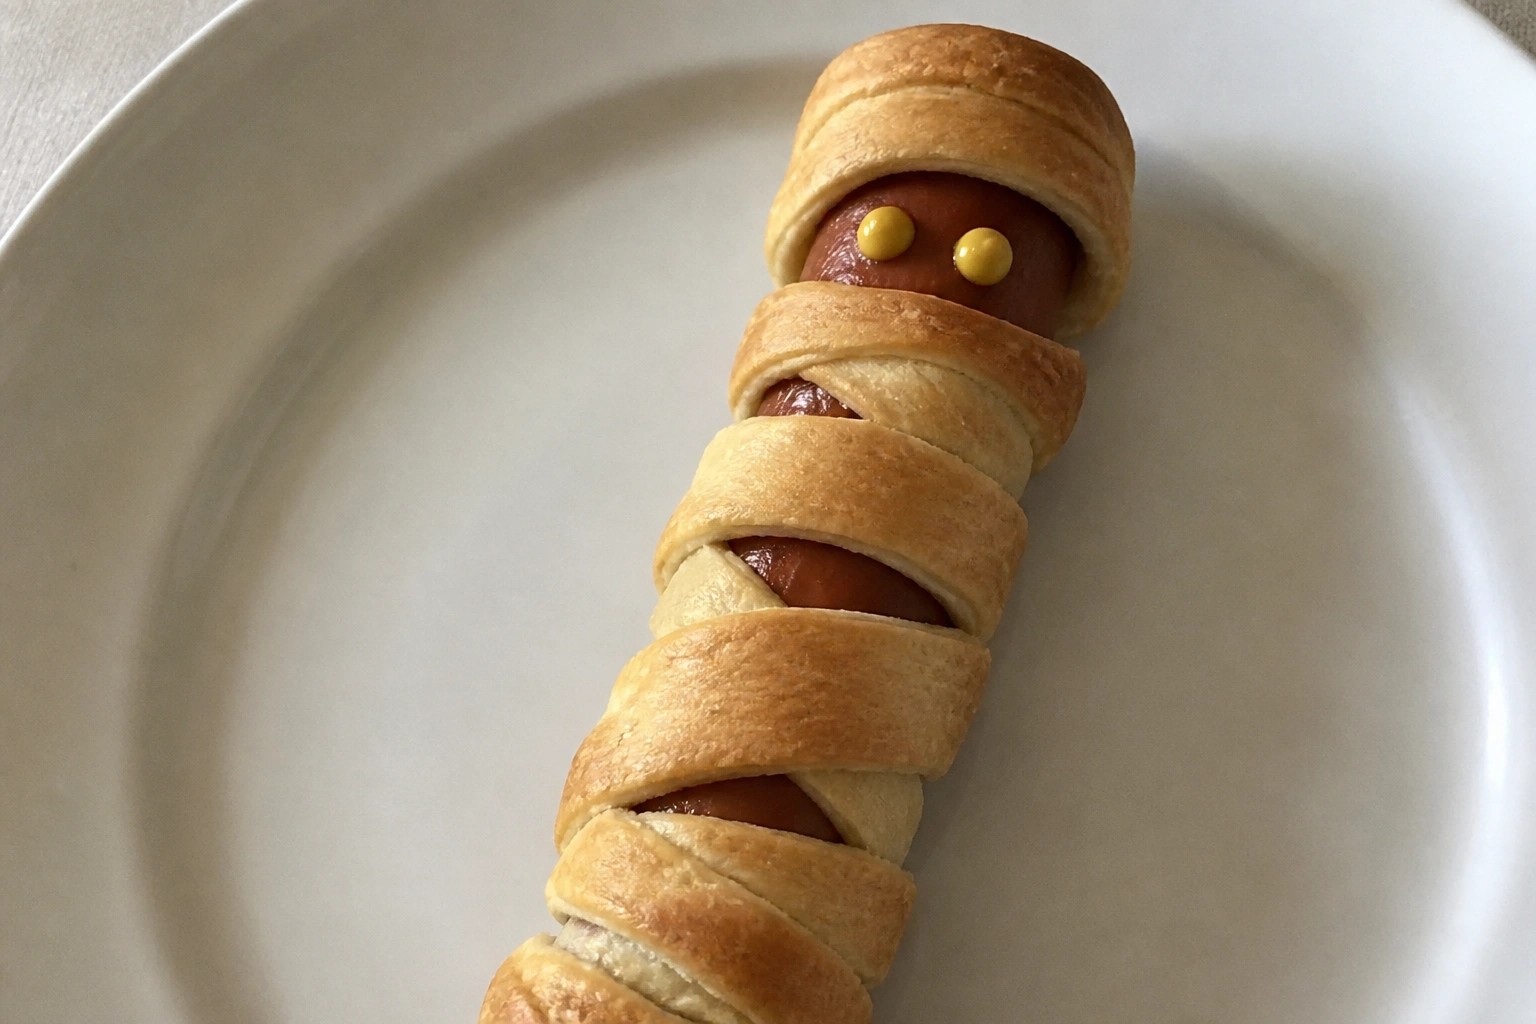
Mummy-Wrapped Sausage Sliders with Mustard Dip
These sliders turn ordinary sausages into a fun Halloween treat by wrapping them in strips of dough that bake up golden and flaky. They work well for a party spread because they are easy to pick up and eat without much fuss. The savory sausage pairs with the light, crisp dough and a simple tangy dip on the side.
The finished sliders have a nice contrast of juicy meat inside and a slightly crunchy exterior from the baked dough. The mustard dip adds a bright note that balances the richness.

Serves 4 people.
Ingredients
- 8 small sausages
- 1 package (8 oz) crescent roll dough
- 8 slider buns
- 1/4 cup yellow mustard
- 2 tablespoons mayonnaise
Instructions
- Preheat the oven to 375°F and line a baking sheet with parchment paper.
- Unroll the crescent roll dough on a clean surface and cut it into thin strips about 1/2 inch wide.
- Wrap each sausage with several dough strips, leaving small gaps so the sausage shows through like mummy bandages. Place the wrapped sausages on the prepared baking sheet.
- Bake for 12 to 15 minutes until the dough is golden brown and the sausages are cooked through.
- While the sausages bake, stir the yellow mustard and mayonnaise together in a small bowl to make the dip.
- Split the slider buns and place one mummy-wrapped sausage in each bun. Serve the sliders with the mustard dip on the side.
Extra Tips
Make the dip a few hours ahead and keep it in the fridge so the flavors have time to blend. If the dough strips start to slide off before baking, press them gently into place. Leftovers reheat best in a 350°F oven for five minutes to keep the dough crisp rather than using a microwave. Course: Appetizer Cuisine: American Equipment: Baking sheet, Oven, Mixing bowl, Knife
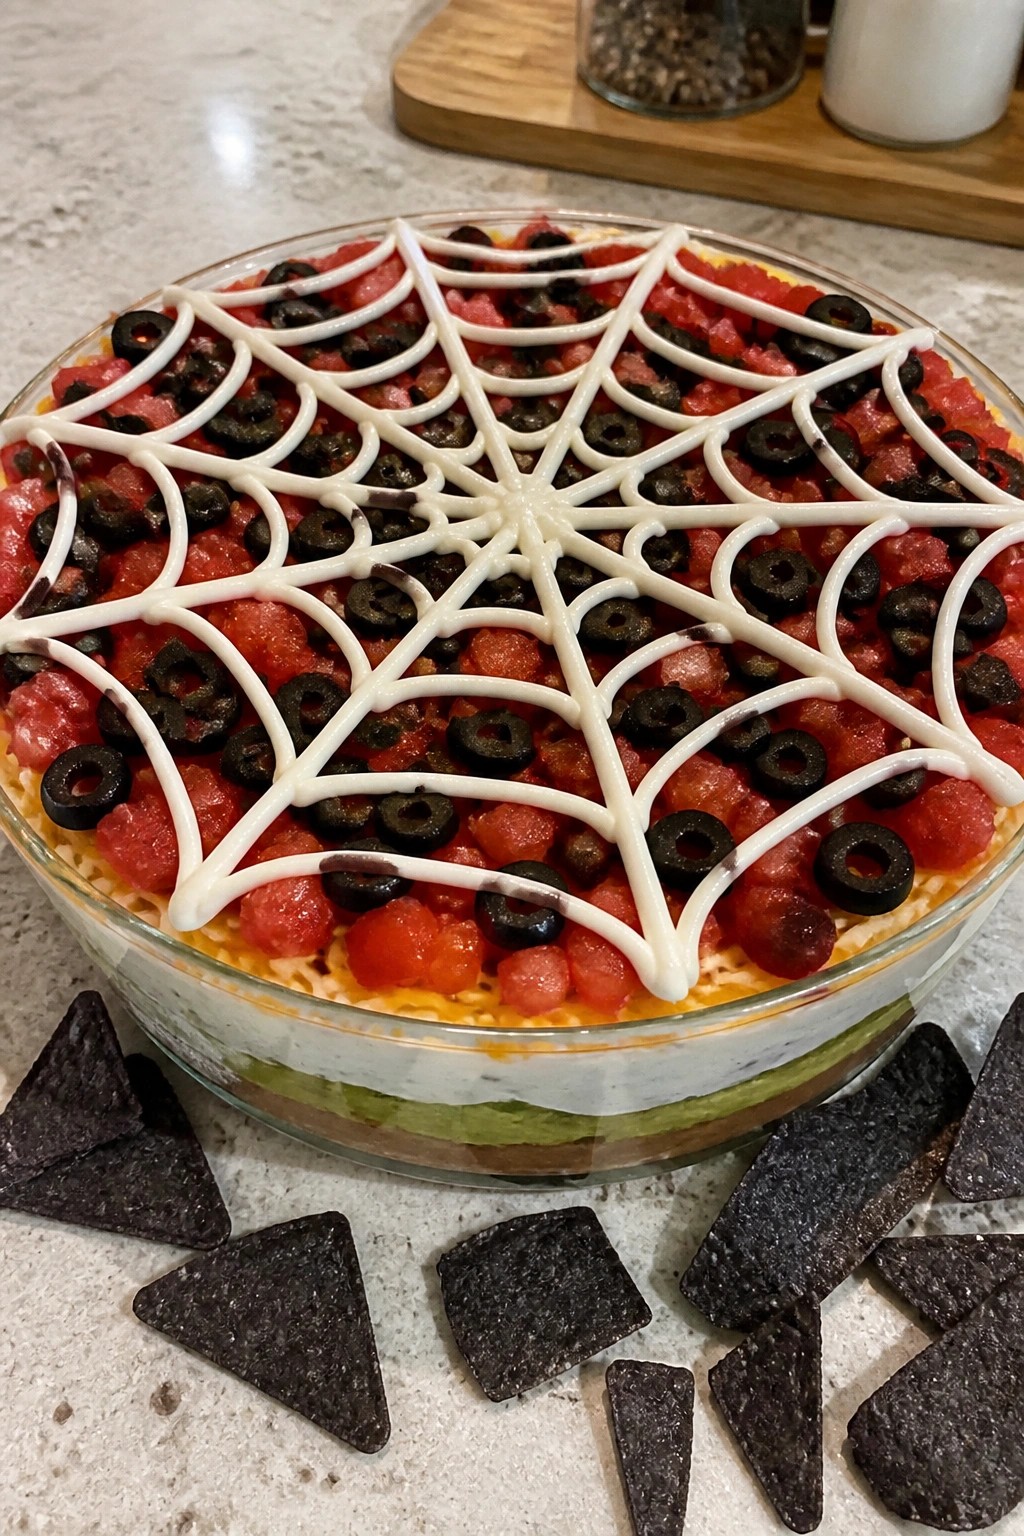
Spiderweb Seven-Layer Taco Dip with Black Tortilla Chips
This seven-layer taco dip gets a spooky upgrade with a sour cream spiderweb piped right on top. The black tortilla chips add contrast that fits right into a Halloween spread. It stays creamy and savory with familiar taco flavors that guests can scoop easily.
It works well as a make-ahead appetizer for parties since the layers hold up in the fridge. The mix of beans, guacamole, and cheese gives it a hearty texture while the web design keeps the look festive without extra effort.
Serves 4 people.
Ingredients
- 1 (16 oz) can refried beans
- 1 cup guacamole
- 1 cup sour cream, divided
- 2 teaspoons taco seasoning
- 1 cup shredded cheddar cheese
- ½ cup diced tomatoes
- ¼ cup sliced black olives
- Black tortilla chips for serving
Instructions
- Spread the refried beans evenly across the bottom of a shallow serving dish to form the first layer.
- Mix ¾ cup sour cream with the taco seasoning in a small bowl until smooth. Spread this mixture over the beans as the second layer.
- Spoon the guacamole over the sour cream layer and spread it gently to cover.
- Sprinkle the shredded cheddar cheese evenly across the guacamole.
- Add the diced tomatoes in an even layer over the cheese.
- Scatter the sliced black olives on top of the tomatoes.
- Place the remaining ¼ cup sour cream in a small zip-top bag and snip off one corner. Pipe concentric circles on the surface, then drag a toothpick from the center outward to create the spiderweb design.
- Serve with black tortilla chips on the side.
Extra Tips
Pipe the sour cream web right before serving so the lines stay sharp. If the guacamole browns slightly during chilling, the cheese and olives on top will hide it. Store any leftovers in an airtight container in the fridge for up to two days and refresh the web with a little extra sour cream if needed. Course: Appetizer Cuisine: Mexican Equipment: Shallow serving dish, Mixing bowl, Zip-top bag
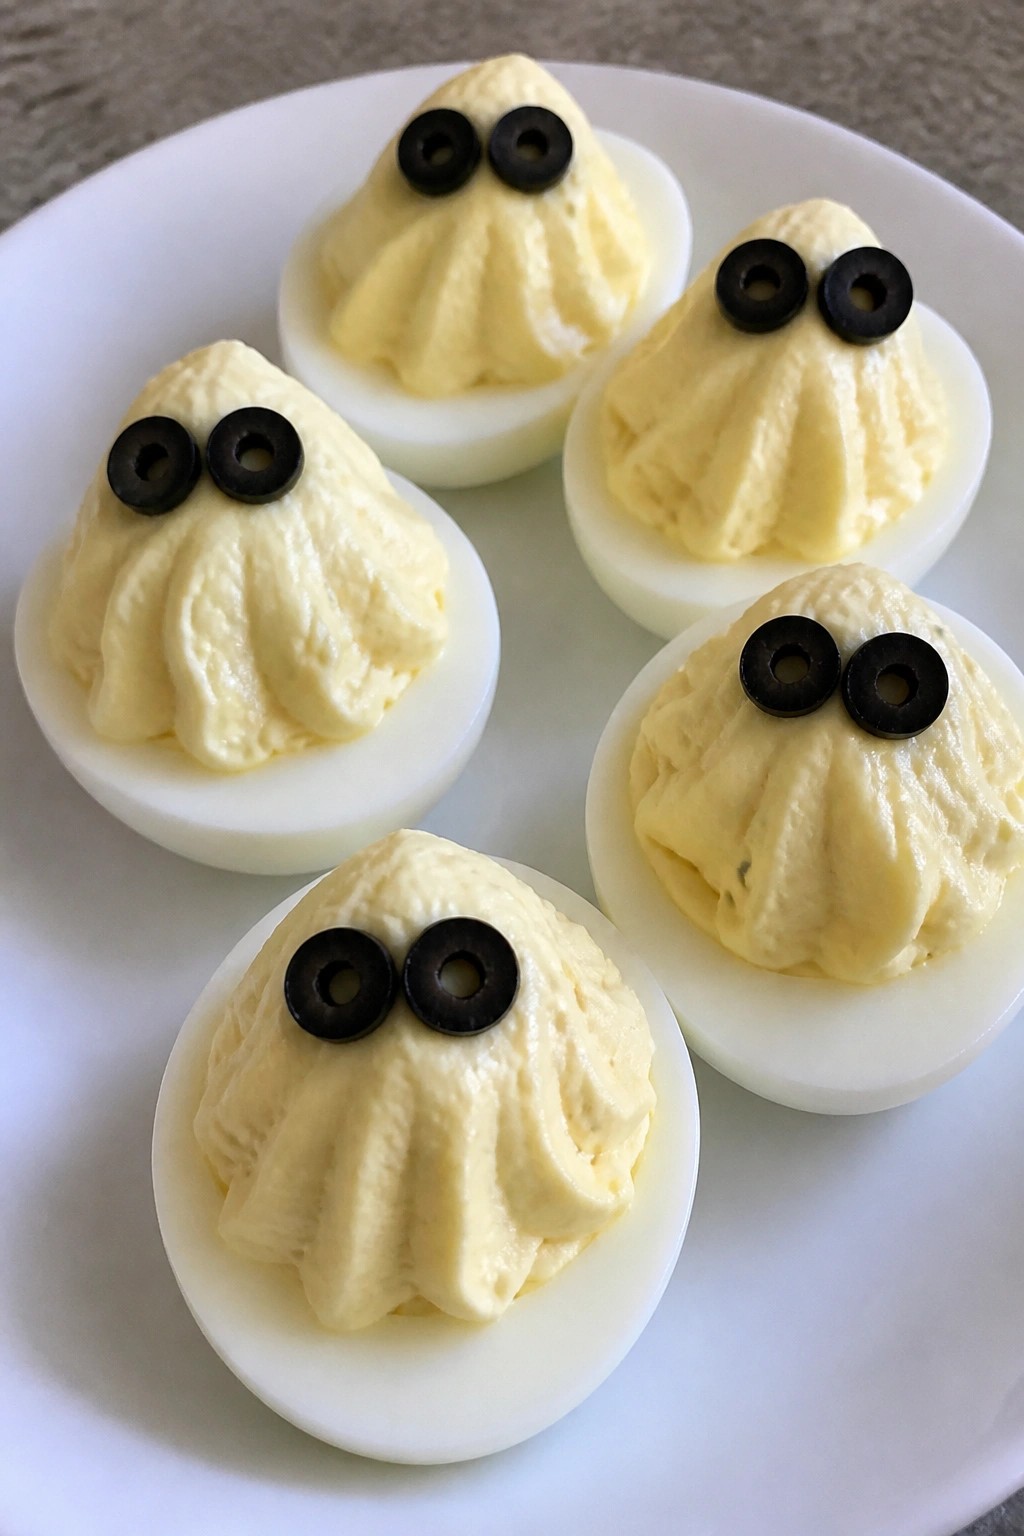
Ghostly Deviled Eggs with Olive Eyes
These ghostly deviled eggs bring a light spooky element to a Halloween party table. They work well as an easy starter that fits right into a mix of finger foods and themed snacks.
The creamy yolk filling gives a smooth texture while the olive eyes add a salty bite. The result stays simple yet stands out on a buffet.
Serves 4 people.
Ingredients
- 6 large eggs
- 3 tablespoons mayonnaise
- 1 teaspoon yellow mustard
- 1/4 teaspoon salt
- 1/8 teaspoon black pepper
- 6 black olives, sliced into 12 rounds
Instructions
- Place the eggs in a pot and cover them with cold water. Bring the water to a boil over medium heat, then reduce to a simmer and cook for 10 minutes.
- Drain the eggs and transfer them to a bowl of ice water. Let them cool for 5 minutes, then peel off the shells.
- Slice each egg in half lengthwise. Gently remove the yolks and place them in a mixing bowl.
- Add the mayonnaise, mustard, salt, and black pepper to the yolks. Mash everything together until the mixture is smooth.
- Spoon the filling back into the egg white halves. Use a small spoon or zip-top bag with one corner cut to pipe neat mounds.
- Press two olive slices onto each filled egg to create the eyes.
Extra Tips
Prepare the eggs a day ahead and store the filled halves in an airtight container in the fridge. Slice the olives right before serving so they stay dark and fresh on top. If the filling feels too thick after mixing, add a tiny splash of the cooking water to loosen it. Course: Appetizer Cuisine: American Equipment: Pot, Mixing Bowl, Knife
Bat-Shaped Caprese Skewers with Balsamic Glaze
These skewers give a classic Caprese salad a fun Halloween twist that fits right into a party spread. The bat shapes catch attention on the table while the fresh ingredients keep things light and easy to eat. They work well as finger food for a crowd and balance creamy cheese with juicy tomatoes and a tangy finish.
The flavor stays bright and simple. Mozzarella provides a mild base, basil adds an herbal note, and the balsamic glaze brings a sweet-sour drizzle that ties everything together.

Serves 4 people.
Ingredients
- 12 ounces fresh mozzarella cheese
- 1 pint cherry tomatoes
- 12 fresh basil leaves
- 1/4 cup balsamic glaze
- 12 wooden skewers
Instructions
- Slice the mozzarella into 1/4-inch thick pieces. Use a small bat-shaped cutter to cut 12 bat shapes from the slices.
- Thread one cherry tomato onto each skewer, followed by a basil leaf, a mozzarella bat, another basil leaf, and a second cherry tomato.
- Arrange the finished skewers on a serving plate. Drizzle the balsamic glaze evenly over the tops just before serving.
Extra Tips
Prepare the mozzarella bats ahead and store them in a covered container in the fridge so the skewers come together quickly at party time. If the balsamic glaze is too thick, warm it slightly for easier drizzling. Skip extra salt since the glaze already adds enough flavor contrast. Course: Appetizer Cuisine: Italian Equipment: Bat-shaped cookie cutter, Wooden skewers, Serving plate
Witch Finger Breadsticks with Marinara Dipping Sauce
These breadsticks bring a playful touch to a Halloween spread. Shaped like crooked fingers and served with a simple marinara dip, they work well as a savory starter that guests can pick up easily. The dough bakes up golden with a light garlic and herb flavor, while the marinara adds a bright, tangy contrast.
The finished breadsticks have a crisp exterior and soft center. They pair nicely with other finger foods at a party and hold up well on a platter for a couple of hours.

Serves 4 people.
Ingredients
- 1 lb pizza dough
- 2 tablespoons olive oil
- 1 teaspoon garlic powder
- 1/2 teaspoon dried oregano
- 1/4 cup grated Parmesan cheese
- 12 whole almonds
- 1 cup marinara sauce
Instructions
- Preheat the oven to 400°F and line a baking sheet with parchment paper.
- Divide the pizza dough into 12 equal pieces. Roll each piece into a thin log about 5 inches long, then gently taper one end to form a fingertip shape.
- Press one almond into the tapered end of each log to create a fingernail.
- Place the shaped dough on the prepared baking sheet. Brush each breadstick lightly with olive oil.
- Sprinkle the garlic powder, dried oregano, and grated Parmesan cheese evenly over the breadsticks.
- Bake for 12 to 15 minutes until the breadsticks are golden brown.
- Warm the marinara sauce in a small saucepan over low heat while the breadsticks bake. Serve the sauce in a bowl alongside the warm breadsticks.
Extra Tips
Shape the dough logs slightly crooked for a more witch-like look. Blanched almonds sit flatter and look more like nails than skin-on ones. If you make the breadsticks ahead, reheat them briefly in a 350°F oven for five minutes to restore crispness before serving. Course: Appetizer Cuisine: American Equipment: Baking Sheet, Mixing Bowl, Pastry Brush
Graveyard Taco Salad Cups with Corn Chip Tombstones
These individual taco salad cups bring a playful graveyard scene to the table. Each serving stands on its own with seasoned beef layered under crisp lettuce and bright toppings, then finished with upright corn chips that look like tombstones. The mix of warm spiced meat, cool vegetables, and crunchy chips makes it easy to eat while mingling.
The recipe keeps portions small so it fits well alongside other finger foods at a Halloween party. Classic taco flavors stay familiar and satisfying without needing utensils.

Serves 4 people.
Ingredients
- 1 pound ground beef
- 2 tablespoons taco seasoning
- 2 cups shredded iceberg lettuce
- 1 cup diced tomatoes
- 1 cup shredded cheddar cheese
- 1/2 cup sliced black olives
- 1 cup corn chips
- 1/2 cup salsa
- 1/4 cup sour cream
Instructions
- Brown the ground beef in a large skillet over medium heat, breaking it up as it cooks until no pink remains.
- Stir in the taco seasoning and 1/4 cup water, then simmer for 3 minutes until the mixture thickens. Remove from heat and let it cool slightly.
- Set out four small clear cups. Spoon an even layer of the seasoned beef into the bottom of each cup.
- Add a layer of shredded lettuce on top of the beef in each cup, followed by diced tomatoes, shredded cheddar cheese, and sliced black olives.
- Spoon salsa over the olives, then add a small dollop of sour cream in the center.
- Insert two or three corn chips upright into the sour cream so they stand like tombstones.
Extra Tips
Prepare the beef ahead and store it in the fridge, then assemble the cups just before guests arrive so the lettuce stays crisp. If you want the corn chips to look more like engraved stones, use a small amount of black food coloring on a toothpick to draw simple lines. Leftovers can be covered and kept in the refrigerator for one day, though the chips will soften. Course: Appetizer Cuisine: Mexican Equipment: Large Skillet, Mixing Bowl
Bloody Mary Shrimp Cocktail Shooters
These shooters bring a bold, savory bite to any Halloween spread. The bright red color fits right in with spooky themes while the chilled shrimp and spicy tomato base keep guests coming back for more. They work well as a passed appetizer or set out on a buffet table at the start of the night.
The texture stays crisp from the celery and tender from the shrimp. Each sip delivers a tangy, lightly spiced flavor that pairs with the briny seafood.

Serves 4 people.
Ingredients
- 8 large cooked shrimp, peeled and deveined
- 1 cup tomato juice
- 2 tablespoons vodka
- 1 teaspoon prepared horseradish
- 1 teaspoon Worcestershire sauce
- 1/2 teaspoon celery salt
- 1/4 teaspoon hot sauce
- 1 tablespoon fresh lemon juice
- 4 celery sticks
- Lemon wedges, for serving
Instructions
- Place the tomato juice, vodka, horseradish, Worcestershire sauce, celery salt, hot sauce, and lemon juice in a mixing bowl. Stir until the mixture is fully combined.
- Chill the Bloody Mary base in the refrigerator for at least 15 minutes so it is cold when served.
- Set out four small shooter glasses. Place two shrimp in each glass so the tails rest over the rim.
- Pour the chilled mixture into each glass until nearly full.
- Add one celery stick to each glass and serve with a lemon wedge on the side.
Extra Tips
Chill the glasses ahead of time to keep the shooters colder longer. Taste the base before pouring and add a bit more hot sauce if you prefer extra heat. The celery sticks double as both garnish and stirrer, so skip them only if you need a nut-free option. Course: Appetizer Cuisine: American Equipment: Mixing Bowl, Measuring Spoons, Shot Glasses
Skeleton Veggie Platter with Green Goddess Dip
This skeleton veggie platter turns basic vegetables into a playful Halloween display that draws guests to the table. The arrangement forms a simple skeleton shape while the dip sits nearby for easy serving.
The green goddess dip brings a creamy texture with bright herb notes and a light tang. It pairs well with the crisp vegetables and keeps the focus on fresh flavors that balance richer party foods.

Serves 4 people.
Ingredients
- 1 cup mayonnaise
- 1 cup plain Greek yogurt
- 1/2 cup fresh parsley leaves
- 1/4 cup fresh tarragon leaves
- 2 tablespoons chopped chives
- 2 garlic cloves
- Juice of 1 lemon
- 1/2 teaspoon salt
- 4 carrots, cut into sticks
- 4 celery stalks
- 1 cucumber, sliced into rounds
- 2 red bell peppers, sliced
- 2 cups broccoli florets
- 6 black olives
Instructions
- Add the mayonnaise, Greek yogurt, parsley, tarragon, chives, garlic cloves, lemon juice, and salt to a blender. Blend until the mixture is smooth and the herbs are fully incorporated.
- Taste the dip and adjust salt if needed, then transfer it to a small bowl and set it aside.
- On a large serving platter, arrange the celery stalks vertically in the center to form the spine and ribs of the skeleton.
- Place carrot sticks at the top to create the skull shape and at the bottom to form leg bones.
- Position the red bell pepper slices as arm bones on either side of the celery spine.
- Scatter the broccoli florets around the top of the celery to fill out the skull area.
- Add cucumber rounds near the carrot sticks at the bottom to represent feet.
- Set the two black olives on the carrot skull area as eyes.
- Place the bowl of green goddess dip beside the arranged vegetables for serving.
Extra Tips
Make the dip a day ahead and store it in the refrigerator so the herb flavors have time to develop fully. Use sturdy vegetables like carrots and celery for the main skeleton lines since they hold their shape better when moved around the platter. If the dip thickens after chilling, stir in a teaspoon of water to loosen it before serving. Course: Appetizer Cuisine: American Equipment: Blender, Serving Platter, Knife
Pumpkin Cheese Ball with Pretzel Broomsticks
This cheese ball brings a fun Halloween touch to any party spread. Shaped like a small pumpkin and served with pretzel sticks, it works well as a quick appetizer that guests can gather around and share. The texture stays creamy and spreadable while the flavors stay savory with a light smoky note from the paprika.
It fits best at a casual gathering where people mingle and pick at finger foods. The orange color comes through naturally, and the pretzels add a salty crunch that pairs with the rich cheese mixture.

Serves 4 people.
Ingredients
- 8 ounces cream cheese, softened
- 1 1/2 cups shredded cheddar cheese
- 1 tablespoon ranch seasoning mix
- 1 teaspoon paprika
- 1/2 teaspoon salt
- 12 pretzel sticks
- 1 celery rib, cut into a 2-inch piece
Instructions
- Place the softened cream cheese, shredded cheddar cheese, ranch seasoning mix, paprika, and salt in a mixing bowl.
- Stir the ingredients together until they form a smooth, even mixture.
- Lay a piece of plastic wrap on the counter and scoop the cheese mixture onto it.
- Wrap the mixture tightly and shape it into a round ball, then gently press ridges around the sides with your fingers to resemble a pumpkin.
- Unwrap the ball and place it on a serving plate. Press the celery piece into the top center to act as the stem.
- Arrange the pretzel sticks around the cheese ball on the plate for serving.
Extra Tips
Chill the finished cheese ball for at least 30 minutes before serving so it firms up and holds its shape. If the mixture feels too soft while shaping, add a little more shredded cheddar to help it bind. The pretzels stay crisp when added just before guests arrive rather than left sitting in the cheese. Course: Appetizer Cuisine: American Equipment: Mixing bowl, Plastic wrap, Knife, Serving plate
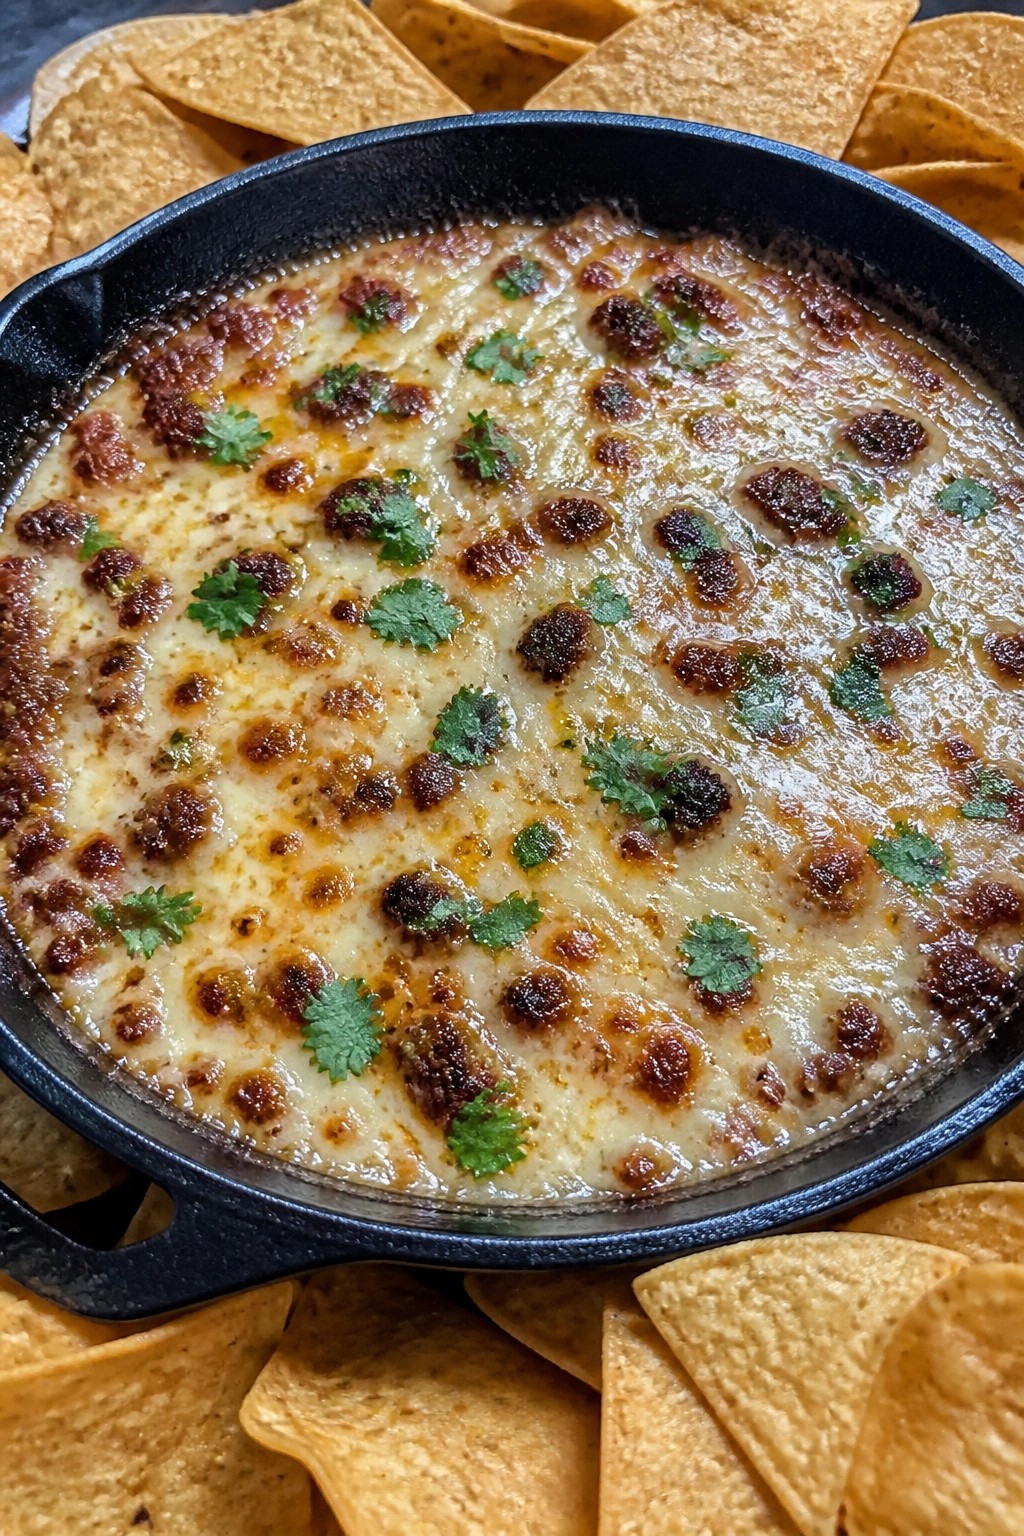
Cauldron Queso Fundido with Chorizo and Chips
This queso fundido brings a bubbling cheese pull to any Halloween spread. The spicy chorizo adds bold flavor that pairs well with crisp tortilla chips for dipping. It works best as a shareable starter at parties where guests gather around the table.
The dish has a creamy melted cheese base with savory bits of sausage throughout. A quick broil at the end creates a golden top that stays gooey underneath.
Serves 4 people.
Ingredients
- 8 oz Mexican chorizo, casings removed
- 1 small yellow onion, finely diced
- 2 garlic cloves, minced
- 12 oz shredded Oaxaca cheese
- 4 oz shredded Monterey Jack cheese
- 1/2 cup whole milk
- 1/4 tsp salt
- 8 oz tortilla chips, for serving
- 2 tbsp chopped fresh cilantro, for garnish
Instructions
- Cook the chorizo in a large skillet over medium heat, breaking it up with a spoon until browned and cooked through, about 6 minutes. Drain excess fat if needed.
- Add the diced onion to the skillet and cook until softened, about 3 minutes. Stir in the minced garlic and cook for 1 minute more.
- Reduce heat to low and pour in the milk. Gradually add the shredded Oaxaca and Monterey Jack cheeses, stirring until fully melted and smooth. Add the salt and stir to combine.
- Transfer the mixture to an oven-safe serving dish if your skillet is not ovenproof. Broil on high for 2 to 3 minutes until the top is lightly browned and bubbling.
- Remove from the oven and let rest for 2 minutes. Sprinkle with chopped cilantro and serve immediately with tortilla chips on the side.
Extra Tips
Stir the cheese mixture constantly over low heat to keep it from separating. If it thickens too much while sitting, add a splash of warm milk and stir to loosen. Leftovers can be reheated gently in a skillet with a little extra milk to restore creaminess. Skip the cilantro if you prefer a milder finish. Course: Appetizer Cuisine: Mexican Equipment: Large skillet, Oven-safe dish, Cheese grater
Vampire Bite Meatball Sliders on Red-Sauced Buns
These sliders give guests a hearty bite sized option that feels festive without extra fuss. They suit Halloween parties where you need food that travels well from kitchen to table and holds up during a long evening of mingling. Juicy meatballs sit in bright tomato sauce that coats the buns, creating a balance of savory meat and tangy sauce in every bite.

Serves 4 people.
Ingredients
- 1 lb ground beef
- 1/2 cup Italian breadcrumbs
- 1 large egg
- 3 cloves garlic, minced
- 1 tsp dried oregano
- 1/2 tsp salt
- 1/4 tsp black pepper
- 2 cups marinara sauce
- 8 slider buns
- 1/4 cup grated Parmesan cheese
Instructions
- Mix the ground beef, breadcrumbs, egg, minced garlic, oregano, salt, and black pepper in a bowl until evenly combined. Shape the mixture into 8 meatballs, each about 2 inches wide.
- Heat the marinara sauce in a skillet over medium heat. Add the meatballs and simmer for 15 minutes, turning them once so they cook through and absorb some sauce.
- While the meatballs cook, warm the slider buns in a 350 degree oven for 5 minutes. Spoon a small amount of marinara sauce onto the bottom half of each bun.
- Place one cooked meatball on each sauced bun bottom. Sprinkle Parmesan cheese over the meatballs, then add the top halves of the buns.
Extra Tips
Simmer the meatballs a few extra minutes if you want thicker sauce clinging to the buns. Use a sturdy roll so the bottom does not get soggy from the marinara. Leftovers keep in the fridge for two days and reheat well in a covered skillet with a splash of water to loosen the sauce. Course: Appetizer Cuisine: American Equipment: Mixing Bowl, Skillet, Baking Sheet
Frankenstein Avocado Toast Bites
These avocado toast bites bring a playful Halloween twist to a classic snack. Small squares of toast get topped with creamy mashed avocado and decorated with simple ingredients to look like Frankenstein faces. They work well as finger food at parties where guests want something light but themed.
The flavor is fresh and savory with a bit of brightness from lemon. The toast stays crisp while the avocado adds creaminess, and the olive and pepper toppings give a salty crunch that matches the spooky look.
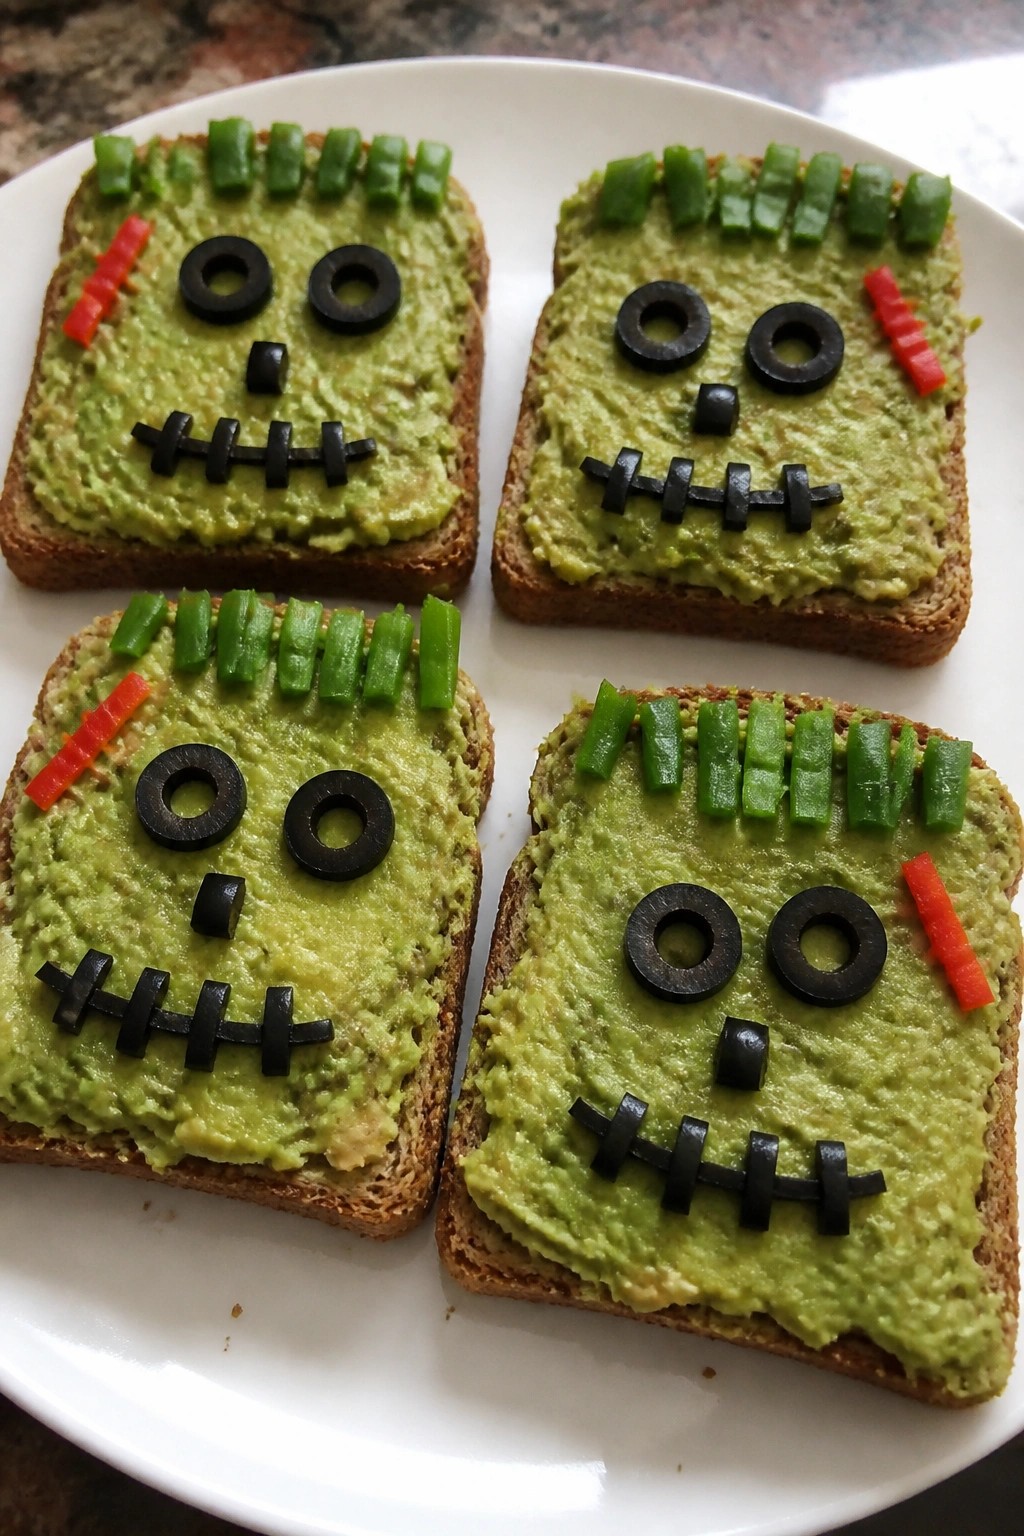
Serves 4 people.
Ingredients
- 4 slices whole wheat bread
- 2 ripe avocados
- 1 tablespoon lemon juice
- 1/2 teaspoon salt
- 8 black olives
- 1 small red bell pepper
- 2 green onions
Instructions
- Toast the 4 slices of bread until golden and crisp, then cut each slice into 4 small squares to make 16 bites total.
- Cut the avocados in half, remove the pits, and scoop the flesh into a mixing bowl. Add the lemon juice and salt, then mash everything together until mostly smooth with a few small chunks remaining.
- Spread a layer of the mashed avocado mixture evenly over each toast square.
- Slice the black olives into rounds and place two rounds on each bite to form eyes. Cut thin strips from the red bell pepper and add one short strip below the eyes on each bite to make a mouth.
- Slice the green onions into small pieces and arrange a few pieces on top of each bite to look like hair or stitches.
Extra Tips
Make the avocado mixture right before assembling so it stays bright green. If you need to prep ahead, toast the bread squares earlier in the day and store them in an airtight container, then add the avocado and face details just before serving. Swap the red bell pepper for thin strips of roasted red pepper if you want a milder flavor. Course: Appetizer Cuisine: American Equipment: Toaster, Mixing Bowl, Sharp Knife
Monster Mash Guacamole Bowl with Purple Chips
This guacamole gets mashed until creamy then piled into a bowl for a simple Halloween spread. The purple chips add a bright contrast that fits right into a party table without extra effort. It works well as a shared starter when guests are arriving and mingling.
The texture stays thick enough to scoop while the lime and fresh vegetables keep each bite bright. Serve it early in the evening so the color stays vibrant.

Serves 4 people.
Ingredients
- 4 ripe avocados
- Juice of 2 limes
- 1/2 cup diced red onion
- 1 cup diced tomatoes
- 1/4 cup chopped cilantro
- 1 teaspoon salt
- 8 oz bag purple tortilla chips
- 4 black olives
- 2 cherry tomatoes
Instructions
- Cut the avocados in half, remove the pits, and scoop the flesh into a mixing bowl.
- Add the lime juice and salt, then mash with a fork until mostly smooth with a few small chunks remaining.
- Stir in the red onion, tomatoes, and cilantro until evenly mixed.
- Transfer the guacamole to a serving bowl and smooth the surface.
- Press two black olives into the top for eyes and place a cherry tomato below each one to finish the monster face.
- Set the bowl on the table with the purple tortilla chips alongside for dipping.
Extra Tips
Keep the avocado pits in the bowl until just before serving to slow browning. If the guacamole tastes flat, add an extra pinch of salt rather than more lime. The purple chips stay crisp longer when kept in a separate bowl instead of tucked into the guacamole. Course: Appetizer Cuisine: American Equipment: Mixing bowl, Knife, Cutting board
Haunted Graveyard Brownies with Cookie Tombstones
These brownies turn a simple chocolate base into a fun graveyard scene that fits right into a Halloween spread. They work well for a small party because the recipe makes just enough for four people and requires only basic pantry items. The brownies bake up fudgy with a slight chew, while the cookie tombstones add a crisp contrast on top.

Serves 4 people.
Ingredients
- 4 tablespoons unsalted butter
- 1/2 cup granulated sugar
- 1 large egg
- 1/4 cup unsweetened cocoa powder
- 1/4 cup all-purpose flour
- Pinch of salt
- 1/4 cup semisweet chocolate chips
- 4 rectangular shortbread cookies
- 1/4 cup crushed chocolate sandwich cookies
- 2 tablespoons white frosting
Instructions
- Preheat the oven to 350 degrees F and line a small loaf pan with parchment paper.
- Melt the butter in a medium bowl, then stir in the sugar until combined.
- Add the egg and mix until smooth.
- Stir in the cocoa powder, flour, and salt until no dry streaks remain.
- Fold in the chocolate chips.
- Spread the batter evenly in the prepared pan and bake for 20 to 22 minutes, until a toothpick comes out with a few moist crumbs.
- Let the brownies cool completely in the pan.
- Cut the cooled brownies into four squares.
- Press one shortbread cookie upright into each brownie square to form a tombstone.
- Sprinkle the crushed chocolate sandwich cookies around the base of each tombstone.
- Pipe or spread a small amount of white frosting on each shortbread cookie to create simple lettering.
Extra Tips
Press the shortbread cookies in while the brownies are still slightly warm if you want them to stand more firmly. The crushed chocolate sandwich cookies give the look of fresh dirt without adding extra sweetness. Store any leftovers in an airtight container at room temperature for up to two days. Course: Dessert Cuisine: American Equipment: Mixing bowl, small loaf pan, parchment paper, oven
Poison Apple Caramel Tartlets with Black Sugar Crust
These tartlets bring a fun twist to classic apple and caramel flavors with a dark crust that fits right into a Halloween spread. They work well as a handheld dessert at parties where guests want something sweet but not too heavy. The combination gives a buttery, slightly crisp shell against soft spiced apples and gooey caramel.
The black sugar in the crust adds a subtle crunch and dramatic color without changing the taste much. Each bite balances tart apple with rich caramel and a hint of salt.

Serves 4 people.
Ingredients
- 1 1/4 cups all-purpose flour
- 1/4 cup granulated sugar
- 1/2 teaspoon black food coloring
- 1/2 cup cold unsalted butter, cubed
- 2-3 tablespoons ice water
- 2 apples, peeled, cored, and thinly sliced
- 1/2 cup caramel sauce
- 1 tablespoon lemon juice
- 2 tablespoons black sanding sugar
- Pinch of salt
Instructions
- Mix the flour, granulated sugar, and salt in a bowl. Add the black food coloring to the ice water.
- Cut the cold butter into the dry mix until it looks like coarse crumbs. Stir in the colored water a little at a time until the dough holds together.
- Press the dough into four 4-inch tartlet pans. Chill the shells for 15 minutes while the oven heats to 375 degrees F.
- Bake the shells for 12 minutes until the edges turn lightly golden. Let them cool on a rack.
- Toss the apple slices with lemon juice in a bowl. Warm the caramel sauce in a small saucepan over low heat.
- Arrange the apple slices in the cooled shells. Drizzle warm caramel over the apples.
- Sprinkle black sanding sugar over the top of each tartlet before serving.
Extra Tips
Chill the dough well before baking to keep the black color even and prevent shrinking. If the caramel thickens too much while sitting, warm it gently again before drizzling so it spreads smoothly over the apples. Course: Dessert Cuisine: American Equipment: Tartlet pans, Mixing bowl, Saucepan, Baking sheet