
Halloween is just around the corner, and I couldn’t be more excited to share some healthy yet spooktacular snack ideas with you all. Finding festive treats that don’t overload on sugar can be a fun challenge, and I’ve stumbled upon some truly delightful options. Picture crafting ghostly fruit pops and veggie monsters—cute and fun for the whole family! These snacks not only keep the Halloween spirit alive but also make for a memorable kitchen adventure with the little ones. Ready to explore these tasty treasures?
Ghostly Fruit Pops
Ghostly Fruit Pops are a delightful and healthy Halloween snack that will spook and satisfy both kids and adults alike. These playful treats aren’t only fun to make, but they’re also packed with nutritious fruits, making them a guilt-free indulgence. Dressed up in ghostly attire, these fruit pops are sure to be a hit at any Halloween gathering, guaranteeing your festivities are both festive and wholesome.
The secret to Ghostly Fruit Pops lies in their simplicity and the creative use of natural ingredients to create eerie yet adorable designs. By using bananas and dark chocolate, you can easily fashion these hauntingly cute treats. The bananas provide a creamy texture while the chocolate adds a rich, contrasting sweetness. Perfect for a serving size of 4-6 people, this recipe is easy to scale up if needed and is a great way to get everyone involved in the kitchen.
Ingredients for Ghostly Fruit Pops:
- 3 ripe bananas
- 1 cup of dark chocolate chips
- 12 lollipop sticks or popsicle sticks
- 24 mini chocolate chips (for eyes)
- Wax paper or a baking sheet
Instructions:
- Prepare the Bananas: Start by peeling the bananas and slicing them in half crosswise. Each banana will yield two ghostly pops. Insert a lollipop stick into the flat end of each banana half to create a handle.
- Melt the Chocolate: In a microwave-safe bowl, heat the dark chocolate chips in 30-second intervals, stirring in between, until fully melted and smooth. You can also melt the chocolate using a double boiler for more controlled heat.
- Coat the Bananas: Line a baking sheet with wax paper. Dip each banana piece into the melted chocolate, using a spoon to help cover the banana entirely if needed. Let the excess chocolate drip off before placing the coated banana on the wax paper.
- Add the Eyes: While the chocolate is still wet, quickly press two mini chocolate chips onto each chocolate-coated banana to create eyes for your ghost. Make sure they’re placed securely so that they don’t fall off.
- Set the Pops: Place the baking sheet in the freezer for about 15-20 minutes, or until the chocolate is fully set and the bananas are firm.
- Serve and Enjoy: Once the chocolate has hardened, remove the pops from the freezer and serve immediately for a chilling treat. If not serving right away, keep the pops in the freezer to maintain their shape.
Extra Tips:
For an extra spooky touch, consider using white chocolate instead of dark chocolate for a more ghost-like appearance. You can also get creative and use edible decorative pens to add mouths or other features to your ghostly friends.
If you’re serving these at a party, make sure to prepare them a few hours in advance and keep them frozen until just before serving to guarantee they maintain their shape and texture. Enjoy experimenting with different types of fruit and coatings to create your own unique Halloween treats!
Veggie Monsters
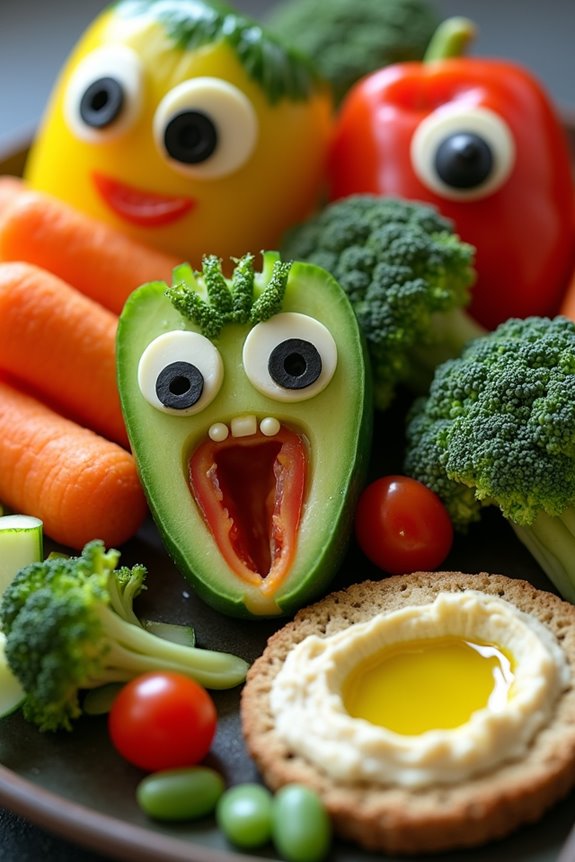
Halloween is a time for fun, creativity, and, unfortunately, a lot of sugar. But who says Halloween snacks can’t be both healthy and exciting? Enter Veggie Monsters, a delightful treat that combines the whimsy of Halloween with the goodness of vegetables. These little monsters are perfect for a party or as a treat at home, where kids and adults alike can enjoy their playful appearance and nutritious ingredients.
By using fresh veggies and a bit of imagination, you can create a platter of edible creatures that are as entertaining as they’re healthy. Veggie Monsters aren’t only an invigorating break from sugary treats, but they also allow you to involve the whole family in the kitchen. Kids can help assemble the monsters, giving them a sense of pride in creating their own snacks.
This recipe is designed to serve 4-6 people, making it ideal for small gatherings or family snack time. These little creatures are made with readily available vegetables and a few simple ingredients that come together to form a colorful and tasty display.
Ingredients (Serving Size: 4-6 people):
- 1 cucumber
- 1 large carrot
- 1 red bell pepper
- 1 yellow bell pepper
- 1 cup cherry tomatoes
- 1 cup broccoli florets
- 1/2 cup hummus
- 1/4 cup black olives
- 1/4 cup cream cheese
- 1 tablespoon olive oil
- Salt and pepper to taste
- Toothpicks
Cooking Instructions:
- Preparation of Vegetables: Begin by washing all the vegetables thoroughly under running water. Peel the cucumber and the carrot. Cut the cucumber into thick slices and the carrot into sticks about 2 inches long. Slice the red and yellow bell peppers into strips. Halve the cherry tomatoes and set aside.
- Creating Monster Bodies: Use the cucumber slices as the base for the monster bodies. For variety, you can also use the bell pepper strips to form different body shapes on a serving platter.
- Assembling the Monsters: Using toothpicks, attach carrot sticks as arms and legs to the cucumber slices or bell pepper strips. Be creative in positioning these limbs to give each monster a unique appearance.
- Adding Facial Features: To create the monster faces, place a small dollop of cream cheese on the cucumber slices or bell peppers, and stick a halved cherry tomato or a slice of black olive on top to form eyes. For a more terrifying effect, use small pieces of broccoli florets as hair and eyebrows.
- Finishing Touches: Drizzle a small amount of olive oil over the veggies to enhance their flavor, and sprinkle with a pinch of salt and pepper. Arrange the completed Veggie Monsters on a large platter, using hummus as a dip in the center for added taste and fun.
Extra Tips:
When creating Veggie Monsters, feel free to experiment with different vegetables and shapes to bring your monsters to life. You can use slices of zucchini, radishes, or even baby corn for more variety.
If you want to add a bit of spookiness, consider using black sesame seeds or chia seeds for monster freckles or warts. Remember, the key is to have fun with the creation process and encourage kids to participate, making it an enjoyable experience for everyone.
Spooky Spider Crackers
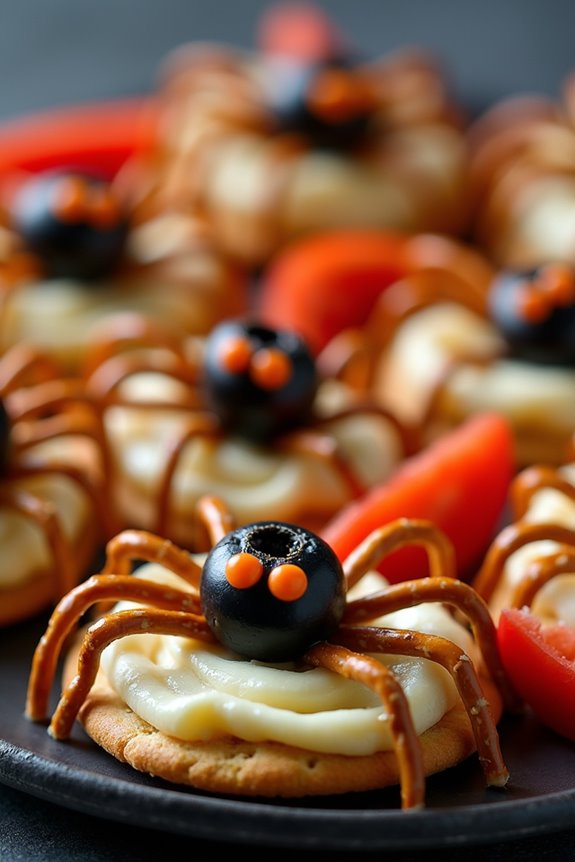
Halloween isn’t just about candy and sweets; it’s also an opportunity to explore fun and healthy snacks that can add to the festive spirit. One such delightful treat is Spooky Spider Crackers, which aren’t only simple to make but also a hit among kids and adults alike. These spooky snacks incorporate a delicious combination of whole-grain crackers, creamy cheese, and olives, making them nutritious as well as visually appealing.
Perfect for a Halloween party or a fun family activity, Spooky Spider Crackers are a great way to get everyone involved in the kitchen. Creating these creepy crawlers is a breeze, and they’re sure to make your Halloween gathering both healthy and memorable. The recipe involves using crackers as the base and decorating them to resemble spiders with the help of cheese and olives.
This dish serves 4-6 people and can be easily adapted to suit your taste preferences. The ingredients and instructions below will guide you through the process of making these fun snacks.
Ingredients for Spooky Spider Crackers (serving size: 4-6 people):
- 24 whole-grain round crackers
- 1 cup of cream cheese or hummus
- 12 black olives, pitted and halved
- 24 pretzel sticks, broken in half
- 1 small carrot, thinly sliced
- 1 red bell pepper, thinly sliced
Cooking Instructions:
- Prepare the Base: Begin by arranging the whole-grain round crackers on a large platter or tray. This will form the base for your spooky spiders.
- Add the Spread: Using a butter knife or small spatula, spread a thin layer of cream cheese or hummus over each cracker. This acts as the “glue” to hold the spider components in place.
- Create the Spider Body: Place half of a black olive in the center of each cracker on top of the spread. This will be the body of the spider.
- Make the Spider Legs: Insert four pretzel stick halves on each side of the olive to mimic the spider’s legs. Firmly press the ends into the cheese or hummus to secure them in place.
- Add the Eyes: For the eyes, place two small circles cut from the thinly sliced carrot on top of the olive. You can use a dab of cream cheese to help them stick.
- Garnish: For added color and flavor, arrange thin slices of red bell pepper around the edge of the platter. This not only enhances the presentation but also provides an additional healthy snack option.
Extra Tips:
To make your Spooky Spider Crackers even more appealing, consider using a variety of spreads such as avocado or flavored cream cheeses. You can also substitute black olives with grapes or raisins for a sweeter version.
Adjust the size of the crackers and olives according to your preference to create larger or smaller spiders. Remember, the goal is to have fun and get creative with your spooky spiders, so don’t hesitate to experiment with different ingredients and decorations. Enjoy your healthy Halloween treat!
Pumpkin Yogurt Cups
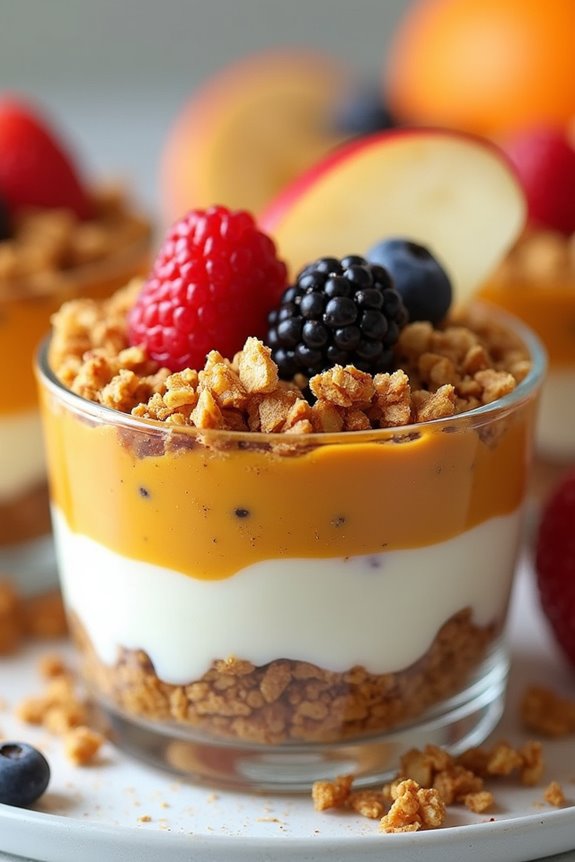
Not only are Pumpkin Yogurt Cups simple to make, but they also offer a healthy alternative to traditional Halloween sweets. By using ingredients like Greek yogurt and natural sweeteners, you can create a dessert that’s both satisfying and nourishing. This recipe is designed to serve 4-6 people, making it ideal for small get-togethers or as a fun family dessert option.
Ingredients (Serves 4-6):
- 2 cups plain Greek yogurt
- 1 cup canned pumpkin puree
- 1/4 cup honey or maple syrup
- 1 teaspoon vanilla extract
- 1 teaspoon pumpkin pie spice
- 1/4 teaspoon cinnamon
- Granola, for topping
- Chopped nuts (like pecans or walnuts), for topping (optional)
- Fresh fruit (such as apple slices or berries), for garnish (optional)
Instructions:
- Mix the Base: In a large mixing bowl, combine the Greek yogurt, pumpkin puree, honey (or maple syrup), vanilla extract, pumpkin pie spice, and cinnamon. Use a whisk to blend the ingredients until they’re thoroughly mixed and smooth.
- Taste and Adjust: Taste the mixture and adjust the sweetness or spice according to your preference. If you prefer a sweeter cup, add a little more honey or maple syrup. For a more pronounced spice flavor, add a pinch more pumpkin pie spice.
- Layer the Cups: Spoon the pumpkin yogurt mixture evenly into small serving cups or bowls, filling each about three-quarters full. This will leave room for toppings.
- Add Toppings: Sprinkle a layer of granola on top of the yogurt mixture in each cup. For added texture and flavor, you can also sprinkle chopped nuts on top of the granola.
- Garnish: If desired, garnish each cup with a few slices of fresh fruit or a handful of berries for a pop of color and extra flavor.
- Chill and Serve: Place the cups in the refrigerator to chill for at least 30 minutes before serving. This allows the flavors to meld together beautifully.
Extra Tips: To make your Pumpkin Yogurt Cups even more festive, consider using Halloween-themed cups or adding a small decorative touch like candy corn on top.
If you’re looking to cut down on sugar even more, you can replace the honey or maple syrup with a natural sweetener like Stevia. Additionally, these cups can be made a day in advance, making them a convenient option for party prep. Just guarantee they’re stored in the refrigerator until ready to serve.
Witch’s Broomsticks

Witch’s Broomsticks are a delightful and spooky snack perfect for a Halloween-themed gathering. These snacks not only look festive but are also a healthier alternative to traditional Halloween candies. Made with just a few simple ingredients, Witch’s Broomsticks can be crafted in no time, making them an excellent choice for busy hosts who want to impress their guests with a creative treat.
These broomsticks are designed to resemble the iconic Halloween symbol, complete with edible bristles and a crispy handle. They aren’t only fun to make but also delicious to eat, combining savory flavors with a touch of chewy sweetness. Plus, they’re a great way to get kids involved in the kitchen, encouraging them to be creative and enjoy making their own snacks.
Ingredients (Serving Size: 4-6 people):
- 12 pretzel sticks (preferably thicker, sturdy ones)
- 12 string cheese sticks
- 12 fresh chives or thin green onions
- 1 tablespoon of cream cheese (optional, for added stickiness)
Cooking Instructions:
- Prepare the Cheese Bristles: Begin by unwrapping the string cheese sticks. Cut each stick into halves to have a total of 24 pieces. Gently peel each half to create thin strips, leaving about 1/4 of the cheese stick unpeeled at the top to hold the “bristles” together.
- Assemble the Broomsticks: Take a pretzel stick and insert it into the unpeeled part of the string cheese, creating the appearance of a broom handle with bristles. If desired, use a small amount of cream cheese at the meeting point of the cheese and pretzel to guarantee they stay together.
- Secure with Chives: Wrap a chive or a thin green onion around the top part of the cheese where it meets the pretzel. This will secure the cheese strips in place and enhance the broomstick appearance. Tie a small knot or tuck the ends under the chive wrap to keep it tight.
- Repeat the Process: Repeat steps 2 and 3 for each pretzel stick and cheese combination until all broomsticks are assembled.
- Chill the Snacks: Place the completed broomsticks on a plate and refrigerate them for at least 10 minutes before serving. This helps the cheese firm up and guarantees the broomsticks hold their shape.
Extra Tips:
For an added touch of flavor, consider using flavored string cheese, such as garlic or herb varieties, to give your Witch’s Broomsticks a unique twist. If chives aren’t available, thinly sliced green onions work just as well and provide a similar effect.
To make the broomsticks more visually appealing, choose pretzels that are consistent in size and length. Finally, if you prefer a gluten-free option, you can use gluten-free pretzel sticks. Enjoy your spooky and tasty Witch’s Broomsticks!
Mummy Apple Slices
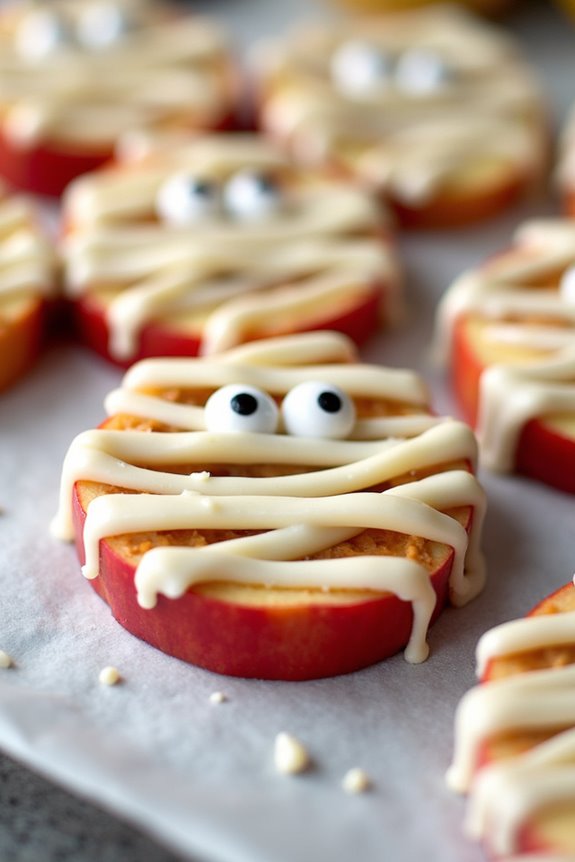
Transform your Halloween treats into a delightful and healthy snack with these Mummy Apple Slices. This fun and spooky recipe is perfect for kids and adults alike, offering a nutritious alternative to traditional Halloween candies. With just a few simple ingredients and minimal preparation time, you can create a delicious snack that’s as enjoyable to make as it’s to eat.
These Mummy Apple Slices aren’t only visually appealing but also packed with nutrients. Apples provide fiber and vitamins, while the peanut butter adds protein and healthy fats. The white chocolate drizzle gives just the right amount of sweetness and the candy eyes bring an element of fun to these festive little mummies. Whether you’re hosting a Halloween party or just looking for a creative snack option, these Mummy Apple Slices are sure to be a hit.
Ingredients (serving size: 4-6 people)
- 4 large apples
- 1 cup creamy peanut butter
- 1 cup white chocolate chips
- 1 tablespoon coconut oil
- Candy eyes (about 24-36 pieces)
- Optional: lemon juice (to prevent browning)
Instructions
- Prepare the Apples: Start by washing the apples thoroughly. Slice each apple into approximately 1/4-inch thick slices. If desired, remove the core from each slice using a small cookie cutter or apple corer. To prevent the apples from browning, you can dip the slices in lemon juice.
- Add the Peanut Butter: Spread a generous layer of creamy peanut butter over one side of each apple slice. This will serve as the “glue” for the candy eyes and also add flavor and nutrients to the snack.
- Melt the White Chocolate: In a microwave-safe bowl, combine the white chocolate chips and coconut oil. Microwave in 20-second intervals, stirring in between, until the chocolate is completely melted and smooth.
- Create the Mummy Wrappings: Transfer the melted white chocolate into a piping bag or a small ziplock bag with a tiny corner snipped off. Drizzle the white chocolate over the peanut butter-covered apple slices in a zigzag pattern to resemble mummy wrappings.
- Add the Candy Eyes: While the white chocolate is still soft, place two candy eyes on each apple slice. Gently press the eyes into the peanut butter to confirm they stick.
- Set and Serve: Allow the chocolate to set for a few minutes at room temperature or place the slices in the refrigerator for faster setting. Serve the Mummy Apple Slices immediately, or store them in an airtight container in the refrigerator until ready to serve.
Extra Tips
When selecting apples, choose varieties that are crisp and slightly tart, such as Granny Smith or Honeycrisp, to balance the sweetness of the white chocolate.
If you want to make the recipe nut-free, substitute the peanut butter with sunflower seed butter. For a vegan version, verify that the white chocolate chips you use are dairy-free.
Additionally, if you don’t have candy eyes on hand, you can use small chocolate chips or raisins as a substitute. Enjoy crafting these spooky treats, and have a happy and healthy Halloween!
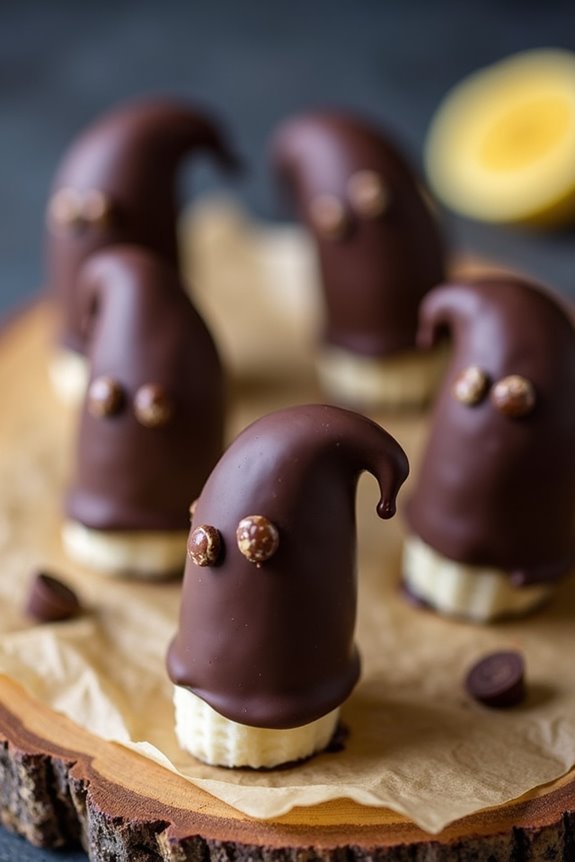
Batty Banana Bites
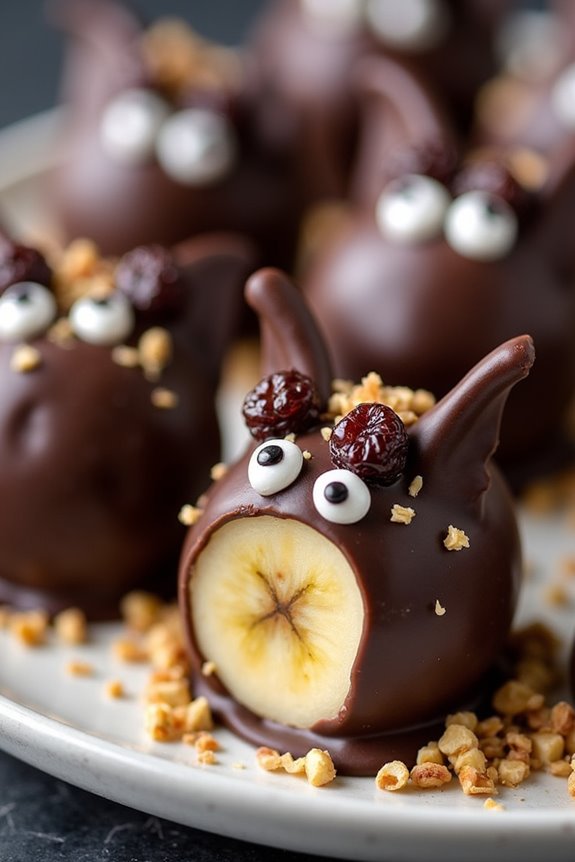
Batty Banana Bites are a delightful and healthy Halloween treat that’s sure to please both kids and adults alike. Perfect for a spooky holiday snack, these bite-sized treats bring together the natural sweetness of bananas with a touch of chocolate and the crunch of nuts, creating a fun and nutritious alternative to traditional Halloween candy.
This recipe is simple and quick to prepare, making it an excellent choice for busy families or those hosting a Halloween party.
These Batty Banana Bites aren’t only fun to make but also versatile, allowing you to get creative with your decorations. You can use different types of nuts, seeds, or even dried fruits to give your bats unique features. This recipe will make enough Batty Banana Bites to serve 4-6 people, providing a perfect portion for a small gathering or a family snack.
Let’s explore the ingredients and steps needed to create these spooky treats.
Ingredients (Serving Size: 4-6 people):
- 4 ripe bananas
- 1 cup of dark chocolate chips
- 1 tablespoon coconut oil
- 1/2 cup crushed almonds or walnuts
- 1/4 cup shredded coconut
- Edible googly eyes or raisins (for decoration)
Instructions:
- Prepare the Bananas: Peel the bananas and cut them into bite-sized chunks, approximately 1-2 inches each. Place the banana pieces on a parchment-lined baking sheet for easy handling.
- Melt the Chocolate: In a microwave-safe bowl, combine the dark chocolate chips with the coconut oil. Microwave in 30-second intervals, stirring between each, until the chocolate is completely melted and smooth.
- Coat the Bananas: Using a fork or skewer, dip each banana chunk into the melted chocolate, making sure it’s fully coated. Allow any excess chocolate to drip off back into the bowl.
- Add the Crunch: Roll the chocolate-coated banana pieces in the crushed almonds or walnuts, pressing gently to confirm the nuts stick to the chocolate.
- Decorate: Place two edible googly eyes or raisins on each banana bite to create the appearance of bat eyes. For additional flair, sprinkle shredded coconut over the top to mimic bat fur.
- Chill: Once decorated, return the banana bites to the parchment-lined baking sheet. Place the sheet in the refrigerator for at least 30 minutes, or until the chocolate has fully set.
- Serve: Transfer the Batty Banana Bites to a serving platter and enjoy!
Extra Tips:
For an added touch of Halloween fun, consider using different colored chocolate such as orange or purple to coat the bananas.
If you prefer a nut-free version, try using crushed graham crackers or rice cereal for the coating.
These Batty Banana Bites are best served chilled, so keep them in the refrigerator until you’re ready to serve. If you’re making them in advance, they can be stored in an airtight container in the fridge for up to 3 days.
Jack-O’-Lantern Oranges
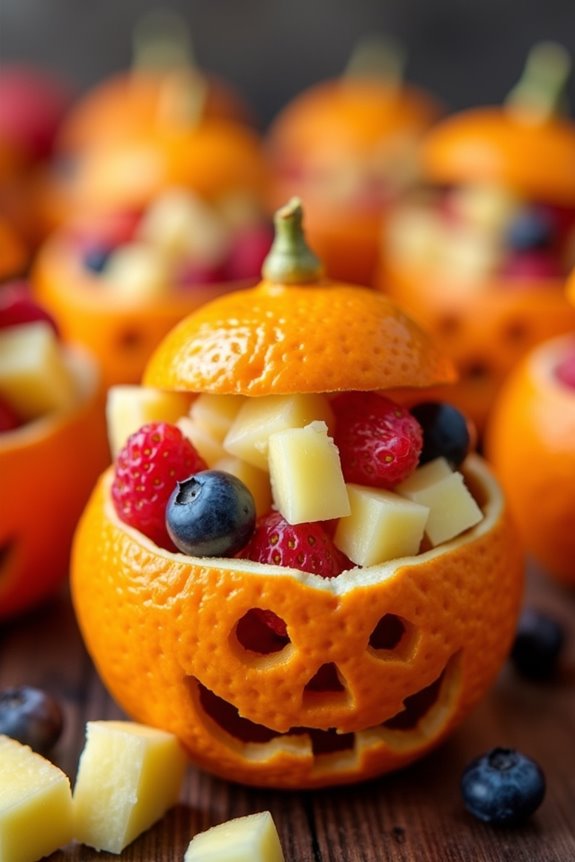
Jack-O’-Lantern Oranges are a fun and healthy Halloween snack that delights both children and adults alike. These cute, little treats are made by transforming ordinary oranges into festive jack-o’-lanterns filled with a delicious fruit salad. Not only are they visually appealing, but they also offer a revitalizing and nutritious option amidst the usual sugary Halloween treats.
With just a few simple ingredients, you can create a spooky and tasty addition to any Halloween celebration. This recipe is perfect for serving 4-6 people and is a great way to involve kids in the kitchen. The process is straightforward and requires minimal time and effort. The natural sweetness of the oranges combined with a medley of fresh fruits makes for a delightful and guilt-free snack.
So, gather your ingredients, and let’s get started on crafting these delightful Jack-O’-Lantern Oranges!
Ingredients for Jack-O’-Lantern Oranges (Serves 4-6):
- 4-6 large oranges
- 1 cup diced pineapple
- 1 cup diced apples
- 1 cup diced strawberries
- 1 cup blueberries
- 1 tablespoon lemon juice
- 1 tablespoon honey (optional)
Cooking Instructions:
- Prepare the Oranges: Begin by slicing off the top of each orange, about 1/4 inch down, to create a lid. Carefully scoop out the inside of the oranges using a spoon, being cautious not to puncture the skin. Reserve the orange segments in a bowl, and set the empty orange shells aside for later use.
- Create Jack-O’-Lantern Faces: Using a small, sharp knife, carefully carve jack-o’-lantern faces into one side of each orange shell. This step is optional but adds a festive touch to your dish. Be creative with your designs, and make certain the openings are large enough to be visible but not too large that they compromise the structure of the orange.
- Prepare the Fruit Salad: Chop the reserved orange segments into small pieces. In a large mixing bowl, combine the chopped orange segments with the diced pineapple, apples, strawberries, and blueberries. Add the lemon juice to the fruit mixture, and stir gently to combine. If desired, drizzle the honey over the fruit salad for added sweetness and mix well.
- Fill the Oranges: Carefully spoon the fruit salad mixture into each prepared orange shell, filling them generously. Place the orange lids back on top for a complete jack-o’-lantern look.
- Serve and Enjoy: Arrange the Jack-O’-Lantern Oranges on a serving platter. They can be served immediately or chilled in the refrigerator for up to an hour before serving. Enjoy your healthy Halloween treat!
Extra Tips:
When preparing Jack-O’-Lantern Oranges, it’s crucial to choose oranges that are firm and have a smooth skin, as they’ll hold up better when hollowed out and carved. If you prefer a more tropical flavor, consider adding other fruits like mango or kiwi to the salad.
For a fun twist, you can also add a sprinkle of cinnamon or a few mint leaves to enhance the flavors. Remember to carve the faces carefully to prevent tearing, and use a paring knife for precision. These delightful snacks aren’t only a treat for the taste buds but also a feast for the eyes, making them a perfect addition to any Halloween gathering.
Monster Mouths
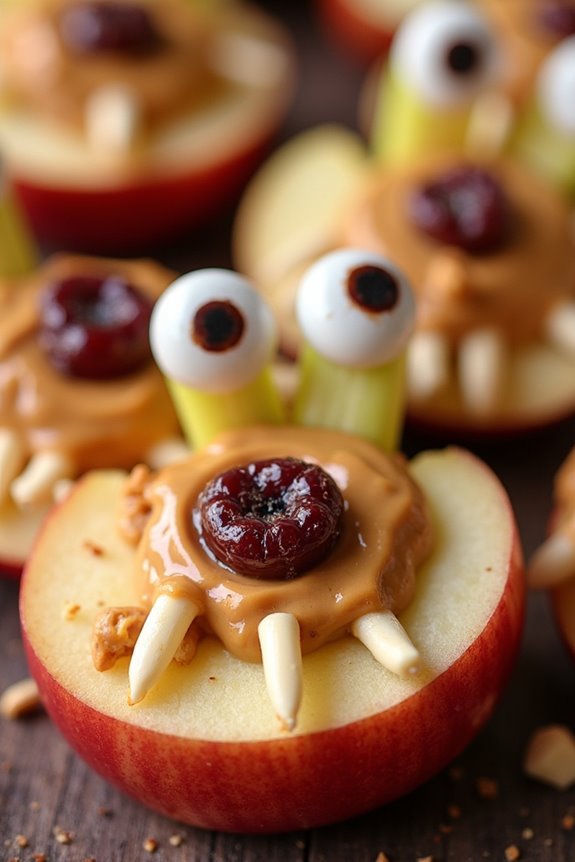
The best part about Monster Mouths is their versatility. You can customize them based on your taste preferences and dietary needs. The traditional recipe uses apples as the base, which provides a crisp texture and a sweet-tart flavor. Peanut butter acts as the “glue” that holds everything together while adding a creamy richness. Almond slivers are used to create the sharp teeth, and the eyes can be crafted from a variety of edible options. This snack isn’t only entertaining to make but also allows for creativity in the kitchen.
Ingredients (Serves 4-6 people):
- 3 medium apples (any variety)
- 1/2 cup smooth peanut butter
- 1/4 cup slivered almonds
- 12-18 edible candy eyes or raisins
- 1 tablespoon lemon juice (optional)
- Honey (optional, for extra sweetness)
Instructions:
- Prepare the Apples: Wash the apples thoroughly and pat them dry with a paper towel. Slice each apple into quarters and remove the cores. Each quarter should then be sliced again to create a thin mouth shape. If you wish to prevent browning, lightly brush the apple slices with lemon juice.
- Spread the Peanut Butter: Using a butter knife or a small spatula, spread a generous layer of peanut butter onto one side of the apple slice. Confirm that the peanut butter reaches the edges so that the almonds can stick easily.
- Create the Teeth: Carefully insert the slivered almonds into the peanut butter side of the apple slice. Space them out evenly to resemble sharp monster teeth. Be gentle to avoid breaking the almonds.
- Assemble the Monster Mouths: Take another apple slice and press the peanut butter side against the almond-slivered slice to form a mouth. Adjust the positioning if necessary, confirming the “teeth” are visible.
- Add the Eyes: Place two candy eyes or raisins on top of each apple mouth to give your monster its character. If needed, use a small dab of peanut butter to secure them in place.
- Optional Sweetness: If you prefer, drizzle a small amount of honey over the completed monster mouths for an extra touch of sweetness.
Extra Tips:
When creating Monster Mouths, make sure to choose apples that are firm to confirm they hold their shape when assembled. If you or your guests have nut allergies, you can substitute the peanut butter with sunflower seed butter or any other nut-free spread.
Similarly, you can use chocolate chips or small marshmallows as an alternative to candy eyes if desired. This recipe is a fantastic way to engage kids in the kitchen, allowing them to express their creativity while learning about healthy snacks. Enjoy crafting these monsters and have a spooktacular Halloween!
Skeleton Veggie Platter
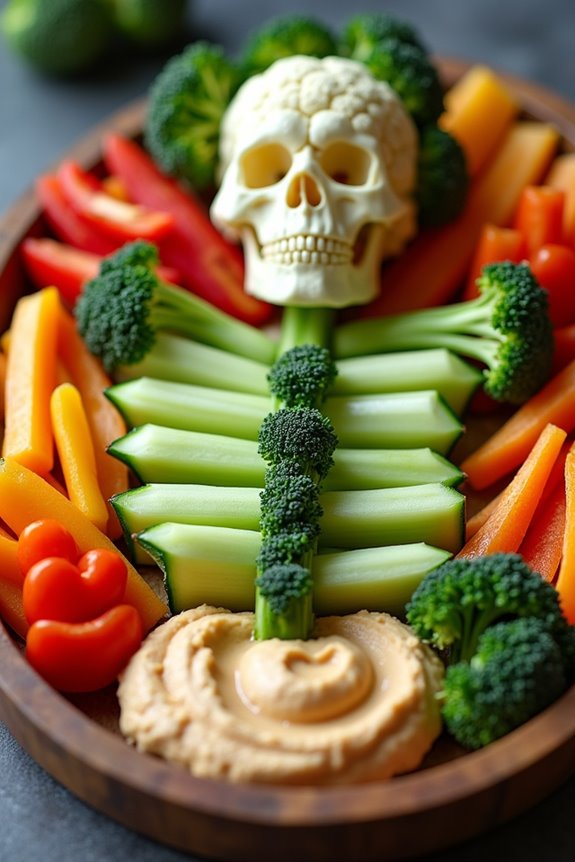
This Halloween, bring a spooky and healthy twist to your celebrations with a Skeleton Veggie Platter. This delightful dish isn’t only a visual treat but also a nutritional powerhouse, perfect for both kids and adults. The platter is cleverly arranged to resemble a skeleton using a variety of fresh, crunchy vegetables, making it an ideal centerpiece for your Halloween party table.
The Skeleton Veggie Platter is designed to serve 4-6 people and incorporates a rainbow of vegetables to guarantee a balance of flavors and textures. With its simple preparation and eye-catching presentation, this dish is a fun way to encourage everyone to enjoy their veggies. Furthermore, it can be easily customized to suit different tastes and dietary preferences.
Ingredients:
- 1 head of cauliflower
- 1 head of broccoli
- 1 cucumber
- 1 red bell pepper
- 1 yellow bell pepper
- 1 bunch of celery
- 1 large carrot
- 1 cup cherry tomatoes
- 1 cup baby carrots
- 1 cup sugar snap peas
- 1 small bowl of hummus or your favorite dip
Instructions:
- Prepare the vegetables: Start by washing all the vegetables thoroughly under cold water. Pat them dry with a clean kitchen towel.
- Cut the vegetables: Break the cauliflower and broccoli into small florets. Slice the cucumber into rounds. Cut the red and yellow bell peppers into strips after removing the seeds and core. Chop the celery into sticks, and slice the large carrot into thin strips.
- Arrange the platter: On a large serving tray, begin assembling the skeleton. Use the cauliflower florets to form the skeleton’s head. Place the broccoli florets to create a “hair” effect around the head.
- Create the skeleton body: Use the celery sticks to form the spine and ribs. Arrange the cucumber rounds as the backbone and rib cage. Place baby carrots and cherry tomatoes around the rib area to add color.
- Add limbs and details: Use the red and yellow bell pepper strips to form the arms and legs of the skeleton. For the hands and feet, arrange the sugar snap peas at the ends of the limbs.
- Finish with the dip: Place a small bowl of hummus or your preferred dip at the bottom of the platter to resemble a “pelvis” and for easy dipping.
Extra Tips:
To make the Skeleton Veggie Platter even more engaging, consider using small cookie cutters to shape some of the veggies into fun Halloween-themed shapes, like bats or pumpkins.
You can also mix and match veggies depending on availability and preference—swap in some radishes or jicama for additional crunch or use different colored peppers for a more vibrant skeleton.
Keep the platter chilled until serving to maintain the freshness and crispness of the vegetables. Enjoy this nutritious and festive dish that’s sure to be a hit at your Halloween gathering!
Creepy Crawly Cheese Sticks
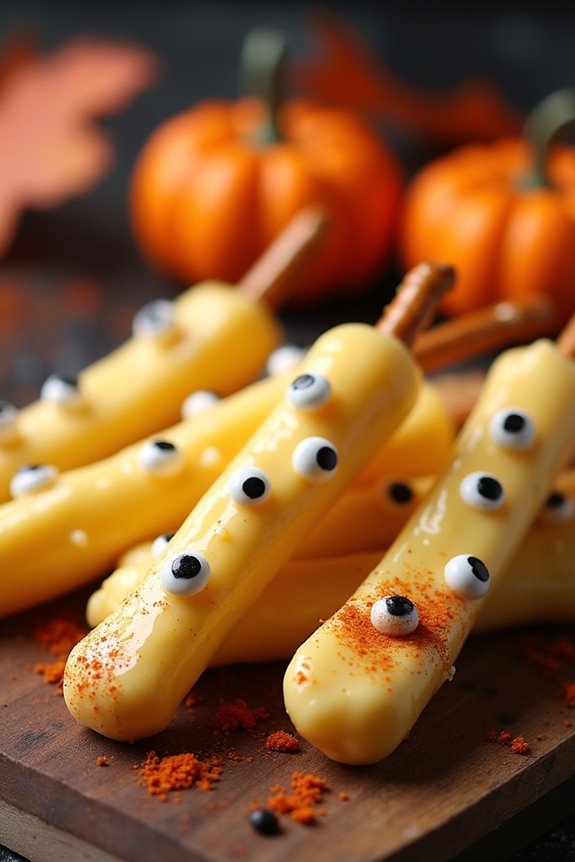
Celebrate Halloween with a fun and spooky snack that both kids and adults will love. Creepy Crawly Cheese Sticks aren’t only a delicious treat but are also nutritious, providing a healthier alternative to the usual candy overload during the holiday season.
These cheese sticks are creatively transformed into creepy-crawly critters, making them the perfect addition to your Halloween spread. The combination of cheese and pretzels provides a satisfying crunch while still being easy enough for little hands to help prepare.
These cheese sticks aren’t only visually fun but also simple to make, requiring minimal ingredients and effort. You can assemble them in advance, making your Halloween party prep a breeze.
Whether you’re hosting a party or just want to add a festive snack to your lunchbox, these Creepy Crawly Cheese Sticks will surely add a fun twist to your Halloween festivities.
Ingredients for 4-6 people:
- 8 string cheese sticks
- 32 mini pretzel sticks
- 16 candy eyes
- 1 tablespoon cream cheese or peanut butter (for sticking the eyes)
- 1 teaspoon paprika (for dusting, optional)
Cooking Instructions:
- Prepare the Cheese Sticks: Begin by unwrapping the string cheese sticks. Cut each cheese stick in half to create 16 smaller pieces, which will serve as the bodies of the creepy crawlies.
- Attach the Legs: Gently insert four mini pretzel sticks into each side of the cheese stick halves to create the legs of the critters. Make sure they’re evenly spaced and securely inserted to prevent them from falling off.
- Add the Eyes: Dab a small amount of cream cheese or peanut butter on the back of each candy eye. Attach two eyes to the front of each cheese stick, pressing gently so that they stick firmly.
- Optional Dusting: If desired, lightly sprinkle a pinch of paprika over the cheese sticks to give the critters a spooky appearance. This step adds a hint of color and flavor but can be omitted if preferred.
- Serve and Enjoy: Arrange your Creepy Crawly Cheese Sticks on a platter. Serve them immediately or refrigerate until ready to serve.
Extra Tips:
For a fun twist, try using different types of cheese sticks, such as cheddar or pepper jack, to vary the flavor and color of your creepy crawlies.
If you’re serving these at a party, consider creating a “graveyard” scene by adding a bed of leafy greens or crushed crackers beneath the cheese sticks.
Additionally, for a nut-free option, substitute the peanut butter with cream cheese or a nut-free spread. Remember, the key to making these cheese sticks extra spooky is in the presentation, so feel free to get creative with the arrangement and additional decorations.