
As Halloween approaches, I find myself eagerly searching for simple yet spooktacular dinner ideas that won’t keep me in the kitchen for hours. Think creepy-crawly spider pizzas or mummy hot dogs. These dishes are not just delicious; they’re also a visual treat. If you adore festive flair as much as I do, you’re in for a treat. Get ready for a culinary adventure that promises fun and flavor.
Creepy-Crawly Spider Pizzas
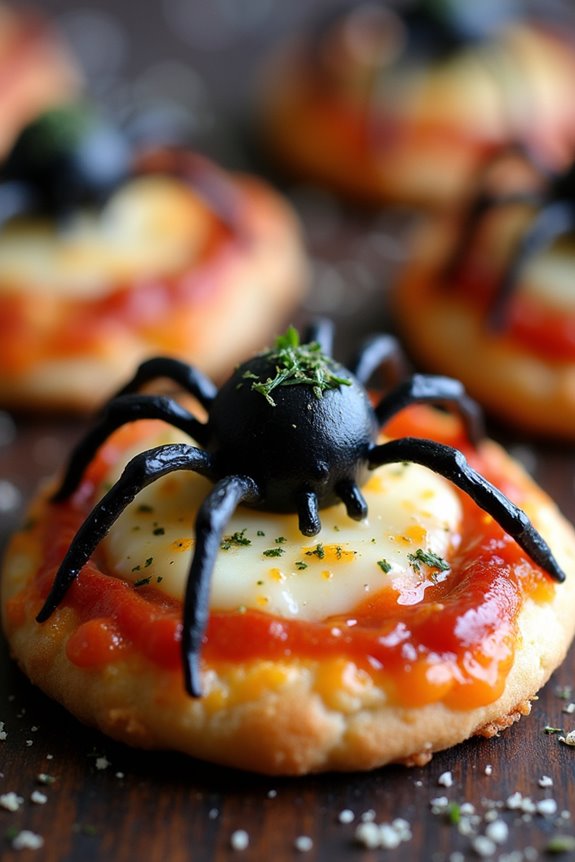
Get ready to thrill your family and friends with these delightfully spooky Creepy-Crawly Spider Pizzas, perfect for a Halloween dinner that combines fun with flavor.
These mini pizzas are designed to look like they’ve creepy crawlers on top, but don’t worry, they’re just delicious black olives turned into edible art. Whether you’re planning a Halloween party or simply want to enjoy a themed dinner with your loved ones, these spider pizzas will surely be a hit.
Not only are they fun to make, but they also offer a great opportunity to get kids involved in the kitchen, letting them assemble their own spooky toppings.
The foundation of these spine-tingling pizzas is a classic, crispy pizza base topped with a rich tomato sauce and melted mozzarella cheese. The highlight, however, is the creative use of black olives to craft spider designs on top of the pizzas.
Each bite offers a delightful combination of traditional pizza flavors with an eerie twist, making it a perfect dish to set the Halloween mood. Whether you’re a fan of creepy crawlers or just love a good themed dish, these spider pizzas are guaranteed to provide a ghoulishly good time.
Ingredients (Serving Size: 4-6 People):
- 6 mini pizza bases or pre-made pizza crusts
- 1 cup tomato pizza sauce
- 2 cups shredded mozzarella cheese
- 1 can of whole black olives
- 1 tablespoon olive oil
- 1 teaspoon dried oregano
- 1 teaspoon garlic powder
- Salt and pepper to taste
Cooking Instructions:
1. Preheat the Oven: Begin by preheating your oven to 400°F (200°C). This guarantees that your pizzas bake evenly and the cheese melts perfectly.
2. Prepare the Pizza Bases: Place the mini pizza bases on a baking sheet lined with parchment paper. Lightly brush each base with a bit of olive oil to help crisp up the crust as it bakes.
3. Spread the Sauce: Evenly spread about 2 tablespoons of tomato pizza sauce over each pizza base, ensuring you leave a small border around the edge for a crust.
4. Add the Cheese: Sprinkle a generous amount of shredded mozzarella cheese over the sauce on each pizza base. This will create the gooey, cheesy layer that everyone loves.
5. Create the Spider Toppings: Drain the can of black olives. For each pizza, you’ll need about 5-6 whole olives for the spider bodies. Slice some olives in half for the spider bodies, and cut others into thin strips to create spider legs.
Arrange them creatively on top of the cheese to resemble spiders.
6. Season the Pizzas: Sprinkle a pinch of dried oregano, garlic powder, salt, and pepper over the top of each pizza to enhance the flavors.
7. Bake the Pizzas: Place the baking sheet in the preheated oven and bake for 10-12 minutes, or until the cheese is melted and bubbly, and the crusts are golden brown.
8. Serve and Enjoy: Once baked, remove the pizzas from the oven and allow them to cool slightly. Serve warm and enjoy your spooky creation!
Extra Tips:
When making Creepy-Crawly Spider Pizzas, feel free to get creative with the toppings. If you want to add more flavor, consider including pepperoni or mushrooms beneath the cheese.
For those who prefer a spicier kick, a sprinkle of red pepper flakes can do wonders. If you’re making these pizzas with kids, let them have fun designing their own spider creations.
Mummy Hot Dogs

Mummy Hot Dogs are a fun and easy-to-make Halloween treat that will delight both kids and adults. These spooky snacks are fundamentally hot dogs wrapped in crescent roll dough to resemble mummies, complete with mustard or ketchup eyes for an extra eerie touch.
They’re perfect for a Halloween party or a themed dinner and can be paired with a variety of dipping sauces or sides. The best part is that they require minimal ingredients and preparation time, making them a convenient choice for busy hosts.
This recipe yields enough for 4-6 people, making it ideal for a small gathering or a family meal. You can easily scale up the recipe for a larger crowd. The combination of the soft, flaky dough with the savory hot dogs creates a mouthwatering blend of textures and flavors that everyone will love.
Whether you’re serving them as an appetizer, snack, or main dish, Mummy Hot Dogs are sure to be a hit.
Ingredients (serving size: 4-6)
- 1 can (8 oz) refrigerated crescent roll dough
- 8 hot dogs
- 1 tablespoon all-purpose flour (for dusting)
- Mustard or ketchup (for decorating)
Cooking Instructions
- Preheat the Oven: Start by preheating your oven to 375°F (190°C). This guarantees the dough will cook evenly and become golden brown.
- Prepare the Dough: Lightly dust a flat surface with flour. Unroll the crescent roll dough, and separate it into four rectangles. Press the perforations to seal them together.
- Cut the Dough: Using a knife or a pizza cutter, cut each rectangle into 10 thin strips. You should have a total of about 40 strips.
- Wrap the Hot Dogs: Take one hot dog and start wrapping it with a strip of crescent dough, leaving a small space for the face. Continue wrapping until the hot dog is covered, with small gaps to resemble a mummy. Repeat this for all the hot dogs.
- Bake: Place the wrapped hot dogs on an ungreased baking sheet. Bake in the preheated oven for 13-17 minutes or until the dough is golden brown and cooked through.
- Decorate: Once baked, remove from the oven and let them cool slightly. Use mustard or ketchup to dot on eyes for each mummy.
Extra Tips
When wrapping the hot dogs, don’t worry if the strips overlap slightly; this adds to the mummy effect. For a crispier texture, consider brushing the dough with a little melted butter before baking.
If you prefer a spicier version, try using jalapeño cheese-filled hot dogs or add a sprinkle of chili powder to the dough before wrapping. For a vegetarian option, substitute regular hot dogs with plant-based versions.
Enjoy your Halloween dinner with these delightful Mummy Hot Dogs!
Ghostly Stuffed Peppers
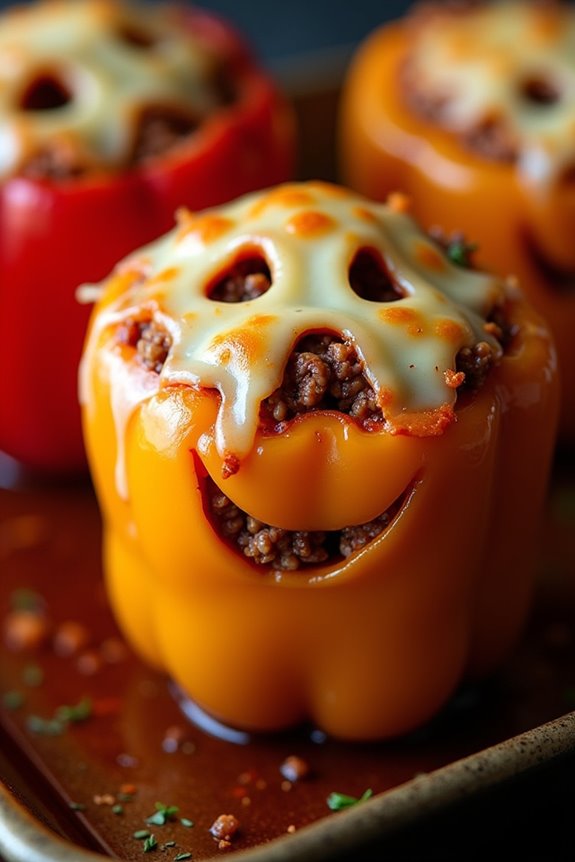
Ghostly Stuffed Peppers are a spooktacular addition to any Halloween dinner table. These adorable and delicious peppers are carved out to resemble little ghosts, making them a fun and festive centerpiece for your meal. Not only are they visually appealing, but they’re also packed with flavor and nutrients, making them a hit with both kids and adults alike. The combination of hearty ground beef, rice, and a medley of spices and vegetables makes for a filling dish that satisfies while keeping the Halloween spirit alive.
These Ghostly Stuffed Peppers are easy to make and can be customized to suit your taste preferences. Whether you prefer more spice or a vegetarian version, this recipe is versatile enough to accommodate. You can even get the whole family involved in the preparation, letting the kids carve the pepper ‘ghosts’ while you handle the fillings. It’s a great way to spend time together in the kitchen and create memories that will last long after the Halloween season has passed.
Ingredients (serving size: 4-6 people):
- 6 medium-sized bell peppers
- 1 pound ground beef or turkey
- 1 cup cooked rice
- 1 small onion, finely chopped
- 2 cloves garlic, minced
- 1 can (15 oz) diced tomatoes
- 1 tablespoon tomato paste
- 1 teaspoon dried oregano
- 1 teaspoon dried basil
- 1 teaspoon paprika
- Salt and pepper to taste
- 1 cup shredded mozzarella cheese
- Olive oil
Cooking Instructions:
- Preheat and Prepare Peppers: Preheat your oven to 375°F (190°C). Wash the bell peppers thoroughly, then carefully cut the tops off each one and remove the seeds and membranes. Using a small knife, carve out facial features to make them look like little ghosts. Set the peppers aside.
- Cook the Filling: In a large skillet over medium heat, add a splash of olive oil and sauté the chopped onion and minced garlic until they become translucent. Add the ground beef (or turkey) and cook until browned, breaking it up into small pieces with a spoon.
- Combine Ingredients: Once the meat is browned, drain any excess fat and stir in the cooked rice, diced tomatoes, tomato paste, oregano, basil, paprika, salt, and pepper. Let the mixture simmer for about 5 minutes, allowing the flavors to meld together.
- Stuff the Peppers: Carefully spoon the beef and rice mixture into each prepared bell pepper, filling them generously. Place the stuffed peppers upright in a baking dish.
- Bake the Peppers: Cover the baking dish with aluminum foil and bake in the preheated oven for 30 minutes. Remove the foil, sprinkle mozzarella cheese over each pepper, and return to the oven. Bake for an additional 10-15 minutes, or until the cheese is melted and bubbly.
- Serve: Once done, remove the peppers from the oven and let them cool slightly before serving. Enjoy your ghostly creations as a fun and tasty Halloween dish!
Extra Tips:
When carving the peppers, make sure to create simple shapes for the eyes and mouth, as intricate designs may cause the peppers to collapse during baking. If you prefer a vegetarian version, substitute the meat with a mixture of black beans and corn.
Additionally, you can prepare the filling a day in advance, making the assembly process quicker on the day of your Halloween celebration. Adjust the seasonings according to your family’s taste preferences, and don’t be afraid to experiment with different types of cheese for a unique twist.
Pumpkin-Shaped Ravioli
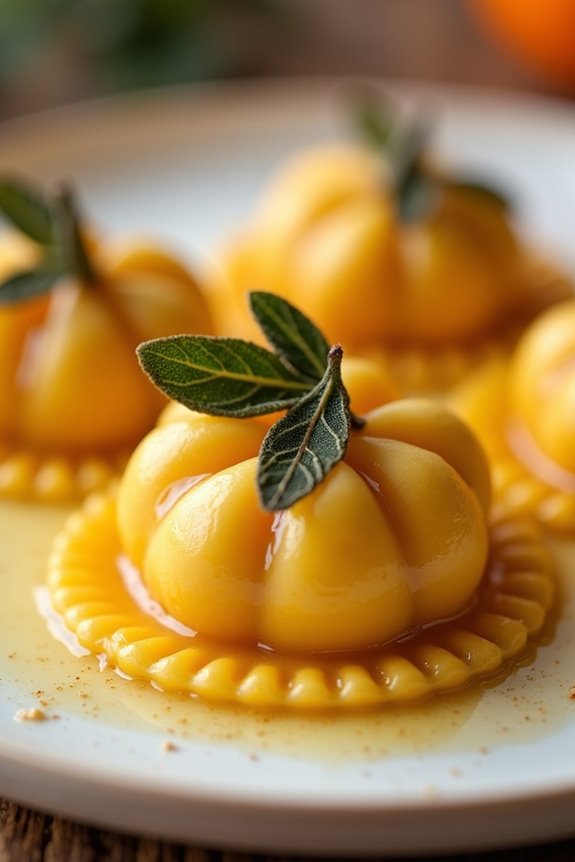
Pumpkin-Shaped Ravioli is a festive and delightful dish perfect for a Halloween-themed dinner. This dish combines the warm, autumnal flavors of pumpkin and spices with the fun and whimsy of Halloween. The ravioli are crafted to resemble small pumpkins, making them not just a delicious treat, but also a charming addition to your Halloween table setting.
The pasta dough envelopes a creamy pumpkin filling, infused with nutmeg and sage, and is served with a light brown butter sauce, adding a rich and nutty flavor to the dish. Not only does Pumpkin-Shaped Ravioli bring a playful aesthetic to the table, but it also provides a comforting and savory taste experience.
The preparation involves creating homemade pasta dough, rolling it out, and using cookie cutters to shape the ravioli into pumpkins. With a bit of patience and creativity, this dish will impress guests with its intricate presentation and its blend of classic fall flavors. Serve this dish to 4-6 people and enjoy a warm, inviting meal that perfectly captures the spirit of the season.
Ingredients (Serves 4-6)
- 2 cups all-purpose flour
- 3 large eggs
- 1 tablespoon olive oil
- 1 cup pumpkin puree
- 1/2 cup ricotta cheese
- 1/4 cup grated Parmesan cheese
- 1/2 teaspoon ground nutmeg
- 1 teaspoon dried sage
- Salt and pepper to taste
- 1/2 cup unsalted butter
- Fresh sage leaves (optional for garnish)
Cooking Instructions
- Prepare the Pasta Dough: In a large mixing bowl, combine the flour and a pinch of salt. Create a well in the center and crack the eggs into it. Add the olive oil. Gradually mix the flour into the eggs using a fork until a dough begins to form. Knead the dough on a floured surface for about 8-10 minutes until it becomes smooth and elastic. Wrap the dough in plastic wrap and let it rest for at least 30 minutes.
- Make the Filling: In another bowl, mix together the pumpkin puree, ricotta cheese, Parmesan cheese, nutmeg, sage, salt, and pepper until well combined. Taste and adjust the seasoning if necessary.
- Roll Out the Dough: Divide the rested dough into four portions. Using a pasta machine or rolling pin, roll each piece of dough into thin sheets, about 1/16-inch thick.
- Cut and Shape the Ravioli: Use a pumpkin-shaped cookie cutter to cut out pumpkin shapes from the dough. Place a small spoonful of the pumpkin filling in the center of half of the cut-outs. Brush the edges with a bit of water, and place another pumpkin-shaped pasta cut-out on top. Press down the edges gently to seal the ravioli, guaranteeing there are no air bubbles.
- Cook the Ravioli: Bring a large pot of salted water to a boil. Add the ravioli in batches and cook for 3-4 minutes, or until they float to the surface. Remove them with a slotted spoon and set aside.
- Prepare the Brown Butter Sauce: In a large skillet, melt the butter over medium heat. Continue to cook until the butter turns golden brown and releases a nutty aroma. Add fresh sage leaves, if using, and allow them to crisp up slightly.
- Serve: Gently toss the cooked ravioli in the brown butter sauce to coat. Serve immediately, garnished with additional Parmesan cheese and fresh sage leaves if desired.
Extra Tips
When making the pasta dough, verify it’s kneaded well to develop the gluten, which gives the dough its elasticity and strength. If the dough feels too dry, add a teaspoon of water at a time until the desired consistency is achieved. Conversely, if it’s too sticky, sprinkle a little more flour.
When cutting out the ravioli, make sure to seal the edges well to prevent the filling from escaping during cooking. For an added touch, you can use a small knife to create grooves on the pasta to mimic the ridges of a pumpkin. This dish can be made ahead of time; simply freeze the uncooked ravioli on a baking sheet, then transfer to a freezer bag for future use.
Monster Meatball Sliders
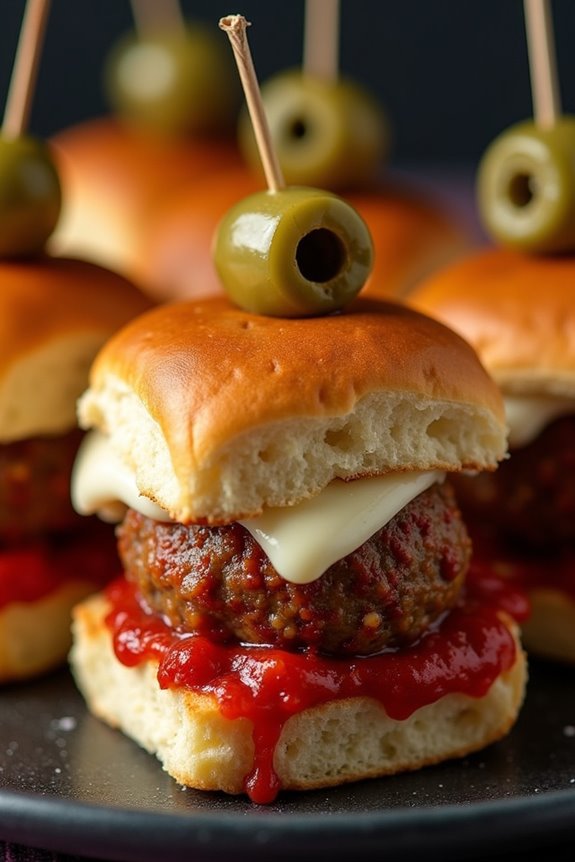
Monster Meatball Sliders are a hauntingly delicious way to add some spooky fun to your Halloween dinner spread. These sliders aren’t only visually entertaining but also pack a punch of flavors with juicy meatballs, melted cheese, and a tangy sauce, all sandwiched between soft slider buns. Perfect for a Halloween gathering or a family dinner, these sliders are easy to make and certain to delight both kids and adults alike.
The key to creating these monstrous sliders lies in the presentation and a bit of creativity. By using olives, toothpicks, and some imagination, you can transform regular meatballs into creepy culinary creations that resemble monster eyes or even ghoulish grins. With a blend of classic Italian seasonings and a rich marinara sauce, these sliders aren’t only fun to look at but are also irresistibly tasty. Prepare to watch your guests devour these frightfully flavorful sliders with glee!
Ingredients (Serves 4-6)
- 1 1/2 pounds ground beef
- 1/2 cup breadcrumbs
- 1/4 cup grated Parmesan cheese
- 1 large egg
- 2 cloves garlic, minced
- 1 tablespoon Italian seasoning
- Salt and pepper, to taste
- 2 cups marinara sauce
- 12 slider buns
- 6 slices of mozzarella cheese, cut in half
- 12 pimento-stuffed green olives
- 12 toothpicks
Cooking Instructions
- Preheat and Prepare: Preheat your oven to 375°F (190°C). Line a baking sheet with parchment paper or lightly grease it to prevent sticking.
- Form the Meatballs: In a large mixing bowl, combine the ground beef, breadcrumbs, Parmesan cheese, egg, minced garlic, Italian seasoning, salt, and pepper. Mix well until all ingredients are evenly incorporated.
- Shape the Meatballs: Roll the meat mixture into 12 equal-sized balls, about 1 1/2 inches in diameter. Place them on the prepared baking sheet, evenly spaced to guarantee they cook evenly.
- Bake the Meatballs: Place the baking sheet in the preheated oven and bake the meatballs for 20-25 minutes, or until they’re cooked through and slightly browned on the outside.
- Simmer in Sauce: While the meatballs are baking, heat the marinara sauce in a large saucepan over medium heat. Once the meatballs are done, transfer them into the simmering sauce and let them cook for an additional 5 minutes, allowing the flavors to meld.
- Assemble the Sliders: Slice each slider bun in half and place a meatball coated in sauce on the bottom half. Top each meatball with a half slice of mozzarella cheese, then place the top half of the bun over the cheese.
- Create the Monster Eyes: Using the toothpicks, attach a pimento-stuffed olive to the top of each slider, creating the appearance of monster eyes peering out from your sliders.
- Serve and Enjoy: Arrange the sliders on a platter and serve immediately while hot and gooey.
Extra Tips
For an added spooky effect, you can use food coloring to dye the mozzarella cheese slices a ghastly shade of green or orange before assembling the sliders.
If you prefer a spicier kick, consider adding a pinch of red pepper flakes to the meatball mixture or using spicy marinara sauce.
Finally, these sliders can be prepared ahead of time and simply reheated in the oven before serving, making them a convenient choice for entertaining a crowd.
Witch’s Brew Chili

Witch’s Brew Chili is a spooktacular dish perfect for your Halloween dinner table. This hearty and flavorful chili combines a variety of beans, vegetables, and spices, simmered to perfection, creating a cauldron of savory goodness. With its rich and robust flavors, this chili is bound to satisfy the appetites of both ghouls and goblins alike.
Whether you’re hosting a Halloween party or just looking for a comforting meal on a chilly October night, Witch’s Brew Chili is the ideal dish to keep everyone warm and happy.
Crafted with a blend of traditional chili ingredients and a few surprising twists, this recipe brings a magical touch to a classic favorite. The addition of cocoa powder and cinnamon gives the chili a unique depth of flavor, while the smoked paprika adds a hint of smokiness that enhances the overall taste.
Serve it with your favorite toppings, such as shredded cheese, sour cream, or chopped green onions, to create a truly enchanting meal experience. This recipe is designed to serve 4-6 people, making it perfect for a small gathering or family dinner.
Ingredients:
- 1 tablespoon olive oil
- 1 medium onion, diced
- 3 cloves garlic, minced
- 1 pound ground beef or turkey
- 1 can (15 oz) kidney beans, drained and rinsed
- 1 can (15 oz) black beans, drained and rinsed
- 1 can (15 oz) diced tomatoes
- 1 cup beef or vegetable broth
- 2 tablespoons tomato paste
- 1 tablespoon chili powder
- 1 teaspoon ground cumin
- 1 teaspoon smoked paprika
- 1/2 teaspoon cocoa powder
- 1/2 teaspoon ground cinnamon
- Salt and pepper, to taste
- Optional toppings: shredded cheese, sour cream, chopped green onions, tortilla chips
Instructions:
- Sauté the Aromatics: Begin by heating the olive oil in a large pot over medium heat. Add the diced onion and minced garlic, sautéing them until the onion becomes translucent and fragrant, about 5 minutes.
- Brown the Meat: Add the ground beef or turkey to the pot. Cook until the meat is browned and fully cooked, breaking it up with a spoon as it cooks. This should take about 8-10 minutes.
- Combine Ingredients: Stir in the drained kidney beans, black beans, and diced tomatoes. Add the beef or vegetable broth and tomato paste, mixing all the ingredients well to guarantee they’re evenly combined.
- Season the Chili: Sprinkle in the chili powder, ground cumin, smoked paprika, cocoa powder, and ground cinnamon. Stir the mixture thoroughly to evenly distribute the spices. Add salt and pepper to taste.
- Simmer the Chili: Bring the mixture to a gentle boil, then reduce the heat to low. Cover the pot and let the chili simmer for at least 30 minutes, stirring occasionally to prevent sticking. This will allow the flavors to meld beautifully.
- Serve and Garnish: Once the chili has thickened to your desired consistency, remove it from the heat. Serve it hot, topped with your choice of shredded cheese, sour cream, chopped green onions, or tortilla chips for added texture and flavor.
Extra Tips:
For an even richer flavor, consider preparing the chili a day in advance and letting it sit in the refrigerator overnight—the flavors will deepen and blend beautifully.
If you prefer a spicier chili, feel free to add a pinch of cayenne pepper or some chopped jalapeños. Additionally, using a slow cooker for this recipe can make the process even more convenient; simply combine all the ingredients in the slow cooker and cook on low for 6-8 hours.
This Witch’s Brew Chili can also be easily adapted to a vegetarian version by omitting the meat and adding more beans or vegetables like zucchini or bell peppers.
Batty BBQ Chicken Wings
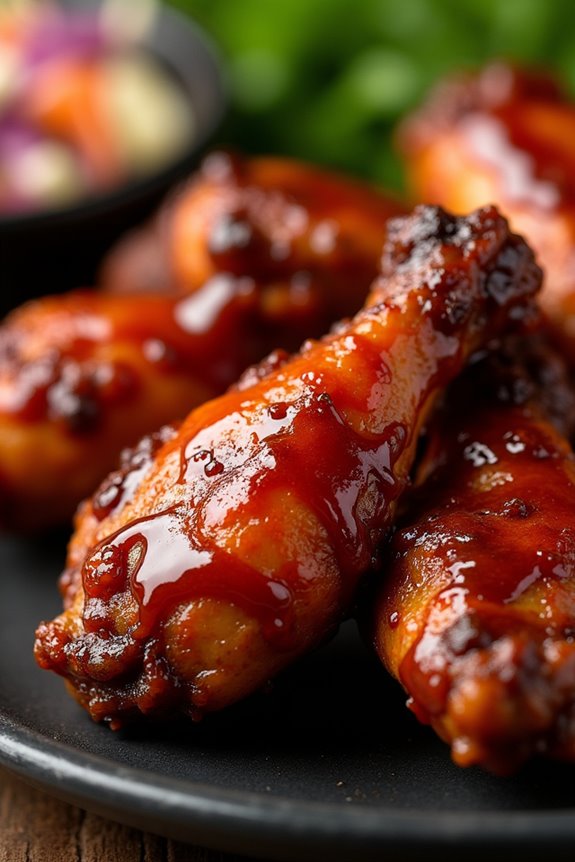
Get ready to add a spooky twist to your Halloween dinner with Batty BBQ Chicken Wings. Perfectly seasoned and dripping with a tangy BBQ sauce, these wings are sure to be a hit at your festive gathering. The deep, rich color of the BBQ sauce gives the wings a bat-like appearance, making them a perfect fit for your Halloween spread.
Whether you’re hosting a party or simply enjoying a themed dinner with family, these wings will bring the right amount of eerie charm to your table. Batty BBQ Chicken Wings aren’t only visually enticing but also deliciously satisfying. The combination of crispy skin, tender meat, and flavorful sauce makes this dish a crowd-pleaser.
What’s more, they’re easy to prepare, requiring just a few simple ingredients and some time in the oven. By following the instructions below, you’ll have a platter of bat-themed wings ready to impress your guests. Let’s plunge into the ingredients and steps to create this spooky delight.
Ingredients (Serves 4-6):
- 3 pounds of chicken wings
- 1 tablespoon of garlic powder
- 1 tablespoon of onion powder
- 1 teaspoon of smoked paprika
- 1 teaspoon of salt
- 1/2 teaspoon of black pepper
- 1 cup of BBQ sauce
- 2 tablespoons of honey
- 1 tablespoon of Worcestershire sauce
- 1 tablespoon of apple cider vinegar
Cooking Instructions:
- Preheat and Prepare: Preheat your oven to 400°F (200°C). Line a large baking sheet with aluminum foil and place an oven-safe wire rack on top. This setup will allow the wings to cook evenly and become extra crispy.
- Season the Wings: In a large bowl, combine the garlic powder, onion powder, smoked paprika, salt, and black pepper. Add the chicken wings to the bowl and toss until the wings are evenly coated with the seasoning mixture.
- Bake the Wings: Arrange the seasoned wings in a single layer on the wire rack. Place the baking sheet in the preheated oven and bake for 35-40 minutes, turning the wings halfway through to confirm even cooking. The wings should be golden brown and cooked through.
- Prepare the BBQ Sauce Mixture: While the wings are baking, mix the BBQ sauce, honey, Worcestershire sauce, and apple cider vinegar in a saucepan over medium heat. Stir occasionally and let the mixture come to a simmer. Cook for about 5 minutes until the sauce thickens slightly.
- Coat the Wings: Once the wings are cooked, remove them from the oven. Using a pastry brush or a spoon, generously coat each wing with the prepared BBQ sauce mixture. Make sure each wing is well covered for maximum flavor.
- Finish Baking: Return the coated wings to the oven and bake for an additional 10 minutes. This will help the sauce adhere to the wings and caramelize slightly, enhancing the flavor and appearance.
- Serve and Enjoy: Remove the wings from the oven and let them rest for a few minutes before serving. Arrange them on a platter and serve with your choice of dipping sauces or sides.
Extra Tips: For an extra crispy finish, you can broil the wings for an additional 2-3 minutes after the final bake, keeping a close eye to prevent burning. If you prefer a spicier kick, add a dash of hot sauce or cayenne pepper to the BBQ sauce mixture.
Finally, make sure to pat the wings dry with paper towels before seasoning to help the spices stick better and guarantee crispiness. Enjoy the hauntingly delicious Batty BBQ Chicken Wings at your Halloween feast!
Frankenstein’s Veggie Burgers
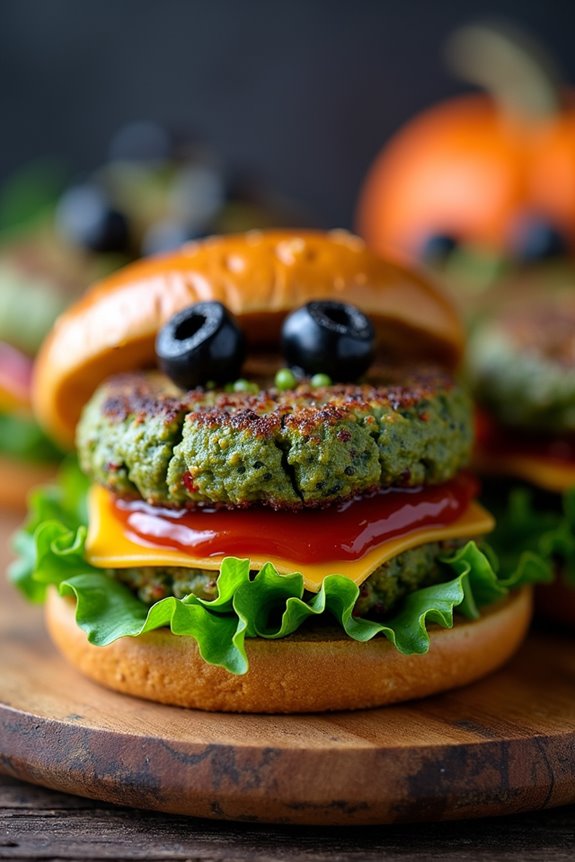
Frankenstein’s Veggie Burgers are a fun and spooky addition to your Halloween dinner table. These delicious and nutritious burgers are designed to look like the iconic monster, making them a delightful treat for both kids and adults. The combination of vibrant green ingredients and creative garnishes gives these veggie burgers their monstrous appearance, while guaranteeing they remain healthy and flavorful. Perfect for a Halloween gathering, these burgers are sure to surprise and entertain your guests with their ghoulish charm.
The base of Frankenstein’s Veggie Burgers is made from a blend of hearty vegetables and grains, providing a satisfying texture and taste. The green hue comes from incorporating spinach and peas, which not only add color but also pack the burgers with nutrients. Topped with whimsical decorations like olive eyes and a ketchup-smeared mouth, these burgers are as fun to make as they’re to eat. This recipe makes enough for 4-6 servings, ideal for a family dinner or a small Halloween party.
Ingredients:
- 2 cups fresh spinach leaves
- 1 cup cooked quinoa
- 1 can (15 oz) chickpeas, drained and rinsed
- 1 cup frozen peas, thawed
- 1/2 cup breadcrumbs
- 1/2 cup finely chopped onion
- 2 cloves garlic, minced
- 1 tablespoon olive oil
- 1 tablespoon soy sauce
- 1 teaspoon smoked paprika
- Salt and pepper to taste
- 6 whole wheat burger buns
- 12 black olives, sliced
- 1/4 cup ketchup
- 1/4 cup mustard
- Lettuce leaves
- 6 slices of cheese (optional)
Instructions:
- Prepare Ingredients: Start by washing the spinach leaves thoroughly. Drain the chickpeas and rinse them under cold water. Thaw the peas by leaving them at room temperature or running them under warm water.
- Blend the Mixture: In a food processor, combine the spinach, chickpeas, peas, onion, garlic, olive oil, soy sauce, smoked paprika, salt, and pepper. Pulse until the mixture is well combined but still slightly chunky to maintain texture.
- Form Burger Patties: Transfer the mixture to a large bowl and stir in the cooked quinoa and breadcrumbs. Mix well until the ingredients are evenly distributed. Divide the mixture into 6 equal parts and shape each part into a patty roughly the size of your burger buns.
- Cook the Patties: Heat a non-stick skillet over medium heat. Add a little olive oil and cook the patties for about 5 minutes on each side or until they’re golden brown and firm.
- Assemble the Burgers: Slice the burger buns and lightly toast them if desired. Place a lettuce leaf on the bottom half of each bun, add the veggie patty, and top with a slice of cheese if using. Use sliced olives to create eyes and a mouth for the Frankenstein face, and use ketchup and mustard to draw scars or stitches.
- Serve and Enjoy: Place the top bun on each burger and serve immediately with your favorite Halloween-themed sides.
Extra Tips:
For an even more monstrous effect, consider using food coloring to dye the buns green or use guacamole as a spread to enhance the green color. If you prefer a spicier version, add a pinch of cayenne pepper to the patty mixture.
Make sure the patties aren’t too thick to guarantee they cook evenly. To prevent the patties from falling apart, assure that the mixture is well-bound with quinoa and breadcrumbs. If needed, add more breadcrumbs to achieve the desired consistency.
Eyeball Spaghetti
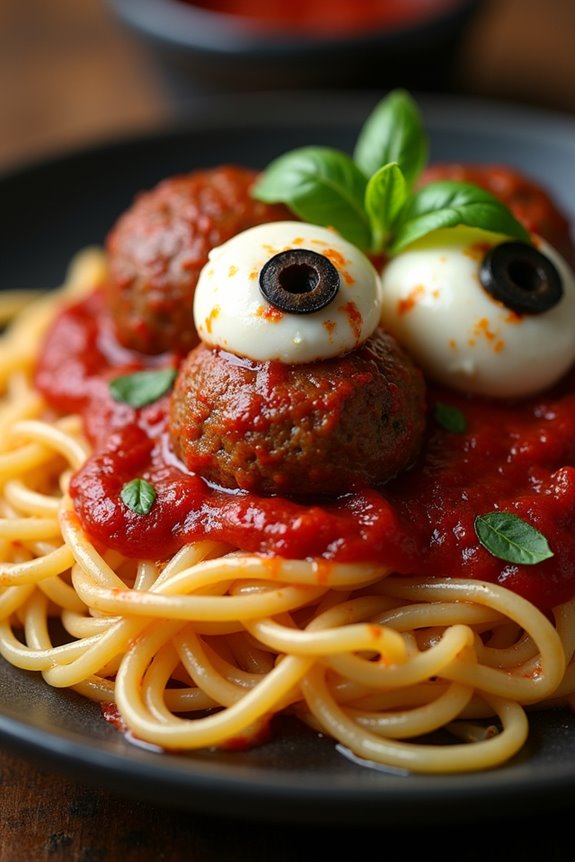
Transform your Halloween dinner into a spooky feast with this Eyeball Spaghetti recipe. This dish isn’t only delicious but also perfectly themed for the occasion, bound to impress both kids and adults alike. The pasta is served with juicy meatballs, each adorned with an “eyeball,” creating a visually striking and fun meal.
Whether you’re hosting a Halloween party or just enjoying a themed dinner at home, Eyeball Spaghetti makes for a perfect centerpiece. The meatballs are flavored with a mix of savory spices and herbs, while the “eyeballs” are made using mozzarella balls with olive slices, creating an eerie, yet tasty, visual effect.
Served atop a bed of spaghetti coated with rich tomato sauce, this dish is both satisfying and entertaining. Not only does it offer a playful twist, but it also brings the comforting flavors of a classic spaghetti and meatball dinner.
Ingredients for 4-6 servings:
- 1 pound spaghetti
- 1 pound ground beef or turkey
- 1/2 cup breadcrumbs
- 1/4 cup grated Parmesan cheese
- 1 egg
- 2 cloves garlic, minced
- 1 tablespoon Italian seasoning
- Salt and pepper to taste
- 1 jar (24 ounces) tomato sauce
- 12 small mozzarella balls (bocconcini)
- 6 pitted black or green olives, sliced into rings
- Fresh basil leaves for garnish
Cooking Instructions:
- Prepare the Meatballs:
- In a large mixing bowl, combine the ground meat, breadcrumbs, Parmesan cheese, egg, minced garlic, Italian seasoning, salt, and pepper. Mix thoroughly until all ingredients are well combined.
- Shape the mixture into 12 equally sized meatballs. Press a mozzarella ball into each meatball, making sure it’s partially exposed to resemble an eyeball. Place an olive slice on top of each mozzarella ball for the pupil.
- Preheat the oven to 375°F (190°C).
- Place the prepared meatballs on a baking sheet lined with parchment paper. Bake for 20-25 minutes, or until the meatballs are cooked through and the cheese is melted.
- While the meatballs are baking, cook the spaghetti according to the package instructions in a large pot of boiling salted water until al dente. Drain and set aside.
- In a large saucepan, heat the tomato sauce over medium heat until it begins to simmer. Add salt and pepper to taste. If desired, stir in a few fresh basil leaves for added flavor.
- Once the meatballs are cooked, carefully place them into the simmering tomato sauce. Allow them to simmer for an additional 5 minutes to soak up the flavors.
- Arrange the cooked spaghetti on a serving platter or individual plates. Spoon the meatballs and sauce over the pasta, making sure each serving has two “eyeballs.”
- Garnish the dish with fresh basil leaves for a pop of color. Serve immediately while hot and enjoy the spooky delight.
- 1 lb pizza dough
- 1 cup marinara sauce
- 2 cups shredded mozzarella cheese
- 1/2 cup sliced pepperoni
- 1/2 cup chopped bell peppers
- 1/4 cup sliced olives
- 1 egg (beaten, for egg wash)
- 1 tablespoon olive oil
- 1 teaspoon dried oregano
- 1 teaspoon garlic powder
- Black and green olives (for eyes)
- Red bell pepper (for tongue)
Extra Tips:
When preparing the meatballs, verify that the mozzarella balls are securely embedded so they stay in place during cooking. If you prefer a spicier version, consider adding a pinch of red pepper flakes to the meatball mixture.
For a vegetarian alternative, substitute the meatballs with plant-based options and follow the same stuffing and decorating procedure. Finally, if you have leftover “eyeballs,” they make for a fun and spooky salad topper or appetizer for your Halloween festivities.
Slithering Snake Calzones
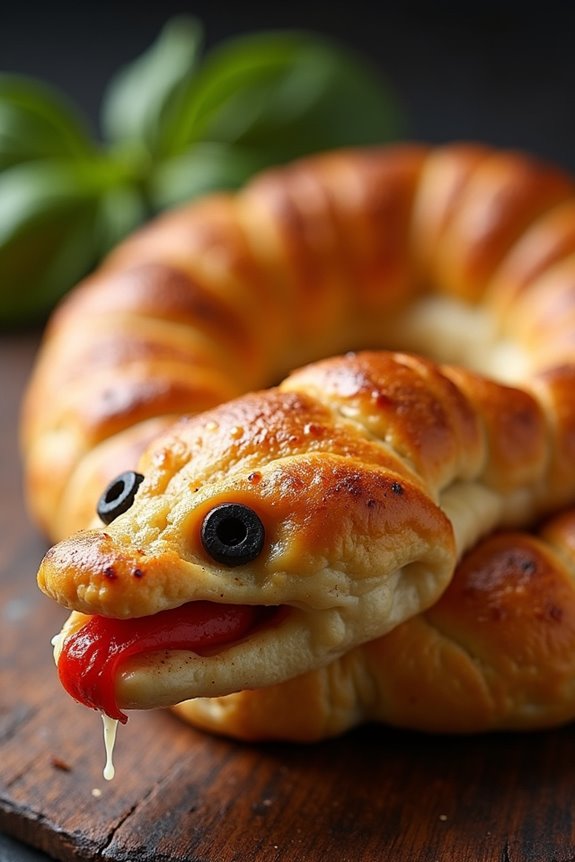
Transform your Halloween dinner menu with these delightfully eerie Slithering Snake Calzones. These imaginative calzones are molded into the shape of snakes, making them a spooky yet delicious addition to your Halloween festivities. Filled with savory ingredients and baked to golden perfection, they’re certain to be a hit among both kids and adults.
With their crispy crust and gooey cheese filling, these treats combine fun and flavor for a memorable meal. The Slithering Snake Calzones not only look impressive but are also relatively easy to prepare. The dough is shaped into a serpentine form, while a variety of fillings guarantee a burst of flavor with each bite.
Whether you’re planning a Halloween party or a cozy night in with family, these calzones will add a whimsical touch to your table. Gather your ingredients and get ready to craft these creepy yet delicious creations that will slither their way into everyone’s hearts!
Ingredients (Serves 4-6)
Cooking Instructions
- Prepare the Dough: Preheat your oven to 375°F (190°C). Roll out the pizza dough on a lightly floured surface into a large rectangle, about 24 inches long and 8 inches wide. This will form the base of your snake.
- Add the Filling: Spread a layer of marinara sauce down the center of the dough, leaving a 1-inch border on all sides. Sprinkle the mozzarella cheese evenly over the sauce, followed by the pepperoni slices, chopped bell peppers, and sliced olives.
- Shape the Snake: Carefully roll the dough over the filling from the long side, sealing the edges to create a long log. Shape the log into an ‘S’ or winding snake shape on a parchment-lined baking sheet. Pinch one end of the dough to form a snake’s head and taper the other end for the tail.
- Decorate the Snake: Use the black and green olives to create eyes on the snake’s head. Cut a small strip of red bell pepper and position it as the snake’s tongue. Brush the entire snake with the beaten egg for a golden finish.
- Season and Bake: Drizzle olive oil over the snake and sprinkle it with dried oregano and garlic powder for additional flavor. Place the baking sheet in the oven and bake for 25-30 minutes, or until the calzone is golden brown and the cheese is bubbling.
- Serve: Once baked, remove the calzone from the oven and let it cool for a few minutes. Slice into sections and serve warm, making sure everyone gets a piece of the slithering snake!
Extra Tips
For an extra crispy crust, consider using a pizza stone to bake your calzones. You can also customize the filling with your favorite ingredients, such as mushrooms, sausage, or even spinach for a healthier twist.
If the dough is difficult to shape, refrigerate it for a few minutes to make it easier to work with. Adjust the spice level by adding crushed red pepper flakes for a fiery bite. Enjoy your Halloween feast with these spooktacular Slithering Snake Calzones!
Jack-O’-Lantern Quesadillas
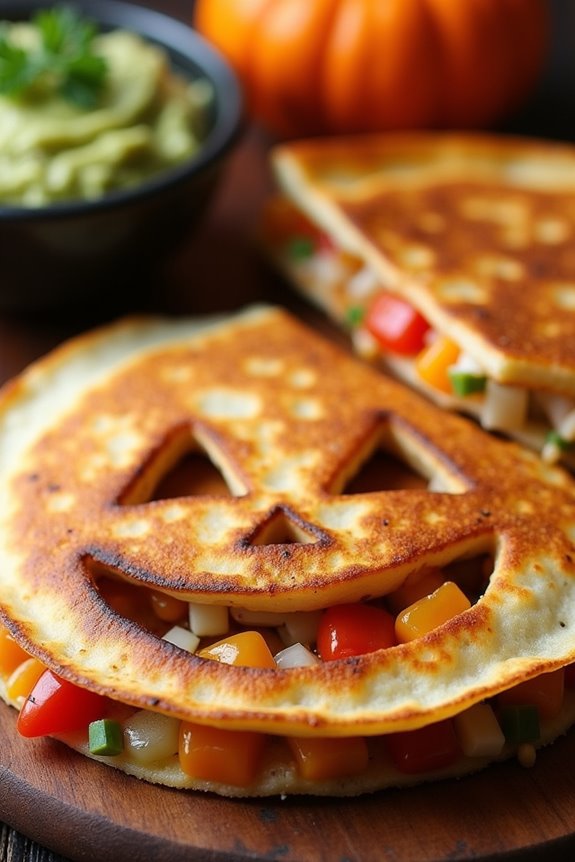
Bring some Halloween spirit to your dinner table with these festive Jack-O’-Lantern Quesadillas. This playful and delicious dish combines the fun of Halloween with the satisfying flavors of a classic quesadilla. Perfect for a spooky appetizer or a main dish, these quesadillas are shaped like jack-o’-lanterns, complete with cheesy smiles and peppery eyes. The combination of melted cheese, savory fillings, and a crispy exterior makes them a hit with both kids and adults alike.
These quesadillas aren’t only visually appealing but also easy to prepare, making them a fantastic choice for a Halloween dinner party or a casual family meal. Customize the filling to suit your taste; whether you prefer chicken, beef, or a vegetarian option, this recipe provides a versatile base that you can adapt to your preferences. Serve them with sour cream, salsa, or guacamole for a complete meal that captures the spooky charm of Halloween.
Ingredients (Serves 4-6):
- 8 large flour tortillas
- 2 cups shredded cheddar cheese
- 1 cup cooked and shredded chicken (optional)
- 1 bell pepper (any color), diced
- 1 small onion, finely chopped
- 1 tablespoon olive oil
- 1 teaspoon ground cumin
- 1 teaspoon chili powder
- Salt and pepper to taste
- Cooking spray or additional olive oil for frying
Instructions:
1. Prepare the Filling: In a medium skillet, heat the olive oil over medium heat. Add the diced bell pepper and chopped onion, sautéing until they’re soft and translucent, about 5 minutes.
If using chicken, stir in the shredded chicken, along with ground cumin, chili powder, salt, and pepper. Cook for another 2-3 minutes until everything is well combined and heated through. Remove from heat and set aside.
2. Create Jack-O’-Lantern Faces: Using a sharp knife, carefully cut jack-o’-lantern faces into 4 of the tortillas. You can make triangle eyes and a jagged smile or get creative with the designs. These will be the top layers of your quesadillas.
3. Assemble the Quesadillas: Lay the remaining 4 tortillas flat on a clean surface. Evenly distribute the cheese over each tortilla, followed by the prepared filling mixture. Top each with one of the jack-o’-lantern face tortillas.
4. Cook the Quesadillas: Lightly grease a large skillet with cooking spray or a little olive oil and heat over medium heat. Carefully place one assembled quesadilla in the skillet. Cook for 2-3 minutes on each side, or until the tortilla is golden brown and the cheese has melted.
Repeat with the remaining quesadillas.
5. Serve: Remove the quesadillas from the skillet and let them cool slightly. Cut each quesadilla into quarters and serve with your choice of sour cream, salsa, or guacamole.
Extra Tips:
To add even more flavor, consider adding additional spices such as smoked paprika or cayenne pepper to the filling. If you prefer a vegetarian option, replace the chicken with black beans or sautéed mushrooms.
For a healthier version, opt for whole wheat tortillas and low-fat cheese. When cutting the jack-o’-lantern faces, use a paring knife for better precision and safety.
These quesadillas are best enjoyed fresh and warm but can be reheated in the oven at 350°F for about 10 minutes if needed.
Vampire Garlic Bread

Transform your Halloween dinner into a spooktacular feast with this Vampire Garlic Bread. This dish isn’t only a perfect side to complement your eerie evening, but it’s also a deliciously garlicky treat that everyone will love.
The robust flavors of roasted garlic combined with buttery, crispy bread will have your guests sinking their teeth into every slice, just like a vampire would. Whether you’re hosting a Halloween party or simply want to celebrate the season with a themed dinner, this recipe is a must-try.
This Vampire Garlic Bread is easy to prepare and can be ready in under 30 minutes. The secret to its delightful taste lies in the generous use of garlic and herbs, which add a punch of flavor, while the melted cheese on top gives it that extra indulgence.
Serve it alongside your main course or as a standalone snack; either way, it’s bound to be a hit. Let’s explore the ingredients you’ll need to create this spooky delight for 4-6 people.
Ingredients:
- 1 large baguette or Italian bread loaf
- 1/2 cup unsalted butter, softened
- 6 cloves garlic, minced
- 1 teaspoon garlic powder
- 1 teaspoon dried oregano
- 1 teaspoon dried parsley
- 1/2 teaspoon salt
- 1/4 teaspoon black pepper
- 1 cup shredded mozzarella cheese
- Optional: 1/4 cup grated Parmesan cheese
- Fresh parsley, chopped (for garnish)
Cooking Instructions:
- Preheat the Oven: Start by preheating your oven to 400°F (200°C). This will guarantee that your garlic bread bakes evenly and becomes perfectly crispy.
- Prepare the Bread: Slice the baguette in half lengthwise. If you’re using a larger loaf, you may want to cut it into smaller segments to make it more manageable.
- Create the Garlic Butter Mixture: In a small mixing bowl, combine the softened butter, minced garlic, garlic powder, dried oregano, dried parsley, salt, and black pepper. Mix well until all ingredients are fully incorporated.
- Spread the Mixture: Generously spread the garlic butter mixture over the cut sides of the bread. Make sure to cover every inch of the surface to ensure maximum flavor.
- Add Cheese: Sprinkle the shredded mozzarella cheese evenly over the buttered bread. If using, add the grated Parmesan cheese on top for an extra cheesy delight.
- Bake the Bread: Place the bread halves on a baking sheet, cut sides up. Bake in the preheated oven for about 10-12 minutes, or until the cheese is bubbly and slightly golden, and the edges of the bread are crispy.
- Garnish and Serve: Remove the bread from the oven and let it cool for a minute. Sprinkle with fresh chopped parsley before slicing and serving your Vampire Garlic Bread.
Extra Tips:
For an extra punch of flavor, consider roasting the garlic before mixing it into the butter. This will give the garlic a sweet and mellow flavor profile, adding depth to your bread.
If you prefer a spicier kick, add a pinch of red pepper flakes to the garlic butter mixture. Additionally, feel free to experiment with different types of cheeses, such as cheddar or gouda, to customize the taste to your preference.
Enjoy your Halloween feast with this deliciously haunting Vampire Garlic Bread!
Haunted Mac and Cheese
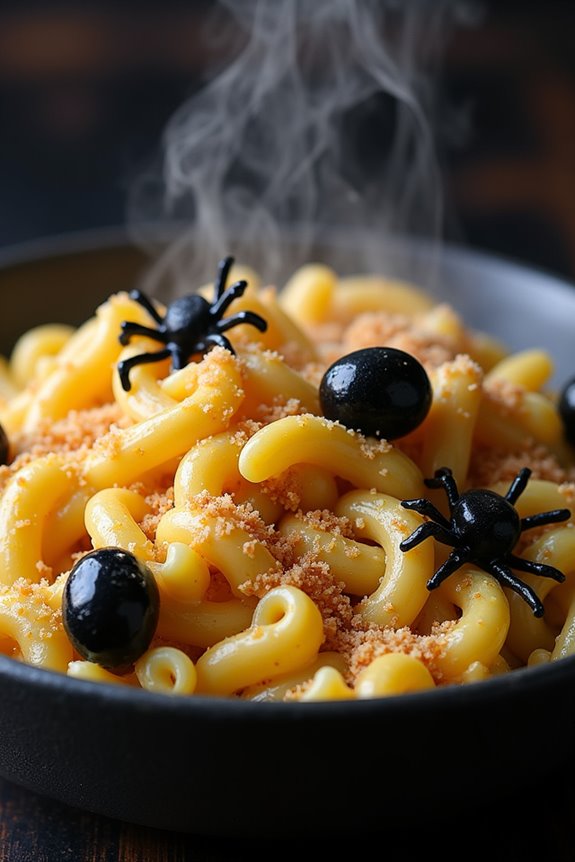
Halloween is the perfect time to get creative in the kitchen, and Haunted Mac and Cheese is a dish that combines comfort food with a spooky twist. This creamy, cheesy delight is enhanced with a hauntingly delicious blend of flavors that will thrill both kids and adults at your Halloween dinner party. With a few simple ingredients, you can transform a classic mac and cheese into a ghoulishly good dish that’s sure to be the star of your festive table.
The secret to this mac and cheese lies in its spooky presentation and a few key ingredients that add a touch of mystery. By incorporating elements like black pasta, gooey cheese, and a crunchy topping, you can create a dish that’s as delightful to look at as it’s to eat. Serve this dish as the main course for a dinner party of 4-6 people, and watch it disappear like a ghost in the night!
Ingredients (Serves 4-6):
- 1 pound black squid ink pasta or regular pasta
- 4 tablespoons unsalted butter
- 1/4 cup all-purpose flour
- 3 cups whole milk
- 2 cups sharp cheddar cheese, shredded
- 1 cup Gruyère cheese, shredded
- 1 teaspoon garlic powder
- 1 teaspoon onion powder
- Salt and pepper to taste
- 1/2 cup panko breadcrumbs
- 1/4 cup Parmesan cheese, grated
- 2 tablespoons olive oil
- Green food coloring (optional)
Cooking Instructions:
- Cook the Pasta: Begin by boiling a large pot of salted water. Add the black squid ink pasta and cook it according to the package instructions until it’s al dente. If using regular pasta, you can add a few drops of black food coloring during cooking to achieve the spooky effect. Drain and set aside.
- Make the Cheese Sauce: In a large saucepan, melt the butter over medium heat. Once melted, add the flour and whisk continuously for about 1 minute to form a roux. Gradually add the milk while whisking, ensuring there are no lumps. Keep whisking until the mixture thickens, about 5 minutes.
- Add the Cheese and Spices: Lower the heat and add the shredded cheddar and Gruyère cheese to the sauce. Stir until the cheese is completely melted and the sauce is smooth. Add garlic powder, onion powder, and season with salt and pepper to taste. If desired, add a drop or two of green food coloring to give the cheese sauce a spooky hue.
- Combine Pasta and Sauce: Add the cooked pasta to the cheese sauce and gently stir until all the pasta is well-coated with the sauce.
- Prepare Topping: In a small bowl, combine panko breadcrumbs, grated Parmesan cheese, and olive oil. Mix until the breadcrumbs are evenly coated with the oil.
- Assemble and Bake: Preheat your oven to 350°F (175°C). Transfer the mac and cheese to a baking dish and sprinkle the breadcrumb mixture evenly over the top. Bake in the preheated oven for 20-25 minutes, or until the top is golden brown and crispy.
- Serve: Remove from the oven and let it cool for a few minutes before serving. This will help the cheese sauce set slightly, making it easier to serve.
Extra Tips:
For an extra spooky presentation, consider using small Halloween-themed cookie cutters to cut out shapes from slices of cheese or use black olives to create spider-like decorations on top of the mac and cheese.
Additionally, you can add a pinch of cayenne pepper or smoked paprika to the cheese sauce for a hint of heat that will surprise your guests. If you can’t find black squid ink pasta, regular pasta with a few drops of black food coloring will work just as well.
Remember to taste the cheese sauce before adding salt, as some cheeses are saltier than others. Enjoy your Haunted Mac and Cheese, and have a frightfully fun Halloween!