
Hello, lovely readers!
Halloween is just around the corner, and I’m bubbling over with excitement for our upcoming work potluck.
I’ve stumbled upon some spook-tacular recipes that are sure to enchant everyone.
Think Witch’s Brew Punch, Mummy Jalapeño Poppers, and Ghostly Deviled Eggs.
These ghoulishly delightful dishes will make our gathering unforgettable and frightfully fun.
Let’s sprinkle some culinary magic into our Halloween celebration!
Witch’s Brew Punch
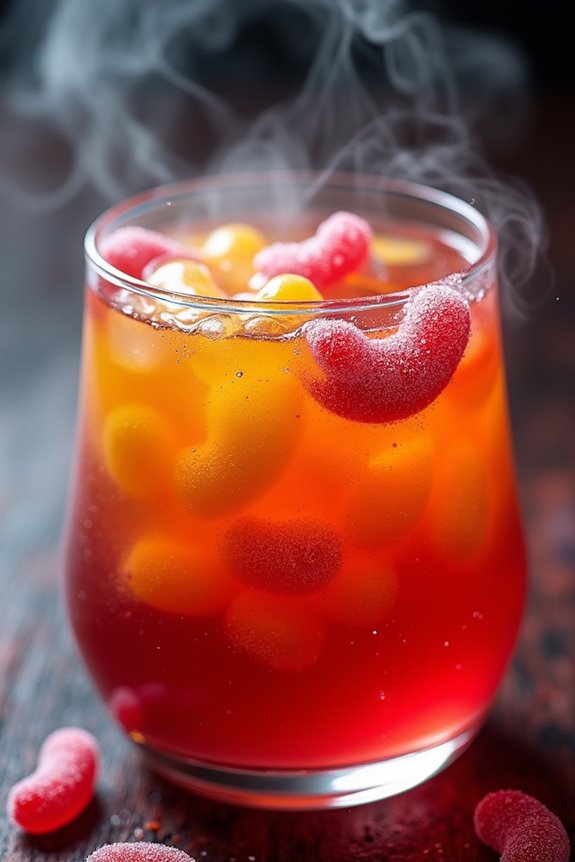
Witch’s Brew Punch is the perfect spooky drink to add a magical touch to your Halloween potluck. This eerie and enchanting punch combines vibrant colors with a mix of flavors that will both surprise and delight your guests. Not only does it look the part with its bubbling, misty appearance, thanks to the addition of dry ice, but it also serves as a deliciously invigorating beverage to complement your Halloween spread.
Designed to serve 4-6 people, Witch’s Brew Punch is a simple yet effective way to impress your party-goers. With a balanced combination of fruity flavors and a hint of fizz, this punch will have everyone clamoring for more. It’s non-alcoholic, making it a perfect choice for guests of all ages. Creating this punch is quick and straightforward, allowing you more time to focus on other aspects of your party planning.
Ingredients for 4-6 servings:
- 4 cups pineapple juice
- 2 cups orange juice
- 1 cup cranberry juice
- 1 liter lemon-lime soda
- 1 teaspoon grenadine (optional for added color)
- 1 cup gummy worms (for garnish)
- 1 small piece of dry ice (for special effects)
Instructions:
- Prepare the Base: Begin by chilling all your liquid ingredients in the refrigerator for at least an hour before starting. This guarantees your punch is served cool and invigorating.
- Mix the Juices: In a large punch bowl, combine the pineapple juice, orange juice, and cranberry juice. Stir well to ensure the flavors are evenly distributed.
- Add Fizz: Just before serving, gently pour the lemon-lime soda into the juice mixture. Stir slowly to retain the carbonation, adding a bubbly effect to your punch.
- Enhance the Color: If desired, add a teaspoon of grenadine to the punch. This will give it a deeper, more mysterious color. Stir gently to incorporate.
- Garnish: Add gummy worms on top of the punch as a fun, edible decoration. They’ll float and add a whimsical touch to your drink.
- Create the Mist: For a dramatic effect, carefully add a small piece of dry ice to the punch bowl. This will create a foggy, misty appearance that will impress your guests. Ensure no dry ice is ingested; it should remain at the bottom of the bowl and not be served in cups.
Extra Tips:
When handling dry ice, use gloves or tongs to avoid direct skin contact, as it can cause burns. Ensure the dry ice is food-grade and is handled safely throughout the party.
If you prefer an alcoholic version, consider adding a splash of rum or vodka to taste. For a more interactive experience, serve the punch in a cauldron for an authentic witchy vibe.
Mummy Jalapeño Poppers
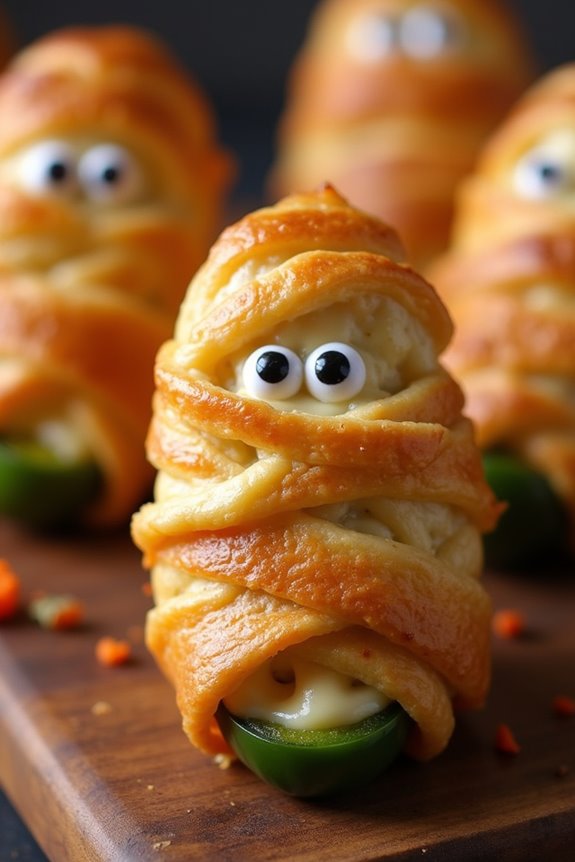
Mummy Jalapeño Poppers are a fun and spooky appetizer that’s perfect for any Halloween potluck. These little bites of deliciousness aren’t only adorable but also pack a punch with their spicy jalapeño flavor, creamy cheese filling, and crispy crescent roll wrapping.
They’re a great way to add some festive flair to your Halloween spread while delighting both kids and adults with their playful mummy appearance.
To make Mummy Jalapeño Poppers, you’ll stuff halved jalapeños with a rich cream cheese mixture, then wrap them with strips of crescent roll dough to mimic the look of a mummy. Once baked to golden perfection, these poppers are topped with edible candy eyes to complete their spooky transformation.
The combination of flavors and textures makes them an irresistible treat, providing a perfect balance of heat, creaminess, and crunch.
Ingredients (serving size: 4-6 people):
- 12 large jalapeño peppers
- 8 oz cream cheese, softened
- 1 cup shredded cheddar cheese
- 1 tsp garlic powder
- 1/2 tsp onion powder
- 1/2 tsp smoked paprika
- 1 can (8 oz) refrigerated crescent rolls
- 24 edible candy eyes
Cooking Instructions:
- Preheat the Oven: Start by preheating your oven to 375°F (190°C). This guarantees it’s hot enough to bake the poppers to a crispy finish.
- Prepare the Jalapeños: Slice the jalapeños in half lengthwise and carefully remove the seeds and membranes using a small spoon. This step is crucial to reduce the heat level, making the poppers palatable for everyone.
- Make the Filling: In a medium mixing bowl, combine the softened cream cheese, shredded cheddar cheese, garlic powder, onion powder, and smoked paprika. Mix until well incorporated and smooth.
- Fill the Jalapeños: Spoon the cheese mixture into each jalapeño half, filling them generously while making sure the filling is level with the top of each jalapeño.
- Wrap with Crescent Dough: Open the can of crescent rolls and unroll the dough. Cut the dough into thin strips, about 1/4 inch wide. Wrap each stuffed jalapeño with the dough strips, leaving a small space for the eyes. Make sure to overlap the dough slightly to create a mummy-like bandage effect.
- Bake the Poppers: Arrange the wrapped jalapeños on a baking sheet lined with parchment paper. Bake in the preheated oven for 12-15 minutes, or until the crescent dough is golden brown and cooked through.
- Add the Eyes: Once baked, remove the poppers from the oven. While they’re still warm, press two candy eyes into the exposed filling of each popper to complete the mummy look.
Extra Tips:
When handling jalapeños, it’s advisable to wear gloves to protect your hands from the oils, which can cause irritation.
If you want to reduce the spiciness further, you can soak the jalapeño halves in cold water for about 15 minutes after deseeding them.
Confirm the dough strips aren’t too thick; otherwise, they may not bake evenly.
If you can’t find edible candy eyes, you can use small dots of cream cheese and black olives for the eyes instead.
Enjoy the poppers warm for the best flavor and texture!
Ghostly Deviled Eggs
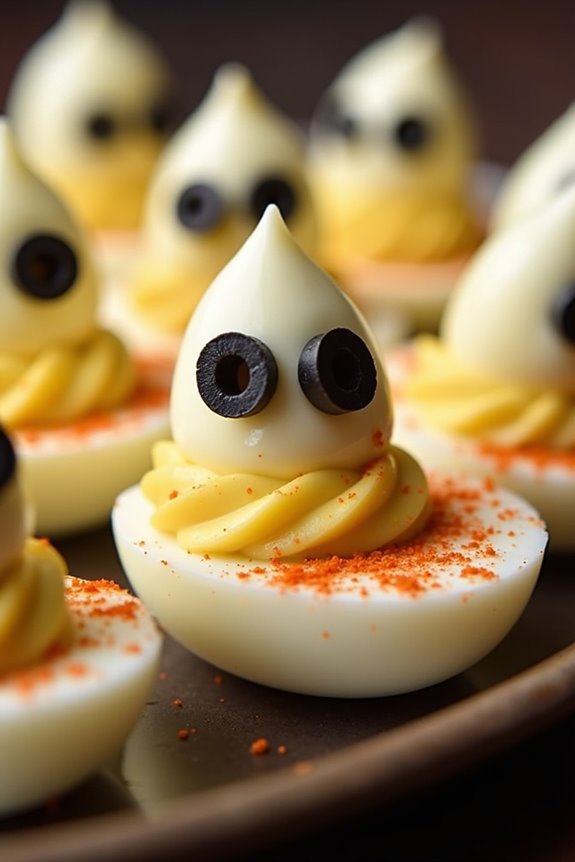
Ghostly Deviled Eggs are a spooktacular addition to any Halloween potluck, adding a touch of eerie elegance to your festive spread. These delicious bites are a twist on the classic deviled eggs, with a ghoulish makeover to delight and perhaps spook your guests.
The creamy yolk filling, enhanced with a hint of mustard and mayonnaise, is piped back into the egg whites and topped with black olives to resemble ghostly eyes. The result is a platter of haunting yet enticing deviled eggs that are sure to be a hit at your Halloween gathering.
Perfect for a serving size of 4-6 people, this recipe is simple yet enthralling, allowing you to create a memorable dish with minimal ingredients. The ghostly deviled eggs not only look impressive but also offer a savory flavor that balances the spooky theme with delicious taste. They’re an excellent choice for those who want to add thematic decor to their potluck without compromising on flavor.
Ingredients:
- 6 large eggs
- 3 tablespoons mayonnaise
- 1 teaspoon Dijon mustard
- Salt, to taste
- Pepper, to taste
- Black olives, sliced into small rounds
- Paprika, for garnish
Cooking Instructions:
- Boil the Eggs: Place the eggs in a saucepan and cover them with cold water. Bring the water to a boil over medium-high heat. Once boiling, remove the saucepan from heat, cover it with a lid, and let the eggs sit in hot water for 10-12 minutes.
- Cool and Peel the Eggs: After the eggs have cooked, transfer them to a bowl of ice water to cool for about 5 minutes. Once cooled, gently crack and peel the eggs under running water to remove the shells.
- Prepare the Yolks: Slice each egg in half lengthwise and carefully remove the yolks, placing them in a separate bowl. Arrange the egg whites on a serving platter.
- Make the Filling: Mash the egg yolks with a fork until smooth. Add mayonnaise, Dijon mustard, salt, and pepper to the yolks, mixing until the filling is creamy and well-combined.
- Pipe the Filling: Spoon the yolk mixture into a piping bag or a plastic bag with a corner snipped off. Pipe the filling back into the egg white halves, making sure to create a smooth and slightly domed shape.
- Create Ghostly Eyes: Place two small slices of black olives on each filled egg to resemble spooky eyes. Sprinkle a dash of paprika over the eggs for an added touch of color and flavor.
Extra Tips:
For an extra touch of Halloween fun, consider adding a few drops of natural food coloring to the yolk mixture to make the ghosts’ eyes stand out even more.
Verify your eggs are fresh, as they’ll be easier to peel after boiling. If you don’t have a piping bag, a spoon can work as a substitute for adding the filling, though the presentation may not be as precise.
Finally, serve the Ghostly Deviled Eggs chilled for the best flavor and texture.
Spooky Spider Pizza Bites
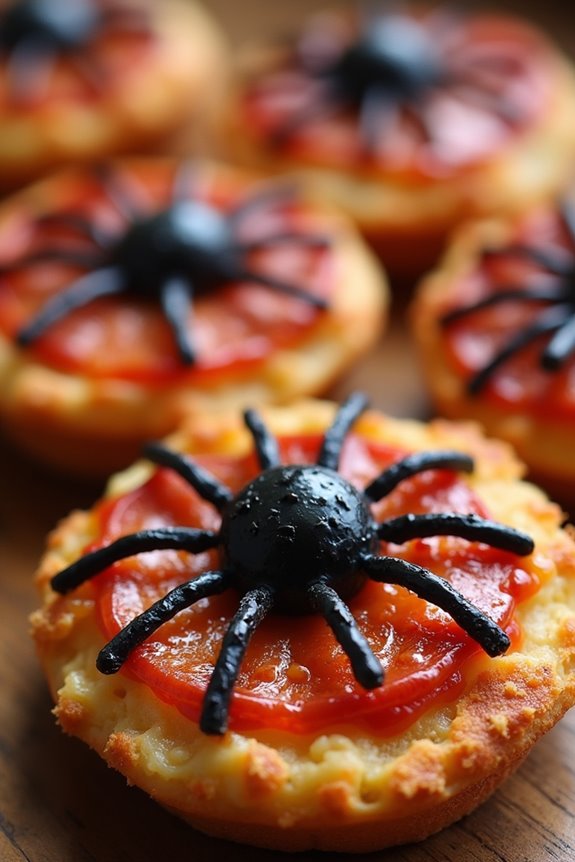
Spooky Spider Pizza Bites are a fun and festive addition to any Halloween potluck. With their creepy yet cute appearance, these mini pizzas are sure to be a hit with both kids and adults. The best part is that they’re simple to make, allowing you to focus on other party preparations. The little “spiders” made from black olives add a spooky flair, while the gooey cheese and flavorful pepperoni keep them delicious and satisfying.
Perfect for a serving size of 4-6 people, these pizza bites can be customized to suit any taste preference. You can easily make them vegetarian by omitting the pepperoni or even add a variety of toppings to cater to your guests’ likes. Whether you’re hosting a Halloween gathering or simply want to surprise your family with a themed meal, these Spooky Spider Pizza Bites are a fantastical choice.
Ingredients:
- 1 can of refrigerated pizza dough
- 1 cup pizza sauce
- 2 cups shredded mozzarella cheese
- 24 slices of pepperoni
- 1 can of black olives
- 1 tablespoon olive oil
- Salt and pepper to taste
- Dried oregano (optional)
Instructions:
- Preheat Your Oven: Begin by preheating your oven to 400°F (200°C). This guarantees that your mini pizzas cook evenly and develop a nice golden crust.
- Prepare the Dough: Roll out the refrigerated pizza dough on a lightly floured surface to prevent sticking. Use a cookie cutter or a glass to cut out circles about 2-3 inches in diameter. Place these dough circles onto a baking sheet lined with parchment paper.
- Assemble the Pizza Bites: Spread a spoonful of pizza sauce onto each dough circle, leaving a small border around the edges for the crust. Sprinkle a generous amount of shredded mozzarella cheese over the sauce.
- Add the Pepperoni & Spiders: Place a slice of pepperoni on top of each pizza bite. To create the spiders, cut black olives in half for the body and slice additional olives into thin strips for the legs. Assemble the spider on top of the pepperoni with one half for the body and 6-8 strips positioned as legs.
- Season and Bake: Lightly brush the crust edges with olive oil and sprinkle a pinch of salt, pepper, and oregano if desired. Place the baking sheet in the preheated oven and bake for 10-12 minutes or until the cheese is bubbly and the crust is lightly browned.
- Serve: Remove from the oven and allow to cool slightly. Serve warm and watch your guests delight in these spooky treats.
Extra Tips:
For a crispier crust, pre-bake the dough circles for about 5 minutes before adding the toppings. This guarantees the base stays firm even with the sauce and cheese.
If you want to save time, you can also use store-bought mini pizza crusts or English muffins. Finally, get creative with your toppings to make different spooky creatures, such as ghosts with mozzarella slices or pumpkins with orange bell pepper rings.
Bat Wing Chicken Drumsticks
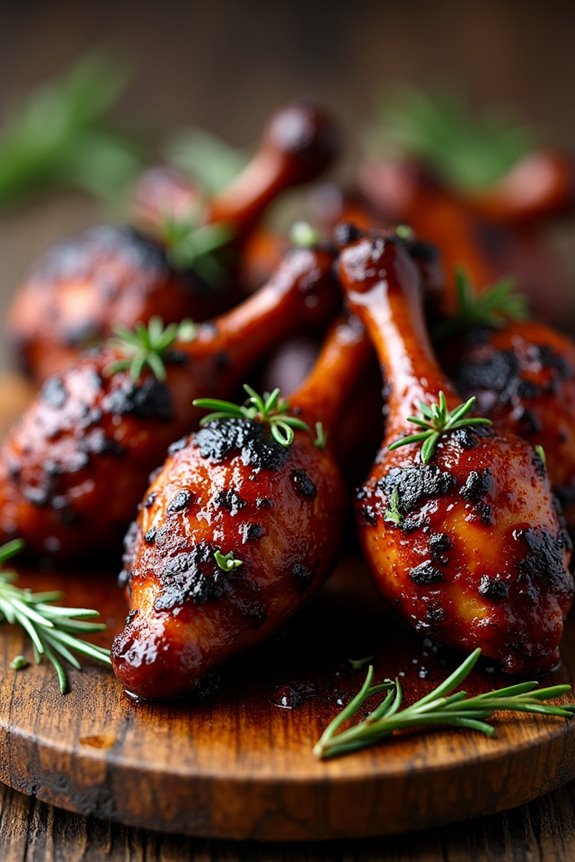
Transform your Halloween potluck into a spooktacular feast with Bat Wing Chicken Drumsticks. These dark and savory drumsticks aren’t only visually striking, thanks to their eerie blackened appearance, but they’re also packed with flavor. Coated in a deliciously smoky and spicy marinade, these wings will be a hit at any Halloween gathering. Perfect for serving 4-6 people, the combination of rich flavors and spooky presentation will leave your guests enchanted by this unique dish.
The secret to achieving the bat wing effect lies in the marinade, which includes a blend of soy sauce, balsamic vinegar, and dark food coloring. These ingredients give the chicken its signature dark color while infusing the meat with a delightful umami taste. Roasting the drumsticks guarantees juicy, tender meat with a crispy exterior. This dish not only satisfies the taste buds but also adds a festive touch to your Halloween spread.
Ingredients (Serves 4-6):
- 12 chicken drumsticks
- 1/2 cup soy sauce
- 1/4 cup balsamic vinegar
- 2 tablespoons olive oil
- 2 tablespoons honey
- 1 tablespoon smoked paprika
- 1 teaspoon garlic powder
- 1 teaspoon onion powder
- 1/2 teaspoon black pepper
- 1/2 teaspoon salt
- 1/4 teaspoon cayenne pepper
- 1/2 teaspoon liquid smoke (optional)
- Black food coloring
Cooking Instructions:
- Prepare the Marinade: In a large mixing bowl, combine soy sauce, balsamic vinegar, olive oil, honey, smoked paprika, garlic powder, onion powder, black pepper, salt, cayenne pepper, and liquid smoke. Stir the ingredients until fully integrated.
- Color the Marinade: Add a few drops of black food coloring to the marinade mixture. Stir until the color is evenly distributed. Continue adding food coloring until the marinade reaches your desired level of darkness.
- Marinate the Chicken: Place the chicken drumsticks in a large resealable plastic bag. Pour the prepared marinade over the drumsticks, making sure they’re all thoroughly coated. Seal the bag and refrigerate for at least 2 hours, preferably overnight, to allow the flavors to absorb into the chicken.
- Preheat the Oven: When ready to cook, preheat your oven to 400°F (200°C). Line a baking sheet with aluminum foil and place a wire rack on top of the foil.
- Bake the Drumsticks: Remove the drumsticks from the marinade, allowing excess marinade to drip off. Arrange the drumsticks on the prepared wire rack. Bake in the preheated oven for 35-40 minutes, or until the chicken is cooked through and the skin is crispy.
- Serve: Remove the drumsticks from the oven and let them cool slightly before serving. Arrange on a platter for a spooky presentation.
Extra Tips:
For extra crispy skin, you can finish the drumsticks under the broiler for 2-3 minutes after baking. Keep a close eye to prevent burning.
If you prefer a smokier flavor, increase the amount of liquid smoke in the marinade. To guarantee the food coloring doesn’t stain your hands, use gloves when handling the marinated chicken.
Serve these Bat Wing Chicken Drumsticks with a side of your favorite dipping sauce for an added layer of flavor.
Creepy Crudités With Goblin Guacamole
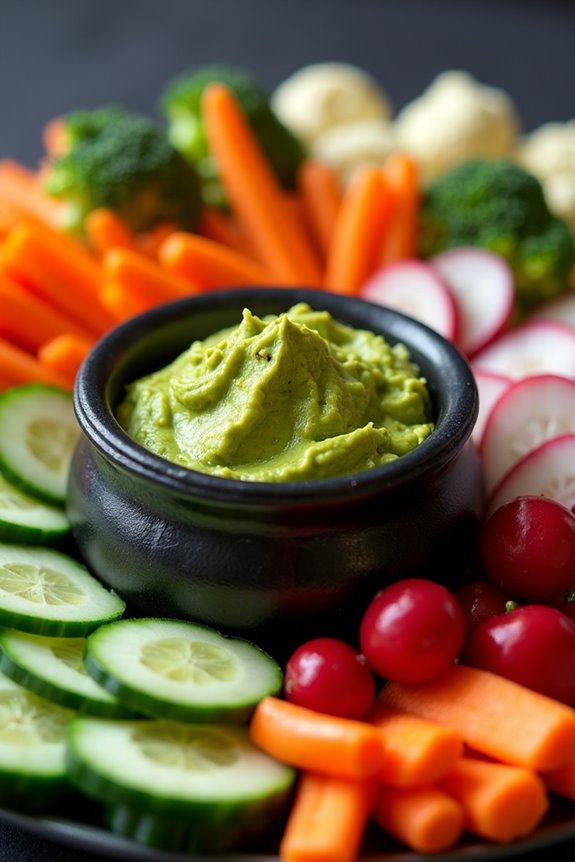
Creepy Crudités with Goblin Guacamole is a perfect addition to any Halloween potluck, offering a healthy yet spooky twist on traditional vegetable platters. This dish combines an array of colorful vegetables with a vibrant green guacamole, designed to resemble a bowl of goblin goo. The vegetables are arranged in a way that enhances the spooky theme, becoming the perfect vehicle to scoop up dollops of the delicious dip. Not only does it look festive, but it also provides a fresh and nutritious option amidst the usual sugary treats.
The guacamole is made with ripe avocados, infused with a blend of lime juice, garlic, and spices to give it a zesty kick, while the crudités consist of an assortment of vegetables, cut and styled to enhance the eerie theme of the dish. A serving size of this Creepy Crudités with Goblin Guacamole is intended for 4-6 people, making it great for small gatherings or as part of a larger spread at a Halloween party. Easy to prepare and visually appealing, this dish is sure to be a hit with both adults and kids alike.
Ingredients for Goblin Guacamole (serves 4-6):
- 3 ripe avocados
- Juice of 2 limes
- 2 cloves of garlic, minced
- 1 small red onion, finely chopped
- 1 small tomato, diced
- 1 jalapeño, seeds removed and finely chopped
- Salt and pepper to taste
- Fresh cilantro, chopped (optional)
Ingredients for Creepy Crudités:
- 1 cucumber, cut into slices
- 1 bunch of radishes, halved
- 2-3 carrots, cut into sticks
- 1 red bell pepper, sliced
- 1 yellow bell pepper, sliced
- 1 small bunch of broccoli, cut into florets
- 1 small bunch of cauliflower, cut into florets
Instructions:
- Prepare the Guacamole: Begin by slicing the avocados in half, removing the pits, and scooping the flesh into a medium-sized bowl. Mash the avocados with a fork until they reach your desired consistency.
- Mix Ingredients: Add the lime juice, minced garlic, chopped red onion, diced tomato, and chopped jalapeño to the avocado. Stir well to combine all ingredients. Season with salt and pepper to taste. If desired, add chopped cilantro for additional flavor. Adjust the seasoning as needed.
- Assemble the Crudités: Arrange the prepared vegetables on a large platter or board. Be creative with the arrangement to enhance the Halloween theme—consider placing the vegetables in a circular pattern or in the shape of a face.
- Serve the Guacamole: Transfer the guacamole to a festive bowl or cauldron-like container and place it at the center of the vegetable arrangement. Verify there are plenty of vegetables within easy reach of the dip for easy serving.
- Final Touches: Optionally, garnish the guacamole with a few extra cilantro leaves or a sprinkle of chopped jalapeño for added color and spice.
Extra Tips: When selecting avocados for the guacamole, look for ones that are slightly soft to the touch but not mushy, indicating ripeness. For an extra spooky touch, use a small plastic skeleton hand or other Halloween-themed serving utensil to scoop the guacamole. You can also add other vegetables or customize the display with Halloween-themed decorations to further enhance the festive look. Keep the guacamole covered with plastic wrap until serving to prevent it from browning.
Graveyard Taco Dip
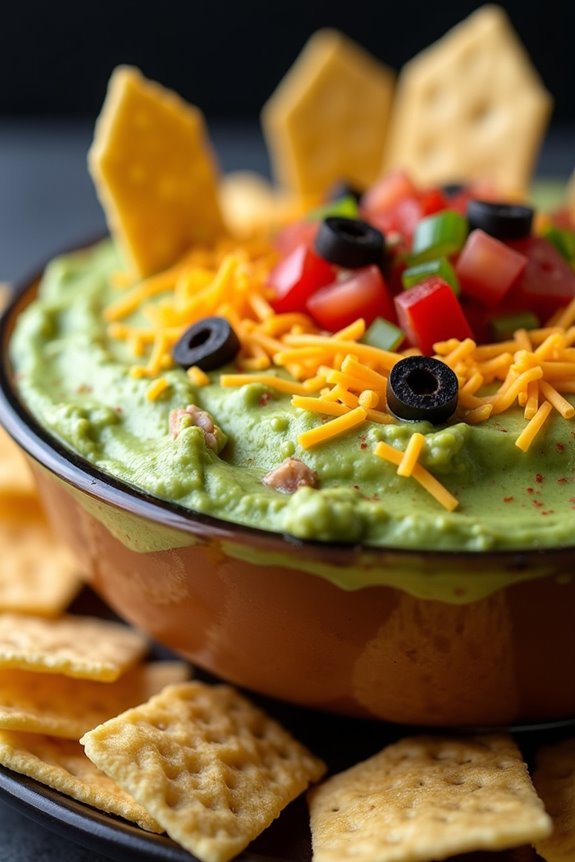
Graveyard Taco Dip is the perfect spooky dish to serve at your Halloween potluck. This layered dip not only tastes delicious, but it also adds an eerie touch to your party table. With its graveyard theme, complete with tombstone-shaped tortilla chips, this dip is sure to be a hit with guests of all ages. The combination of creamy refried beans, tangy sour cream, flavorful guacamole, and fresh toppings makes this dish a festive and satisfying choice for your Halloween gathering.
This dip is easy to assemble and can be made ahead of time, allowing you to focus on other party preparations. The layers of this dish offer a delightful mix of textures and flavors, ensuring that each bite is a savory treat. Serve it with tortilla chips for dipping, and watch it disappear almost as quickly as a ghost in the night. Perfect for a serving size of 4-6 people, this Graveyard Taco Dip will leave your guests haunted by its deliciousness.
Ingredients:
- 1 can (16 oz) refried beans
- 1 cup sour cream
- 1 packet taco seasoning
- 1 cup guacamole
- 1 cup shredded cheddar cheese
- 1/2 cup diced tomatoes
- 1/4 cup sliced black olives
- 2 green onions, sliced
- Tortilla chips (preferably shaped like tombstones)
Cooking Instructions:
- Prepare the Refried Beans: In a medium-sized bowl, mix the refried beans with half of the taco seasoning packet until well combined. This will give the beans an added depth of flavor.
- Layer the Ingredients: In a shallow, rectangular dish, spread the seasoned refried beans evenly on the bottom. This will be the base layer of your dip.
- Add the Sour Cream: In a separate bowl, mix the remaining taco seasoning with the sour cream. Spread this mixture over the refried beans to create the second layer.
- Top with Guacamole: Gently spread the guacamole over the sour cream layer, ensuring it’s evenly distributed. This will create a vibrant green layer that resembles grass.
- Sprinkle Cheese and Vegetables: Evenly sprinkle the shredded cheddar cheese over the guacamole. Then, add the diced tomatoes, black olives, and sliced green onions on top for added color and texture.
- Create the Graveyard: Arrange the tombstone-shaped tortilla chips in rows, sticking them upright in the dip to mimic gravestones in a graveyard.
- Chill and Serve: Cover the dish with plastic wrap and refrigerate for at least 30 minutes before serving. This allows the flavors to meld together.
Extra Tips:
For an extra spooky touch, you can use a small amount of sour cream or cream cheese to pipe “RIP” or other spooky words onto the tortilla chips before placing them in the dip. If you can’t find pre-shaped tombstone chips, you can use a cookie cutter to shape regular tortilla chips.
Make sure to serve the dip with plenty of extra chips on the side, as this dish is sure to be a crowd-pleaser. Keep the dip chilled until just before serving to maintain the fresh flavors and textures.
Monster Meatball Eyeballs
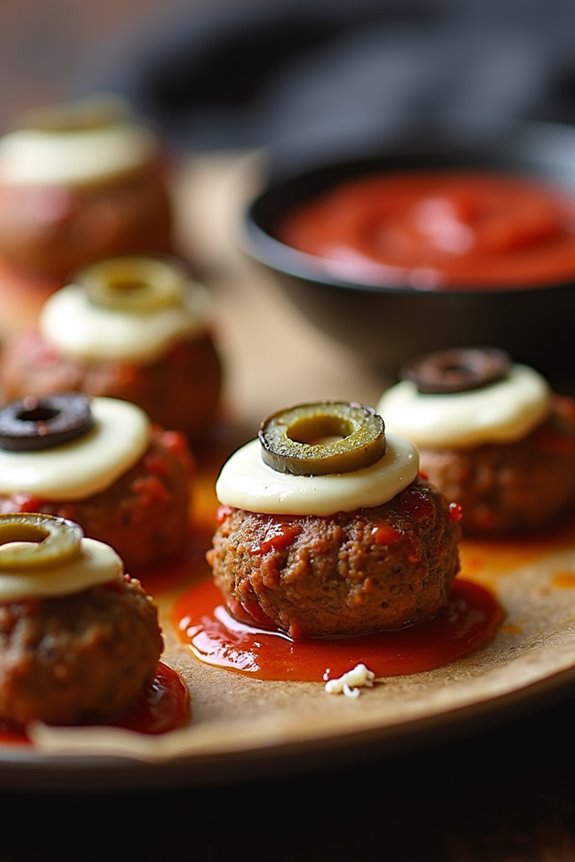
Monster Meatball Eyeballs are the perfect spooky treat to serve at your Halloween potluck. These tasty and terrifying treats combine the savory flavors of classic meatballs with a monstrous twist that will surely delight and frighten your guests. Shaped like eerie eyeballs, these meatballs aren’t only delicious but also a visual spectacle that will stand out on any Halloween platter.
Whether you’re hosting a ghoulish gathering or attending a frightful feast, Monster Meatball Eyeballs will be an irresistible addition to your menu.
The savory meatballs are made from a blend of ground beef and pork, seasoned with garlic, onions, and Italian herbs for a robust flavor. Each meatball is then topped with a slice of mozzarella cheese and an olive slice to create the eerie eyeball effect. Baked to perfection, these meatball eyeballs are juicy and flavorful, making them a hit with both kids and adults alike.
Here’s how you can make these spooky appetizers for 4-6 people:
Ingredients:
- 1 pound ground beef
- 1/2 pound ground pork
- 1/2 cup breadcrumbs
- 1/4 cup grated Parmesan cheese
- 1/4 cup milk
- 1 large egg
- 2 cloves garlic, minced
- 1 small onion, finely chopped
- 1 teaspoon dried Italian seasoning
- Salt and pepper to taste
- 8 ounces mozzarella cheese, sliced into small rounds
- 14-16 green or black olives, sliced
- 1 cup marinara sauce
Cooking Instructions:
- Preheat the Oven: Start by preheating your oven to 375°F (190°C) to make sure it’s ready for the meatballs.
- Prepare the Meatball Mixture: In a large mixing bowl, combine the ground beef, ground pork, breadcrumbs, Parmesan cheese, milk, egg, garlic, onion, Italian seasoning, salt, and pepper. Mix thoroughly until all ingredients are well incorporated.
- Shape the Meatballs: Roll the mixture into 14-16 golf ball-sized meatballs. Place them evenly spaced on a baking sheet lined with parchment paper or a lightly greased baking dish.
- Bake the Meatballs: Place the meatballs in the preheated oven and bake for 20-25 minutes, or until they’re cooked through and reach an internal temperature of 160°F (71°C).
- Add the Eyeball Features: Remove the meatballs from the oven and top each one with a slice of mozzarella cheese. Return them to the oven for another 2-3 minutes or until the cheese has just begun to melt.
- Finish the Eyeballs: Once the cheese is slightly melted, remove the meatballs from the oven and immediately top each cheese slice with an olive slice to create the pupil of the eyeball.
- Serve the Eyeballs: Warm the marinara sauce and serve it as a dip alongside the Monster Meatball Eyeballs for added flavor.
Extra Tips:
For a more dramatic presentation, consider using both green and black olive slices for different “eye colors” to create variety on your serving platter. If you prefer a spicier kick, add a pinch of red pepper flakes to the meatball mixture.
Make sure the mozzarella slices aren’t too large; they should fit nicely on top of the meatballs without overwhelming them. Finally, these meatballs can be prepared ahead of time and refrigerated, then baked right before serving to save time on the day of your event.
Pumpkin Cheese Ball
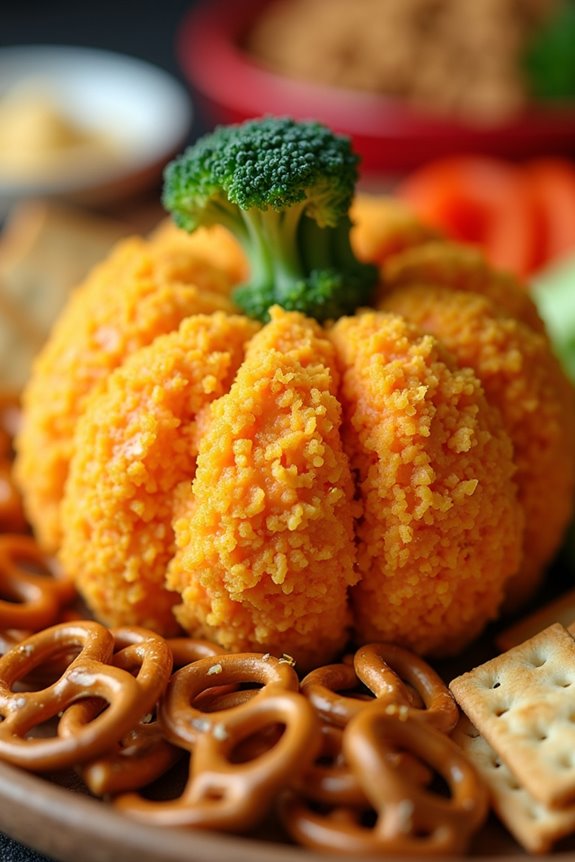
For a spooktacular Halloween potluck, nothing screams festive more than a Pumpkin Cheese Ball. This delightful appetizer combines cream cheese, sharp cheddar, and seasonings, all in the shape of a cute pumpkin. Not only is it visually appealing, but it also offers a savory and creamy burst of flavor. Perfect for dipping crackers, pretzels, or veggies, this cheese ball is bound to be a crowd favorite at your gathering.
The Pumpkin Cheese Ball is surprisingly easy to make and can be prepared ahead of time, allowing you to focus on other party preparations. Its vibrant orange color comes from the cheddar cheese, which is enhanced by a touch of paprika. The finishing touch is a broccoli stem or bell pepper piece on top, making it look like a real pumpkin. This recipe serves 4-6 people, guaranteeing everyone gets a taste of this cheesy delight.
Ingredients:
- 2 (8 oz) packages of cream cheese, softened
- 2 cups sharp cheddar cheese, shredded
- 1 teaspoon garlic powder
- 1 teaspoon onion powder
- 1/2 teaspoon smoked paprika
- 1/2 teaspoon salt
- 1/4 teaspoon black pepper
- 1/2 cup crushed nacho-flavored tortilla chips
- 1 broccoli stalk or a small piece of green bell pepper
- Crackers, pretzels, or veggies for serving
Instructions:
- Prepare the Cheese Mixture: In a large mixing bowl, combine the softened cream cheese, shredded sharp cheddar cheese, garlic powder, onion powder, smoked paprika, salt, and black pepper. Mix well using a hand mixer or a sturdy spatula until all ingredients are thoroughly combined and the mixture is smooth.
- Shape the Cheese Ball: Lay a piece of plastic wrap on a clean surface. Scoop the cheese mixture onto the plastic wrap and use your hands to shape it into a round ball. Wrap the plastic tightly around the cheese ball, making sure it’s well-formed into a pumpkin shape. Chill in the refrigerator for at least 2 hours or until firm.
- Coat the Cheese Ball: Once the cheese ball is firm, remove it from the fridge and unwrap it. Roll the cheese ball in the crushed nacho-flavored tortilla chips until it’s fully coated, giving it a vibrant orange hue reminiscent of a pumpkin.
- Add the Stem: To create the pumpkin stem, press a broccoli stalk or a small piece of green bell pepper into the top of the cheese ball. This adds a realistic touch and completes the pumpkin look.
- Serve: Place the Pumpkin Cheese Ball on a platter surrounded by an assortment of crackers, pretzels, or veggies for dipping. Serve immediately or refrigerate until ready to serve.
Extra Tips:
For the best results, make sure that the cream cheese is softened before mixing. This will make the blending process smoother and prevent lumps.
If you’re short on time, you can speed up the chilling process by placing the cheese ball in the freezer for about 30 minutes.
Feel free to customize the flavors by adding ingredients like minced jalapeños or crushed nuts to the cheese mixture. Additionally, experiment with different coatings like crushed nuts or herbs for extra flavor and texture.
Eerie Eyeball Pasta Salad
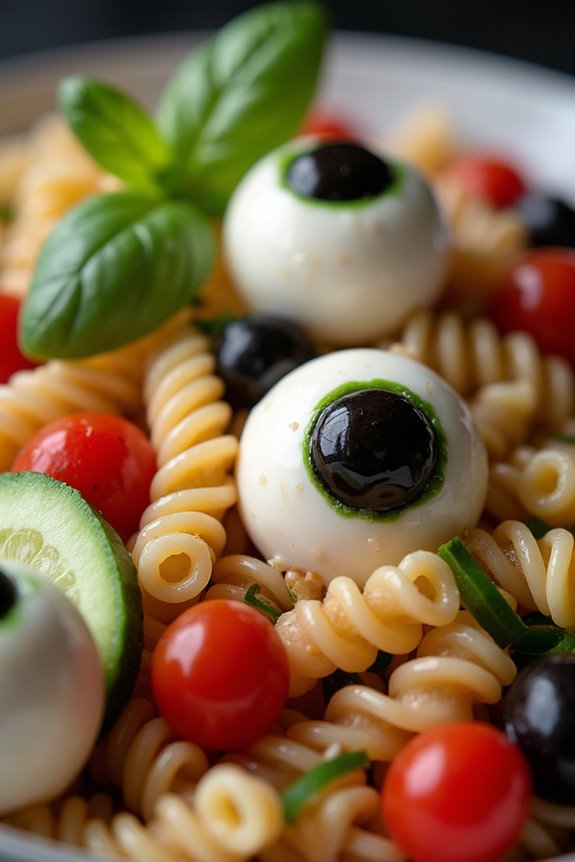
Eerie Eyeball Pasta Salad is the perfect dish to bring some spooky fun to your Halloween potluck. This creepy culinary creation combines the classic flavors of a pasta salad with a ghoulish twist, featuring mozzarella eyeballs staring up from a delicious mix of pasta, vegetables, and a zesty dressing. The eerie appearance is sure to catch the attention of your guests, while the delightful taste will keep them coming back for more.
This dish isn’t only easy to prepare, but also a great way to showcase your creativity in the kitchen during the Halloween season.
The key to making Eerie Eyeball Pasta Salad is to balance the savory elements with a touch of whimsy. The pasta serves as the base, providing a hearty foundation that pairs well with the tangy dressing and fresh vegetables. The mozzarella balls, turned into spooky eyeballs with the help of olives and food coloring, add a fun and thematic element to the dish. This recipe serves 4-6 people, making it an ideal contribution to any potluck or gathering where you want to impress with both flavor and presentation.
Ingredients:
- 12 oz rotini or bowtie pasta
- 1 cup cherry tomatoes, halved
- 1 cup cucumber, diced
- 1/2 cup black olives, sliced
- 1/4 cup red onion, thinly sliced
- 8 oz mozzarella balls (bocconcini)
- 1/4 cup balsamic vinaigrette dressing
- Black food coloring
- Green olives, pitted
- Fresh basil leaves for garnish (optional)
- Salt and pepper to taste
Instructions:
- Cook the Pasta: Begin by cooking the pasta according to the package instructions. Once cooked, drain and rinse under cold water to stop the cooking process and cool down the pasta. Transfer to a large bowl.
- Prepare the Vegetables: While the pasta is cooking, prepare the vegetables. Halve the cherry tomatoes, dice the cucumber, slice the red onion, and slice the black olives. Add these to the bowl with the cooled pasta.
- Create the Eyeballs: To make the “eyeballs,” take the mozzarella balls and carefully use a toothpick to apply a small dot of black food coloring to mimic the pupil. Slice the green olives into thin rings and place one ring on top of each mozzarella ball. The green olive should surround the black dot, resembling an eerie eyeball. Set aside.
- Assemble the Salad: Add the mozzarella eyeballs to the pasta and vegetable mixture. Pour the balsamic vinaigrette dressing over the salad, and toss gently to combine all ingredients. Season with salt and pepper to taste.
- Garnish and Serve: If desired, garnish the salad with fresh basil leaves for added color and flavor. Serve the Eerie Eyeball Pasta Salad chilled, making sure the mozzarella eyeballs are prominently displayed on top for maximum effect.
Extra Tips:
For an added touch of spookiness, you can use different colored food dyes to create a variety of “eyeball” colors, such as red or blue.
Feel free to mix up the vegetables based on your preference or what you have available. If you want to prepare this dish ahead of time, keep the dressing separate and add it just before serving to maintain the freshness and texture of the vegetables.
Finally, verify the pasta is well-rinsed and cooled before mixing to prevent it from becoming mushy.
Ghoulish Graveyard Brownies

Bring a spooky touch to your Halloween potluck with these delightful Ghoulish Graveyard Brownies. Perfect for both kids and adults, these brownies aren’t only scrumptious but also visually engaging with their eerie graveyard theme. The rich, fudgy brownies serve as the perfect backdrop for a graveyard scene, complete with cookie tombstones, candy pumpkins, and a crumbled cookie dirt path. These brownies are sure to be the highlight of your Halloween spread, sparking conversation and delighting taste buds.
Creating Ghoulish Graveyard Brownies is a fun and creative process that allows you to get imaginative with your decorations. While the base is a classic brownie recipe, the real magic happens in the details you add to transform them into a spooky scene. Whether you’re hosting a large Halloween party or a small get-together, these brownies will add a festive flair to your dessert table.
The combination of rich chocolate flavors and imaginative decoration makes this recipe a must-try for any Halloween gathering.
Ingredients (Serving Size: 4-6 people):
- 1/2 cup unsalted butter
- 1 cup granulated sugar
- 2 large eggs
- 1 teaspoon vanilla extract
- 1/3 cup unsweetened cocoa powder
- 1/2 cup all-purpose flour
- 1/4 teaspoon salt
- 1/4 teaspoon baking powder
- 6 chocolate sandwich cookies, crushed
- 6 oval-shaped cookies (for tombstones)
- Edible markers (for writing on tombstones)
- Candy pumpkins
- Green icing or edible grass for decoration
Cooking Instructions:
- Preheat the Oven: Begin by preheating your oven to 350°F (175°C). Grease an 8×8 inch baking pan or line it with parchment paper to prevent the brownies from sticking.
- Prepare Brownie Batter: In a medium saucepan, melt the butter over low heat. Remove from heat and stir in the sugar, eggs, and vanilla extract until well combined. Add the cocoa powder, flour, salt, and baking powder, and mix until the batter is smooth and free of lumps.
- Bake the Brownies: Pour the prepared batter into the greased pan and spread it evenly. Place the pan in the preheated oven and bake for 20-25 minutes, or until a toothpick inserted in the center comes out with a few moist crumbs. Let the brownies cool completely in the pan.
- Decorate the Graveyard: Once the brownies are cool, spread the crushed chocolate sandwich cookies over the top to create the appearance of dirt. Write spooky phrases like “RIP” on the oval-shaped cookies using the edible markers, then insert these into the brownies to serve as tombstones.
- Add Final Touches: Arrange candy pumpkins and use green icing or edible grass around the tombstones for a more authentic graveyard look. Feel free to add more candy decorations to enhance the spooky scene.
Extra Tips:
When preparing your Ghoulish Graveyard Brownies, make sure to allow the brownies to cool completely before decorating; this guarantees that the decorations won’t melt or slide off.
If you want to add an extra layer of flavor, consider mixing in chocolate chips or nuts into the brownie batter. For a more personalized touch, use different types of candy to represent other spooky elements like ghosts or goblins.
And remember, the more creative you get with your decorations, the more impressive your graveyard will look! Enjoy the process, and have a hauntingly good time serving these at your Halloween event.