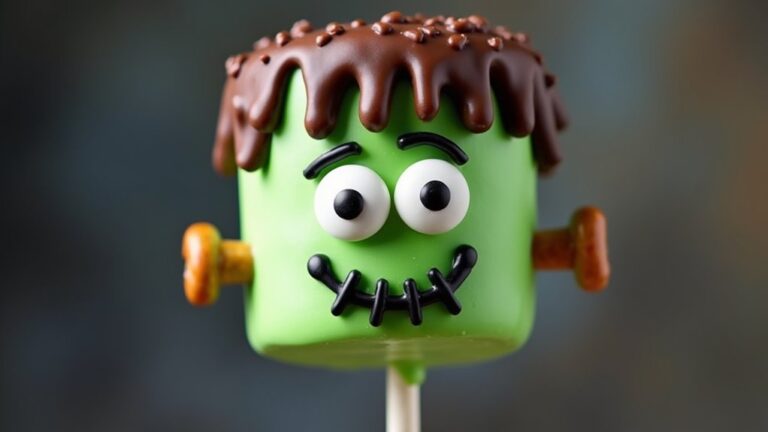
Halloween is right around the corner and I couldn’t be more excited to share some whimsical dessert ideas for your potluck. Picture Vampire Bat Cupcakes, Witch’s Cauldron Brownies, and Ghostly Meringue Pops gracing the dessert table. There’s such a thrill in crafting treats that are both scrumptious and delightfully spooky. These creations are sure to spark some fun conversations and leave everyone enchanted. Curious to see what other hauntingly delicious treats made the list?
Vampire Bat Cupcakes
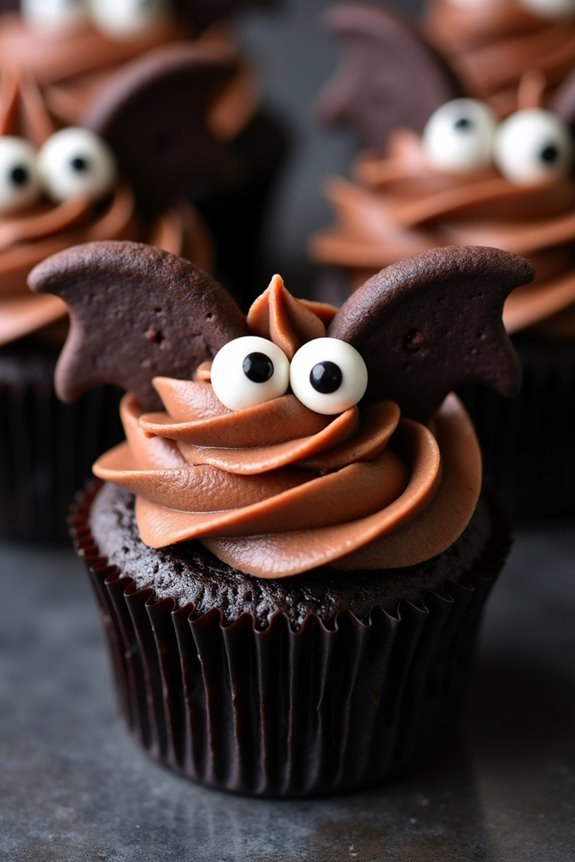
Vampire Bat Cupcakes are a fun and spooky addition to any Halloween potluck. These cupcakes aren’t only delicious but also have a playful appearance that’s sure to delight kids and adults alike. The combination of a rich chocolate cake base and the sweet, creamy frosting, coupled with candy decorations, makes these cupcakes a must-have for your Halloween dessert table.
The cupcakes are decorated to resemble little vampire bats with wings made from chocolate sandwich cookies and eyes crafted out of candy. The process is simple enough for bakers of any skill level, and the end result is worth the effort. With a serving size of 4-6 people, this recipe is perfect for sharing at your Halloween gathering.
Ingredients:
- 1 cup all-purpose flour
- 1/2 cup unsweetened cocoa powder
- 1 teaspoon baking powder
- 1/2 teaspoon baking soda
- 1/2 teaspoon salt
- 1/2 cup unsalted butter, softened
- 1 cup granulated sugar
- 2 large eggs
- 1 teaspoon vanilla extract
- 1/2 cup buttermilk
- 12 chocolate sandwich cookies
- 24 candy eyes
- 1 cup chocolate frosting
Instructions:
- Preheat and Prepare: Preheat your oven to 350°F (175°C) and line a cupcake pan with 12 paper liners.
- Mix Dry Ingredients: In a medium bowl, whisk together the flour, cocoa powder, baking powder, baking soda, and salt until well combined.
- Cream Butter and Sugar: In a large bowl, beat the softened butter and sugar together with an electric mixer until light and fluffy, about 3 minutes.
- Add Eggs and Vanilla: Add the eggs one at a time, beating well after each addition. Stir in the vanilla extract.
- Combine with Dry Ingredients: Gradually add the dry ingredients to the wet ingredients, alternating with the buttermilk, beginning and ending with the dry ingredients. Mix until just combined.
- Fill and Bake: Divide the batter evenly among the cupcake liners, filling each about two-thirds full. Bake in the preheated oven for 18-20 minutes, or until a toothpick inserted into the center of a cupcake comes out clean. Allow the cupcakes to cool completely on a wire rack.
- Decorate: Once cooled, spread a generous amount of chocolate frosting over each cupcake.
- Create Bat Wings: Split the chocolate sandwich cookies in half and scrape off the cream filling. Break each half into two to create wings. Press the cookie pieces into the frosting to form bat wings on each cupcake.
- Add Candy Eyes: Place two candy eyes on each cupcake above the wings to complete the vampire bat look.
Extra Tips:
When making Vampire Bat Cupcakes, make sure the cupcakes are completely cooled before decorating to prevent the frosting from melting. You can prepare the cupcakes a day in advance and store them in an airtight container.
For an extra spooky touch, use red gel icing to add little fangs or blood drips on each bat. If you’re serving these cupcakes to a crowd, consider doubling the recipe to accommodate more guests.
Witch’s Cauldron Brownies
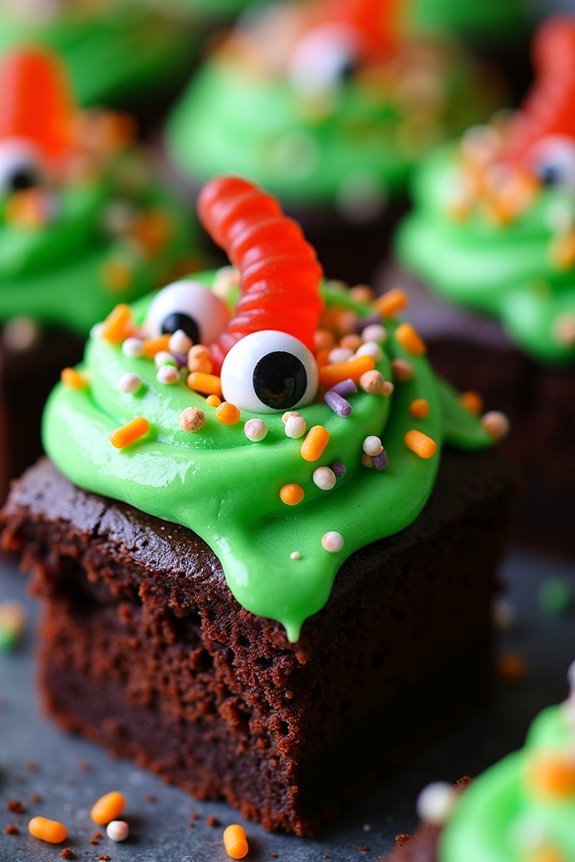
Halloween is the perfect time to release your creativity in the kitchen, and Witch’s Cauldron Brownies are a spooky and delicious treat that will captivate your potluck guests. These brownies aren’t only rich and chocolatey but also adorned with eerie green frosting and candy decorations that mimic a bubbling witch’s brew. The result is a dessert that’s as fun to make as it’s to eat, making it a fantastic addition to any Halloween gathering.
Crafting Witch’s Cauldron Brownies involves a mix of classic brownie batter and creative decorating techniques that transform a simple dessert into a Halloween masterpiece. The base is a dense, fudgy brownie that serves as the perfect canvas for your cauldron creation. Topped with a vibrant green frosting and embellished with candy eyes, gummy worms, or other ghoulish treats, these brownies are sure to cast a spell on anyone who takes a bite.
Ingredients (serving size: 4-6 people)
- 1 cup unsalted butter
- 2 cups granulated sugar
- 4 large eggs
- 1 cup all-purpose flour
- 1 cup unsweetened cocoa powder
- 1 teaspoon vanilla extract
- 1/2 teaspoon salt
- 1/2 teaspoon baking powder
- Green food coloring
- 1 cup powdered sugar
- 2-3 tablespoons milk
- Assorted candies for decoration (e.g., candy eyeballs, gummy worms, sprinkles)
Instructions
- Preheat and Prepare Pan: Preheat your oven to 350°F (175°C). Grease a 9×13 inch baking pan or line it with parchment paper to guarantee easy removal of the brownies.
- Melt Butter and Sugar: In a medium saucepan over low heat, melt the butter. Remove from heat and stir in the granulated sugar until well combined.
- Mix Wet Ingredients: Add the eggs and vanilla extract to the butter and sugar mixture. Stir until smooth and fully combined.
- Combine Dry Ingredients: In a separate bowl, whisk together the flour, cocoa powder, salt, and baking powder. Gradually add the dry ingredients to the wet mixture, stirring until just combined.
- Bake the Brownies: Pour the brownie batter into the prepared baking pan. Spread it evenly and bake in the preheated oven for 25-30 minutes, or until a toothpick inserted into the center comes out with a few moist crumbs.
- Prepare Frosting: While the brownies are cooling, make the green frosting by combining powdered sugar, a few drops of green food coloring, and milk in a bowl. Adjust the consistency by adding more milk if necessary until you achieve a spreadable consistency.
- Decorate: Once the brownies are completely cool, spread the green frosting over the top. Decorate with assorted candies to create a witch’s cauldron effect, adding candy eyes, gummy worms, and sprinkles to mimic a bubbling brew.
Extra Tips
For a more intense chocolate flavor, consider adding a handful of chocolate chips to the brownie batter before baking. If you want to make the frosting extra vibrant, use gel food coloring, as it provides more intense color without altering the frosting’s consistency.
When decorating, let your imagination run wild—try using different types of candy to create unique and spooky designs. If making these brownies for a larger crowd, simply double the recipe and bake in a larger pan.
Ghostly Meringue Pops
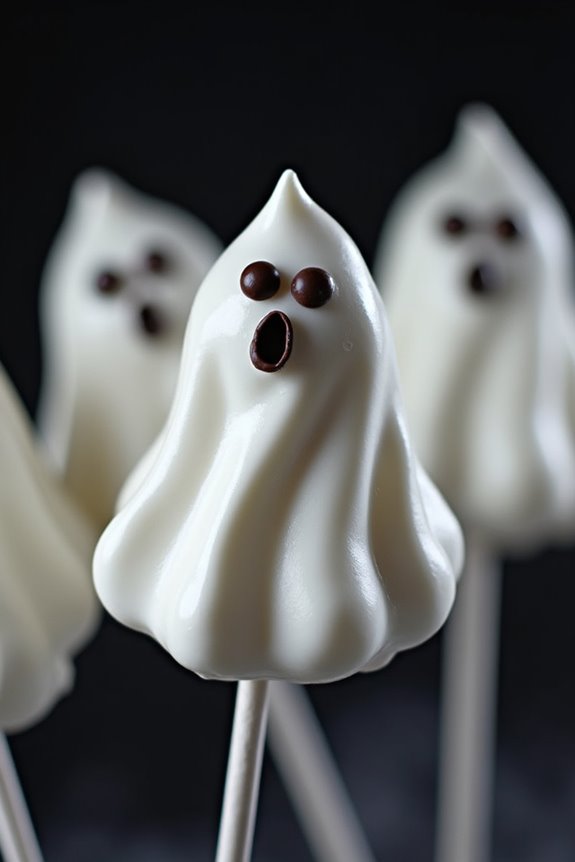
Ghostly Meringue Pops are a spooktacular treat perfect for a Halloween potluck. These light and airy pops are shaped like little ghosts and are sure to delight both kids and adults alike with their whimsical appearance and sweet, melt-in-your-mouth texture.
They’re an excellent addition to any Halloween dessert table, offering a fun and creative way to celebrate the spooky season. Plus, they’re easy to make with just a few simple ingredients, making them an ideal choice for busy hosts.
The meringue pops are made by whipping egg whites into stiff peaks, then carefully forming ghost shapes on a baking sheet. After baking, the ghosts are decorated with melted chocolate to give them expressive faces, transforming simple ingredients into a playful, delicious dessert.
These pops are perfect for sharing, and you can customize the ghost faces to give each pop a unique personality. This recipe serves 4-6 people, making it a great option for small gatherings or family celebrations.
Ingredients:
- 4 large egg whites
- 1 cup granulated sugar
- 1/4 teaspoon cream of tartar
- 1 teaspoon vanilla extract
- Black gel food coloring or melted chocolate for decorating
- Lollipop sticks
Cooking Instructions:
- Preheat and Prepare: Preheat your oven to 200°F (95°C). Line two baking sheets with parchment paper. This will prevent the meringue from sticking and guarantee even baking.
- Beat Egg Whites: In a clean, dry bowl, beat the egg whites on medium speed using an electric mixer until foamy. Add the cream of tartar and continue beating until soft peaks form.
- Add Sugar Gradually: Slowly add the granulated sugar, about a tablespoon at a time, while continuing to beat the mixture. Increase the speed to high and beat until stiff, glossy peaks form, and the sugar is fully dissolved. This should take about 7-10 minutes.
- Add Vanilla: Gently fold in the vanilla extract using a spatula, making sure it’s thoroughly mixed without deflating the meringue.
- Pipe Ghosts: Transfer the meringue mixture to a piping bag fitted with a round tip. Pipe ghost shapes onto the prepared baking sheets, making each about 3 inches tall. Insert a lollipop stick into the base of each ghost, ensuring it’s well embedded.
- Bake: Place the baking sheets in the preheated oven and bake for 1.5 to 2 hours, or until the meringues are dry and can easily be lifted off the parchment paper. Turn off the oven and let the meringues cool completely inside to prevent cracking.
- Decorate: Once cooled, use black gel food coloring or melted chocolate to draw eyes and mouths on the ghostly pops. Allow the decorations to set before serving.
Extra Tips: For best results, verify that all your equipment is completely grease-free, as any oil or fat can prevent the meringue from reaching its full volume.
If you don’t have a piping bag, you can use a plastic sandwich bag with a corner snipped off. When decorating, you can use a toothpick to help create finer details with the chocolate or food coloring.
Remember to store the meringues in an airtight container if you’re not serving them immediately to keep them crisp.
Monster Eyeball Truffles

Monster Eyeball Truffles are a fun and spooky dessert perfect for a Halloween potluck. These delightful treats are made from a rich chocolate truffle base, covered in a smooth white chocolate coating, and decorated with edible eyes to resemble creepy monster eyeballs. The truffles aren’t only visually striking but also incredibly delicious, with a creamy center that melts in your mouth. They’re sure to be a hit with both kids and adults at any Halloween gathering.
Creating these Monster Eyeball Truffles is easier than you might think. With a few simple ingredients and a little creativity, you can whip up a batch of these ghoulish goodies in no time. This recipe makes approximately 24 truffles, perfect for serving 4-6 people, depending on how many each person indulges in. Gather your ingredients and get ready to impress your friends and family with these spooky sweet treats.
Ingredients:
- 1 ½ cups of semisweet chocolate chips
- ½ cup of heavy cream
- 1 tablespoon of unsalted butter
- 1 teaspoon of vanilla extract
- 12 ounces of white chocolate chips
- Edible candy eyes
- Red and black gel food coloring
- ½ teaspoon of vegetable oil (optional for thinning chocolate)
Instructions:
- Prepare the Truffle Mixture:
- In a medium-sized heatproof bowl, combine the semisweet chocolate chips, heavy cream, and butter. Microwave in 30-second intervals, stirring after each, until the mixture is smooth and fully melted. Stir in the vanilla extract.
- Cover the bowl with plastic wrap and refrigerate for about 1-2 hours, or until the mixture is firm enough to scoop and roll.
- Once the mixture is firm, use a small cookie scoop or a tablespoon to scoop out portions of the chocolate mixture. Roll into smooth balls and place them on a baking sheet lined with parchment paper.
- Place the white chocolate chips in a microwave-safe bowl and microwave in 30-second intervals, stirring until smooth. If the chocolate is too thick, add a small amount of vegetable oil to thin it out.
- Using a fork, dip each truffle into the melted white chocolate, making sure it’s fully coated. Place the coated truffles back onto the parchment paper.
- Before the white chocolate hardens, place a candy eye in the center of each truffle. Use red and black gel food coloring to add veins and details around the eyes, creating a spooky effect.
- Allow the truffles to sit at room temperature or refrigerate them until the white chocolate has completely set.
- 1 cup graham cracker crumbs
- 4 tablespoons unsalted butter, melted
- 1/4 cup granulated sugar
- 8 oz cream cheese, softened
- 1 cup pumpkin puree
- 1/2 cup granulated sugar
- 1 teaspoon vanilla extract
- 1 teaspoon ground cinnamon
- 1/2 teaspoon ground nutmeg
- 1/4 teaspoon ground ginger
- 2 large eggs
Extra Tips:
For the perfect Monster Eyeball Truffles, verify that your chocolate mixture is well-chilled before rolling to make the process easier. When melting the white chocolate, be careful not to overheat it, as it can become grainy. If your chocolate starts to thicken during the dipping process, reheat it gently.
For a more personalized touch, feel free to experiment with different food coloring designs and eye placements to create unique monster looks. These truffles can be stored in an airtight container in the refrigerator for up to a week, making them a convenient make-ahead Halloween treat.
Pumpkin Patch Cheesecake Bars
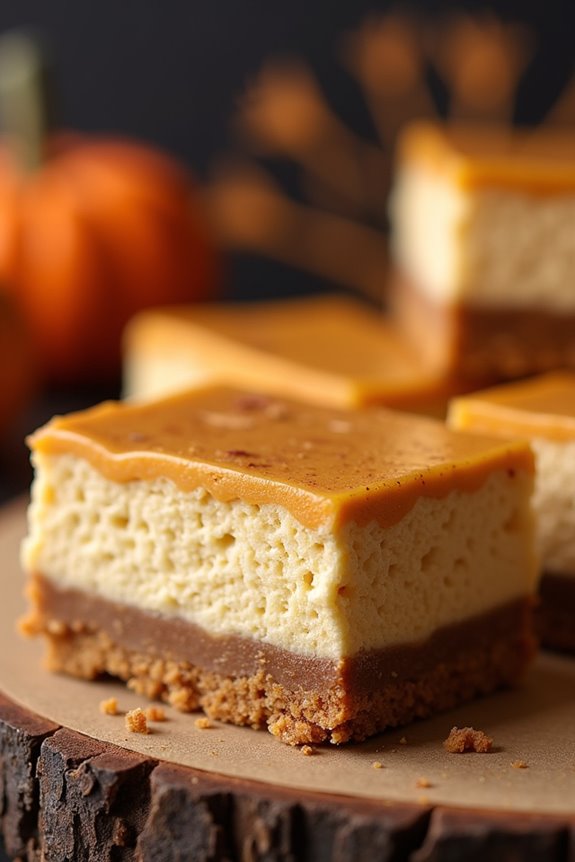
Pumpkin Patch Cheesecake Bars are a delightful treat perfect for your Halloween potluck. These bars combine the rich, velvety texture of cheesecake with the warm, spiced flavor of pumpkin, creating a festive dessert that’s not only delicious but also visually appealing.
Topped with a cinnamon graham cracker crust and a creamy pumpkin cheesecake filling, these bars are certain to be a hit with both kids and adults alike. They’re ideal for serving at gatherings, as they’re easy to cut into individual portions and can be enjoyed as a hand-held dessert.
The recipe yields a serving size of 4-6 people, making it perfect for smaller get-togethers. These Pumpkin Patch Cheesecake Bars are easy to prepare and can be made ahead of time, allowing you to focus on other aspects of your Halloween celebration.
Whether you’re an experienced baker or just starting out, this recipe is straightforward and promises a rewarding result that will impress your guests.
Ingredients
Cooking Instructions
- Prepare the Oven and Pan: Preheat your oven to 325°F (163°C). Line an 8×8-inch square baking pan with parchment paper, allowing some overhang on the sides for easy removal.
- Make the Crust: In a medium bowl, combine the graham cracker crumbs, melted butter, and 1/4 cup of granulated sugar. Mix until the crumbs are evenly coated. Press the mixture firmly into the bottom of the prepared baking pan to form an even layer. Set aside.
- Prepare the Cheesecake Filling: In a large mixing bowl, beat the softened cream cheese until smooth and creamy. Add the pumpkin puree, 1/2 cup of granulated sugar, vanilla extract, ground cinnamon, nutmeg, and ginger. Mix well until all ingredients are fully combined.
- Add the Eggs: Add the eggs one at a time, beating on low speed after each addition just until combined. Be careful not to overmix, as this can incorporate too much air and affect the texture of the bars.
- Assemble and Bake: Pour the pumpkin cheesecake mixture over the prepared crust, spreading it evenly. Bake in the preheated oven for about 35-40 minutes, or until the edges are set and the center slightly jiggles when gently shaken.
- Cool and Chill: Remove the bars from the oven and let them cool to room temperature. Once cooled, refrigerate for at least 3 hours or until fully chilled and set.
- Slice and Serve: Using the parchment paper overhang, lift the cheesecake bars out of the pan. Slice into bars and serve chilled.
Extra Tips
For the best results, make sure the cream cheese is fully softened before beginning to guarantee a smooth cheesecake filling.
If you’re short on time, you can prepare the bars a day in advance and store them in the refrigerator until ready to serve. For a decorative touch, consider adding a dollop of whipped cream or a sprinkle of cinnamon on each bar before serving.
To prevent the cheesecake from cracking, avoid opening the oven door frequently while baking, and let the bars cool gradually before refrigerating.
Spooky Spiderweb Cookies
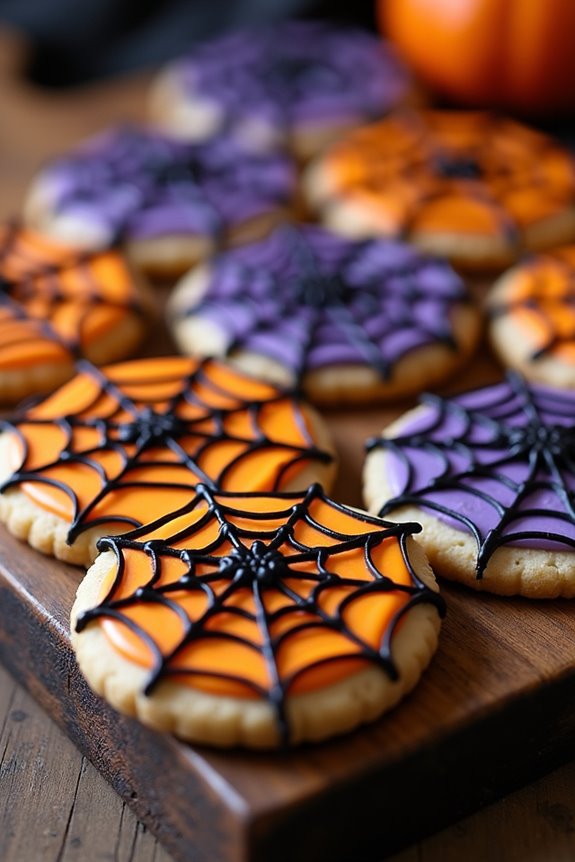
Spooky Spiderweb Cookies are the perfect treat for a Halloween potluck, delighting guests with their eerie design and delicious taste. These cookies are a fun and creative way to add a spooky touch to your dessert table, making them a hit with both kids and adults. The combination of a rich, buttery sugar cookie base and a striking royal icing spiderweb design guarantees these cookies aren’t only visually appealing but also scrumptiously satisfying.
The process of making Spooky Spiderweb Cookies involves baking classic sugar cookies and then decorating them with intricate spiderweb patterns using royal icing. Although the spiderweb design might seem complex, it’s actually quite simple and can be achieved with just a few basic techniques. With a little bit of practice, you’ll be able to create these hauntingly beautiful cookies that will surely impress your friends and family at any Halloween gathering.
Ingredients (Serving Size: 4-6 people)
- 1 cup unsalted butter, softened
- 1 cup granulated sugar
- 1 large egg
- 1 teaspoon vanilla extract
- 2 ½ cups all-purpose flour
- ½ teaspoon baking powder
- ¼ teaspoon salt
- 2 cups powdered sugar
- 2-3 tablespoons meringue powder
- 5-6 tablespoons water
- Food coloring (black, orange, and purple)
- Piping bags with fine tips or plastic squeeze bottles
Instructions
1. Prepare the Sugar Cookie Dough: Preheat your oven to 350°F (175°C). In a large bowl, cream together the softened butter and granulated sugar until light and fluffy. Add the egg and vanilla extract, mixing well until fully incorporated.
In a separate bowl, whisk together the flour, baking powder, and salt. Gradually add the dry ingredients to the wet ingredients, mixing until a dough forms.
2. Chill and Cut the Dough: Roll the dough into a ball, wrap it in plastic wrap, and refrigerate for about 1 hour. Once chilled, roll out the dough on a lightly floured surface to about ¼-inch thickness. Use a round cookie cutter to cut out shapes and place them on a parchment-lined baking sheet.
3. Bake the Cookies: Bake the Cookies in the preheated oven for 8-10 minutes, or until the edges are lightly golden. Remove from the oven and allow them to cool on a wire rack.
4. Prepare the Royal Icing: In a medium bowl, combine the powdered sugar and meringue powder. Gradually add water, mixing until you achieve a thick yet flowy consistency.
Divide the icing into separate bowls, adding food coloring to each to create black, orange, and purple icing.
5. Decorate the Cookies: Using piping bags or squeeze bottles, outline the cookies with orange or purple icing. Fill in the centers, then use the black icing to pipe small circles starting from the center and working outward.
Using a toothpick, drag lines from the center to the edge to create a spiderweb effect.
6. Allow to Set: Let the decorated cookies dry completely, about 1-2 hours, before serving or packaging.
Extra Tips
For the best results, make sure that your royal icing is the right consistency; it should be thick enough to hold its shape but fluid enough to flow smoothly. If the icing is too thick, add a few drops of water to thin it out. Conversely, add more powdered sugar if it’s too runny.
Experiment with different colors to add variety to your cookies, and consider adding edible glitter or sprinkles for an extra festive look. Ultimately, if you’re short on time, store-bought sugar cookie dough can be used as a quick alternative to making the dough from scratch.
Creepy Crawly Cake Pops
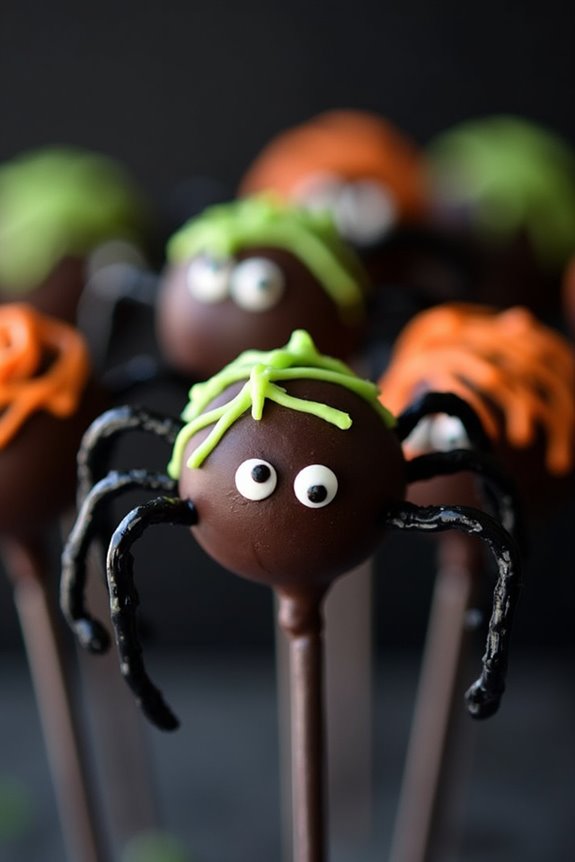
Creepy Crawly Cake Pops are the perfect spooky treat to bring to any Halloween potluck. These delicious, bite-sized desserts aren’t only fun to make but also add a festive touch to any celebration. The rich and moist cake is coated in smooth chocolate and decorated to resemble creepy crawlies, sure to delight all your guests, young and old alike.
Whether you’re an experienced baker or just looking for a fun project with the kids, these cake pops are a fantastic choice for your Halloween festivities.
The key to making these cake pops truly creepy is in the decoration. With a little creativity, you can transform simple cake pops into eerie insects or spooky spiders. Using colored candy melts, sprinkles, and edible eyes, you can give each pop its own personality. This recipe will guide you through creating a batch of cake pops that serves 4-6 people, perfect for sharing at your next Halloween gathering.
Ingredients (serves 4-6):
- 1 box of chocolate cake mix (plus ingredients required for cake)
- 1 cup of chocolate frosting
- 2 cups of dark chocolate candy melts
- 1 cup of orange candy melts
- 1/2 cup of green candy melts
- Edible candy eyes
- Assorted sprinkles
- Lollipop sticks
- Black licorice strings
Instructions:
- Bake the Cake: Begin by preparing the chocolate cake following the instructions on the box. Allow the cake to cool completely once baked.
- Crumble the Cake: Once the cake is cooled, crumble it into a large mixing bowl. The texture should resemble breadcrumbs.
- Mix with Frosting: Add 1 cup of chocolate frosting to the crumbled cake. Mix until the frosting is completely incorporated, and the mixture holds together when pressed.
- Form the Cake Balls: Roll the cake and frosting mixture into small balls, roughly the size of a walnut. Place them on a baking sheet lined with parchment paper.
- Chill the Cake Balls: Insert a lollipop stick halfway into each cake ball. Chill them in the refrigerator for at least 1 hour to firm up.
- Melt the Candy Coating: Melt the dark chocolate candy melts in a microwave-safe bowl, stirring every 30 seconds until smooth.
- Coat the Cake Pops: Dip each chilled cake pop into the melted chocolate, making sure it’s fully coated. Allow the excess to drip off, and then stand them upright in a foam block to set.
- Decorate the Cake Pops: Melt the orange and green candy melts separately. Use a spoon or piping bag to drizzle over the cake pops. Add edible eyes and use black licorice strings to create legs, transforming them into creepy crawlies.
- Set the Decoration: Allow the decorated cake pops to set completely at room temperature or in the refrigerator.
Extra Tips:
For added stability, dip the tip of the lollipop stick in melted chocolate before inserting it into the cake balls. This helps the stick adhere better to the cake pop.
When melting candy melts, verify not to overheat them; stir frequently to avoid scorching. If you’re using white candy melts, you can add gel food coloring to customize your colors.
Finally, feel free to get creative with your designs – the more unique and creepy, the better!
Candy Corn Rice Krispie Treats
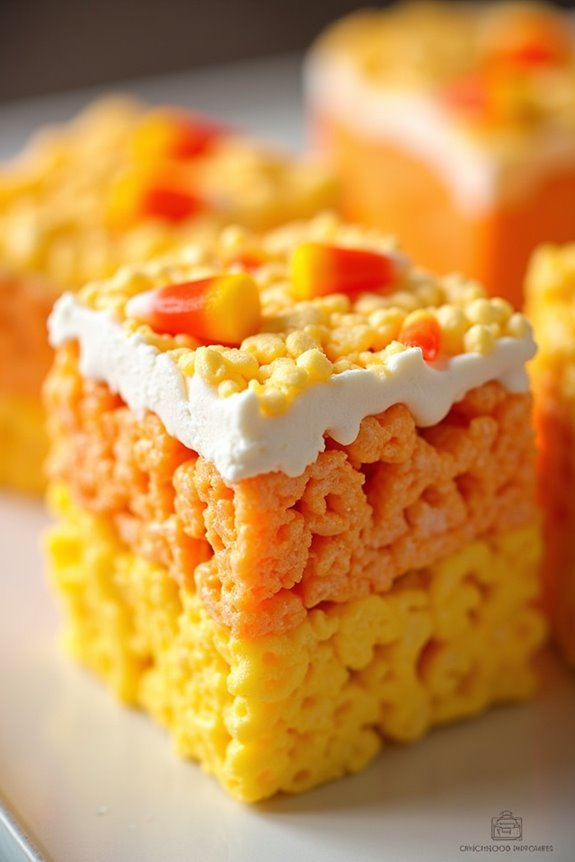
Bring a touch of sweet nostalgia to your Halloween potluck with Candy Corn Rice Krispie Treats. This playful variation on the classic Rice Krispie Treat combines the gooey marshmallow goodness with the vibrant colors and flavors of candy corn. Perfect for a festive gathering, these treats are easy to make and guaranteed to be a hit with both kids and adults.
The layers of orange, yellow, and white not only mimic the colors of candy corn but also create a visually appealing dessert that captures the spirit of the holiday.
These Candy Corn Rice Krispie Treats aren’t only delicious but also versatile, allowing you to get creative with your presentation. Cut them into squares, rectangles, or even triangles to further mimic the appearance of candy corn pieces. With just a few ingredients and simple steps, you can whip up a batch of these delightful treats to share with your family and friends.
Follow the recipe below to make enough for a serving size of 4-6 people.
Ingredients:
- 6 cups Rice Krispies cereal
- 4 cups mini marshmallows
- 3 tablespoons unsalted butter
- 1 teaspoon vanilla extract
- Yellow food coloring
- Orange food coloring
- 1 cup candy corn
- Cooking spray or parchment paper
Instructions:
- Prepare the pan: Lightly grease a 9×13 inch baking pan with cooking spray or line it with parchment paper. This will prevent the sticky mixture from adhering to the pan.
- Melt the butter and marshmallows: In a large saucepan over low heat, melt the butter. Once melted, add the mini marshmallows and stir continuously until they’re completely melted and the mixture is smooth. Remove from heat and stir in the vanilla extract.
- Divide the marshmallow mixture: Divide the melted marshmallow mixture evenly into three separate bowls. These portions will be used to create the colored layers.
- Color the layers: Add a few drops of yellow food coloring to one bowl of marshmallow mixture and stir until the color is evenly distributed. In the second bowl, add a few drops of orange food coloring and mix well. Leave the third bowl plain.
- Mix with Rice Krispies: Divide the Rice Krispies cereal into three equal parts. Mix one part with the yellow marshmallow mixture, another with the orange, and the last with the plain marshmallow mixture.
- Layer the mixtures: Press the yellow mixture into the prepared pan, spreading it evenly to form the first layer. Next, layer the orange mixture on top, pressing it gently to affirm it adheres. Finally, spread the plain mixture over the top, pressing it down to form the final layer.
- Add candy corn: While the mixture is still warm, gently press candy corn pieces into the top layer. Space them evenly for a decorative effect.
- Cool and cut: Allow the treats to cool completely at room temperature. Once set, cut them into desired shapes and sizes.
Extra Tips:
When making Candy Corn Rice Krispie Treats, it’s important to work quickly after melting the marshmallows, as the mixture can harden as it cools. If you find that the marshmallow mixture is becoming difficult to work with, gently warm it over low heat to soften it again.
Additionally, wetting your hands with a little water can help prevent the sticky mixture from adhering to your fingers as you press and smooth the layers. For a fun variation, consider adding a few drops of candy corn flavored extract to the marshmallow mixture for an extra burst of Halloween flavor.
Enjoy these treats as a festive addition to your Halloween potluck, and watch them disappear from the dessert table!
Haunted Graveyard Pudding Cups
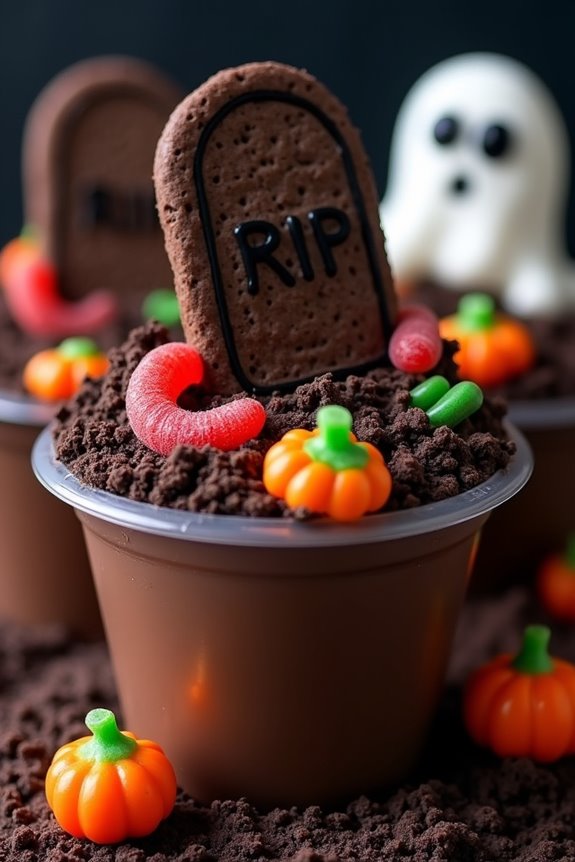
Make your Halloween extra spooky and delicious with Haunted Graveyard Pudding Cups. This dessert is perfect for a potluck, delighting both kids and adults with its creative presentation and rich flavors.
These pudding cups are layered with chocolatey goodness, crushed cookies, and topped with eerie decorations that resemble a haunted graveyard. Whether you’re hosting a party or attending one, these pudding cups will surely be the talk of the night.
The beauty of this dessert lies not only in its taste but also in its presentation. Each cup is designed to look like a miniature graveyard, complete with tombstones, ghosts, and other haunting elements. The combination of creamy chocolate pudding, crunchy cookie “dirt,” and decorative candies creates a delightful contrast in textures and flavors.
Plus, they’re incredibly easy to make, so you can focus on having fun this Halloween.
Ingredients (Serving Size: 4-6 people)
- 2 cups of chocolate pudding mix
- 3 cups of cold milk
- 1 package of chocolate sandwich cookies
- 12 oval-shaped cookies (like Milano cookies)
- 1 tube of black gel icing
- Gummy worms
- Candy pumpkins
- Whipped cream for ghost decoration
- Clear plastic cups
Cooking Instructions
- Prepare the Pudding: In a large mixing bowl, whisk together the chocolate pudding mix and cold milk until smooth and thickened. This should take around 2-3 minutes. Set the pudding aside to allow it to set further while you prepare the other components.
- Crush the Cookies: Place the chocolate sandwich cookies in a sealable plastic bag and crush them using a rolling pin. Aim for a texture similar to dirt, with both fine crumbs and small chunks. These will be used to create the “graveyard dirt” layer in your cups.
- Assemble the Cups: Take your clear plastic cups and fill each one about halfway with the prepared chocolate pudding. Layer a generous amount of crushed cookies on top of the pudding to resemble dirt, leaving some extra space at the top for decorations.
- Decorate the Tombstones: Use the black gel icing to write spooky messages or draw RIP on the oval-shaped cookies. Insert them vertically into the cookie layer in each cup to resemble tombstones.
- Add Decorative Elements: Place gummy worms, candy pumpkins, and small dollops of whipped cream (to look like ghosts) around the tombstones. Feel free to get creative with your decorations to enhance the haunted graveyard look.
- Chill Before Serving: Refrigerate the assembled pudding cups for at least 30 minutes before serving. This allows the pudding to firm up and the flavors to meld together.
Extra Tips
For a more vibrant graveyard scene, consider adding a few drops of green food coloring to some of the whipped cream to create grass-like patches.
If you prefer a homemade touch, you can also make the chocolate pudding from scratch using cocoa powder, sugar, and milk. Adjust the sweetness to your taste.
When decorating the tombstones, let your creativity flow with different spooky phrases and designs. Ultimately, prepare these cups in advance to save time on the day of your Halloween potluck.
Black Cat Macarons
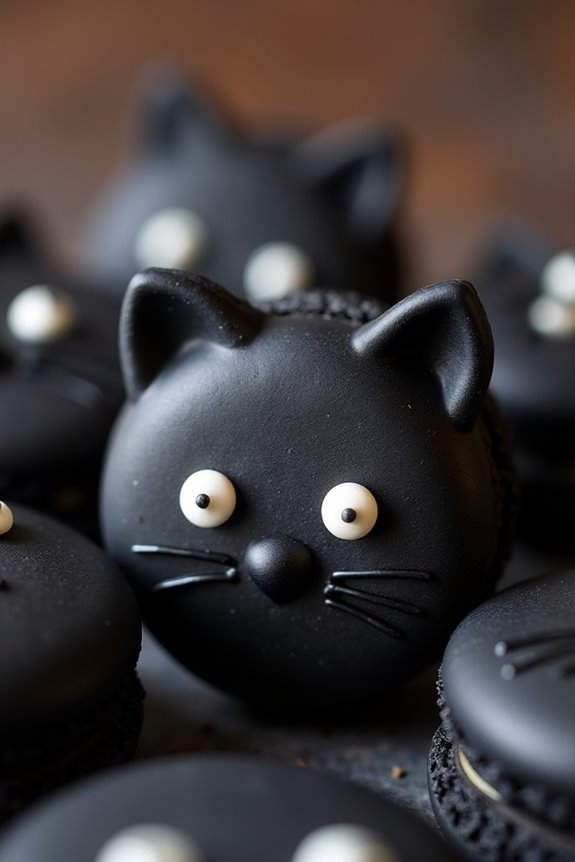
Black Cat Macarons are a delightful and spooky treat perfect for your Halloween potluck. These macarons aren’t only visually enchanting with their black, cat-shaped shells and adorable whisker details, but they also offer a deliciously sweet and chewy texture that will impress your guests. The combination of almond-flavored macarons and a creamy, rich filling creates a balance of flavors that’s hard to resist.
Making Black Cat Macarons requires some precision, as macarons are a delicate confection known for their smooth, crisp shells and soft, chewy centers. This recipe will guide you through the process of whipping egg whites to the perfect consistency, folding in almond flour and confectioners’ sugar, and piping the batter into the cute cat shape. With a little patience and practice, you’ll have a batch of macarons that aren’t only delicious but also a whimsical addition to your Halloween dessert spread.
Ingredients (Serves 4-6):
- 100g almond flour
- 150g confectioners’ sugar
- 90g egg whites (about 3 large eggs), room temperature
- 65g granulated sugar
- Black gel food coloring
- 100g unsalted butter, softened
- 150g powdered sugar
- 1 tsp vanilla extract
- Pinch of salt
- Edible black marker or black royal icing for decoration
Cooking Instructions:
- Prepare Macaron Batter: In a food processor, pulse the almond flour and confectioners’ sugar until well combined. Sift the mixture into a large bowl to verify there are no lumps.
- Whip Egg Whites: In a separate mixing bowl, beat the egg whites on medium speed until they become foamy. Slowly add the granulated sugar while continuing to beat the egg whites until stiff peaks form. Add black gel food coloring, a little at a time, until you reach the desired shade of black.
- Combine Ingredients: Gently fold the almond flour mixture into the whipped egg whites using a spatula. Be careful not to overmix; the batter should have a smooth, lava-like consistency.
- Pipe the Macarons: Transfer the batter to a piping bag fitted with a round tip. On a baking sheet lined with parchment paper, pipe small circles for the cat’s face and add small dollops on the sides for ears. Tap the baking sheet on the counter to remove any air bubbles.
- Rest the Macarons: Allow the piped macarons to rest at room temperature for 30-60 minutes, or until a skin forms on the surface. This is essential for achieving the signature macaron texture.
- Bake: Preheat your oven to 300°F (150°C). Bake the macarons in the preheated oven for 15-18 minutes. They should easily lift off the parchment paper when done. Let them cool completely on the baking sheet.
- Prepare the Filling: In a bowl, beat the softened butter until creamy. Gradually add the powdered sugar, vanilla extract, and a pinch of salt. Beat until smooth and well combined.
- Assemble the Macarons: Pair similar-sized macaron shells. Pipe a small amount of filling onto one shell, then gently press another shell on top to create a sandwich.
- Decorate: Use an edible black marker or black royal icing to draw the eyes, nose, and whiskers on each macaron to create the black cat face.
Extra Tips:
When making macarons, verify that all your mixing bowls and utensils are completely clean and free of grease, as any fat can prevent egg whites from whipping properly.
It’s also important to weigh your ingredients precisely for the best results. If your macarons crack or don’t develop feet, try adjusting your oven temperature or baking time slightly.
Practice makes perfect, so don’t be discouraged if your first batch isn’t flawless!
Mummy Wrapped Pretzel Rods
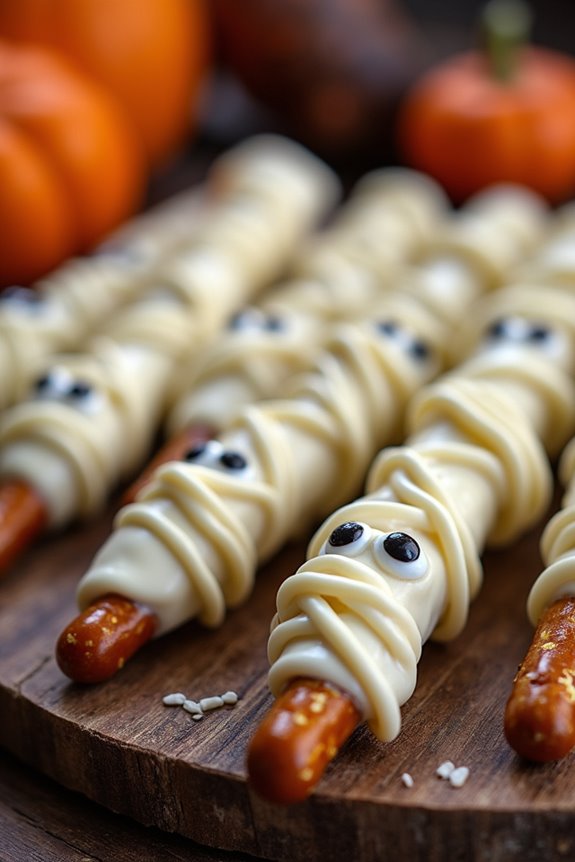
Mummy Wrapped Pretzel Rods are the perfect spooky treat for your next Halloween potluck. These delightful snacks aren’t only fun to make but also add a festive touch to your dessert table. The combination of salty pretzels, sweet white chocolate, and the playful design of a mummy make them irresistible to both kids and adults.
Easy to prepare, these pretzel rods offer a creative way to get everyone in the Halloween spirit without requiring too much time or effort. Whether you’re hosting a Halloween party or contributing to a communal potluck, Mummy Wrapped Pretzel Rods are sure to impress.
Their charming appearance is achieved with just a few simple ingredients, making them an ideal choice for those looking to whip up something quick yet effective. The recipe is straightforward enough that even little ones can help with the decorating, making it a fun family activity in the lead-up to Halloween.
Ingredients (serves 4-6 people):
- 12 pretzel rods
- 1 cup white chocolate chips
- 1 tablespoon coconut oil (optional, for smoother chocolate)
- 24 candy eyes
- Black edible marker (optional)
Cooking Instructions:
- Prepare the Chocolate: Begin by melting the white chocolate chips. Place the white chocolate chips in a microwave-safe bowl. If using, add the coconut oil to help the chocolate melt smoothly. Microwave the chocolate in 30-second intervals, stirring after each interval, until the chocolate is completely melted and smooth.
- Dip the Pretzels: Once your chocolate is melted, dip each pretzel rod into the chocolate, covering about 2/3 of the rod. Use a spoon to help coat the pretzels evenly if needed. Allow any excess chocolate to drip back into the bowl.
- Create the Mummy Wraps: Lay the dipped pretzels on a baking sheet lined with parchment paper. With the remaining melted chocolate, fill a small piping bag or a ziplock bag with a small corner snipped off. Drizzle the white chocolate over the pretzels in a zigzag pattern to create the look of mummy wraps.
- Add the Eyes: Before the chocolate sets completely, place two candy eyes on each pretzel rod where the mummy’s face would be.
- Allow to Set: Let the pretzel rods sit at room temperature or place them in the refrigerator for faster setting until the chocolate is firm.
- Optional Detailing: For added detail, use a black edible marker to add small lines or stitches on the mummy wraps.
Extra Tips: To make your mummy pretzels even more festive, consider experimenting with different colors of candy melts for the wraps. You can also use different types of candy eyes to give each mummy its own personality.
Be sure to let the chocolate set completely before serving to avoid any mess. If you’re making these treats with kids, be sure to supervise the use of the microwave and the handling of melted chocolate.
Gory Brain Jell-O Molds
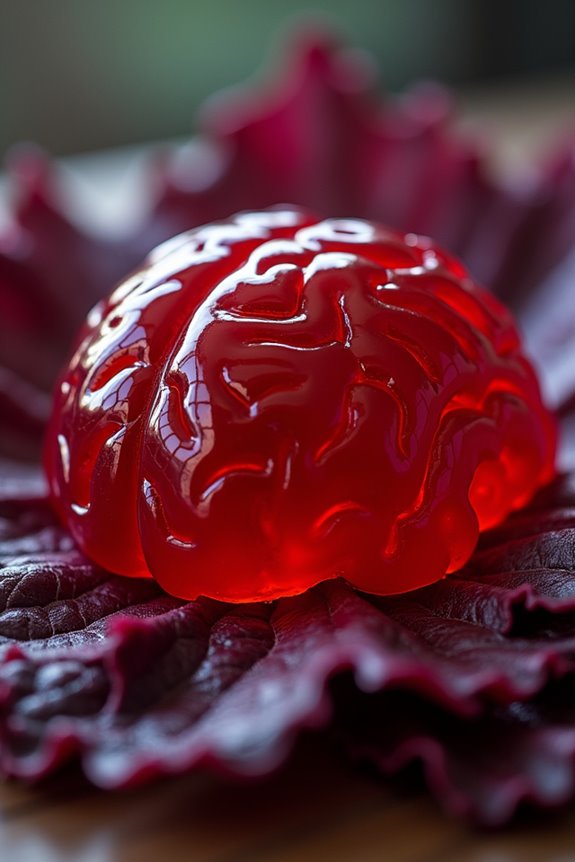
Craving a spine-chilling treat for your Halloween potluck? Search no more than the Gory Brain Jell-O Mold, a dessert that’s equal parts spooky and scrumptious. Perfect for adding a bit of fright to your festivity, this jelly mold not only appears terrifyingly realistic but is also delightfully fruity. The gelatinous texture combined with a mix of flavors creates an eerie yet appealing concoction that will surely impress your guests.
This recipe serves 4-6 people and is surprisingly simple to make. The key to achieving a lifelike brain appearance lies in the mold itself, so be sure to have a brain-shaped mold handy. With just a few ingredients and some cooling time, you’ll have a gory masterpiece ready to serve. The addition of a few drops of food coloring will enhance the visual effect, making it appear freshly harvested from a mad scientist’s lab.
Ingredients for Gory Brain Jell-O Molds:
- 2 packets (3 oz each) of peach or strawberry flavored gelatin
- 2 cups boiling water
- 1 cup cold water
- 1 cup evaporated milk
- 1 drop red food coloring
- 1 drop blue food coloring
- Cooking spray
- Brain-shaped gelatin mold
Instructions:
- Prepare the Mold: Lightly spray the inside of the brain-shaped mold with cooking spray. This will help the gelatin release easily once set. Make sure to coat all the nooks and crannies for a seamless finish.
- Mix the Gelatin: In a large bowl, dissolve the two packets of flavored gelatin in 2 cups of boiling water. Stir until completely dissolved, ensuring no granules remain.
- Color the Mixture: Add one drop each of red and blue food coloring to the gelatin mixture. Stir well until the color is evenly distributed, creating a dark, blood-like hue.
- Incorporate the Milk: Pour in 1 cup of cold water followed by 1 cup of evaporated milk into the gelatin mixture. Stir until fully combined. This addition will give the Jell-O a slightly opaque, brain-like appearance.
- Fill the Mold: Carefully pour the gelatin mixture into the prepared brain mold. Make sure it fills the mold completely to capture all the details.
- Chill the Gelatin: Place the mold in the refrigerator and let it set for at least 4 hours, or until the gelatin is firm to the touch.
- Unmold the Brain: Once the gelatin is set, gently pull away from the edges of the mold to loosen it. Invert the mold onto a serving platter and give it a little shake to release the brain.
Extra Tips:
For an extra touch of realism, consider serving the Gory Brain Jell-O Mold on a bed of leafy greens or red cabbage to mimic a surgical table setting.
If you want to go even further with the gore factor, add some raspberry or strawberry syrup drizzled over the top to mimic blood oozing from the brain.
Frankenstein Marshmallow Pops
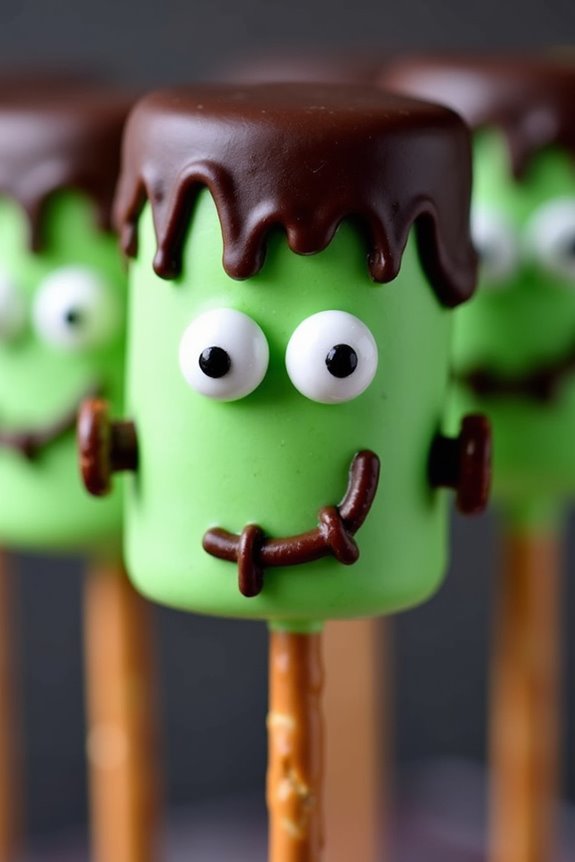
Frankenstein Marshmallow Pops are the perfect Halloween treat that combines creativity and deliciousness in one spooky package. These fun and easy-to-make treats are ideal for a Halloween potluck, offering a delightful combination of gooey marshmallows, crunchy toppings, and vibrant colors that will certainly catch the eye of your guests.
The best part? You don’t need to be a professional baker to make these adorable little monsters. Whether you’re hosting a gathering or attending one, these Frankenstein Marshmallow Pops are sure to be a crowd-pleaser and a conversation starter.
Creating Frankenstein Marshmallow Pops isn’t only a treat for the taste buds but also a fun activity that you can enjoy with family and friends. The process involves dipping marshmallows in melted chocolate and then decorating them to resemble everyone’s favorite green monster.
The decorating possibilities are endless—use candy eyes, pretzel sticks, and colored sprinkles to bring your Frankensteins to life. Plus, they’re conveniently served on sticks, making them an easy-to-eat, mess-free dessert option for any Halloween event.
Ingredients (Serving Size: 4-6 people)
- 12 large marshmallows
- 1 cup green candy melts
- 1/2 cup chocolate chips
- 12 lollipop sticks
- 24 candy eyes
- 12 small pretzel sticks, broken in half
- Black decorating gel
- Parchment paper
Instructions
- Prepare the Workspace: Begin by lining a baking sheet with parchment paper to place your finished pops on. This will prevent them from sticking and make cleanup easier.
- Insert Sticks: Push a lollipop stick into each marshmallow, making sure it’s secure but not going all the way through the top.
- Melt the Candy Melts: In a microwave-safe bowl, melt the green candy melts according to package instructions. Stir until smooth and completely melted.
- Coat the Marshmallows: Dip each marshmallow into the melted green candy, turning to coat evenly. Allow excess to drip off before placing it on the parchment-lined sheet. Repeat for all marshmallows.
- Add Hair and Eyes: Before the green coating sets, press two candy eyes onto each marshmallow. For the hair, melt chocolate chips in a separate bowl and use a spoon or piping bag to drizzle the chocolate over the top of the marshmallow, creating a hair-like texture.
- Attach Bolts: Insert half a pretzel stick into each side of the marshmallow to mimic Frankenstein’s bolts.
- Draw the Face: Use black decorating gel to draw a stitched mouth and any additional details to give your Frankenstein pop character.
- Set and Serve: Allow the pops to set completely at room temperature or refrigerate for faster results. Once set, they’re ready to serve!
Extra Tips
When making Frankenstein Marshmallow Pops, make certain that the candy melts aren’t too hot, as this can cause the marshmallows to melt or slide off the stick.
If you want a smoother finish, consider double-dipping the marshmallows after the first coat has set. For added fun, you can experiment with different colors for the hair or use different types of candy to personalize your Frankensteins.
If you’re short on time, prepare the marshmallows in advance and decorate them just before your event. Enjoy your spooky creations!

