
Planning a Halloween potluck for the little ones? Let’s explore 14 kid-friendly ideas that will enchant and delight at any gathering. From Monster Mash Guacamole to Mummy Hot Dogs, these recipes are sure to please. We’ll cover creative main dishes and festive desserts to keep those tiny ghosts and goblins entertained. Join me on this fun culinary adventure!
Monster Mash Guacamole
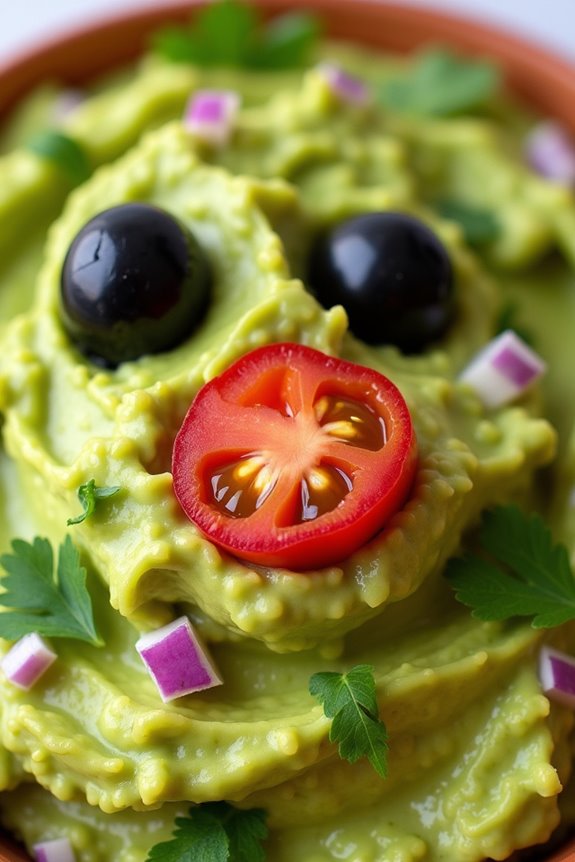
Transform your Halloween potluck into a spooktacular feast with Monster Mash Guacamole! This guacamole isn’t only delicious but also adds a fun, festive touch to your party with its creepy, monster-like presentation. Filled with fresh avocados, tangy lime, and savory spices, this guacamole is perfect for kids and adults alike. Serve it alongside some tortilla chips or veggie sticks and let the monster mash begin!
The secret to making this guacamole extra special is in its presentation. Shape the guacamole into a monster face on a platter, using olives for eyes and cherry tomatoes for a creepy grin. With its smooth texture and vibrant green color, Monster Mash Guacamole will surely be the highlight of your Halloween gathering.
Ingredients (serves 4-6 people):
- 4 ripe avocados
- 1 medium lime, juiced
- 1 small red onion, finely chopped
- 1-2 cloves garlic, minced
- 1 medium tomato, diced
- 2 tablespoons fresh cilantro, chopped
- Salt and pepper to taste
- 6-8 black olives
- 4-6 cherry tomatoes, halved
- Tortilla chips or veggie sticks for serving
Cooking Instructions:
- Prepare the Avocados: Start by slicing the avocados in half and removing the pits. Scoop the flesh into a large mixing bowl.
- Mash the Avocados: Use a fork or potato masher to mash the avocados until they reach your desired consistency. Some prefer it chunky, others smooth, so mash accordingly.
- Add Lime Juice: Pour the lime juice over the mashed avocados. This not only adds flavor but also helps prevent the avocados from browning.
- Mix in Vegetables and Herbs: Add the finely chopped red onion, minced garlic, diced tomato, and chopped cilantro to the avocado mixture. Stir well to combine all the ingredients evenly.
- Season Your Guacamole: Season the guacamole generously with salt and pepper. Taste and adjust the seasoning as needed.
- Assemble the Monster Face: Transfer the guacamole to a serving platter and shape it into a round or oval face. Use the black olives for eyes and the halved cherry tomatoes to create a mouth or other facial features.
- Serve: Present your Monster Mash Guacamole with tortilla chips or veggie sticks around the platter for dipping.
Extra Tips: For a more flavorful guacamole, consider adding a dash of cumin or a pinch of crushed red pepper flakes for a bit of heat. If you’re making this dish ahead of time, store it in an airtight container with a piece of plastic wrap pressed directly onto the surface of the guacamole to prevent browning. Always taste the guacamole before serving to verify the seasoning is just right.
Mummy Hot Dogs
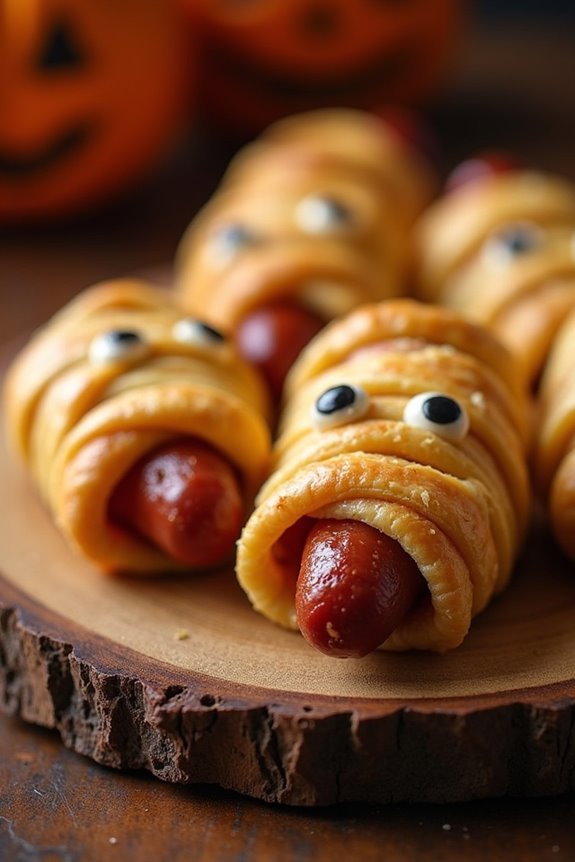
Mummy Hot Dogs are a delightful and spooky treat perfect for a kid-friendly Halloween potluck. These playful snacks aren’t only easy to make, but they also bring a fun twist to the classic hot dog. Wrapped with crescent roll dough to resemble mummies, these hot dogs are bound to be a hit with children and adults alike. The combination of the warm, savory hot dog and the flaky, buttery pastry creates a satisfying and festive dish that fits perfectly with the Halloween theme.
Whether you’re hosting a Halloween party or attending a potluck, Mummy Hot Dogs offer a simple yet creative way to add a touch of fun to the menu. The preparation is straightforward, requiring just a few ingredients and minimal cooking skills. The end result is a visually appealing dish that looks intricate but is surprisingly easy to assemble. With just a few steps, you can have a platter of these adorable mummies ready to delight your guests.
Ingredients (Serves 4-6):
- 8 hot dogs
- 1 can (8 ounces) refrigerated crescent roll dough
- 2 tablespoons mustard or ketchup (for eyes)
- Cooking spray or parchment paper
Cooking Instructions:
- Preheat the Oven: Begin by preheating your oven to 375°F (190°C). This guarantees that the mummy hot dogs will bake evenly and achieve the perfect golden brown color.
- Prepare the Dough: Unroll the crescent roll dough and separate it into four rectangles. Pinch the perforations to seal any gaps, creating a smooth surface for cutting.
- Cut the Dough: Using a sharp knife or a pizza cutter, slice each rectangle into thin strips, approximately 1/4 inch wide. These strips will form the “bandages” for your mummy hot dogs.
- Wrap the Hot Dogs: Take each hot dog and begin wrapping it with the dough strips, leaving small gaps to resemble mummy bandages. Be sure to leave a small space near one end for the “face.” Continue wrapping until all the hot dogs are covered.
- Bake the Mummies: Place the wrapped hot dogs on a baking sheet lined with parchment paper or lightly sprayed with cooking spray. Bake in the preheated oven for 12-15 minutes, or until the dough is golden brown and fully cooked.
- Add the Eyes: Once the mummies are baked and slightly cooled, use a toothpick or a small piping bag to dot mustard or ketchup onto the exposed area of the hot dog to create eyes.
Extra Tips: For an extra creative touch, consider using candy eyeballs instead of mustard or ketchup for the eyes. If you want to add a bit of variety, you can use cheese slices under the dough for a cheesy version of mummy hot dogs.
Remember to keep an eye on them while baking to prevent the dough from over-browning. These mummy hot dogs are best served warm, so try to time their preparation close to serving time for the best taste and texture.
Spooky Spider Pizza
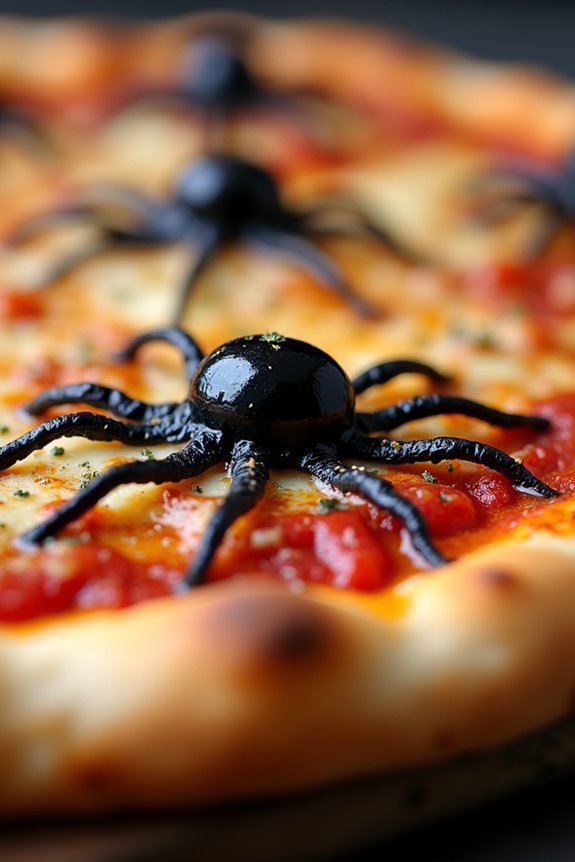
Transform your Halloween potluck into a ghoulishly good time with Spooky Spider Pizza! This delightful dish combines the savory flavors of a classic pizza with a creepy-crawly twist that’s perfect for the holiday. Ideal for a gathering of 4-6 people, each slice is topped with olive spiders that will delight both kids and adults alike.
Not only is this dish delicious and fun, but it also allows everyone to get involved in the pizza-making process, making it an engaging activity for all ages. This Spooky Spider Pizza is a great way to express your creativity in the kitchen while keeping things simple and tasty.
The pizza is built on a crispy homemade or store-bought dough, layered with tangy pizza sauce, gooey mozzarella cheese, and finished with spider-like olives. Whether you’re hosting a Halloween party or bringing a dish to share, this pizza is sure to be a standout hit. Now, let’s plunge into the ingredients and cooking instructions to make this festive dish come to life.
Ingredients (serving size: 4-6 people):
- 1 lb pizza dough (homemade or store-bought)
- 1 cup pizza sauce
- 2 cups shredded mozzarella cheese
- 1/2 cup sliced black olives (for spiders)
- 1/4 cup pepperoni slices (optional)
- 1/4 teaspoon dried oregano (optional)
- 1/4 teaspoon garlic powder (optional)
- Flour (for dusting)
Cooking Instructions:
- Preheat and Prepare: Preheat your oven to 475°F (245°C). If using a pizza stone, place it in the oven while preheating. Lightly dust your work surface with flour and roll out the pizza dough into a 12-inch circle. Transfer the rolled dough onto a pizza peel or a baking sheet lined with parchment paper.
- Sauce and Cheese: Spread the pizza sauce evenly over the dough, leaving a small border around the edges for the crust. Sprinkle the shredded mozzarella cheese evenly over the sauce.
- Create Spider Toppings: To make olive spiders, cut some whole black olives in half for the spider bodies. Use additional olives to slice thin legs. Place spider bodies and legs strategically on top of the cheese, creating as many spiders as you like. Add pepperoni slices if desired for extra flavor.
- Season and Bake: Sprinkle oregano and garlic powder over the pizza for added flavor. Carefully transfer the pizza onto the hot pizza stone or place the baking sheet in the oven. Bake for 10-12 minutes, or until the crust is golden and the cheese is bubbly and slightly browned.
- Cool and Serve: Remove the pizza from the oven and let it cool for a couple of minutes. Slice the pizza and serve warm, allowing guests to enjoy their spooky creations.
Extra Tips: For a crispier crust, consider pre-baking the pizza dough for 5 minutes before adding toppings. If you prefer more toppings, feel free to add additional ingredients like bell peppers or mushrooms, but keep in mind that overload can make the pizza soggy.
To make the pizza-making process more interactive, you can also let kids design their own spiders with olives and other toppings. This recipe is versatile, so have fun experimenting with various ingredients to suit your taste and theme!
Ghostly Popcorn Balls

Get ready to spook your taste buds with these delicious Ghostly Popcorn Balls, perfect for a kid-friendly Halloween potluck. These sweet treats aren’t only fun to make but also a delight to eat, with their marshmallowy goodness holding together popcorn, candy, and a hint of vanilla.
The ghostly appearance makes them an exciting addition to any Halloween party spread, and the combination of textures and flavors will have kids and adults alike coming back for more. Plus, they’re easy to make, requiring minimal prep time, so you can focus on enjoying the festivities.
These Ghostly Popcorn Balls are a fantastic way to involve little helpers in the kitchen. Children will love shaping the sticky mixture into balls and decorating them to resemble spooky ghosts.
You can customize the recipe by adding your favorite candies or even a pinch of salt for a sweet-and-salty twist. This recipe makes enough for 4-6 people, guaranteeing everyone gets a share of these hauntingly delicious treats. So gather your ingredients and prepare for a fun-filled Halloween cooking session!
Ingredients (Serves 4-6):
- 10 cups popped popcorn
- 1/4 cup (1/2 stick) unsalted butter
- 1 package (10 oz) marshmallows
- 1 teaspoon vanilla extract
- 1/4 teaspoon salt
- 1/2 cup mini chocolate chips or candy eyes
- Cooking spray or additional butter for handling
Instructions:
- Pop the Popcorn: Begin by popping your popcorn. You can use an air popper or stovetop method. Once popped, measure out 10 cups and place them in a large mixing bowl. Remember to remove any unpopped kernels.
- Melt the Marshmallows: In a medium saucepan over low heat, melt the unsalted butter. Add the marshmallows and stir continuously until they’re completely melted and smooth. Stir in the vanilla extract and salt until well combined.
- Combine the Mixtures: Pour the marshmallow mixture over the popcorn in the large mixing bowl. Use a spatula to gently fold and coat the popcorn evenly with the marshmallow mixture. Make sure all the popcorn is covered.
- Form the Balls: Lightly spray your hands with cooking spray or coat them with a little butter to prevent sticking. Scoop about 1 cup of the popcorn mixture at a time and form into a ball, pressing gently to hold its shape. Place each ball onto a sheet of wax or parchment paper.
- Decorate the Ghosts: While the popcorn balls are still slightly warm, press mini chocolate chips or candy eyes into each ball to create ghostly faces. Let them cool and set completely before serving.
Extra Tips:
To make the process even easier, consider using pre-popped popcorn or microwave popcorn without butter. If you want to add some variety, try mixing in a handful of your favorite candies or nuts into the popcorn mixture before forming the balls.
This recipe is highly adaptable; just make sure that any added ingredients are bite-sized to maintain the shape of the popcorn balls. Store the finished Ghostly Popcorn Balls in an airtight container to keep them fresh and chewy for your Halloween event.
Pumpkin Patch Brownies
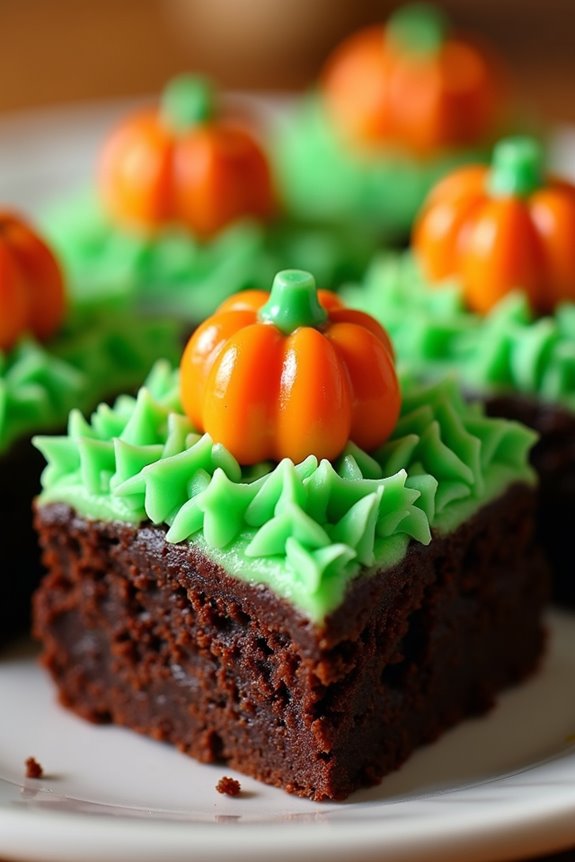
Pumpkin Patch Brownies are a delightful and festive treat perfect for any kid-friendly Halloween potluck. These brownies combine the rich, fudgy texture of a classic brownie with a playful pumpkin patch theme, making them a hit with both kids and adults.
Imagine a moist brownie base topped with green frosting to mimic grass, and decorated with mini pumpkin candies or fondant pumpkins to create a cute edible pumpkin patch. Not only are they visually appealing, but they also offer a delicious taste that embodies the essence of fall, thanks to the subtle hints of cinnamon and nutmeg.
Creating Pumpkin Patch Brownies is a fun and engaging activity that can be enjoyed with children, encouraging creativity and excitement about Halloween. The recipe is straightforward and requires basic baking skills, making it a perfect opportunity for family bonding.
Whether you’re preparing for a school event, a Halloween party, or just a cozy night at home, these brownies are sure to impress. With a serving size that caters to 4-6 people, this recipe is designed to be shared and savored by everyone.
Ingredients (Serving Size: 4-6 people):
- 1 cup unsalted butter
- 2 cups granulated sugar
- 4 large eggs
- 1 teaspoon vanilla extract
- 1 cup all-purpose flour
- 1/2 cup unsweetened cocoa powder
- 1/4 teaspoon salt
- 1/2 teaspoon cinnamon
- 1/4 teaspoon nutmeg
- 1 cup green frosting
- 10-12 mini pumpkin candies or fondant pumpkins
Cooking Instructions:
- Preheat and Prep: Preheat your oven to 350°F (175°C). Grease a 9×9-inch baking pan with butter or non-stick spray and line it with parchment paper for easy removal.
- Melt Butter and Mix: In a microwave-safe bowl or a saucepan, melt the butter. Once melted, transfer to a large mixing bowl and add the sugar. Beat together until well combined.
- Add Eggs and Vanilla: Add the eggs one at a time, mixing well after each addition. Stir in the vanilla extract until the mixture is smooth.
- Combine Dry Ingredients: In a separate bowl, whisk together the flour, cocoa powder, salt, cinnamon, and nutmeg. Gradually add the dry ingredients to the wet mixture, stirring until just combined. Be careful not to overmix.
- Bake: Pour the brownie batter into the prepared baking pan, spreading it evenly. Bake in the preheated oven for 25-30 minutes, or until a toothpick inserted into the center comes out with a few moist crumbs.
- Cool and Decorate: Allow the brownies to cool completely in the pan. Once cooled, spread a layer of green frosting over the top to create the appearance of grass.
- Create the Pumpkin Patch: Decorate the frosted brownies with mini pumpkin candies or fondant pumpkins, arranging them to mimic a pumpkin patch.
Extra Tips:
To enhance the pumpkin patch theme, consider using shredded coconut dyed with green food coloring for a more textured grass effect. If you want to add a bit of crunch, sprinkle crushed pretzels or nuts around the pumpkins to resemble dirt paths.
Remember to let the brownies cool completely before frosting to prevent the frosting from melting. For a personal touch, involve children in the decorating process, allowing them to express their creativity with the pumpkin arrangement.
Witch’s Brew Punch

Witch’s Brew Punch is a delightful and spooky drink that’s perfect for any Halloween gathering, especially when catering to kids. This punch isn’t only fun to make but also a treat to the eyes, with its vibrant colors and bubbling effect. The punch is non-alcoholic, making it suitable for children, and it’s filled with fruity flavors that are certain to be a hit with everyone at the party.
To create this magical concoction, you’ll need a few simple ingredients that can easily be found at your local grocery store. The blend of juices and soda gives the punch a revitalizing taste, while the addition of gummy worms and other fun garnishes adds a playful touch. This recipe serves 4-6 people, making it ideal for a small gathering or as part of a larger potluck spread.
Ingredients:
- 4 cups of pineapple juice
- 2 cups of orange juice
- 2 cups of lemon-lime soda
- 1 cup of grape juice
- 1 cup of ginger ale
- 1 cup of gummy worms
- 1 lime, sliced
- Ice cubes
Instructions:
- Prepare the Base: In a large punch bowl, combine the pineapple juice, orange juice, and grape juice. Stir the mixture well to confirm all the juices are thoroughly mixed.
- Add the Fizz: Slowly pour in the lemon-lime soda and ginger ale. Be gentle to preserve the carbonation, which gives the punch its delightful fizz and bubbly appearance.
- Chill the Punch: Add a generous amount of ice cubes to the punch bowl to keep the drink cold. The ice will also help maintain the carbonation longer.
- Garnish: Add the gummy worms on top of the punch. They’ll float and create a whimsical, spooky effect. Finish with lime slices for a pop of color and additional flavor.
- Serve: Ladle the punch into individual cups, ensuring each serving gets a gummy worm or two for an extra spooky surprise.
Extra Tips:
For an even spookier effect, serve the punch in a cauldron-style bowl to enhance the witchy theme. You can also add dry ice to the punch bowl for a foggy, magical effect, but make sure to handle it carefully and remove it before serving to confirm safety.
Experiment with different types of gummy candies to add variety and more colors to your punch.
Creepy Caramel Apples
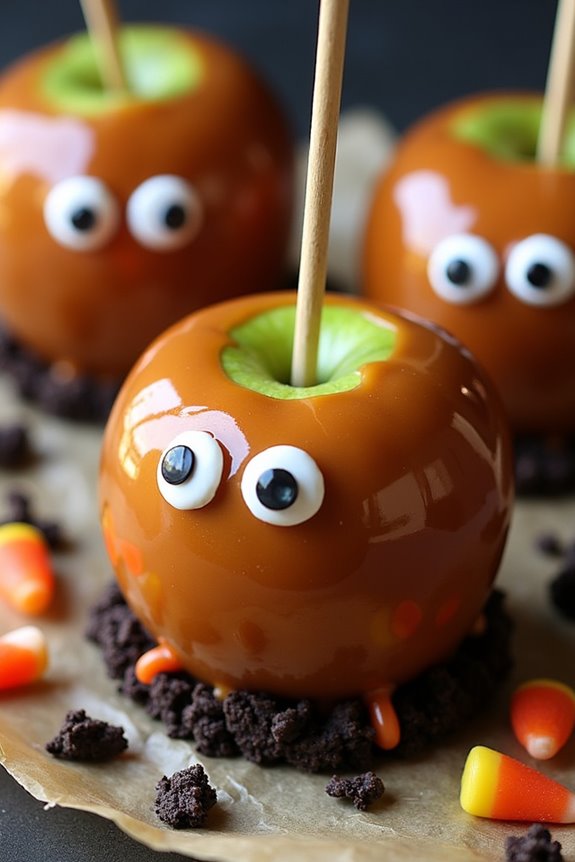
Celebrate Halloween with a frightfully fun treat that’s perfect for a kid-friendly potluck: Creepy Caramel Apples. These deliciously eerie delights are sure to be a hit with both children and adults alike as they combine the classic taste of caramel apples with a spooky twist.
Perfect for satisfying those sweet-tooth cravings, these treats also offer a creative opportunity for families to enjoy some festive fun together in the kitchen.
Creepy Caramel Apples aren’t only a visual treat but also an explosion of sweet and tart flavors. The crispness of the apples pairs wonderfully with the gooey, rich caramel coating.
For an extra spooky touch, these apples are decorated with edible eyes, gummy worms, and other ghoulish garnishes that will delight and frighten at your Halloween gathering. This recipe is designed to serve 4-6 people, making it ideal for sharing at your next festive event.
Ingredients (Serving Size: 4-6 people):
- 4-6 medium-sized apples (Granny Smith or Honeycrisp)
- 1 1/2 cups store-bought caramel sauce or homemade caramel
- 1 tablespoon heavy cream
- 4-6 wooden sticks
- 1/2 cup mini chocolate chips or candy melts (white, black, or colored)
- Edible candy eyes
- Assorted gummy worms, candy corn, or other Halloween-themed candies
- 1/4 cup crushed Oreos or chocolate cookie crumbs
- Parchment paper
Cooking Instructions:
- Prepare the Apples:
- Begin by washing and thoroughly drying the apples to remove any waxy residue. This guarantees the caramel adheres properly. Insert a wooden stick into the top of each apple, pushing down until secure.
- In a medium saucepan, heat the caramel sauce over low heat, stirring occasionally. Add the heavy cream and continue stirring until the mixture is smooth and fully combined. This will create a luscious, creamy consistency.
- Dip each apple into the melted caramel, turning to coat evenly. Allow any excess caramel to drip back into the saucepan. Place the coated apples on a parchment-lined baking sheet.
- While the caramel is still warm, press edible candy eyes onto the apples to create a spooky face. Add gummy worms and other candies, pressing gently so they adhere. Sprinkle crushed Oreos or chocolate cookie crumbs around the base for an extra eerie effect.
- Transfer the decorated apples to the refrigerator for about 15-20 minutes to allow the caramel to set completely. This will help the decorations stay in place.
- 6 cups rice cereal
- 4 cups mini marshmallows
- 3 tablespoons butter
- Green food coloring
- 1 cup chocolate melts or chocolate chips
- 12 candy eyes
- Black icing gel
- 6 pretzel sticks
Extra Tips:
To prevent the caramel from sliding off the apples, verify that the apples are completely dry before dipping. If the caramel cools too much during decoration, simply reheat it gently over low heat to regain its smooth consistency.
For an extra spooky touch, try using black or dark-colored candy melts to drizzle over the apples, creating a cobweb effect. Remember, creativity is key, so feel free to experiment with different toppings and designs to suit your Halloween theme!
Frankenstein Rice Krispie Treats
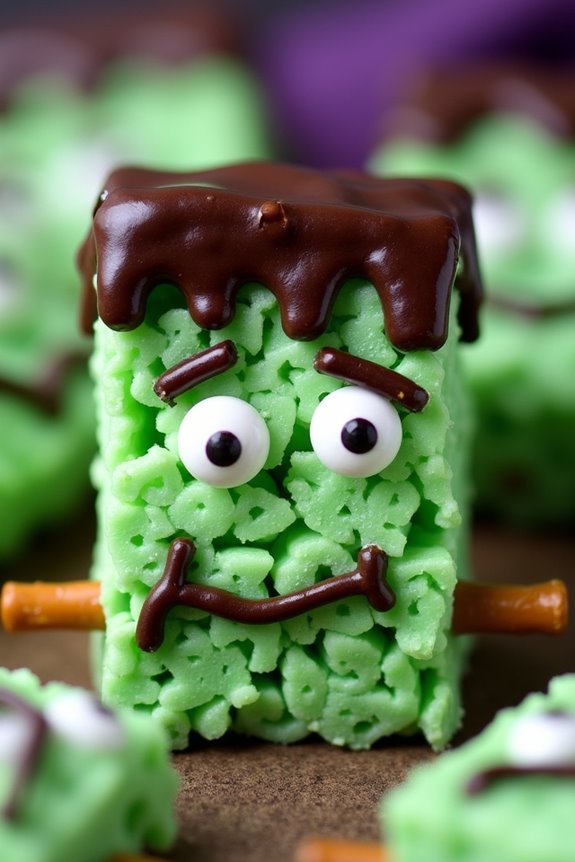
Frankenstein Rice Krispie Treats are a spooktacular addition to any Halloween potluck, providing a mix of fun and fright that both kids and adults will enjoy.
These ghoulishly delightful snacks are simple to make and allow for creative decoration, making them a great activity for the entire family. The combination of crispy rice cereal, gooey marshmallow, and vibrant green coloring brings the classic Frankenstein monster to life in a deliciously sweet form.
Perfect for serving 4-6 people, these treats are ideal for a small gathering or as a part of a larger dessert spread. The treat’s whimsical appearance makes them a hit at any Halloween event, and their familiar flavors guarantee they appeal to even the pickiest eaters.
Whether you’re aiming to impress with your culinary creativity or simply offer a tasty snack, Frankenstein Rice Krispie Treats are a must-have for your Halloween festivities.
Ingredients:
Instructions:
- Prepare the Base: Begin by greasing a 9×13-inch baking dish with butter or non-stick spray. This will prevent the treats from sticking to the dish later on.
- Melt the Marshmallows: In a large saucepan, melt 3 tablespoons of butter over low heat. Once melted, add the mini marshmallows and stir continuously until completely melted and smooth.
- Add Color: Stir in green food coloring into the melted marshmallow mixture until you achieve a vibrant shade of green that resembles Frankenstein’s skin.
- Combine with Cereal: Remove the saucepan from heat and quickly add the rice cereal, stirring until the cereal is evenly coated with the green marshmallow mixture.
- Transfer to Dish: Pour the mixture into the prepared baking dish. Using a buttered spatula, press the mixture evenly into the dish. Allow it to cool and set for about 30 minutes.
- Cut and Shape: Once set, cut the rice krispie treats into rectangles. The size can be adjusted based on your preference, but they should ideally be around 3×2 inches for easy handling.
- Melt Chocolate: Melt the chocolate melts or chocolate chips in a microwave-safe bowl, microwaving in 30-second intervals and stirring in between, until smooth.
- Decorate: Dip one end of each rectangle in the melted chocolate to create Frankenstein’s hair. While the chocolate is still wet, place two candy eyes below the hairline.
- Add Details: Use the black icing gel to draw a mouth and add scars or stitches to Frankenstein’s face. Break the pretzel sticks in half and insert one on each side of the treat to represent bolts.
- Set and Serve: Allow the chocolate and icing to fully set before serving. Arrange them on a platter for a spooky presentation.
Extra Tips: Confirm that the marshmallow mixture is still warm when adding the food coloring for easier blending.
You can adjust the intensity of the green color by adding more or less food coloring as desired. If you find the mixture sticking to your hands or utensils, lightly butter them to help press and shape the treats.
For added flavor, consider using flavored rice cereal or incorporating a teaspoon of vanilla extract to the marshmallow mixture before adding the cereal.
Vampire Veggie Platter
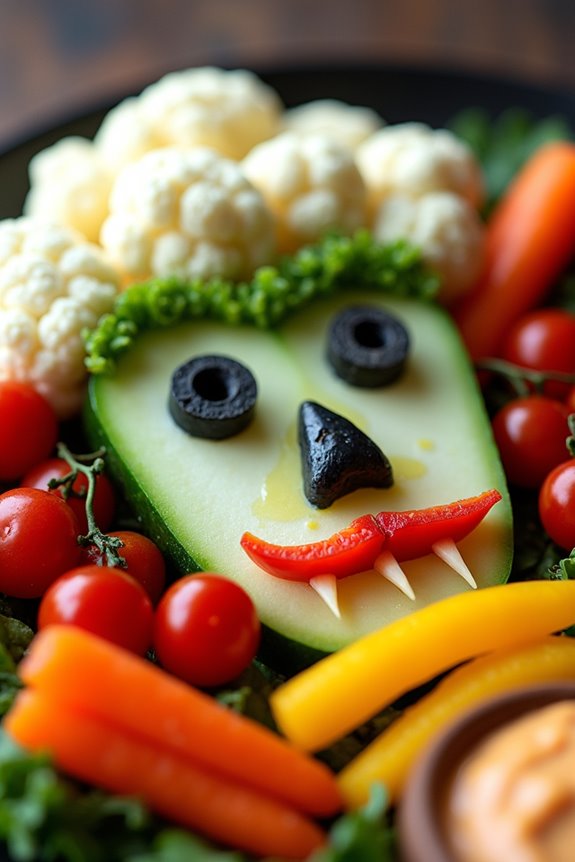
Halloween is a time for spooky fun, and what better way to add a little fright to your festivities than with a Vampire Veggie Platter? This dish is perfect for a Halloween potluck, offering a healthy snack option that’s both visually appealing and delicious. The platter is designed to look like a vampire’s face, complete with fangs and a blood-red mouth, using a variety of fresh vegetables. Not only is this platter a hit with kids, but it also promotes them to eat their veggies, making it a win-win for parents and party hosts alike.
The key to creating an impressive Vampire Veggie Platter is in the arrangement of colorful vegetables to form the different facial features. Start with a large serving tray or platter as your canvas. Then, use vegetables like cherry tomatoes, red bell peppers, cucumbers, carrots, and cauliflower to craft the vampire’s face. This not only provides a vibrant palette but also guarantees that each bite is packed with vitamins and nutrients. Serve with a side of your favorite dip, like hummus or ranch, to add even more flavor to this ghoulishly good dish.
Ingredients for a Vampire Veggie Platter (Serving Size: 4-6 people)
- 1 large head of cauliflower
- 1 large cucumber
- 1 red bell pepper
- 1 yellow bell pepper
- 1 carton of cherry tomatoes
- 2 medium carrots
- 1 small bunch of green onions
- 1 cup of hummus or ranch dip
- 4 large black olives
Instructions
- Prepare the Vegetables: Begin by washing all the vegetables thoroughly under running water. Pat them dry with a clean kitchen towel to remove any excess moisture.
- Create the Vampire’s Face: On a large serving platter, arrange the cauliflower florets at the top to form the vampire’s hair. Use a few black olives to give the hair some depth and texture.
- Eyes and Eyebrows: Slice the cucumber into rounds and use two slices for the eyes. Place a black olive slice in the center of each cucumber slice to mimic the pupils. Slice the green onions into small pieces and arrange them above the cucumber slices to form eyebrows.
- Nose and Cheeks: Cut the red bell pepper into thin strips. Use a small piece to create the nose, placing it between the eyes. Arrange cherry tomatoes on either side of the nose to give the vampire rosy cheeks.
- Mouth and Fangs: Slice the yellow bell pepper into a long strip to form the mouth. Cut small triangles from the red bell pepper to create the fangs and position them inside the mouth strip for a toothy grin.
- Final Touches: Slice the carrots into thin sticks and place them around the platter to add a pop of color. Serve with a bowl of hummus or ranch dip on the side for dipping.
Extra Tips
When arranging the Vampire Veggie Platter, consider using a round platter to give the face a natural shape. You can also use additional vegetables like radishes or small pickles for added variety and color. If you have more time, consider blanching the cauliflower briefly to enhance its color and make it more tender.
Goblin Goulash
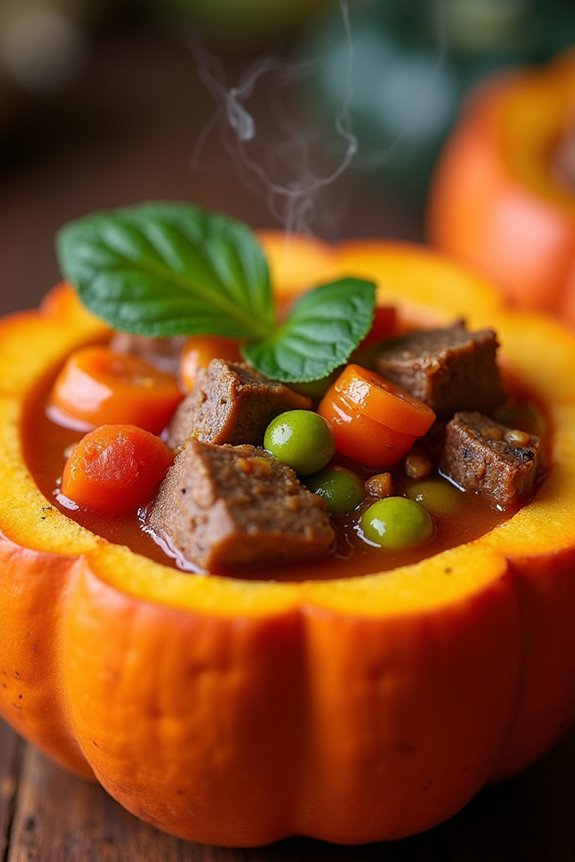
Goblin Goulash is a fun and spooky dish perfect for a Halloween potluck, delighting kids with its playful name and rich flavors. This hearty stew combines tender beef, colorful vegetables, and a savory tomato sauce, creating a comforting, filling meal that will keep little goblins satisfied. The playful presentation and delicious taste will make it a hit among both kids and adults at any Halloween gathering.
The beauty of Goblin Goulash lies in its versatility and ease of preparation. Using simple ingredients, you can whip up a batch that serves 4-6 people, making it ideal for sharing. This dish not only provides a warm, nourishing meal for chilly autumn nights but also offers an opportunity for creativity in the kitchen.
With Halloween in mind, consider serving the goulash in hollowed-out mini pumpkins or cauldrons to enhance the spooky theme even further.
Ingredients for 4-6 servings:
- 1 1/2 pounds beef stew meat, cut into 1-inch cubes
- 2 tablespoons olive oil
- 1 onion, chopped
- 2 cloves garlic, minced
- 1 bell pepper, chopped (any color)
- 1 carrot, sliced
- 1 can (14.5 oz) diced tomatoes
- 1 cup beef broth
- 2 tablespoons tomato paste
- 1 teaspoon paprika
- 1 teaspoon dried oregano
- Salt and pepper to taste
- 1 cup frozen peas
- 1 tablespoon flour (optional, for thickening)
- Cooked egg noodles or rice, for serving
Cooking Instructions:
- Brown the Beef: In a large pot or Dutch oven, heat the olive oil over medium-high heat. Add the beef stew meat and sear on all sides until browned. This should take about 5-7 minutes. Remove the beef from the pot and set it aside.
- Sauté Vegetables: In the same pot, add the chopped onion and minced garlic. Sauté for 2-3 minutes until the onion becomes translucent and fragrant.
- Add Vegetables and Seasoning: Add the chopped bell pepper and sliced carrot to the pot, cooking for another 3-4 minutes. Stir in the diced tomatoes, beef broth, tomato paste, paprika, oregano, salt, and pepper.
- Simmer the Goulash: Return the browned beef to the pot, stirring to combine everything. Bring the mixture to a boil, then reduce the heat to low. Cover the pot and let it simmer for about 1 1/2 to 2 hours, or until the beef is tender.
- Add Peas and Thicken (Optional): In the last 15 minutes of cooking, stir in the frozen peas. If you prefer a thicker goulash, mix the flour with a small amount of water to create a slurry and stir it into the pot.
- Serve: Once the goulash has reached your desired consistency and the beef is tender, remove from heat. Serve over cooked egg noodles or rice for a complete meal.
Extra Tips:
For a more festive presentation, serve the Goblin Goulash in hollowed-out mini pumpkins or decorative cauldrons to enhance the Halloween theme. If you want to add more veggies or adjust the seasoning to taste, feel free to do so—goulash is incredibly adaptable.
If you’re preparing this dish ahead of time for a potluck, it’s easy to reheat and will taste even better as the flavors have more time to meld. Enjoy this deliciously spooky dish with your little goblins!
Skeleton Cheese Platter
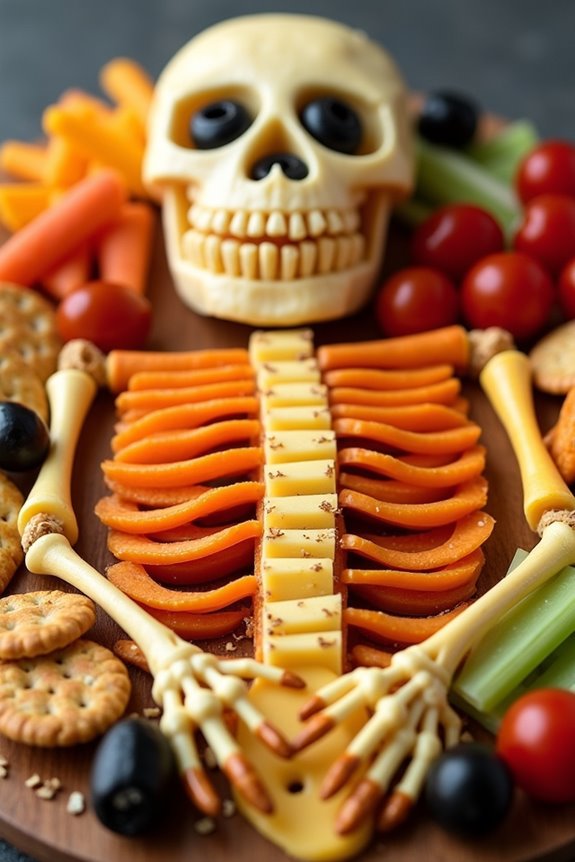
Skeleton Cheese Platter is a fun and spooky addition to any kid-friendly Halloween potluck. This creative platter isn’t only visually appealing but also provides a variety of tasty snacks that kids will love.
Constructing a skeleton out of cheese, crackers, and other delicious goodies will surely be a hit with the little ones, and it’s a great way to motivate them to try different flavors and textures. The platter is easy to assemble and can be customized to suit the tastes of your guests, making it a versatile option for any Halloween gathering.
To create the Skeleton Cheese Platter, you’ll need an assortment of cheeses and snacks to form the different parts of the skeleton. While the head can be created using a round piece of cheese, the body can be represented by rows of sliced cheese and crackers.
Use vegetables like celery sticks, carrots, and olives to make the arms, legs, and eyes. This dish isn’t only about the taste but also about the fun of putting it together. Kids can even help in assembling the platter, which adds to the excitement of the Halloween celebration.
Ingredients for 4-6 People:
- 1 large round piece of cheese (such as Brie or Camembert) for the head
- 1 cup of sliced cheese (various types like cheddar, Swiss, gouda)
- 1 cup of assorted crackers
- 1 cup of pretzel sticks
- 1 cup of celery sticks
- 1 cup of baby carrots
- 1/2 cup of olives (black or green)
- 1/2 cup of cherry tomatoes
- 1/4 cup of almonds or nuts (optional)
Instructions:
- Prepare the Head: Place the large round piece of cheese at the top of a large platter or cutting board to represent the skeleton’s head. Use a small knife to carve out eye sockets and a mouth, filling them with olives for eyes and a strip of carrot for a mouth.
- Create the Spine: Arrange the sliced cheese in a vertical line beneath the head to form the spine. Alternate different types of cheeses for variety.
- Add the Ribcage: Surround the spine with rows of crackers on either side to mimic a ribcage. Confirm that the crackers are placed evenly and neatly for a cohesive look.
- Construct the Arms and Legs: Use pretzel sticks and celery sticks to form the arms and legs. Position them coming out from the ribcage and spine. Use baby carrots at the ends to represent hands and feet.
- Finish with Details: Use olives for the eyes and cherry tomatoes to add pops of color to the platter. You can place them strategically around the platter for added decoration. Finally, sprinkle some almonds or nuts around the platter for added texture.
Extra Tips:
To make your Skeleton Cheese Platter even more appealing, consider using a variety of colorful vegetables and different types of cheese to add visual interest.
Confirm that all the items are bite-sized and easy for kids to pick up and eat. You can also arrange the platter on a themed tablecloth or plate to enhance the Halloween ambiance.
Don’t forget to provide small serving utensils or toothpicks to make it easier for kids to serve themselves. Enjoy the creativity and fun of assembling this spooky yet delicious platter!
Haunted Haystack Cookies
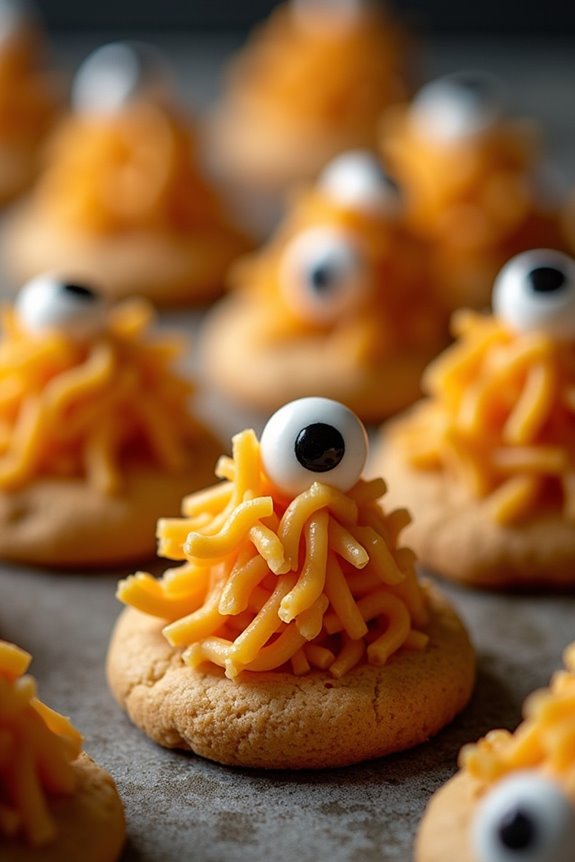
Haunted Haystack Cookies are a spooktacular treat perfect for any Halloween potluck gathering. These no-bake cookies are a delightful combination of crunchy chow mein noodles and creamy butterscotch, providing a satisfying mix of textures and flavors.
Shaped like little haystacks and adorned with creepy candy eyeballs, they’re both fun to make and eat, especially for the little ones. Not only are they easy to prepare, but they also add a touch of whimsy and fright to any Halloween dessert table.
This recipe makes about 24 cookies, which is perfect for serving 4-6 people, allowing each person to enjoy a few cookies. The cookies are quick to assemble, making them an excellent last-minute addition to your Halloween festivities.
With simple ingredients and minimal equipment needed, these Haunted Haystack Cookies are a great recipe for getting kids involved in the kitchen, letting them release their creativity in decorating these spooky snacks.
Ingredients:
- 1 cup butterscotch chips
- 1/2 cup creamy peanut butter
- 3 cups chow mein noodles (dry)
- 1/2 cup mini marshmallows
- Candy eyeballs (approximately 48 pieces)
Instructions:
- Melt the Butterscotch Chips: In a microwave-safe bowl, combine the butterscotch chips and peanut butter. Heat in the microwave on medium power for about 1-2 minutes, stirring every 30 seconds until completely melted and smooth.
- Mix the Ingredients: Once melted, carefully fold in the chow mein noodles and mini marshmallows. Stir until the noodles and marshmallows are thoroughly coated in the butterscotch mixture.
- Form the Haystacks: Line a baking sheet with parchment paper. Using a spoon, scoop small mounds of the mixture onto the parchment, shaping them into haystacks. Each haystack should be about the size of a golf ball.
- Add the Candy Eyeballs: Before the mixture sets, press two candy eyeballs onto each haystack, giving them a haunted appearance.
- Cool the Cookies: Allow the haystack cookies to cool and set completely at room temperature. This should take about 15-20 minutes. Once set, they’re ready to serve.
Extra Tips: To guarantee the butterscotch mixture coats the chow mein noodles evenly, make sure the butterscotch chips and peanut butter are completely melted and smooth before mixing.
If you prefer, you can use white chocolate chips instead of butterscotch for a different flavor profile. If you’re making these cookies ahead of time, store them in an airtight container at room temperature. Avoid refrigerating them as it can make the noodles lose their crunchiness.
Encourage kids to get creative with the decorations—adding colored sprinkles or edible glitter can give your haunted haystacks an extra spooky flair!
Bat Wings With Sweet Dipping Sauce
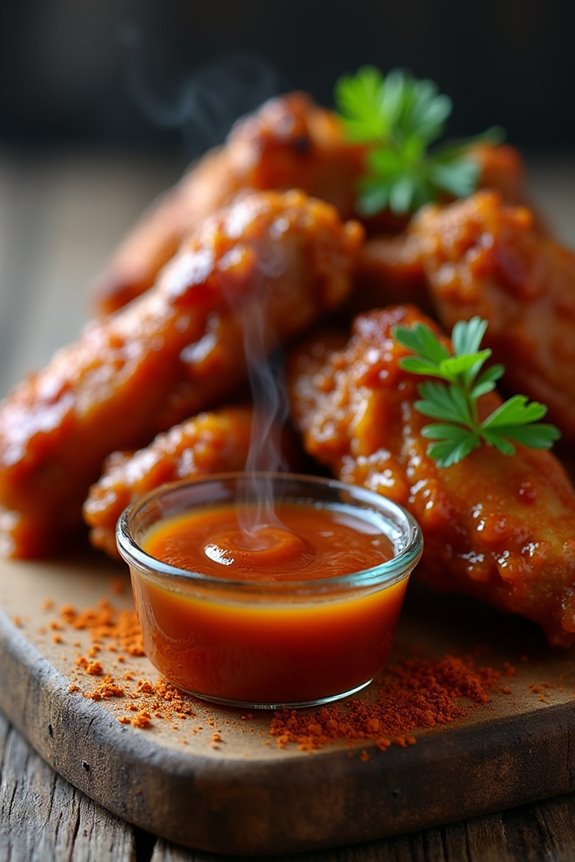
Transform your Halloween potluck into a spooky feast with these delicious Bat Wings With Sweet Dipping Sauce. Perfectly suited for kids and adults alike, this dish offers a fun twist on traditional chicken wings. The wings are seasoned to perfection and baked until crispy, while the sweet dipping sauce adds a delightful contrast to the savory wings. Not only are these bat wings a treat to eat, but they also make for an eye-catching presentation at any Halloween gathering.
The key to making these bat wings extra special is the combination of a flavorful marinade and a sticky, sweet dipping sauce that will have everyone reaching for more. By using simple ingredients that you likely already have in your pantry, you can create a dish that’s both easy to prepare and impressive to serve. This recipe is designed to serve 4-6 people, making it ideal for small get-togethers or as part of a larger Halloween spread.
Ingredients:
- 2 pounds of chicken wings
- 1/4 cup soy sauce
- 1 tablespoon olive oil
- 1 tablespoon honey
- 2 cloves garlic, minced
- 1 teaspoon smoked paprika
- 1/2 teaspoon ground black pepper
- 1/4 teaspoon salt
- 1/2 cup ketchup
- 2 tablespoons brown sugar
- 1 tablespoon apple cider vinegar
- 1 tablespoon Worcestershire sauce
Cooking Instructions:
- Prepare the Marinade: In a large mixing bowl, combine the soy sauce, olive oil, honey, minced garlic, smoked paprika, ground black pepper, and salt. Mix well to confirm all ingredients are thoroughly combined.
- Marinate the Wings: Add the chicken wings to the marinade, confirming each wing is well coated. Cover the bowl with plastic wrap and refrigerate for at least 2 hours, or overnight for best results.
- Preheat the Oven: Preheat your oven to 400°F (200°C). Line a baking sheet with aluminum foil and place a wire rack on top. This will help the wings cook evenly and become crispy.
- Bake the Wings: Arrange the marinated wings on the wire rack, confirming they’re spaced apart. Bake in the preheated oven for 25-30 minutes, turning halfway through, until the wings are cooked through and crispy.
- Make the Dipping Sauce: While the wings are baking, prepare the sweet dipping sauce. In a small saucepan, combine ketchup, brown sugar, apple cider vinegar, and Worcestershire sauce. Cook over medium heat, stirring occasionally, until the sugar dissolves and the sauce thickens slightly, about 5-7 minutes.
- Serve: Once the wings are done, remove them from the oven and let them cool slightly. Serve the wings with the sweet dipping sauce on the side for a fun and tasty Halloween treat.
Extra Tips:
For an extra crispy texture, you can broil the wings for an additional 3-5 minutes after baking. Keep a close watch to prevent burning.
If you prefer a spicier version, consider adding a pinch of cayenne pepper or a dash of hot sauce to the marinade.
When making the dipping sauce, adjust the sweetness by adding more or less brown sugar according to your taste preference.
Finally, for a more festive appearance, use food-safe black coloring to tint the marinade, giving the wings a darker, bat-like appearance.
Zombie Finger Breadsticks

Zombie Finger Breadsticks are a spooky and delicious addition to any kid-friendly Halloween potluck, offering a fun way to get into the spirit of the holiday. These breadsticks are shaped to resemble creepy, yet appetizing zombie fingers that are sure to catch both the eyes and taste buds of young trick-or-treaters. Made from simple ingredients, they can be whipped up in no time, providing a perfect balance of flavor and fright.
Crafting these eerie breadsticks involves a few straightforward steps, making it an ideal recipe for involving kids in the kitchen. Not only is the process fun, but the end result is a crunchy, savory treat that pairs wonderfully with a bowl of marinara sauce or a spooky-themed dip. Whether served as an appetizer or a side dish, Zombie Finger Breadsticks are sure to be a hit at your Halloween gathering.
Ingredients for 4-6 servings:
- 1 package of refrigerated pizza dough
- 24 whole almonds
- 1 tablespoon of olive oil
- 1 teaspoon of garlic powder
- 1 teaspoon of dried oregano
- Red food coloring (optional)
- Salt to taste
Cooking Instructions:
- Prepare the Dough: Preheat your oven to 375°F (190°C). Roll out the refrigerated pizza dough onto a lightly floured surface to prevent sticking. Cut the dough into 24 equal strips, each about 4 inches long. These will form the base of your zombie fingers.
- Shape the Fingers: Gently roll each dough strip between your hands to form a finger-like shape, tapering one end to form a tip. Make sure the fingers aren’t too thin, as they’ll expand slightly during baking.
- Create the Nail Bed: Press a whole almond firmly into the tapered end of each dough finger to resemble a fingernail. The almond should stick into the dough, but if it doesn’t, lightly moisten the back of the almond with water to help it adhere.
- Add Details: Lightly score the dough with a small knife to create knuckle lines and wrinkles. This will give your breadsticks a more realistic finger appearance.
- Season the Fingers: In a small bowl, mix olive oil, garlic powder, dried oregano, and salt. Brush this mixture over each finger to add flavor. For an extra spooky touch, use a small brush to paint the almond “nails” with a bit of red food coloring for a bloodied effect.
- Bake the Breadsticks: Place the shaped and seasoned dough fingers on a baking sheet lined with parchment paper. Bake in the preheated oven for about 15-20 minutes, or until the breadsticks are golden brown and cooked through.
- Serve: Remove the breadsticks from the oven and allow them to cool slightly before serving. These can be enjoyed warm or at room temperature, paired with a dipping sauce of your choice.
Extra Tips:
For an added layer of flavor, consider infusing the olive oil with fresh herbs or spices before brushing it on the dough. If you’re planning on making these for a party, prepare the dough fingers in advance and store them in the refrigerator until you’re ready to bake. This will save you time on the day of your event.
Additionally, if almonds are a concern due to allergies, sunflower seeds can be used as a nut-free alternative for the “nails.”