
As Halloween draws near, my thoughts turn to the delightfully spooky treats we can create with our little ones. Creepy-crawly chocolate bark and ghostly meringue treats are just the beginning of our festive fun. There’s something magical about tiny hands and big imaginations coming together in the kitchen. And let’s not forget about those adorable mummy hot dog wraps. A cauldron full of ideas is bubbling up, just waiting to be explored!
Spooky Spider Cupcakes
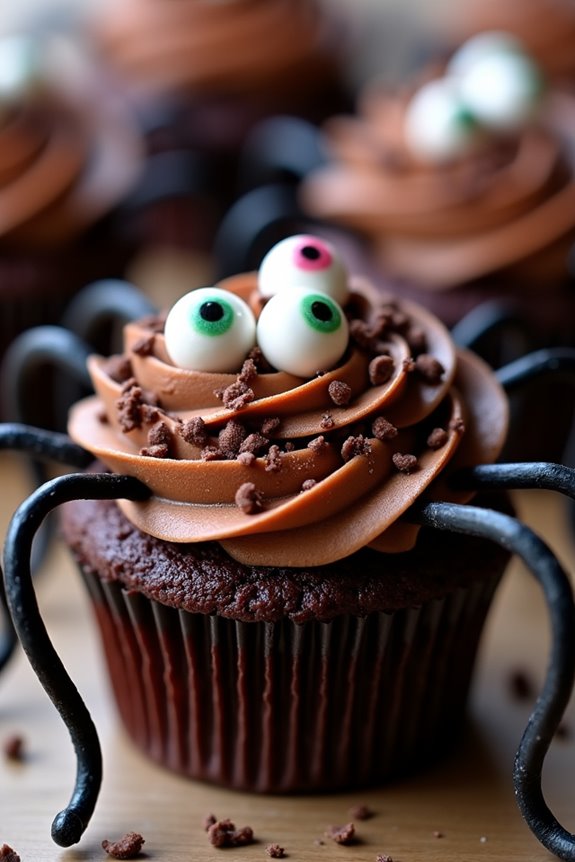
Get ready to add a dose of creepy-crawly fun to your Halloween celebrations with these Spooky Spider Cupcakes. Ideal for a kid-friendly baking session, these cupcakes aren’t only delicious but also a creative outlet for little bakers. With a rich chocolate base and chocolate frosting, these cupcakes transform into cute spiders with the help of some clever decorations. Perfect for a Halloween party or just a fun family activity, these cupcakes are sure to be a hit with both kids and adults alike.
Preparing these Spooky Spider Cupcakes is as much about the process as it’s about the final product. The recipe is straightforward yet engaging, allowing kids to get hands-on with mixing, baking, and decorating. The decorations can be adapted to whatever candy or sprinkles you have on hand, making each spider a unique creation. Whether you’re a seasoned baker or a beginner, these cupcakes are simple to whip up and offer endless possibilities for customization.
Ingredients (Serves 4-6):
- 1 cup all-purpose flour
- 1/2 cup unsweetened cocoa powder
- 1 teaspoon baking powder
- 1/2 teaspoon baking soda
- 1/4 teaspoon salt
- 1/2 cup unsalted butter, softened
- 1 cup granulated sugar
- 2 large eggs
- 1 teaspoon vanilla extract
- 1/2 cup whole milk
- 1 cup chocolate frosting
- 1/2 cup chocolate sprinkles
- 24 black licorice strings
- 12 candy eyeballs
Cooking Instructions:
- Preheat the Oven: Begin by preheating your oven to 350°F (175°C). Line a 12-cup muffin tin with cupcake liners to prepare for the batter.
- Mix Dry Ingredients: In a medium-sized bowl, whisk together the flour, cocoa powder, baking powder, baking soda, and salt. This will guarantee that all dry ingredients are evenly distributed.
- Cream Butter and Sugar: In a separate large bowl, use an electric mixer to cream the butter and sugar together until light and fluffy. This should take about 3-4 minutes.
- Add Eggs and Vanilla: Beat in the eggs one at a time, making sure each one is fully incorporated before adding the next. Then, mix in the vanilla extract.
- Combine Wet and Dry Ingredients: Gradually add the dry ingredient mixture to the creamed butter and sugar, alternating with the milk. Start and end with the dry ingredients, mixing until just combined.
- Fill and Bake: Divide the batter evenly among the cupcake liners, filling each about two-thirds full. Bake in the preheated oven for 18-20 minutes, or until a toothpick inserted into the center of a cupcake comes out clean.
- Cool and Frost: Allow the cupcakes to cool in the tin for about 5 minutes before transferring them to a wire rack to cool completely. Once cooled, spread a generous amount of chocolate frosting on each cupcake.
- Decorate: Cover each frosted cupcake with chocolate sprinkles. Cut the licorice strings into small pieces to form eight legs per cupcake. Insert four licorice pieces on each side of the cupcakes. Add two candy eyeballs on top to complete the spider look.
Extra Tips:
When baking these Spooky Spider Cupcakes, make sure to let the cupcakes cool completely before frosting to prevent the frosting from melting. If you’re making these cupcakes in advance, store them in an airtight container once cooled to keep them fresh.
For a fun variation, try using different colored frosting or candy eyes to give each spider its own personality. If you’re short on time, you can use a store-bought cake mix and frosting as a shortcut. Enjoy your creepy, delicious creations!
Monster Marshmallow Pops
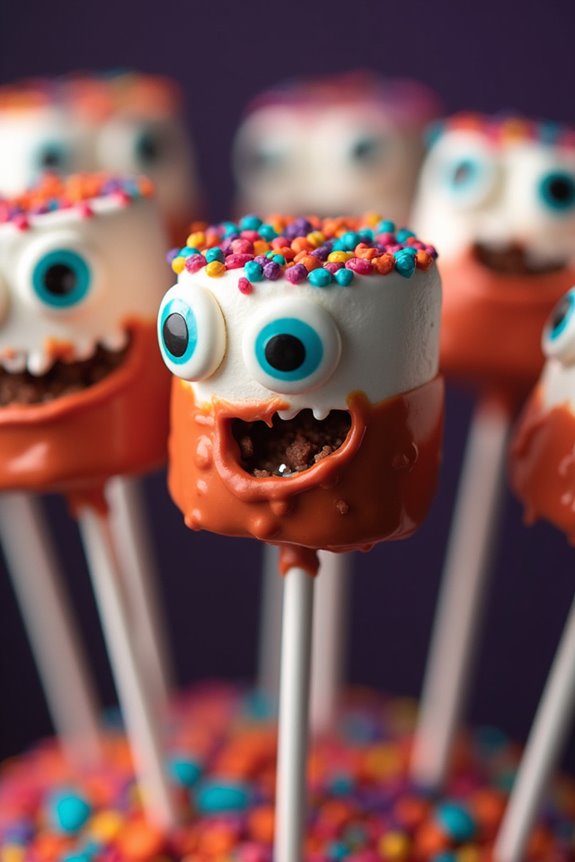
Monster Marshmallow Pops are a delightful and whimsical treat perfect for Halloween festivities. These colorful and spooky creations are sure to captivate kids and adults alike with their vibrant decorations and sweet, gooey centers. They’re simple to make and provide an excellent opportunity for little chefs to get involved in the kitchen. The combination of fluffy marshmallows, creamy chocolate, and an array of fun toppings makes these pops a delightful addition to any Halloween party spread.
These Monster Marshmallow Pops aren’t only visually appealing but also incredibly delicious. The process of making them is straightforward, requiring minimal cooking skills, which makes them an ideal activity for children. With a bit of supervision, kids can release their creativity by personalizing their marshmallow monsters using an assortment of edible decorations. This recipe is designed to serve 4-6 people, offering a fun and interactive way to celebrate Halloween with family and friends.
Ingredients for Monster Marshmallow Pops (serving size: 4-6 people):
- 12 large marshmallows
- 1 cup semi-sweet chocolate chips
- 1 tablespoon coconut oil (or vegetable oil)
- 12 lollipop sticks
- Assorted candy eyes
- Assorted colored sanding sugar
- Mini chocolate chips
- Assorted colored candy melts (optional)
- Sprinkles
- Edible glitter (optional)
Cooking Instructions:
- Prepare the Workstation: Set up a clear workspace by placing parchment paper on a large baking sheet. This will serve as a setting area for the decorated marshmallows to dry.
- Melt the Chocolate: In a microwave-safe bowl, combine the semi-sweet chocolate chips and coconut oil. Microwave in 30-second intervals, stirring in between, until the chocolate is fully melted and smooth.
- Insert Lollipop Sticks: Insert a lollipop stick halfway into each marshmallow, ensuring it’s secure and stable.
- Dip the Marshmallows: Holding the stick, dip each marshmallow into the melted chocolate, covering it completely. Allow any excess chocolate to drip off before placing it onto the prepared parchment paper.
- Decorate the Marshmallows: While the chocolate is still wet, decorate each marshmallow with candy eyes, mini chocolate chips, and sprinkles to create monster faces. You can also dip the tops in colored sanding sugar for added color.
- Create Monster Details: If desired, melt assorted colored candy melts and use them to add additional monster features like hair, scales, or patterns on the marshmallows.
- Allow to Set: Let the decorated marshmallows sit at room temperature until the chocolate is fully set. This may take about 30 minutes.
- Serve and Enjoy: Once set, your Monster Marshmallow Pops are ready to serve. Display them in a fun arrangement for an eye-catching Halloween treat.
Extra Tips:
To make the Monster Marshmallow Pops even more engaging, consider setting up a decorating station with various toppings and decorations for kids to choose from. Encourage them to get creative with their monster designs by mixing and matching different candies and colors.
If you’re making these ahead of time, store them in an airtight container at room temperature to keep them fresh. Finally, if you prefer a different flavor profile, try using white chocolate or dark chocolate instead of semi-sweet chocolate for coating the marshmallows.
Witch Hat Cookies

Witch Hat Cookies are the perfect spooky treat to bake with kids during Halloween! These delightful cookies not only look adorable but also taste delicious. The fun and easy-to-follow recipe encourages creativity, making it an engaging activity for the whole family.
With just a few simple ingredients, you can craft these magical treats that will be a hit at any Halloween party or gathering.
The base of these cookies is a soft, buttery sugar cookie, which is topped with a chocolate kiss to create the point of the witch’s hat. The finishing touch is a band made of colorful icing, which adds a pop of color and holds the chocolate kiss in place. This recipe yields enough to serve 4-6 people, allowing everyone to indulge in a sweet, whimsical treat.
Ingredients (Serving Size: 4-6 people):
- 1 cup unsalted butter, softened
- 1 cup granulated sugar
- 1 large egg
- 1 teaspoon vanilla extract
- 2 ½ cups all-purpose flour
- 1 teaspoon baking powder
- ¼ teaspoon salt
- 1 bag of chocolate kisses (approximately 20-24 pieces)
- 1 tube of orange or purple icing (or any Halloween-themed color)
Instructions:
- Prepare the Dough: In a large mixing bowl, cream together the softened butter and granulated sugar until light and fluffy. Add the egg and vanilla extract, mixing well until fully incorporated.
- Combine Dry Ingredients: In a separate bowl, whisk together the all-purpose flour, baking powder, and salt. Gradually add the dry ingredients to the wet ingredients, mixing on low speed until a smooth dough forms.
- Chill the Dough: Divide the dough in half, shape into discs, and wrap in plastic wrap. Refrigerate for at least 1 hour to firm up the dough, making it easier to handle.
- Preheat and Roll: Preheat your oven to 350°F (175°C). Line a baking sheet with parchment paper. Roll out one disc of dough on a lightly floured surface to a 1/4-inch thickness.
- Cut and Bake: Using a round cookie cutter (approximately 2-3 inches in diameter), cut out circles from the dough and place them on the prepared baking sheet. Bake for 8-10 minutes, or until the edges are lightly golden. Allow the cookies to cool on the baking sheet for a few minutes before transferring to a wire rack.
- Assemble the Witch Hats: Once the cookies are completely cooled, pipe a small dot of icing in the center of each cookie. Press a chocolate kiss onto the icing dot, allowing the icing to act as glue. Then, pipe a band of icing around the base of each chocolate kiss to complete the witch hat look.
Extra Tips:
When making Witch Hat Cookies, it’s important to make sure that the cookies are completely cooled before assembling. This prevents the chocolate kisses from melting and losing their shape.
If desired, let the kids get involved by allowing them to pipe the icing and place the chocolate kisses. This hands-on activity enhances their experience and makes the process even more enjoyable.
Additionally, you can experiment with different colored icings and sprinkles for added decoration and fun.
Ghostly Meringue Treats
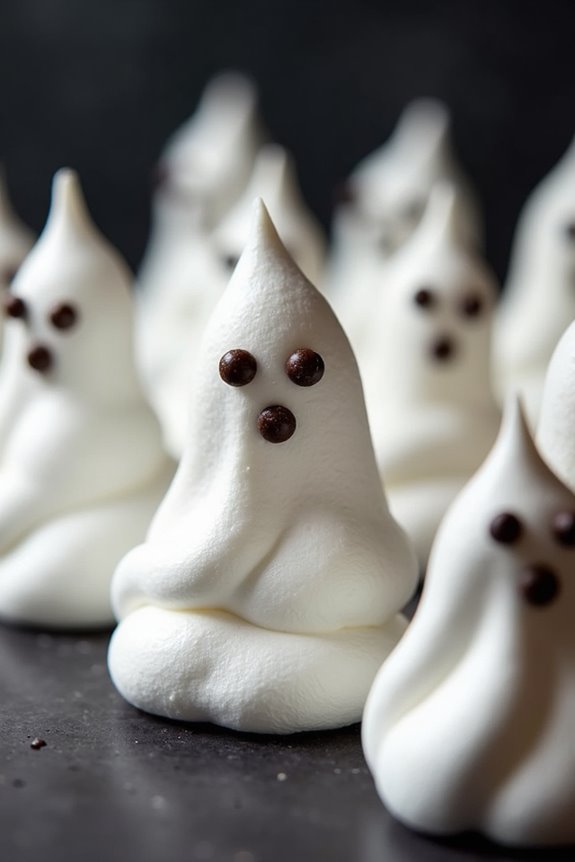
Ghostly Meringue Treats are a delightful and spooky addition to your Halloween festivities. These light and airy confections are perfect for children, both regarding taste and fun. With their ghostly appearance and sweet flavor, they’re sure to be a hit at any Halloween party. Plus, making them is a great way to involve kids in the kitchen, as the recipe is simple enough for little hands to help with.
Whether you’re looking for a unique treat to share or a fun project to do together as a family, Ghostly Meringue Treats fit the bill perfectly. These meringue treats aren’t only visually appealing but also melt in your mouth with every bite. The key to achieving the perfect meringue is all in the technique, ensuring you get that classic crisp exterior with a soft interior.
With just a few ingredients, you can whip up these ghostly figures in no time. The best part? You can get creative with their faces, making each ghost a unique character by using chocolate chips or edible markers to give them personality. This recipe serves 4-6 people, making it ideal for a small gathering or family dessert.
Ingredients:
- 4 large egg whites
- 1 cup granulated sugar
- 1/4 teaspoon cream of tartar
- 1 teaspoon vanilla extract
- Mini chocolate chips or edible markers for decorating
Instructions:
- Preheat and Prepare: Preheat your oven to 225°F (110°C). Line two baking sheets with parchment paper to prevent the meringues from sticking.
- Beat the Egg Whites: In a large mixing bowl, using an electric mixer, beat the egg whites on medium speed until foamy. Add the cream of tartar and continue to beat until soft peaks form.
- Add Sugar Gradually: Increase the mixer speed to high and add the granulated sugar gradually, about one tablespoon at a time. Beat until the sugar is fully dissolved, and the meringue holds stiff, glossy peaks.
- Flavor the Meringue: Gently fold in the vanilla extract, being careful not to deflate the meringue.
- Shape the Ghosts: Transfer the meringue to a piping bag fitted with a large round tip. Pipe ghost shapes onto the prepared baking sheets, pulling the tip up to form a peak at the top of each ghost.
- Decorate the Faces: Gently press mini chocolate chips into the meringue ghosts to create eyes and mouths, or wait until after baking to draw faces using edible markers.
- Bake: Place the baking sheets in the oven and bake for about 1.5 to 2 hours, or until the meringues are dry to the touch and easily lift off the parchment paper. Turn off the oven and let the meringues cool completely inside to prevent cracking.
- Serve and Enjoy: Once cooled, serve your Ghostly Meringue Treats immediately or store them in an airtight container for up to a week.
Extra Tips:
Ensure that your mixing bowl and beaters are completely clean and dry before you start, as any grease or moisture can prevent the egg whites from whipping properly. It’s also important to add the sugar gradually to achieve a smooth texture, and to bake the meringues at a low temperature to avoid browning.
If you don’t have a piping bag, you can use a plastic bag with the corner snipped off. Have fun with the decorations—let the kids’ creativity shine by giving each ghost its own unique expression!
Frankenstein Rice Krispie Bars
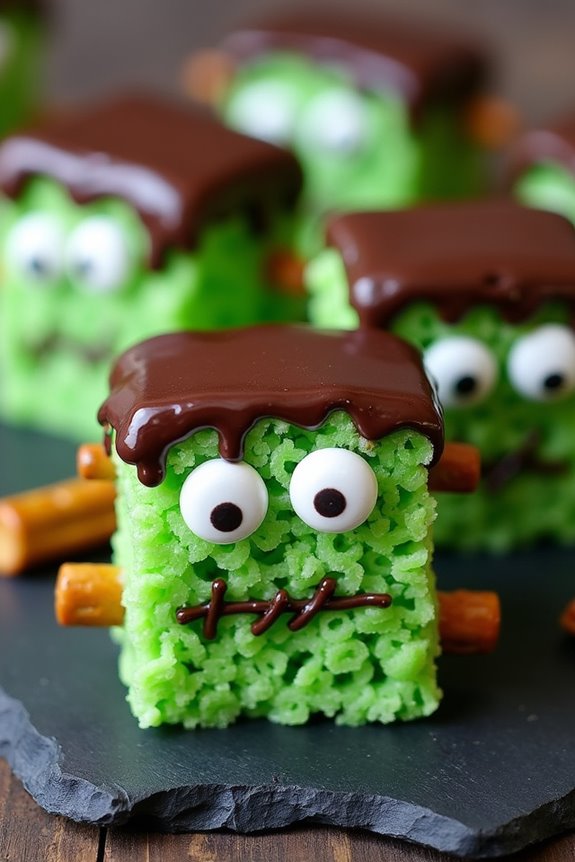
Frankenstein Rice Krispie Bars are a spooktacular treat that’s perfect for Halloween festivities and a hit with kids and adults alike. These deliciously ghoulish bars are made with classic Rice Krispies, but with a monstrous twist. They’re dyed green and decorated to resemble the iconic Frankenstein’s monster, complete with candy eyes, chocolate hair, and a bolt detail that will delight everyone at your Halloween party.
The combination of chewy marshmallows and crispy rice cereal makes these bars an irresistible snack, while the fun design adds a playful touch to your Halloween spread. This recipe is simple enough for the little ones to help with, making it a great activity to do together. With just a few ingredients and steps, you can create a batch of these delightful Frankenstein Rice Krispie Bars in no time.
Ingredients (Serving Size: 4-6 people):
- 6 cups Rice Krispies cereal
- 4 cups mini marshmallows
- 3 tablespoons unsalted butter
- Green food coloring
- 1 cup semi-sweet chocolate chips or chocolate melts
- Candy eyes
- Pretzel sticks, cut into small pieces for bolts
- Optional: Black icing for additional decoration
Instructions:
- Prepare the Pan: Begin by lining a 9×13-inch baking pan with parchment paper, leaving some overhang on the sides for easy removal of the bars later.
- Melt the Butter and Marshmallows: In a large saucepan, melt the butter over low heat. Add the mini marshmallows to the melted butter, stirring continuously until they’re completely melted and smooth.
- Add Food Coloring: Once the marshmallows are melted, add a few drops of green food coloring and stir until the color is evenly distributed. You can adjust the intensity of the green by adding more drops if desired.
- Mix with Rice Krispies: Remove the saucepan from heat and quickly add the Rice Krispies cereal. Stir until the cereal is evenly coated with the green marshmallow mixture.
- Transfer to Pan: Pour the mixture into the prepared baking pan. Using a spatula lightly coated with cooking spray, press the mixture down evenly into the pan.
- Cool: Allow the Rice Krispie mixture to cool and set in the pan for about 30 minutes at room temperature.
- Melt Chocolate: While the bars are setting, melt the chocolate chips or chocolate melts in a microwave-safe bowl, heating in 30-second intervals and stirring in between until smooth.
- Decorate Frankenstein: Cut the cooled Rice Krispie mixture into rectangles. Dip one end of each rectangle into the melted chocolate to create Frankenstein’s hair. Attach the candy eyes below the chocolate-covered area and insert a small piece of pretzel on each side for the bolts.
- Add Final Touches: Use black icing, if desired, to add additional details like stitches or a mouth.
Extra Tips:
For best results, use fresh marshmallows, as older ones may not melt as smoothly. If you want to make these treats ahead of time, store them in an airtight container at room temperature for up to two days. If you prefer a little extra flavor, try adding a splash of vanilla extract to the marshmallow mixture before mixing with the cereal. Finally, make sure to supervise children closely during the melting steps and when cutting pretzel sticks.
Pumpkin Patch Brownies

Bring the magic of a pumpkin patch into your kitchen with these delightful Pumpkin Patch Brownies. Perfect for a Halloween party or an afternoon treat, these brownies aren’t only delicious but also easy to make with kids.
With a rich, fudgy chocolate base, topped with creamy frosting and adorned with candy pumpkins, these brownies are sure to be a hit among children and adults alike. The combination of chocolate and pumpkin captures the essence of autumn, making these brownies a seasonal favorite.
Gather your little bakers and let them help with this fun and festive baking project. Not only will you create a delicious treat, but you’ll also make wonderful memories in the process. Let’s jump into the recipe to create a batch of Pumpkin Patch Brownies that serves 4-6 people.
Ingredients:
- 1 cup unsalted butter
- 1 cup granulated sugar
- 1 cup brown sugar
- 4 large eggs
- 1 teaspoon vanilla extract
- 1 cup all-purpose flour
- 1 cup unsweetened cocoa powder
- 1 teaspoon baking powder
- 1/2 teaspoon salt
- 1 cup semisweet chocolate chips
- 1 cup canned pumpkin puree
- 1/2 teaspoon ground cinnamon
- 1/4 teaspoon ground nutmeg
- 1/4 cup cream cheese, softened
- 2 cups powdered sugar
- 1 tablespoon milk
- 1 package of candy pumpkins or mini marshmallow pumpkins
Instructions:
- Preheat and Prep: Preheat your oven to 350°F (175°C). Line a 9×13-inch baking pan with parchment paper, leaving some overhang for easy removal, and set aside.
- Mix the Brownie Batter: In a large microwave-safe bowl, melt the butter. Add granulated sugar and brown sugar, whisking until combined. Stir in the eggs and vanilla extract until smooth.
- Combine Dry Ingredients: In another bowl, sift together the flour, cocoa powder, baking powder, and salt. Gradually add the dry ingredients to the wet mixture, stirring until fully incorporated. Fold in the chocolate chips.
- Prepare Pumpkin Mixture: In a separate bowl, mix together the pumpkin puree, ground cinnamon, and ground nutmeg. Spread half of the brownie batter evenly into the prepared baking pan. Dollop the pumpkin mixture on top, then cover with the remaining brownie batter, swirling the two with a knife for a marbled effect.
- Bake: Bake in the preheated oven for 25-30 minutes, or until a toothpick inserted into the center comes out with a few moist crumbs. Let the brownies cool completely in the pan on a wire rack.
- Make the Frosting: While the brownies are cooling, beat the cream cheese in a medium bowl until smooth. Gradually add the powdered sugar and milk, beating until creamy. Spread the frosting over the cooled brownies.
- Decorate: Finally, place the candy pumpkins or mini marshmallow pumpkins on top of the frosted brownies, arranging them to resemble a pumpkin patch.
Extra Tips:
For the best results, make sure the brownies are completely cooled before frosting to prevent the frosting from melting. If you’re baking with younger kids, let them handle the decorating part; it’s a great way for them to express creativity.
You can also substitute the candy pumpkins with chocolate-covered sunflower seeds for a different look. Store any leftovers in an airtight container at room temperature for up to 3 days or in the refrigerator for up to a week. Enjoy your Pumpkin Patch Brownies with a glass of cold milk or a warm cup of cider for a perfect autumn treat!
Creepy Crawly Chocolate Bark
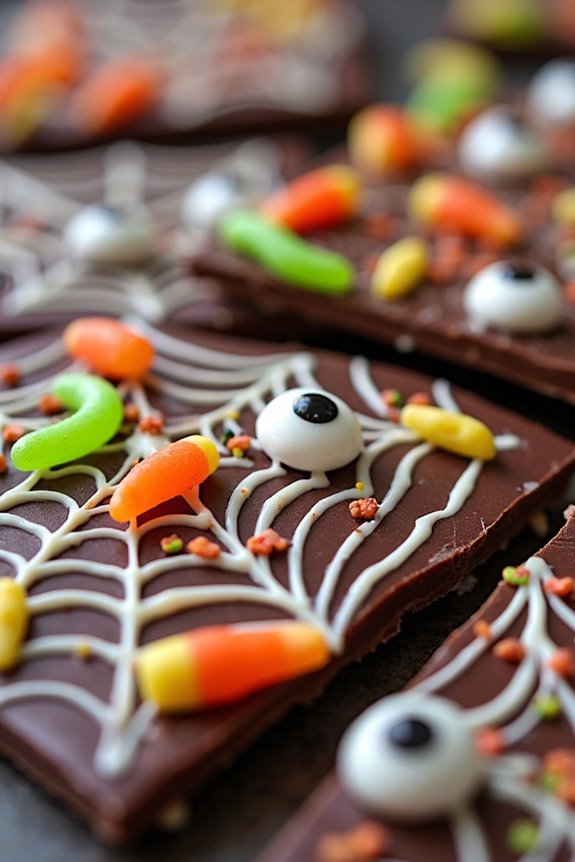
Creepy Crawly Chocolate Bark is the perfect Halloween treat that combines deliciously spooky fun with easy, kid-friendly cooking. This no-bake recipe is great for getting kids involved in the kitchen, allowing them to release their creativity while making something sweet and festive.
With a base of smooth, melted chocolate, this bark is adorned with a variety of Halloween-themed candies and decorations to create a creepy, crawly appearance that’s sure to delight little ones and adults alike.
The best part about Creepy Crawly Chocolate Bark is its simplicity and versatility. You can customize the toppings based on personal preference or dietary needs, and it’s an ideal project for encouraging kids to experiment with different textures and flavors.
Whether you’re hosting a Halloween party or simply want to indulge in some spooky fun at home, this recipe is sure to be a hit with everyone.
Ingredients for Creepy Crawly Chocolate Bark (serves 4-6):
- 12 oz semi-sweet chocolate chips
- 1 cup white chocolate chips
- 1/2 cup mini pretzel sticks
- 1/2 cup candy eyeballs
- 1/4 cup gummy worms
- 1/4 cup candy corn
- 1/4 cup Halloween sprinkles
- Parchment paper
Cooking Instructions:
- Prepare the Baking Sheet: Line a baking sheet with parchment paper. This will prevent the chocolate from sticking and make it easy to remove once the bark has set.
- Melt the Chocolate: In a microwave-safe bowl, melt the semi-sweet chocolate chips in 30-second intervals, stirring between each interval, until smooth. Alternatively, you can melt the chocolate using a double boiler on the stove.
- Spread the Chocolate: Pour the melted chocolate onto the prepared baking sheet and use a spatula to spread it into an even layer, approximately 1/4 inch thick.
- Melt the White Chocolate: In a separate microwave-safe bowl, melt the white chocolate chips using the same method as the semi-sweet chocolate.
- Create a Web Design: Drizzle the melted white chocolate over the spread semi-sweet chocolate in a spiral pattern. Use a toothpick to drag lines from the center to the edges, creating a spider web effect.
- Add Toppings: While the chocolate is still soft, scatter the mini pretzel sticks, candy eyeballs, gummy worms, candy corn, and sprinkles evenly over the surface. Gently press them into the chocolate to make sure they stick.
- Set the Bark: Allow the chocolate bark to cool at room temperature for about 2 hours, or until fully set. For a quicker setting, you can place the baking sheet in the refrigerator for about 30 minutes.
- Break into Pieces: Once the chocolate is set, break the bark into irregular pieces and serve.
Extra Tips:
For best results, make sure to use high-quality chocolate, as it will melt more smoothly and have a shinier finish. If you prefer a different type of chocolate, feel free to substitute dark or milk chocolate chips for the semi-sweet ones.
Encourage kids to get creative with the toppings; other fun additions can include crushed cookies, nuts, or different types of candy. Keep the bark stored in an airtight container at room temperature for up to a week, but keep in mind that the candy decorations may soften over time.
Mummy Hot Dog Wraps

Looking for a spooky yet scrumptious treat to serve this Halloween? Mummy Hot Dog Wraps are the perfect finger food for a festive gathering. These adorable and delicious snacks aren’t only easy to make but will also delight both kids and adults alike. With their clever appearance resembling a mummy wrapped in bandages, these hot dog wraps are bound to be a hit at your Halloween party or any fun-filled occasion.
The process of making Mummy Hot Dog Wraps is simple and engaging, making it an excellent activity to get kids involved in the kitchen. Using crescent roll dough and hot dogs, you can create a batch of these mummies in no time. They’re a savory treat that can be served as an appetizer or a main course. Plus, with a dollop of ketchup or mustard for dipping, they add a tasty twist to any Halloween spread.
Ingredients (Serving Size: 4-6 people):
- 8 hot dogs
- 1 can of refrigerated crescent roll dough
- 2 tablespoons of ketchup (for dipping)
- 2 tablespoons of mustard (for dipping)
- Cooking spray or parchment paper
- Optional: Peppercorns or edible eyes for decoration
Cooking Instructions:
- Preheat the Oven: Begin by preheating your oven to 375°F (190°C). This guarantees the mummy hot dog wraps will bake evenly and attain a golden brown color.
- Prepare the Dough: Unroll the crescent roll dough on a lightly floured surface. If the dough is in perforated triangles, gently press the seams together to create a smooth sheet. Use a knife or pizza cutter to slice the dough into thin strips, about 1/4 inch wide.
- Wrap the Hot Dogs: Take each hot dog and wrap it with the dough strips, leaving a small gap at the top for the mummy’s face. Start from one end and overlap the strips slightly to give the appearance of mummy bandages. Continue until each hot dog is wrapped.
- Add Eyes (Optional): If using peppercorns or edible eyes, press them into the gap left at the top of the hot dog to create eyes for your mummies.
- Bake: Place the wrapped hot dogs on a baking sheet lined with parchment paper or lightly sprayed with cooking spray. Bake in the preheated oven for 12-15 minutes, or until the dough is golden brown and cooked through.
- Serve: Remove from the oven and let them cool slightly. Serve warm with ketchup and mustard on the side for dipping.
Extra Tips:
For an extra touch of creativity, you can use small pieces of cheese under the dough for a cheesy mummy surprise. If you’re preparing these treats for a larger crowd, feel free to double the recipe.
Additionally, if you want to make these wraps ahead of time, you can prepare them a few hours in advance and store them in the refrigerator until you’re ready to bake. Just confirm to label the dough strips well to avoid any confusion during assembly.
Enjoy your spooky culinary creation and watch as your guests unwrap a delightful treat!
Candy Corn Cereal Bars
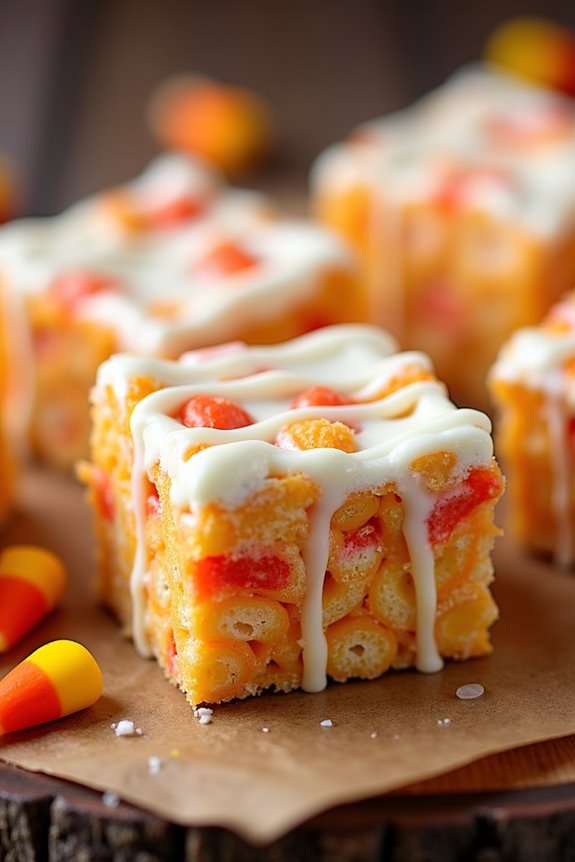
Candy Corn Cereal Bars are a delightful treat that combines the crunch of cereal with the festive colors and flavors of Halloween. Perfect for kids and adults alike, these no-bake bars are easy to make and require just a few simple ingredients.
Whether you’re hosting a Halloween party or just want to enjoy a spooky snack, these bars will surely be a hit. With a sweet and gooey texture, they’re reminiscent of traditional rice cereal treats but with a fun, seasonal twist.
The recipe is designed to serve 4-6 people, making it ideal for family gatherings or small parties. The combination of marshmallows, butter, and candy corn creates a deliciously chewy base, while the addition of your favorite cereal adds a satisfying crunch.
These bars can be customized with different types of cereal and additional Halloween-themed candies if desired. Follow the steps below to create this festive and delicious treat.
Ingredients:
- 4 cups of your favorite cereal (such as Rice Krispies or Cheerios)
- 1 bag (10 ounces) of mini marshmallows
- 3 tablespoons of unsalted butter
- 1 cup of candy corn
- 1/2 cup of white chocolate chips (optional)
Instructions:
- Prepare the Pan: Line an 8×8-inch baking dish with parchment paper, leaving some overhang on the sides for easy removal later.
- Melt the Butter and Marshmallows: In a large saucepan, melt the butter over low heat. Once melted, add the mini marshmallows and stir continuously until they’re completely melted and smooth.
- Combine with Cereal: Remove the saucepan from the heat and quickly stir in the cereal. Make sure the cereal is evenly coated with the marshmallow mixture.
- Add Candy Corn: Gently fold in the candy corn, ensuring it’s distributed throughout the mixture.
- Press into Pan: Transfer the mixture to the prepared baking dish. Use a spatula or wax paper to press the mixture evenly into the pan.
- Add White Chocolate (Optional): If using white chocolate chips, melt them in the microwave in 20-second intervals, stirring in between, until smooth. Drizzle the melted chocolate over the top of the cereal bars.
- Cool and Set: Allow the bars to cool at room temperature for about 1 hour or until they’re firm enough to cut.
- Cut and Serve: Once set, lift the bars out of the pan using the parchment paper overhang. Cut into squares or rectangles and serve.
Extra Tips:
For a more festive touch, you can add a few drops of food coloring to the melted marshmallow mixture to create a spooky hue. Additionally, consider adding other Halloween-themed candies, such as gummy worms or chocolate eyeballs, for extra fun.
If you find the mixture too sticky to handle, lightly grease your hands or spatula with cooking spray to make pressing into the pan easier. These bars can be stored in an airtight container at room temperature for up to 3 days, making them a convenient make-ahead option for any Halloween event.
Skeleton Gingerbread Cookies
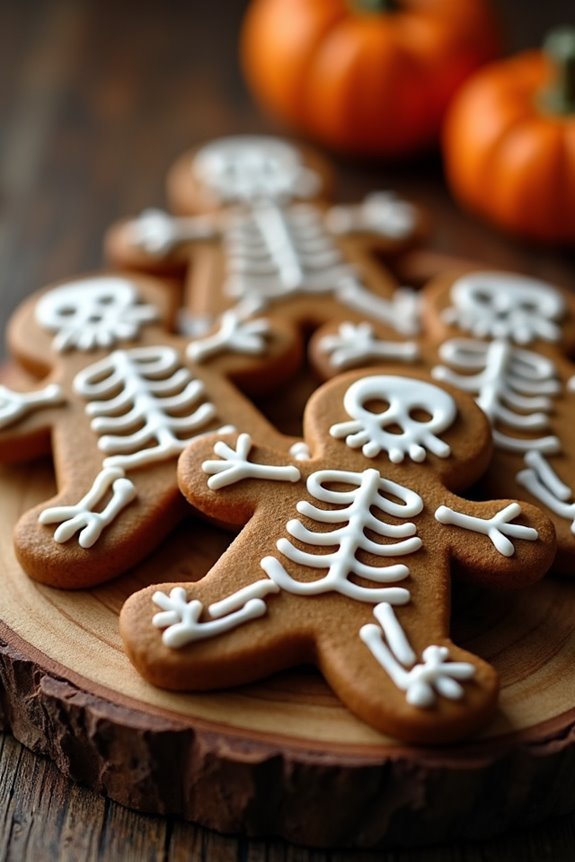
Skeleton Gingerbread Cookies are a spooktacular treat perfect for Halloween baking with the kids. These delightful cookies not only taste delicious with their warm spices but also provide a fun opportunity to get creative with decorating.
Children will love the hands-on experience of rolling out the dough and using cookie cutters to create their own little gingerbread skeletons. By adding a playful touch with some simple icing, these cookies will be transformed into a Halloween hit that’s as fun to make as they’re to eat.
To begin with, the classic gingerbread dough is enhanced with spices like cinnamon, ginger, and cloves, giving the cookies a rich aroma and flavor. The dough is then rolled out and cut into the shape of gingerbread men.
Once baked, the real fun begins with decorating. Using royal icing or a simple glaze, you can draw spooky skeleton designs on the cookies, turning them into adorable edible skeletons. This activity can engage children’s creativity and make for a memorable family baking session.
Ingredients (Serves 4-6):
- 3 cups all-purpose flour
- 3/4 cup packed brown sugar
- 3/4 teaspoon baking soda
- 1 tablespoon ground ginger
- 1 tablespoon ground cinnamon
- 1/2 teaspoon ground cloves
- 1/2 teaspoon salt
- 3/4 cup unsalted butter, softened
- 1 large egg
- 1/2 cup molasses
- 1 teaspoon vanilla extract
- Royal icing or white icing pen for decorating
Instructions:
- Prepare the Dough: In a large mixing bowl, whisk together the flour, brown sugar, baking soda, ginger, cinnamon, cloves, and salt. Add the softened butter and use a pastry cutter or your fingers to blend it into the dry ingredients until the mixture resembles coarse crumbs.
- Mix Wet Ingredients: In another bowl, beat the egg, then whisk in the molasses and vanilla extract until well combined. Gradually add this mixture to the dry ingredients, stirring until a soft dough forms.
- Chill the Dough: Divide the dough into two equal parts, flatten each into a disk, wrap in plastic wrap, and refrigerate for at least 1 hour. This will make the dough easier to roll out and cut.
- Preheat the Oven: Set your oven to 350°F (175°C). Line two baking sheets with parchment paper.
- Roll and Cut: On a lightly floured surface, roll out one portion of dough to about 1/4-inch thickness. Use gingerbread man-shaped cookie cutters to cut out the cookies. Carefully transfer the shapes to the prepared baking sheets.
- Bake the Cookies: Bake in the preheated oven for 8 to 10 minutes, or until the edges are firm and the cookies are slightly puffed. Allow the cookies to cool on the baking sheets for 5 minutes before transferring them to a wire rack to cool completely.
- Decorate the Skeletons: Once the cookies are completely cooled, use royal icing or a white icing pen to draw skeleton designs on the gingerbread men. Let the icing set before serving.
Extra Tips: For an extra burst of flavor, consider adding a pinch of nutmeg to the dough. If you don’t have a gingerbread man cookie cutter, you can use any festive shape you like and adjust the skeleton design accordingly.
Also, make sure the cookies are completely cool before decorating to prevent the icing from melting. Store the decorated cookies in an airtight container to keep them fresh and crisp for up to a week.