
Looking to add some spine-tingling flair to your Halloween party menu?
Our spooky stuffed mushrooms and ghostly deviled eggs are just the beginning.
These tantalizing treats not only taste incredible but also bring that extra touch of Halloween magic to your table.
Get ready to impress your guests with a spread that’s as festive as it is flavorful.
Let’s uncover these hauntingly delicious appetizer ideas together!
Spooky Stuffed Mushrooms

The stuffing itself combines cream cheese with a medley of herbs, garlic, and crunchy breadcrumbs, creating a flavorful filling that pairs perfectly with the earthy taste of the mushrooms.
Whether you’re hosting a large gathering or a small get-together, these Spooky Stuffed Mushrooms are sure to be a hit. The recipe is designed to serve 4-6 people, making it an ideal choice for intimate gatherings or as part of a larger spread of Halloween-themed dishes.
Ingredients:
- 16 large cremini or button mushrooms
- 1 tablespoon olive oil
- 4 cloves garlic, minced
- 1 small onion, finely chopped
- 1/2 cup cream cheese, softened
- 1/4 cup grated Parmesan cheese
- 1/4 cup breadcrumbs
- 2 tablespoons fresh parsley, chopped
- Salt and pepper to taste
- 1/4 teaspoon ground black pepper
- 1/4 teaspoon smoked paprika
Instructions:
- Preheat and Prepare Mushrooms: Preheat your oven to 375°F (190°C). Clean the mushrooms with a damp paper towel and remove the stems. Set the caps aside and finely chop the stems.
- Sauté Ingredients: In a skillet, heat the olive oil over medium heat. Add the chopped mushroom stems, minced garlic, and onion. Sauté for about 5 minutes, or until the mixture is soft and fragrant.
- Mix the Filling: In a mixing bowl, combine the sautéed mushroom mixture with cream cheese, Parmesan cheese, breadcrumbs, parsley, salt, pepper, and smoked paprika. Mix until well blended.
- Stuff the Mushrooms: Spoon the cream cheese mixture into the mushroom caps, pressing lightly to fill them completely.
- Bake the Mushrooms: Place the stuffed mushrooms on a baking sheet lined with parchment paper. Bake in the preheated oven for 20-25 minutes, or until the mushrooms are tender and the tops are golden brown.
- Serve: Allow the mushrooms to cool slightly before serving. Arrange them on a spooky-themed platter for a festive presentation.
Extra Tips:
For an even spookier presentation, you can use black food coloring to tint the stuffing a dark hue, making the mushrooms look even more eerie.
Additionally, you can use a small knife to carve faces or designs into the mushroom caps before baking for a ghostly effect.
Be sure to taste the stuffing mixture before filling the mushrooms to adjust seasoning as needed, ensuring that each bite is perfectly balanced.
If you prefer a slightly crispier topping, switch the broiler on for the last 2-3 minutes of baking.
Pumpkin-Shaped Cheese Ball
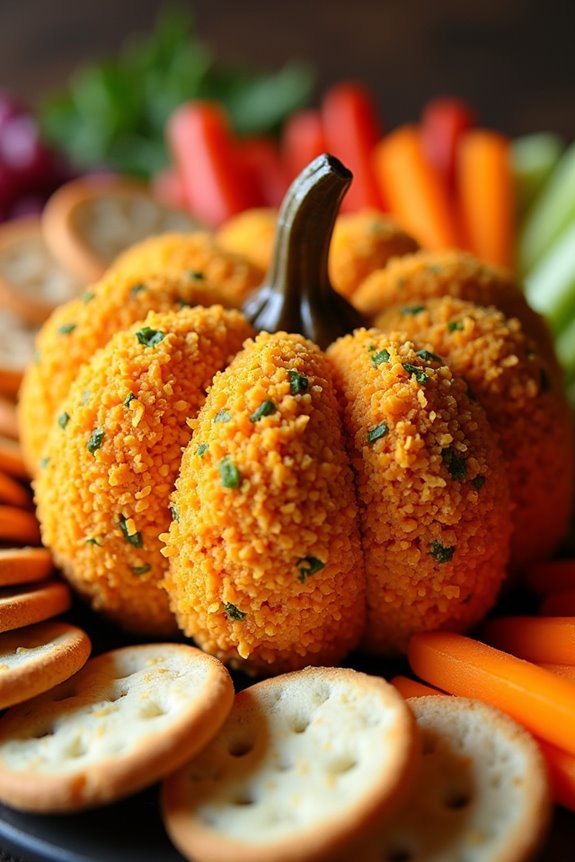
Halloween is the perfect time to get creative in the kitchen, especially when it comes to appetizers for adults. One standout dish that will delight your guests is the Pumpkin-Shaped Cheese Ball. This delightful and savory treat isn’t only delicious but also visually impressive, adding a festive touch to your Halloween spread. The cheese ball combines a mix of creamy cheeses and spices, all wrapped up in a charming pumpkin shape that’s almost too cute to eat.
The Pumpkin-Shaped Cheese Ball is a breeze to make and can be prepared ahead of time, making it ideal for busy hosts. The mixture of cheeses and ingredients can be customized to suit your taste, whether you prefer a bit of heat, a touch of smokiness, or a milder flavor. Once shaped and decorated to resemble a pumpkin, this cheese ball is sure to be a conversation starter at your Halloween gathering.
Serve it with an assortment of crackers, breadsticks, or fresh vegetables for a complete appetizer experience.
Ingredients (Serving Size: 4-6 people):
- 16 oz cream cheese, softened
- 2 cups shredded sharp cheddar cheese
- 1/4 cup grated Parmesan cheese
- 1/4 cup finely chopped green onions
- 1/4 cup finely chopped bell pepper (orange or red)
- 2 teaspoons Worcestershire sauce
- 1 teaspoon garlic powder
- 1/2 teaspoon smoked paprika
- Salt and pepper to taste
- 1/2 cup crushed pretzels (for coating)
- 1 small bell pepper stem (for decoration)
Instructions:
- Prepare the Ingredients: Begin by allowing the cream cheese to soften at room temperature. This will make it easier to mix with the other ingredients.
- Mix the Cheese Base: In a large mixing bowl, combine the softened cream cheese, shredded cheddar cheese, and grated Parmesan cheese. Mix thoroughly until smooth.
- Add Flavorings: Add the finely chopped green onions, bell pepper, Worcestershire sauce, garlic powder, smoked paprika, salt, and pepper to the cheese mixture. Stir until all ingredients are well combined.
- Shape the Cheese Ball: Lay a large piece of plastic wrap on a flat surface. Transfer the cheese mixture onto the plastic wrap and shape it into a rough ball. Wrap the cheese ball tightly with the plastic wrap, using your hands to shape it into a pumpkin-like form. Twist the top of the wrap to secure it.
- Chill the Cheese Ball: Place the wrapped cheese ball in the refrigerator for at least 2 hours, or until it’s firm enough to hold its shape.
- Coat and Decorate: Remove the cheese ball from the refrigerator and unwrap it. Roll the cheese ball in the crushed pretzels, covering it completely. Press the pretzels gently to confirm they stick. Insert the bell pepper stem into the top to create the pumpkin stem.
- Serve: Place the cheese ball on a serving platter, surrounded by your choice of crackers, breadsticks, or vegetables. It’s ready to serve and enjoy!
Extra Tips:
For an extra festive touch, consider adding a few drops of orange food coloring to the cheese mixture to enhance the pumpkin look further. If you prefer a crunchier texture, you can substitute the pretzel coating with finely chopped nuts.
Remember to taste the cheese mixture before shaping, adjusting the seasoning as needed to match your guests’ preferences. Finally, allow the cheese ball to sit at room temperature for about 15 minutes before serving to confirm a smooth and spreadable consistency. Enjoy your spooky and delicious Halloween treat!
Witches’ Fingers Breadsticks

Witches’ Fingers Breadsticks are a spooktacular addition to any Halloween party, especially for adults looking to indulge in a bit of festive fun. These creepy breadsticks are shaped to resemble witches’ fingers, complete with knobby knuckles and almond fingernails, making them a perfect appetizer to set the Halloween mood.
Easy to make and delicious to eat, these breadsticks bring a touch of eerie elegance to your Halloween buffet. Not only are Witches’ Fingers Breadsticks a visual treat, but they also pack a flavorful punch. Made from pre-made pizza dough, these breadsticks are seasoned with aromatic herbs and spices that tantalize the taste buds.
They’re perfect for dipping in a hearty marinara sauce or your favorite cheese dip. Whether you’re hosting a Halloween dinner party or a casual get-together, these frightful fingers are sure to be a hit.
Ingredients for 4-6 people:
- 1 lb pre-made pizza dough
- 24 whole blanched almonds
- 2 tablespoons olive oil
- 1 teaspoon garlic powder
- 1 teaspoon dried rosemary
- 1 teaspoon dried oregano
- 1 teaspoon coarse sea salt
- 1 egg, beaten (for egg wash)
- Red food coloring (optional, for almond fingernails)
Instructions:
- Prepare the Dough: Preheat your oven to 375°F (190°C). Take the pizza dough out of the refrigerator and let it sit at room temperature for about 20 minutes to make it easier to handle.
- Shape the Fingers: On a lightly floured surface, divide the dough into 24 equal pieces. Roll each piece into a thin strip, about 4-5 inches long, resembling a finger. Make three shallow cuts with a knife along the middle of each strip to create knuckle lines.
- Add the Fingernails: Gently press a blanched almond into the tip of each dough strip to create a fingernail. If desired, you can paint the almonds with a small amount of red food coloring before placing them for a more gory look.
- Season the Breadsticks: In a small bowl, mix the olive oil with garlic powder, rosemary, oregano, and sea salt. Brush each breadstick generously with this seasoning mixture to enhance flavor.
- Apply the Egg Wash: Brush each breadstick lightly with the beaten egg to give them a golden color when baked.
- Bake the Breadsticks: Place the breadsticks on a baking sheet lined with parchment paper, making sure they aren’t touching. Bake in the preheated oven for 15-20 minutes, or until they’re golden brown and cooked through.
- Serve: Allow the breadsticks to cool slightly before serving. They can be enjoyed warm or at room temperature with your choice of dip.
Extra Tips: For an even spookier presentation, serve the Witches’ Fingers Breadsticks with a bowl of marinara sauce or a blood-red beet hummus as “bloody dip.” If you prefer a crunchier texture, roll the dough strips thinner and bake for an additional 2-3 minutes.
To guarantee the almonds stay in place, you can secure them with a dab of the egg wash before baking. Enjoy crafting these creepy creations as part of your festive Halloween spread!
Ghostly Deviled Eggs

Transform your Halloween party into a spine-chilling feast with these Ghostly Deviled Eggs. Perfect for adults who appreciate a touch of sophistication with their spooky fare, these appetizer bites are as eerie as they’re delicious. The classic deviled egg is given a haunting twist with a stark contrast of black olives against fluffy white egg whites, creating a ghostly appearance that’s sure to captivate your guests.
Not only are these deviled eggs a visual treat, but they’re also packed with flavor, offering a creamy, tangy filling that tantalizes the taste buds. Serve these Ghostly Deviled Eggs at your next Halloween gathering, and watch as your guests delight in both their frightful presentation and delectable taste.
Crafted to satisfy 4-6 people, these eggs are an ideal addition to any spooky celebration. They’re simple to prepare, making them a convenient choice for hosts who want to impress without spending all day in the kitchen. Gather your ingredients, follow our step-by-step instructions, and get ready to serve up a dish that perfectly balances the eerie and the elegant.
Ingredients (serves 4-6):
- 6 large eggs
- 1/4 cup mayonnaise
- 1 teaspoon Dijon mustard
- 1 teaspoon white vinegar
- Salt and pepper to taste
- Black olives
- Paprika (optional)
Cooking Instructions:
- Boil the Eggs: Place the eggs in a saucepan and cover them with cold water. Bring the water to a boil over medium-high heat. Once boiling, cover the saucepan, reduce the heat to low, and let the eggs simmer for 10 minutes.
- Cool and Peel: After boiling, immediately transfer the eggs to a bowl of ice water to cool for about 5 minutes. This will make peeling easier. Once cooled, gently crack the shells and carefully peel them under running water.
- Prepare the Filling: Slice each egg in half lengthwise and remove the yolks, placing them in a medium bowl. Mash the yolks with a fork until smooth. Add mayonnaise, Dijon mustard, white vinegar, salt, and pepper. Mix until creamy and well combined.
- Fill the Egg Whites: Spoon or pipe the yolk mixture back into the egg white halves, filling each cavity generously.
- Create Ghostly Faces: Slice black olives into small pieces to form eyes and mouths. Place them carefully on the yolk mixture to create spooky ghost faces.
- Garnish and Serve: Optionally, sprinkle a little paprika over the eggs for added color and flavor. Arrange the eggs on a serving platter and serve immediately or refrigerate until ready to serve.
Extra Tips:
When boiling eggs, make sure not to overcrowd the saucepan, as this can lead to uneven cooking. For an extra creamy filling, consider using a hand mixer to blend the yolk mixture until smooth.
If you’re making these ahead of time, store the filled eggs in an airtight container in the refrigerator, but add the olive decorations just before serving to guarantee they remain fresh and crisp. If you want to add a bit more fright to your eggs, consider using a small dab of Sriracha or hot sauce for the ghost mouths, giving them a fiery, sinister look.
Bat Wings With Spicy Dip
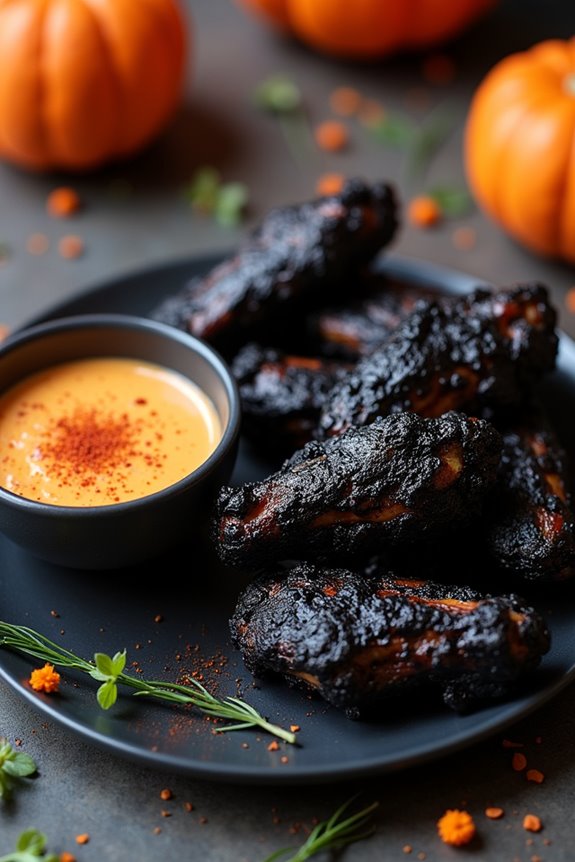
Halloween isn’t just for kids, and adults can enjoy the spooky festivities with delicious and themed appetizers like Bat Wings With Spicy Dip. These chicken wings are perfectly seasoned and baked to perfection, then coated in a rich, smoky sauce that gives them an eerie black appearance, reminiscent of bat wings. Paired with a spicy dip that adds a kick to every bite, this dish is sure to be a hit at any Halloween gathering, bringing a touch of frightful delight to the appetizer table.
Whether you’re hosting a Halloween party or simply enjoying a festive night in, these Bat Wings With Spicy Dip are a must-try. They combine flavors that are both bold and comforting, making them ideal for adults who appreciate a bit of heat and a lot of flavor. The preparation is straightforward, and the result is a dish that’s as visually striking as it’s delicious.
Ingredients for 4-6 servings:
- 2 lbs chicken wings
- 1 teaspoon salt
- 1 teaspoon black pepper
- 1 tablespoon smoked paprika
- 1 tablespoon garlic powder
- 1 tablespoon onion powder
- 1/4 cup soy sauce
- 1/4 cup balsamic vinegar
- 1/4 cup honey
- 1 tablespoon Worcestershire sauce
- 2 tablespoons activated charcoal powder (food grade)
- 1 cup mayonnaise
- 1 tablespoon hot sauce
- 1 tablespoon lemon juice
- 1 teaspoon cayenne pepper
- 1 teaspoon chili powder
Cooking Instructions:
- Prepare the Chicken Wings: Preheat your oven to 400°F (200°C). Rinse the chicken wings under cold water and pat dry with paper towels. This helps the seasoning adhere to the wings better.
- Season the Wings: In a large mixing bowl, combine the salt, black pepper, smoked paprika, garlic powder, and onion powder. Toss the chicken wings in the mixture until they’re evenly coated.
- Bake the Wings: Line a baking sheet with aluminum foil and place a wire rack on top. Arrange the seasoned wings in a single layer on the rack. Bake in the preheated oven for 35-40 minutes, flipping halfway through, until the wings are crispy and cooked through.
- Prepare the Bat Wing Sauce: While the wings are baking, in a small saucepan over medium heat, combine the soy sauce, balsamic vinegar, honey, Worcestershire sauce, and activated charcoal powder. Stir continuously until the mixture is smooth and begins to thicken, about 5-7 minutes.
- Coat the Wings: Once the wings are done, remove them from the oven and let them cool for a few minutes. Transfer the wings to a large bowl and pour the prepared bat wing sauce over them. Toss the wings until they’re fully coated and appear a dark, eerie black.
- Make the Spicy Dip: In a small bowl, combine the mayonnaise, hot sauce, lemon juice, cayenne pepper, and chili powder. Mix until smooth and well combined, adjusting the heat level to your preference.
- Serve: Arrange the bat wings on a platter, and serve with the spicy dip on the side for dipping. Enjoy the spooky and flavorful treat!
Extra Tips:
For the best results, confirm the chicken wings are completely dry before seasoning, as this will help achieve a crispy skin. If you prefer a smokier flavor, try using a smoked hot sauce in the dip.
When handling activated charcoal powder, be cautious as it can stain surfaces and clothing. Adjust the spice level of the dip by altering the amount of cayenne pepper and hot sauce to suit your taste.
Finally, consider garnishing the dish with some fresh herbs or edible flowers for a pop of color against the dark wings.
Bloody Mary Shrimp Shots

For those looking to add a bit of sophistication and spookiness to their Halloween gathering, Bloody Mary Shrimp Shots are the perfect appetizer. This dish combines the classic flavors of a Bloody Mary cocktail with succulent shrimp, creating an enticing and visually striking starter. The presentation in shot glasses adds an element of fun and elegance, making it an ideal choice for adult guests.
These shrimp shots aren’t only delicious but also easy to prepare ahead of time, allowing you to enjoy the festivities without spending too much time in the kitchen. The combination of tangy tomato juice, spicy horseradish, and a hint of vodka creates a savory base that beautifully complements the chilled shrimp.
Here’s how you can whip up this delightful appetizer for 4-6 people.
Ingredients (serving size: 4-6 people):
- 1 pound large shrimp, peeled and deveined
- 2 cups tomato juice
- 1/4 cup vodka
- 2 tablespoons lemon juice
- 1 tablespoon Worcestershire sauce
- 2 teaspoons hot sauce
- 1 tablespoon prepared horseradish
- 1/2 teaspoon celery salt
- 1/2 teaspoon ground black pepper
- 1 teaspoon smoked paprika
- 1 tablespoon olive oil
- Lemon wedges, for garnish
- Celery sticks, for garnish
- Fresh dill, for garnish
Instructions:
- Prepare the Shrimp: Start by boiling a pot of water with a pinch of salt. Add the shrimp and cook for about 2-3 minutes until they turn pink and opaque. Immediately transfer them to an ice bath to stop the cooking process, then drain and pat dry with paper towels.
- Make the Bloody Mary Mix: In a large mixing bowl, combine the tomato juice, vodka, lemon juice, Worcestershire sauce, hot sauce, horseradish, celery salt, black pepper, and smoked paprika. Stir well to verify all ingredients are thoroughly mixed.
- Assemble the Shots: Take shot glasses and pour about 2-3 tablespoons of the Bloody Mary mix into each glass. Add one to two shrimp per glass, depending on size, verifying they’re partially submerged in the mix.
- Garnish and Serve: Garnish each shot glass with a celery stick, a sprig of fresh dill, and a lemon wedge on the rim. Serve immediately or refrigerate until ready to serve.
Extra Tips:
When preparing the Bloody Mary mix, adjust the horseradish and hot sauce according to your guests’ spice preferences. The mix can be prepared a day in advance and stored in the refrigerator, allowing the flavors to meld together.
If you prefer a non-alcoholic version, simply omit the vodka and add more tomato juice. For an added Halloween touch, consider adding a dash of green food coloring to the mix for a ghoulish appearance.
Mummy Jalapeño Poppers
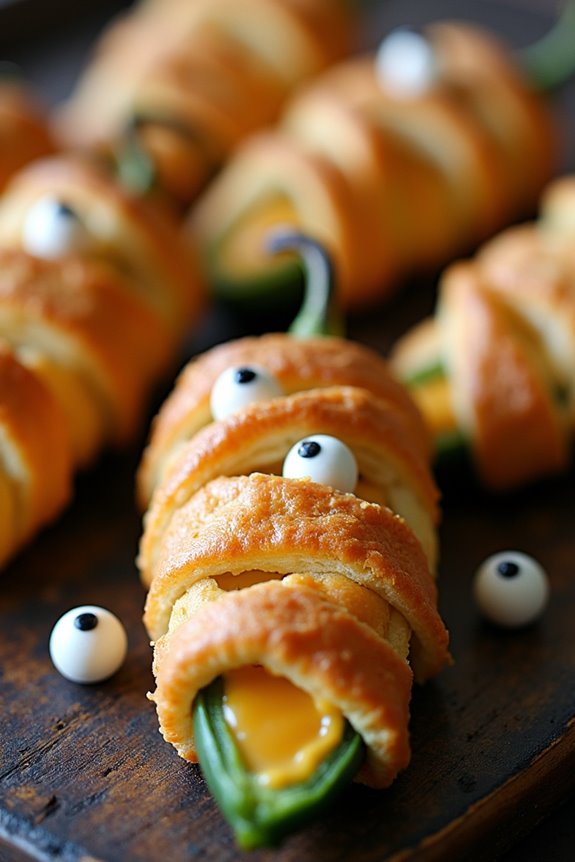
Halloween is the perfect time to get creative with your appetizers, and what better way to spice up your adult gathering than with Mummy Jalapeño Poppers? These delightful snacks combine the heat of jalapeños with a creamy, cheesy filling, all wrapped up in a flaky pastry “mummy” blanket. Not only do they pack a flavorful punch, but their spooky presentation makes them a fun addition to any Halloween spread.
Mummy Jalapeño Poppers are an exciting twist on traditional jalapeño poppers, offering a unique visual appeal that fits the Halloween theme. The key to these poppers is balancing the spicy kick of the jalapeños with a rich, creamy filling, and then adding a touch of whimsy by wrapping them in strips of dough to resemble mummies. Perfect for serving 4-6 people, this recipe is sure to be a hit at your next festive gathering.
Ingredients (for 4-6 servings):
- 12 large jalapeños
- 8 oz cream cheese, softened
- 1 cup shredded cheddar cheese
- 1 teaspoon garlic powder
- 1 teaspoon onion powder
- 1/2 teaspoon smoked paprika
- Salt and pepper to taste
- 1 package refrigerated crescent roll dough
- 24 small candy eyeballs (optional, for decoration)
Cooking Instructions:
- Prepare the Jalapeños: Preheat your oven to 375°F (190°C). Carefully slice each jalapeño in half lengthwise and remove the seeds and membranes using a small spoon. Be cautious, as the oils can irritate your skin and eyes.
- Make the Filling: In a medium-sized bowl, combine the softened cream cheese, shredded cheddar cheese, garlic powder, onion powder, smoked paprika, salt, and pepper. Mix until all ingredients are well incorporated.
- Fill the Jalapeños: Using a small spoon or a piping bag, fill each jalapeño half with the cheese mixture, pressing it in gently to guarantee it’s well-packed.
- Wrap the Jalapeños: Unroll the crescent roll dough and cut it into thin strips, about 1/4 inch wide. Wrap each filled jalapeño half with the dough strips, leaving gaps to create the appearance of a mummy. Make sure to leave space near the top for the candy eyeballs if you’re using them.
- Bake the Poppers: Place the wrapped jalapeños on a baking sheet lined with parchment paper. Bake in the preheated oven for about 15-20 minutes, or until the dough is golden brown and cooked through.
- Decorate: If desired, carefully place two candy eyeballs on each popper once they’ve cooled slightly, pressing them into the exposed filling to create a spooky mummy effect.
Extra Tips:
When handling jalapeños, wearing gloves can help prevent any irritation from the capsaicin in the peppers. If you prefer a milder version, consider using mini bell peppers instead.
Additionally, for a crispier texture, you can pre-bake the jalapeño halves for about 5 minutes before adding the filling. This extra step will guarantee they maintain a nice crunch even after baking. Enjoy your spooktacular Mummy Jalapeño Poppers!
Vampire Garlic Knots

Get ready to ward off vampires and impress your guests with these flavorful Vampire Garlic Knots! Perfect for a spooky Halloween gathering, these delicious knots aren’t only infused with aromatic garlic, but also feature a hint of rosemary and Parmesan for an added depth of flavor.
Whether you’re hosting an adult Halloween party or just want a festive appetizer to enjoy, these knots will surely be a hit. Serve them warm with a side of marinara sauce for a complete, mouthwatering treat.
These knots are quick and easy to prepare, making them a great choice for busy hosts. Utilizing store-bought pizza dough saves time, and the garlic butter topping can be whipped up in minutes. The combination of buttery garlic and fresh herbs makes these knots irresistible.
Follow this recipe for a batch of delightfully fragrant and flavorful Vampire Garlic Knots that will keep your friends and family coming back for more.
Ingredients (Serves 4-6):
- 1 pound store-bought pizza dough
- 1/4 cup unsalted butter
- 5 cloves garlic, minced
- 1 tablespoon fresh rosemary, finely chopped
- 1/4 cup grated Parmesan cheese
- 1 teaspoon salt
- 1 tablespoon olive oil
- 1/4 cup fresh parsley, chopped (optional, for garnish)
- Marinara sauce, for serving
Cooking Instructions:
- Preheat the Oven: Preheat your oven to 400°F (200°C). Line a baking sheet with parchment paper or lightly grease it with olive oil to prevent sticking.
- Prepare the Dough: Roll out the pizza dough on a floured surface to about 1/4 inch thickness. Use a knife or pizza cutter to slice the dough into strips approximately 1 inch wide and 6 inches long.
- Form the Knots: Take each strip of dough and tie it into a knot. Place the knots on the prepared baking sheet, leaving a little space between each one to allow for expansion during baking.
- Make the Garlic Butter: In a small saucepan, melt the butter over low heat. Add the minced garlic and rosemary, stirring occasionally until the garlic is fragrant and lightly golden. This should take about 2-3 minutes. Remove from heat and stir in the salt.
- Brush the Knots: Using a pastry brush, generously coat each knot with the garlic butter mixture. Be sure to get some of the garlic and rosemary onto each knot for maximum flavor.
- Bake the Knots: Place the baking sheet in the preheated oven and bake for 15-18 minutes, or until the knots are golden brown and cooked through.
- Add Parmesan and Garnish: Remove the knots from the oven and immediately sprinkle with grated Parmesan cheese. For an extra touch, garnish with chopped fresh parsley if desired.
- Serve: Serve the Vampire Garlic Knots warm with a side of marinara sauce for dipping.
Extra Tips:
For best results, allow the pizza dough to come to room temperature before rolling it out; this will make it easier to handle and prevent tearing.
If you prefer a spicier twist, consider adding a pinch of red pepper flakes to the garlic butter. Additionally, these garlic knots can be made a few hours in advance and reheated in a 350°F (175°C) oven for about 5 minutes before serving.
This makes them a convenient option for entertaining, as you can focus on other party preparations while still offering freshly baked appetizers.
Black Magic Beet Hummus
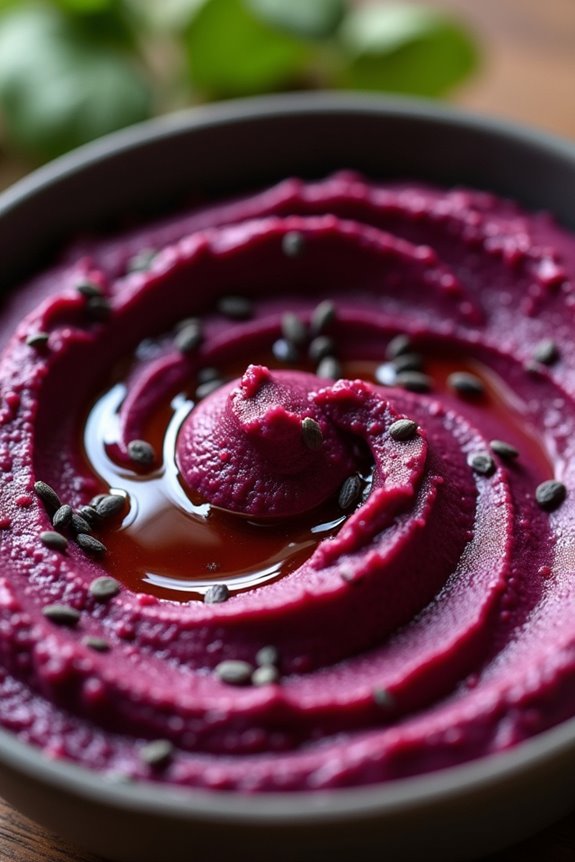
Black Magic Beet Hummus is a vibrant and spooky appetizer that’s perfect for adult Halloween gatherings. With its deep purple hue and earthy flavor, this hummus isn’t only visually striking but also deliciously nutritious. The use of roasted beets gives the hummus a sweet undertone, while the traditional hummus ingredients like chickpeas and tahini add a creamy texture and nutty richness.
Serve it with an assortment of vegetables, pita chips, or even dark rye bread for a delightfully eerie snack. This recipe is easy to prepare, making it a great choice for hosts who want to impress their guests without spending hours in the kitchen.
The key to achieving the striking color and delicious flavor lies in roasting the beets until they’re tender and slightly caramelized. This not only enhances their natural sweetness but also guarantees that the hummus has a smooth consistency. For a bit of extra flair, garnish the hummus with a sprinkle of black sesame seeds or a drizzle of olive oil.
Ingredients (serves 4-6):
- 2 medium beets, roasted and peeled
- 1 can (15 oz) chickpeas, drained and rinsed
- 3 tablespoons tahini
- 2 cloves garlic, minced
- 3 tablespoons lemon juice
- 2 tablespoons olive oil
- Salt and pepper to taste
- Black sesame seeds for garnish (optional)
- Olive oil for drizzling (optional)
Instructions:
- Preheat the Oven: Preheat your oven to 400°F (200°C). Wrap each beet in aluminum foil and place them on a baking sheet.
- Roast the Beets: Roast the beets in the oven for about 45-60 minutes, or until they’re tender when pierced with a fork. Remove from the oven and let them cool before peeling.
- Prepare the Hummus Base: Once the beets are cool enough to handle, peel them and chop them into chunks. Add the beet chunks to a food processor along with the chickpeas, tahini, minced garlic, lemon juice, and olive oil.
- Blend the Ingredients: Pulse the mixture in the food processor until smooth. If the hummus is too thick, you can add a little water or more olive oil to reach your desired consistency.
- Season the Hummus: Taste the hummus and add salt and pepper to your liking. Blend again briefly to incorporate the seasoning.
- Serve and Garnish: Transfer the hummus to a serving bowl. If desired, garnish with a sprinkle of black sesame seeds and a drizzle of olive oil.
Extra Tips:
For the best flavor, make sure your beets are fully roasted and soft before blending. This will guarantee a smooth hummus and enhance the sweet, earthy beet flavor.
If you don’t have a food processor, a high-powered blender can also be used to achieve a creamy consistency. Store any leftover hummus in an airtight container in the refrigerator for up to a week. For a more dramatic presentation, serve the beet hummus in a dark bowl to accentuate its striking color.
Graveyard Layered Taco Dip
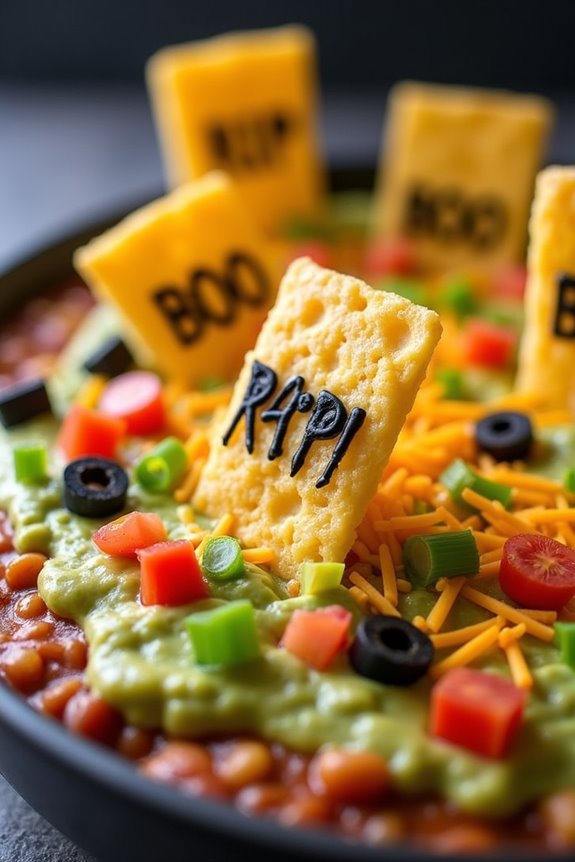
Graveyard Layered Taco Dip is a fun and spooky appetizer perfect for adult Halloween gatherings. This dish combines classic taco flavors with a creepy visual twist, making it a festive addition to your party spread. The layered dip features refried beans, guacamole, sour cream, salsa, cheese, and more, arranged to resemble a haunting graveyard scene.
It’s not only delicious but also a great conversation starter. This recipe for Graveyard Layered Taco Dip serves 4-6 people and is easy to assemble, requiring minimal cooking. It’s a versatile dish that can be customized with your favorite taco ingredients and decorations.
Whether you’re hosting a small gathering or a larger party, this dip is sure to be a hit with your guests. Serve it with tortilla chips for an irresistible combination of flavors and textures.
Ingredients:
- 1 can (16 oz) refried beans
- 1 packet taco seasoning
- 1 cup guacamole
- 1 cup sour cream
- 1 cup salsa
- 2 cups shredded cheddar cheese
- 1 cup chopped tomatoes
- 1/2 cup sliced black olives
- 2 green onions, chopped
- 1 bag tortilla chips
- 6-8 rectangular tortilla chips (for gravestones)
- Black edible marker (for writing on gravestones)
Instructions:
- Prepare the Base Layer: In a medium bowl, mix the refried beans with the taco seasoning until well combined. Spread this mixture evenly in the bottom of a 9×13 inch serving dish or a similarly sized platter.
- Add the Guacamole Layer: Gently spread the guacamole over the bean mixture, making sure an even layer is formed. This layer adds creaminess and a pop of green color to your dip.
- Layer the Sour Cream: Carefully add the sour cream over the guacamole. You can use a spatula to smooth it out for an even layer.
- Spoon on the Salsa: Spread the salsa over the sour cream. Be gentle to avoid mixing the layers too much.
- Sprinkle the Cheese: Evenly distribute the shredded cheddar cheese over the salsa. This cheesy layer will add a delicious, rich flavor to the dip.
- Add Toppings: Scatter the chopped tomatoes, sliced black olives, and chopped green onions over the cheese layer. These toppings add color and texture to the dip.
- Create the Graveyard Scene: Use the rectangular tortilla chips as gravestones. Write spooky messages like “RIP” or “BOO” on each chip using the black edible marker. Stick these chips upright into the dip to create the graveyard effect.
- Serve: Place the remaining tortilla chips around the dip for serving.
Extra Tips:
When making the Graveyard Layered Taco Dip, it’s important to guarantee each layer is spread evenly to maintain distinct layers for both aesthetic and flavor purposes.
Feel free to customize the toppings with ingredients such as jalapeños or corn for added flavor. If you want to prepare this dish in advance, you can assemble the layers up to the cheese the day before and add the toppings and decorations right before serving to keep it fresh and visually appealing.
Monster Meatball Skewers

Monster Meatball Skewers are a perfect Halloween appetizer for adults looking to add a touch of spooky fun to their party spread. These skewers combine flavorful meatballs with an eerie presentation that captures the Halloween spirit. The meatballs are packed with spices and herbs, threaded onto skewers, and adorned with small, edible decorations to resemble little monsters. These aren’t only delicious but also a conversation starter among your guests.
This dish is designed to serve 4-6 people, making it an ideal choice for a medium-sized gathering. Each skewer can be customized with a variety of garnishes to give each “monster” its own unique personality. Whether you’re hosting a full-blown Halloween bash or a more intimate gathering with close friends, Monster Meatball Skewers are sure to impress and delight your guests.
Ingredients:
- 1 pound ground beef
- 1/2 cup breadcrumbs
- 1/4 cup grated Parmesan cheese
- 1 egg
- 2 cloves garlic, minced
- 1 tablespoon Worcestershire sauce
- 1 teaspoon dried oregano
- 1 teaspoon salt
- 1/2 teaspoon black pepper
- 12 wooden skewers
- Black olives (pitted, for decoration)
- Cherry tomatoes (for decoration)
- Fresh basil leaves (for garnish)
- 1 cup marinara sauce (for dipping)
Cooking Instructions:
- Prepare the Meatball Mixture: In a large bowl, combine the ground beef, breadcrumbs, Parmesan cheese, egg, minced garlic, Worcestershire sauce, dried oregano, salt, and black pepper. Mix until all ingredients are well combined and the mixture is uniform.
- Form the Meatballs: Using your hands, shape the mixture into small, even-sized balls, about 1 inch in diameter. This should yield around 24 meatballs, depending on the size.
- Preheat Your Oven: Preheat your oven to 400°F (200°C).
- Assemble the Skewers: Thread three meatballs onto each skewer, leaving enough space between each one to add garnishes later.
- Bake the Meatballs: Place the skewers on a baking sheet lined with parchment paper. Bake in the preheated oven for 15-20 minutes, or until the meatballs are cooked through and have a slightly crispy exterior.
- Decorate the Skewers: Once the meatballs are cooked, remove them from the oven and let them cool slightly. Use pieces of black olives and halves of cherry tomatoes to create “eyes” for the monster faces. Secure them with toothpicks if necessary.
- Add Garnishes: Place fresh basil leaves between the meatballs on the skewers for added flavor and presentation.
- Serve with Marinara Sauce: Transfer the skewers to a serving platter and serve with a side of marinara sauce for dipping.
Extra Tips:
For a more intense flavor, you can prepare the meatball mixture a day in advance and let it sit in the refrigerator overnight. This allows the flavors to meld together beautifully.
If you want to make the decoration process easier, consider using food-safe markers to draw spooky faces on the cherry tomatoes. Additionally, for a smoky twist, you can grill the meatball skewers instead of baking them. Just make certain that the skewers are soaked in water for 30 minutes prior to grilling to prevent them from burning.
Spicy Cauldron Cheese Fondue
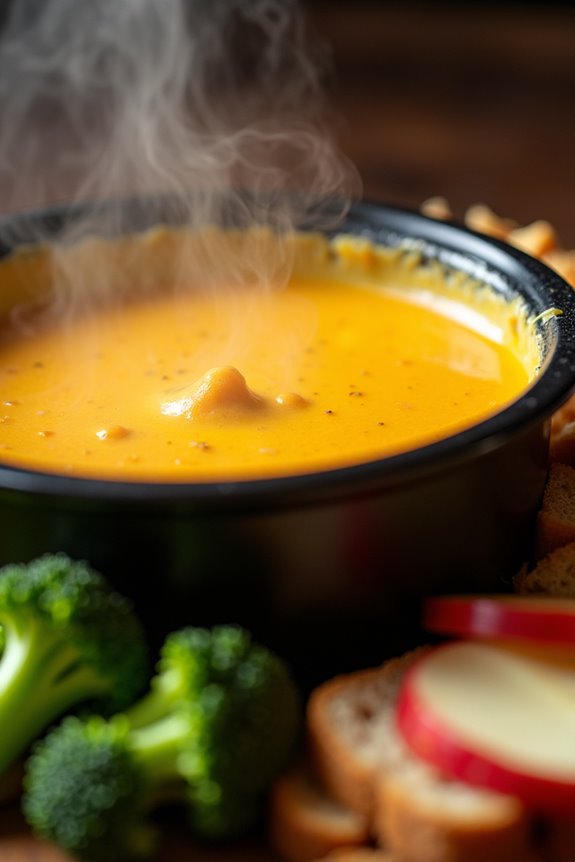
The blend of cheeses used in this fondue guarantees a smooth, velvety consistency that clings perfectly to your choice of dippers. Spices like cayenne pepper and paprika are added for a touch of heat, while garlic and white wine infuse the mixture with depth and complexity.
Paired with crusty bread, assorted vegetables, or even sliced apples, this fondue is a versatile appetizer that caters to a variety of palates and dietary preferences.
Ingredients (Serves 4-6):
- 1 clove garlic, halved
- 1 cup dry white wine
- 2 cups Gruyère cheese, grated
- 2 cups Emmental cheese, grated
- 1 tablespoon cornstarch
- 1 tablespoon lemon juice
- 1 teaspoon Dijon mustard
- 1/2 teaspoon cayenne pepper
- 1/2 teaspoon smoked paprika
- Salt to taste
- Freshly ground black pepper to taste
- Assorted dippers (such as cubed bread, steamed vegetables, sliced apples)
Instructions:
- Prepare the Cauldron: Rub the inside of a fondue pot or heavy-bottomed saucepan with the cut sides of the garlic clove to impart a subtle garlic flavor. Discard the garlic once the pot is well-coated.
- Heat the Wine: Pour the white wine into the pot and heat over medium heat until it begins to simmer gently. Avoid boiling the wine as it can affect the fondue’s texture.
- Mix the Cheese: In a separate bowl, toss the grated Gruyère and Emmental cheeses with the cornstarch. This will help thicken the fondue and prevent the cheese from clumping.
- Melt the Cheese: Gradually add the cheese mixture to the simmering wine, stirring constantly in a circular motion. Allow each addition to melt completely before adding more to guarantee a smooth consistency.
- Flavor the Fondue: Once all the cheese has melted and the mixture is smooth, stir in the lemon juice, Dijon mustard, cayenne pepper, and smoked paprika. Season with salt and black pepper to taste.
- Serve: Keep the fondue warm over low heat (or using a fondue burner if available) and serve immediately with your choice of dippers.
Extra Tips:
For the best flavor, choose a high-quality dry white wine, such as a Sauvignon Blanc or a dry Riesling. The wine not only adds flavor but also helps to maintain the fondue’s consistency.
If you prefer a milder fondue, reduce the amount of cayenne pepper, or omit it altogether. For smoother melting, guarantee the cheese is finely grated, and add it slowly to the pot.
Finally, to prevent the fondue from separating, maintain a gentle heat and stir regularly.