
As Halloween approaches, the excitement of crafting spooky treats fills the air. Whipping up ghostly cupcakes with marshmallow spirits or eerie eyeball truffles can truly impress. There’s a special thrill in transforming simple ingredients into delightful ghoulish creations. Ready to explore more in the enchanting world of Halloween desserts? Let’s embark on this delicious adventure together.
Ghostly Cupcakes
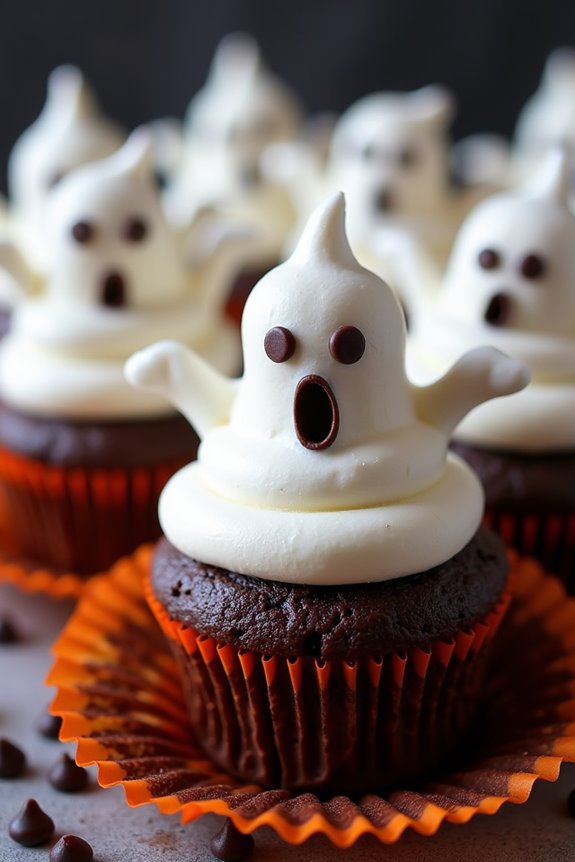
Ghostly Cupcakes are a hauntingly delightful treat perfect for any Halloween gathering. These spooky cupcakes are made with a moist chocolate base, topped with a fluffy marshmallow ghost that’s sure to delight both kids and adults alike. The combination of rich chocolate and sweet marshmallow creates a delicious balance that’s both festive and indulgent. Not only do they taste amazing, but they also make a fun and eye-catching addition to any Halloween dessert table.
Crafted to serve 4-6 people, these Ghostly Cupcakes are relatively simple to make, yet their spooky design will make them a standout at any Halloween party. The recipe begins with a classic chocolate cupcake batter, which is then baked to perfection. Once cooled, the cupcakes are topped with marshmallow ghosts made from melted marshmallows shaped into adorable ghostly figures. A few decorative touches, such as mini chocolate chips for eyes and mouths, bring these little specters to life.
Ingredients:
- 1 cup all-purpose flour
- 1/2 cup unsweetened cocoa powder
- 1 teaspoon baking powder
- 1/2 teaspoon baking soda
- 1/4 teaspoon salt
- 1/2 cup unsalted butter, softened
- 1 cup granulated sugar
- 2 large eggs
- 1 teaspoon vanilla extract
- 1/2 cup buttermilk
- 12 large marshmallows
- 24 mini chocolate chips
Cooking Instructions:
- Preheat Oven and Prepare Cupcake Batter: Preheat your oven to 350°F (175°C). Line a muffin tin with cupcake liners. In a medium bowl, whisk together the flour, cocoa powder, baking powder, baking soda, and salt.
- Cream Butter and Sugar: In a large bowl, beat the softened butter and granulated sugar together until light and fluffy. This should take about 3-4 minutes with an electric mixer.
- Add Eggs and Vanilla: Add the eggs, one at a time, beating well after each addition. Mix in the vanilla extract until combined.
- Combine Dry Ingredients and Buttermilk: Gradually add the dry ingredients to the wet mixture, alternating with the buttermilk. Start and end with the dry ingredients, mixing until just combined. Don’t overmix.
- Fill and Bake: Spoon the batter evenly into the prepared cupcake liners, filling each about 2/3 full. Bake in the preheated oven for 18-20 minutes, or until a toothpick inserted into the center of a cupcake comes out clean.
- Cool Cupcakes: Allow the cupcakes to cool in the pan for 5 minutes, then transfer them to a wire rack to cool completely.
- Create Marshmallow Ghosts: Once the cupcakes have cooled, melt the large marshmallows in a microwave-safe bowl for about 10-15 seconds until they’re just starting to puff and soften. Carefully shape them into ghostly figures using your fingers or a small spatula.
- Decorate with Chocolate Chips: Place the marshmallow ghosts on top of each cupcake. Use mini chocolate chips to create eyes and mouths on the marshmallow ghosts.
Extra Tips:
To guarantee your Ghostly Cupcakes are the highlight of the party, use high-quality cocoa powder for a richer chocolate flavor. If you’re making these cupcakes in advance, store them in an airtight container to keep them fresh.
When melting the marshmallows for the ghosts, keep an eye on them to prevent overcooking, as they can become too sticky to handle. Finally, feel free to get creative with the ghost shapes and expressions for a unique and personalized touch!
Eerie Eyeball Truffles
Looking to add a spooky touch to your Halloween dessert table? Eerie Eyeball Truffles are the perfect blend of creepy and delicious, making them a hit at any Halloween party.
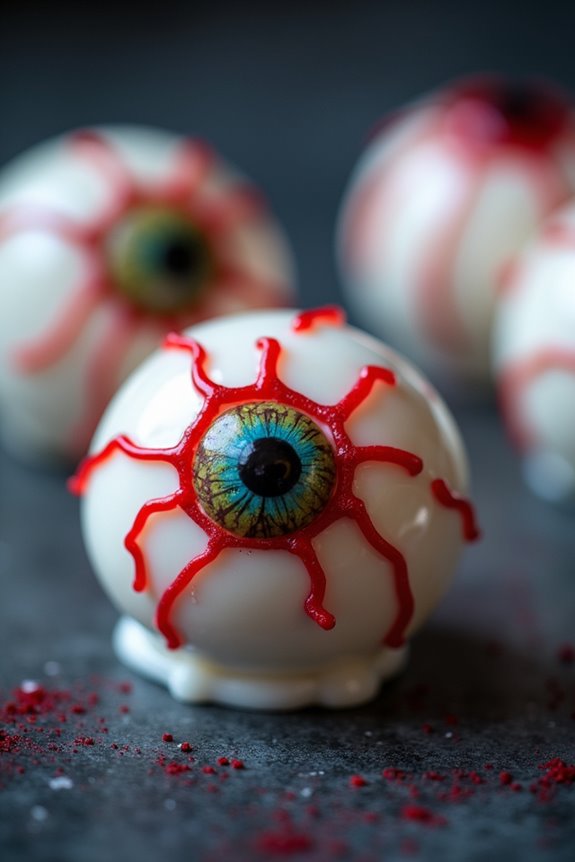
These truffles aren’t only fun to make but also delightful to eat, combining a rich chocolate center with a ghoulishly decorated exterior that resembles an eyeball. Ideal for serving to a crowd, they’re sure to impress both kids and adults alike.
The key to these truffles is creating a smooth, creamy chocolate ganache interior, which is then coated with white chocolate and finished off with a “pupil” and “iris” to complete the eerie look. With a serving size of 4-6 people, this recipe makes enough truffles to keep your guests both entertained and satisfied.
Be prepared to get a little messy, as decorating these truffles can be a fun activity to share with family and friends.
Ingredients:
- 1 cup heavy cream
- 8 ounces semisweet chocolate chips
- 1 teaspoon vanilla extract
- 12 ounces white chocolate chips
- 1 tablespoon coconut oil
- Red and blue food coloring
- 12-18 candy eyeballs or chocolate chips
- Red and black icing gel or edible markers
Instructions:
- Prepare the Ganache: In a small saucepan, heat the heavy cream over medium heat until it just begins to simmer. Remove from heat and pour over the semisweet chocolate chips in a heatproof bowl. Let sit for 2 minutes, then stir until smooth and glossy. Stir in the vanilla extract.
- Chill the Ganache: Cover the bowl with plastic wrap and refrigerate for 1-2 hours until the ganache is firm enough to scoop and mold.
- Shape the Truffles: Once the ganache is firm, use a spoon or melon baller to scoop out small portions of the ganache. Roll each portion between your palms to form a smooth ball. Place the balls on a baking sheet lined with parchment paper and refrigerate while you prepare the coating.
- Melt the White Chocolate: In a microwave-safe bowl, combine the white chocolate chips and coconut oil. Microwave in 30-second intervals, stirring after each, until the mixture is completely melted and smooth.
- Coat the Truffles: Using a fork, dip each ganache ball into the melted white chocolate, ensuring it’s fully coated. Tap off any excess chocolate and place back onto the parchment-lined baking sheet.
- Decorate the Eyeballs: Before the white chocolate sets completely, press a candy eyeball or chocolate chip into the center of each truffle to create a pupil. Use the red and blue food coloring to paint or draw an iris around the pupil. Draw squiggly red lines emanating from the iris to mimic bloodshot veins using the red icing gel or markers.
- Set the Coating: Allow the truffles to sit at room temperature or refrigerate them until the white chocolate is completely set.
Extra Tips:
When melting chocolate, be careful not to overheat it as it can seize and become grainy. If this happens, try adding a small amount of coconut oil to restore its smooth consistency.
For the best results, use gel food coloring or edible markers for decorating, as liquid food coloring can cause the chocolate to seize. If you’re short on time, the ganache mixture can be prepared a day in advance and stored in the refrigerator until you’re ready to shape and coat the truffles.
Enjoy getting creative with your decorations for an extra spooky touch!
Spooky Spider Cookies
Get ready to spook your guests with these delightfully creepy Spooky Spider Cookies this Halloween. These cookies aren’t only frightfully fun to look at, but they’re also deliciously sweet and satisfying. Perfect for a Halloween party or just a festive treat at home, these cookies will be a hit with both kids and adults.
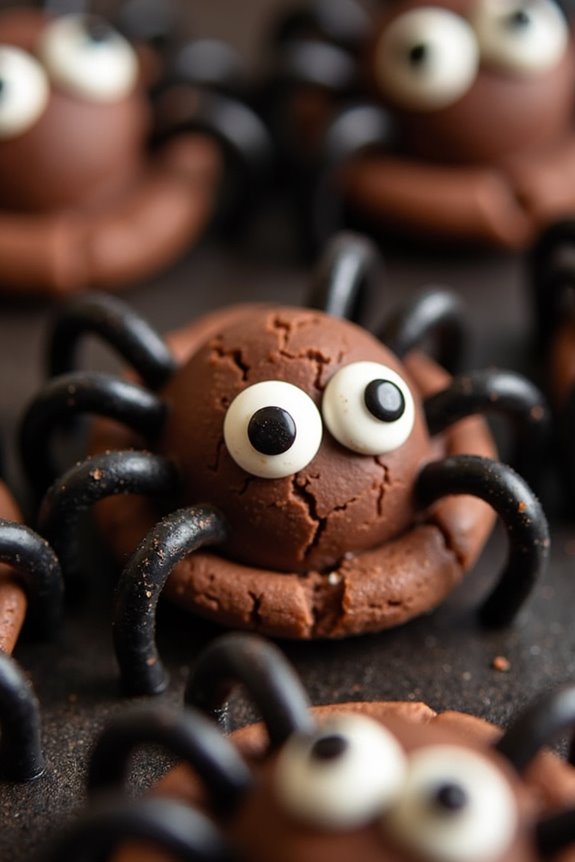
Combining rich chocolate flavors with a playful design, these cookies are as tasty as they’re entertaining. The Spooky Spider Cookies are designed to resemble little spiders, complete with chocolate bodies and licorice legs. The base of the cookie is a classic chocolate cookie, which is then adorned with a chocolate truffle to form the spider’s body. Licorice strings are used to create the legs, and candy eyes are added to give each spider a fun, lifelike appearance.
This recipe serves 4-6 people, making it a perfect treat for a small gathering or a delicious dessert for the family.
Ingredients (Serving Size: 4-6 people):
- 1 cup unsalted butter, softened
- 1 cup granulated sugar
- 1 cup packed brown sugar
- 2 large eggs
- 1 teaspoon vanilla extract
- 2 3/4 cups all-purpose flour
- 1/2 cup unsweetened cocoa powder
- 1 teaspoon baking soda
- 1/2 teaspoon salt
- 24 chocolate truffles
- 48 candy eyes
- Black licorice strings, cut into 1-inch pieces
Instructions:
- Preheat and Prepare: Preheat your oven to 350°F (175°C). Line a baking sheet with parchment paper to prevent the cookies from sticking during baking.
- Mix the Bases: In a large mixing bowl, cream together the softened butter, granulated sugar, and brown sugar until the mixture is light and fluffy. This should take about 3-4 minutes using an electric mixer.
- Add Wet Ingredients: Beat in the eggs one at a time, making sure each is fully incorporated before adding the next. Mix in the vanilla extract.
- Combine Dry Ingredients: In a separate bowl, sift together the all-purpose flour, unsweetened cocoa powder, baking soda, and salt.
- Form the Dough: Gradually add the dry ingredients to the wet ingredients, mixing until just combined. Don’t overmix to guarantee your cookies remain soft.
- Shape the Cookies: Scoop tablespoon-sized amounts of dough and roll them into balls. Place them onto the prepared baking sheet, leaving about 2 inches of space between each cookie.
- Bake the Cookies: Bake in the preheated oven for 10-12 minutes, or until the edges are firm but the centers are still soft. Remove from the oven and let cool slightly on the baking sheet.
- Assemble the Spiders: While the cookies are still warm, gently press a chocolate truffle into the center of each cookie to form the spider’s body. Insert four licorice string pieces on each side of the truffle to make the legs.
- Add the Eyes: Dab a small amount of the cookie’s melted chocolate on the back of each candy eye and place them on the truffle to create the spider’s eyes.
- Cool Completely: Allow the cookies to cool completely on a wire rack, making sure the truffles set and the eyes stay in place.
Extra Tips:
To make the Spooky Spider Cookies even more fun, you can experiment with different types of candy eyes for varied expressions on your spiders.
If you prefer a crunchier cookie, add an extra minute to the baking time, but be careful not to overbake. For a more intense chocolate flavor, consider adding a handful of chocolate chips to the dough.
These cookies can be stored in an airtight container for up to a week, making them a great make-ahead option for your Halloween festivities.
Witch Hat Cones
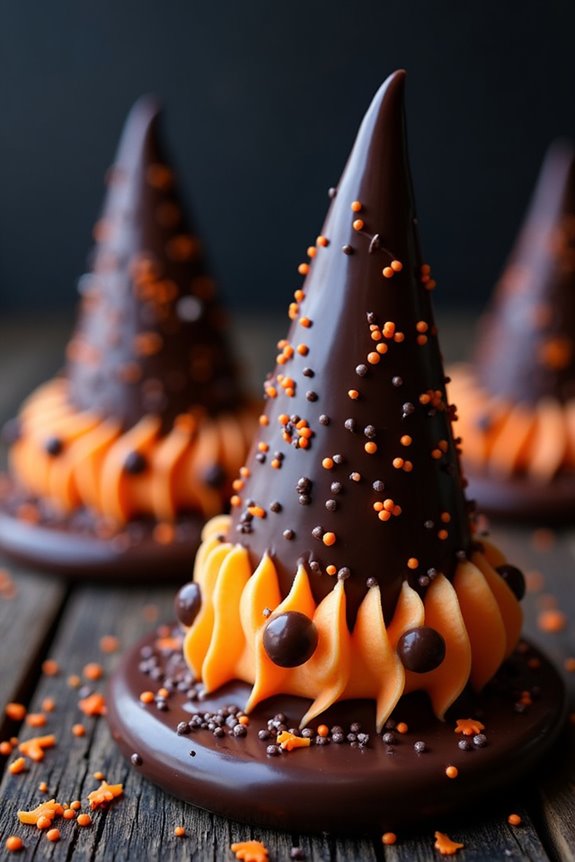
Witch Hat Cones are the perfect whimsical treat to add a touch of magic to your Halloween celebrations. These delightful desserts are both fun to make and serve, offering a creative twist on traditional Halloween treats. The cones are visually striking with their iconic witch hat shape and can be customized with a variety of decorations to suit your Halloween party theme.
Not only do they look enchanting, but they also taste delicious, combining the crunchy texture of the cone with the rich, sweet flavors of chocolate and toppings. Perfect for a serving size of 4-6 people, Witch Hat Cones require minimal ingredients and effort, making them an excellent choice for both seasoned bakers and novice cooks.
With a few simple steps, you can create a batch of these delightful cones that will be a hit among family and friends. Whether you’re hosting a Halloween party or looking for a fun activity with kids, these Witch Hat Cones are sure to impress and satisfy everyone’s sweet tooth.
Ingredients (for 4-6 servings):
- 6 sugar cones
- 6 round chocolate cookies
- 1 cup semisweet chocolate chips
- 1 tablespoon vegetable oil
- Assorted Halloween sprinkles
- Icing in assorted colors (black, orange, purple)
Instructions:
- Prepare the Chocolate Coating: In a microwave-safe bowl, combine the semisweet chocolate chips and vegetable oil. Microwave in 30-second intervals, stirring between each interval, until the chocolate is fully melted and smooth.
- Assemble the Witch Hats: Take a sugar cone and dip the wide rim into the melted chocolate to create a thick coat. Immediately press the coated rim onto the center of a chocolate cookie to form the base of the witch hat. Repeat for all cones and cookies.
- Decorate the Hats: Use the assorted icing colors to pipe decorative bands around the base of each cone where it meets the cookie. Use sprinkles to add extra flair to the hats, creating patterns or designs as desired.
- Set the Cones: Place the completed witch hat cones on a tray lined with wax paper. Allow them to set at room temperature until the chocolate has hardened, or place them in the refrigerator for about 15 minutes to quicken the process.
- Serve and Enjoy: Once the chocolate has set, your Witch Hat Cones are ready to serve. Arrange them on a festive platter for a show-stopping Halloween dessert display.
Extra Tips: When making Witch Hat Cones, verify that the chocolate isn’t too hot when dipping the cones, as it can cause the cones to become soft.
If you prefer a more vibrant color scheme, you can use colored candy melts instead of chocolate chips. Additionally, consider using a small piping bag for more detailed icing work. For a fun twist, fill the inside of the cones with small candies or chocolates before attaching them to the cookie base, creating an extra surprise for those who take a bite!
Frankenstein Marshmallow Pops
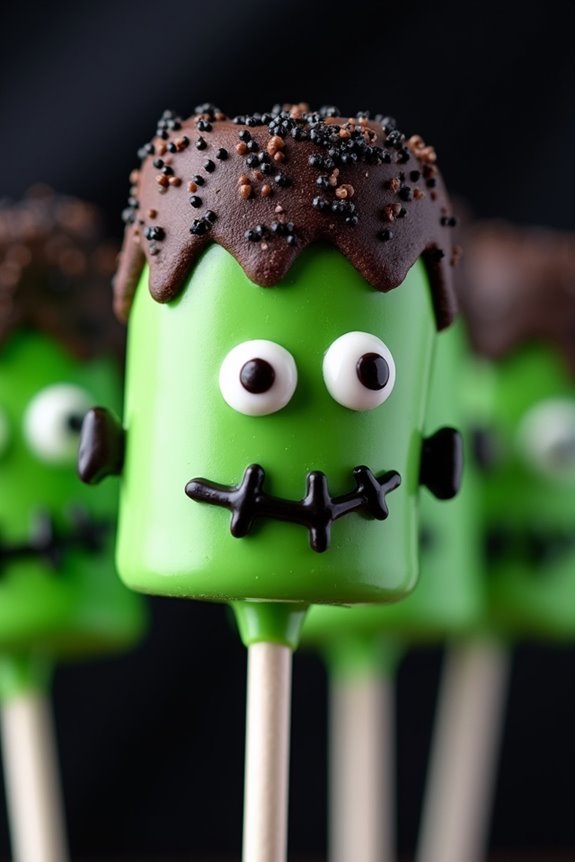
Frankenstein Marshmallow Pops are a fun and spooky treat perfect for Halloween festivities. These creative snacks are sure to be a hit with both kids and adults alike. The pops are made using marshmallows, melted candy, and a few decorative elements to bring Frankenstein’s monster to life. Not only are they visually appealing, but they also deliver a delightful combination of sweet marshmallow and candy coating with a satisfying crunch from the decorations.
Perfect for a Halloween party or a festive dessert table, Frankenstein Marshmallow Pops are easy to make and require minimal time in the kitchen. With just a few ingredients and some creativity, you can whip up a batch of these ghoulish goodies in no time. The recipe yields enough pops to serve 4-6 people, making it ideal for small gatherings or as a fun activity to do with family and friends.
Ingredients for 4-6 servings:
- 12 large marshmallows
- 12 lollipop sticks
- 1 cup green candy melts
- 1/4 cup chocolate chips
- 1/4 cup black sprinkles
- 1/4 cup mini marshmallows
- 1 tube black decorating gel
- 1 tube white decorating gel
Cooking Instructions:
- Prepare the Marshmallows: Insert a lollipop stick into each of the large marshmallows, guaranteeing they’re secure but don’t pierce through the top. This will form the base of your Frankenstein pops.
- Melt the Candy: In a microwave-safe bowl, melt the green candy melts in 30-second intervals, stirring in between, until completely smooth. Be careful not to overheat the candy, as it can become too thick to work with.
- Coat the Marshmallows: Dip each marshmallow into the melted green candy, covering it completely. Allow any excess to drip off back into the bowl. Stand the pops upright in a foam block or a similar holder to set.
- Create Frankenstein’s Hair: Melt the chocolate chips in a small microwave-safe bowl using the same method as with the green candy melts. Once melted, dip the top third of each marshmallow into the chocolate to create Frankenstein’s hair. Sprinkle black sprinkles onto the chocolate before it sets for added texture.
- Add Bolts: Cut the mini marshmallows in half. Using a dab of melted green candy, attach one mini marshmallow half to each side of the marshmallow pop to represent Frankenstein’s bolts.
- Decorate the Face: Use the black decorating gel to draw a scar and mouth on each marshmallow pop. Then, use the white decorating gel to add small dots for eyes, and top them with a small dot of black gel for pupils.
- Let Set: Allow the pops to set completely at room temperature, or place them in the refrigerator for a quicker setting time.
Extra Tips: For best results, make certain that all your ingredients are at room temperature before you start. If you find the candy melts are too thick, add a teaspoon of vegetable oil to achieve a smoother consistency. When applying the decorating gels, practice on a piece of parchment paper first to guarantee steady hands when drawing on the marshmallows. If you’re making these with children, let them get creative with their designs for a fun and engaging activity!
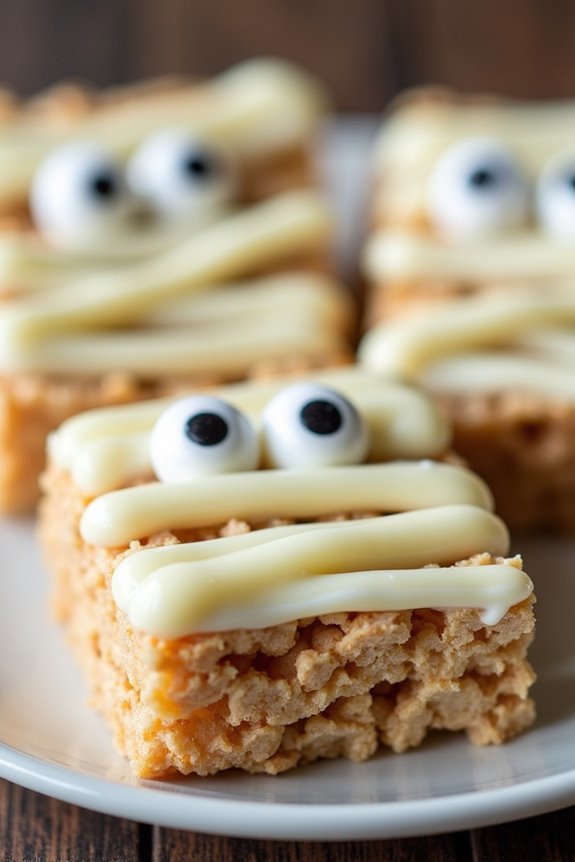
Mummy Rice Krispies Treats
Looking to add a touch of spookiness to your Halloween treats? Mummy Rice Krispies Treats are a fun and festive way to delight both kids and adults during the Halloween season.
These delicious morsels are a playful twist on the classic Rice Krispies Treats, dressed up to resemble mummies with the help of some melted white chocolate and candy eyes. Not only are they incredibly tasty, but they also make for an eye-catching addition to any Halloween party spread.
These Mummy Rice Krispies Treats are easy to make and require only a few ingredients, making them a great option for those who want to whip up something quick and delicious without spending hours in the kitchen.
Whether you’re hosting a Halloween party or just looking for a fun activity to do with the kids, these treats are sure to be a hit. With this recipe, you’ll have enough to serve 4-6 people, ensuring that everyone gets a chance to enjoy these spooktacular treats.
Ingredients:
- 6 cups Rice Krispies cereal
- 3 tablespoons unsalted butter
- 1 package (10 oz) mini marshmallows
- 1 cup white chocolate chips
- Candy eyes
Cooking Instructions:
- Prepare the Pan: Start by lining a 9×13-inch baking dish with parchment paper or lightly greasing it with non-stick cooking spray. This will make it easier to remove the treats once they’ve set.
- Melt the Butter and Marshmallows: In a large saucepan over medium heat, melt the unsalted butter. Add the mini marshmallows and stir continuously until they’re completely melted and the mixture is smooth.
- Combine with Cereal: Remove the saucepan from the heat and immediately add the Rice Krispies cereal. Stir until all the cereal is well-coated with the marshmallow mixture.
- Transfer to Pan: Pour the mixture into the prepared baking dish. Using a spatula or your hands (lightly greased to prevent sticking), press the mixture evenly into the pan.
- Cool and Set: Allow the Rice Krispies mixture to cool and set for about 30 minutes at room temperature.
- Melt the White Chocolate: In a microwave-safe bowl, melt the white chocolate chips in 20-second intervals, stirring in between until smooth and fully melted.
- Create the Mummy Wraps: Transfer the melted white chocolate into a piping bag or a zip-top bag with a small corner snipped off. Drizzle the chocolate over the Rice Krispies treats in a back-and-forth motion to create the look of mummy bandages.
- Add Candy Eyes: Before the chocolate sets, place candy eyes on top of each mummy to give them a spooky appearance.
- Cut and Serve: Once the chocolate has hardened, use a sharp knife to cut the treats into rectangles or squares. Serve and enjoy!
Extra Tips:
For an added touch of flavor, consider adding a teaspoon of vanilla extract to the melted marshmallow mixture before combining it with the cereal.
If you don’t have a piping bag, a plastic sandwich bag with a small corner cut off works perfectly for drizzling the white chocolate.
Make sure to press the Rice Krispies mixture into the pan gently to avoid making the treats too dense.
Store leftovers in an airtight container at room temperature for up to three days to keep them fresh and chewy.
Pumpkin Patch Brownies
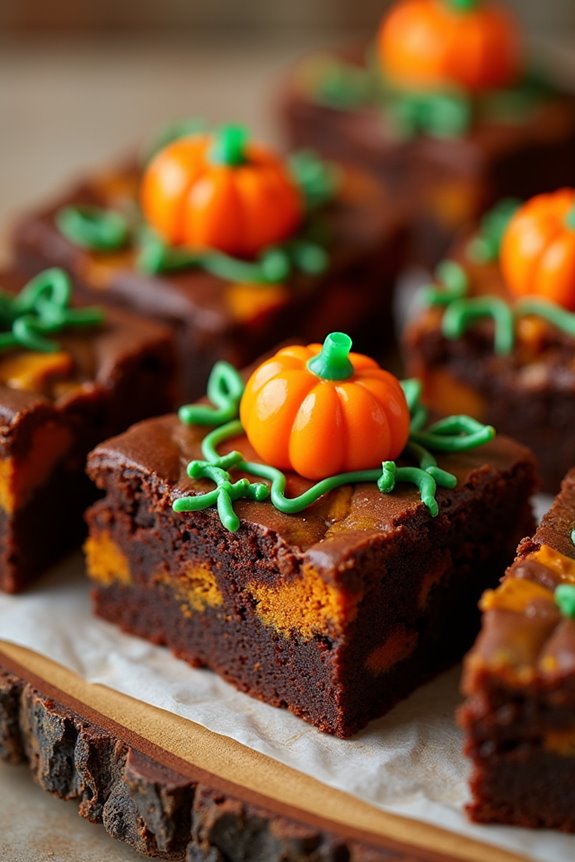
Pumpkin Patch Brownies are the perfect treat to get everyone in the Halloween spirit. These delicious brownies combine the rich, fudgy texture of classic brownies with the autumnal flavors of pumpkin and spices. Topped with a creative candy design to mimic a pumpkin patch, they’re visually delightful and certain to be a hit at any Halloween gathering.
Whether you’re hosting a party or simply indulging in a festive dessert, these brownies will bring a touch of whimsy and a lot of flavor to your festivities.
These brownies aren’t only fun to look at but also easy to make, making them a great option for bakers of all skill levels. The recipe combines simple ingredients that come together to create a moist and flavorful brownie base, which is then adorned with candy pumpkins and green icing to resemble a little pumpkin patch.
The recipe is designed to serve 4-6 people, making it ideal for small gatherings. Below, you’ll find a detailed list of ingredients and step-by-step instructions to help you create this delightful dessert.
Ingredients (Serves 4-6):
- 1 cup unsalted butter
- 2 cups granulated sugar
- 4 large eggs
- 1 teaspoon vanilla extract
- 1 cup all-purpose flour
- 1/2 cup unsweetened cocoa powder
- 1/2 teaspoon baking powder
- 1/4 teaspoon salt
- 1/2 cup canned pumpkin puree
- 1 teaspoon pumpkin pie spice
- Candy pumpkins for decoration
- Green decorating icing
Instructions:
- Preheat the Oven: Begin by preheating your oven to 350°F (175°C). This guarantees that your oven is at the right temperature by the time your batter is ready.
- Prepare the Baking Pan: Grease a 9×13 inch baking pan or line it with parchment paper. This will prevent the brownies from sticking and make them easier to remove from the pan once baked.
- Melt the Butter: In a medium saucepan, melt the butter over medium heat. Once melted, remove from heat and stir in the granulated sugar until well combined.
- Mix Wet Ingredients: Add the eggs one at a time to the butter-sugar mixture, beating well after each addition. Stir in the vanilla extract.
- Combine Dry Ingredients: In a separate bowl, sift together the flour, cocoa powder, baking powder, and salt.
- Mix the Batter: Gradually add the dry ingredients to the wet mixture, stirring until just combined. Be careful not to overmix.
- Add Pumpkin Flavor: Divide the batter into two equal parts. In one half of the batter, fold in the pumpkin puree and pumpkin pie spice.
- Layer the Batter: Pour the plain brownie batter into the prepared baking pan and spread evenly. Then, dollop the pumpkin batter over the top and use a knife to swirl the two layers together.
- Bake: Place the pan in the preheated oven and bake for 25-30 minutes, or until a toothpick inserted into the center comes out with a few moist crumbs.
- Cool and Decorate: Allow the brownies to cool completely in the pan on a wire rack. Once cooled, use the green decorating icing to create vines and place candy pumpkins on top to resemble a pumpkin patch.
Extra Tips:
To guarantee the best results, make sure all ingredients are at room temperature before mixing. This helps them to combine more smoothly and evenly.
When swirling the pumpkin batter into the brownie batter, try not to overdo it; a few gentle swirls will give you a nice marbled effect.
If you’re having trouble finding candy pumpkins, you can substitute with orange candies or even small pieces of candy corn for a similar festive look.
Store any leftovers in an airtight container to keep them fresh and moist.
Vampire Bite Red Velvet Cake
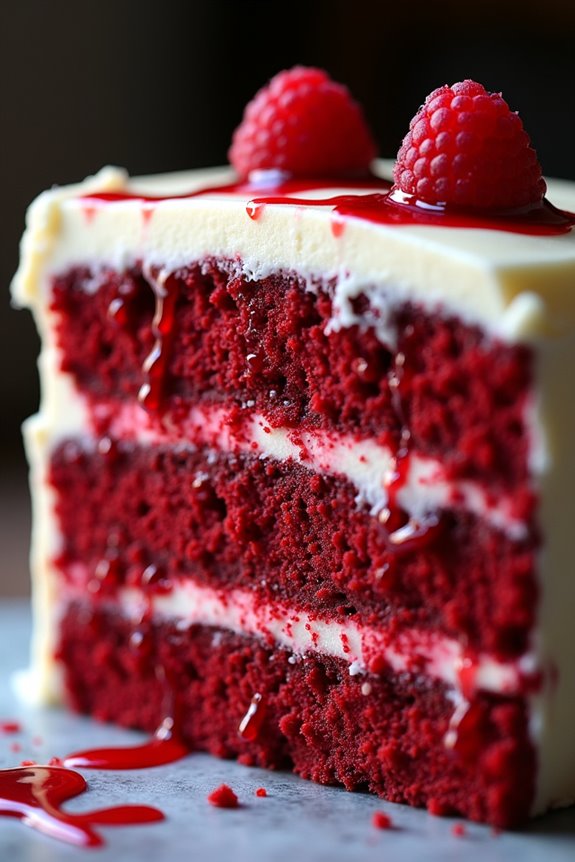
Vampire Bite Red Velvet Cake is a spooky twist on the classic red velvet cake, making it a perfect centerpiece for your Halloween dessert spread. This cake, with its striking red hue and deliciously soft texture, is designed to resemble a vampire’s bite, complete with a creamy frosting and a surprise raspberry filling that oozes like “blood.”
It’s an ideal dessert for adding an extra touch of drama and excitement to your Halloween festivities, delighting both kids and adults alike. This recipe serves 4-6 people, making it perfect for a small Halloween gathering. The cake is made from a moist red velvet base, layered with rich cream cheese frosting, and accented with a tart raspberry filling to mimic the look of a vampire’s bite.
The combination of flavors and textures is sure to please your guests, while the eerie presentation will add a fun and spooky element to your party. Follow these steps to create a visually stunning and delicious dessert that will impress everyone at your Halloween celebration.
Ingredients:
- 2 1/2 cups all-purpose flour
- 1 1/2 cups granulated sugar
- 1 teaspoon baking soda
- 1 teaspoon salt
- 1 teaspoon cocoa powder
- 1 1/2 cups vegetable oil
- 1 cup buttermilk, room temperature
- 2 large eggs
- 2 tablespoons red food coloring
- 1 teaspoon vanilla extract
- 1 teaspoon white vinegar
- 8 ounces cream cheese, softened
- 1/2 cup unsalted butter, softened
- 4 cups powdered sugar
- 1 teaspoon vanilla extract
- 1 cup raspberries
- 1 tablespoon lemon juice
- 1/4 cup sugar
Instructions:
- Preheat Oven: Preheat your oven to 350°F (175°C) and grease two 9-inch round cake pans. Line the bottoms with parchment paper for easy removal.
- Mix Dry Ingredients: In a large bowl, sift together the flour, sugar, baking soda, salt, and cocoa powder. Set aside.
- Combine Wet Ingredients: In another bowl, whisk together the vegetable oil, buttermilk, eggs, red food coloring, vanilla extract, and vinegar until well combined.
- Combine Mixtures: Gradually add the wet ingredients to the dry ingredients, mixing until just combined and smooth. Be careful not to overmix the batter.
- Bake the Cakes: Divide the batter evenly between the prepared cake pans. Bake for 25-30 minutes, or until a toothpick inserted into the center comes out clean. Let the cakes cool in the pans for 10 minutes, then transfer to a wire rack to cool completely.
- Prepare Frosting: Beat the softened cream cheese and butter together until creamy and smooth. Gradually add the powdered sugar and vanilla extract, beating until well combined and fluffy.
- Make Raspberry Filling: In a small saucepan over medium heat, combine raspberries, lemon juice, and sugar. Stir occasionally until the raspberries break down and the mixture thickens slightly. Remove from heat and let cool.
- Assemble the Cake: Place one cake layer on a serving plate. Spread a thin layer of cream cheese frosting over the top, then add a layer of raspberry filling. Place the second cake layer on top and frost the entire cake with the remaining cream cheese frosting.
- Decorate: For a vampire bite effect, use a spoon to create two small indents on the top of the cake and fill them with raspberry filling to look like bite marks. Allow the filling to drip slightly for an authentic “blood” effect.
Extra Tips:
For an extra dramatic effect, consider adding a touch of black food coloring to the frosting for a more ghoulish appearance.
To guarantee even cake layers, use a serrated knife to level the tops before assembling. If fresh raspberries are unavailable, frozen raspberries can be substituted; just make sure they’re fully thawed and drained before use.
Finally, for a fun twist, you can add edible glitter or candy vampire teeth around the cake for a complete Halloween theme.
Candy Corn Parfaits
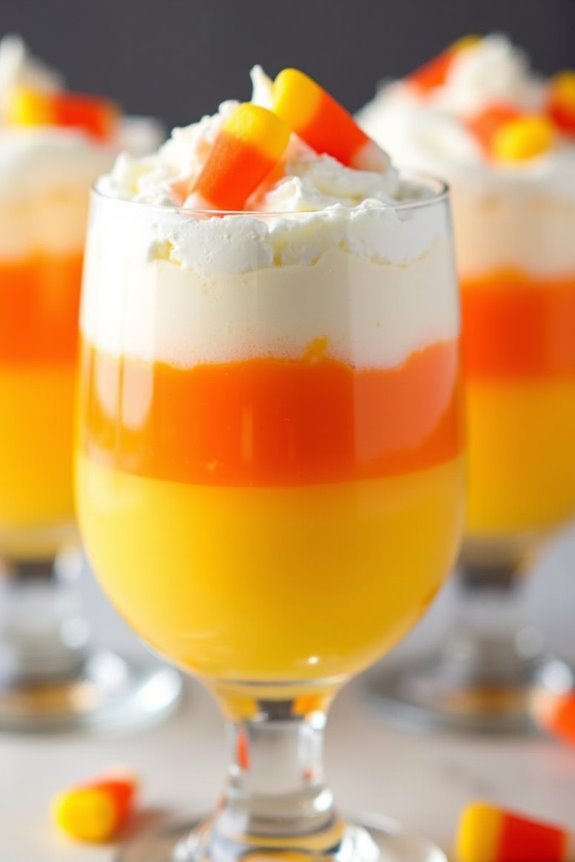
Candy Corn Parfaits are a delightful treat that combines the festive colors of Halloween with a sweet and creamy taste that everyone will enjoy. These parfaits mimic the appearance of candy corn by layering yellow, orange, and white components in a clear glass, making them not only delicious but visually appealing as well. They’re perfect for Halloween parties, gatherings, or just a fun dessert at home with the family.
The base of the parfait is a smooth and creamy vanilla pudding. To achieve the candy corn colors, we’ll be using food coloring to transform the pudding into vibrant layers of yellow and orange. The final layer is a fluffy and light whipped cream, completing the candy corn look. This easy-to-make dessert is certain to be a hit, and it’s ready in just a few simple steps.
Ingredients (Serves 4-6):
- 2 cups vanilla pudding
- Yellow food coloring
- Orange food coloring
- 1 cup whipped cream
- Candy corn candies (for garnish)
- Clear serving cups or glasses
Cooking Instructions:
- Prepare the Vanilla Pudding: Begin by preparing 2 cups of vanilla pudding according to the package instructions, or you can use pre-made pudding if you prefer.
- Color the Pudding: Divide the pudding into two equal portions. In one portion, add a few drops of yellow food coloring and mix well until the color is evenly distributed. In the other portion, add a few drops of orange food coloring and mix until you have a consistent orange color.
- Layer the Parfaits: Take your clear serving cups or glasses and start layering. First, spoon the yellow pudding into the bottom of each glass, filling it about one-third full. Next, carefully spoon the orange pudding on top of the yellow layer, filling another third of the glass. Confirm that each layer is smooth and even for the best appearance.
- Top with Whipped Cream: Finish the parfaits by topping them with a generous layer of whipped cream, filling the remainder of the glass.
- Garnish: Finally, add a few candy corn candies on top of the whipped cream for a decorative touch and to tie in the candy corn theme.
- Chill: Place the parfaits in the refrigerator for at least 30 minutes to allow them to set and chill before serving.
Extra Tips:
For an added touch of flavor, consider mixing a little vanilla extract into the whipped cream before topping the parfaits. If you want to make the dessert a bit healthier, you can substitute Greek yogurt for some or all of the vanilla pudding.
Additionally, if you’re making the parfaits for a larger group, simply double or triple the recipe as needed. Be sure to use clear glasses or cups to showcase the beautiful layers, and serve them with small spoons to make it easy for guests to enjoy every bite.
Skeleton Gingerbread Men
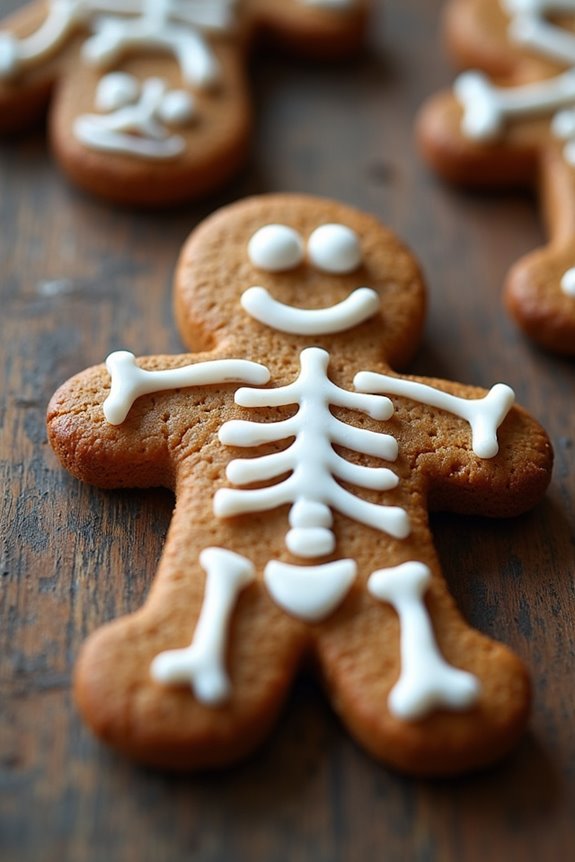
Skeleton Gingerbread Men are a frightfully fun twist on the classic holiday cookie. Perfect for Halloween, these cookies add a spooky flair to any dessert table with their skeletal icing designs. The gingerbread men are made with a blend of warm spices, creating a deliciously aromatic treat that’s both festive and flavorful.
These cookies not only serve as a delightful sweet but also as a creative activity for kids and adults alike, allowing for imaginative decoration.
These Skeleton Gingerbread Men are perfect for a serving size of 4-6 people, making them an ideal choice for a small Halloween gathering. The recipe involves crafting traditional gingerbread dough, cutting it into fun shapes, and decorating the baked cookies with icing to resemble spooky skeletons. Whether you’re hosting a Halloween party or simply enjoying a cozy night in, these cookies will surely add a touch of eerie delight.
Ingredients:
- 3 cups all-purpose flour
- 3/4 cup dark brown sugar
- 3/4 cup molasses
- 1 large egg
- 1/2 cup unsalted butter, softened
- 1 tablespoon ground ginger
- 1 tablespoon ground cinnamon
- 1/2 teaspoon ground cloves
- 1/2 teaspoon baking soda
- 1/4 teaspoon salt
- Royal icing (store-bought or homemade)
- Black food coloring gel (optional)
Cooking Instructions:
- Prepare the Dough: In a large mixing bowl, cream together the softened butter and dark brown sugar until light and fluffy. Add the egg and molasses, mixing well until combined.
- Mix Dry Ingredients: In a separate bowl, whisk together the flour, ground ginger, ground cinnamon, ground cloves, baking soda, and salt. Gradually add the dry ingredients to the wet ingredients, mixing until a smooth dough forms.
- Chill the Dough: Divide the dough in half, shape each half into a disk, wrap in plastic wrap, and refrigerate for at least 1 hour. Chilling the dough helps it firm up and makes it easier to roll out.
- Preheat the Oven: Preheat your oven to 350°F (175°C). Line two baking sheets with parchment paper.
- Roll Out the Dough: On a lightly floured surface, roll out one disk of dough to about 1/4 inch thickness. Use gingerbread man cookie cutters to cut out shapes, and place them on the prepared baking sheets.
- Bake the Cookies: Bake the cookies in the preheated oven for 8-10 minutes, or until the edges are firm. Allow the cookies to cool on the baking sheets for 5 minutes before transferring them to a wire rack to cool completely.
- Decorate the Cookies: Once the cookies are completely cool, prepare the royal icing according to package instructions or your recipe. If desired, tint the icing with black food coloring gel. Use a piping bag or a small squeeze bottle to draw skeleton designs on each gingerbread man.
Extra Tips:
To guarantee your Skeleton Gingerbread Men have the perfect texture, avoid over-mixing the dough once the flour is added. Over-mixing can result in tough cookies.
Additionally, if you’re making your own royal icing, ensure it’s the right consistency for piping—thick enough to hold its shape but thin enough to flow smoothly. If the icing is too thick, add a few drops of water; if too thin, add more powdered sugar.
Finally, let the decorated cookies sit at room temperature until the icing is completely dry before storing them in an airtight container. This will help preserve the intricate designs and prevent smudging.