
Hey there, fellow Halloween enthusiasts! 🎃
If you’re anything like me, you’re always on the hunt for simple yet spooktacular treats to impress your little ghouls and goblins. From Ghoulish Ghost Cupcakes to Creepy Witch Finger Cookies, I’ve gathered some of the easiest and most festive baking ideas to add a touch of magic to your Halloween celebrations.
Let’s get ready to create some hauntingly delicious delights that’ll have everyone howling for more!
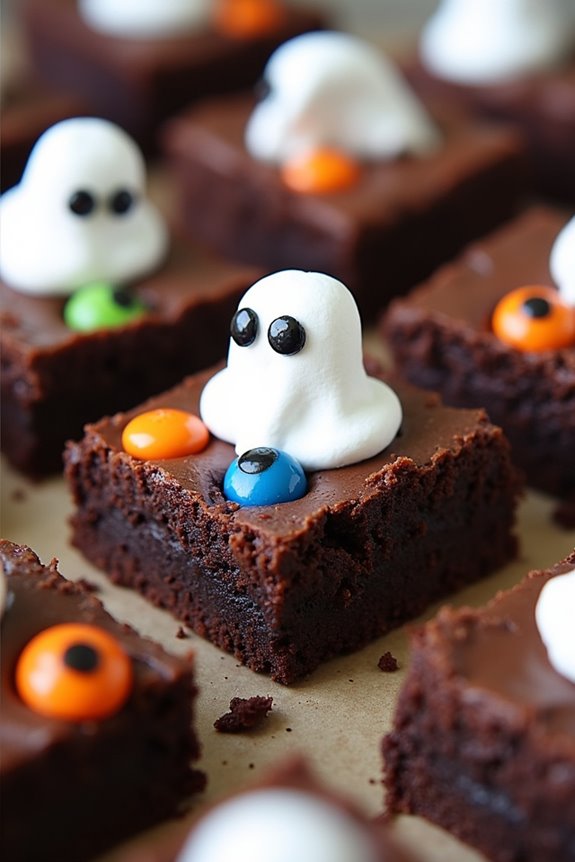
Ghoulish Ghost Cupcakes

These Ghoulish Ghost Cupcakes are the perfect spooky treat to add to your Halloween festivities. With their eerie white frosting and adorable ghostly shapes, these cupcakes are sure to be a hit with both kids and adults alike. The rich, chocolatey base paired with a fluffy marshmallow topping makes for a delightful mix of flavors and textures that will leave your guests enchanted.
Not only are these cupcakes delicious, but they’re also fun to make. Whether you’re hosting a Halloween party or just want to surprise your family with a festive treat, these ghostly cupcakes are an excellent choice. With a few simple ingredients and some creative frosting techniques, you’ll have a batch of spine-tingling cupcakes ready to enjoy.
Ingredients (Serves 4-6 people):
- 1 cup all-purpose flour
- 1/2 cup unsweetened cocoa powder
- 1 cup granulated sugar
- 1/2 teaspoon baking powder
- 1/2 teaspoon baking soda
- 1/4 teaspoon salt
- 1/2 cup unsalted butter, melted
- 2 large eggs
- 1 teaspoon vanilla extract
- 1/2 cup buttermilk
- 1 cup mini marshmallows
- 1/2 cup heavy cream
- 1/4 cup confectioners’ sugar
- Black food coloring or gel for decorating
Instructions:
- Preheat and Prepare: Preheat your oven to 350°F (175°C). Line a cupcake pan with 12 paper liners.
- Mix Dry Ingredients: In a large bowl, sift together the flour, cocoa powder, sugar, baking powder, baking soda, and salt.
- Combine Wet Ingredients: In another bowl, whisk together the melted butter, eggs, vanilla extract, and buttermilk until well combined.
- Create Batter: Gradually add the wet ingredients to the dry ingredients, stirring until just combined. Be careful not to overmix.
- Bake Cupcakes: Divide the batter evenly among the cupcake liners, filling each about two-thirds full. Bake in the preheated oven for 18-20 minutes, or until a toothpick inserted into the center comes out clean. Allow them to cool completely on a wire rack.
- Prepare Marshmallow Topping: In a microwave-safe bowl, melt the mini marshmallows with heavy cream in 30-second intervals, stirring in between, until smooth.
- Whip Cream: Whip the confectioners’ sugar into the marshmallow mixture until fluffy and peaks form.
- Frost Cupcakes: Use a piping bag to pipe the marshmallow mixture onto each cooled cupcake, creating a ghostly shape.
- Decorate: Use a toothpick to dot on eyes and mouths with black food coloring or gel to create ghost faces.
Extra Tips:
For the best results, confirm that your cupcakes are completely cooled before applying the marshmallow frosting to prevent it from melting. If the marshmallow topping is too thick, add a little more cream to achieve the desired consistency.
To stabilize the frosting for longer-lasting ghosts, refrigerate the cupcakes before serving. Also, get creative with your ghost faces—try different expressions to give your cupcakes more personality!
Spooky Spiderweb Cookies
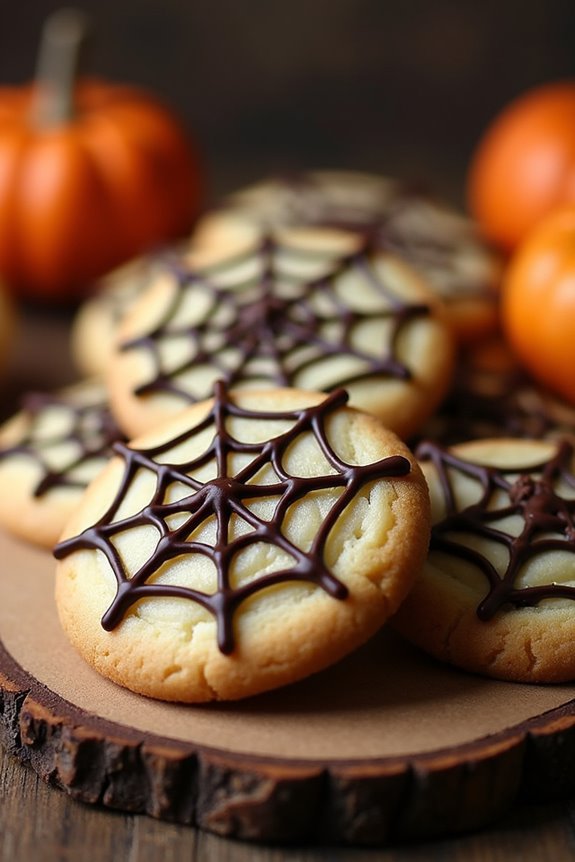
Get ready to add a touch of spookiness to your Halloween festivities with these delightful Spooky Spiderweb Cookies. Perfect for a Halloween party or just a fun autumn treat, these cookies are as delicious as they’re decorative. With a crisp, buttery base and a spooky spiderweb design made from melted chocolate, these cookies are sure to impress both kids and adults alike.
Not only do they look impressive, but they’re also incredibly easy to make, making them a great option for baking with children or as a last-minute Halloween treat. These cookies are designed to serve 4-6 people, making them ideal for a small gathering.
The key to achieving the perfect spiderweb design is a steady hand and a little patience, but don’t worry if they aren’t perfect—imperfections only add to their spooky charm. Whether you’re an experienced baker or a novice in the kitchen, these cookies are a fun and rewarding project that will add a festive touch to your Halloween celebrations.
Ingredients (Serves 4-6):
- 2 cups all-purpose flour
- 1/2 teaspoon baking powder
- 1/4 teaspoon salt
- 3/4 cup unsalted butter, softened
- 1 cup granulated sugar
- 1 large egg
- 1 teaspoon pure vanilla extract
- 1/2 cup semi-sweet chocolate chips
- 1 tablespoon heavy cream or milk
Instructions:
- Prepare the Cookie Dough:
- Preheat your oven to 350°F (175°C) and line two baking sheets with parchment paper.
- In a medium bowl, whisk together the flour, baking powder, and salt. Set aside.
- In a large mixing bowl, cream the softened butter and granulated sugar together using an electric mixer until light and fluffy, about 3 minutes.
- Add the egg and vanilla extract to the butter mixture, beating until well combined.
- Gradually add the dry ingredients to the wet ingredients, mixing until a soft dough forms.
- Roll the dough into 1-inch balls and place them 2 inches apart on the prepared baking sheets.
- Flatten each ball slightly with the palm of your hand.
- Bake in the preheated oven for 10-12 minutes, or until the cookies are just beginning to brown around the edges. Remove from the oven and let cool on the baking sheets for 5 minutes, then transfer to a wire rack to cool completely.
- While the cookies are cooling, melt the semi-sweet chocolate chips in a microwave-safe bowl with the heavy cream or milk. Heat in 20-second increments, stirring in between, until the chocolate is smooth and melted.
- Transfer the melted chocolate to a small piping bag or a ziplock bag with a tiny corner snipped off.
- Starting from the center of each cookie, pipe a series of concentric circles, then use a toothpick to drag lines from the center to the edge to create a spiderweb effect.
- Allow the chocolate to set at room temperature or place the cookies in the refrigerator for a quicker setting time.
- Once the chocolate has set, serve the cookies on a festive platter and enjoy!
- 1 cup unsalted butter, softened
- 1 cup powdered sugar
- 1 large egg
- 1 teaspoon vanilla extract
- 1 teaspoon almond extract
- 2 2/3 cups all-purpose flour
- 1 teaspoon baking powder
- 1 teaspoon salt
- Green gel food coloring
- 3/4 cup whole almonds
- 1/4 cup strawberry or raspberry jam
Extra Tips:
For an even more festive touch, consider adding a small chocolate spider to each cookie. Simply pipe a small dot of chocolate for the body and add legs using the melted chocolate.
If you don’t have a piping bag, a ziplock bag with a small corner cut off will work just fine for piping the chocolate. Remember that the key to a spooky spiderweb is having fun, so don’t worry about making each cookie perfect—embrace the imperfections for a truly unique Halloween treat.
Creepy Witch Finger Cookies
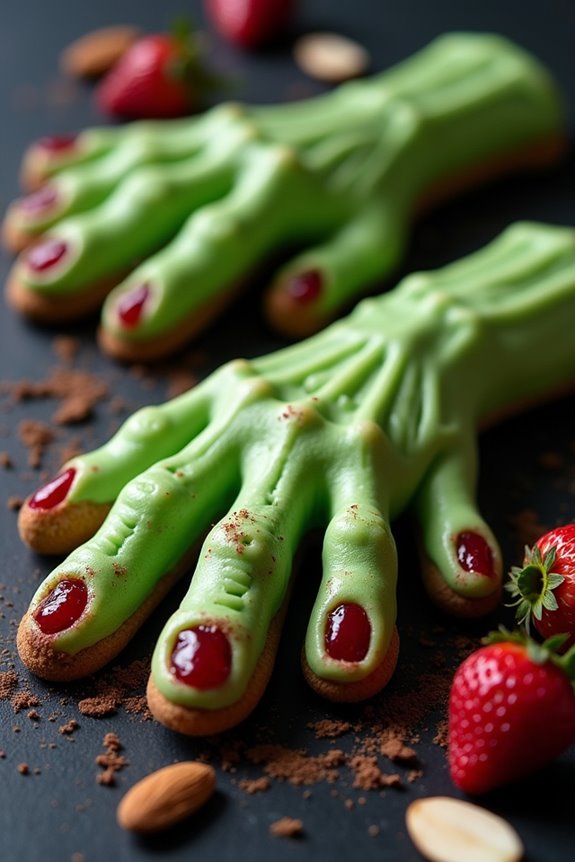
Halloween is the perfect time to release your culinary creativity and these Creepy Witch Finger Cookies are sure to be a hit at any spooky gathering.
These creepy treats aren’t only delightfully eerie but also deliciously buttery and sweet. Shaped like gnarly fingers and adorned with almond nails, they’re bound to send a shiver down your guests’ spines while satisfying their sweet cravings.
Whether you’re hosting a Halloween party or just want to surprise your family with a fun and creepy snack, these cookies will surely become a holiday favorite.
The key to perfect Witch Finger Cookies lies in their realistic texture and color. A hint of green food coloring gives them an unsettling, ghastly hue, while strategic scoring and almond nails create the appearance of knobby knuckles and dirty fingernails.
With a mix of simple ingredients, these cookies are easy to prepare and can be made in advance, allowing you to focus on other festive activities. Follow this recipe to create a batch that will serve 4-6 people.
Ingredients:
Instructions:
- Preheat the Oven: Begin by preheating your oven to 325°F (163°C). Line two baking sheets with parchment paper to prevent the cookies from sticking.
- Mix the Wet Ingredients: In a large mixing bowl, beat the softened butter and powdered sugar together until light and fluffy. Add the egg, vanilla extract, and almond extract, and continue to mix until well combined.
- Prepare the Dry Ingredients: In a separate bowl, whisk together the all-purpose flour, baking powder, and salt. Gradually add the dry ingredients to the wet mixture, mixing until a dough forms.
- Add Food Coloring: Add a small amount of green gel food coloring to the dough and mix until you achieve a uniform green color. Adjust the amount of coloring for your desired intensity.
- Shape the Fingers: Take a tablespoon of dough and roll it into a finger-sized log. Use a knife to score lines in the dough to mimic knuckles. Press an almond firmly into one end of the log to resemble a fingernail.
- Bake the Cookies: Place the shaped fingers on the prepared baking sheets. Bake in the preheated oven for 20-25 minutes, or until the cookies are set and slightly golden at the edges.
- Add Bloody Details: Remove the cookies from the oven and let them cool slightly. Remove the almonds, dab a small amount of jam in the nail bed cavity, and press the almond back into place, allowing the jam to ooze slightly.
- Cool Completely: Allow the cookies to cool completely on a wire rack before serving.
Extra Tips:
For an extra creepy effect, use a small brush to apply some cocoa powder to the knuckles and around the fingernails to create a dirty appearance.
Feel free to experiment with the dough to make the fingers as thin or thick as you like, but remember that baking times may vary slightly.
If you’re making these cookies in advance, store them in an airtight container to keep them fresh and delicious. Enjoy your spooky creation and have a hauntingly delightful Halloween!
Bewitching Brownie Bites
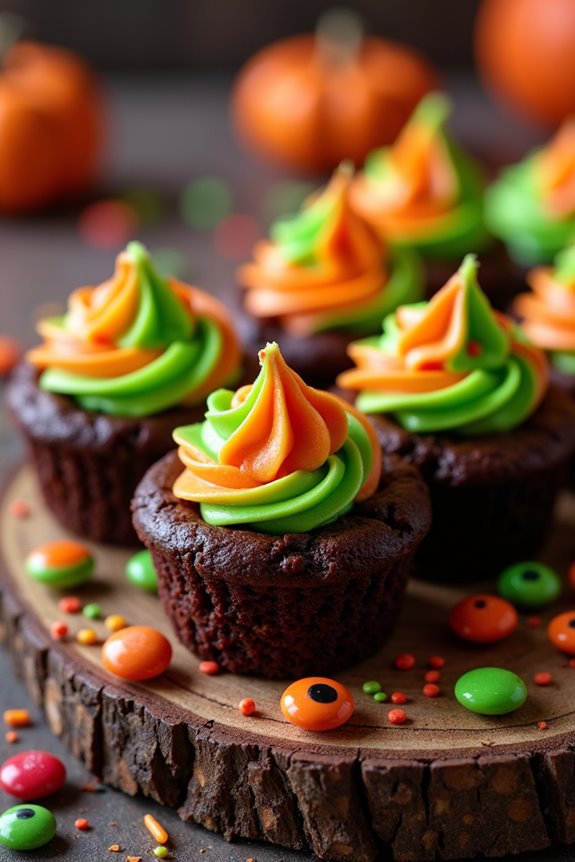
Indulge in a spellbinding treat this Halloween with these Bewitching Brownie Bites. These decadent, bite-sized delights are a perfect blend of rich chocolatey goodness and a hint of spooky fun. Perfect for a Halloween party or a cozy night in with the family, these brownies are sure to enchant your taste buds.
The great thing about Bewitching Brownie Bites is that they aren’t only delicious but also simple to prepare, making them a fantastic choice for both beginner and experienced bakers looking to add a touch of magic to their Halloween festivities.
These brownie bites are made from a classic brownie base, ensuring a fudgy and moist center. Once baked, they’re topped with a whimsical swirl of colored icing and candy decorations to give them a festive look. You can get creative with your toppings, using candy eyes, sprinkles, or any of your favorite Halloween-themed candies.
With just a few ingredients and some creative flair, these spooky treats will be the highlight of your dessert table.
Ingredients (Serves 4-6):
- 1 cup unsalted butter
- 2 cups granulated sugar
- 4 large eggs
- 1 teaspoon vanilla extract
- 1 cup all-purpose flour
- 1 cup unsweetened cocoa powder
- 1/2 teaspoon salt
- 1/2 teaspoon baking powder
- 1 cup semi-sweet chocolate chips
- Assorted Halloween candies (e.g., candy eyes, sprinkles)
- 1 cup prepared icing (orange or green food coloring optional)
Instructions:
- Preheat and Prepare: Preheat your oven to 350°F (175°C). Grease or line a mini muffin tin with paper liners; this will help you achieve the perfect brownie bites without sticking.
- Melt the Butter: In a medium saucepan, melt the butter over low heat. Once melted, remove from heat and stir in the sugar, eggs, and vanilla extract until smooth.
- Mix the Dry Ingredients: In a separate bowl, whisk together the flour, cocoa powder, salt, and baking powder. Gradually add this dry mixture to the wet ingredients, stirring until just combined.
- Add Chocolate Chips: Fold in the semi-sweet chocolate chips, ensuring they’re evenly distributed throughout the batter.
- Fill the Muffin Tin: Spoon the brownie batter into the prepared mini muffin tin, filling each cup about 3/4 full to allow room for rising.
- Bake the Brownies: Bake in the preheated oven for 12-15 minutes or until a toothpick inserted into the center comes out mostly clean. Be careful not to overbake to keep them fudgy.
- Cool and Decorate: Allow the brownie bites to cool in the tin for about 5 minutes, then transfer them to a wire rack to cool completely. Once cooled, pipe a swirl of icing on top of each brownie and decorate with your selected Halloween candies.
Extra Tips:
For an extra touch of Halloween magic, consider using themed liners for your muffin tin. If you want to add a hint of surprise to each bite, you can insert a small piece of candy or chocolate in the center of each brownie before baking.
Additionally, if you don’t have a piping bag for the icing, you can use a plastic sandwich bag with the corner snipped off. Remember, the decorations are where you can let your creativity shine—feel free to experiment with different candy combinations to make your Bewitching Brownie Bites uniquely yours!
Monster Mash Cake Pops

Get ready to impress your Halloween party guests with these whimsical Monster Mash Cake Pops. These delightful treats aren’t only visually appealing but also packed with delicious flavor. Made with a moist cake center and coated with a vibrant candy shell, Monster Mash Cake Pops are perfect for any spooky celebration. Their fun and colorful design makes them a hit among both kids and adults, and they’re surprisingly simple to create at home.
Creating Monster Mash Cake Pops involves a few key steps, including baking the cake, crumbling it, and mixing it with frosting to form the base of the pops. Once you’re ready to assemble, you’ll dip the cake balls into melted candy coating, and decorate them with candy eyes and other festive embellishments. The result is an eye-catching and tasty treat that adds a pop of fun to your Halloween dessert table.
Ingredients (serving size: 4-6 people):
- 1 box of cake mix (any flavor)
- Ingredients needed for cake mix (eggs, oil, water)
- 1 cup of frosting (store-bought or homemade)
- 2 cups of candy melts (assorted colors like green, purple, orange)
- Candy eyes
- Lollipop sticks
- Sprinkles and other edible decorations
Instructions:
- Bake the Cake: Preheat your oven as directed on the cake mix package. Prepare the cake batter according to the package instructions and pour it into a greased baking pan. Bake the cake in the oven until a toothpick inserted in the center comes out clean. Allow the cake to cool completely.
- Crumble the Cake: Once the cake is cooled, crumble it into fine pieces in a large mixing bowl. The finer the crumbs, the smoother your cake pops will be.
- Mix with Frosting: Add about 1 cup of frosting to the crumbled cake. Mix thoroughly until the mixture is moist and holds together, but not overly sticky. Adjust with more frosting if necessary.
- Shape the Cake Balls: Scoop out small portions of the cake mixture and roll them into 1-inch balls. Place the balls on a baking sheet lined with parchment paper.
- Insert Sticks: Melt a small amount of candy melts. Dip the tip of each lollipop stick into the melted candy, then insert it halfway into each cake ball. This helps secure the stick in place. Chill the cake pops in the freezer for about 15 minutes.
- Melt Candy Coating: Melt the remaining candy melts in separate bowls according to the package instructions. Use a microwave or double boiler, stirring until smooth.
- Coat the Cake Pops: Dip each cake pop into the melted candy coating, allowing any excess to drip off. Stand the pops upright in a foam block to set.
- Decorate: Before the coating hardens, press candy eyes and other decorations onto the cake pops. Use a contrasting color of candy melts to drizzle over the pops for added effect.
- Let Set: Allow the decorated cake pops to set completely at room temperature or in the refrigerator.
Extra Tips:
To guarantee your Monster Mash Cake Pops turn out perfectly, make sure the cake balls are well-chilled before dipping them into the candy coating. This prevents them from falling apart.
If the candy coating is too thick, add a small amount of vegetable shortening to thin it out. Be creative with your decorations; using different candy melts colors and sprinkles can help you create a variety of monster designs.
Finally, store your cake pops in an airtight container at room temperature for up to a week, or in the refrigerator for longer freshness. Enjoy your spooky creation!
Eerie Eyeball Truffles

Looking to add a spooky yet delicious touch to your Halloween festivities? Eerie Eyeball Truffles might just be the perfect addition to your party spread. These delightful chocolate truffles are designed to look like creepy eyeballs, making them a fun and eye-catching treat for kids and adults alike. Not only do they make for a great visual on your dessert table, but they’re also incredibly tasty, combining rich chocolate and creamy fillings that melt in your mouth.
To make Eerie Eyeball Truffles, you’ll need to start with a basic chocolate truffle recipe, which you’ll then transform into your ghoulish creation. The key to these truffles is in the decoration – using colored candy melts, edible ink pens, and candies to mimic the look of an eyeball. This recipe caters to a serving size of 4-6 people, perfect for a small Halloween gathering.
Ingredients:
- 8 ounces of semi-sweet chocolate, chopped
- 1/2 cup heavy cream
- 1 teaspoon vanilla extract
- 1 tablespoon unsalted butter
- 1/2 cup white candy melts
- 1/4 cup red candy melts
- 12 small round candies (like M&M’s) for the iris
- Edible ink pens (preferably black)
Instructions:
- Prepare the Chocolate Base: In a medium heatproof bowl, combine the chopped semi-sweet chocolate and the butter. Heat the heavy cream in a small saucepan over medium heat until it begins to simmer. Pour the hot cream over the chocolate and butter. Let it sit for a minute, then stir until the mixture is smooth and glossy. Stir in the vanilla extract.
- Chill the Mixture: Cover the bowl with plastic wrap and refrigerate the chocolate mixture for about 2 hours, or until firm enough to scoop.
- Form the Truffles: Once the mixture is firm, use a melon baller or small cookie scoop to form small balls (about 1 inch in diameter) of the chocolate mixture. Place them on a baking sheet lined with parchment paper. Return to the refrigerator for 30 minutes to set.
- Decorate the Truffles: Melt the white candy melts according to package instructions. Dip each chilled truffle into the white candy melt, ensuring it’s completely coated. Place back on the parchment paper. Immediately press an M&M into the center of each truffle to serve as the “iris.”
- Add Details: Melt the red candy melts and use a toothpick to draw squiggly red lines from the iris outward to simulate blood vessels. Allow the truffles to set completely.
- Finish with Edible Ink: Once the candy coating has hardened, use the edible ink pen to draw a small black dot in the center of the “iris” to mimic a pupil. Your eerie eyeball truffles are now ready to serve!
Extra Tips: For a more realistic look, you can use a variety of colored candy melts and candies for different eye colors and effects. If you find the chocolate mixture too sticky when shaping into balls, lightly dust your hands with cocoa powder. To speed up the setting process, you can place the truffles in the freezer for short periods. These truffles are best enjoyed chilled, so keep them refrigerated until you’re ready to serve.
Pumpkin Patch Rice Krispie Treats
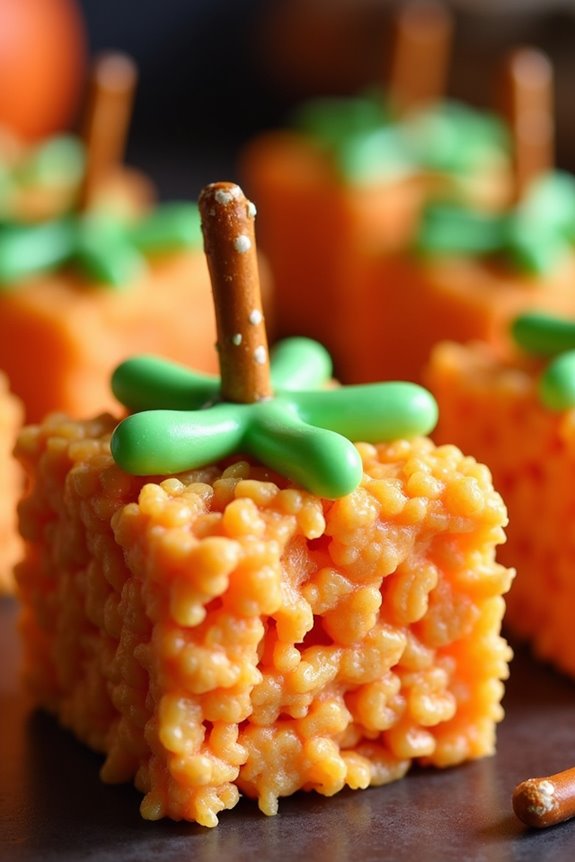
Pumpkin Patch Rice Krispie Treats are a delightful and festive addition to your Halloween baking repertoire. These treats aren’t only easy to make but also provide a fun activity for the entire family. The combination of gooey marshmallows, crispy rice cereal, and a touch of pumpkin spice makes them irresistible to both kids and adults.
Plus, decorating them to resemble mini pumpkin patches adds a creative and seasonal touch to your Halloween table. Whether you’re hosting a party or just want to enjoy a spooky snack, these Pumpkin Patch Rice Krispie Treats are perfect for the occasion.
The recipe yields enough to serve 4-6 people, making it ideal for a small gathering or family treat night. With simple ingredients and easy-to-follow steps, you’ll have these treats ready in no time, leaving plenty of room for creativity in decorating.
Ingredients (Serves 4-6):
- 3 tablespoons unsalted butter
- 1 package (10 oz) mini marshmallows
- 6 cups Rice Krispies cereal
- 1/2 teaspoon pumpkin spice
- Orange food coloring
- Green candy melts or green icing
- Pretzel sticks
Instructions:
- Prepare the Base: Start by melting the unsalted butter in a large saucepan over low heat. Once melted, add the mini marshmallows to the saucepan, stirring continuously until they’re completely melted and smooth.
- Add Flavor and Color: Stir in the pumpkin spice and a few drops of orange food coloring into the melted marshmallow mixture. Adjust the food coloring until you reach the desired pumpkin-like hue.
- Mix in Cereal: Remove the saucepan from heat and quickly add the Rice Krispies cereal to the marshmallow mixture. Stir until the cereal is fully coated and the mixture is well combined.
- Shape the Treats: Using a spatula or your hands (lightly greased with butter or cooking spray), press the mixture into a greased 9×13 inch baking dish. Allow it to cool for about 10 minutes.
- Cut and Decorate: Once cooled, cut the Rice Krispie mixture into small squares or rectangles. Insert a pretzel stick into the top of each square to resemble a pumpkin stem.
- Add the Finishing Touches: Melt the green candy melts according to package instructions or use green icing to pipe small leaves or vines around the pretzel stems for a realistic pumpkin patch look.
Extra Tips:
When making Pumpkin Patch Rice Krispie Treats, be sure to work quickly when adding the cereal to the marshmallow mixture to guarantee even coating before it cools.
Using a lightly greased spatula or wax paper will help press the mixture into the pan without sticking. If you find the mixture too sticky to handle, rub a little butter on your hands.
Feel free to get creative with the decorations – you can use mini chocolate chips for eyes or add candy corn for extra flair. Enjoy the process and have fun creating your own edible pumpkin patch!
Frighteningly Fudgy Brownies
Frighteningly Fudgy Brownies are the perfect treat to conjure up some spooky fun in the kitchen this Halloween. These decadent squares combine rich chocolate flavor with a delightfully dense and chewy texture that will have trick-or-treaters and party-goers alike howling for more.
With a few eerie embellishments, you can easily transform these classic brownies into a ghoulish delight, perfect for any Halloween gathering. Whether you’re a seasoned baker or just stepping into the world of confections, this recipe is designed to be both simple and satisfyingly spooky.
The secret to these Frighteningly Fudgy Brownies is the balance between high-quality cocoa powder and melted chocolate, which guarantees every bite is packed with intense chocolate flavor.
Add in some eerie decorations like candy eyes or marshmallow ghosts, and you’ll have a show-stopping dessert that not only tastes amazing but also adds a festive touch to your Halloween spread. This recipe makes a batch suitable for 4-6 people, making certain that everyone at your small gathering gets a taste of the frightful fun.
Ingredients
- 1 cup of unsalted butter
- 2 cups of granulated sugar
- 4 large eggs
- 1 teaspoon of vanilla extract
- 1 cup of all-purpose flour
- 1 cup of unsweetened cocoa powder
- 1 teaspoon of salt
- 1/2 teaspoon of baking powder
- 1 cup of semi-sweet chocolate chips
- Halloween-themed decorations (candy eyes, marshmallow ghosts, etc.)
Cooking Instructions
- Preheat and Prepare: Preheat your oven to 350°F (175°C). Grease a 9×13 inch baking dish with butter or non-stick spray and line with parchment paper for easy removal of the brownies after baking.
- Melt the Butter and Chocolate: In a microwave-safe bowl, melt the unsalted butter and semi-sweet chocolate chips in 30-second intervals, stirring after each interval until smooth and fully combined. Allow it to cool slightly.
- Mix the Wet Ingredients: In a large mixing bowl, combine the granulated sugar, eggs, and vanilla extract. Beat the mixture on medium speed with an electric mixer until it becomes fluffy and light in color, about 2 minutes.
- Combine Dry Ingredients: In another bowl, sift together the all-purpose flour, unsweetened cocoa powder, salt, and baking powder to make sure there are no lumps.
- Create the Batter: Slowly mix the melted butter and chocolate mixture into the wet ingredients, stirring constantly to incorporate. Gradually add the dry ingredients to the wet mixture, folding gently with a spatula until just combined. Be careful not to overmix.
- Pour and Decorate: Pour the brownie batter into the prepared baking dish, spreading it evenly with a spatula. Decorate the top with your choice of Halloween-themed decorations like candy eyes or marshmallow ghosts, pressing them slightly into the batter.
- Bake: Place the baking dish in the preheated oven and bake for 25-30 minutes, or until a toothpick inserted into the center comes out with a few moist crumbs attached. Avoid overbaking to maintain that fudgy texture.
- Cool and Serve: Allow the brownies to cool in the pan on a wire rack. Once cooled, lift them out of the pan using the parchment paper edges, cut into squares, and serve to your enthusiastic guests.
Extra Tips
For the best Frighteningly Fudgy Brownies, use high-quality cocoa powder and chocolate for the most intense flavor.
Be sure to measure your flour accurately using a spoon-and-level method to avoid dense brownies. If you prefer a gooier center, slightly underbake the brownies, and remember they’ll continue to set as they cool.
Finally, get creative with your decorations—using a variety of Halloween-themed toppings will add both flavor and a festive touch to your spooky treats.
Haunted House Gingerbread Cookies
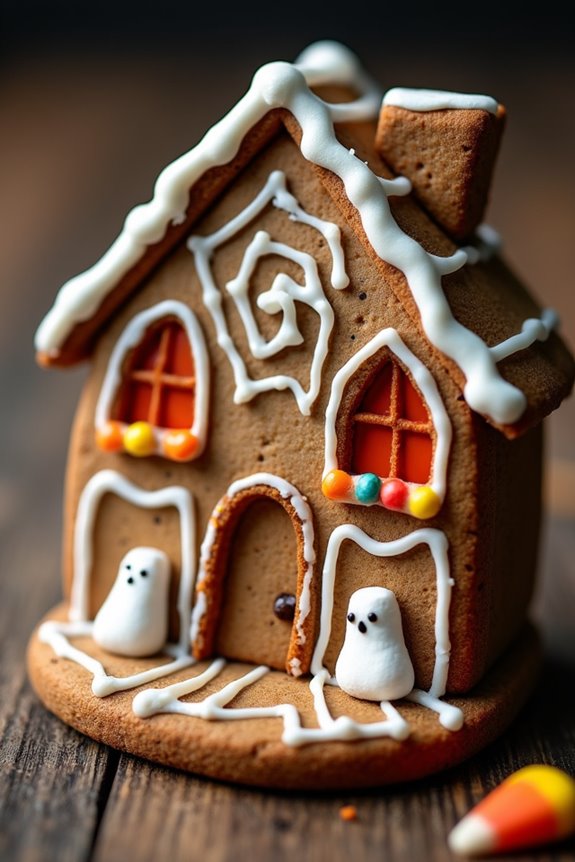
Haunted House Gingerbread Cookies are the perfect Halloween treat, both fun to make and delicious to eat. These cookies aren’t only a delightful dessert, but they also double as a creative activity for friends and family during the Halloween season. The process of making Haunted House Gingerbread Cookies involves crafting spooky shapes and decorating them with eerie details that bring the haunted house theme to life.
Whether you’re a seasoned baker or a beginner looking for a festive challenge, these cookies are bound to impress anyone who lays eyes on them.
To get started, you’ll need a basic gingerbread cookie dough, which serves as the foundation for your haunted creations. The rich, spiced flavor of gingerbread complements the dark, mysterious elements of Halloween. Once baked and cooled, the cookies become a blank canvas for your imagination. Using royal icing and an array of colored candies, you can transform simple gingerbread shapes into spooky haunted houses complete with ghostly figures, creepy windows, and cobwebs.
This recipe will guide you through each step, making certain your haunted cookies are as tasty as they’re terrifying.
Ingredients (serving size: 4-6 people)
- 3 cups all-purpose flour
- 3/4 cup unsalted butter, softened
- 3/4 cup brown sugar
- 1/2 cup molasses
- 1 egg
- 1 teaspoon vanilla extract
- 1 teaspoon baking soda
- 1 tablespoon ground ginger
- 1 tablespoon ground cinnamon
- 1/2 teaspoon ground cloves
- 1/2 teaspoon salt
- Royal icing (store-bought or homemade)
- Assorted candy for decorating (e.g., candy corn, mini marshmallows, licorice)
- Food coloring (optional)
Cooking Instructions
- Prepare the Dough: In a large mixing bowl, beat the softened butter and brown sugar together until light and fluffy. Add the molasses, egg, and vanilla extract, mixing until well combined.
- Combine Dry Ingredients: In a separate bowl, whisk together the flour, baking soda, ginger, cinnamon, cloves, and salt. Gradually add this dry mixture to the wet ingredients, mixing until a dough forms.
- Chill the Dough: Divide the dough in half, flatten into disks, and wrap each in plastic wrap. Chill the dough in the refrigerator for at least 1 hour, or until firm.
- Preheat the Oven: Preheat your oven to 350°F (175°C) and line two baking sheets with parchment paper.
- Roll and Cut the Dough: On a lightly floured surface, roll out one disk of dough to about 1/4-inch thickness. Use haunted house cookie cutters to cut out shapes, and place them on the prepared baking sheets.
- Bake the Cookies: Bake the cookies for 8-10 minutes, or until the edges are firm and the centers are set. Allow them to cool on the baking sheets for a few minutes before transferring to a wire rack to cool completely.
- Decorate the Cookies: Once the cookies are completely cool, use royal icing to outline and fill in the haunted house shapes. Use assorted candies to create spooky details like windows, doors, and ghostly figures. Add food coloring to the icing if desired for more vibrant designs.
Extra Tips
For the best results, make certain your dough is well-chilled before rolling it out; this helps prevent it from becoming too sticky and difficult to handle.
When cutting out your haunted house shapes, dip the cookie cutters in flour to ensure clean cuts. If your royal icing is too thick, add a few drops of water to achieve the desired consistency for piping.
Finally, allow the decorated cookies to dry completely before stacking or storing them to avoid smudging your designs. Enjoy the process and let your creativity shine with each haunted gingerbread house!
Vampire Bite Red Velvet Cupcakes
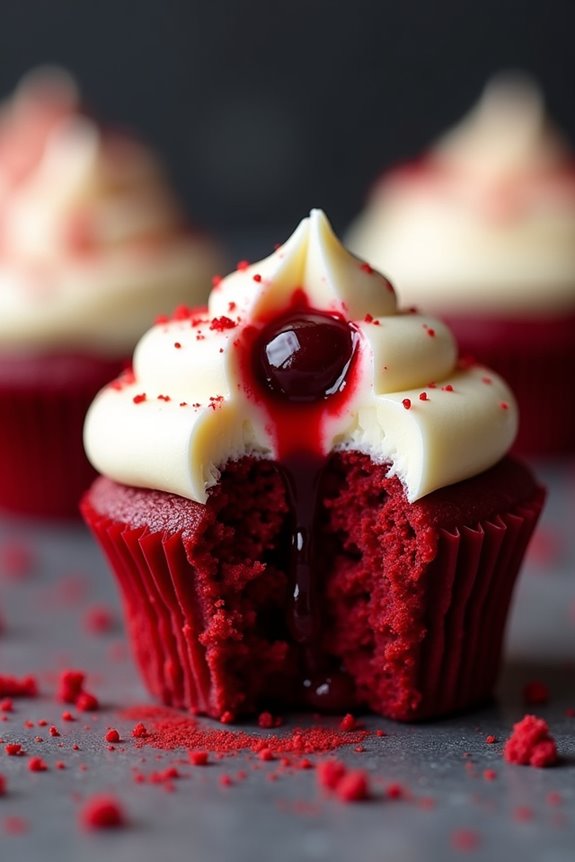
Indulge in the spooky spirit of Halloween with these deliciously eerie Vampire Bite Red Velvet Cupcakes. Perfectly moist with vibrant red tones, these cupcakes are sure to captivate your guests’ attention. The allure of the red velvet is enhanced by the dramatic cherry filling that oozes out like a vampire’s bite.
These cupcakes not only look impressive but also offer a delightful combination of flavors that will leave everyone craving more. The cupcakes are topped with a smooth and creamy cream cheese frosting, which adds a lovely contrast to the rich red cake.
With just a few simple steps, you can create these gory yet delightful treats for your Halloween party or for a fun family dessert. This recipe makes 12-15 cupcakes, serving approximately 4-6 people.
Ingredients:
- 1 1/4 cups all-purpose flour
- 1 cup granulated sugar
- 1 tablespoon cocoa powder
- 1/2 teaspoon baking soda
- 1/2 teaspoon salt
- 1/2 cup unsalted butter, softened
- 2 large eggs
- 1 cup buttermilk
- 1 teaspoon vanilla extract
- 1 tablespoon red food coloring
- 1 teaspoon white vinegar
- 1/2 cup cherry preserves or cherry pie filling
- 8 oz cream cheese, softened
- 1/4 cup unsalted butter, softened
- 2 cups powdered sugar
- 1 teaspoon vanilla extract
Instructions:
- Preheat the Oven: Begin by preheating your oven to 350°F (175°C). Line a muffin tin with cupcake liners to guarantee the cupcakes don’t stick and are easy to serve.
- Mix Dry Ingredients: In a medium-sized bowl, whisk together the flour, cocoa powder, baking soda, and salt. This guarantees that the dry ingredients are evenly distributed and the cocoa powder doesn’t clump.
- Cream Butter and Sugar: In a large bowl, beat the softened butter and granulated sugar together until light and fluffy, about 3-4 minutes. This step incorporates air into the mixture, which helps the cupcakes rise.
- Add Wet Ingredients: Beat in the eggs one at a time, followed by the vanilla extract and red food coloring. Mix until the color is evenly distributed.
- Combine with Buttermilk and Vinegar: Gradually add the dry ingredients to the butter mixture, alternating with the buttermilk. Start and end with dry ingredients. Finally, stir in the vinegar for a slight tang and to enhance the red color.
- Fill the Cupcake Liners: Spoon the batter into the prepared cupcake liners, filling each about 2/3 full. This guarantees that the cupcakes have room to rise without overflowing.
- Bake: Place the tray in the preheated oven and bake for 18-20 minutes, or until a toothpick inserted into the center comes out clean. Let them cool completely on a wire rack.
- Prepare the Filling: While the cupcakes are baking, use a small saucepan to warm the cherry preserves until they’re slightly thinner and easier to work with.
- Core the Cupcakes: Once the cupcakes have cooled, use a small knife or a cupcake corer to remove a small piece from the center of each cupcake. Fill the cavity with about 1 teaspoon of cherry preserves or filling.
- Make the Frosting: In a medium bowl, beat the cream cheese and butter together until smooth. Gradually add the powdered sugar and vanilla extract, beating until the frosting is light and fluffy.
- Decorate: Pipe or spread the cream cheese frosting over each cupcake. For added effect, you can drizzle a little bit of the cherry preserve over the frosting to mimic blood drips.
Extra Tips:
For the best results, make sure all your ingredients are at room temperature before you start baking. This guarantees that they blend more smoothly and evenly.
If you want to add an extra touch of spookiness, consider inserting small plastic vampire fangs into the cupcakes before serving.
Be careful with the amount of food coloring used; it should be just enough to achieve the vivid red color without overwhelming the taste. If you prefer a less sweet option, you can reduce the amount of powdered sugar in the frosting.
Enjoy your hauntingly delicious creation!
Mummy Wrapped Hot Dogs
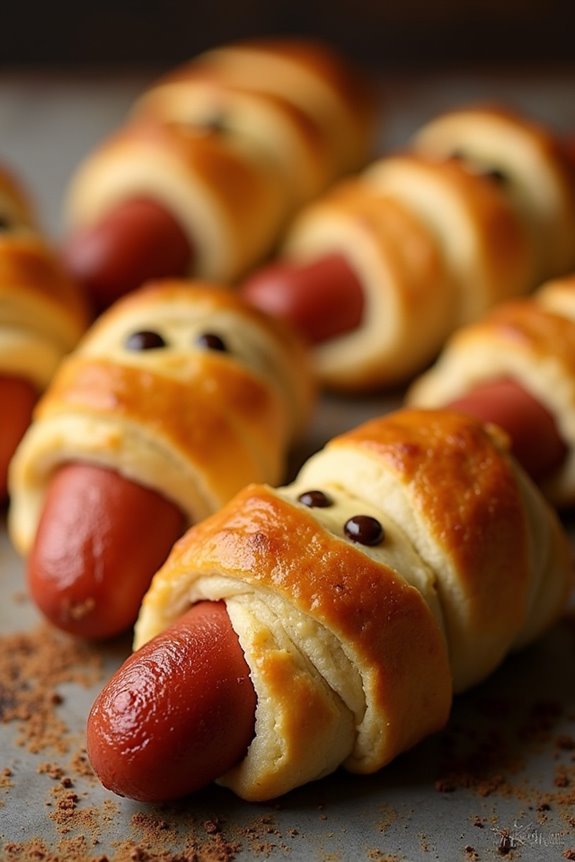
Halloween is the perfect time to get creative in the kitchen, and Mummy Wrapped Hot Dogs are a fun and festive treat that will delight both kids and adults alike. This playful recipe transforms ordinary hot dogs into spooky mummies with the help of crescent roll dough. The result is a delicious, savory snack that pairs perfectly with your favorite dipping sauces.
Whether you’re hosting a Halloween party or just looking for a themed dish to enjoy with your family, these Mummy Wrapped Hot Dogs are certain to be a hit.
These mummies aren’t only adorable, but they’re also incredibly easy to make. With minimal ingredients and prep time, you can whip up a batch of these tasty treats in no time. The crescent roll dough gives the hot dogs a flaky, buttery exterior, while the hot dogs themselves provide a satisfying, meaty bite.
Serve them warm right out of the oven for the best experience. Follow this simple recipe to create your own Mummy Wrapped Hot Dogs for a serving size of 4-6 people.
Ingredients:
- 8 hot dogs
- 1 can of crescent roll dough
- 1 egg, beaten
- Mustard or ketchup for eyes
Instructions:
- Preheat the oven: Start by preheating your oven to 375°F (190°C). This will guarantee that your Mummy Wrapped Hot Dogs bake evenly and come out perfectly golden.
- Prepare the dough: Open the can of crescent roll dough and unroll it onto a clean surface. Use a sharp knife or a pizza cutter to slice the dough into thin strips, about 1/4 inch wide. These strips will become the mummy’s “bandages.”
- Wrap the hot dogs: Take a hot dog and begin wrapping it with the dough strips, leaving a small gap near the top for the face. Overlap the dough slightly as you go to create the look of wrapped bandages. Repeat with the remaining hot dogs.
- Brush with egg: Place the wrapped hot dogs on a baking sheet lined with parchment paper. Use a pastry brush to apply a thin layer of beaten egg over the dough. This will give them a nice golden color once baked.
- Bake: Put the baking sheet in the preheated oven and bake for about 15-20 minutes, or until the dough is golden brown and cooked through.
- Add the eyes: Once the mummies are out of the oven, use a small amount of mustard or ketchup to dot on eyes for each mummy. A toothpick works well for this step.
- Serve: Allow the Mummy Wrapped Hot Dogs to cool slightly before serving them with your choice of dipping sauces.
Extra Tips:
To make your Mummy Wrapped Hot Dogs even more festive, consider using different types of sauces to create varied expressions on your mummies. Additionally, you can experiment with different types of sausages or add a slice of cheese underneath the dough for an extra layer of flavor.
If you want to prep ahead, you can wrap the hot dogs in dough a few hours before baking and store them in the refrigerator until ready to bake. This recipe is versatile and can easily be adjusted to accommodate more servings by simply increasing the quantity of ingredients.