
If you’re anything like me, the thrill of whipping up festive treats is simply irresistible. I’ve gathered a collection of 11 easy Halloween cookies perfect for those spontaneous baking urges. Picture crafting spooky spiderwebs or whimsical monster eyeballs with just a few simple ingredients. From gluten-free ghostly meringues to classic chocolate chip bat wings, there’s something delightful for every taste and occasion. Let’s explore these effortless treats together!
Spooky Spiderweb Chocolate Cookies
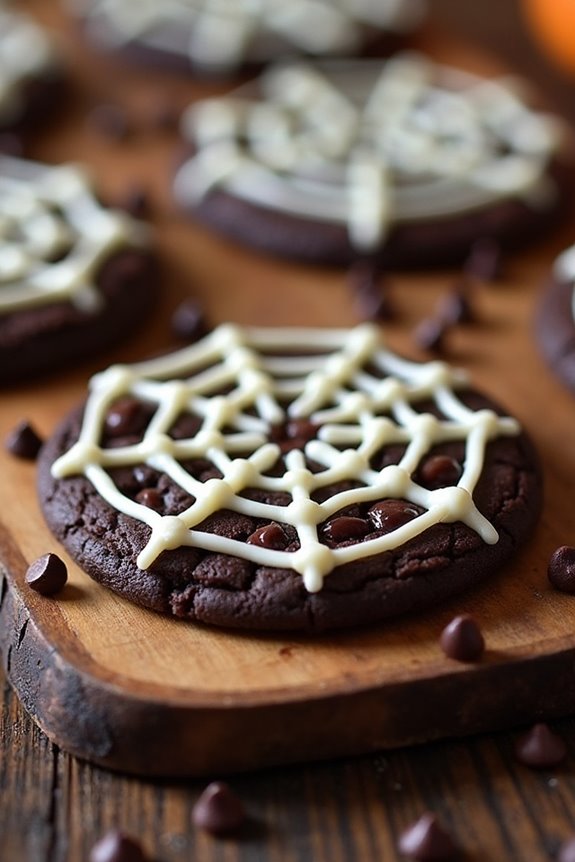
Spooky Spiderweb Chocolate Cookies are the perfect treat for those who find themselves in need of a last-minute Halloween dessert. These cookies not only taste delightful with their rich chocolate flavor, but they also add a touch of eerie elegance to your Halloween spread.
With a simple spiderweb design made from icing, these cookies are sure to impress guests of all ages. Whether you’re hosting a Halloween party or just want to surprise your family with a festive dessert, these cookies are quick and easy to make.
Ideal for serving 4-6 people, the Spooky Spiderweb Chocolate Cookies can be whipped up in less than an hour, making them perfect for last-minute preparations. The combination of cocoa powder and dark chocolate gives these cookies a deep, indulgent taste, while the vanilla icing provides the perfect contrast, both in flavor and appearance.
With the right ingredients, a little creativity, and this straightforward recipe, you’ll have a batch of cookies that not only taste delicious but also look like they’re straight out of a Halloween bakery.
Ingredients:
- 1 cup all-purpose flour
- 1/2 cup unsweetened cocoa powder
- 1/2 teaspoon baking soda
- 1/4 teaspoon salt
- 1/2 cup unsalted butter, softened
- 1/2 cup granulated sugar
- 1/2 cup packed light brown sugar
- 1 large egg
- 1 teaspoon vanilla extract
- 1/2 cup dark chocolate chips
- 1/2 cup powdered sugar
- 1-2 tablespoons milk
Instructions:
- Preheat your oven to 350°F (175°C). Line a baking sheet with parchment paper to prevent the cookies from sticking.
- Mix dry ingredients: In a medium-sized bowl, whisk together the flour, cocoa powder, baking soda, and salt. This will guarantee that the ingredients are well distributed.
- Cream butter and sugars: In a large bowl, use an electric mixer to beat the softened butter, granulated sugar, and light brown sugar until the mixture is light and fluffy, about 2-3 minutes.
- Add egg and vanilla: Beat in the egg and vanilla extract until fully incorporated and the mixture is smooth.
- Combine wet and dry ingredients: Gradually add the dry ingredients to the wet ingredients, mixing on low speed until just combined. Be careful not to over-mix.
- Fold in chocolate chips: Gently stir in the dark chocolate chips using a spatula or wooden spoon.
- Shape cookies: Scoop tablespoon-sized amounts of dough onto the prepared baking sheet, leaving enough space between each cookie for spreading.
- Bake: Place the baking sheet in the preheated oven and bake for 10-12 minutes, or until the cookies are set around the edges but still soft in the center.
- Cool: Allow the cookies to cool on the baking sheet for about 5 minutes before transferring them to a wire rack to cool completely.
- Prepare icing: In a small bowl, mix the powdered sugar with just enough milk to create a thick but pourable icing. Transfer the icing to a piping bag or a resealable plastic bag with a small corner cut off.
- Decorate: Once the cookies are cool, pipe a spiral of icing on each cookie. Starting from the center, use a toothpick to drag lines outward to create a spiderweb effect.
Extra Tips:
For the perfect spiderweb design, make sure the icing is thick enough to hold its shape but not so thick that it can’t be piped easily. If you don’t have a piping bag, a small plastic bag with the tip cut off works just as well.
If you’re short on time, you can skip the spiderweb design and simply dust the cookies with powdered sugar for a more understated look. Feel free to get creative with additional toppings like candy spiders or sprinkles to enhance the Halloween theme.
Ghostly Meringue Cookies

Ghostly Meringue Cookies are a perfect treat for last-minute bakers who want to delight their Halloween guests with something sweet and spooky. These light and airy cookies are shaped like little ghostly figures, making them an adorable addition to any Halloween party spread. With just a few ingredients and a bit of creativity, you can whip up these hauntingly delicious treats in no time. The key to these cookies is achieving the right meringue texture, which should be crisp on the outside and slightly chewy on the inside.
This recipe serves 4-6 people, making it ideal for a small gathering or family celebration. Ghostly Meringue Cookies aren’t only fun to make but also gluten-free, which can be a bonus for guests with dietary restrictions. Whether you’re a seasoned baker or a novice in the kitchen, these cookies are simple enough for anyone to master. Just follow the instructions closely, and you’ll have a batch of spooky meringue ghosts ready to enchant your guests.
Ingredients:
- 4 large egg whites
- 1 cup granulated sugar
- 1/4 teaspoon cream of tartar
- 1 teaspoon vanilla extract
- Chocolate chips or edible black gel for eyes
Instructions:
- Preheat the oven: Begin by preheating your oven to 225°F (110°C). This low temperature is essential for baking meringues to guarantee they dry out rather than brown.
- Prepare the baking sheets: Line two baking sheets with parchment paper. This will prevent the meringues from sticking and make cleanup easier.
- Beat the egg whites: In a clean, dry mixing bowl, beat the egg whites on medium speed until they become foamy. This usually takes about 1-2 minutes.
- Add cream of tartar: Add the cream of tartar to the foamy egg whites. Continue to beat on medium speed until soft peaks begin to form.
- Incorporate sugar gradually: Gradually add the granulated sugar, about one tablespoon at a time, while continuing to beat the mixture. Increase the speed to high, and beat until the meringue is glossy and stiff peaks form. This should take about 5-7 minutes.
- Add vanilla extract: Gently fold in the vanilla extract, making sure it’s evenly distributed throughout the meringue without deflating it.
- Pipe the meringue: Transfer the meringue mixture to a piping bag fitted with a round tip. Pipe ghost shapes onto the prepared baking sheets by creating a small round base and then pulling up to form a peak.
- Add eyes: Press two chocolate chips or dab two small dots of edible black gel onto each meringue ghost to make the eyes.
- Bake the meringues: Place the baking sheets in the preheated oven and bake for 1 hour and 30 minutes. Turn off the oven and let the meringues sit inside for another hour to dry completely.
- Cool and serve: Once the meringues are fully dry and have cooled, carefully remove them from the parchment paper and serve them at your Halloween gathering.
Extra Tips:
For the perfect meringue texture, verify that your mixing bowl and beaters are completely clean and dry before starting. Any trace of grease or moisture can prevent the egg whites from whipping up properly.
It’s also important to use room temperature eggs, as they whip up more easily. If you don’t have a piping bag, you can use a plastic zip-top bag with a corner snipped off.
Finally, avoid making these cookies on a humid day, as moisture in the air can affect the meringues’ ability to dry out properly.
Monster Eyeball Sugar Cookies

Monster Eyeball Sugar Cookies are the perfect Halloween treat for those who need a spooky, last-minute baking solution. These cookies aren’t only delicious but also visually striking, with their eerie eyeball design that’s sure to wow friends and family. The cookies are easy to make, requiring just a few simple ingredients and minimal baking skills.
They’re a fun way to celebrate Halloween without spending hours in the kitchen, making them ideal for busy parents or those with a packed holiday schedule.
The beauty of Monster Eyeball Sugar Cookies is in their simplicity and versatility. They can be customized with different colors and decorations to fit any Halloween theme. The dough for the cookies is a classic sugar cookie base, which is then topped with icing and candy eyeballs to create a spooky effect.
This recipe makes enough cookies to serve 4-6 people, perfect for a small Halloween gathering or as a festive treat for your children and their friends.
Ingredients:
- 2 1/2 cups all-purpose flour
- 1/2 teaspoon baking powder
- 1/4 teaspoon salt
- 3/4 cup unsalted butter, softened
- 1 cup granulated sugar
- 1 large egg
- 1 teaspoon vanilla extract
- 1 tube of white icing or royal icing
- Assorted food coloring (green, red, purple, etc.)
- Candy eyeballs
Instructions:
- Preheat the Oven: Start by preheating your oven to 350°F (175°C). Line two baking sheets with parchment paper or silicone baking mats to prevent the cookies from sticking.
- Mix Dry Ingredients: In a medium-sized bowl, whisk together the flour, baking powder, and salt. This will guarantee that the baking powder is evenly distributed throughout the flour.
- Cream Butter and Sugar: In a large bowl, use an electric mixer to beat the softened butter and granulated sugar together until the mixture is light and fluffy, about 2-3 minutes. This step incorporates air into the mixture, which helps the cookies rise.
- Add Egg and Vanilla: Beat in the egg and vanilla extract until fully combined. This adds flavor and helps to bind the ingredients together.
- Combine Wet and Dry Ingredients: Gradually add the flour mixture to the butter mixture, mixing on low speed until just combined. Be careful not to overmix, as this can make the cookies tough.
- Roll and Shape Cookies: Roll the dough into 1-inch balls and place them on the prepared baking sheets about 2 inches apart. Gently flatten each ball with the bottom of a glass or your hand.
- Bake the Cookies: Bake in the preheated oven for 10-12 minutes, or until the edges are just beginning to turn golden. Remove from the oven and allow the cookies to cool on the baking sheets for 5 minutes before transferring them to a wire rack to cool completely.
- Decorate the Cookies: Once cooled, spread a thin layer of white icing on each cookie. Use food coloring to tint additional icing in various Halloween colors. Place a candy eyeball in the center of each cookie and use the colored icing to create veins or designs around the eye.
Extra Tips:
For a more dramatic effect, consider using gel food coloring for vibrant hues. If you’re short on time, you can use pre-made sugar cookie dough from the store and focus solely on the decorating.
Additionally, if you can’t find candy eyeballs, a small round candy like an M&M with a dot of icing can substitute as a pupil. Remember to keep the cookies stored in an airtight container to maintain freshness. Enjoy your deliciously spooky Monster Eyeball Sugar Cookies!
Black Cat Sandwich Cookies

Halloween is the perfect time to indulge in playful, themed treats, and Black Cat Sandwich Cookies are an ideal choice for both kids and adults alike. These delightful cookies not only taste delicious but also add a festive touch to any Halloween gathering.
With their simple preparation and whimsical appearance, they’re the perfect solution for last-minute bakers who want to create something special without spending hours in the kitchen.
These chocolaty sandwich cookies are shaped to resemble cute black cats, complete with almond slivers for ears and mini chocolate chips for eyes. The cookies are filled with a rich chocolate ganache or any preferred filling, adding an extra layer of decadence.
Designed to serve 4-6 people, this recipe guarantees that everyone gets to enjoy a sweet treat, even on a tight schedule.
Ingredients (Serves 4-6)
- 1 cup all-purpose flour
- 1/2 cup unsweetened cocoa powder
- 1/2 teaspoon baking soda
- 1/4 teaspoon salt
- 1/2 cup unsalted butter, softened
- 3/4 cup granulated sugar
- 1 large egg
- 1 teaspoon vanilla extract
- 1/4 cup heavy cream
- 1/4 cup semi-sweet chocolate chips
- Almond slivers for decorating
- Mini chocolate chips for eyes
- Black food coloring (optional)
Instructions
1. Prepare the Dough: In a medium bowl, whisk together the flour, cocoa powder, baking soda, and salt. In a separate large bowl, beat the softened butter and granulated sugar together until light and fluffy.
Add the egg and vanilla extract, mixing well. Gradually add the dry ingredients to the wet ingredients, mixing until a dough forms. Optionally, add a few drops of black food coloring to enhance the color.
2. Chill and Roll: Wrap the dough in plastic wrap and refrigerate for at least 30 minutes. This makes it easier to handle. Once chilled, preheat your oven to 350°F (175°C) and line a baking sheet with parchment paper.
3. Shape the Cookies: Roll out the dough on a lightly floured surface to about 1/4-inch thickness. Using a round cookie cutter or the rim of a glass, cut out circles for the cat faces.
Place them on the prepared baking sheet. Press two almond slivers into the top of each circle to form ears and two mini chocolate chips for eyes.
4. Bake: Bake the cookies for 10-12 minutes or until set. Allow them to cool on the baking sheet for a few minutes before transferring to a wire rack to cool completely.
5. Prepare the Filling: Heat the heavy cream in a small saucepan over medium heat until it just begins to simmer. Remove from heat and pour over the semi-sweet chocolate chips in a heatproof bowl.
Let it sit for a minute before stirring until smooth. Allow the ganache to cool and thicken slightly.
6. Assemble the Sandwiches: Once the cookies are completely cool, spread a small amount of the chocolate ganache on the flat side of one cookie and top with another to form a sandwich.
Repeat with remaining cookies.
7. Decorate: Optionally, use additional ganache or black food coloring to add whiskers or other details to the cat faces.
Extra Tips
Make sure that the butter is softened before mixing; this will help achieve a smooth dough. Chilling the dough is essential as it prevents the cookies from spreading too much during baking, maintaining their shape.
If the ganache is too runny, let it sit at room temperature or refrigerate briefly to thicken. Finally, for those who prefer a different filling, consider using peanut butter or cream cheese frosting as an alternative to chocolate ganache.
Witch Hat Peanut Butter Cookies

If you’re looking for a fun and festive treat that’s quick to whip up for a Halloween gathering, Witch Hat Peanut Butter Cookies are the perfect solution. These cookies combine the classic flavors of peanut butter and chocolate, adorned with a whimsical witch hat made from a chocolate kiss and a fudge-striped cookie. Not only are they delicious, but they also add a charming touch to any Halloween spread.
Plus, they’re easy enough to make that even last-minute bakers can pull them off with ease. The base of these cookies is a soft, chewy peanut butter cookie that pairs perfectly with the chocolatey decorations on top. The fudge-striped cookie serves as the brim of the witch hat, while a chocolate kiss forms the pointy top.
With just a few ingredients and minimal preparation time, you can have these delightful cookies ready to impress your guests. This recipe makes enough for 4-6 people, guaranteeing everyone gets to enjoy a taste of Halloween magic.
Ingredients (for 4-6 servings):
- 1 cup creamy peanut butter
- 1 cup granulated sugar
- 1 large egg
- 1 teaspoon vanilla extract
- 1 package of chocolate kisses
- 1 package of fudge-striped cookies
Instructions:
- Preheat the Oven: Preheat your oven to 350°F (175°C). Line a baking sheet with parchment paper to prevent sticking and guarantee even baking.
- Mix the Dough: In a medium bowl, combine the creamy peanut butter, granulated sugar, egg, and vanilla extract. Stir until all ingredients are well blended and form a smooth dough.
- Shape the Cookies: Scoop tablespoon-sized amounts of dough and roll them into balls. Place the balls onto the prepared baking sheet, spacing them about 2 inches apart to allow room for spreading.
- Bake the Cookies: Bake in the preheated oven for 10-12 minutes, or until the edges are lightly golden. The cookies will be soft, so let them cool on the baking sheet for about 5 minutes before transferring to a wire rack to cool completely.
- Assemble the Witch Hats: Once the cookies are cool, top each peanut butter cookie with a fudge-striped cookie, striped side down, to form the brim of the hat. Then, gently press a chocolate kiss onto the center of the striped cookie to complete the witch hat.
Extra Tips:
For added flair, consider using colored icing to draw a band around the base of the chocolate kiss, giving the witch hats a pop of color. If you want to add a bit more flavor, try using different varieties of chocolate kisses, such as dark chocolate or caramel-filled.
These cookies are best enjoyed fresh but can be stored in an airtight container at room temperature for up to a week. If you’re preparing them in advance, wait to assemble the witch hats until just before serving to keep the cookies looking their best.
Frankenstein Rice Krispie Treat Cookies

Frankenstein Rice Krispie Treat Cookies are a fun and easy way to add some spooky flair to your Halloween festivities, especially if you’re short on time. These treats combine the classic crunch of Rice Krispie treats with a playful, monstrous twist that’s both delicious and festive. Perfect for a quick baking session, these cookies add a touch of creativity to your Halloween spread without the need for elaborate decoration skills.
The vibrant colors and quirky design make them a hit not only with kids but also with adults who appreciate a bit of whimsy. This recipe serves 4-6 people and is perfect for those last-minute Halloween gatherings or bake sales. With just a few basic ingredients and a bit of imagination, you can whip up these Frankenstein-inspired treats in no time.
Whether you’re an experienced baker or a beginner, you’ll find this recipe straightforward and enjoyable to make. Gather your ingredients and get ready to impress your guests with these ghoulishly good cookies!
Ingredients:
- 4 cups mini marshmallows
- 6 cups Rice Krispies cereal
- 3 tablespoons unsalted butter
- Green food coloring
- 1 cup semi-sweet chocolate chips
- 1/2 cup candy eyes
- 1/4 cup black or chocolate sprinkles
- 1/4 cup mini pretzel sticks, broken in halves
Instructions:
- Prepare the Base: In a large saucepan, melt the unsalted butter over low heat. Add the mini marshmallows and stir continuously until completely melted and smooth.
- Color the Mixture: Once the marshmallows are melted, add a few drops of green food coloring to the mixture and stir until you achieve the desired shade of green.
- Combine with Cereal: Remove the saucepan from heat and immediately stir in the Rice Krispies cereal. Mix until the cereal is completely coated with the green marshmallow mixture.
- Shape the Treats: Transfer the mixture to a greased baking sheet. Press the mixture evenly using a buttered spatula or clean hands to flatten it to about 1/2 inch thick.
- Cut and Form Cookies: Once the mixture is slightly set but still pliable, use a knife to cut it into squares or rectangles. These will be the face of your Frankenstein cookies.
- Melt Chocolate: In a microwave-safe bowl, melt the chocolate chips in 30-second intervals, stirring in between until smooth.
- Decorate Faces: Dip the top edge of each square into the melted chocolate to create Frankenstein’s hair. Stick the candy eyes below the hairline and use the sprinkles to form a mouth. Insert a pretzel stick half into each side of the “head” for bolts.
- Set the Cookies: Allow the cookies to sit at room temperature or refrigerate for about 15 minutes until the chocolate sets and everything holds together.
Extra Tips:
For a more personalized touch, you can use different colors of food coloring or sprinkles to customize your Frankenstein Rice Krispie Treat Cookies. If you’re making these with kids, let them get creative by adding other edible decorations like gummy worms or colored icing.
Store the cookies in an airtight container to keep them fresh for several days. If you’re preparing them in advance, you can also freeze the cookies for up to a month and thaw them at room temperature when needed.
Pumpkin Spice Snickerdoodles

If you’re a last-minute baker looking to whip up something festive and delicious for Halloween, these Pumpkin Spice Snickerdoodles are just the treat you need. With a delightful blend of classic snickerdoodle flavors and a hint of pumpkin spice, these cookies are perfect for capturing the essence of autumn. The warm spices combined with a soft, chewy texture will make them a hit at any Halloween gathering or simply as a cozy treat to enjoy with a cup of tea.
These cookies are easy to make and come together quickly, making them ideal for those spontaneous baking sessions. With this recipe serving 4-6 people, you’ll have enough to share with family or friends, or to enjoy a couple of extras for yourself. Whether you’re an experienced baker or just starting, this recipe will guide you through each step to guarantee your cookies turn out perfectly every time.
Ingredients:
- 1 cup unsalted butter, softened
- 1 cup granulated sugar
- 1/2 cup brown sugar, packed
- 1 large egg
- 1 teaspoon vanilla extract
- 3/4 cup canned pumpkin puree
- 3 cups all-purpose flour
- 1 teaspoon baking soda
- 1/2 teaspoon cream of tartar
- 1/2 teaspoon salt
- 1 teaspoon ground cinnamon
- 1/2 teaspoon ground nutmeg
- 1/4 teaspoon ground cloves
- 1/4 teaspoon ground ginger
- 1/4 cup granulated sugar (for rolling)
- 1 teaspoon ground cinnamon (for rolling)
Instructions:
- Preheat the Oven: Start by preheating your oven to 350°F (175°C). Line two baking sheets with parchment paper or silicone baking mats and set them aside.
- Cream the Butter and Sugars: In a large mixing bowl, cream together the softened butter, granulated sugar, and brown sugar until the mixture is light and fluffy. This should take about 2-3 minutes using an electric mixer on medium speed.
- Add Wet Ingredients: Beat in the egg and vanilla extract, followed by the canned pumpkin puree. Mix until everything is fully incorporated.
- Combine Dry Ingredients: In a separate bowl, whisk together the flour, baking soda, cream of tartar, salt, cinnamon, nutmeg, cloves, and ginger.
- Mix Wet and Dry Ingredients: Gradually add the dry ingredient mixture to the wet ingredients, mixing until just combined. Be careful not to overmix, as this can make the cookies tough.
- Prepare Cinnamon-Sugar Coating: In a small bowl, combine the 1/4 cup granulated sugar and 1 teaspoon ground cinnamon.
- Shape and Coat the Dough: Using a tablespoon or cookie scoop, form dough balls. Roll each ball in the cinnamon-sugar mixture until fully coated.
- Bake the Cookies: Place the coated dough balls onto the prepared baking sheets, spacing them about 2 inches apart. Bake in the preheated oven for 10-12 minutes, or until the edges are set and the tops are slightly cracked.
- Cool the Cookies: Remove the cookies from the oven and let them cool on the baking sheets for about 5 minutes before transferring them to a wire rack to cool completely.
Extra Tips: When measuring the flour, be sure to spoon it into the measuring cup and level it off with a knife to avoid packing it in, which can lead to dense cookies.
If you prefer a stronger pumpkin flavor, you can increase the pumpkin puree slightly, but be aware that this may alter the texture of the cookies. Additionally, for a fun Halloween twist, consider adding a few drops of orange food coloring to the dough or decorating the tops with festive sprinkles before baking.
Bloody Red Velvet Thumbprint Cookies
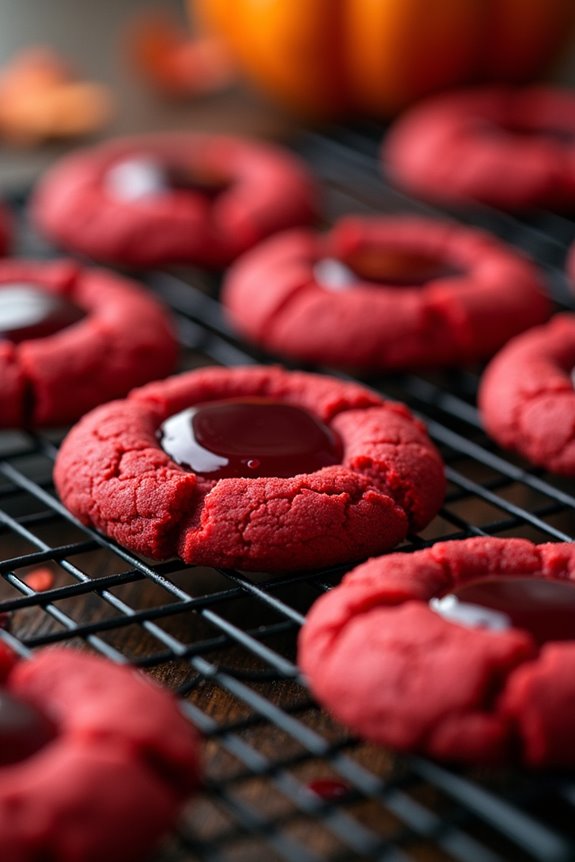
Looking for a spooky yet delicious treat to whip up at the last minute this Halloween? These Bloody Red Velvet Thumbprint Cookies are sure to impress with their vibrant red hue and sweet, gooey centers. Perfect for a Halloween gathering or a cozy night in, these cookies combine the classic flavor of red velvet with a gory twist. Not only are they eye-catching, but they’re also incredibly easy to make, guaranteeing you’ll have a hauntingly good dessert ready in no time.
The rich, buttery cookie base is tinted with a striking red color, while a dollop of raspberry jam (or your favorite red jam) gives the appearance of “blood” in the center of each cookie. The combination of the soft, chewy cookie and the sweet, sticky jam is irresistible. Plus, the recipe can be easily doubled if you’re expecting a larger crowd. Follow the steps below for a batch of 24 cookies, serving 4 to 6 people, and get ready to wow your guests with this sinister sweet treat.
Ingredients:
- 1 cup unsalted butter, softened
- 3/4 cup granulated sugar
- 1 large egg
- 1 teaspoon vanilla extract
- 1 tablespoon red food coloring
- 2 1/4 cups all-purpose flour
- 2 tablespoons unsweetened cocoa powder
- 1/2 teaspoon baking powder
- 1/4 teaspoon salt
- 3/4 cup raspberry jam (or any red jam of choice)
Instructions:
- Preheat the Oven: Begin by preheating your oven to 350°F (175°C). Line two baking sheets with parchment paper or silicone baking mats.
- Cream the Butter and Sugar: In a large mixing bowl, cream together the softened butter and granulated sugar until light and fluffy, about 3 to 5 minutes. This step is vital for achieving the right texture.
- Add Wet Ingredients: Beat in the egg and vanilla extract until well combined. Add the red food coloring and mix until the color is evenly distributed.
- Mix Dry Ingredients: In a separate bowl, whisk together the flour, cocoa powder, baking powder, and salt. This guarantees the cocoa powder is evenly dispersed throughout the dough.
- Combine Ingredients: Gradually add the dry ingredients to the wet ingredients, mixing until just combined. Be careful not to overmix, as this can result in tough cookies.
- Shape the Cookies: Scoop tablespoon-sized amounts of dough and roll them into balls. Place the dough balls on the prepared baking sheets, spacing them about 2 inches apart.
- Create Thumbprints: Using your thumb or the back of a small spoon, gently press an indentation into the center of each dough ball.
- Add the Jam: Fill each indentation with about 1/2 teaspoon of raspberry jam.
- Bake: Bake the cookies in the preheated oven for 12-15 minutes, or until the edges are set but the centers remain soft.
- Cool: Allow the cookies to cool on the baking sheets for about 5 minutes before transferring them to a wire rack to cool completely.
Extra Tips: When making these cookies, make sure to use gel or paste food coloring if you want a vibrant red, as liquid food coloring may not provide enough intensity. If you prefer a different flavor, strawberry or cherry jam makes a great substitute for raspberry.
To store, keep the cookies in an airtight container at room temperature for up to 5 days. These cookies also freeze well, so you can make them ahead of time and enjoy them later!
Candy Corn Sugar Cookies

Halloween is the perfect time to indulge in sweet treats, and what better way to celebrate than with Candy Corn Sugar Cookies? These festive cookies aren’t only a delight to the taste buds but also a visual treat with their vibrant colors reminiscent of classic candy corn.
Perfect for last-minute bakers, this recipe is both simple and quick, allowing you to whip up a batch just in time for your Halloween gatherings or trick-or-treating events.
Candy Corn Sugar Cookies combine the buttery goodness of traditional sugar cookies with the fun and flair of Halloween-themed decorations. With minimal ingredients and straightforward steps, you can create a batch of these delightful cookies to serve 4-6 people in under an hour.
Whether you’re a novice baker or a seasoned pro, this recipe is a surefire way to bring a bit of spooky sweetness to your holiday festivities.
Ingredients (serves 4-6 people):
- 1 cup unsalted butter, softened
- 1 cup granulated sugar
- 1 large egg
- 1 teaspoon vanilla extract
- 2 ½ cups all-purpose flour
- 1 teaspoon baking powder
- ¼ teaspoon salt
- Orange and yellow food coloring
- ½ cup candy corn pieces
Cooking Instructions:
- Preheat and Prepare: Preheat your oven to 350°F (175°C). Line two baking sheets with parchment paper to prevent the cookies from sticking.
- Cream Butter and Sugar: In a large mixing bowl, cream together the softened butter and granulated sugar until light and fluffy. This should take about 2-3 minutes using an electric mixer on medium speed.
- Add Wet Ingredients: Beat in the egg and vanilla extract until well combined. This will help to incorporate air into the mixture, guaranteeing the cookies are light.
- Mix Dry Ingredients: In a separate bowl, whisk together the all-purpose flour, baking powder, and salt. Slowly add the dry ingredients to the wet mixture, mixing until just combined.
- Divide and Color Dough: Divide the dough into three equal parts. Leave one part plain, and color one part with orange food coloring and the other with yellow food coloring. Mix each part until the color is evenly distributed.
- Shape Cookies: Take small amounts of each colored dough and roll them into small balls. Press them together to form a triangular shape, resembling candy corn. Place a piece of candy corn on top of each cookie.
- Bake: Place the cookies on the prepared baking sheets, spacing them about 2 inches apart. Bake for 10-12 minutes or until the edges are lightly golden. Remove from the oven and let cool on the baking sheet for 5 minutes before transferring to a wire rack to cool completely.
Extra Tips: For the brightest colors, use gel food coloring as it provides more vibrant hues without altering the dough’s consistency. If you’re short on time, you can prepare the dough in advance and refrigerate it for up to two days.
When forming the candy corn shapes, work quickly to prevent the dough from becoming too soft and sticky. Always make sure your butter is at room temperature before starting, as this will guarantee a smooth, consistent dough.
Bat Wing Chocolate Chip Cookies
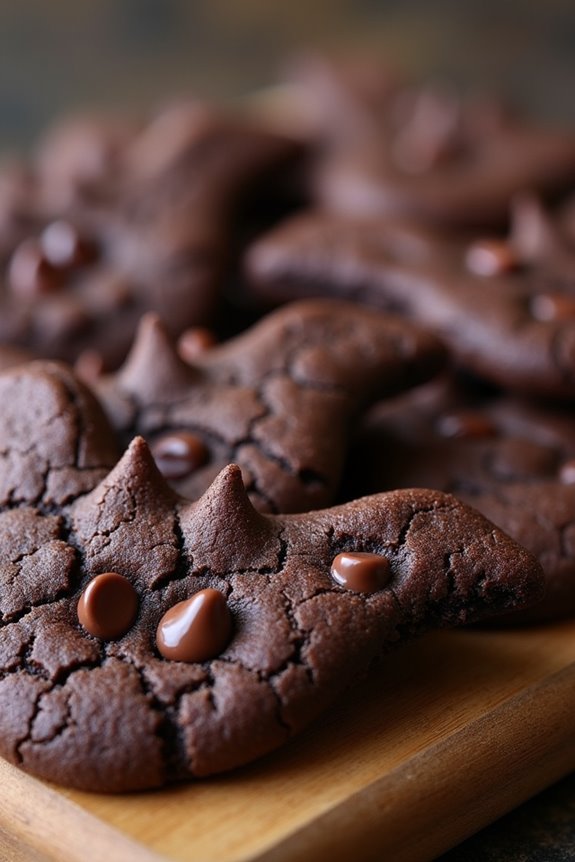
If you’re looking for a spooky yet delightful treat this Halloween and you’re short on time, Bat Wing Chocolate Chip Cookies are the perfect solution. These cookies aren’t only easy to make, but they also bring a festive touch to any Halloween gathering.
Soft and chewy, with just the right amount of chocolate chips, these cookies are sure to be a hit with both kids and adults alike. The unique bat wing shape is achieved by a simple technique that adds a bit of flair to the classic chocolate chip cookie.
Whether you’re hosting a Halloween party or just want to enjoy a themed treat, these cookies are quick to whip up and absolutely delicious. With minimal baking skills required, you’ll have a batch ready in no time to impress your guests.
Ingredients (Serves 4-6 people):
- 1 cup unsalted butter, softened
- 1 cup granulated sugar
- 1 cup packed brown sugar
- 2 large eggs
- 1 teaspoon vanilla extract
- 3 cups all-purpose flour
- 1 teaspoon baking soda
- 1 teaspoon salt
- 2 cups semi-sweet chocolate chips
- Black food coloring (gel-based is preferable)
Instructions:
- Preheat and Prepare: Preheat your oven to 350°F (175°C). Line two baking sheets with parchment paper to prevent sticking.
- Cream Butter and Sugars: In a large bowl, use an electric mixer to cream together the softened butter, granulated sugar, and brown sugar until the mixture is light and fluffy.
- Add Wet Ingredients: Beat in the eggs, one at a time, ensuring each is well mixed before adding the next. Add the vanilla extract and mix until combined.
- Mix Dry Ingredients: In a separate bowl, whisk together the flour, baking soda, and salt. Gradually add this dry mixture to the wet ingredients, mixing on low speed until just combined.
- Color and Add Chips: Add black food coloring to the dough, a little at a time, until the desired shade of black is achieved. Fold in the chocolate chips until evenly distributed.
- Shape the Cookies: Using a tablespoon, scoop out portions of dough and roll them into balls. Place them on the prepared baking sheets, leaving enough space between each ball as they’ll spread while baking.
- Create Bat Wings: Use a knife or a small spatula to flatten and shape each dough ball into a rough oval, then pinch each side to form pointed ends resembling bat wings.
- Bake: Bake in the preheated oven for about 10-12 minutes, or until the edges are set but the centers are still soft. Allow the cookies to cool on the baking sheet for 5 minutes before transferring them to a wire rack to cool completely.
Extra Tips:
For an extra festive touch, consider using Halloween-themed chocolate chips or adding a sprinkle of edible glitter before baking.
If you prefer a more intense black color, use more food coloring, but be cautious as too much can affect the texture. Make sure not to over-bake the cookies to maintain their soft and chewy texture.
If you don’t have black food coloring, you can also use dark cocoa powder to achieve a similar effect.
Zombie Finger Shortbread Cookies
If you’re looking for a spine-chilling treat that captures the spirit of Halloween, Zombie Finger Shortbread Cookies might just be the perfect addition to your spooky festivities. These cookies aren’t only delicious but also eerily realistic, making them a fun and slightly creepy treat for both children and adults.
With their ghoulish appearance and buttery taste, they’re sure to be a hit at any Halloween gathering. The best part is they’re quick and easy to make, perfect for last-minute bakers who want to impress without too much hassle.
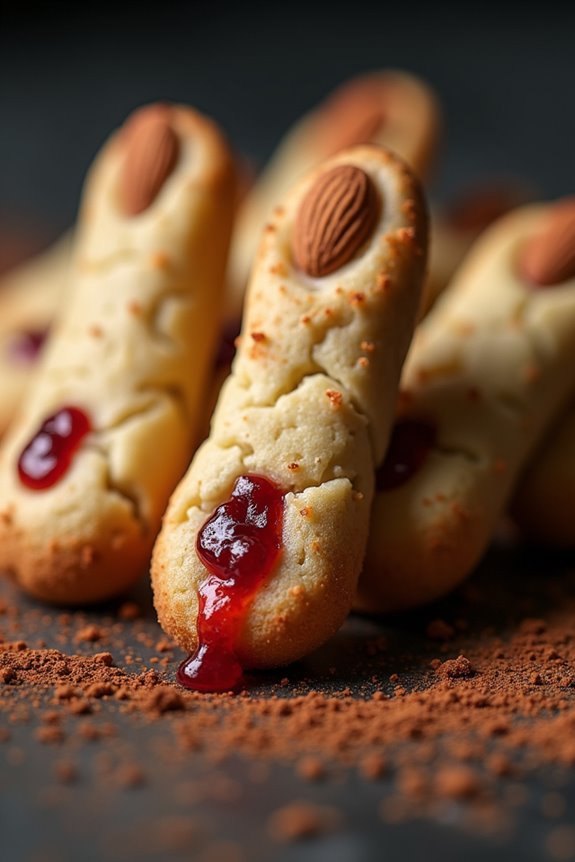
Zombie Finger Shortbread Cookies are made using a basic shortbread dough, which is then molded and decorated to resemble gnarled, severed fingers. A touch of red jam or icing at the ‘cut’ end gives an extra gruesome effect, while an almond ‘fingernail’ adds a realistic touch.
Whether you’re hosting a haunted house party or simply want a festive snack, these cookies will provide a frightful yet delightful surprise. Follow this simple recipe to create a batch for 4-6 people.
Ingredients:
- 1 cup unsalted butter, softened
- 1 cup powdered sugar
- 1 teaspoon vanilla extract
- 2 1/2 cups all-purpose flour
- 1/2 teaspoon salt
- 24 whole blanched almonds
- Red food coloring or strawberry jam for decoration
Instructions:
- Prepare the Dough: In a large mixing bowl, cream together the softened butter, powdered sugar, and vanilla extract until the mixture is light and fluffy. Gradually mix in the all-purpose flour and salt until a smooth dough forms. If the dough is too sticky, add a little more flour until the texture is manageable.
- Shape the Fingers: Preheat your oven to 325°F (165°C). Take a small portion of the dough and roll it into a thin log, about the size and shape of a finger. Use a knife to make light indentations for knuckles and wrinkles, giving the cookies a more realistic appearance.
- Add the Fingernails: Press a whole blanched almond into the tip of each dough ‘finger’ to create the appearance of a fingernail. Confirm the almond is secure but not pushed too deeply into the dough.
- Bake the Fingers: Arrange the shaped fingers on a baking sheet lined with parchment paper. Bake in the preheated oven for 20-25 minutes or until the cookies are lightly golden. Keep an eye on them to confirm they don’t overbake.
- Decorate the Fingers: Remove the cookies from the oven and let them cool slightly. Once cool enough to handle, use red food coloring or strawberry jam at the ‘cut’ end of each finger to create a bloody effect.
Extra Tips: For an extra gruesome look, you can use a small amount of cocoa powder to lightly dust the cookies, giving them an aged and dirty appearance.
If you’re using jam for the bloody effect, be sure to choose a thick, vibrant red variety to make the cookies look as realistic as possible. Additionally, if you’re short on time, prepare the dough a day in advance and store it in the refrigerator; just remember to let it come to room temperature before shaping the fingers.
Enjoy your terrifyingly tasty treats!