
As Halloween draws near, I’ve gathered some frightfully fun recipes that will surely add a spooky touch to your celebrations. Simple ingredients are all you need to craft Spooky Spider Cookies or Mummy Hot Dogs that disappear in a flash. Whether you’re planning a festive party or want to surprise your loved ones with eerie treats, these scarily simple recipes are just what you need. Get ready to enchant everyone with these hauntingly delicious delights. Let’s stir up some Halloween magic in the kitchen!
Spooky Spider Cookies

Spooky Spider Cookies are a delightful treat perfect for Halloween festivities. These cookies not only taste delicious but are also fun to make, bringing a playful and spooky element to your Halloween spread. The rich chocolate cookie base provides the perfect foundation for the creepy-crawly spider design, complete with chocolate peanut butter cup bodies and candy eyes that will intrigue guests of all ages.
Whether you’re hosting a Halloween party or looking for a fun baking project with the kids, these Spooky Spider Cookies are a surefire way to add a sweet scare to your celebrations.
Creating these cookies is as enjoyable as devouring them. The process is simple enough for even beginner bakers, making it a great activity for the whole family. The ingredients are easy to find and the assembly of the spider shapes allows for creativity and personalization.
The end result is a batch of cookies that look like mini works of art, sure to impress anyone who sees them. Serve them up as part of a Halloween buffet or wrap them individually for a creepy, edible party favor.
Ingredients (Serving Size: 4-6 people):
- 1 cup unsalted butter, softened
- 1 cup granulated sugar
- 1 cup light brown sugar, packed
- 2 large eggs
- 1 teaspoon vanilla extract
- 2 1/2 cups all-purpose flour
- 1 teaspoon baking soda
- 1/2 teaspoon salt
- 1/2 cup unsweetened cocoa powder
- 24 mini chocolate peanut butter cups
- 48 candy eyes
- 1/2 cup semisweet chocolate chips
Cooking Instructions:
- Preheat the Oven: Begin by preheating your oven to 350°F (175°C) to guarantee it’s at the right temperature when you’re ready to bake.
- Prepare the Cookie Dough: In a large mixing bowl, cream together the softened butter, granulated sugar, and brown sugar until light and fluffy. This should take about 2-3 minutes. Add the eggs one at a time, beating well after each addition, then mix in the vanilla extract.
- Mix Dry Ingredients: In a separate bowl, whisk together the flour, baking soda, salt, and cocoa powder. Gradually add the dry ingredients to the wet mixture, stirring until just combined.
- Shape the Cookies: Scoop tablespoons of dough onto a baking sheet lined with parchment paper, leaving about 2 inches between each cookie to allow for spreading.
- Bake: Place the cookies in the preheated oven and bake for 9-11 minutes or until the edges are firm but the centers are still soft. Be careful not to overbake as you want a chewy texture.
- Add the Spiders: Immediately after removing the cookies from the oven, gently press one mini chocolate peanut butter cup into the center of each cookie. Allow them to sit for about 2-3 minutes.
- Create the Spider Legs: Melt the semisweet chocolate chips in a microwave-safe bowl, stirring every 30 seconds until smooth. Transfer the melted chocolate to a piping bag or a plastic bag with a tiny corner snipped off. Pipe eight legs around each peanut butter cup body.
- Finish with Eyes: Dab a small amount of melted chocolate onto the back of each candy eye and place two eyes on top of each peanut butter cup. Allow the cookies to cool completely so the chocolate sets.
Extra Tips:
For a more pronounced chocolate flavor, consider using dark cocoa powder instead of unsweetened. If you have leftover melted chocolate, drizzle it over the cookies for an extra decorative touch.
These cookies can be stored in an airtight container for up to a week, making them a great make-ahead option for Halloween festivities. Additionally, try experimenting with different types of candy eyes to give each spider a unique expression.
Ghostly Marshmallow Pops
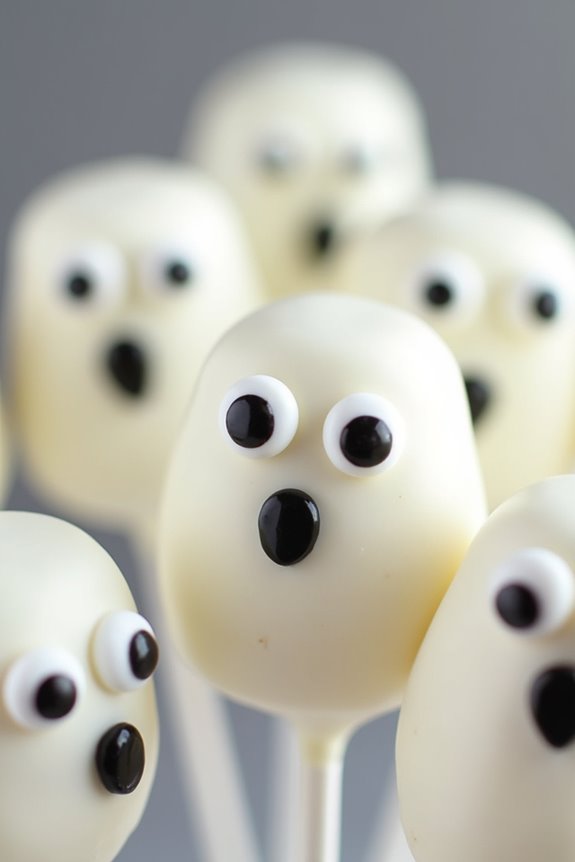
Halloween is the perfect time to get creative in the kitchen, and Ghostly Marshmallow Pops are a delightful treat that’s both easy to make and fun to eat. These spooky snacks are ideal for parties or simply as a festive activity to enjoy with family and friends.
With their hauntingly adorable appearance, these marshmallow pops will add a whimsical touch to your Halloween celebrations, while their sweet taste will satisfy any sweet tooth. Perfect for serving 4-6 people, these Ghostly Marshmallow Pops require minimal ingredients and can be customized with different decorations to suit your Halloween theme.
The pops are fundamentally large marshmallows on sticks, coated in white chocolate to create a ghostly appearance, and decorated with edible eyes to bring your marshmallow ghosts to life. Enjoy making these ghostly treats and watch them disappear as quickly as they were made!
Ingredients (for 4-6 servings):
- 12 large marshmallows
- 12 lollipop sticks or skewers
- 1 cup white chocolate chips or candy melts
- Edible candy eyes or mini chocolate chips
- Black food coloring gel (optional)
- Wax paper
Instructions:
- Preparation: Begin by preparing your workstation. Lay a sheet of wax paper on a flat surface to place the marshmallow pops once they’re coated. Insert a lollipop stick or skewer into each marshmallow, making sure they’re secure but not poking through the top.
- Melting the Chocolate: Melt the white chocolate chips or candy melts in a microwave-safe bowl. Heat in 30-second intervals, stirring in between, until the chocolate is smooth and fully melted. Be careful not to overheat, as this can cause the chocolate to seize.
- Coating the Marshmallows: Dip each marshmallow into the melted white chocolate, turning it to make sure it’s fully coated. Allow any excess chocolate to drip off before placing the marshmallow on the wax paper. Repeat this process for all marshmallows.
- Adding the Eyes: While the chocolate is still wet, carefully press two edible candy eyes or mini chocolate chips onto each marshmallow to form the ghost’s eyes. If desired, use black food coloring gel to add a small mouth below the eyes for a spookier effect.
- Setting the Pops: Allow the chocolate to set completely. You can speed up this process by placing the marshmallow pops in the refrigerator for about 10-15 minutes.
- Serving: Once the chocolate has set, your Ghostly Marshmallow Pops are ready to be served. Arrange them on a platter or stick them into a pumpkin or foam block for a festive display.
Extra Tips:
To add some variety to your Ghostly Marshmallow Pops, consider using different colored candy melts or adding sprinkles to the chocolate coating before it sets.
If you’re making these treats with children, let them get creative by drawing different expressions on the ghosts with food coloring pens. For a neater presentation, use a small spoon or spatula to smooth out any uneven chocolate coating.
Finally, make sure to store any uneaten pops in a cool, dry place to keep the chocolate from melting.
Mummy Hot Dogs
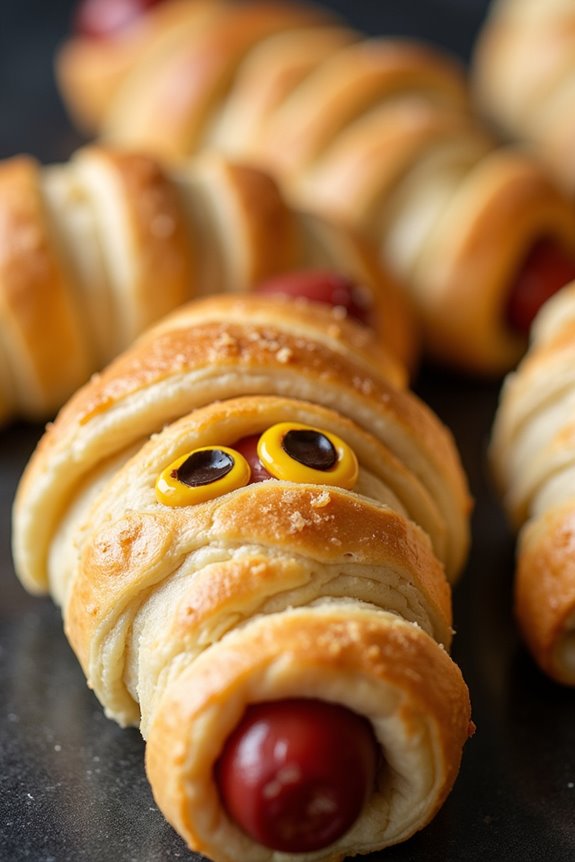
The combination of savory hot dogs and buttery dough is both comforting and satisfying. The crescent roll dough provides a soft, flaky texture that complements the juicy hot dogs perfectly. As you bake them, the dough turns golden brown, adding a delightful crunch with every bite. Pair these with some mustard or ketchup for dipping, and you’ve got yourself a simple yet impressive dish that will be loved by both kids and adults alike.
Ingredients for 4-6 servings:
- 1 package of crescent roll dough
- 8 hot dogs
- 1 egg (optional, for egg wash)
- Mustard or ketchup (for decorating and dipping)
Instructions:
- Preheat the Oven: Start by preheating your oven to 375°F (190°C). This allows the oven to reach the desired temperature while you prep the Mummy Hot Dogs.
- Prepare the Dough: Unroll the package of crescent roll dough. Separate the dough into triangles and then use a knife or pizza cutter to slice each triangle into thin strips, roughly 1/4 inch wide. These strips will be used to wrap around the hot dogs to create the mummy effect.
- Wrap the Hot Dogs: Take one hot dog and begin wrapping it with a strip of dough, leaving a small gap for the “face” where you can later add eyes. Continue wrapping each hot dog with the dough strips, overlapping slightly to create the appearance of bandages. Repeat until all hot dogs are wrapped.
- Apply Egg Wash (Optional): For a glossy finish, beat the egg in a small bowl and brush a light layer of egg wash over the wrapped hot dogs. This step adds an attractive sheen to the dough as it bakes.
- Bake the Mummies: Place the wrapped hot dogs on a baking sheet lined with parchment paper. Make sure they’re spaced apart to guarantee even cooking. Bake in the preheated oven for 12-15 minutes or until the dough is golden brown and cooked through.
- Add Eyes: Once the Mummy Hot Dogs are baked and slightly cooled, use a toothpick or small piping bag to dot small mustard or ketchup “eyes” in the gaps left for the face.
- Serve: Arrange the Mummy Hot Dogs on a platter and serve with additional mustard or ketchup for dipping. Enjoy these festive treats warm with your guests.
Extra Tips:
For an even more festive look, consider using mini hot dogs or cocktail sausages for bite-sized mummies. If you want to add variety, try using different types of sausages or add cheese slices inside the dough before wrapping.
Be creative with the eyes — you can use tiny pieces of olives or candy eyes for a more pronounced effect. Additionally, if you’re involving kids, let them help with wrapping the dough or placing the eyes; it’s a great way to make cooking a fun family activity.
Witch’s Broomstick Pretzels

Witch’s Broomstick Pretzels are a fun and festive treat perfect for Halloween gatherings. These creative snacks aren’t only visually appealing but also satisfyingly crunchy and delicious. The combination of salty pretzel sticks and creamy cheese makes them a hit with both kids and adults alike.
Whether you’re hosting a Halloween party or just looking for a spooky snack to enjoy at home, these Witch’s Broomstick Pretzels will definitely cast a spell on your taste buds.
Making Witch’s Broomstick Pretzels is surprisingly easy and requires minimal ingredients and effort. With just a few simple steps, you can create an impressive snack that adds a touch of magic to your Halloween spread. This recipe serves 4-6 people, making it ideal for small gatherings or family snacking.
Get ready to broom up some delicious fun and impress your guests with these whimsical treats.
Ingredients:
- 12 pretzel sticks
- 6 string cheese sticks
- Fresh chives or thin strips of green onion (about 12 strips)
- A small bowl of honey mustard or any preferred dipping sauce
Cooking Instructions:
- Prepare the Cheese: Unwrap the string cheese sticks and gently pull them apart into individual strings. Each cheese stick should yield about 4-5 strings, depending on thickness. This will form the bristles of the broomstick.
- Assemble the Broomsticks: Take one pretzel stick and gather about 4-5 strings of cheese at one end. Hold the cheese strings together tightly to mimic the bristles of a broom.
- Secure the Broom Bristles: Tie a strip of chive or green onion around the gathered end of the cheese strings to secure them in place. Make sure it’s tied tightly so the cheese doesn’t slip off the pretzel stick. Trim any excess chive or onion for a neat finish.
- Repeat the Process: Continue assembling the remaining broomsticks by repeating steps 2 and 3 with the rest of the pretzel sticks and cheese strings.
- Serve and Enjoy: Arrange the Witch’s Broomstick Pretzels on a platter. Serve with a small bowl of honey mustard or your favorite dipping sauce for added flavor.
Extra Tips:
For a more authentic look, consider using whole chives instead of cutting them into strips, as they’re naturally thin and perfect for tying.
If you’re serving these at a party, prepare them a little in advance and refrigerate until serving to guarantee the cheese remains firm. Additionally, experiment with different types of cheese sticks for varied flavors, such as mozzarella or cheddar.
Enjoy getting creative with your Witch’s Broomstick Pretzels, and watch as they become a bewitching centerpiece at your Halloween celebration!
Ghoulish Guacamole Eyeballs
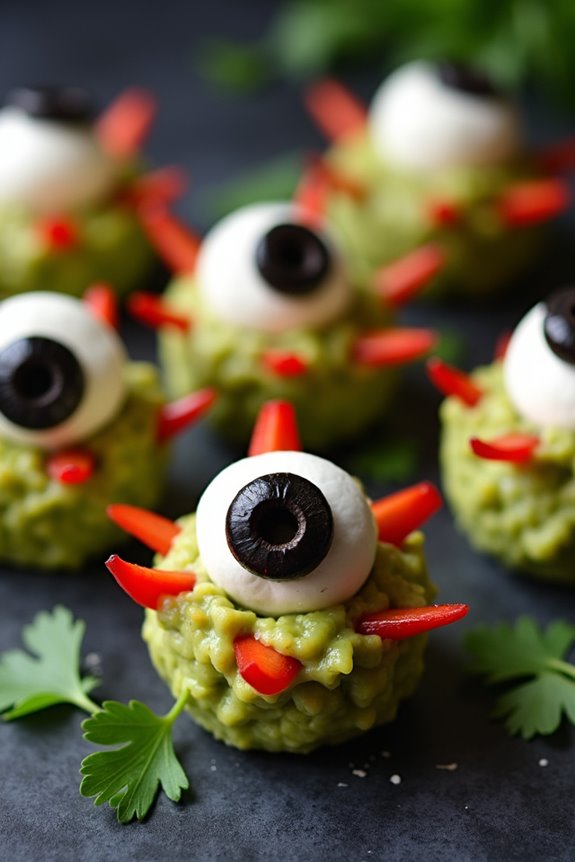
Ghoulish Guacamole Eyeballs are a spooktacular addition to any Halloween party spread. This creepy yet delicious recipe puts a fun twist on the classic guacamole, transforming it into something that will delight and perhaps unsettle your guests. Perfect for a serving size of 4-6 people, these edible eyeballs are sure to stand out on your festive table.
The creamy texture of the guacamole paired with the eerie look of the eyeballs makes it a memorable snack that perfectly captures the spirit of Halloween. This dish isn’t only visually impressive but also packed with flavor. The fresh ingredients used in the guacamole guarantee a rich and authentic taste that complements the Halloween theme with its vibrant green color.
With just a few simple steps, you can create these ghoulish snacks that are as fun to make as they’re to eat. Whether you’re hosting a Halloween party or simply want to indulge in some spooky fun with family and friends, Ghoulish Guacamole Eyeballs are a must-try.
Ingredients (serving size: 4-6):
- 3 ripe avocados
- 1 lime, juiced
- 1 teaspoon salt
- 1/2 cup diced onion
- 3 tablespoons chopped fresh cilantro
- 2 roma tomatoes, diced
- 1 teaspoon minced garlic
- 1 pinch ground cayenne pepper (optional)
- 12 black olives, pitted
- 12 small mozzarella balls (bocconcini)
- 1 small red bell pepper
Cooking Instructions:
- Prepare the Avocados: Start by cutting the avocados in half, removing the pits, and scooping the flesh into a large mixing bowl. Use a fork to mash the avocado until it’s smooth but still slightly chunky.
- Mix the Guacamole: Add the lime juice, salt, diced onion, chopped cilantro, diced tomatoes, and minced garlic to the avocado. Mix everything together until well combined. If you like a bit of heat, sprinkle a pinch of cayenne pepper into the mix.
- Shape the Eyeballs: Roll the guacamole into small, walnut-sized balls. These will form the base of your eyeballs.
- Add the Mozzarella: Place a small mozzarella ball on top of each guacamole ball, pressing down gently so that it sticks.
- Complete the Eyeballs: Cut the black olives into halves and place one half onto each mozzarella ball to create the pupil of the eyeball.
- Add Bloodshot Effect: Slice the red bell pepper into thin strips and arrange them around the mozzarella ball to mimic the bloodshot veins of an eyeball.
- Serve: Arrange the completed eyeballs on a serving platter. You can add extra decorations such as green leafy lettuce or edible flowers to enhance the presentation.
Extra Tips:
To guarantee the guacamole remains fresh and vibrant, prepare it as close to serving time as possible. If you need to make it in advance, cover the guacamole balls tightly with plastic wrap to prevent browning.
Additionally, feel free to get creative with decorations; you can use different colored bell peppers or even add edible glitter for an extra spooky touch. Finally, remember that ripe avocados are key to achieving the best texture and flavor for your guacamole eyeballs.
Creepy Crawly Cupcakes

Get ready to delight and spook your friends and family with these Creepy Crawly Cupcakes, perfect for a Halloween gathering.
These deliciously moist and rich chocolate cupcakes are topped with a wickedly sweet frosting and adorned with gummy worms and candy spiders to create a fun, eerie appearance.
Whether you’re hosting a Halloween party or simply want to enjoy a themed treat, these cupcakes are bound to be a hit with both kids and adults alike.
The combination of flavors and textures in these cupcakes is as delightful as it’s frightful.
The cupcakes are chocolatey and tender, while the frosting adds a creamy sweetness.
The gummy worms and candy spiders not only make them look festive but also add a fun chewiness to each bite.
Serve them alone or pair them with other spooky treats to create a delightful Halloween dessert table.
Ingredients (Serves 4-6 people):
- 1 cup all-purpose flour
- 1 cup granulated sugar
- 1/3 cup unsweetened cocoa powder
- 1/2 teaspoon baking soda
- 1/4 teaspoon baking powder
- 1/4 teaspoon salt
- 1/2 cup unsalted butter, melted
- 2 large eggs
- 1 teaspoon vanilla extract
- 1/2 cup buttermilk
- 1 cup chocolate chips
- 1 tub (16 oz) of vanilla frosting
- Green and orange food coloring
- 1 package gummy worms
- 1 package candy spiders
Instructions:
1. Preheat and Prepare: Preheat your oven to 350°F (175°C). Line a 12-cup muffin tin with cupcake liners.
2. Mix Dry Ingredients: In a large mixing bowl, whisk together the flour, sugar, cocoa powder, baking soda, baking powder, and salt until well combined.
3. Combine Wet Ingredients: In a separate bowl, mix the melted butter, eggs, and vanilla extract. Stir in the buttermilk until the mixture is smooth.
4. Combine Mixtures: Gradually add the wet ingredients to the dry ingredients, mixing gently until just combined.
Be careful not to overmix. Stir in the chocolate chips.
5. Fill and Bake: Divide the batter evenly among the cupcake liners, filling each about 2/3 full.
Bake in the preheated oven for 18-20 minutes, or until a toothpick inserted into the center of a cupcake comes out clean.
6. Cool: Allow the cupcakes to cool in the muffin tin for 5 minutes before transferring them to a wire rack to cool completely.
7. Prepare Frosting: Divide the vanilla frosting into two bowls.
Tint one bowl of frosting with green food coloring and the other with orange food coloring, stirring until the colors are evenly mixed.
8. Decorate: Once the cupcakes are completely cooled, use a spatula or piping bag to frost half the cupcakes with green frosting and the other half with orange frosting.
Decorate each cupcake with gummy worms and candy spiders to create a creepy crawly look.
Extra Tips:
For the best results, make sure your ingredients, especially the eggs and buttermilk, are at room temperature before starting.
This helps facilitate the batter mixing smoothly and the cupcakes bake evenly.
When adding food coloring to the frosting, start with a small amount and gradually add more until you reach your desired shade.
Be creative with your decorations—add edible eyes or sprinkles for added fun.
If you can’t find candy spiders, you can use chocolate chips or small pretzel pieces to create spider shapes.
Enjoy crafting these spooky treats and watching your guests’ reactions!
Bloodshot Deviled Eggs
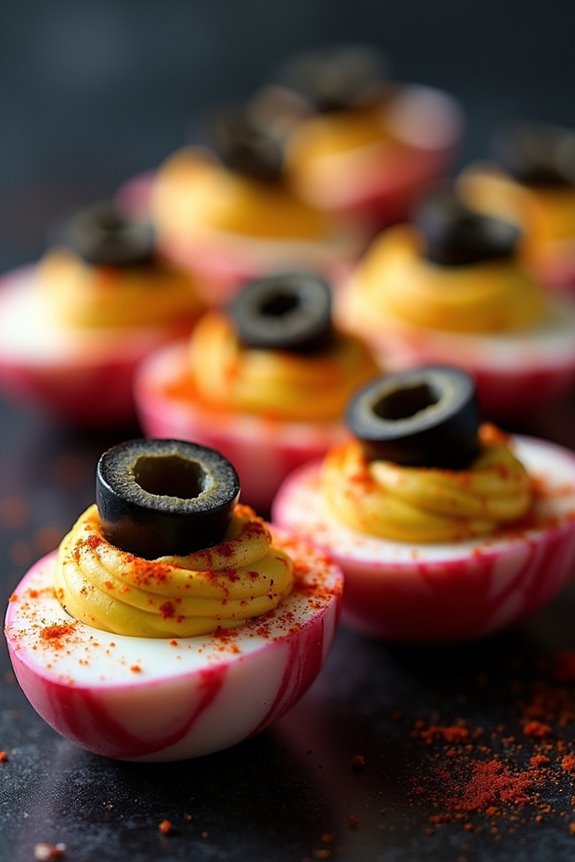
Bloodshot Deviled Eggs are a spooky and delicious twist on the traditional deviled eggs, perfect for your Halloween party spread. This eerie appetizer not only looks creepy with its bloodshot eye appearance but also packs a flavorful punch. The combination of tangy mustard, creamy mayo, and a hint of spice creates a delightful filling that will have your guests reaching for seconds.
To achieve the bloodshot effect, the eggs are first boiled and then gently cracked before being soaked in a mixture of beet juice and vinegar to create the red veins. This unique method transforms regular deviled eggs into a ghoulish treat that’s both eye-catching and appetizing. Read on to learn how to create this fun and festive dish that serves 4-6 people.
Ingredients:
- 6 large eggs
- 1 cup beet juice
- 1/4 cup apple cider vinegar
- 1/3 cup mayonnaise
- 1 tablespoon Dijon mustard
- 1/2 teaspoon salt
- 1/2 teaspoon black pepper
- Paprika for garnish
- Black olives, sliced (for pupils)
Cooking Instructions:
- Boil the Eggs: Place the eggs in a single layer in a saucepan and cover them with water by about an inch. Bring the water to a rolling boil over medium-high heat. Once boiling, remove the pan from heat, cover, and let the eggs sit for 10-12 minutes.
- Prepare the Beet Mixture: While the eggs are boiling, combine beet juice and apple cider vinegar in a medium bowl. Stir gently to mix. This will be used to create the bloodshot effect.
- Crack the Eggs: After the eggs are done, drain and cool them under cold running water. Gently crack the eggshells by rolling them on a flat surface, but don’t peel them. The idea is to create small cracks where the beet mixture can seep through.
- Soak the Eggs: Submerge the cracked eggs in the beet juice mixture. Let them soak for at least 2 hours in the refrigerator for a more pronounced vein effect.
- Peel and Halve the Eggs: After soaking, carefully peel the eggs. You’ll notice the red veins on the egg whites. Slice each egg in half lengthwise and remove the yolks.
- Prepare the Filling: In a small bowl, mash the yolks with a fork. Add mayonnaise, Dijon mustard, salt, and black pepper. Mix until smooth and creamy.
- Fill the Egg Whites: Using a spoon or piping bag, fill each egg white half with the yolk mixture. Sprinkle a pinch of paprika on top for added color and flavor.
- Add the Pupil: Place a slice of black olive on each filled egg to mimic the pupil of an eyeball.
Extra Tips: To make the bloodshot effect more intense, let the eggs soak in the beet juice mixture overnight. If you want to experiment with flavors, you can add other spices or herbs to the yolk mixture, such as a dash of cayenne pepper for heat or chopped chives for freshness.
Additionally, when piping the yolk mixture into the egg whites, use a star tip for a decorative touch. Remember, the beet juice may stain, so handle with care and wear gloves if needed. Enjoy your creepy creation!
Frankenstein Rice Krispie Treats
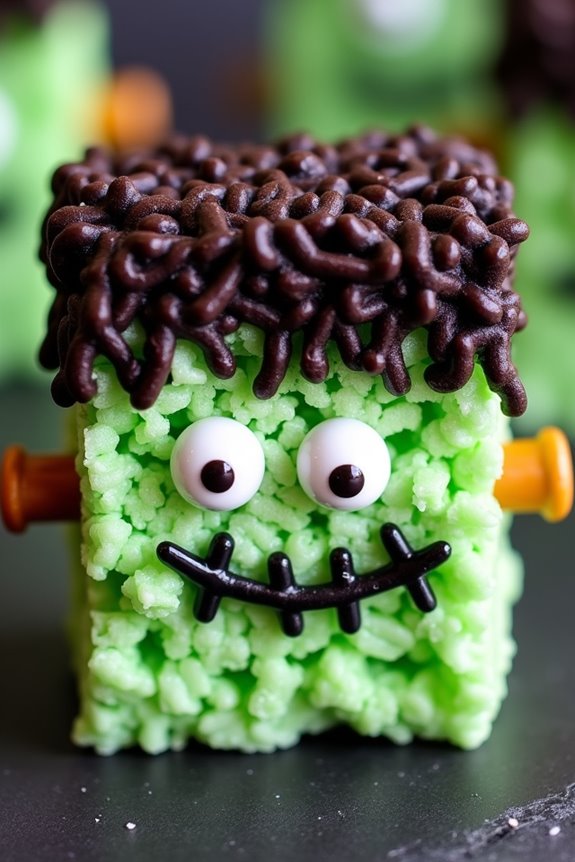
Frankenstein Rice Krispie Treats are a fun and spooky way to celebrate Halloween with a delicious twist. These gooey, crunchy squares are dressed up with green food coloring, chocolate details, and candy eyes to resemble everyone’s favorite monster, Frankenstein. Not only are they delightful to look at, but they also pack the classic sweet and buttery flavor of traditional Rice Krispie treats. Perfect for a Halloween party, these treats are sure to be a hit among kids and adults alike.
This recipe is simple to make and doesn’t require any baking, making it an excellent choice for a quick and festive dessert. The base of the treats is made with marshmallows and Rice Krispies cereal, with a hint of green dye to give them an eerie Frankenstein hue. Chocolate frosting and candy decorations complete the transformation, bringing our friendly monster to life. This recipe serves 4-6 people, making it great for smaller gatherings or family treats.
Ingredients:
- 6 cups Rice Krispies cereal
- 10 oz (about 40) large marshmallows
- 3 tablespoons unsalted butter
- Green food coloring
- 1 cup chocolate frosting
- Candy eyes
- Black licorice or chocolate sprinkles (for hair)
- Mini pretzel sticks or chocolate sticks (for bolts)
- 1 teaspoon vanilla extract (optional)
Cooking Instructions:
- Prepare the Pan: Line a 9×13 inch baking dish with parchment paper or lightly grease it with cooking spray. This will prevent the treats from sticking to the pan.
- Melt the Butter and Marshmallows: In a large pot, melt the butter over low heat. Add the marshmallows and stir continuously until they’re completely melted and smooth.
- Add Color and Vanilla: Remove the pot from heat. Stir in a few drops of green food coloring until you reach the desired shade of Frankenstein green. Add vanilla extract if using, and mix well.
- Combine with Cereal: Gently fold in the Rice Krispies cereal until it’s fully coated with the green marshmallow mixture. Make sure all the cereal is evenly covered.
- Press into the Pan: Transfer the mixture to the prepared baking dish. Using a spatula or wax paper, press the mixture firmly and evenly into the pan.
- Cool and Cut: Allow the mixture to cool completely, which should take about 30 minutes. Once cooled, lift the treats from the pan using the parchment paper and cut them into rectangles or squares.
- Decorate: Spread a thin layer of chocolate frosting on top of each square to create Frankenstein’s hair. Place candy eyes near the top of each piece. Use black licorice or chocolate sprinkles to finish the hair, and insert mini pretzel sticks on each side of the treat to represent Frankenstein’s bolts.
Extra Tips:
For best results, work quickly when adding the color and mixing the cereal, as the marshmallow mixture can harden if left to sit. If you find the mixture is sticking to your hands or the spatula while pressing it into the pan, lightly grease your hands or the tool with butter or cooking spray.
Adding a little extra green food coloring can intensify the color, but do so sparingly to avoid altering the flavor. If you’re making these treats ahead of time, store them in an airtight container at room temperature for up to two days to maintain their freshness and texture.
Jack-o’-Lantern Stuffed Peppers
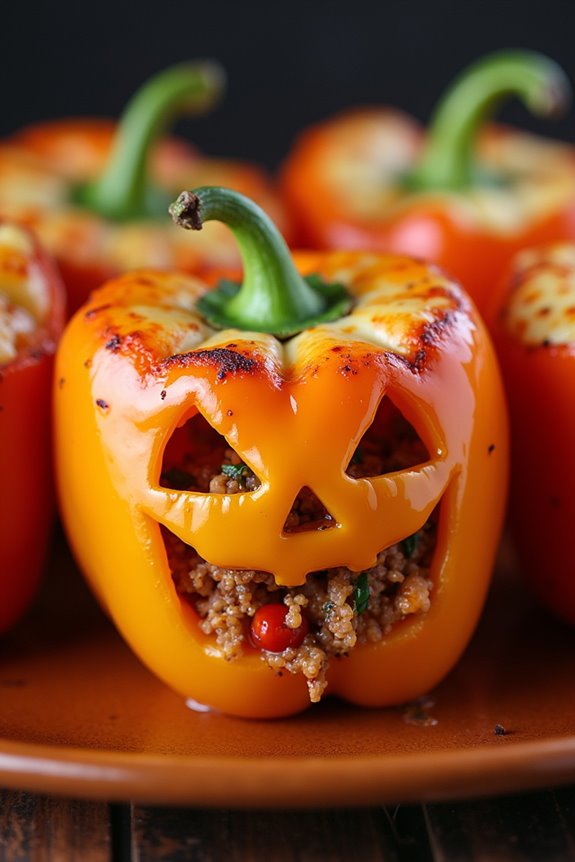
Transform your Halloween dinner into a festive feast with these charming Jack-o’-Lantern Stuffed Peppers. This fun recipe combines the classic flavors of a stuffed bell pepper with the spooky fun of a carved pumpkin, creating a perfect dish for your Halloween celebrations.
These peppers aren’t only visually appealing but also packed with a delicious and hearty filling that will satisfy both kids and adults alike. The stuffed peppers are filled with a savory mixture of ground beef, rice, tomatoes, and spices, and then baked to perfection.
The highlight of this dish is the carved faces on the peppers, mimicking the traditional Jack-o’-Lanterns. Not only do they bring a festive touch to your dining table, but they also add a delightful twist to your Halloween menu. Easy to make and incredibly satisfying, these Jack-o’-Lantern Stuffed Peppers are sure to become a holiday favorite.
Ingredients for 4-6 servings:
- 6 large orange bell peppers
- 1 pound ground beef
- 1 cup cooked rice
- 1 can (14.5 oz) diced tomatoes, drained
- 1 small onion, finely chopped
- 2 cloves garlic, minced
- 1 teaspoon dried oregano
- 1 teaspoon dried basil
- Salt and pepper to taste
- 1 cup shredded mozzarella cheese
- 2 tablespoons olive oil
Cooking Instructions:
- Preheat the Oven: Begin by preheating your oven to 375°F (190°C) to make sure it’s hot enough for baking the peppers.
- Prepare the Peppers: Cut the tops off the peppers and remove the seeds and membranes. Using a small paring knife, carefully carve Jack-o’-Lantern faces into the side of each pepper for a festive look.
- Cook the Filling: In a large skillet, heat the olive oil over medium heat. Add the chopped onion and minced garlic, sautéing until the onion is translucent. Add the ground beef, cooking until it’s browned and cooked through. Drain any excess fat.
- Mix the Filling: Stir in the cooked rice, diced tomatoes, oregano, basil, salt, and pepper. Cook the mixture for an additional 5 minutes, allowing the flavors to meld together.
- Stuff the Peppers: Carefully spoon the beef and rice mixture into each carved pepper, filling them to the top. Place the stuffed peppers upright in a baking dish.
- Bake the Peppers: Cover the dish with aluminum foil and bake in the preheated oven for 30-35 minutes, or until the peppers are tender.
- Add Cheese: Remove the foil, sprinkle the shredded mozzarella cheese on top of each pepper, and return to the oven. Bake for an additional 5-10 minutes, or until the cheese is melted and bubbly.
- Serve: Remove the stuffed peppers from the oven and let them cool slightly before serving. Enjoy these festive and delicious Jack-o’-Lantern Stuffed Peppers!
Extra Tips:
When selecting bell peppers, choose ones that are evenly shaped and can stand upright for the best presentation. If you want to add a bit of heat, consider using a pinch of crushed red pepper flakes in the filling.
For a vegetarian version, you can substitute the ground beef with a meat substitute or additional vegetables. Make sure to carve the faces carefully to avoid breaking the peppers.
Finally, if you prefer softer peppers, extend the baking time by 5-10 minutes before adding the cheese.
Vampire Bat Oreo Truffles
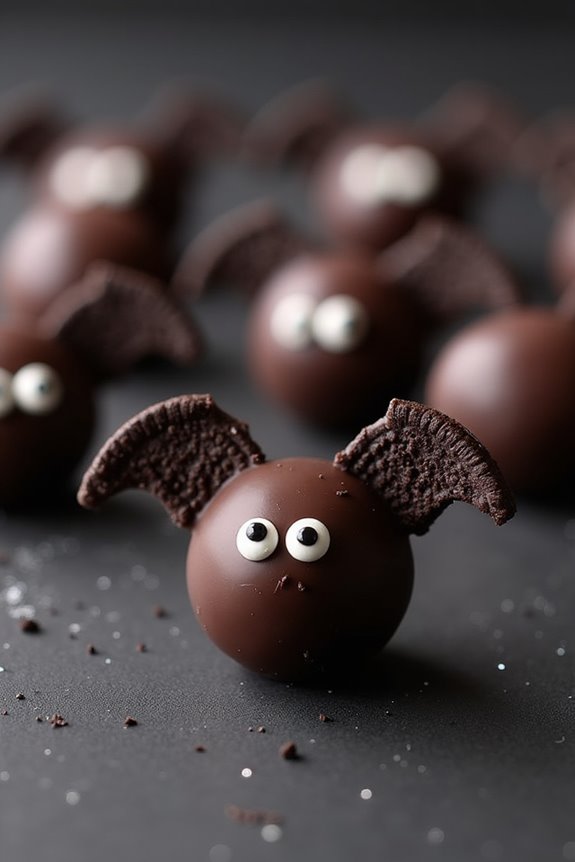
Vampire Bat Oreo Truffles are a spooky and delicious treat perfect for Halloween festivities. These bite-sized morsels are made with crushed Oreo cookies, cream cheese, and a chocolate coating, and are transformed into adorable vampire bats with the addition of candy eyes and almond slivers for wings.
Not only are they fun to make, but they also offer a rich, creamy, chocolatey flavor that will delight both kids and adults alike. This recipe is great for a party, as it yields enough truffles to serve 4-6 people.
It’s a simple yet creative way to add a touch of ghoulish charm to your Halloween spread. Whether you’re hosting a gathering or just want a festive treat, Vampire Bat Oreo Truffles are bound to be a hit. They require no baking, making them an easy and quick option for busy Halloween preparations.
Ingredients (Serves 4-6):
- 36 Oreo cookies
- 8 oz (226g) cream cheese, softened
- 12 oz (340g) semi-sweet chocolate chips
- 1 tablespoon vegetable oil
- Candy eyes
- 1/4 cup slivered almonds
Instructions:
1. Prepare the Oreo Mixture: Start by placing the Oreo cookies in a food processor. Pulse until the cookies are finely crushed and resemble a sand-like texture.
In a mixing bowl, combine the crushed Oreos with the softened cream cheese. Mix thoroughly until a smooth, dough-like consistency is achieved.
2. Shape the Truffles: Scoop out tablespoon-sized portions of the Oreo mixture and roll them into balls using your hands. Place the balls on a baking sheet lined with parchment paper.
Once all the balls are formed, refrigerate them for about 20-30 minutes to firm up.
3. Melt the Chocolate: While the Oreo balls are chilling, melt the semi-sweet chocolate chips. You can do this by placing the chocolate chips and vegetable oil in a microwave-safe bowl.
Heat in 30-second intervals, stirring in between, until the chocolate is smooth and completely melted.
4. Coat the Truffles: Remove the Oreo balls from the refrigerator. Dip each ball into the melted chocolate, making sure it’s fully coated.
Use a fork to lift the truffle out of the chocolate, allowing any excess to drip off. Place the coated truffles back on the parchment-lined baking sheet.
5. Decorate the Truffles: While the chocolate coating is still soft, press two slivered almonds into each truffle to resemble wings.
Add two candy eyes to each truffle to complete the vampire bat look. Allow the chocolate to set completely, either at room temperature or in the refrigerator.
Extra Tips:
For best results, verify that the cream cheese is at room temperature before mixing with the Oreo crumbs; this helps the ingredients combine more smoothly.
If you find the chocolate is hardening too quickly while decorating, you can briefly reheat it to maintain its fluidity.
To make the truffles even more festive, consider using different colored candy melts for the coating or adding a sprinkle of edible glitter to give them an extra spooky sparkle.