
Halloween is just around the corner, and I’ve been busy creating some delightfully spooky treats that will make any gathering a sweet success. Picture yourself enjoying a fudgy brownie topped with gooey ghosts or eerie spider webs. Each bite offers a scrumptious blend of rich chocolate and playful Halloween charm. I’m so excited to share these enchanting recipes with you. Your taste buds are sure to have a magical experience!
Gooey Ghost Brownies
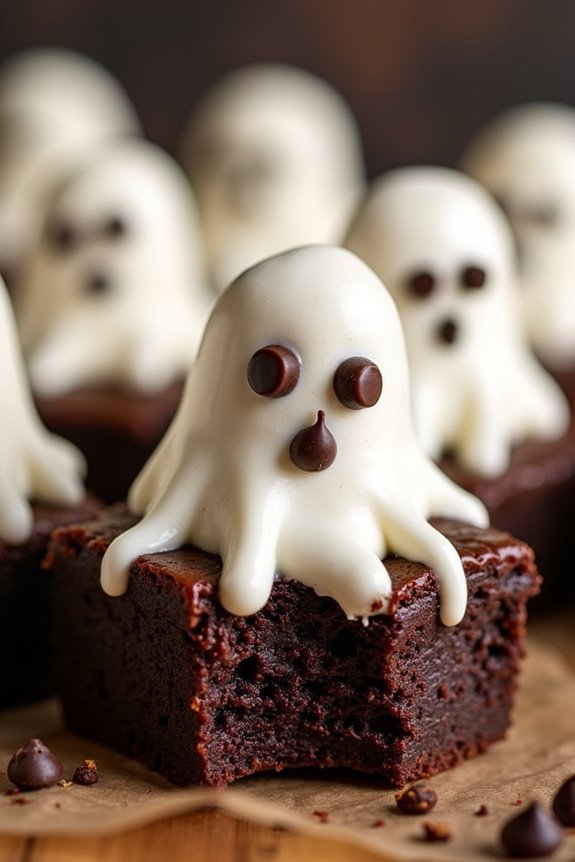
Halloween is the perfect time to indulge in sweet treats that are as spooky as they’re delicious. One of the best ways to celebrate the occasion is by making Gooey Ghost Brownies. These brownies are rich, chocolatey, and topped with adorable marshmallow ghosts that add a playful and festive touch. Perfect for a Halloween party or a family gathering, these brownies will surely be a hit among kids and adults alike.
To make these Gooey Ghost Brownies, you’ll start with a classic brownie base that’s fudgy and decadent. The marshmallow ghosts are added on top, making them fun to create and even more enjoyable to eat. This recipe serves 4-6 people, making it ideal for a small gathering or for a family treat. Gather your ingredients and get ready to make a hauntingly delicious dessert that everyone will love.
Ingredients:
- 1 cup unsalted butter
- 2 cups granulated sugar
- 1 cup unsweetened cocoa powder
- 1 teaspoon vanilla extract
- 4 large eggs
- 1 cup all-purpose flour
- 1/2 teaspoon baking powder
- 1/4 teaspoon salt
- 12 large marshmallows
- 1/2 cup white chocolate chips
- 2 tablespoons mini chocolate chips (for ghost eyes)
Instructions:
- Preheat the Oven: Preheat your oven to 350°F (175°C). Grease a 9×13 inch baking dish or line it with parchment paper for easy removal.
- Prepare the Brownie Batter: In a medium saucepan, melt the butter over low heat. Once melted, remove from heat and stir in the granulated sugar and cocoa powder until smooth. Add the vanilla extract and eggs, one at a time, stirring well after each addition.
- Mix in Dry Ingredients: In a separate bowl, combine the flour, baking powder, and salt. Gradually mix the dry ingredients into the wet mixture until just combined. Be careful not to over-mix.
- Bake the Brownies: Pour the brownie batter into the prepared baking dish, spreading it evenly. Bake in the preheated oven for 20-25 minutes, or until a toothpick inserted into the center comes out with a few moist crumbs.
- Create the Ghosts: While the brownies are baking, melt the white chocolate chips in a microwave-safe bowl in 30-second intervals, stirring in between, until smooth. Allow to cool slightly.
- Add Marshmallow Ghosts: Once the brownies are out of the oven, immediately place the marshmallows on top, spacing them evenly. Return the dish to the oven for 2-3 minutes until the marshmallows puff up slightly.
- Decorate the Ghosts: Using a spoon, drizzle the melted white chocolate over each marshmallow to create a ghostly shape. Press two mini chocolate chips into the top of each marshmallow to form the eyes.
- Cool and Serve: Allow the brownies to cool in the dish for about 15 minutes before slicing. Serve warm or at room temperature for the best gooey texture.
Extra Tips:
For an extra chocolaty experience, consider adding a handful of chocolate chips into the brownie batter before baking. If you want a more pronounced ghost shape, gently flatten the marshmallows before placing them on top of the brownies.
You can also experiment with different types of chocolate for the ghost drizzle, like dark or milk chocolate, to suit your taste. If you’re making these brownies ahead of time, store them in an airtight container, but try to add the ghost decorations on the day of serving for the freshest appearance.
Spider Web Swirl Brownies
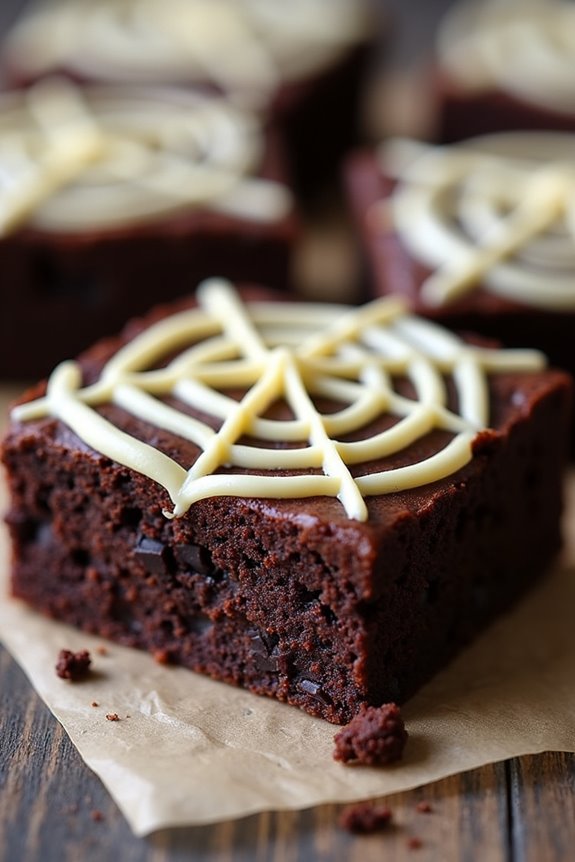
Spider Web Swirl Brownies are the perfect treat to add a spooky touch to your Halloween celebrations. These decadent brownies, swirled with a creamy white chocolate web, not only look impressive but also pack a rich, chocolatey flavor that’s sure to delight both kids and adults alike.
Whether you’re hosting a Halloween party or simply looking to indulge in a festive dessert, these brownies are a must-try.
To create the intricate spider web design, you’ll use a simple technique involving a toothpick to drag lines through the white chocolate layer. This creates a web-like pattern that sits atop the fudgy chocolate brownie base. The combination of textures and flavors makes these brownies a standout dessert that’s as fun to make as it’s to eat.
The following recipe serves 4-6 people, making it ideal for a small gathering or family treat.
Ingredients:
- 1 cup unsalted butter
- 1 cup granulated sugar
- 1 cup brown sugar, packed
- 4 large eggs
- 1 teaspoon vanilla extract
- 1 cup all-purpose flour
- 1 cup unsweetened cocoa powder
- 1/2 teaspoon salt
- 1/2 teaspoon baking powder
- 1 cup white chocolate chips
- 2 tablespoons heavy cream
Cooking Instructions:
- Preheat and Prepare the Pan: Preheat your oven to 350°F (175°C). Grease and line a 9×13 inch baking pan with parchment paper, leaving some overhang on the sides to easily lift the brownies out later.
- Melt the Butter: In a medium saucepan, melt the butter over low heat. Once melted, remove from heat and stir in the granulated sugar and brown sugar until well combined.
- Mix Wet Ingredients: Allow the butter and sugar mixture to cool slightly, then whisk in the eggs one at a time, ensuring each egg is fully incorporated before adding the next. Stir in the vanilla extract.
- Combine Dry Ingredients: In a separate bowl, sift together the flour, cocoa powder, salt, and baking powder. Gradually add the dry ingredients to the wet mixture, stirring until just combined.
- Pour and Bake: Pour the brownie batter into the prepared pan, spreading it evenly with a spatula. Bake in preheated oven for 25-30 minutes, or until a toothpick inserted into the center comes out with just a few moist crumbs.
- Prepare White Chocolate Swirl: While the brownies are baking, melt the white chocolate chips with the heavy cream in a microwave-safe bowl, heating in 20-second intervals and stirring in between until smooth.
- Create Spider Web Design: Once the brownies are done, remove them from the oven and let them cool slightly. Pour the melted white chocolate over the top, spreading it evenly. Quickly use a toothpick to draw lines from the center to the edges, creating a spider web pattern.
- Cool and Serve: Allow the brownies to cool completely in the pan on a wire rack. Lift the brownies from the pan using the parchment overhang, cut into squares, and serve.
Extra Tips:
For a more pronounced web design, you can add a drop or two of black food coloring to the white chocolate before swirling.
If you find the white chocolate too thick to swirl easily, add an extra tablespoon of heavy cream to thin it out.
Remember to work quickly when creating the spider web design, as the white chocolate will begin to set as it cools.
For added Halloween flair, consider decorating the brownies with candy spiders or edible glitter.
Mummy Brownie Bites

Mummy Brownie Bites are a delightful and spooky treat perfect for any Halloween gathering. These bite-sized brownies take classic chocolatey goodness and transform them into adorable mummies with the help of some simple decorations. Whether you’re hosting a Halloween party or just want a festive dessert to enjoy with friends and family, these Mummy Brownie Bites will surely be a hit.
They’re fun to make and even more fun to eat, combining the rich flavor of brownies with a whimsical, holiday-themed presentation. This recipe is designed to serve 4-6 people, making it ideal for a small get-together or as a sweet treat for your family. The process is straightforward, and you don’t need to be a professional baker to achieve impressive results.
With a few ingredients and some creativity, you can whip up these charming desserts in no time. So, gather your ingredients and get ready to create these fun and festive Halloween treats!
Ingredients:
- 1 box of brownie mix (for an 8×8 inch pan)
- Ingredients as per brownie mix instructions (usually eggs, oil, and water)
- 1 cup of white chocolate chips
- 1 tablespoon of coconut oil (or vegetable shortening)
- Candy eyes (available at baking supply stores)
Cooking Instructions:
- Prepare the Brownies: Preheat your oven to the temperature specified on your brownie mix package. Follow the instructions on the box to prepare the brownie batter. Pour the batter into a greased or parchment-lined 8×8 inch baking pan.
- Bake the Brownies: Place the pan in the preheated oven and bake according to the time recommended on the brownie mix package, usually about 20-25 minutes. A toothpick inserted into the center should come out with a few moist crumbs but not wet batter.
- Cool and Cut: Once baked, remove the brownies from the oven and allow them to cool completely in the pan. Once cooled, carefully remove the brownies from the pan and cut them into small squares or rectangles, about 1-2 inches in size to create bite-sized pieces.
- Melt the White Chocolate: In a microwave-safe bowl, combine the white chocolate chips and coconut oil. Microwave in 30-second intervals, stirring in between, until the chocolate is completely melted and smooth.
- Decorate the Mummies: Using a spoon or a piping bag with a small round tip, drizzle the melted white chocolate over the brownie bites in a back-and-forth motion to create the look of mummy bandages. Leave a small area exposed where the candy eyes will be placed.
- Add the Eyes: While the white chocolate is still soft, gently press two candy eyes onto each brownie bite where there’s no chocolate drizzle.
- Set the Chocolate: Allow the chocolate to set completely before serving. You can speed up the process by placing the brownies in the refrigerator for about 10-15 minutes.
Extra Tips:
When making Mummy Brownie Bites, be sure to let the brownies cool completely before cutting them into pieces to prevent them from crumbling. If you don’t have candy eyes, you can use small round candies or even mini chocolate chips as a substitute.
For a more professional finish, use a piping bag for the white chocolate drizzle, but if you don’t have one, a simple plastic bag with a small corner snipped works just fine. Enjoy serving these cute and creepy treats at your Halloween celebrations!
Witch Hat Topped Brownies
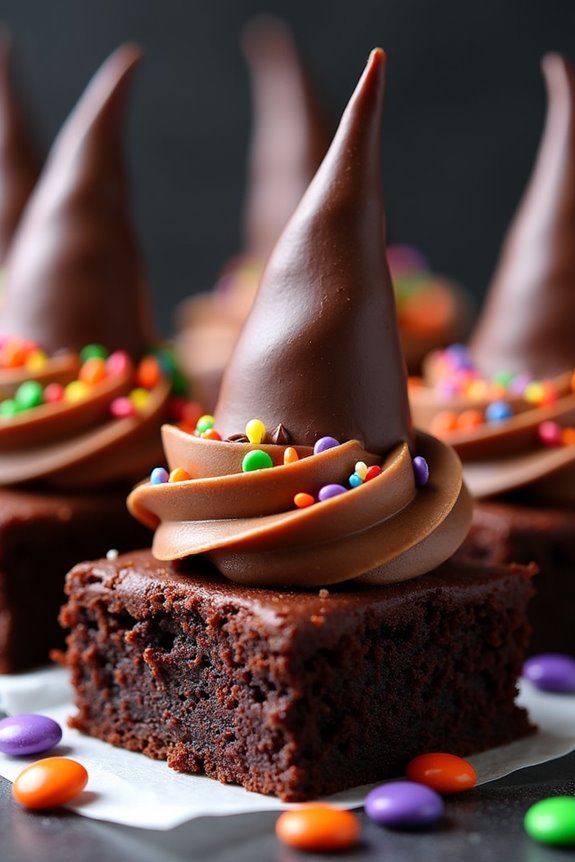
Witch Hat Topped Brownies are a delightful and spooky treat perfect for Halloween festivities. These whimsical brownies not only satisfy your sweet tooth but also add a playful touch to your Halloween spread. With their rich chocolatey base and decorative witch hat toppers, they’re sure to be a hit at any gathering.
Whether you’re hosting a Halloween party or simply indulging in a festive treat with family, these brownies will definitely enchant both kids and adults alike.
The charm of Witch Hat Topped Brownies lies in their simplicity and creativity. The base is a classic, fudgy brownie, while the witch hat is crafted from a chocolate sugar cone topped with a dollop of frosting. This recipe guarantees you can whip up these magical delights for a serving size of 4-6 people, providing enough to share the Halloween spirit.
Easy to make and customize, these brownies allow for a bit of spooky fun in the kitchen.
Ingredients for Witch Hat Topped Brownies (Serves 4-6):
- 1 cup unsalted butter
- 2 cups granulated sugar
- 4 large eggs
- 1 teaspoon vanilla extract
- 1 cup all-purpose flour
- 1/2 cup cocoa powder
- 1/4 teaspoon salt
- 1/2 teaspoon baking powder
- 6 chocolate sugar cones
- 1/2 cup chocolate frosting
- Colored sprinkles or candies for decoration
Cooking Instructions:
- Prepare the Brownie Batter: Preheat your oven to 350°F (175°C). In a large saucepan, melt the butter over low heat. Remove from heat and stir in the sugar, eggs, and vanilla extract. Beat in the flour, cocoa powder, salt, and baking powder until the mixture is smooth and well combined.
- Bake the Brownies: Pour the brownie batter into a greased 9×13 inch baking pan, spreading it evenly. Bake in the preheated oven for 20-25 minutes, or until a toothpick inserted into the center comes out with a few moist crumbs. Allow the brownies to cool completely in the pan on a wire rack.
- Prepare the Witch Hat Toppers: While the brownies are cooling, take your chocolate sugar cones and carefully trim the open end to make sure they sit flat on the brownie surface. Fill each cone with a small amount of chocolate frosting, then invert them onto the brownies to form the witch hats.
- Decorate the Brownies: Once the hats are securely placed, use the remaining frosting to pipe around the base of each cone. Decorate with colored sprinkles or candies to give each hat a festive look.
- Serve and Enjoy: Cut the brownies into squares, each topped with a witch hat. Serve them on a festive platter and enjoy your Halloween-themed treat with family and friends.
Extra Tips:
When making Witch Hat Topped Brownies, make sure that the brownies are completely cooled before placing the witch hats on top to prevent them from melting.
If you want to add a touch of color to the witch hats, consider using colored frosting or edible glitter for an extra magical touch. Additionally, you can customize the decorations with different candies and sprinkles to match your Halloween theme.
Store any leftovers in an airtight container at room temperature to maintain their freshness.
Pumpkin Patch Brownies
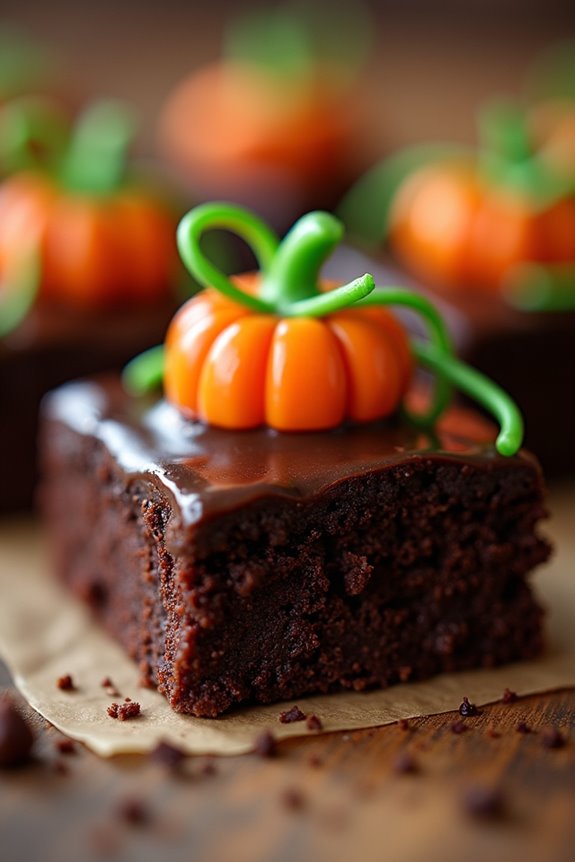
The process of making these brownies is both straightforward and enjoyable. You’ll start by preparing a classic brownie batter, ensuring it’s rich and chocolatey to serve as the foundation of your dessert.
Once baked to perfection, the brownies are topped with a layer of chocolate ganache or frosting to mimic the soil of a pumpkin patch. Finally, candy pumpkins and green icing are used to create a whimsical landscape that captures the spirit of the season. The combination of flavors and textures in each bite makes these brownies an irresistible addition to any Halloween celebration.
Ingredients for 4-6 servings:
- 1 cup all-purpose flour
- 1 cup granulated sugar
- 1/2 cup unsweetened cocoa powder
- 1/2 cup butter, melted
- 2 large eggs
- 1 teaspoon vanilla extract
- 1/4 teaspoon baking powder
- 1/4 teaspoon salt
- 1/2 cup semi-sweet chocolate chips
- 1/2 cup heavy cream
- 1/4 cup candy pumpkins
- Green icing (for decoration)
Cooking Instructions:
- Preheat the Oven: Preheat your oven to 350°F (175°C). Grease a 9×9 inch baking pan or line it with parchment paper for easy removal.
- Prepare the Brownie Batter: In a mixing bowl, combine the melted butter, sugar, and vanilla extract. Beat in the eggs, one at a time, until the mixture is smooth and well combined.
- Mix the Dry Ingredients: In a separate bowl, whisk together the flour, cocoa powder, baking powder, and salt. Gradually fold the dry mixture into the wet ingredients until just combined. Be careful not to overmix.
- Bake the Brownies: Pour the batter into the prepared baking pan, spreading it evenly. Bake for 25-30 minutes, or until a toothpick inserted into the center comes out with a few moist crumbs.
- Make the Chocolate Ganache: While the brownies are cooling, heat the heavy cream in a small saucepan over medium heat until it begins to simmer. Remove from heat and pour over the chocolate chips in a heatproof bowl. Let it sit for 2-3 minutes, then stir until smooth and glossy.
- Decorate the Brownies: Once the brownies have cooled completely, spread the chocolate ganache over the top. Arrange the candy pumpkins on the ganache, pressing them gently to secure. Use the green icing to add vines and leaves, creating a pumpkin patch effect.
- Serve: Allow the ganache to set before cutting the brownies into squares. Serve and enjoy!
Extra Tips:
When making Pumpkin Patch Brownies, make sure to allow the brownies to cool completely before adding the ganache; this prevents the ganache from melting into the brownies.
If you prefer a more intense chocolate flavor, consider using dark chocolate chips for the ganache. Additionally, feel free to get creative with the decorations—use Halloween-themed sprinkles or edible glitter to add extra pizzazz to your pumpkin patch.
Store leftovers in an airtight container at room temperature for up to three days, ensuring the brownies remain fresh and delicious.
Eyeball Brownie Bites
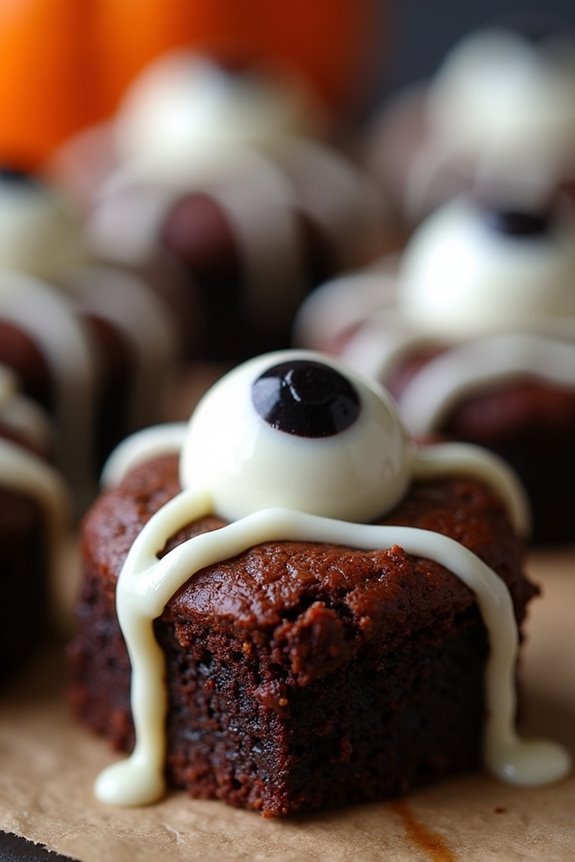
Eyeball Brownie Bites are a fun and spooky treat perfect for any Halloween gathering. These delicious bites combine the rich, fudgy goodness of brownies with a creepy twist, making them an instant hit among both kids and adults.
Whether you’re hosting a Halloween party or simply want to surprise your family with a festive dessert, these Eyeball Brownie Bites are sure to impress.
The recipe is simple and straightforward, allowing you to create a batch in no time. The brownies are baked to perfection, then topped with candy eyeballs for a ghoulish effect.
With a serving size of 4-6 people, this recipe is perfect for small gatherings or family dinners. Gather your ingredients and let’s plunge into the world of Halloween treats!
Ingredients (Serving Size: 4-6 people):
- 1 cup all-purpose flour
- 1 cup sugar
- 1/2 cup unsweetened cocoa powder
- 1/2 teaspoon baking powder
- 1/4 teaspoon salt
- 1/2 cup unsalted butter, melted
- 2 large eggs
- 1 teaspoon vanilla extract
- 1/2 cup semisweet chocolate chips
- 24 candy eyeballs
- 1/4 cup white chocolate, melted (for decoration)
Instructions:
- Preheat the Oven: Start by preheating your oven to 350°F (175°C). This guarantees that the brownies will bake evenly and achieve the perfect texture.
- Prepare the Baking Pan: Line an 8×8 inch baking pan with parchment paper, leaving some overhang on the sides for easy removal of the brownies later.
- Mix Dry Ingredients: In a medium-sized bowl, whisk together the flour, sugar, cocoa powder, baking powder, and salt until well combined.
- Combine Wet Ingredients: In a separate large bowl, mix together the melted butter, eggs, and vanilla extract. Stir until the mixture is smooth and homogenous.
- Make the Batter: Gradually add the dry ingredients into the wet mixture, stirring gently until just combined. Be careful not to overmix. Fold in the semisweet chocolate chips.
- Bake the Brownies: Pour the brownie batter into the prepared baking pan, spreading it evenly. Bake for 20-25 minutes or until a toothpick inserted into the center comes out with a few moist crumbs.
- Cool and Cut: Allow the brownies to cool completely in the pan on a wire rack. Once cooled, lift them out using the parchment paper overhang and cut into bite-sized squares.
- Decorate with Eyeballs: Melt the white chocolate and drizzle it over the brownies. Immediately place candy eyeballs on each brownie square, pressing gently to adhere.
- Serve and Enjoy: Arrange the Eyeball Brownie Bites on a serving platter and enjoy your spooky creation!
Extra Tips:
For an extra spooky effect, consider using food coloring to tint the white chocolate drizzle in shades of green or red.
If you don’t have candy eyeballs, you can create your own using small circles of white fondant and edible markers.
Vampire Bite Brownies

Vampire Bite Brownies are a spooky twist on a classic treat, perfect for any Halloween gathering. These brownies not only satisfy your sweet tooth but also add a touch of Halloween fun with their creative design. The rich, chocolatey brownies are topped with a blood-red raspberry coulis and garnished with eerie “fang marks”, making them look like they’ve just been bitten by a vampire.
They’re sure to be a hit at any party, delighting both kids and adults alike with their festive appearance and delicious taste.
To make these Vampire Bite Brownies, you’ll start with a standard brownie base, which provides the perfect foundation for the gory decorations. The raspberry coulis is easy to make and adds a tart contrast to the sweet brownies, enhancing both flavor and visual appeal. With just a few simple steps, you’ll transform ordinary brownies into a Halloween masterpiece that will impress your guests.
This recipe serves 4-6 people, making it ideal for a small gathering or family treat.
Ingredients:
- 1 cup unsalted butter
- 2 cups granulated sugar
- 4 large eggs
- 1 teaspoon vanilla extract
- 1 cup all-purpose flour
- 1/2 cup cocoa powder
- 1/4 teaspoon salt
- 1/2 teaspoon baking powder
- 1 cup fresh or frozen raspberries
- 1/4 cup granulated sugar (for raspberry coulis)
- 1 tablespoon lemon juice
- Powdered sugar (for dusting)
- Red food coloring (optional)
Instructions:
- Preheat the Oven: Begin by preheating your oven to 350°F (175°C). Grease a 9×13-inch baking pan or line it with parchment paper to prevent sticking.
- Prepare the Brownie Batter: In a large saucepan, melt the butter over low heat. Once melted, remove from heat and stir in 2 cups of sugar until well combined. Add the eggs one at a time, beating well after each addition. Mix in the vanilla extract.
- Combine Dry Ingredients: In a separate bowl, sift together the flour, cocoa powder, salt, and baking powder. Gradually add this dry mixture to the wet ingredients, stirring until just combined.
- Bake the Brownies: Pour the brownie batter into the prepared baking pan, spreading it evenly. Bake in the preheated oven for 25-30 minutes, or until a toothpick inserted into the center comes out with a few moist crumbs. Allow to cool completely in the pan.
- Make the Raspberry Coulis: While the brownies cool, prepare the raspberry coulis. In a small saucepan, combine the raspberries, 1/4 cup sugar, and lemon juice. Cook over medium heat, stirring frequently, until the raspberries break down and the mixture thickens, about 10 minutes. Strain through a fine-mesh sieve to remove seeds. Add a few drops of red food coloring if desired for a more vibrant color.
- Decorate the Brownies: Once the brownies are cooled, cut them into squares. Use a small spoon to create two small “bite” marks on each piece. Drizzle the raspberry coulis over the brownies, focusing on the area around the bite marks to simulate blood. Dust with powdered sugar for a spooky effect.
Extra Tips:
For an extra touch, consider using white chocolate chips to create “fangs” on top of the brownies. Simply melt the white chocolate and pipe small fang shapes around the bite marks.
If you want to make the brownies even more festive, you can add a touch of orange zest to the batter for a hint of citrus flavor. Additionally, if you prefer a more intense chocolate flavor, substitute part of the cocoa powder with dark cocoa powder. Adjust the amount of sugar in the coulis if your raspberries are especially sweet or tart, ensuring a perfect balance of flavors.
Monster Mash Brownies

Halloween Brownies are the perfect treat to bring a spooky yet delicious twist to your festive celebrations. These delectable squares of chocolatey goodness come with a fun, monster-themed topping that will delight both kids and adults alike.
Our Monster Mash Brownies aren’t just a treat for the taste buds but also a visual feast, featuring colorful candy eyes and vibrant icing that mimic a monstrous mashup. Whether you’re hosting a Halloween party or simply looking to enjoy a cozy night in with a themed dessert, these brownies are sure to be a hit.
The beauty of Monster Mash Brownies lies in their simplicity and creativity. The base of the recipe is a rich, fudgy brownie that serves as the perfect canvas for all your spooky decorations. With a few basic ingredients and some Halloween-themed candies, you can transform ordinary brownies into a festive masterpiece.
Not only are these brownies easy to make, but they also allow for a lot of personalization, so you can get as creative as you want with your monster designs. Gather your ingredients, preheat your oven, and let’s get started on this fun culinary adventure.
Ingredients (Serves 4-6)
- 1 cup unsalted butter
- 2 cups granulated sugar
- 4 large eggs
- 1 teaspoon vanilla extract
- 1 cup all-purpose flour
- 1 cup unsweetened cocoa powder
- 1/2 teaspoon salt
- 1 cup semi-sweet chocolate chips
- Various colored icing (green, purple, orange)
- Candy eyes
- Halloween-themed sprinkles
Cooking Instructions
- Preheat the Oven and Prepare the Pan: Begin by preheating your oven to 350°F (175°C). Line a 9×13-inch baking pan with parchment paper or lightly grease it with butter to prevent the brownies from sticking.
- Melt the Butter and Mix with Sugar: In a medium saucepan over low heat, melt the butter. Once melted, remove from heat and stir in the granulated sugar until the mixture is smooth and creamy.
- Add Eggs and Vanilla: Allow the butter and sugar mixture to cool slightly, then add in the eggs one at a time, beating well after each addition. Stir in the vanilla extract until combined.
- Combine Dry Ingredients: In a separate bowl, whisk together the flour, cocoa powder, and salt. Gradually add the dry ingredients to the wet mixture, stirring until just combined. Be careful not to overmix to guarantee the brownies remain fudgy.
- Fold in Chocolate Chips: Gently fold in the chocolate chips until they’re evenly distributed throughout the batter.
- Bake the Brownies: Pour the brownie batter into the prepared baking pan, spreading it evenly. Place in the preheated oven and bake for 25-30 minutes, or until a toothpick inserted into the center comes out with a few moist crumbs.
- Cool and Decorate: Once baked, remove the brownies from the oven and let them cool completely in the pan on a wire rack. Once cooled, use the colored icing to create monster faces on top of the brownies. Add candy eyes and sprinkle with Halloween-themed decorations to complete the look.
Extra Tips
When decorating your Monster Mash Brownies, feel free to get creative with the designs. You can use piping bags for more precise icing application or simply use a spoon for a more rustic look.
If you’re short on time, you can also use store-bought brownie mix as a base and focus on the decorations. Remember to let the brownies cool completely before decorating to guarantee the icing and toppings adhere well.
Finally, for an extra fudgy texture, be sure to avoid overbaking and keep an eye on your brownies in the last few minutes of baking. Enjoy your monstrously delicious creation!
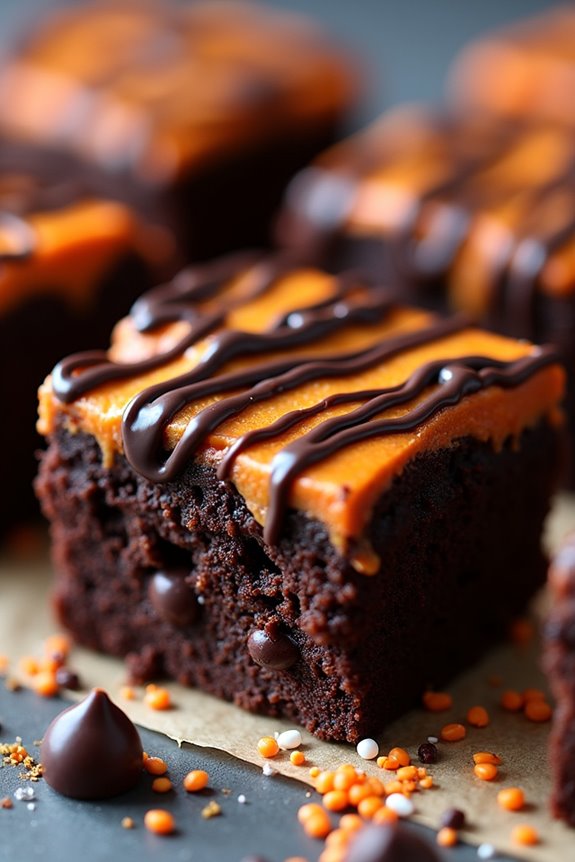
Candy Corn Infused Brownies

Candy Corn Infused Brownies offer a festive twist on the classic chocolate treat, making them a perfect addition to your Halloween celebrations. These delectable brownies combine the rich, fudgy texture we all love with the sweet, nostalgic flavor of candy corn. The vibrant colors of the candy corn not only make these brownies visually appealing but also add an unexpected burst of sweetness that complements the chocolate beautifully.
Whether you’re hosting a Halloween party or simply want to delight your family with a special dessert, these brownies are bound to be a hit.
Creating these brownies is a straightforward process that infuses the classic brownie batter with melted candy corn, adding a unique dimension to their flavor profile. By carefully incorporating the candy corn, you can achieve a balance between the chocolate and the sweet, sugary taste of the candy. The key to success with this recipe is to guarantee the candy corn is melted properly and evenly distributed within the batter, resulting in a delightful treat that’s both familiar and exciting.
With a serving size suitable for 4-6 people, these Candy Corn Infused Brownies are an easy way to bring a touch of Halloween magic to your dessert table.
Ingredients (Serves 4-6):
- 1 cup unsalted butter
- 1 cup granulated sugar
- 1 cup packed light brown sugar
- 4 large eggs
- 1 teaspoon vanilla extract
- 1 cup all-purpose flour
- 1/2 cup unsweetened cocoa powder
- 1/2 teaspoon salt
- 1/2 teaspoon baking powder
- 1 cup candy corn, plus extra for topping
- 1/2 cup semi-sweet chocolate chips
Cooking Instructions:
- Preheat the Oven: Begin by preheating your oven to 350°F (175°C). Line a 9×9-inch baking pan with parchment paper or lightly grease it to prevent the brownies from sticking.
- Melt the Candy Corn: In a small saucepan, melt the candy corn over low heat, stirring frequently. Be careful not to burn it. Once melted, set aside to cool slightly.
- Prepare the Batter: In a large mixing bowl, cream together the unsalted butter, granulated sugar, and brown sugar until light and fluffy. Add in the eggs one at a time, beating well after each addition. Stir in the vanilla extract.
- Combine Dry Ingredients: In a separate bowl, whisk together the flour, cocoa powder, salt, and baking powder. Gradually add the dry ingredients to the wet mixture, mixing until just combined.
- Incorporate Candy Corn and Chocolate Chips: Gently fold the melted candy corn and semi-sweet chocolate chips into the brownie batter until evenly distributed.
- Bake the Brownies: Pour the batter into the prepared baking pan, smoothing the top with a spatula. Scatter extra candy corn on top for decoration. Bake in the preheated oven for 25-30 minutes, or until a toothpick inserted into the center comes out with a few moist crumbs attached.
- Cool and Serve: Allow the brownies to cool in the pan for at least 10 minutes before transferring them to a wire rack. Cut into squares and serve.
Extra Tips:
When melting the candy corn, keep the heat low and stir constantly to avoid burning it, as candy corn can scorch easily. If the candy corn begins to harden upon cooling, reheat it gently until it becomes manageable again.
Additionally, keep an eye on the brownies towards the end of the baking time to guarantee they don’t overbake, which can result in a dry texture. For an extra festive presentation, consider adding Halloween-themed sprinkles or a drizzle of white chocolate on top once the brownies have cooled.
Graveyard Brownie Bars

Graveyard Brownie Bars are the perfect treat to spook up your Halloween festivities. These deliciously rich and fudgy brownies are transformed into a spooky graveyard scene with the help of some creative decorations.
Whether you’re throwing a Halloween party or just want to surprise your family with a fun dessert, these Graveyard Brownie Bars are sure to be a hit. The combination of chocolatey goodness and eerie toppings makes them both a treat for the taste buds and a feast for the eyes.
The concept of turning brownies into a graveyard scene is simple and fun. By using ingredients like chocolate sandwich cookies, candy pumpkins, and gummy worms, you can easily create a miniature graveyard right on top of your brownie.
This recipe is designed to serve 4-6 people, making it perfect for small gatherings or family nights. With just a little bit of effort, you can create a dessert that’s not only delicious but also captures the spirit of Halloween.
Ingredients (Serves 4-6):
- 1 box brownie mix (plus ingredients required for the mix)
- 12 chocolate sandwich cookies, crushed
- 6 oval-shaped cookies (e.g. Milano cookies)
- 1 tube black decorating gel or icing
- 12 candy pumpkins
- 12 gummy worms
- 1 cup chocolate frosting
Instructions:
- Prepare the Brownies: Preheat your oven to the temperature indicated on the brownie mix box. Prepare the brownie batter according to the package instructions. Pour the batter into a greased baking dish and bake as directed.
- Cool the Brownies: Once baked, remove the brownies from the oven and allow them to cool completely in the pan. This usually takes about 30 minutes.
- Frost the Brownies: Spread a layer of chocolate frosting evenly over the cooled brownies. This will act as the ‘soil’ for your graveyard.
- Crush the Cookies: Place the chocolate sandwich cookies in a ziplock bag and crush them into fine crumbs using a rolling pin. Sprinkle these cookie crumbs over the frosted brownies to resemble dirt.
- Create the Tombstones: Using the black decorating gel or icing, write spooky words or names like “RIP” on each oval-shaped cookie. These will serve as the tombstones.
- Decorate the Graveyard: Insert the decorated oval cookies into the brownies to resemble tombstones. Place candy pumpkins and gummy worms around the tombstones for added effect.
- Serve: Cut the brownies into squares, ensuring each piece contains part of the graveyard decoration. Serve and enjoy!
For extra tips, consider making the brownies a day in advance to allow the flavors to meld together. This also gives ample time for the brownies to cool thoroughly, making it easier to frost and decorate.
You can also customize the decorations by adding small edible bones or ghost-shaped candies for additional spookiness. Remember to keep the brownies in a cool, dry place to prevent the decorations from melting or losing their shape before serving.
Black Cat Brownies

Halloween is the perfect time to get creative in the kitchen, and Black Cat Brownies are a delightful treat that embodies the spooky spirit of the season. These brownies aren’t only deliciously fudgy but also come with a fun, decorative twist. Perfect for Halloween parties or as a special treat for your family, these brownies will be a hit with both kids and adults alike.
The rich chocolatey base is adorned with charming black cat faces, crafted from simple ingredients like chocolate chips and candy, adding a playful yet slightly eerie element to your dessert table.
Creating these Halloween Brownies is a great way to get into the festive mood, and they’re surprisingly easy to make. With just a few steps, you can transform a classic brownie recipe into something whimsically spooky.
Whether you’re an experienced baker or a novice in the kitchen, you’ll find this recipe straightforward and enjoyable to follow. Since this recipe yields enough to serve 4-6 people, it’s perfect for small gatherings or family dinners. So, gather your ingredients and get ready to impress your guests with these adorable and scrumptious Black Cat Brownies.
Ingredients (Servings: 4-6)
- 1/2 cup unsalted butter
- 1 cup granulated sugar
- 2 large eggs
- 1 teaspoon vanilla extract
- 1/3 cup unsweetened cocoa powder
- 1/2 cup all-purpose flour
- 1/4 teaspoon salt
- 1/4 teaspoon baking powder
- 1/2 cup semi-sweet chocolate chips
- Black icing or gel
- Small candy eyes
- Mini marshmallows (cut in half)
Instructions
- Preheat the Oven: Start by preheating your oven to 350°F (175°C). This guarantees that the brownies will bake evenly.
- Prepare the Baking Dish: Line an 8×8 inch baking pan with parchment paper or lightly grease it with butter to prevent sticking.
- Melt the Butter: In a medium-sized saucepan over low heat, melt the butter. Once melted, remove from heat and stir in the sugar, eggs, and vanilla extract until well combined.
- Mix the Dry Ingredients: In a separate bowl, whisk together the cocoa powder, flour, salt, and baking powder. Gradually add this dry mixture to the wet ingredients, stirring until just combined.
- Add Chocolate Chips: Gently fold in the semi-sweet chocolate chips, ensuring they’re evenly distributed throughout the batter.
- Pour and Bake: Pour the brownie batter into the prepared baking dish, spreading it evenly. Bake in the preheated oven for 20-25 minutes, or until a toothpick inserted in the center comes out with a few moist crumbs.
- Cool and Decorate: Allow the brownies to cool completely in the pan before removing them. Once cooled, cut into squares. Use black icing to draw cat faces on each brownie square, attach candy eyes, and use mini marshmallows as noses or other features to create the black cat design.
Extra Tips
For the best results, make sure not to overmix the batter once you add the dry ingredients, as this can make the brownies tough instead of fudgy.
Also, be careful not to overbake the brownies; they should be slightly underdone in the center when you take them out of the oven, as they’ll continue to set as they cool.
When decorating, feel free to get creative with the black cat faces—try different expressions or add whiskers using the icing for a more detailed look. Enjoy these brownies as a fun and festive treat that captures the essence of Halloween!
Zombie Brain Brownies
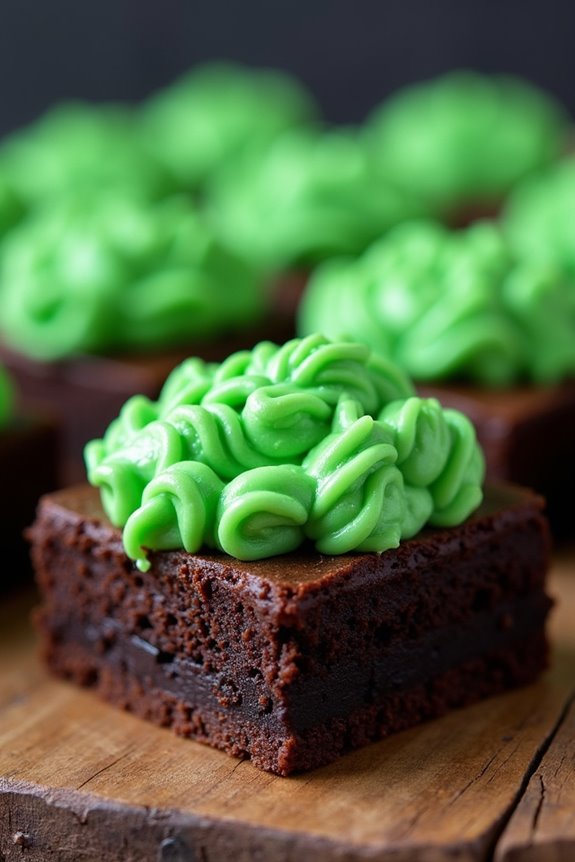
Halloween is the perfect time to release your culinary creativity, and what better way to do so than with some delightfully spooky Zombie Brain Brownies? These deliciously eerie treats are sure to be a hit at any Halloween gathering. With their ghoulishly green tops and rich chocolatey base, these brownies not only look the part but taste amazing too.
Whether you’re hosting a party or just want to surprise your family with a festive dessert, Zombie Brain Brownies are a fun and scrumptious way to celebrate the season.
The key to these spooky brownies lies in their unique presentation and the combination of flavors. The base is a classic, fudgy brownie that serves as the perfect foundation for the creepy brain-like topping. This topping is made with a vibrant green cream cheese mixture that not only adds a pop of Halloween color but also provides a tangy contrast to the sweetness of the brownies.
Serve these to a group of 4-6 people, and watch them disappear faster than a ghost at midnight!
Ingredients:
- 1 cup (2 sticks) unsalted butter
- 2 cups granulated sugar
- 4 large eggs
- 1 teaspoon vanilla extract
- 1 cup all-purpose flour
- 1/2 cup unsweetened cocoa powder
- 1/4 teaspoon salt
- 8 oz cream cheese, softened
- 1/4 cup powdered sugar
- Green food coloring
- 1 teaspoon almond extract (optional for brain topping)
Cooking Instructions:
- Preheat and Prepare: Preheat your oven to 350°F (175°C). Grease a 9×13-inch baking pan or line it with parchment paper for easy removal later.
- Make the Brownie Batter: In a medium saucepan, melt the butter over low heat until completely liquid. Remove from heat and stir in the granulated sugar until well combined. Allow the mixture to cool slightly before adding the eggs, one at a time, beating well after each addition. Stir in the vanilla extract.
- Mix Dry Ingredients: In a separate bowl, sift together the flour, cocoa powder, and salt. Gradually add this dry mixture to the butter mixture, stirring until just combined. Be careful not to overmix.
- Pour and Bake: Pour the brownie batter into the prepared baking pan, spreading it evenly with a spatula. Bake in the preheated oven for 25-30 minutes, or until a toothpick inserted in the center comes out mostly clean. Allow the brownies to cool completely in the pan.
- Prepare Brain Topping: In a medium bowl, beat the softened cream cheese with powdered sugar until smooth. Add several drops of green food coloring and almond extract (if using), and mix until you achieve a uniform green color that resembles zombie flesh.
- Decorate: Once the brownies are completely cool, spread the green cream cheese mixture over the top in an uneven pattern to mimic the look of brains. Use a fork to create grooves or swirls for added effect.
- Serve: Cut the brownies into squares and serve them up to your guests, who’ll surely be impressed by your creepy culinary creation!
Extra Tips:
For the best results, make certain your butter is melted thoroughly but not too hot when adding the eggs, to avoid cooking them in the batter.
When making the brain topping, adjust the amount of food coloring to achieve your desired shade of green. You can also use a piping bag to add more intricate details to the brain design if you’re feeling artistic.
And remember, these brownies are best served slightly chilled, so consider refrigerating them for 30 minutes before serving to enhance the flavors and maintain the structure of the brain topping. Enjoy the spooky season with these deliciously devilish delights!
Bat Wing Brownies

Indulge in the spooky spirit of Halloween with Bat Wing Brownies, a decadent treat that combines rich, fudgy brownie goodness with a hint of eerie charm. These brownies are perfect for a Halloween party, a family gathering, or simply as a delicious treat to celebrate the season. The classic chocolatey taste is elevated with a creative twist, as the brownies are topped with a haunting bat wing decoration made from dark chocolate and marshmallows.
It’s a fun and festive way to bring a little magic to your Halloween celebrations. This recipe serves 4-6 people, making it ideal for a small gathering or a family dessert. The preparation involves creating a delicious brownie base, then adding the bat wing decoration, which is sure to delight both kids and adults alike.
Whether you’re an experienced baker or a beginner looking to try something new, this recipe is easy to follow and promises a visually stunning result. Gather your ingredients and get ready to create an enchanting Halloween treat that will have everyone coming back for more.
Ingredients:
- 1 cup unsalted butter
- 2 cups granulated sugar
- 4 large eggs
- 1 teaspoon vanilla extract
- 1 cup all-purpose flour
- 1 cup unsweetened cocoa powder
- 1/2 teaspoon salt
- 1/2 teaspoon baking powder
- 1 cup dark chocolate chips
- 12 large marshmallows
- Black food coloring (optional)
- Edible silver glitter or sprinkles (optional)
Instructions:
- Prepare the Oven and Pan: Preheat your oven to 350°F (175°C). Grease a 9×13 inch baking pan or line it with parchment paper for easy removal of the brownies.
- Melt the Butter and Mix with Sugar: In a microwave-safe bowl, melt the butter. Combine the melted butter with the granulated sugar in a large mixing bowl, whisking until the mixture is smooth and creamy.
- Add Eggs and Vanilla: Beat in the eggs, one at a time, confirming each egg is fully incorporated before adding the next. Stir in the vanilla extract to add a rich flavor to the mixture.
- Combine Dry Ingredients: In a separate bowl, sift together the flour, cocoa powder, salt, and baking powder. Gradually add the dry ingredients to the wet ingredients, mixing until just combined. Be careful not to overmix.
- Fold in Chocolate Chips: Gently fold the dark chocolate chips into the batter, distributing them evenly throughout.
- Bake the Brownies: Pour the brownie batter into the prepared baking pan, spreading it evenly. Bake in the preheated oven for 25-30 minutes, or until a toothpick inserted into the center comes out with a few moist crumbs.
- Create Bat Wings: While the brownies are baking, prepare the bat wings. Cut each marshmallow in half and press them into a bat wing shape. If desired, add a drop of black food coloring to darken the marshmallows. Dust with edible silver glitter or sprinkles for extra sparkle.
- Decorate the Brownies: Once the brownies are done, remove them from the oven and let them cool in the pan for about 10 minutes. Press the marshmallow bat wings into the top of each brownie square while still slightly warm to confirm they stick.
- Cool Completely: Allow the brownies to cool completely in the pan before cutting them into squares, confirming the decorations remain intact.
Extra Tips:
For an extra spooky effect, you can drizzle melted dark chocolate over the marshmallow bat wings to create a more defined wing pattern. If you prefer a different flavor profile, you can substitute milk chocolate or white chocolate chips for the dark chocolate.
Also, feel free to get creative with the decorations—consider using edible eyes or colored icing to add more personality to your bat wings. Remember, the key to perfect brownies isn’t overbaking them; a slightly underbaked center ensures a fudgy texture. Enjoy your Halloween Brownies with a glass of cold milk or a scoop of vanilla ice cream for a truly indulgent treat!
Haunted House Brownies
Bring a spooky twist to your Halloween celebrations with these delightful Haunted House Brownies. Perfect for a party centerpiece or a fun treat at home, these brownies combine rich, gooey chocolate with creative decorating to capture the haunted house theme.
Whether you’re a baking whiz or just looking for a fun activity to do with friends or family, these brownies offer a delicious experience from start to finish.
These Haunted House Brownies are designed to serve 4-6 people, making them ideal for a small gathering or a cozy night in. With the right ingredients and a little creativity, you can transform a simple brownie recipe into a spooky masterpiece.
Get ready to indulge in these deliciously eerie treats that are as fun to make as they’re to eat.
Ingredients (serves 4-6):
- 1 cup unsalted butter
- 2 cups granulated sugar
- 4 large eggs
- 1 teaspoon vanilla extract
- 1 cup all-purpose flour
- 1 cup unsweetened cocoa powder
- 1/2 teaspoon salt
- 1/2 teaspoon baking powder
- 1/2 cup dark chocolate chips
- 1/2 cup white chocolate chips
- Black and orange food coloring
- Halloween-themed sprinkles
- Marshmallow ghosts or candy decorations
- 1 tablespoon milk
Instructions:
- Preheat and Prepare: Preheat your oven to 350°F (175°C). Grease a 9×13 inch baking pan and line it with parchment paper, leaving an overhang on the sides to lift the brownies easily after baking.
- Melt Butter and Mix: In a medium saucepan over low heat, melt 1 cup of unsalted butter. Once melted, remove from heat and stir in 2 cups of granulated sugar until well combined. Allow the mixture to cool slightly.
- Add Eggs and Vanilla: In a large bowl, beat 4 large eggs and 1 teaspoon of vanilla extract together. Gradually add the butter and sugar mixture into the egg mixture, stirring continuously to avoid cooking the eggs.
- Combine Dry Ingredients: In another bowl, sift together 1 cup of all-purpose flour, 1 cup of unsweetened cocoa powder, 1/2 teaspoon of salt, and 1/2 teaspoon of baking powder. Gradually fold the dry ingredients into the wet ingredients until just combined.
- Add Chocolate Chips: Stir in 1/2 cup of dark chocolate chips. Pour the brownie batter into the prepared baking pan, spreading it evenly with a spatula.
- Bake: Bake in the preheated oven for 25-30 minutes or until a toothpick inserted into the center comes out with a few moist crumbs. Avoid overbaking to keep the brownies fudgy.
- Decorate: Allow the brownies to cool completely in the pan. In a small bowl, melt the white chocolate chips with 1 tablespoon of milk until smooth. Divide into two bowls and add black food coloring to one and orange to the other. Drizzle or pipe the colored chocolate over the brownies to create a haunted house scene.
Add Halloween-themed sprinkles and marshmallow ghosts or candy decorations for extra spookiness.
Extra Tips: To guarantee your brownies have the perfect fudgy texture, be cautious not to overmix the batter after adding the dry ingredients. This can cause too much air to be incorporated, resulting in cake-like brownies.
If you prefer a more customized haunted house look, feel free to use additional decorations like edible glitter or icing pens. These brownies can be made a day in advance and stored in an airtight container to keep them fresh for your spooky celebration.
Bloody Red Velvet Brownies

Halloween is the perfect time to indulge in sweet treats that are as spooky as they’re delicious. These Bloody Red Velvet Brownies are a perfect blend of rich cocoa flavor and a striking red hue that makes them ideal for any Halloween gathering. The combination of a moist, dense brownie with a slightly tangy cream cheese topping creates a delectable dessert that’s sure to become a favorite at your Halloween parties.
What makes these brownies particularly festive is their deep red color, reminiscent of blood, which is achieved by adding red food coloring to a traditional brownie mix. The cream cheese topping not only adds a delicious contrast in both flavor and texture but also serves as a canvas for creating eerie designs or patterns on the surface of each brownie.
Whether you’re serving these at a haunted house party or simply enjoying them as a family treat, Bloody Red Velvet Brownies are a must-try for Halloween.
Ingredients for a serving size of 4-6 people:
- 1 cup all-purpose flour
- 1 cup granulated sugar
- 1/2 cup unsalted butter, melted
- 2 large eggs
- 2 tablespoons cocoa powder
- 1 teaspoon vanilla extract
- 1 tablespoon red food coloring
- 1/4 teaspoon salt
- 1/2 teaspoon white vinegar
- 1/2 cup buttermilk
- 8 ounces cream cheese, softened
- 1/4 cup powdered sugar
- 1/2 teaspoon vanilla extract (for cream cheese topping)
Cooking Instructions:
- Preheat the Oven: Begin by preheating your oven to 350°F (175°C). Grease a 9×9 inch baking pan with butter or non-stick spray and set it aside.
- Mix Dry Ingredients: In a medium-sized bowl, sift together the all-purpose flour, cocoa powder, and salt to guarantee there are no lumps and the ingredients are well combined.
- Prepare Wet Ingredients: In a separate large bowl, whisk together the melted butter and granulated sugar until well blended. Add in the eggs one at a time, beating well after each addition. Stir in the vanilla extract, red food coloring, and vinegar until the mixture is smooth and evenly colored.
- Combine Ingredients: Gradually add the dry ingredients to the wet mixture, alternating with the buttermilk. Mix gently until just combined, being careful not to overmix. The batter should be thick and evenly red.
- Prepare Cream Cheese Topping: In a small bowl, beat the softened cream cheese, powdered sugar, and vanilla extract until smooth and creamy.
- Assemble the Brownies: Pour the red velvet brownie batter into the prepared baking pan, spreading it evenly. Dollop spoonfuls of the cream cheese mixture onto the surface of the brownie batter. Use a knife or skewer to swirl the cream cheese mixture into the brownie batter, creating a marbled effect.
- Bake: Place the pan in the preheated oven and bake for 25-30 minutes, or until a toothpick inserted into the center comes out with a few moist crumbs. Be careful not to overbake, as this will dry out the brownies.
- Cool and Serve: Allow the brownies to cool in the pan on a wire rack before cutting them into squares. Serve them fresh for the best texture and flavor.
Extra Tips:
For an extra spooky touch, consider adding edible decorations like candy eyeballs or a drizzle of red icing to enhance the Halloween theme. If you prefer a slightly less vibrant red color, you can adjust the amount of food coloring to your liking.
When swirling the cream cheese topping, be gentle to avoid blending the colors completely, as you want to maintain the distinct marbled appearance. Enjoy these festive treats with a glass of cold milk or a scoop of vanilla ice cream for an indulgent Halloween dessert experience.