
As the spooky season creeps closer, I’m absolutely thrilled to share some delightfully eerie food ideas that will transform your dinner into a ghoulish feast. Picture starting with a steaming bowl of Witch’s Brew Soup. Then, move on to the playful Mummy Wrapped Hot Dogs and the ever-so-creepy Monster Eyeball Meatballs. Each dish promises to tantalize your senses and captivate your guests. Are you ready to explore more hauntingly delicious creations?
Witch’s Brew Soup

As the spooky season approaches, there’s no better way to celebrate Halloween than with a bubbling cauldron of Witch’s Brew Soup. This eerie and delicious concoction is perfect for warming up on a chilly October night. Packed with vibrant vegetables and aromatic herbs, this soup isn’t only visually enticing but also a wholesome treat for family and friends.
Whether you’re hosting a Halloween party or simply enjoying a cozy night in, Witch’s Brew Soup is sure to cast a spell on all who taste it.
The beauty of Witch’s Brew Soup lies in its versatility and the ease with which it can be prepared. The deep green hue mimics a witch’s potion, while the varied textures and flavors create a delightful experience for the palate. This recipe serves 4-6 people and can be easily adjusted to accommodate more guests if needed.
Gather around the cauldron and let this magical soup work its charms, transporting you to a world of mysterious flavors and enchanting aromas.
Ingredients:
- 2 tablespoons olive oil
- 1 large onion, chopped
- 3 cloves garlic, minced
- 2 medium carrots, sliced
- 2 stalks celery, sliced
- 1 zucchini, diced
- 1 cup green beans, cut into 1-inch pieces
- 1 can (15 oz) diced tomatoes
- 4 cups vegetable broth
- 1 teaspoon dried thyme
- 1 teaspoon dried rosemary
- 1 teaspoon dried oregano
- Salt and pepper to taste
- 2 cups fresh spinach
- 1 cup cooked pasta (shells or elbows work well)
- 1/4 cup fresh parsley, chopped
Instructions:
- Prepare the Ingredients: Begin by preparing all the vegetables. Chop the onion, mince the garlic, slice the carrots and celery, dice the zucchini, and cut the green beans. Having all your ingredients prepped will make the cooking process smoother.
- Sauté the Aromatics: In a large pot or Dutch oven, heat the olive oil over medium heat. Add the chopped onion and minced garlic, and sauté until the onion is translucent and the garlic is fragrant, about 3-4 minutes.
- Cook the Vegetables: Add the carrots, celery, zucchini, and green beans to the pot. Stir well and cook for an additional 5 minutes, allowing the vegetables to soften slightly.
- Add Tomatoes and Broth: Pour in the diced tomatoes with their juice and the vegetable broth. Stir to combine all ingredients. Bring the mixture to a gentle boil.
- Season the Soup: Add the dried thyme, rosemary, and oregano to the pot. Season with salt and pepper according to your preference. Stir well and reduce the heat to low, allowing the soup to simmer for about 20 minutes.
- Incorporate Spinach and Pasta: Once the vegetables are tender, add the fresh spinach and cooked pasta to the soup. Stir until the spinach is wilted and everything is heated through, about 3-5 minutes.
- Finish with Fresh Herbs: Remove the pot from heat and stir in the chopped fresh parsley. Taste the soup and adjust the seasoning if needed.
Extra Tips:
For a richer flavor, consider using homemade vegetable broth or adding a splash of white wine to the soup. If you prefer a heartier texture, incorporate some white beans or chickpeas.
To make the dish spookier, serve it in black bowls or cauldrons and garnish with a dollop of sour cream or Greek yogurt to mimic a swirling potion. Remember, the key to a great soup is letting it simmer long enough for the flavors to meld, so don’t rush the process.
Enjoy your Witch’s Brew Soup while it’s piping hot, and feel free to add your own magical twist to the recipe!
Mummy Wrapped Hot Dogs

Mummy Wrapped Hot Dogs are a fun and festive dish perfect for Halloween gatherings. These playful treats resemble mummies, with hot dogs wrapped in dough to create a spooky yet delicious snack. Ideal for both kids and adults, they add a touch of creativity to any Halloween party spread. The combination of savory hot dogs and buttery pastry makes them a crowd-pleaser, and they’re incredibly easy to make with just a few simple ingredients.
These delightful Mummy Wrapped Hot Dogs can be prepared in under an hour, making them a quick and convenient option for busy hosts. The recipe yields enough to serve 4-6 people and can be easily doubled or tripled for larger gatherings. Whether you’re hosting a Halloween bash or simply looking to enjoy a themed meal with your family, these mummies are sure to delight everyone with their whimsical appearance and tasty flavor.
Ingredients (serving size: 4-6 people):
- 8 hot dogs
- 1 can of refrigerated crescent roll dough
- Mustard or ketchup for decorating
- Optional: 1 egg, beaten (for egg wash)
Cooking Instructions:
- Preheat the Oven: Begin by preheating your oven to 375°F (190°C). This will guarantee that the mummies bake evenly and achieve a nice golden color.
- Prepare the Dough: Open the can of refrigerated crescent roll dough and unroll it on a clean surface. Separate the dough into 4 rectangles by pinching together the perforated edges within each rectangle.
- Cut the Dough: Using a sharp knife or a pizza cutter, cut each rectangle into thin strips about 1/4 inch wide. These strips will be used to wrap around the hot dogs to create the mummy effect.
- Wrap the Hot Dogs: Take one hot dog and begin wrapping it with the dough strips, leaving a small gap near the top for the face. Overlap the dough slightly as you wrap to create a bandaged look. Repeat this process with all 8 hot dogs.
- Apply Egg Wash (Optional): If you desire a glossy finish, brush the dough-wrapped hot dogs lightly with a beaten egg using a pastry brush. This step is optional and not required for taste.
- Bake: Place the wrapped hot dogs on a baking sheet lined with parchment paper. Bake in the preheated oven for 12-15 minutes or until the dough is golden brown and cooked through.
- Decorate: Once out of the oven, let the mummies cool slightly. Use mustard or ketchup to add eyes and any other desired facial features to bring your mummies to life.
Extra Tips:
For extra flavor, you can add a slice of cheese under the dough before wrapping the hot dogs. Consider serving the Mummy Wrapped Hot Dogs with a variety of dipping sauces such as honey mustard, barbecue sauce, or spicy ketchup to cater to different taste preferences.
If you have leftover dough, it can be used to make mini mummy bites using cocktail sausages. Remember to keep an eye on the mummies while baking, as oven temperatures can vary, and you don’t want the dough to burn.
Monster Eyeball Meatballs

Halloween is the perfect time to get creative in the kitchen and delight your family and friends with spooky treats. One dish that’s bound to be a hit at your Halloween party is Monster Eyeball Meatballs. These creepy yet delicious meatballs are designed to look like eerie eyeballs, making them both fun and appetizing.
Whether you’re hosting a haunted house party or simply want to surprise your little ghouls and goblins, this recipe will add a touch of the macabre to your Halloween spread. Monster Eyeball Meatballs aren’t only visually striking, but they’re also packed with flavor. Made with a blend of ground beef and pork, these meatballs are seasoned to perfection and adorned with mozzarella cheese and black olives to create the perfect eyeball effect.
Served with a tangy tomato sauce, they make a satisfying main dish or a spooky appetizer. This recipe serves 4-6 people, making it ideal for a small gathering or family dinner.
Ingredients:
- 1 pound ground beef
- 1/2 pound ground pork
- 1/2 cup breadcrumbs
- 1/4 cup grated Parmesan cheese
- 2 cloves garlic, minced
- 1 small onion, finely chopped
- 1 large egg
- 1 tablespoon Worcestershire sauce
- 1 teaspoon salt
- 1/2 teaspoon black pepper
- 1 teaspoon dried oregano
- 1 teaspoon dried basil
- 12 small mozzarella balls (bocconcini)
- 12 black olives, sliced
- 2 cups marinara sauce
Cooking Instructions:
1. Preheat the Oven: Begin by preheating your oven to 375°F (190°C). This will guarantee that your meatballs cook evenly and develop a nice crust.
2. Mix the Meatball Ingredients: In a large mixing bowl, combine the ground beef, ground pork, breadcrumbs, Parmesan cheese, minced garlic, chopped onion, egg, Worcestershire sauce, salt, pepper, oregano, and basil. Mix thoroughly until all ingredients are well incorporated.
3. Form the Meatballs: Take a small portion of the meat mixture and roll it into a ball, about the size of a golf ball. Press your thumb into the center to make an indent. Place a mozzarella ball into the indent and cover it with the meat, making sure the cheese is completely enclosed.
Repeat this process to make approximately 12 meatballs.
4. Add the “Eyeballs”: Place a slice of black olive on top of each meatball, pressing it slightly into the meat to resemble an eyeball.
5. Bake the Meatballs: Arrange the prepared meatballs on a baking sheet lined with parchment paper. Bake in the preheated oven for 20-25 minutes, or until the meatballs are cooked through and the cheese is melted.
6. Heat the Marinara Sauce: While the meatballs are baking, heat the marinara sauce in a saucepan over medium heat until it simmers gently.
7. Serve the Dish: Once the meatballs are cooked, remove them from the oven and let them rest for a few minutes. Serve them hot with the marinara sauce, either on the side for dipping or ladled over the top for a more dramatic effect.
Extra Tips:
For an extra spooky touch, consider using different colored olives or food coloring in the mozzarella to vary the look of your eyeballs. If you’d like a bit more heat, you can add a pinch of red pepper flakes to the meat mixture.
To make certain your meatballs are tender, avoid over-mixing the ingredients and handle the meat gently when forming the balls. Finally, for even cooking, try to make all the meatballs the same size. Enjoy your Monster Eyeball Meatballs with a side of spaghetti for a complete Halloween meal!
Bat Wing Chicken Tenders
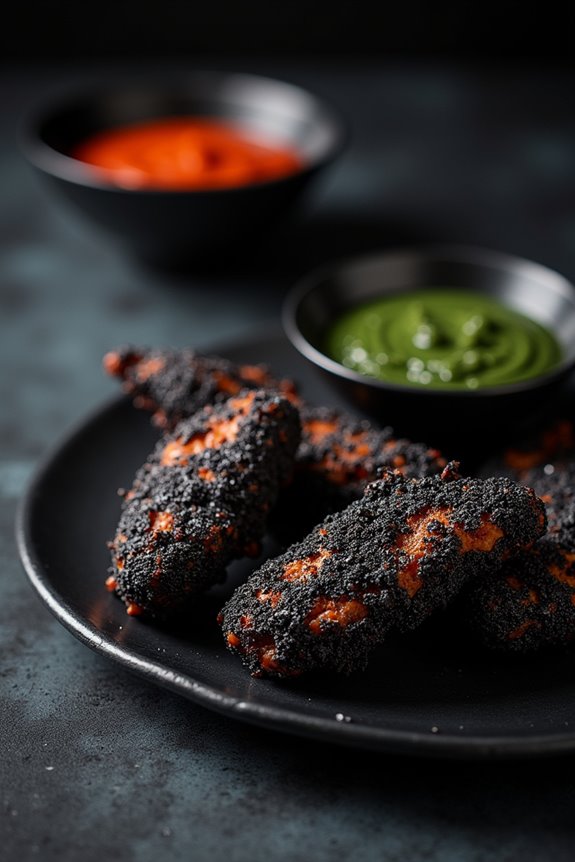
Get ready to spook and delight your guests with these Bat Wing Chicken Tenders this Halloween! This dish is a fun twist on classic chicken tenders, perfect for adding a creepy yet tasty element to your Halloween spread. The tenders are seasoned to perfection and coated in a dark, crispy crust that gives them an eerie look reminiscent of bat wings. Serve them with a side of your favorite dipping sauce, and watch as your guests gobble them up!
The secret to achieving the perfect “bat wing” look is in the unique blend of spices and the dark breading used to coat the chicken. This recipe isn’t only visually striking but also packed with flavor, guaranteeing that these tenders are a hit with both kids and adults alike. With a few simple ingredients and steps, you can create this spooky dish that will surely be the star of your Halloween party.
Ingredients for 4-6 people:
- 1 ½ pounds boneless, skinless chicken tenders
- 1 cup buttermilk
- 1 cup all-purpose flour
- ½ cup cornstarch
- 1 teaspoon garlic powder
- 1 teaspoon onion powder
- 1 teaspoon smoked paprika
- 1 teaspoon salt
- ½ teaspoon black pepper
- ½ teaspoon cayenne pepper
- 1 tablespoon activated charcoal powder
- 2 large eggs
- Vegetable oil for frying
Cooking Instructions:
- Prepare the Chicken: Rinse the chicken tenders under cold water and pat them dry with paper towels. Place them in a shallow dish and cover them with buttermilk. Let them marinate for at least 30 minutes in the refrigerator to tenderize and flavor the chicken.
- Mix the Dry Ingredients: In a large bowl, combine the flour, cornstarch, garlic powder, onion powder, smoked paprika, salt, black pepper, cayenne pepper, and activated charcoal powder. Mix well until all the ingredients are evenly distributed, making sure the charcoal powder is thoroughly incorporated for that dark color.
- Prepare the Egg Wash: In a separate bowl, beat the eggs until smooth. Set aside.
- Coat the Chicken: Remove the chicken tenders from the buttermilk and shake off any excess. Dip each tender into the egg wash, making sure it’s fully coated. Then dredge it in the dry ingredient mixture, pressing lightly to adhere the coating to the chicken.
- Heat the Oil: In a large skillet or deep fryer, heat about 2 inches of vegetable oil over medium-high heat until it reaches 350°F (175°C). It’s important to maintain this temperature for even cooking.
- Fry the Tenders: Carefully place the coated chicken tenders into the hot oil, frying in batches to avoid overcrowding. Cook each batch for about 6-8 minutes, turning occasionally, until they’re crispy and cooked through. The internal temperature should reach 165°F (74°C).
- Drain and Serve: Once cooked, transfer the tenders to a plate lined with paper towels to drain excess oil. Serve immediately with your choice of dipping sauces.
Extra Tips:
For an even spookier presentation, consider serving these Bat Wing Chicken Tenders on a dark platter with a side of red or green dipping sauce, like a spicy ketchup or avocado dip.
If you don’t have activated charcoal powder, you can use black food coloring in the batter to achieve the same eerie effect. Remember to keep the oil at a consistent temperature to guarantee even frying and to prevent the tenders from becoming too greasy. Enjoy your Halloween feast!
Jack-o’-Lantern Stuffed Peppers

Celebrate Halloween with a spooky twist on a classic dish by preparing Jack-o’-Lantern Stuffed Peppers. This fun and festive recipe transforms ordinary bell peppers into edible jack-o’-lanterns, making it a delightful addition to any Halloween party or family dinner. The peppers are carved with faces, stuffed with a savory mixture of ground beef, rice, and spices, and then baked to perfection. Not only do they provide a festive appearance, but these stuffed peppers are also wholesome and delicious, sure to please both adults and children alike.
The Jack-o’-Lantern Stuffed Peppers are a great way to incorporate the spirit of Halloween into your meal without resorting to sweets and candies. This dish is ideal for serving 4-6 people, making it perfect for a small gathering. The preparation is simple, yet the presentation is bound to impress your guests. This recipe can also be easily customized to suit different dietary preferences by altering the stuffing ingredients. Get ready to carve your way into a memorable Halloween feast with this creative and nourishing dish.
Ingredients (Serves 4-6):
- 6 large orange bell peppers
- 1 pound ground beef or turkey
- 1 cup cooked rice
- 1 small onion, finely chopped
- 2 cloves garlic, minced
- 1 can (14.5 oz) diced tomatoes
- 1 cup shredded mozzarella cheese
- 1 teaspoon Italian seasoning
- Salt and pepper to taste
- 1 tablespoon olive oil
Cooking Instructions:
- Preheat the Oven: Start by preheating your oven to 375°F (190°C) to guarantee it’s ready for baking once the peppers are stuffed.
- Prepare the Peppers: Cut the tops off the bell peppers and remove the seeds and membranes. Using a small paring knife, carefully carve jack-o’-lantern faces into each pepper. Set aside the tops and hollowed peppers.
- Cook the Filling: In a large skillet, heat olive oil over medium heat. Add the chopped onion and minced garlic, sautéing until the onion is translucent. Add the ground beef or turkey and cook until browned, breaking it apart with a spoon.
- Mix the Stuffing: Once the meat is cooked, drain any excess fat. Stir in the cooked rice, diced tomatoes (with juice), Italian seasoning, salt, and pepper. Allow the mixture to simmer for about 5 minutes, allowing the flavors to meld together.
- Stuff the Peppers: Spoon the meat and rice mixture into each carved pepper until they’re generously filled. Sprinkle mozzarella cheese on top of each filled pepper, pressing it down slightly.
- Bake the Peppers: Place the stuffed peppers in a baking dish and cover them loosely with aluminum foil. Bake in the preheated oven for 25-30 minutes. Remove the foil and bake for an additional 10 minutes, or until the peppers are tender and the cheese is melted and bubbly.
- Serve: Allow the peppers to cool slightly before serving. Place the tops back onto the peppers for presentation if desired, and enjoy!
Extra Tips:
To guarantee your peppers don’t tip over while baking, you might want to slice a small amount off the bottom to create a flat base. If you prefer a vegetarian version, replace the ground meat with more vegetables or a plant-based protein like lentils or quinoa. Additionally, feel free to experiment with different types of cheese or add some heat with a pinch of chili flakes to the stuffing. Enjoy your delicious and spooky Jack-o’-Lantern Stuffed Peppers!
Pumpkin Patch Deviled Eggs

Pumpkin Patch Deviled Eggs are a spooky twist on a classic appetizer, perfect for Halloween gatherings. These delightful treats aren’t only visually appealing but also packed with flavor, making them a hit at any festive occasion. The creamy yolk mixture is tinted with a touch of orange food coloring to mimic mini pumpkins, while a dash of paprika adds a subtle smoky flavor. By using chives as stems, these deviled eggs bring a playful yet sophisticated element to your Halloween spread.
Creating these Pumpkin Patch Deviled Eggs is fun and straightforward, making it an ideal recipe for involving kids in the kitchen. The whimsical appearance of these eggs will intrigue both children and adults, encouraging them to dig in. Whether you’re hosting a Halloween party or simply want to add a themed dish to your meal, these deviled eggs are sure to impress your guests with their creativity and taste.
Ingredients for 4-6 people:
- 6 large eggs
- 3 tablespoons mayonnaise
- 1 teaspoon Dijon mustard
- 1/2 teaspoon white vinegar
- Salt and pepper, to taste
- Orange food coloring
- Paprika, for garnish
- 12 small chives, cut into 1-inch pieces
Cooking Instructions:
- Boil the Eggs: Begin by placing the eggs in a saucepan and covering them with cold water. Bring the water to a boil over medium-high heat. Once boiling, remove the saucepan from heat and cover it with a lid. Let the eggs sit in hot water for about 10-12 minutes.
- Cool and Peel: After the eggs have cooked, transfer them to an ice bath to cool for about 5 minutes. Once cooled, gently crack and peel the shells off the eggs.
- Prepare the Yolks: Slice each egg in half lengthwise and carefully remove the yolks. Place the yolks in a mixing bowl and set the egg whites aside on a serving platter.
- Make the Filling: Mash the egg yolks with a fork until smooth. Add mayonnaise, Dijon mustard, white vinegar, salt, and pepper. Mix until well combined. Add a few drops of orange food coloring and stir until the mixture reaches a pumpkin-like hue.
- Fill the Egg Whites: Spoon or pipe the yolk mixture back into the egg white halves. Mound the filling to resemble small pumpkins.
- Garnish: Sprinkle a light dusting of paprika over the yolk mixture for added flavor and color. Place a chive piece into the top of each yolk mound to resemble a pumpkin stem.
Extra Tips:
When preparing Pumpkin Patch Deviled Eggs, it’s important to verify that the eggs are perfectly hard-boiled to avoid any greenish yolk discoloration, which can occur from overcooking.
Using a pastry bag or a plastic bag with a snipped corner can help in neatly piping the yolk mixture into the egg whites. If you want to make these eggs ahead of time, store the egg whites and yolk mixture separately in the refrigerator and assemble them just before serving to maintain freshness and presentation.
Ghostly Mashed Potatoes

Ghostly Mashed Potatoes are a fun and spooky twist on the classic side dish, perfect for any Halloween gathering. This recipe takes the traditional creamy mashed potatoes and gives them a haunting makeover with ghostly shapes and eerie garnishes.
Whether you’re hosting a Halloween party or just want to add a festive touch to your family dinner, these mashed potatoes will be a delight for both kids and adults.
The key to creating these spooky specters is in the presentation. By using a simple piping technique, you can transform the mashed potatoes into ghostly figures with haunting faces. The smooth, creamy texture of the potatoes makes them easy to work with, and the addition of black olives or peppercorns for eyes brings these little ghosts to life.
Served alongside your favorite main course, Ghostly Mashed Potatoes are certain to be a hit.
Ingredients (Serving Size: 4-6 people)
- 2 pounds of potatoes, peeled and chopped
- 1/2 cup of milk
- 1/4 cup of butter
- Salt to taste
- Black pepper to taste
- Black olives, sliced (for eyes)
- Chives, finely chopped (optional for garnish)
Cooking Instructions
- Prepare the Potatoes: Begin by peeling and chopping the potatoes into uniform pieces to guarantee even cooking. Place them in a large pot and fill with enough water to cover the potatoes completely.
- Cook the Potatoes: Bring the pot to a boil over medium-high heat. Reduce the heat to medium and let the potatoes simmer for about 15-20 minutes, or until they’re fork-tender.
- Drain and Mash: Once cooked, drain the potatoes thoroughly and return them to the pot. Add the butter and milk, then mash the potatoes using a potato masher or electric mixer until smooth and creamy. Season with salt and black pepper to taste.
- Shape the Ghosts: Transfer the mashed potatoes into a large piping bag fitted with a wide round tip. On a serving platter, pipe the mashed potatoes into ghost shapes, creating a swirling, peaked appearance.
- Decorate the Ghosts: Use the sliced black olives to create eyes on each ghost. Alternatively, whole peppercorns can be used for a more subtle look. If desired, sprinkle finely chopped chives around the platter for an additional garnish.
Extra Tips
When creating the ghost shapes, it’s important to work quickly with the mashed potatoes while they’re still warm, as they’re easier to pipe and shape.
If the potatoes start to cool and become too stiff, gently reheat them to regain their pliability. Additionally, for an extra creamy texture, consider using a ricer instead of a masher for the potatoes. This will give your Ghostly Mashed Potatoes an ultra-smooth consistency, making them even more delightful to eat.
Spider Web Pizza

Spider Web Pizza is the perfect dish to add a spooky twist to your Halloween celebration. This fun and easy recipe transforms a classic pizza into a haunting delight that will impress both kids and adults. By creating a spider web pattern with cheese and topping it with an olive spider, you’ll have a themed dish that not only looks great but also tastes delicious.
Whether you’re hosting a Halloween party or simply getting into the festive spirit at home, this Spider Web Pizza is sure to be a crowd-pleaser. This recipe is designed to serve 4-6 people, making it ideal for a small gathering or family meal. The gooey cheese, savory tomato sauce, and crispy crust create a mouth-watering base, while the creative design adds a touch of Halloween fun.
With just a few simple ingredients and steps, you can whip up this spooky treat in no time. Let’s plunge into the ingredients and instructions to get started on your own Spider Web Pizza!
Ingredients
- 1 pre-made pizza crust (12-inch)
- 1 cup pizza sauce
- 2 cups shredded mozzarella cheese
- ½ cup sliced black olives
- 1 tablespoon olive oil
- 1 green bell pepper (optional)
- 1 cup pepperoni slices (optional)
Cooking Instructions
- Preheat the Oven: Begin by preheating your oven to 425°F (220°C) to make sure it’s hot enough to create a crispy crust.
- Prepare the Pizza Base: Place the pre-made pizza crust on a pizza stone or baking sheet. Brush the crust lightly with olive oil to enhance the flavor and crispiness.
- Add the Sauce: Spread the pizza sauce evenly over the crust, leaving a small border around the edge for the crust. This will guarantee each bite is packed with flavor.
- Create the Spider Web: Sprinkle the shredded mozzarella cheese over the sauce in a circular pattern. Then, use additional strips of cheese to form concentric circles and connect them with lines to mimic a spider web design.
- Decorate with Olive Spiders: Cut several black olive slices in half to form the spider bodies, and use thin strips of olives for the legs. Arrange them strategically on the pizza to enhance the spooky effect.
- Add Additional Toppings: If desired, place pepperoni slices and sliced green bell peppers artfully around the pizza. This step is optional but can add extra flavor and visual appeal.
- Bake the Pizza: Place the pizza in the preheated oven and bake for 12-15 minutes or until the cheese is fully melted and bubbly, and the crust is golden brown.
- Serve and Enjoy: Once baked, remove the pizza from the oven and let it cool slightly. Slice into wedges and serve your Spider Web Pizza warm.
Extra Tips
For an even spookier effect, consider using food coloring to dye parts of the cheese or sauce to create a more intricate web design.
Additionally, you can use whole olives or cherry tomatoes for larger “spiders.” If you prefer a homemade crust, make sure you let it rise properly for a better texture.
Finally, always keep an eye on the pizza while baking to prevent overcooking, and feel free to get creative with the toppings and design to make your Spider Web Pizza uniquely yours!
Bloody Finger Breadsticks

Looking for a spooky and delicious treat to serve at your Halloween party? Search no further than Bloody Finger Breadsticks. These eerie appetizers aren’t only fun to make but also a hit among guests of all ages. Shaped like gory fingers and served with a side of marinara sauce for a bloody effect, they’re perfect for adding a touch of fright to your festive spread.
Bloody Finger Breadsticks are made using simple ingredients that are easy to find and even easier to assemble. This recipe serves 4-6 people and requires minimal prep work, making it an ideal choice for busy hosts. The combination of crispy breadsticks and tangy marinara sauce is sure to be a crowd-pleaser, ensuring that your Halloween party is both memorable and delicious.
Ingredients (serving size: 4-6 people):
- 1 can of refrigerated breadstick dough
- 1/4 cup of sliced almonds
- 1 egg, beaten
- 1/2 teaspoon garlic powder
- 1/2 teaspoon Italian seasoning
- 1/4 cup grated Parmesan cheese
- 1 cup marinara sauce (for dipping)
Cooking Instructions:
- Preheat the Oven: Preheat your oven to 375°F (190°C). Line a baking sheet with parchment paper to prevent the breadsticks from sticking.
- Prepare the Dough: Open the can of refrigerated breadstick dough and separate the strips. Stretch each strip slightly to lengthen it, making it resemble more like a finger.
- Shape the Fingers: Pinch one end of each dough strip to create a fingertip shape. Use a knife to make small horizontal cuts to simulate knuckles on the breadsticks.
- Add Almond Fingernails: Press a sliced almond onto the pinched end of each breadstick to resemble a fingernail. Make sure the almonds are secure so they don’t fall off during baking.
- Season the Breadsticks: Brush each breadstick with the beaten egg to give them a golden color. Sprinkle with garlic powder, Italian seasoning, and Parmesan cheese for added flavor.
- Bake the Breadsticks: Place the prepared breadsticks on the lined baking sheet. Bake in the preheated oven for 12-15 minutes, or until they’re golden brown and cooked through.
- Serve with Marinara Sauce: Heat the marinara sauce in a small pot or microwave until warm. Serve the breadsticks alongside the sauce for dipping, creating the effect of bloody fingers.
Extra Tips:
For an even more realistic look, consider using food coloring to tint the almonds a darker shade, enhancing their resemblance to dirty fingernails.
If you don’t have sliced almonds, you can use pumpkin seeds as an alternative. Make sure to monitor the breadsticks as they bake to prevent over-browning.
To save time, the marinara sauce can be prepared in advance and simply reheated before serving. Enjoy creating this creepy yet tasty treat that’s sure to delight and spook your guests at your Halloween gathering!
Zombie Brain Cupcakes

Zombie Brain Cupcakes are a spooky and delightful treat perfect for your Halloween celebrations. These cupcakes aren’t only fun to make but are also deliciously moist with a rich, creamy filling. Their eerie appearance is sure to impress your guests and add a chilling touch to your Halloween party spread. The combination of chocolate cupcakes with a gooey, brain-like filling, and a creepy decoration will make them a hit among both kids and adults.
These cupcakes are inspired by the classic horror movie monsters and are designed to look like zombie brains. The vibrant colors and textures are achieved through clever use of food coloring and decorating techniques. Not only do they look the part, but they also taste amazing, with a perfect balance of sweetness and gooeyness. Whether you’re throwing a big Halloween bash or just want to surprise your family with a spooky treat, Zombie Brain Cupcakes are the way to go.
Ingredients for Zombie Brain Cupcakes (Serves 4-6 people):
- 1 cup all-purpose flour
- 1/2 cup unsweetened cocoa powder
- 1 teaspoon baking powder
- 1/2 teaspoon baking soda
- 1/4 teaspoon salt
- 1/2 cup unsalted butter, softened
- 1 cup granulated sugar
- 2 large eggs
- 1 teaspoon vanilla extract
- 1/2 cup buttermilk
- Red gel food coloring
- 1 cup marshmallow fluff
- 1/2 cup heavy cream
- Green gel food coloring
- White frosting
- Black decorating gel
Cooking Instructions:
- Preheat and Prepare: Preheat your oven to 350°F (175°C) and line a cupcake tray with 12 cupcake liners.
- Mix Dry Ingredients: In a medium bowl, whisk together the flour, cocoa powder, baking powder, baking soda, and salt. Set aside.
- Cream Butter and Sugar: In a large mixing bowl, cream together the softened butter and granulated sugar until light and fluffy. This should take about 3-4 minutes with an electric mixer.
- Add Eggs and Vanilla: Beat in the eggs, one at a time, mixing well after each addition. Add the vanilla extract and mix until fully incorporated.
- Combine with Buttermilk: Gradually add the dry ingredients to the wet mixture, alternating with the buttermilk, starting and ending with the dry ingredients. Mix until just combined, being careful not to overmix.
- Add Color: Stir in a few drops of red gel food coloring until the batter reaches a desired “bloody” hue.
- Bake: Divide the batter evenly among the cupcake liners. Bake in the preheated oven for 18-20 minutes, or until a toothpick inserted into the center comes out clean. Allow cupcakes to cool completely on a wire rack.
- Prepare Filling: In a small bowl, mix the marshmallow fluff with a few drops of green gel food coloring. Stir until the marshmallow is evenly colored.
- Core Cupcakes: Once the cupcakes are cool, use a knife or cupcake corer to remove a small section from the center of each cupcake.
- Fill Cupcakes: Fill the hollowed-out centers with the green marshmallow mixture using a piping bag or spoon.
- Frost Cupcakes: Using a piping bag fitted with a round tip, pipe white frosting on top of each cupcake, creating a brain-like pattern. Draw lines and details with black decorating gel to enhance the look.
Extra Tips:
For the best results, make certain your butter is at room temperature before you start. This guarantees it creams properly with the sugar, resulting in a light and fluffy cupcake.
When adding food coloring, start with a small amount and gradually add more until you achieve the desired color. If you’re making these cupcakes with children, let them get creative with the decorations – it’s a fun way to involve them in the Halloween preparations.
Finally, consider storing the cupcakes in an airtight container if making them a day in advance to maintain their freshness.
Graveyard Dirt Pudding
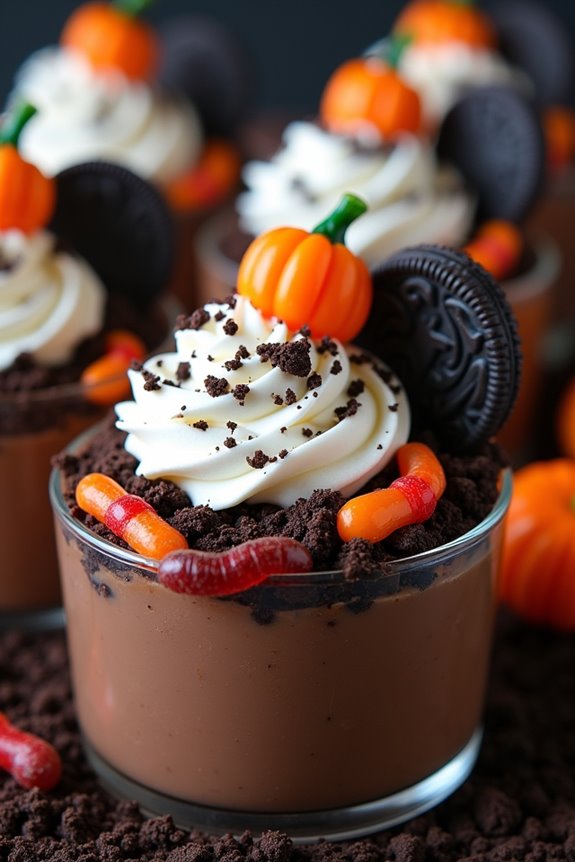
Graveyard Dirt Pudding is a spooktacular Halloween treat that’s both easy to make and delightful to eat. This eerie dessert combines layers of creamy chocolate pudding, crushed cookies, and gummy worms, creating a fun and delicious concoction that resembles a creepy graveyard scene. Perfect for Halloween parties, it’s a hit with both kids and adults, bringing a touch of whimsy and a dash of fright to your festive table.
Its simplicity makes it an ideal recipe for involving little helpers in the kitchen, turning the preparation into a fun family activity. This no-bake dessert is all about assembling the layers, making it a breeze to prepare even at the last minute. The rich chocolate pudding blends perfectly with the crunchy texture of the cookie crumbs, while the gummy worms add a playful touch to the presentation.
Decorate the top with tombstones made from cookies or chocolate, creating a hauntingly delicious treat that’s sure to be a crowd-pleaser. With just a few ingredients, you can create a memorable Halloween dish that’s both visually striking and scrumptiously satisfying.
Ingredients for 4-6 Servings:
- 2 cups of cold milk
- 1 package (3.9 ounces) of instant chocolate pudding mix
- 1 package (14 ounces) of chocolate sandwich cookies
- 1 container (8 ounces) of whipped topping, thawed
- Gummy worms
- Optional: chocolate cookies or biscuits for tombstones
- Optional: candy pumpkins for decoration
Cooking Instructions:
- Prepare the Pudding: In a medium-sized mixing bowl, whisk together the cold milk and the instant chocolate pudding mix. Stir for about 2 minutes until the mixture is smooth and begins to thicken. Allow it to sit for 5 minutes to set.
- Crush the Cookies: Place the chocolate sandwich cookies in a resealable plastic bag and crush them using a rolling pin or a food processor until they resemble fine dirt. Reserve about 1/4 cup of the crushed cookies for topping.
- Layer the Dessert: In a large serving dish or individual cups, start by adding a layer of cookie crumbs at the bottom. Next, add a layer of chocolate pudding, followed by a layer of the whipped topping. Repeat the layers until you reach the top of your dish or cups.
- Decorate the Graveyard: Sprinkle the reserved cookie crumbs over the top layer of whipped topping to create the appearance of dirt. Insert gummy worms partially into the top layer, allowing them to “crawl” out. If using, place chocolate cookies or biscuits upright to resemble tombstones. Add candy pumpkins for additional decoration.
- Chill and Serve: Place the completed dessert in the refrigerator for at least 1 hour to allow the layers to set and the flavors to meld. Serve chilled and enjoy the spooky treat!
Extra Tips:
For an added Halloween touch, consider using edible writing gel to inscribe spooky names or messages on the tombstone cookies. If you’re making individual servings, mason jars or clear cups work well to showcase the layered effect.
Feel free to experiment with different gummy candies like spiders or bats to enhance the creepy factor. For a more indulgent version, substitute some of the whipped topping with cream cheese for a richer taste. Enjoy crafting this Graveyard Dirt Pudding and delight in the festive spirit it brings to your Halloween celebration!