
Hey there, fellow Halloween enthusiasts! 🎃
Are you ready to add a touch of spooky sophistication to your adults-only Halloween bash?
I’ve got you covered with some hauntingly delicious appetizer ideas that will thrill your guests.
From Witch’s Brew Cheese Fondue to Bloody Mary Shrimp Shooters, each dish is crafted to impress with both eerie vibes and gourmet flair.
Let’s get creative and whip up a spread that’s as bewitching as it is delectable!
Witch’s Brew Cheese Fondue

Turn your Halloween gathering into a hauntingly delightful event with this Witch’s Brew Cheese Fondue. Perfect for adults looking to indulge in a savory treat, this fondue combines a rich blend of cheeses melted into a silky potion, enhanced with a hint of garlic and a splash of white wine.
Served bubbling from a cauldron-like fondue pot, it’s a bewitching centerpiece that invites guests to dip and savor a variety of accompaniments like crusty bread, crisp vegetables, and juicy fruits.
Crafting this dish is as much fun as it’s to eat, making it a fantastic option for a festive gathering. The fondue’s smooth texture and robust flavor will cast a spell over your guests, leaving them enchanted and enthusiastic for more.
Not only does it serve as a delicious appetizer, but it also provides a wonderful opportunity for socializing as everyone gathers around to dip and share. This recipe serves 4-6 people, guaranteeing there’s enough magic for everyone at your Halloween party.
Ingredients for 4-6 People:
- 1 clove garlic, halved
- 1 cup dry white wine
- 8 ounces Gruyère cheese, grated
- 8 ounces Emmental cheese, grated
- 1 tablespoon cornstarch
- 2 tablespoons brandy or kirsch
- 1 teaspoon lemon juice
- Freshly ground black pepper, to taste
- Ground nutmeg, to taste
- Assorted dippers: cubed bread, apple slices, vegetable sticks (e.g., carrots, bell peppers, broccoli)
Cooking Instructions:
- Prepare the Fondue Pot: Rub the inside of a fondue pot or a heavy saucepan with the cut side of the garlic halves. Discard the garlic once the pot is well rubbed.
- Heat the Wine: Pour the white wine into the pot and heat over medium-low until it starts to warm up, but don’t allow it to boil.
- Melt the Cheese: Gradually add the grated Gruyère and Emmental cheeses to the pot, stirring constantly with a wooden spoon in a circular motion until the cheese is melted and smooth.
- Thicken the Fondue: In a small bowl, mix the cornstarch with the brandy or kirsch and lemon juice. Stir this mixture into the cheese fondue to help thicken it. Continue to stir until the mixture is smooth and creamy.
- Season the Fondue: Season the fondue with freshly ground black pepper and a pinch of nutmeg to taste. Adjust the seasoning according to your preference.
- Serve and Enjoy: Keep the fondue warm over a low flame. Arrange the assorted dippers around the pot, encouraging guests to dip and enjoy.
Extra Tips:
To maintain the fondue’s smooth and creamy texture, keep a gentle heat throughout the preparation. Avoid letting the cheese fondue boil, as high temperatures can cause the cheese to separate, resulting in a grainy texture.
If the fondue becomes too thick, add a little more white wine to adjust the consistency. Additionally, consider experimenting with different cheeses or adding a dash of your favorite hot sauce for a spicy kick.
Vampire Bat Wings

Vampire Bat Wings are a spooky and delicious addition to any Halloween party, especially when catering to an adult crowd. These savory chicken wings are marinated in a dark, flavorful sauce that resembles the eerie appearance of bat wings, making them a perfect thematic dish for the occasion.
With a balance of sweet, spicy, and tangy flavors, these wings are guaranteed to be a hit and will have your guests coming back for more. The key to making these wings stand out is in the marinade, which uses a combination of dark soy sauce, balsamic vinegar, and a hint of molasses to give them their deep color and rich taste.
Paired with a touch of garlic and a kick of hot sauce, these Vampire Bat Wings are both visually striking and irresistibly tasty. Whether you’re hosting a haunted house gathering or a costume party, these wings will add a frightful flair to your appetizer spread.
Ingredients (Serves 4-6)
- 3 pounds of chicken wings
- 1/2 cup dark soy sauce
- 1/4 cup balsamic vinegar
- 2 tablespoons molasses
- 2 tablespoons olive oil
- 4 cloves garlic, minced
- 1 tablespoon hot sauce
- 1 tablespoon smoked paprika
- 1 teaspoon black pepper
- 1 teaspoon salt
- 1/2 teaspoon cayenne pepper
- Chopped fresh parsley for garnish (optional)
Cooking Instructions
- Prepare the Wings: Begin by washing and patting dry the chicken wings with paper towels. Cut the wings at the joint to separate the drumette from the wingette, discarding the tip or saving it for stock.
- Make the Marinade: In a large mixing bowl, combine the dark soy sauce, balsamic vinegar, molasses, olive oil, minced garlic, hot sauce, smoked paprika, black pepper, salt, and cayenne pepper. Whisk the ingredients together until well mixed.
- Marinate the Wings: Add the chicken wings to the bowl with the marinade, making sure each piece is well coated. Cover the bowl with plastic wrap and refrigerate for at least 2 hours, or overnight for best results, allowing the flavors to penetrate the meat.
- Preheat the Oven: Preheat your oven to 400°F (200°C). Line a baking sheet with aluminum foil and place a wire rack on top. This will allow the heat to circulate around the wings, promoting even cooking and crispy skin.
- Bake the Wings: Arrange the marinated wings on the wire rack in a single layer, making sure they aren’t touching. Bake in the preheated oven for 40-45 minutes, turning halfway through, until the wings are cooked through and have a dark, glossy appearance.
- Serve and Garnish: Once cooked, remove the wings from the oven and let them rest for a few minutes. Transfer to a serving platter and garnish with chopped parsley if desired. Serve hot and enjoy these spooky treats!
Extra Tips
To achieve the best flavor, allow the wings to marinate overnight if possible. This extended marinating time will guarantee that the wings are deeply infused with the dark, savory flavors of the marinade.
Additionally, make sure to use a wire rack on the baking sheet to help the wings cook evenly and develop a crispy exterior. If you prefer more heat, feel free to increase the amount of hot sauce or cayenne pepper in the marinade to suit your taste.
Ghostly Stuffed Mushrooms

Crafting these Ghostly Stuffed Mushrooms is both an enjoyable and rewarding experience. The recipe is designed to serve 4-6 people, making it suitable for intimate gatherings or as part of a larger spread.
Whether you’re hosting a haunted house party or simply enjoying a cozy night in, these stuffed mushrooms are sure to captivate your guests with their hauntingly delicious taste.
Ingredients:
- 20 large white button mushrooms
- 2 tablespoons olive oil
- 1 small onion, finely chopped
- 2 cloves garlic, minced
- 1/4 cup bread crumbs
- 1/4 cup grated Parmesan cheese
- 4 ounces cream cheese, softened
- 2 tablespoons fresh parsley, chopped
- Salt and pepper to taste
- 1/4 teaspoon ground nutmeg
- Cooking spray or additional olive oil for baking
Instructions:
- Preheat Oven: Start by preheating your oven to 375°F (190°C). This guarantees a consistent temperature for baking the mushrooms evenly.
- Prepare Mushrooms: Gently clean the mushrooms with a damp paper towel. Remove the stems carefully and set them aside. Arrange the mushroom caps on a baking sheet lined with parchment paper, and lightly drizzle them with 1 tablespoon of olive oil.
- Cook the Filling: In a skillet over medium heat, add the remaining tablespoon of olive oil. Sauté the chopped onion until translucent, about 3-4 minutes. Add the minced garlic and chopped mushroom stems, cooking for an additional 2 minutes.
- Mix Ingredients: In a mixing bowl, combine the sautéed onion and garlic mixture, bread crumbs, Parmesan cheese, cream cheese, and chopped parsley. Season with salt, pepper, and ground nutmeg. Mix thoroughly until all ingredients are well incorporated.
- Stuff Mushrooms: Using a small spoon or a piping bag, carefully fill each mushroom cap with the prepared mixture, mounding it slightly over the top of each cap.
- Bake: Lightly spray the stuffed mushrooms with cooking spray or drizzle with a bit more olive oil to enhance browning. Bake in the preheated oven for 20-25 minutes, or until the tops are golden and the mushrooms are tender.
- Serve: Remove from the oven and let them cool slightly before serving. Arrange them on a platter and watch them disappear!
Extra Tips:
For an extra touch of ghostly charm, you can use small bits of black olives or capers to create eyes for the ghostly mushrooms before baking.
Additionally, feel free to experiment with different herbs or cheeses to customize the flavor to your liking. If you prefer a meatier filling, you can add cooked sausage or bacon bits to the mixture.
Remember to taste the filling before stuffing the mushrooms to adjust the seasoning to your preference. These Ghostly Stuffed Mushrooms are best served warm, so plan to bake them just before your guests arrive for maximum flavor and presentation.
Mummy Jalapeño Poppers
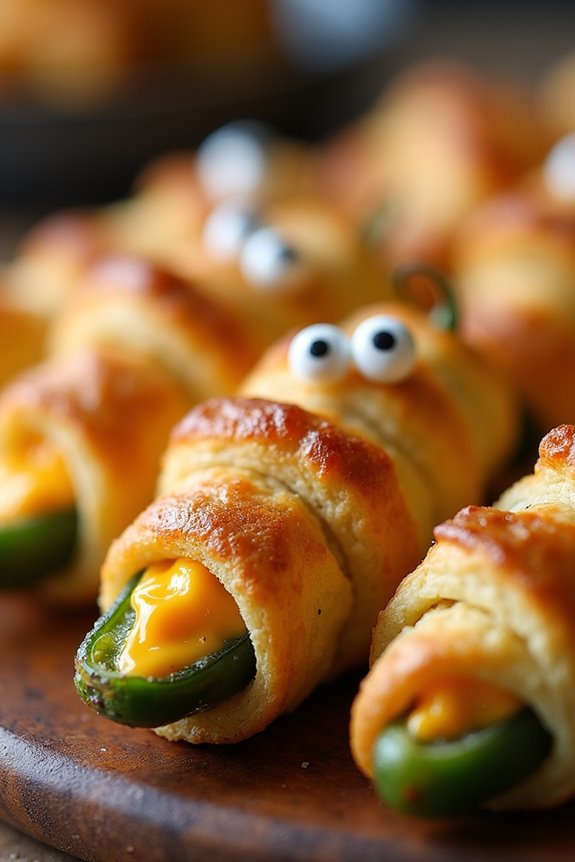
Halloween is the perfect time to get creative in the kitchen, and these Mummy Jalapeño Poppers are sure to be a hit at your adult Halloween gathering. With their spooky yet fun appearance, these poppers combine the spicy kick of jalapeños with creamy cheese filling, all wrapped in a deliciously flaky crescent roll casing. Not only do they make a great appetizer, but they also add a festive touch to your Halloween spread, making them irresistible both in taste and presentation.
Whether you’re hosting a party or simply enjoying a night in with friends, these Mummy Jalapeño Poppers will quickly become a favorite. The combination of flavors and textures is mouthwatering, and their mummy-like appearance adds an element of whimsy to your Halloween festivities. Best of all, they’re easy to make and can be prepared in advance, leaving you more time to enjoy the company of your guests.
So, let’s explore the ingredients and cooking instructions to start making these spooky treats.
Ingredients for 4-6 servings:
- 10 large jalapeño peppers
- 8 oz cream cheese, softened
- 1 cup shredded cheddar cheese
- 1/2 teaspoon garlic powder
- 1/2 teaspoon onion powder
- 1/4 teaspoon smoked paprika
- Salt and pepper to taste
- 1 can (8 oz) refrigerated crescent roll dough
- 20 small candy eyes
Cooking Instructions:
- Preheat and Prepare: Preheat your oven to 400°F (200°C). Line a baking sheet with parchment paper or a silicone baking mat for easy cleanup.
- Prepare the Jalapeños: Cut each jalapeño in half lengthwise and remove the seeds and membranes using a spoon or a small knife. Be sure to wear gloves to protect your hands from the pepper’s oils.
- Make the Cheese Filling: In a medium-sized bowl, mix together the softened cream cheese, shredded cheddar cheese, garlic powder, onion powder, smoked paprika, salt, and pepper until well combined.
- Fill the Jalapeños: Spoon the cheese mixture into each jalapeño half, pressing it slightly to confirm it’s well packed.
- Wrap with Crescent Dough: Unroll the crescent roll dough and press the seams together to form a single sheet. Using a pizza cutter or knife, cut the dough into thin strips, about 1/4 inch wide.
- Create the Mummy Effect: Wrap each stuffed jalapeño with the dough strips, leaving small gaps to give them the appearance of a mummy. Make sure to leave space for the eyes.
- Bake: Place the wrapped jalapeños on the prepared baking sheet and bake for 12-15 minutes, or until the dough is golden brown and crispy.
- Add Eyes: Once baked, remove the poppers from the oven and allow them to cool slightly before adding two candy eyes to each one for the finishing touch.
Extra Tips:
To guarantee your Mummy Jalapeño Poppers have the perfect balance of heat and flavor, taste the jalapeños before preparation as their spiciness can vary.
If you prefer milder poppers, consider soaking the jalapeño halves in cold water for about 30 minutes before filling them. You can also prepare the cheese filling a day ahead and store it in the fridge, making assembly quicker on the day of your event.
For a smoky twist, consider adding a bit of cooked, crumbled bacon to the cheese mixture. Finally, if candy eyes aren’t available, you can use small dots of cream cheese or mustard to create eyes. Enjoy your spooky and delicious creation!
Black Widow Deviled Eggs

Black Widow Deviled Eggs are the perfect spooky treat to serve at an adult Halloween party. These eggs are a devilishly delightful twist on the traditional deviled egg, incorporating a dark, gothic appearance that fits the Halloween theme. The creamy yolk filling is enhanced with rich flavors and topped with a black olive garnish that resembles a spider, making for an eerie yet delicious appetizer. Not only do they look the part, but they also provide a flavorful bite that will leave your guests coming back for more.
This recipe serves 4-6 people, making it ideal for an intimate gathering or as part of a larger buffet spread. The preparation involves simple ingredients, most of which you may already have in your kitchen. The key to mastering these Halloween-themed deviled eggs is in the presentation – with a little creativity, you can transform ordinary deviled eggs into a platter of creepy crawlers that will surely impress your guests.
Ingredients:
- 6 large eggs
- 1/4 cup mayonnaise
- 1 teaspoon Dijon mustard
- 1 teaspoon white vinegar
- Salt and black pepper, to taste
- 8-10 black olives
Instructions:
- Boil the Eggs: Place the eggs in a medium saucepan and cover them with cold water. Bring the water to a boil over medium-high heat. Once boiling, remove the saucepan from heat, cover with a lid, and let the eggs sit for 10-12 minutes.
- Prepare the Eggs: After the eggs have finished cooking, drain the hot water and place the eggs in an ice bath to cool for about 5 minutes. Once cooled, gently peel the eggs and slice them in half lengthwise.
- Make the Filling: Carefully remove the yolks and place them in a medium bowl. Set the egg whites aside on a plate. Mash the yolks with a fork until they’re smooth. Add mayonnaise, Dijon mustard, white vinegar, salt, and pepper to the mashed yolks, and mix until well combined.
- Fill the Egg Whites: Using a spoon or a piping bag with a star tip, fill the hollowed egg whites with the yolk mixture. Make sure each egg white half is generously filled.
- Create the Olive Spiders: Slice the black olives in half. Use one half for the spider’s body and slice the other half into thin strips to create legs. Arrange the olive body and legs on top of the yolk filling to resemble a spider.
- Chill and Serve: Once assembled, place the deviled eggs in the refrigerator to chill for at least 30 minutes before serving. This allows the flavors to meld and guarantees a revitalizing bite.
Extra Tips:
For the best results, use fresh eggs as they’re easier to peel after boiling. If you’re short on time, consider making the eggs the night before and storing them in the refrigerator until you’re ready to assemble them.
When slicing the olives for the spider legs, use a sharp knife for precise cuts. You can also experiment with adding food coloring to the yolk mixture for an even more dramatic effect, but be sure to choose natural food coloring to avoid altering the taste.
Spooky Spider Bread Bowl

Spooky Spider Bread Bowl is the perfect Halloween appetizer for adults who want to add a festive touch to their holiday gathering. This dish takes the classic bread bowl to a new level by transforming it into a creepy, crawly spider, complete with legs made from breadsticks. Not only is it visually impressive, but it also serves as a delicious centerpiece that will surely capture the attention of your guests.
The bread bowl can be filled with your choice of dip, such as a creamy spinach artichoke or a spicy queso, making it versatile and customizable to your taste preferences.
To create the Spooky Spider Bread Bowl, you’ll prepare a homemade bread dough that’s shaped into a round bread bowl for the body and long breadsticks for the spider legs. Once baked to golden perfection, the bread bowl is hollowed out and filled with your chosen dip, with the breadstick legs arranged around it to complete the spider look. This appetizer serves 4-6 people, making it an ideal choice for smaller gatherings or as part of a larger spread of Halloween-themed snacks.
Ingredients for Spooky Spider Bread Bowl:
- 4 cups all-purpose flour
- 2 teaspoons salt
- 1 tablespoon sugar
- 2 1/4 teaspoons active dry yeast
- 1 1/4 cups warm water (about 110°F)
- 2 tablespoons olive oil
- 1 egg (for egg wash)
- 1/2 teaspoon black sesame seeds (optional, for decoration)
- 1 cup of your favorite dip (spinach artichoke, queso, etc.)
Instructions:
- Prepare the Dough: In a large mixing bowl, combine the warm water, sugar, and yeast. Let it sit for about 5 minutes until frothy. Add the olive oil, flour, and salt to the yeast mixture. Stir until a dough forms.
- Knead the Dough: Transfer the dough to a floured surface and knead for about 8-10 minutes until smooth and elastic. If the dough is sticky, add a little more flour as needed.
- Let the Dough Rise: Place the dough in a greased bowl, cover it with a damp cloth, and let it rise in a warm place for 1-2 hours, or until it has doubled in size.
- Shape the Spider: Preheat your oven to 375°F (190°C). Punch down the dough and divide it into two portions: one larger portion for the body and a smaller portion for the legs. Shape the larger portion into a round loaf and place it on a baking sheet lined with parchment paper.
- Create the Legs: Divide the smaller portion of dough into 8 equal pieces. Roll each piece into a long, thin breadstick to form the spider legs. Arrange the legs around the body on the baking sheet, tucking one end of each leg under the body.
- Add Finishing Touches: Beat the egg and brush it over the entire spider to give it a shiny finish. Sprinkle black sesame seeds on the body for added texture and a spooky appearance.
- Bake the Bread: Bake in the preheated oven for 20-25 minutes, or until the bread is golden brown and sounds hollow when tapped.
- Hollow Out the Bread Bowl: Once cooled, cut a circular piece from the top of the spider body and hollow it out to make room for the dip.
- Serve: Fill the hollowed bread bowl with your chosen dip and serve with the breadstick legs arranged around it.
Extra Tips:
When shaping the spider legs, make sure they aren’t too thick, as thinner legs will bake more evenly and have a better texture. If you prefer, you can add food coloring to the dough to give the spider an even spookier look, such as black or orange.
Also, consider using the removed bread pieces from the hollowed body as additional dippers for the dip. To save time on the day of your event, you can prepare the dough a day ahead and let it rise overnight in the refrigerator.
Bloody Mary Shrimp Shooters

Searching for a spooky yet sophisticated appetizer to serve at your adult Halloween party? Search no more than Bloody Mary Shrimp Shooters. This dish is a tantalizing mix of spicy, tangy, and savory flavors that will captivate your guests‘ taste buds while keeping in theme with the eerie Halloween festivities.
The Bloody Mary Shrimp Shooters combine the classic elements of a Bloody Mary cocktail with succulent shrimp, offering a shot of elegance and fun that’s sure to impress. Perfect for a crowd, this appetizer isn’t only visually stunning but also easy to prepare.
Served in small shot glasses, each shooter features a blend of vodka-infused tomato juice with a hint of spice, topped with a perfectly poached shrimp. The combination of flavors is bold and invigorating, making it an ideal palate cleanser before the main course. Whether you’re hosting a sophisticated sit-down dinner or a lively cocktail party, these Bloody Mary Shrimp Shooters are sure to be a hit!
Ingredients (Serves 4-6)
- 1 pound large shrimp, peeled and deveined
- 2 cups tomato juice
- 1/4 cup vodka
- 1 tablespoon Worcestershire sauce
- 1 tablespoon hot sauce (adjust to taste)
- 1 tablespoon horseradish
- 1 tablespoon lemon juice
- 1 teaspoon celery salt
- 1 teaspoon black pepper
- 1 teaspoon smoked paprika
- Lemon wedges, for garnish
- Celery sticks, for garnish
Instructions
1. Prepare the Shrimp: Start by bringing a large pot of salted water to a boil. Add the shrimp and cook for about 2-3 minutes until they turn pink and opaque. Be sure not to overcook them.
Once done, transfer the shrimp to an ice bath to stop the cooking process. This will keep them tender and juicy.
2. Mix the Bloody Mary Base: In a medium-sized mixing bowl, combine the tomato juice, vodka, Worcestershire sauce, hot sauce, horseradish, lemon juice, celery salt, black pepper, and smoked paprika. Stir the mixture well to guarantee all the ingredients are fully incorporated.
Adjust the seasoning to your taste by adding more hot sauce or horseradish if you prefer a spicier kick.
3. Assemble the Shooters: Pour the Bloody Mary mixture into shot glasses, filling each about three-quarters full. Skewer the cooked shrimp onto small cocktail picks, then place one shrimp on top of each shot glass, allowing it to rest on the rim.
This not only enhances the presentation but also makes it easier for guests to enjoy.
4. Garnish and Serve: Add a lemon wedge and a small celery stick to each glass for garnish. These add a touch of color and allow guests to customize the flavor of their shooter.
Serve immediately to confirm the shrimp remain fresh and the Bloody Mary mixture retains its vibrant flavor.
Extra Tips
When preparing Bloody Mary Shrimp Shooters, it’s vital to use fresh, high-quality ingredients for the best flavor. If possible, make the Bloody Mary mix a few hours ahead of time and chill it in the refrigerator.
This allows the flavors to meld together, resulting in a more robust taste. Feel free to experiment with the seasoning to cater to your guests’ preferences, and consider adding additional garnishes like olives or pickles for extra flair.
Creepy Crudité Platter
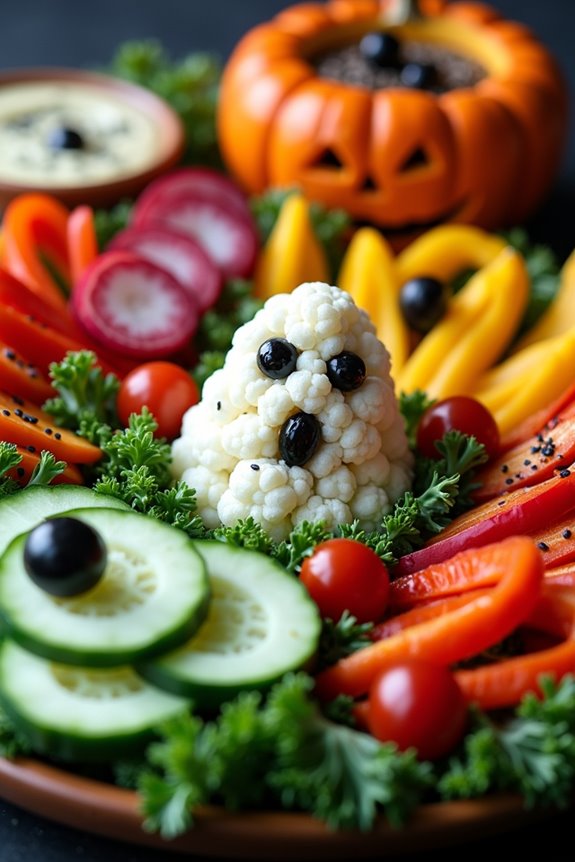
Halloween is the perfect time to transform ordinary dishes into something delightfully eerie, and a Creepy Crudité Platter is an excellent way to add a touch of spookiness to your Halloween spread. This dish involves an assortment of fresh vegetables, creatively arranged to resemble creepy creatures or eerie scenes.
With the right presentation, the vibrant colors and natural textures of the vegetables can become spiders, ghosts, or even a graveyard setting. This platter isn’t only fun to make but also provides a healthy snacking option amidst the usual Halloween treats.
The Creepy Crudité Platter is designed to serve 4-6 people, making it ideal for a small gathering or a family night in. The array of vegetables guarantees that there’s something for everyone, and it can easily be customized according to personal preferences or dietary needs.
Pair the platter with a couple of themed dips, like a spicy pumpkin hummus or a black bean dip, to enhance the flavors and maintain the Halloween theme. With minimal cooking and maximum creativity, this dish is a guaranteed hit at any Halloween party.
Ingredients (Serves 4-6):
- 1 small head of cauliflower
- 1 large cucumber
- 1 red bell pepper
- 1 yellow bell pepper
- 1 bunch of radishes
- 1 pint of cherry tomatoes
- 2 large carrots
- 1 small bunch of kale or spinach, for garnish
- 1 cup black olives
- 2 cups of your favorite hummus or dip
Instructions:
- Prepare the Vegetables:
- Wash all vegetables thoroughly under cold water. Peel the carrots and cut them into thin, long strips. Slice the cucumber into rounds. Break the cauliflower into small florets. Slice the bell peppers into strips, and halve the cherry tomatoes. Trim the radishes, leaving a small part of the stem for a “tail”.
- Arrange the cauliflower florets to resemble a ghostly figure or a skeleton head. Use the black olives to create eyes and other facial features. Arrange the cucumber slices in concentric circles to resemble spider webs, with cherry tomatoes as spiders. Use the bell pepper strips to create a pumpkin shape or a fiery flame design.
- On a large platter, lay down the kale or spinach as a base to represent a grassy field or forest. Place the prepared vegetable designs carefully on top, making sure each design is distinct and visible. Scatter additional olives and radishes around to add more texture and intrigue.
- Serve the platter alongside bowls of your chosen dips, such as hummus or black bean dip. Place them strategically around the platter to maintain the spooky theme, perhaps as cauldrons or bubbling pots.
- 1 can (15 oz) chickpeas, drained and rinsed
- 1 cup pumpkin puree
- 1/4 cup tahini
- 2 tablespoons olive oil
- 2 tablespoons lemon juice
- 2 cloves garlic, minced
- 1 teaspoon ground cumin
- 1/2 teaspoon smoked paprika
- Salt and pepper to taste
- Pumpkin seeds and fresh parsley for garnish
Extra Tips:
To guarantee your Creepy Crudité Platter makes a lasting impression, consider using carved mini pumpkins as bowls for the dips. You can also sprinkle edible glitter or black sesame seeds around the platter to mimic dirt or cobwebs.
If you want to add an extra layer of fun, provide small plastic spiders or other Halloween-themed decorations to enhance the presentation. Remember to keep the vegetables crisp by preparing them as close to serving time as possible, or store them in cold water to maintain their freshness.
Pumpkin Patch Hummus
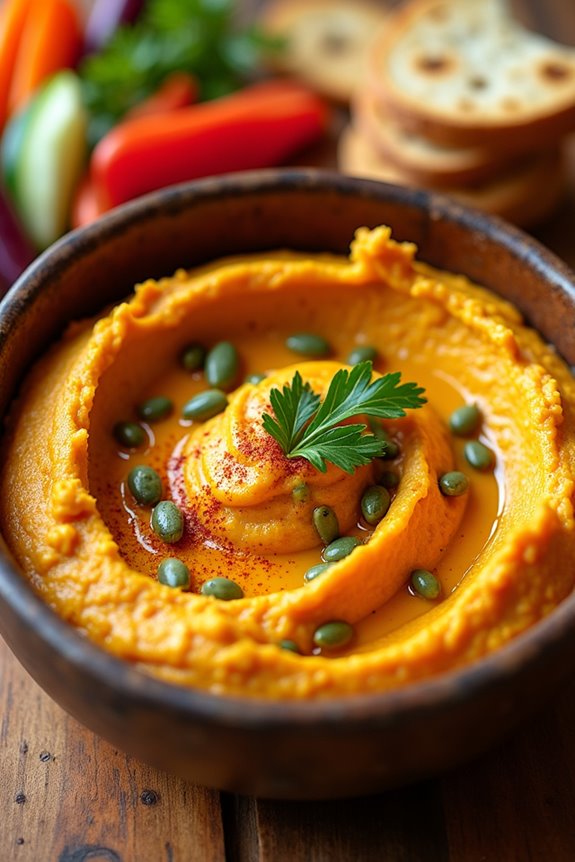
Pumpkin Patch Hummus is a festive and flavorful appetizer perfect for adult Halloween gatherings. This unique twist on traditional hummus incorporates the rich, earthy flavors of pumpkin and warm spices, creating a spread that’s both visually appealing and delicious. The orange hue of the pumpkin gives the hummus an autumnal look, ideal for celebrating the spooky season.
Serve it with an array of colorful veggies, pita chips, or crusty bread to provide your guests with a healthy yet indulgent treat.
The key to a successful Pumpkin Patch Hummus is blending the creamy texture of chickpeas with the sweet and savory notes of pumpkin puree. Seasoned with garlic, cumin, and a hint of paprika, this dish captures the essence of fall while maintaining the classic hummus flavor.
The addition of tahini guarantees the hummus remains smooth and rich, making it a crowd-pleaser at any adult Halloween party. Whether you’re hosting a large gathering or an intimate get-together, this hummus will surely be a hit.
Ingredients (Serves 4-6):
Cooking Instructions:
- Prepare the Chickpeas: Begin by draining and rinsing the chickpeas thoroughly. This step is important to remove any excess salt or preservatives from the canning process.
- Blend the Base: In a food processor, combine the drained chickpeas, pumpkin puree, tahini, olive oil, lemon juice, and minced garlic. Blend until the mixture is smooth and creamy. You may need to scrape down the sides of the processor a couple of times to guarantee an even consistency.
- Add Spices: Add the ground cumin and smoked paprika to the mixture. Blend again until the spices are fully incorporated. Taste the hummus and add salt and pepper according to your preference.
- Garnish and Serve: Transfer the hummus to a serving bowl. Garnish with a drizzle of olive oil, a sprinkle of smoked paprika, and a scattering of pumpkin seeds and chopped fresh parsley. Serve with pita chips, sliced vegetables, or crusty bread on the side.
Extra Tips:
For an even creamier texture, consider peeling the skins off the chickpeas before blending. This step can be time-consuming but greatly enhances the smoothness of the hummus.
If your hummus is too thick, you can add a tablespoon of water or more olive oil to reach the desired consistency. For a touch of heat, consider adding a pinch of cayenne pepper or red chili flakes.
Finally, this hummus can be made a day in advance, allowing the flavors to meld together beautifully in the refrigerator.
Gory Guacamole Eyeballs
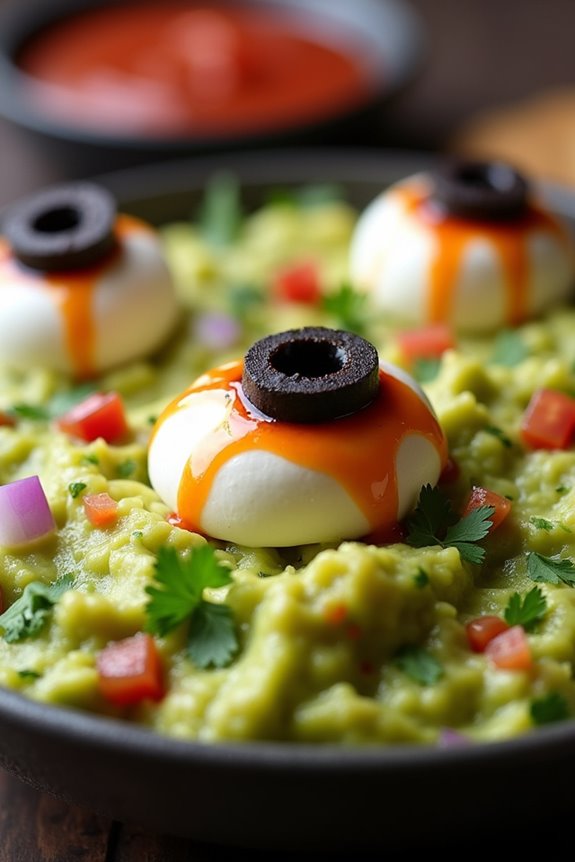
Gory Guacamole Eyeballs are the perfect Halloween appetizer to add a touch of the macabre to your adult gathering. This spooky yet delicious dish transforms classic guacamole into a creepy creation that’s both fun and flavorful. The bright green hue of the guacamole is contrasted by eerie eyeball decorations made from simple ingredients, making it an eye-catching centerpiece for your Halloween spread.
Whether you’re hosting a costume party or a horror movie night, these Gory Guacamole Eyeballs are sure to be a hit among your guests.
The key to making these gory eyeballs is using fresh, ripe avocados to create a creamy, vibrant guacamole base. The “eyeballs” are crafted with mozzarella balls, sliced olives, and a touch of hot sauce for a bloodshot effect. Not only do these additions provide a chilling visual, but they also enhance the flavor with a subtle tang and spice.
This appetizer is both a feast for the eyes and the taste buds, making it an entertaining and delicious addition to your Halloween menu.
Ingredients (Serves 4-6):
- 4 ripe avocados
- 1 lime, juiced
- 1 teaspoon salt
- 1/2 cup diced onion
- 3 tablespoons chopped fresh cilantro
- 2 roma tomatoes, diced
- 1 teaspoon minced garlic
- 1 pinch ground cayenne pepper (optional)
- 12 small mozzarella balls (bocconcini)
- 6 black olives, sliced
- Hot sauce (for decoration)
Instructions:
- Prepare the Avocados: Cut the avocados in half, remove the pits, and scoop the flesh into a mixing bowl. Use a fork to mash the avocados to your desired consistency, whether you prefer it chunky or smooth.
- Mix the Guacamole: Add the lime juice and salt to the mashed avocados, then mix in the diced onion, cilantro, tomatoes, and garlic. Stir everything together until well combined. If you like an extra kick, add a pinch of cayenne pepper.
- Create the Eyeballs: Place the mozzarella balls on top of the guacamole. Cut the black olives into slices and position one slice on each mozzarella ball to form the pupil of the eyeball.
- Add the Bloodshot Effect: Use a toothpick to apply small drops of hot sauce around the mozzarella balls to create a bloodshot effect, enhancing the gory appearance.
- Serve: Transfer the gory guacamole eyeballs to a serving dish and arrange them for maximum visual impact. Serve with tortilla chips or vegetable sticks for dipping.
Extra Tips:
For the best flavor, prepare the guacamole just before serving to guarantee it stays fresh and vibrant. If you need to make it in advance, cover it tightly with plastic wrap directly on the surface to minimize browning.
Feel free to customize the heat level of the guacamole by adjusting the amount of cayenne pepper or hot sauce. Finally, experiment with different types of olives or even add a drizzle of black food coloring gel for an extra spooky touch to your gory creation.
Sinister Charcuterie Board
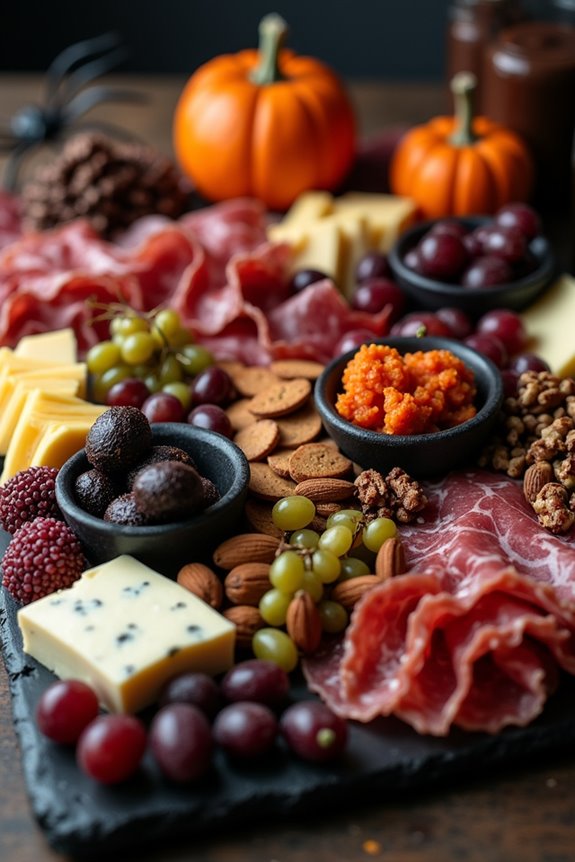
Sinister Charcuterie Board is the perfect Halloween appetizer for adults who are seeking a sophisticated yet spooky treat. This board combines an array of delicious meats, cheeses, and accompaniments, all artfully arranged to create an eerie yet appetizing display. The key to a successful Sinister Charcuterie Board lies in the selection of high-quality ingredients and the creative presentation that evokes the spirit of Halloween.
To begin crafting your Sinister Charcuterie Board, consider the visual and flavor contrast of your ingredients. Opt for a variety of cured meats and cheeses, selecting those with different textures and colors to maintain interest and appeal. The use of black, red, and dark purple elements can enhance the spooky theme, while strategic placement of props like small pumpkins or plastic spiders can add an extra layer of Halloween charm. This recipe serves 4-6 people, making it ideal for a small gathering or an intimate Halloween party.
Ingredients:
- 8 oz assorted cured meats (such as prosciutto, salami, and soppressata)
- 8 oz assorted cheeses (such as aged cheddar, brie, and blue cheese)
- 1 cup mixed olives (green and black)
- 1 cup dried fruits (such as figs and apricots)
- 1 cup fresh fruits (such as grapes and dark berries)
- 1/2 cup nuts (such as almonds and walnuts)
- 1/4 cup dark chocolate pieces or truffles
- Black crackers or charcoal crackers
- 1 small decorative pumpkin or gourd
- Optional: edible flowers or herbs for garnish
Cooking Instructions:
- Prepare Your Ingredients: Begin by slicing the cured meats into thin, bite-sized pieces. Cut the cheeses into various shapes – cubes, wedges, or slices – to create visual interest on the board.
- Arrange the Base: Start by placing the larger items, such as the cheeses and the decorative pumpkin, on the board. Space them out to create balance and symmetry.
- Add the Meats: Drape the sliced meats around the cheeses and pumpkin, allowing them to naturally fold and curl for a rustic appearance.
- Include the Fruits and Nuts: Fill in the gaps with clusters of fresh and dried fruits, as well as small handfuls of nuts. This will add color and texture to the board.
- Incorporate Olives and Chocolate: Use small dishes or bowls for the olives and dark chocolate pieces, placing them strategically around the board to maintain balance.
- Add Crackers: Tuck the black or charcoal crackers into the remaining spaces, standing some upright for height and placing others flat for easy access.
- Finishing Touches: Finally, add any optional edible flowers or herbs for a touch of color and freshness. Arrange a few plastic spiders or Halloween-themed props for a spooky effect.
Extra Tips:
When assembling your Sinister Charcuterie Board, remember that variety is key. Aim to include a range of textures and flavors, from creamy cheeses to salty meats and sweet fruits.
Consider the flow of the board, ensuring that guests can easily reach each component. Additionally, serving utensils such as small knives for the cheeses and toothpicks for the meats can enhance the dining experience. Enjoy the process of arranging your board, letting your creativity guide you to create a truly sinister yet scrumptious masterpiece.