
As the crisp autumn air ushers in the spirit of Halloween, I’ve curated 11 charming breakfast ideas that are sure to captivate your little ones’ imaginations. Picture ghostly pancakes with chocolate chip smiles or vibrant Jack-O’-Lantern bagels just waiting to be personalized. These delightful treats combine fun and nutrition, transforming breakfast into a playful morning celebration. Ready to turn your kitchen into a Halloween wonderland? Let’s explore these enchanting creations together!
Ghostly Pancakes

Transform your ordinary breakfast into a spook-tacular feast with these playful Ghostly Pancakes! Perfect for Halloween morning, these pancakes aren’t just delicious but also a fun way to engage your kids in the holiday spirit. The idea is to make fluffy pancakes and decorate them to look like adorable little ghosts using simple ingredients you probably already have at home.
These pancakes are guaranteed to bring a smile to your little one’s face and get them excited for the festivities ahead. The secret to these Ghostly Pancakes lies in both the shape and the decoration. Once you have your pancake batter ready, you’ll need to pour it onto the griddle in a way that creates a ghost-like shape.
With some creativity in decorating—using chocolate chips for eyes and a mouth—these pancakes will come to life. The whole family will enjoy not only eating them but also making them together. Let’s jump into this delightful Halloween breakfast that serves 4-6 people.
Ingredients:
- 2 cups all-purpose flour
- 2 tablespoons sugar
- 1 tablespoon baking powder
- 1/2 teaspoon salt
- 2 large eggs
- 1 3/4 cups milk
- 1/4 cup melted butter
- 1 teaspoon vanilla extract
- Chocolate chips (for decoration)
- Butter or oil for greasing the griddle
Cooking Instructions:
1. Prepare the Batter: In a large mixing bowl, combine the flour, sugar, baking powder, and salt. In another bowl, whisk together the eggs, milk, melted butter, and vanilla extract.
Pour the wet ingredients into the dry ingredients and gently stir until just combined. It’s okay if there are small lumps.
2. Preheat the Griddle: Heat a non-stick griddle or large skillet over medium heat. Lightly grease it with butter or oil to prevent sticking.
3. Form the Ghost Shapes: Using a ladle, pour the batter onto the griddle in a ghost shape. You can make larger round bases with a smaller top for the head and little tails at the bottom.
Feel free to use a spoon to nudge the batter into shape if needed.
4. Cook the Pancakes: Allow the pancakes to cook until bubbles start to form on the surface and the edges begin to set, about 2-3 minutes. Flip carefully with a spatula and cook for another 2 minutes until golden brown.
5. Decorate the Pancakes: Once cooked, move the pancakes to a plate. Use chocolate chips to create eyes and a mouth on each ‘ghost’.
Press them gently into the surface of the pancakes while they’re still warm so they stick.
Extra Tips:
To make the ghost shapes more defined, you can use a squeeze bottle to control the batter flow better, allowing for more precise shaping. If you don’t have a squeeze bottle, a piping bag or even a ziplock bag with a corner snipped off works well.
If you want extra fluffy pancakes, let the batter rest for about 5 minutes before cooking to allow the baking powder to activate fully. Also, be sure to keep the heat at medium; too high a heat will burn the pancakes before they’re cooked through. Happy Haunting!
Mummy Toast

Halloween is a time for spooky fun, and what better way to start the day than with a breakfast that will delight and surprise your little ones? Mummy Toast is a creative and easy breakfast idea that will surely become a Halloween favorite in your house. The combination of gooey melted cheese, crispy toast, and a touch of tomato sauce creates a deliciously ghoulish treat that both children and adults will enjoy.
Best of all, it’s simple enough to prepare in the morning rush, making it a perfect choice for a festive start to Halloween day.
This fun and festive breakfast isn’t only appealing to the eyes but also to the taste buds. Mummy Toast is made by layering strips of cheese to mimic the look of a mummy’s wrappings, with olive slices for eyes adding the perfect touch of spookiness. The recipe is versatile, allowing you to customize it to your child’s tastes or dietary needs.
Whether you serve it as a quick breakfast before heading out to school or as part of a Halloween brunch, Mummy Toast is sure to be a hit!
Ingredients for 4-6 servings:
- 6 slices of whole-wheat bread
- 1 cup of tomato sauce or marinara sauce
- 12 slices of mozzarella cheese
- 12 black olive slices
- Cooking spray or butter
Instructions:
- Preheat the Oven: Start by preheating your oven to 375°F (190°C). This guarantees that your Mummy Toast will bake evenly and the cheese will melt to perfection.
- Prepare the Bread: Lightly spray a baking sheet with cooking spray or spread a thin layer of butter on it to prevent sticking. Arrange the slices of whole-wheat bread evenly on the baking sheet.
- Add Sauce: Spread about 2 tablespoons of tomato sauce or marinara sauce evenly over each slice of bread, covering the entire surface. This will be the base layer and provide a flavorful foundation for the mummy design.
- Create the Mummy Wrappings: Cut the mozzarella cheese slices into thin strips, approximately 1/4 inch wide. Lay the cheese strips across the bread slices in a crisscross pattern, resembling mummy bandages. Be creative and let some sauce peek through to enhance the mummy effect.
- Add the Eyes: Place two black olive slices near the top of each slice of bread to create the mummy’s eyes. Gently press them into the cheese so they adhere well.
- Bake the Mummy Toast: Place the baking sheet in the preheated oven and bake for about 10-12 minutes, or until the cheese is melted and slightly golden. Keep a close eye on them to avoid overbaking.
- Serve and Enjoy: Once done, remove the Mummy Toast from the oven and let it cool slightly before serving. Enjoy your spooky and delicious breakfast treat!
Extra Tips:
For a healthier twist, you can substitute the whole-wheat bread with gluten-free or multigrain bread. If your child prefers, you can use a different type of cheese, like cheddar or provolone, to add a different flavor profile.
To make the preparation faster in the morning, you can pre-slice the cheese and olives the night before. Adding a sprinkle of oregano or Italian herbs to the tomato sauce can enhance the flavor further.
Finally, let your little ones join in the fun by allowing them to arrange the cheese strips and olive eyes, making the cooking process a part of your Halloween festivities!
Pumpkin Spice Waffles
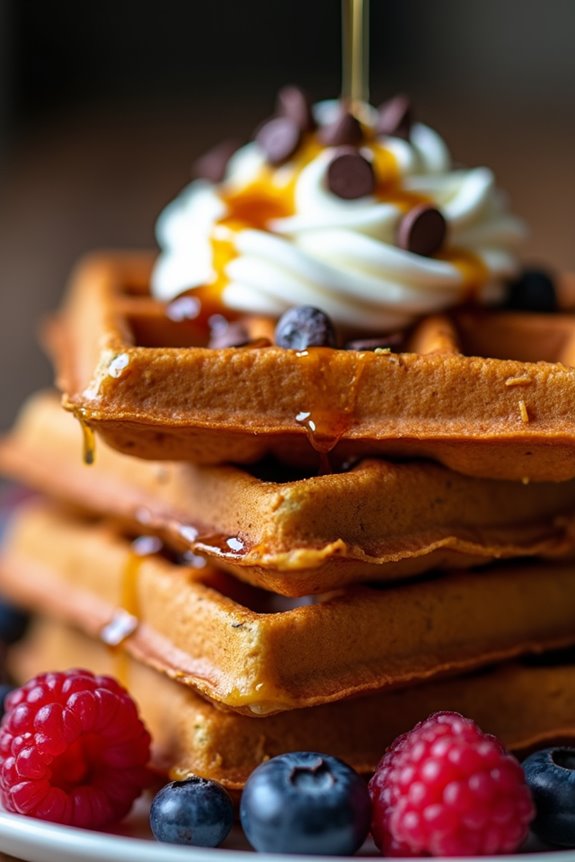
Not only do these waffles fill the kitchen with a cozy aroma, but they also offer a deliciously sweet and mildly spiced taste that pairs well with a variety of toppings. From maple syrup and whipped cream to chocolate chips and fresh berries, the topping possibilities are endless.
With this recipe, you’ll have a batch of waffles that are crispy on the outside and tender on the inside, making them a delightful addition to any Halloween morning.
Ingredients for 4-6 servings:
- 2 cups all-purpose flour
- 1 tablespoon baking powder
- 1/2 teaspoon baking soda
- 1/2 teaspoon salt
- 2 teaspoons ground cinnamon
- 1 teaspoon ground ginger
- 1/2 teaspoon ground nutmeg
- 1/4 teaspoon ground cloves
- 1/4 cup brown sugar
- 1 cup canned pumpkin puree
- 2 large eggs
- 1 1/2 cups milk
- 1/4 cup melted butter
- 1 teaspoon vanilla extract
Cooking Instructions:
- Preheat the Waffle Iron: Begin by preheating your waffle iron according to the manufacturer’s instructions. This guarantees the waffles cook evenly and achieve a crispy exterior.
- Mix Dry Ingredients: In a large mixing bowl, combine the flour, baking powder, baking soda, salt, cinnamon, ginger, nutmeg, and cloves. Whisk them together until well combined to guarantee the spices are evenly distributed throughout the batter.
- Combine Wet Ingredients: In a separate bowl, whisk together the brown sugar, pumpkin puree, eggs, milk, melted butter, and vanilla extract. Mix until the ingredients are well-blended and smooth.
- Combine Mixtures: Gradually add the wet ingredients to the dry ingredients, stirring gently until just combined. Be careful not to overmix, as this can make the waffles tough. The batter should be slightly lumpy.
- Cook Waffles: Pour the batter onto the preheated waffle iron, using about 1/2 cup of batter per waffle (adjust based on your waffle iron’s size). Close the iron and cook until the waffles are golden brown and crisp, usually about 5-7 minutes.
- Serve: Remove the waffles from the iron and serve immediately with your choice of toppings, such as maple syrup, fresh fruit, or a sprinkle of powdered sugar.
Extra Tips:
For the best results, verify all your ingredients are at room temperature before you start mixing. This helps the batter come together more smoothly and results in a better texture.
If you want to make the waffles extra special, consider adding chocolate chips or pecans to the batter before cooking. Additionally, you can keep cooked waffles warm in a low oven (around 200°F) while you finish making the entire batch. This way, everyone can enjoy their waffles hot and fresh at the same time.
Spider Web Eggs
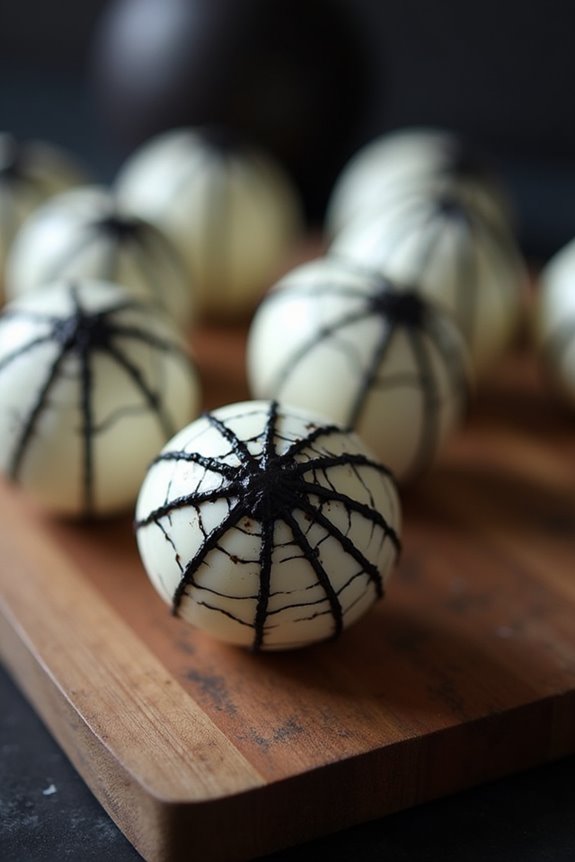
Halloween isn’t just about trick-or-treating and spooky decorations; it’s also a great time to get creative in the kitchen! Spider Web Eggs are a fun and visually enthralling breakfast idea that’s perfect for kids. These eggs are hard-boiled and adorned with a web-like design that will surely be a hit at any Halloween breakfast table.
The secret to achieving the intricate web pattern lies in cracking the shells and soaking the eggs in a mixture of food coloring and water. This easy and entertaining recipe is perfect for getting the kids involved in the kitchen and enjoying a spooky start to their Halloween festivities.
Creating Spider Web Eggs isn’t only about the aesthetics but also about offering a nutritious and protein-packed breakfast. They’re simple to prepare and can be made in advance, making them a convenient option for busy Halloween mornings. The process is straightforward, and the results are stunningly eerie.
So, gather your little ghouls and goblins and get cracking on these delightfully creepy eggs!
Ingredients for 4-6 Servings:
- 6 large eggs
- 4 cups water (for boiling)
- 1/2 cup water (for dyeing)
- 1 tablespoon white vinegar
- Black food coloring (gel or liquid)
Cooking Instructions:
- Boil the Eggs: Place the eggs in a saucepan and add enough water to cover them by about an inch. Bring the water to a rolling boil over medium-high heat. Once boiling, turn off the heat, cover the saucepan, and let the eggs sit in the hot water for 10-12 minutes.
- Cool and Crack: After boiling, transfer the eggs to an ice bath to cool for about 5 minutes. Once cooled, gently tap the eggs on a hard surface to crack the shells evenly, creating a spider web pattern. Be careful not to remove the shells.
- Prepare the Dye: In a bowl, mix 1/2 cup of water, 1 tablespoon of white vinegar, and enough black food coloring to achieve a deep color. Stir until the dye is well combined.
- Dye the Eggs: Submerge the cracked eggs in the dye mixture, ensuring they’re fully covered. Allow them to soak for at least 2 hours or overnight for more intense web patterns.
- Peel and Serve: Carefully peel the eggs to reveal the spider web design. Serve them as a spooky breakfast treat or as part of a Halloween-themed meal.
Extra Tips:
For a more vivid spider web effect, consider using gel food coloring as it tends to create more intense colors. If you’re short on time, you can speed up the dyeing process by placing the eggs and dye mixture in the refrigerator.
Additionally, you can experiment with different colors to create a variety of spooky egg designs. Remember to handle the eggs gently when cracking and peeling to maintain the intricate web patterns. Enjoy the creative process and have a fun-filled Halloween breakfast!
Witch Hat Donuts
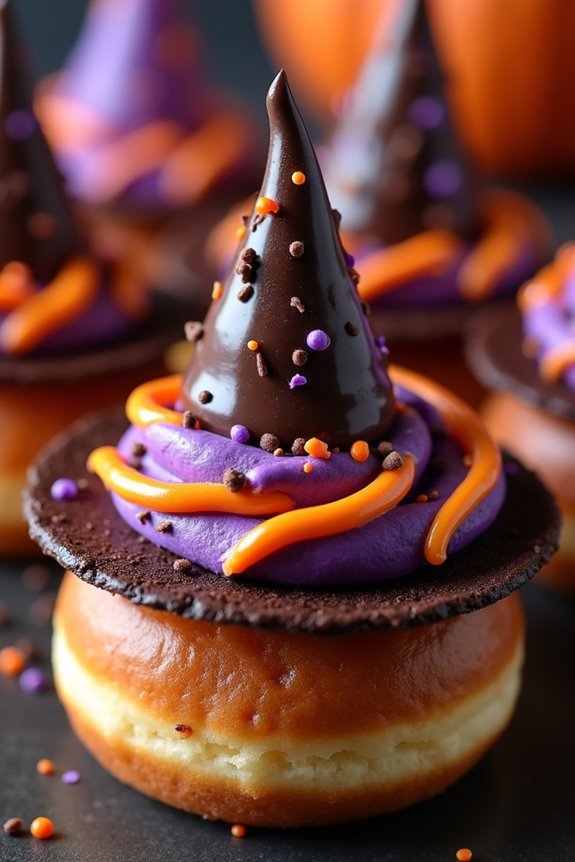
Halloween breakfast just got a whole lot more fun with these delightful Witch Hat Donuts. Perfect for the spooky season, these treats aren’t just visually appealing but also incredibly delicious. They combine the classic taste of donuts with a whimsical twist, making them an instant hit among kids.
The donuts are topped with a chocolate cone to mimic a witch’s hat, offering a blend of flavors that will keep everyone coming back for more. Crafting these Witch Hat Donuts is a breeze, even for those who may not consider themselves baking experts.
With a bit of creativity and some simple ingredients, you can transform ordinary donuts into a magical breakfast treat. This recipe is designed to serve 4-6 people, making it ideal for a family breakfast or a small Halloween gathering.
Ingredients:
- 12 plain donuts
- 12 sugar cones
- 2 cups of chocolate chips
- 1 tablespoon of coconut oil
- Assorted Halloween sprinkles
- 1 cup of orange icing
- 1 cup of purple icing
Instructions:
1. Prepare the Chocolate Coating: In a microwave-safe bowl, combine the chocolate chips and coconut oil. Heat in the microwave in 30-second intervals, stirring in between, until the mixture is completely melted and smooth.
2. Dip the Cones: Carefully dip each sugar cone into the melted chocolate, making sure they’re fully coated. Place them on a baking sheet lined with parchment paper, and sprinkle with Halloween sprinkles for a festive touch.
Allow the chocolate to set completely, either by leaving them at room temperature or placing them in the fridge for faster setting.
3. Decorate the Donuts: While the cones are setting, take the plain donuts and use a piping bag to add orange and purple icing around the top. Feel free to be creative with your designs to make them extra festive.
4. Assemble the Witch Hats: Once the chocolate on the cones has set, carefully place one coated cone on top of each donut, pressing gently to secure it in place. The pointed end should face upward, resembling a witch’s hat.
5. Add Final Touches: Use additional sprinkles or icing to add any final decorations to the hats, guaranteeing they’re both appealing and secure.
Extra Tips:
For best results, confirm that the chocolate coating isn’t too hot when dipping the cones, as it may cause the sugar cones to soften and lose their shape.
If you’re preparing these Witch Hat Donuts in advance, store them in a cool, dry place to keep the chocolate from melting. Feel free to experiment with different colored icings and sprinkles to match your Halloween party theme, and consider adding a touch of edible glitter for extra sparkle.
Frankenstein Smoothie Bowls
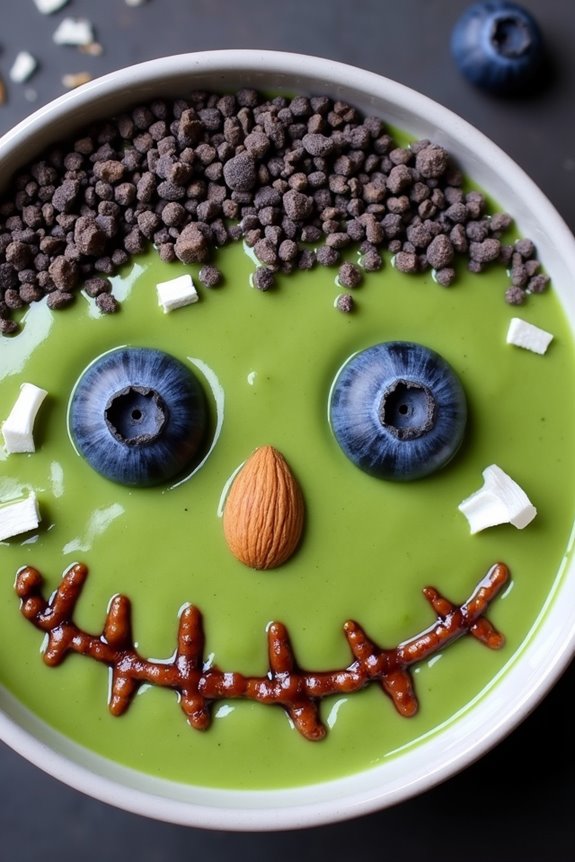
Halloween is a time for spooky fun and creative culinary delights, and what better way to start the day than with a Frankenstein Smoothie Bowl? This ghoulishly green breakfast treat is both nutritious and delicious, making it perfect for little monsters of all ages. Packed with fruits and veggies, this smoothie bowl brings a terrifyingly tasty twist to the classic breakfast smoothie, offering a fun and healthy option to energize your kids for a day full of Halloween adventures.
The Frankenstein Smoothie Bowl combines vibrant green ingredients to create a monstrous hue that resembles the iconic creature. The base is made from a blend of spinach, bananas, and kiwi, delivering a naturally sweet taste and a boost of vitamins. Topped with creative and creepy decorations like chia seeds, blueberries, and sliced almonds, this dish not only looks the part but also offers a range of textures to enjoy. Kids will have a blast assembling their own Frankenstein faces, making breakfast an interactive and enjoyable experience.
Ingredients (Serves 4-6):
- 3 cups fresh spinach
- 3 bananas, frozen
- 4 kiwi fruits, peeled and chopped
- 1 cup Greek yogurt
- 1/2 cup almond milk
- 2 tablespoons honey
- 1/4 cup chia seeds
- 1/2 cup blueberries
- 1/4 cup sliced almonds
- 1/4 cup granola
- 1/4 cup coconut flakes
- Edible eyes (optional, for decoration)
Instructions:
- Prepare the Green Smoothie Base: In a blender, combine the fresh spinach, frozen bananas, peeled and chopped kiwi fruits, Greek yogurt, almond milk, and honey. Blend until smooth and creamy, guaranteeing there are no chunks left for a silky consistency.
- Divide the Smoothie: Pour the smoothie mixture evenly into 4-6 bowls, depending on the number of servings you desire. The mixture should be thick enough to hold toppings without sinking.
- Decorate Your Frankenstein Faces: Begin by sprinkling chia seeds on top of each smoothie to mimic Frankenstein’s hair. Use blueberries for the eyes, placing them where you imagine Frankenstein’s eyes would be. Add a sliced almond for the nose and use granola to fashion a mouth. Coconut flakes can serve as additional hair or scars, adding texture and color.
- Add Final Touches: If you have edible eyes, place them on top of the blueberries for a more realistic monster look. This step is optional but adds a fun and spooky detail to the smoothie bowls.
- Serve and Enjoy: Once your Frankenstein Smoothie Bowls are decorated to your liking, serve them immediately to maintain the creamy texture. Encourage the kids to participate in the decoration process for an engaging breakfast activity.
Extra Tips:
When preparing the smoothie base, ascertain that the bananas are well-frozen before blending; this helps achieve a thick, ice-cream-like texture. If the smoothie seems too thick, you can add a splash more of almond milk to reach the desired consistency.
Feel free to customize the toppings with your kids’ favorite fruits or nuts to make the experience even more enjoyable. For a nut-free version, simply omit the almonds and granola, and replace them with additional fruit or seeds.
Jack-O’-Lantern Bagels
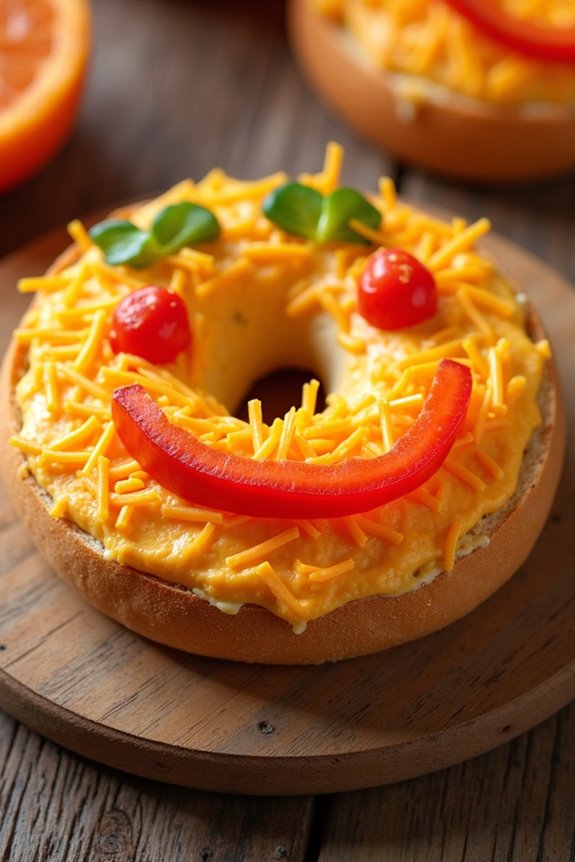
Start your Halloween morning with a fun and festive breakfast that will delight kids and adults alike. Jack-O’-Lantern Bagels are a creative twist on the classic bagel and cream cheese breakfast, transforming the bagels into cute and spooky pumpkin faces. This recipe isn’t only delicious but also a wonderful way to get kids involved in the kitchen, making it a perfect activity for the Halloween season.
Creating Jack-O’-Lantern Bagels is simple and requires minimal ingredients, yet offers maximum enjoyment. By using a combination of orange food coloring and simple toppings, you can easily turn ordinary bagels into a delightful Halloween-themed breakfast. This recipe serves 4-6 people, making it ideal for a family breakfast or a small Halloween gathering.
Ingredients:
- 4-6 plain bagels
- 8 ounces cream cheese
- Orange food coloring
- 1 cup shredded cheddar cheese
- 1 small cucumber
- 1 red bell pepper
- 1 small carrot
- Salt and pepper to taste
Instructions:
- Prepare the Cream Cheese Mixture: Begin by softening the cream cheese. Place it in a mixing bowl and add a few drops of orange food coloring. Stir until the cream cheese is evenly colored and has a smooth, spreadable consistency. Adjust the color by adding more food coloring as necessary to achieve a vibrant orange hue.
- Toast the Bagels: Cut each bagel in half and toast them to your desired level of crispiness. This not only enhances the texture but also makes it easier to spread the cream cheese.
- Spread the Cream Cheese: Once the bagels are toasted, generously spread the orange-colored cream cheese onto each half, ensuring an even layer.
- Create the Jack-O’-Lantern Faces: Use the shredded cheddar cheese to sprinkle over the top of the cream cheese, giving the bagels a textured appearance. Slice the cucumber and bell pepper into small pieces to create eyes and mouths for your Jack-O’-Lantern faces. For extra detailing, you can cut thin strips of carrot to form eyebrows or other facial features.
- Assemble the Faces: Arrange the cucumber, red bell pepper, and carrot pieces on the bagels to create different Jack-O’-Lantern faces. Encourage creativity by making each bagel face unique.
- Serve and Enjoy: Once all the faces are assembled, sprinkle a bit of salt and pepper over the top for added flavor. Serve immediately and enjoy your festive Halloween breakfast.
Extra Tips:
To make your Jack-O’-Lantern Bagels even more engaging, consider setting up a “decorating station” where kids can customize their bagels with various toppings and create their own designs. This not only makes breakfast interactive but also allows each child to explore their creativity.
Additionally, if you prefer a sweeter version, try using a sweet cream cheese spread and top with fruits like mandarin orange slices and blueberries for an equally delightful morning treat.
Bat-Shaped Bacon
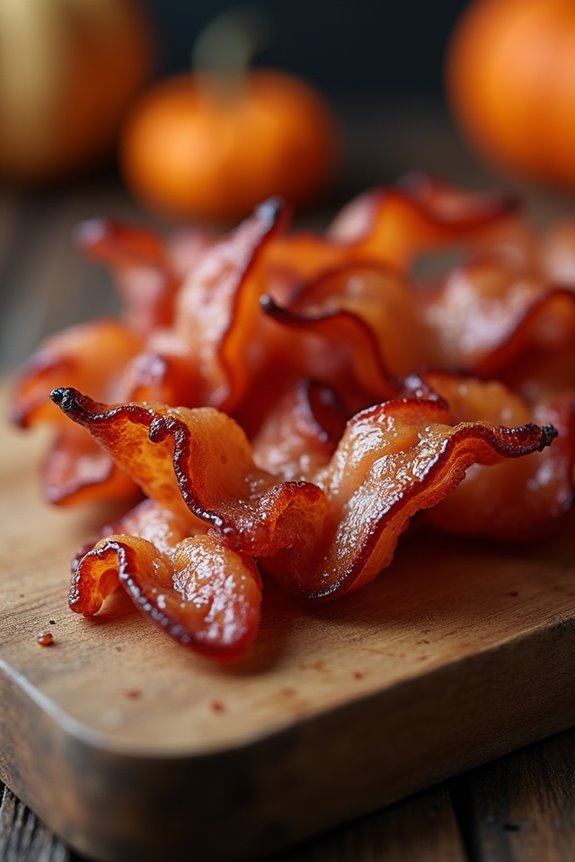
Making Bat-Shaped Bacon is surprisingly simple and requires minimal ingredients, making it a perfect addition to a busy morning routine. The key is to shape the bacon strips carefully before cooking to achieve that bat-like appearance. Once cooked, these bacon bats can be used as a standalone snack or as a delightful garnish on other breakfast favorites. Follow these instructions to whip up this easy and festive dish, ensuring a delightful start to your family’s Halloween festivities.
Ingredients for 4-6 Servings:
- 12 slices of bacon
- Non-stick cooking spray
- Wax paper or parchment paper
Cooking Instructions:
- Prep the Workspace: Begin by preheating your oven to 400°F (200°C). Line a baking sheet with aluminum foil for easy cleanup, and place a wire rack on top. Lightly coat the wire rack with non-stick cooking spray to prevent sticking.
- Shape the Bacon: Take a slice of bacon and lay it flat on a piece of wax paper or parchment paper. Fold the bacon slice in half widthwise, then use your fingers to gently shape each side into bat wings by creating small curves at the edges. Repeat with all bacon slices.
- Arrange on Rack: Carefully transfer the bat-shaped bacon slices onto the prepared wire rack. Make sure they’re spaced evenly apart to allow for even cooking.
- Bake the Bacon: Place the baking sheet in the preheated oven. Bake the bacon for 15-20 minutes or until it reaches your desired level of crispiness. Keep an eye on the bacon to prevent it from burning.
- Cool and Serve: Once done, remove the bacon from the oven and let it cool slightly on the wire rack. This will help the bacon maintain its shape and crispiness. Serve immediately as a fun addition to your Halloween breakfast spread.
Extra Tips:
For best results, use thick-cut bacon, as it holds its shape better during cooking and provides a more pronounced bat silhouette.
If you’re having trouble shaping the bacon, try using kitchen scissors to make small cuts along the edges to help form the bat wings.
Additionally, consider serving these bat-shaped bacon slices on a bed of scrambled eggs dyed with a bit of food coloring for an extra spooky effect.
Adjust the cooking time based on your oven’s performance and your personal texture preference, as bacon can cook quickly and varies by brand and cut.
Monster Muffins
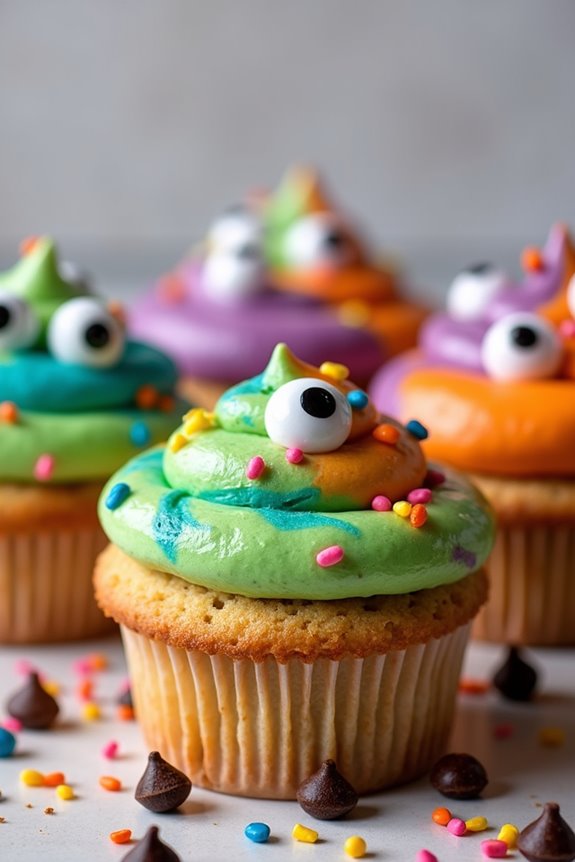
Get ready to delight your little monsters this Halloween morning with a batch of spooktacular Monster Muffins! These fun and festive muffins are as delicious as they’re adorable. With their vibrant colors and playful decorations, they’re sure to be a hit with kids and adults alike. Not only do they make for a perfect breakfast treat, but they also double as a great snack for Halloween parties.
These muffins are bursting with flavor and creativity, making them an ideal way to start your Halloween festivities. The Monster Muffins are incredibly easy to make and require only a few basic ingredients that you likely already have in your pantry. The recipe is flexible enough to allow you to personalize each muffin with different colors and decorations, letting your creativity shine.
Whether you want to make them spooky, silly, or just plain cute, these muffins will surely bring smiles to everyone’s faces. Let’s plunge into this monstrously delightful recipe and make some Halloween magic in the kitchen!
Ingredients (Serves 4-6 people):
- 2 cups all-purpose flour
- 1 cup granulated sugar
- 1 tablespoon baking powder
- 1/2 teaspoon salt
- 2 large eggs
- 1/2 cup vegetable oil
- 1 cup milk
- 1 teaspoon vanilla extract
- Food coloring (green, purple, orange)
- Candy eyes
- Colored sprinkles
- Mini chocolate chips
Cooking Instructions:
- Preheat the Oven: Start by preheating your oven to 350°F (175°C). Line a 12-cup muffin tin with paper liners; this will prevent the muffins from sticking.
- Mix Dry Ingredients: In a large bowl, whisk together the flour, sugar, baking powder, and salt until they’re well combined. This will guarantee an even distribution of ingredients.
- Prepare Wet Ingredients: In a separate bowl, lightly beat the eggs. Add in the vegetable oil, milk, and vanilla extract, and mix until well combined. This mixture will help keep the muffins moist.
- Combine the Mixtures: Gradually add the wet ingredients to the dry ingredients, stirring gently with a spatula or wooden spoon until just combined. Be careful not to overmix, as this can make the muffins tough.
- Divide and Color the Batter: Divide the batter evenly into three smaller bowls. Add a few drops of different food coloring to each bowl (one green, one purple, and one orange) and gently fold until the color is evenly distributed.
- Fill Muffin Cups: Spoon the different colored batters into the muffin liners, filling each about 2/3 full. You can layer the colors or mix them to create a marbled effect.
- Decorate Before Baking: Add candy eyes, colored sprinkles, and mini chocolate chips on top of the batter before baking to create fun monster faces.
- Bake: Place the muffin tin in the preheated oven and bake for 18-22 minutes, or until a toothpick inserted into the center of a muffin comes out clean.
- Cool and Serve: Allow the muffins to cool in the tin for about 5 minutes, then transfer them to a wire rack to cool completely. Serve them warm or at room temperature.
Extra Tips:
For an extra creative touch, consider using edible markers to draw fun expressions directly onto the candy eyes after baking. If you want to make the muffins even more vibrant, use gel food coloring instead of liquid, as it provides more intense colors without altering the batter consistency.
Feel free to experiment with different decorations such as gummy worms or pretzel sticks to give your Monster Muffins a unique personality. Finally, these muffins can be made a day in advance – just store them in an airtight container to keep them fresh. Enjoy your Halloween breakfast fun!
Eyeball Yogurt Parfaits
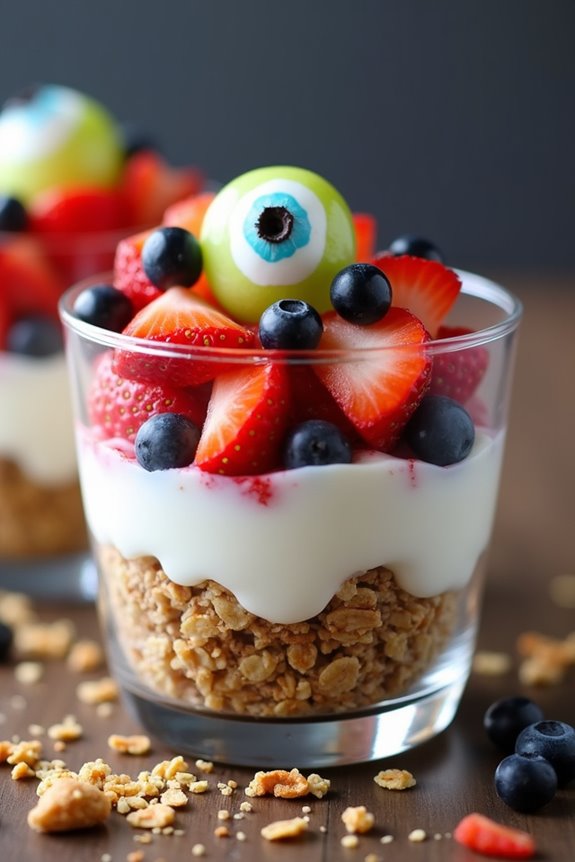
Halloween is a time for spooky fun, and what better way to start the day than with a breakfast that combines nutritious ingredients with a touch of eerie delight? Eyeball Yogurt Parfaits are a creative and healthy breakfast option that’s perfect for kids. With layers of vibrant fruit, creamy yogurt, and a ghoulish eyeball surprise, these parfaits are sure to excite little ones and add a festive flair to your Halloween morning.
These parfaits aren’t only visually striking but also easy to prepare. You can make them the night before to save time on a busy morning, or involve the kids in assembling their own spooky creations. By using Greek yogurt, your parfaits will be rich in protein, while the fruits add natural sweetness and essential vitamins. The “eyeball” effect is achieved using peeled grapes or lychee fruit, adding a fun and creepy twist to a healthy breakfast.
Ingredients (serves 4-6 people):
- 3 cups Greek yogurt
- 1 cup granola
- 1 cup strawberries, sliced
- 1 cup blueberries
- 1/2 cup peeled green grapes or canned lychee fruit
- 2 tablespoons honey or maple syrup (optional)
- 12-18 candy eyeballs or chocolate chips
Instructions:
- Prepare the Yogurt Base: In a medium bowl, mix the Greek yogurt with honey or maple syrup if you prefer a sweeter base. Stir until well combined.
- Assemble the Parfaits: Divide the granola equally and layer it at the bottom of each serving glass or bowl. This will form the crunchy base of your parfait.
- Create the Eyeballs: For each serving, take two or three peeled grapes or lychee fruit. Gently press a candy eyeball or a chocolate chip into each piece of fruit, creating a spooky “eyeball” effect.
- Layer the Parfaits: Spoon a layer of yogurt over the granola in each glass. Add a layer of sliced strawberries and blueberries, then place the “eyeballs” on top.
- Finish and Serve: Add another layer of yogurt to cover the fruit and eyeballs, then top with remaining fruit and another “eyeball” for decoration. Serve immediately or refrigerate until ready to enjoy.
Extra Tips:
To make the parfaits more festive, consider using colored yogurt by mixing a few drops of natural food coloring into the yogurt. If you’re making these ahead of time, keep the granola separate until serving to maintain its crunch.
You can also customize the parfaits by choosing your kids’ favorite fruits or using dairy-free yogurt for a vegan option. Encourage the kids to get involved in the assembly process to make breakfast even more fun and interactive!
Skeleton Sausage Links

Skeleton Sausage Links are a fun and spooky breakfast idea perfect for celebrating Halloween with your kids. These creatively designed sausages resemble skeleton bones, making them an exciting addition to your Halloween breakfast table. The dish isn’t only visually appealing but also delicious and easy to prepare, ensuring that your little ones start their day with a smile.
This recipe for Skeleton Sausage Links is designed to serve 4-6 people, making it ideal for a family breakfast or a small Halloween-themed gathering. Using simple ingredients and straightforward steps, you can whip up this delightful dish in no time. Whether you’re planning a full Halloween breakfast spread or just want to add a touch of festivity to your morning, these sausage links are sure to be a hit.
Ingredients:
- 12 sausage links
- 1 cup pancake mix
- 1 large egg
- 3/4 cup milk
- 2 tablespoons vegetable oil
- Cooking spray
- Ketchup (optional, for decoration)
Instructions:
- Preheat the Oven: Start by preheating your oven to 400°F (200°C). Line a baking sheet with parchment paper or lightly grease it with cooking spray to prevent sticking.
- Prepare the Pancake Batter: In a medium-sized mixing bowl, combine the pancake mix, egg, milk, and vegetable oil. Whisk the ingredients together until you have a smooth batter. The batter should be slightly thick to coat the sausages well.
- Coat the Sausages: Dip each sausage link into the pancake batter, ensuring they’re fully coated. You can use a fork or tongs to help with this process. Allow any excess batter to drip off before placing them on the prepared baking sheet.
- Bake the Sausages: Arrange the coated sausage links on the baking sheet, leaving a little space between each one. Bake in the preheated oven for about 15-18 minutes, or until the pancake coating is golden brown and the sausages are cooked through.
- Decorate (Optional): If desired, use ketchup to draw bone-like designs on the surface of each sausage link to enhance the skeleton appearance. Serve warm and enjoy your spooky breakfast creation!
Extra Tips:
When preparing Skeleton Sausage Links, consider using your favorite type of sausages to customize the flavor to your family’s taste. You can experiment with different seasonings in the pancake batter, such as adding a pinch of cinnamon or nutmeg for a hint of sweetness.
If you’re short on time, precooked sausages can be used, but be sure to adjust the baking time accordingly. For an extra touch of fun, pair your Skeleton Sausage Links with other Halloween-themed breakfast items like ghost-shaped pancakes or jack-o’-lantern fruit cups.