
As the spooky season approaches, I’m bubbling over with excitement to whip up some Halloween magic in the kitchen. These 14 sinfully delightful dinner ideas will turn any gathering into a frightful feast that everyone will adore. From the aromatic Witch’s Brew Stew to the playful Mummy Meatloaf, each dish offers a taste of the eerie season. It’s all about creating a bewitching atmosphere filled with flavors that captivate the senses. I can’t wait to share these enchanting recipes with you!
Witch’s Brew Stew
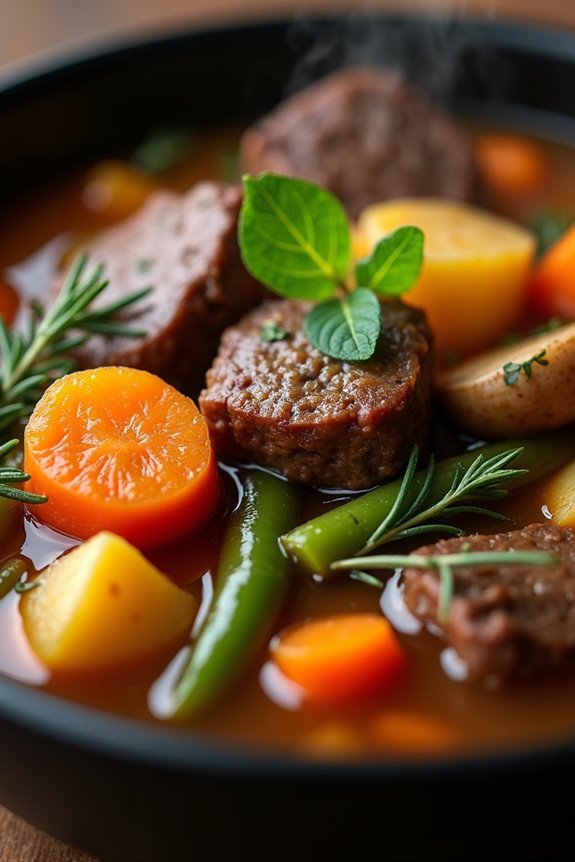
As the autumn leaves fall and the air turns crisp, there’s no better way to celebrate Halloween than with a cauldron of Witch’s Brew Stew. This hearty and flavorful concoction is perfect for warming up on a chilly October night, and it’s sure to impress both ghouls and goblins at your dinner table.
With its rich blend of savory vegetables, tender meat, and aromatic herbs, this stew captures the essence of a magical evening, bubbling away like a potion in a witch’s cauldron. Crafted to serve 4-6 people, Witch’s Brew Stew combines a variety of ingredients that meld together to create a symphony of flavors.
The slow cooking process guarantees that each component is infused with the robust seasoning, making every spoonful a delightful experience. Whether you’re planning a spooky dinner party or simply want to enjoy a festive meal with your family, this stew is the perfect choice to bring the Halloween spirit to life.
Ingredients:
- 2 tablespoons olive oil
- 1 pound beef stew meat, cut into 1-inch cubes
- 1 large onion, chopped
- 3 garlic cloves, minced
- 4 cups beef broth
- 2 cups water
- 3 large carrots, sliced
- 2 large potatoes, diced
- 1 cup mushrooms, sliced
- 1 cup green beans, trimmed and halved
- 1 tablespoon tomato paste
- 1 teaspoon dried thyme
- 1 teaspoon dried rosemary
- 1 bay leaf
- Salt and pepper to taste
Cooking Instructions:
- Prepare the Meat: In a large pot or Dutch oven, heat the olive oil over medium-high heat. Add the beef stew meat in batches, making sure not to overcrowd the pot. Brown the meat on all sides, then remove it and set aside.
- Sauté the Vegetables: In the same pot, add the chopped onion and minced garlic. Sauté for about 5 minutes, or until the onion is translucent and the garlic is fragrant.
- Combine Ingredients: Return the browned beef to the pot. Add the beef broth, water, sliced carrots, diced potatoes, and mushrooms. Stir in the tomato paste, dried thyme, rosemary, and bay leaf.
- Simmer the Stew: Bring the mixture to a boil, then reduce the heat to low. Cover the pot and let the stew simmer for about 1.5 to 2 hours, or until the meat is tender and the flavors have melded together.
- Add Final Touches: About 15 minutes before serving, add the green beans to the pot. Season the stew with salt and pepper to taste. Remove the bay leaf before serving.
Extra Tips:
For the best results, use a heavy-bottomed pot or Dutch oven to guarantee even cooking and prevent burning. If you prefer a thicker stew, you can mix a tablespoon of cornstarch with a bit of cold water and stir it into the stew during the last 10 minutes of cooking.
Feel free to get creative with additional vegetables or spices to suit your taste. And remember, like many stews, Witch’s Brew Stew often tastes even better the next day, so consider making it ahead of time to allow the flavors to deepen.
Mummy Meatloaf
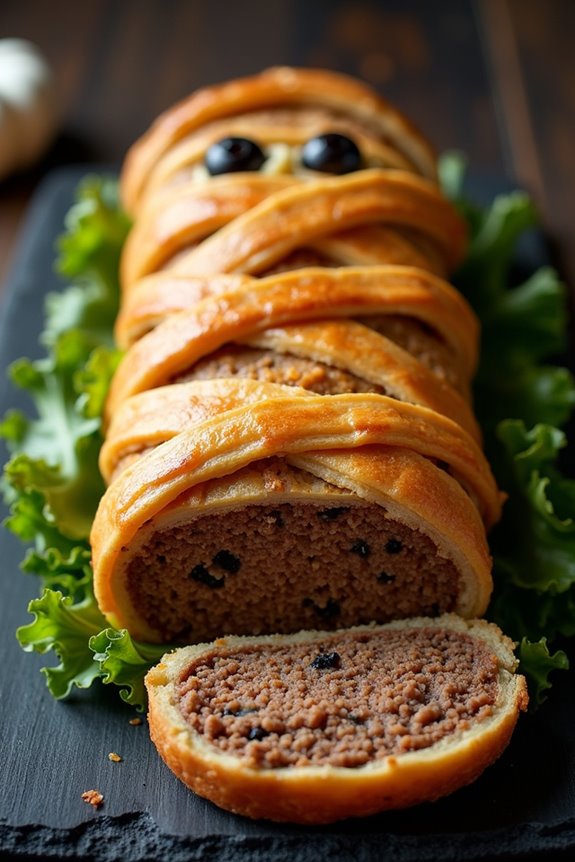
Are you looking to add a spooky twist to your Halloween dinner menu? Mummy Meatloaf is a fun and delicious way to surprise your family and guests with a dish that’s as eye-catching as it’s tasty. This cleverly crafted meatloaf is shaped like a mummy and wrapped in strips of dough to give it a creepy, yet playful, appearance.
Perfect for a Halloween dinner party or a family meal, this dish is sure to delight both kids and adults alike with its flavorful and festive presentation.
Creating Mummy Meatloaf is easier than it looks, and you don’t need to be a culinary artist to achieve impressive results. The secret lies in using versatile ingredients that come together quickly, and simple techniques to create a savory, moist meatloaf encased in dough strips for the “bandages.”
This recipe serves 4-6 people, making it an ideal choice for a small gathering or family dinner. Follow the instructions below to bring this Halloween special to life in your kitchen.
Ingredients (Serves 4-6):
- 1 ½ pounds ground beef
- 1 cup bread crumbs
- 1/2 cup milk
- 1/2 cup ketchup
- 1/4 cup finely chopped onion
- 2 cloves garlic, minced
- 1 tablespoon Worcestershire sauce
- 1 teaspoon salt
- 1/2 teaspoon black pepper
- 1 teaspoon dried thyme
- 2 large eggs
- 1 package refrigerated crescent roll dough
- 2 olives for eyes
- Cooking spray
Instructions:
- Preheat and Prepare: Preheat your oven to 350°F (175°C). Lightly grease a baking sheet with cooking spray to prevent the meatloaf from sticking.
- Mix the Meatloaf: In a large bowl, combine ground beef, bread crumbs, milk, ketchup, onion, garlic, Worcestershire sauce, salt, pepper, thyme, and eggs. Mix thoroughly with your hands or a spoon until all ingredients are evenly incorporated.
- Shape the Meatloaf: Transfer the meat mixture to the prepared baking sheet. Shape it into an oval, resembling a mummy, making sure it’s compact and even on all sides.
- Wrap the Mummy: Unroll the crescent roll dough and separate it into strips. Drape the strips over the meatloaf, leaving some spaces open to mimic mummy bandages. Make sure to tuck the ends under the loaf to secure them in place.
- Create the Eyes: Cut two small circles from the olives and place them near the top of the meatloaf to form the mummy’s eyes.
- Bake: Place the baking sheet in the preheated oven and bake for 50-60 minutes, or until the internal temperature of the meatloaf reaches 160°F (70°C) and the dough is golden brown.
- Serve: Once cooked, remove the mummy meatloaf from the oven and let it rest for about 5 minutes before slicing. Serve warm and enjoy!
Extra Tips:
For an even spookier presentation, consider placing the mummy meatloaf on a platter lined with lettuce or kale to resemble a graveyard scene.
You can also use a mixture of ground pork and beef for added flavor and moisture. If you don’t have crescent roll dough, puff pastry can be used as an alternative for the mummy bandages.
Finally, confirm the meatloaf is well compacted when shaping it to maintain its form during baking.
Vampire Bat Wings

Vampire Bat Wings
Looking to add a spooky twist to your Halloween dinner table this year? Try making Vampire Bat Wings, a delightfully sinister dish that will enchant both kids and adults alike. These wings are perfectly seasoned and glazed with a dark, sticky sauce that gives them their signature “bat-like” appearance. Not only do they look eerily fitting for the Halloween season, but they also pack a flavorful punch that will leave everyone asking for more.
Vampire Bat Wings are the perfect blend of sweet, spicy, and savory flavors. The secret to their rich, dark color is the combination of soy sauce, balsamic vinegar, and a touch of honey, which caramelizes beautifully in the oven. These wings aren’t only visually striking but also incredibly easy to make, ensuring that you spend more time enjoying the party than in the kitchen. Serve them hot from the oven for a ghoulishly fun centerpiece at your Halloween gathering.
Ingredients (Serving size: 4-6 people)
- 3 pounds chicken wings
- 1/2 cup soy sauce
- 1/4 cup balsamic vinegar
- 1/4 cup honey
- 2 tablespoons dark brown sugar
- 1 tablespoon olive oil
- 1 teaspoon garlic powder
- 1 teaspoon onion powder
- 1/2 teaspoon smoked paprika
- 1/2 teaspoon black pepper
- 1/4 teaspoon cayenne pepper
- 1 tablespoon cornstarch
- 2 tablespoons water
- Fresh parsley (for garnish, optional)
Cooking Instructions
- Prep the Wings: Preheat your oven to 400°F (200°C). Pat the chicken wings dry with paper towels to remove excess moisture, which will help them crisp up during baking.
- Make the Marinade: In a large mixing bowl, combine the soy sauce, balsamic vinegar, honey, dark brown sugar, olive oil, garlic powder, onion powder, smoked paprika, black pepper, and cayenne pepper. Stir until the sugar is dissolved and the ingredients are well mixed.
- Marinate the Wings: Add the chicken wings to the bowl, ensuring they’re fully coated with the marinade. Cover the bowl with plastic wrap and refrigerate for at least 1 hour, or overnight for the best flavor infusion.
- Bake the Wings: Line a baking sheet with aluminum foil and place a wire rack on top. Arrange the marinated wings on the rack, ensuring they’re evenly spaced. Bake in the preheated oven for 35-40 minutes, turning them halfway through, until the wings are cooked through and have a deep, glossy glaze.
- Thicken the Sauce: While the wings are baking, pour the remaining marinade into a small saucepan. Bring it to a simmer over medium heat. In a separate small bowl, mix the cornstarch with water to create a slurry. Slowly add the slurry to the simmering marinade, stirring continuously until the sauce thickens.
- Coat the Wings: Once the wings are done, remove them from the oven and brush them with the thickened sauce for an extra layer of flavor. Return them to the oven for an additional 5 minutes to set the glaze.
- Serve: Arrange the Vampire Bat Wings on a serving platter. Garnish with fresh parsley, if desired, and serve immediately for maximum impact.
Extra Tips:
For extra crispy wings, consider broiling them for an additional 3-5 minutes at the end of the baking time, but keep a close watch to prevent burning. If you prefer a milder spice level, reduce the amount of cayenne pepper in the marinade.
Spooky Stuffed Peppers

Spooky Stuffed Peppers are a fun and festive dish perfect for a Halloween dinner party. These delightful peppers are carved to resemble jack-o’-lanterns and filled with a savory mixture that will satisfy both kids and adults alike. They make for a colorful and eye-catching centerpiece for your table, while also being nutritious and delicious.
Whether you’re hosting a spooky soiree or simply enjoying a themed family dinner, these stuffed peppers are sure to be a hit. The filling is a flavorful blend of ground meat, rice, vegetables, and seasonings that’s cooked to perfection and then encased in vibrant bell peppers. The peppers can be carved into spooky faces before baking, adding an extra layer of Halloween magic to the dish.
Not only are these stuffed peppers a treat for the taste buds, but they also provide a balanced meal with protein, grains, and vegetables all in one. Here’s how you can make Spooky Stuffed Peppers for 4-6 people:
Ingredients:
- 6 medium-sized bell peppers (any color)
- 1 pound ground beef or turkey
- 1 cup cooked rice (white or brown)
- 1 small onion, chopped
- 2 cloves garlic, minced
- 1 can (14.5 ounces) diced tomatoes, drained
- 1 cup shredded cheese (cheddar or mozzarella)
- 2 teaspoons Italian seasoning
- Salt and pepper to taste
- Olive oil for drizzling
Cooking Instructions:
- Prepare the Peppers: Preheat your oven to 375°F (190°C). Cut the tops off the bell peppers and remove the seeds and membranes. Using a small, sharp knife, carefully carve jack-o’-lantern faces into the side of each pepper. Set aside.
- Cook the Filling: In a large skillet, heat a tablespoon of olive oil over medium heat. Add the chopped onion and minced garlic, sautéing until the onion is translucent. Add the ground beef or turkey, cooking until it’s browned. Drain excess fat if necessary.
- Combine Ingredients: Stir in the cooked rice, drained diced tomatoes, Italian seasoning, salt, and pepper. Cook for an additional 3-4 minutes, allowing the flavors to meld together. Remove from heat and mix in half of the shredded cheese.
- Stuff the Peppers: Place the hollowed and carved peppers in a baking dish. Spoon the meat and rice mixture into each pepper, filling them generously. Sprinkle the remaining cheese on top of each stuffed pepper.
- Bake: Drizzle a little olive oil over the peppers. Cover the dish with aluminum foil and bake in the preheated oven for 25-30 minutes. Remove the foil and bake for an additional 10-15 minutes, or until the peppers are tender and the cheese is bubbly and golden.
- Serve: Carefully transfer the spooky stuffed peppers to a serving platter. Serve hot and enjoy the compliments!
Extra Tips:
For an extra spooky touch, use orange bell peppers to mimic the look of traditional jack-o’-lanterns. If you’re short on time, you can use instant rice or pre-cook the peppers slightly in the microwave to shorten the baking time.
Feel free to adjust the seasonings to your preference, and add other vegetables like mushrooms or zucchini for extra flavor and nutrients. If you’re serving guests with dietary restrictions, consider using a plant-based ground meat substitute for a vegetarian version.
Ghostly Mashed Potatoes

As the ghosts and goblins prepare to haunt the night, why not give your Halloween dinner a spooky twist with Ghostly Mashed Potatoes? This eerie yet delightful dish is a perfect addition to your Halloween menu, bringing a touch of whimsy and festivity to your dinner table.
These mashed potatoes are sculpted into ghostly shapes, adding both flavor and fun to your meal, making them an ideal side dish for both kids and adults alike. The creamy texture and rich taste of these mashed potatoes are enhanced by a subtle infusion of garlic and butter, creating a comforting dish that’s as delicious as it’s visually appealing.
Topped with black pepper or black sesame seeds for the eyes, these ghostly mashed potatoes aren’t only easy to make but also add a festive flair to your Halloween celebration. Serve them alongside your favorite spooky entrees for a hauntingly good meal.
Ingredients for 4-6 servings:
- 2 pounds of potatoes (Yukon Gold or Russet)
- 4 tablespoons of unsalted butter
- 1/2 cup of whole milk or heavy cream
- 2 cloves of garlic, minced
- Salt to taste
- Black pepper or black sesame seeds for decoration
Cooking Instructions:
- Prepare the Potatoes: Start by peeling the potatoes and cutting them into evenly sized chunks. This will guarantee that they cook evenly.
- Boil the Potatoes: Place the potato chunks into a large pot and cover them with cold water. Add a pinch of salt and bring the water to a boil over medium-high heat. Cook the potatoes until they’re tender and easily pierced with a fork, about 15-20 minutes.
- Drain and Mash: Once the potatoes are cooked, drain them thoroughly and return them to the pot. Use a potato masher or ricer to mash the potatoes until smooth.
- Add Flavor: In a small saucepan, melt the butter over low heat. Add the minced garlic and cook until fragrant, about 1-2 minutes. Pour the garlic butter over the mashed potatoes.
- Creamy Consistency: Gradually add the milk or cream to the potatoes, stirring continuously until you reach your desired consistency. Season with salt to taste.
- Shape the Ghosts: To create the ghostly shapes, use a spoon or piping bag to mound the mashed potatoes into individual ghost shapes on a serving platter. Use black pepper or black sesame seeds to create eyes on each ghost.
- Serve: Serve the Ghostly Mashed Potatoes immediately, while warm, as an engaging and spooky side dish.
Extra Tips:
For an even more ghostly effect, consider adding a small amount of white food coloring to the mashed potatoes for an extra pale appearance.
If you’re preparing these for a children’s party, you might want to involve the kids in shaping the ghosts, as it’s a fun and creative activity. When mashing, avoid overworking the potatoes to prevent them from becoming gluey.
Enjoy these ghostly delights with a hearty Halloween meal!
Pumpkin Pot Pie

Pumpkin Pot Pie is a delightful twist on the classic pot pie, perfect for celebrating Halloween with a cozy and festive meal. This dish combines the rich, creamy texture of pumpkin with savory ingredients, creating a comforting balance of flavors that will warm you up on a chilly October evening.
With its flaky crust and hearty filling, this pumpkin pot pie is bound to be a hit at your Halloween dinner table, pleasing both kids and adults alike. The filling, made with a mix of tender vegetables and chunks of chicken, is enriched by the addition of pumpkin puree, which not only gives it a luscious texture but also infuses it with a hint of sweetness.
Topped with a buttery, golden crust, this pot pie is a delightful way to incorporate seasonal ingredients into your Halloween menu. It’s an easy-to-make dish that can be prepared in advance, allowing you to enjoy the festivities without spending too much time in the kitchen.
Ingredients for 4-6 servings:
- 2 cups cooked chicken, diced
- 1 cup pumpkin puree
- 1 cup chicken broth
- 1 cup frozen peas and carrots
- 1 onion, finely chopped
- 2 cloves garlic, minced
- 2 tablespoons all-purpose flour
- 1 tablespoon butter
- 1 teaspoon dried thyme
- 1 teaspoon salt
- 1/2 teaspoon black pepper
- 1/4 teaspoon nutmeg
- 1 sheet puff pastry, thawed
- 1 egg, beaten (for egg wash)
Cooking Instructions:
- Preheat the Oven: Begin by preheating your oven to 400°F (200°C). This guarantees that your pot pie will bake evenly and the crust will become golden and crisp.
- Prepare the Filling: In a large skillet over medium heat, melt the butter. Add the chopped onion and minced garlic, sautéing until the onion becomes translucent and fragrant, about 3-4 minutes.
- Thicken the Mixture: Sprinkle the flour over the sautéed onions and garlic, stirring constantly to form a roux. Slowly add the chicken broth, whisking continuously to prevent lumps, and allow the mixture to thicken.
- Combine Ingredients: Add the pumpkin puree to the skillet, stirring to incorporate it fully into the sauce. Then, mix in the cooked chicken, peas and carrots, thyme, salt, pepper, and nutmeg. Allow the mixture to simmer for about 5 minutes to let the flavors meld together.
- Assemble the Pot Pie: Pour the filling into a baking dish. Roll out the thawed puff pastry on a lightly floured surface to fit the top of the dish. Place the pastry over the filling, trimming any excess and pressing the edges to seal. Cut a few slits in the top of the pastry to allow steam to escape.
- Bake the Pot Pie: Brush the pastry with the beaten egg for a glossy finish. Place the pot pie in the preheated oven and bake for 25-30 minutes, or until the crust is golden brown and puffed.
- Serve and Enjoy: Remove the pot pie from the oven and let it cool slightly before serving. This will make it easier to cut and serve without the filling spilling out.
Extra Tips:
For a vegetarian version, you can substitute the chicken with an equal amount of mushrooms or other vegetables like zucchini or bell peppers. If you prefer a spicier flavor, add a pinch of cayenne pepper or a dash of hot sauce to the filling.
To save time, you can assemble the pot pie a day in advance and store it in the refrigerator, baking it just before serving. Make sure to adjust the baking time slightly if it’s chilled. Enjoy your Halloween feast with this comforting and flavorful Pumpkin Pot Pie!
Hauntingly Good Lasagna

Get ready to impress your guests with a frightfully delicious lasagna that will bring the spirit of Halloween to your dinner table. This Hauntingly Good Lasagna isn’t only a treat for the taste buds but also a feast for the eyes. With layers of flavorful meats, creamy cheeses, and hearty pasta, it’s the perfect dish to serve at your Halloween gathering.
The spooky twist comes with the creative presentation, where each slice reveals a ghostly surprise hidden within. This serving of Hauntingly Good Lasagna is designed to satisfy the appetites of 4-6 people, making it ideal for family dinners or small get-togethers. The combination of savory ingredients and a touch of Halloween whimsy guarantees that this dish will be the highlight of your meal.
Whether you’re a seasoned chef or a kitchen novice, this recipe is easy to follow and promises a hauntingly good time for everyone involved.
Ingredients:
- 12 lasagna noodles
- 1 pound ground beef
- 1 pound Italian sausage
- 1 large onion, chopped
- 3 cloves garlic, minced
- 24 ounces marinara sauce
- 15 ounces ricotta cheese
- 1 egg
- 1/4 cup grated Parmesan cheese
- 16 ounces shredded mozzarella cheese
- 1 teaspoon dried Italian seasoning
- Salt and pepper to taste
- Black olives for decoration (optional)
- Fresh basil leaves for garnish (optional)
Instructions:
- Cook the Noodles: Begin by boiling a large pot of salted water. Add the lasagna noodles and cook until al dente, following package instructions. Drain and set aside, being careful to prevent them from sticking together.
- Prepare the Meat Sauce: In a large skillet over medium heat, cook the ground beef and Italian sausage until browned. Drain excess fat. Add the chopped onion and minced garlic, cooking until the onion is translucent. Stir in the marinara sauce, Italian seasoning, salt, and pepper. Let the sauce simmer for 10 minutes to allow the flavors to meld.
- Mix the Ricotta Filling: In a mixing bowl, combine the ricotta cheese, egg, and grated Parmesan cheese. Mix until smooth and well combined.
- Assemble the Lasagna: Preheat your oven to 375°F (190°C). In a 9×13-inch baking dish, spread a thin layer of meat sauce at the bottom. Layer with 4 lasagna noodles, half of the ricotta mixture, a third of the meat sauce, and a third of the mozzarella cheese. Repeat for the second layer. For the final layer, add the remaining noodles, meat sauce, and mozzarella cheese.
- Create the Ghostly Effect: If desired, cut black olives into small shapes to create spooky faces and place them on top of the mozzarella cheese to resemble ghosts. This adds a fun Halloween twist to the dish.
- Bake the Lasagna: Cover the baking dish with aluminum foil and bake in the preheated oven for 25 minutes. Remove the foil and bake for an additional 10 minutes or until the cheese is bubbly and golden brown.
- Serve and Garnish: Remove the lasagna from the oven and let it cool for a few minutes before slicing. Garnish with fresh basil leaves if desired, and serve hot.
Extra Tips:
For a more cohesive flavor, you can make the meat sauce a day ahead, allowing it to fully develop its taste. Confirm the noodles are thoroughly drained and slightly cooled to prevent them from sticking during assembly.
When layering, press down gently to guarantee the lasagna is compact and the layers hold together well. If you’re looking to add more vegetables, consider incorporating spinach or mushrooms into the meat sauce.
Creepy Crawly Pasta
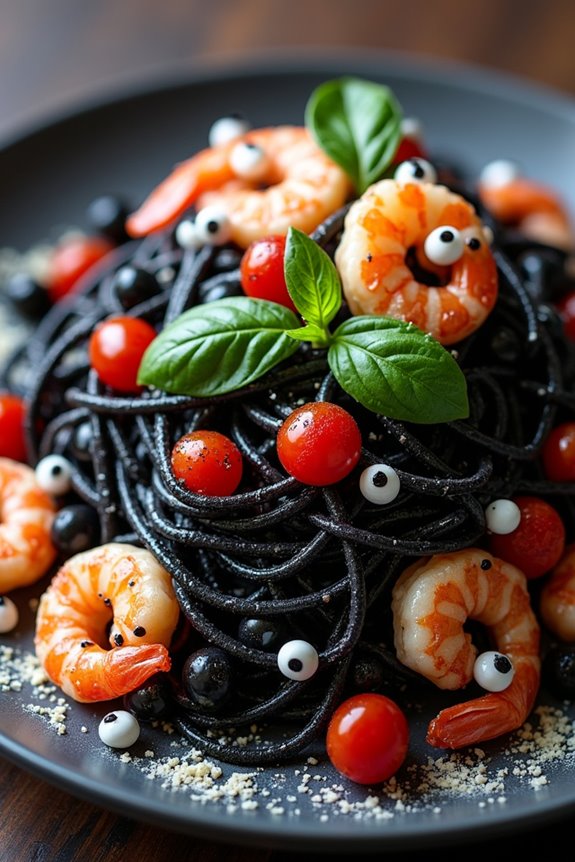
Halloween is the perfect time to let your culinary creativity run wild, and what better way to do so than with a dish as eerie as Creepy Crawly Pasta? This dish combines the whimsy of Halloween with a deliciously satisfying meal that’s sure to be a hit at your next spooky gathering.
With a blend of rich, savory flavors and an appearance that will send shivers down your spine, Creepy Crawly Pasta is bound to captivate both the eyes and taste buds of your guests.
The key to making this dish truly creepy lies in its presentation. By incorporating black pasta, such as squid ink spaghetti, and decorating it with “crawly” elements like black olives and cherry tomatoes shaped like spiders, you’ll create a dish that not only tastes delightful but also adds a touch of gothic charm to your Halloween table.
Whether you’re hosting a dinner party or simply want to surprise your family with a festive meal, Creepy Crawly Pasta is a perfect choice.
Ingredients for 4-6 servings:
- 1 pound squid ink spaghetti
- 2 tablespoons olive oil
- 4 cloves garlic, minced
- 1 teaspoon red pepper flakes
- 1/2 cup black olives, sliced
- 1 cup cherry tomatoes, halved
- 1/4 cup fresh basil leaves, chopped
- 1/2 cup grated Parmesan cheese
- Salt and pepper, to taste
- 12 cooked shrimp, optional
- Edible googly eyes (optional for decoration)
Cooking Instructions:
1. Prepare the Pasta:
Begin by bringing a large pot of salted water to a boil. Add the squid ink spaghetti and cook according to the package instructions until al dente.
Drain the pasta, reserving about 1/2 cup of the pasta water, and set aside.
2. Sauté the Garlic:
In a large skillet, heat the olive oil over medium heat. Add the minced garlic and red pepper flakes, sautéing for about 1-2 minutes until the garlic becomes fragrant.
Be careful not to let the garlic brown.
3. Combine Ingredients:
Add the sliced black olives and halved cherry tomatoes to the skillet. Cook for an additional 3-4 minutes until the tomatoes begin to soften.
If you have cooked shrimp, add them to the skillet at this point and cook until warmed through.
4. Mix with Pasta:
Add the cooked squid ink spaghetti to the skillet, tossing it with the garlic and tomato mixture.
Use the reserved pasta water to loosen the sauce as needed. Stir in the chopped basil and grated Parmesan cheese, ensuring everything is well combined.
5. Season and Serve:
Taste and adjust the seasoning with salt and pepper as desired. Divide the pasta into serving plates, and if using, place edible googly eyes on shrimp or tomatoes to enhance the “creepy” effect.
Extra Tips:
For an even spookier presentation, consider placing the pasta on a large serving platter and arranging the shrimp or tomato “spiders” crawling over the dish.
If squid ink pasta is unavailable, you can use regular spaghetti and add black food coloring to the water before boiling. Always taste and adjust the seasoning at the end, as the intensity of the squid ink can vary.
And most importantly, have fun with your decorations – the more creative you are, the more festive the experience!
Monster Mash Soup

Celebrate Halloween with a spooktacular bowl of Monster Mash Soup! This hearty and flavorful dish is perfect for warming up on a chilly October evening. The vibrant colors and delightful textures make this a fun and inviting dish for both kids and adults. Filled with nutritious vegetables and spooky-shaped pasta, it’s sure to be a hit at your Halloween dinner party.
Enjoy the savory blend of tender potatoes, earthy mushrooms, and sweet carrots, all brought together in a luscious broth. The addition of spooky-shaped pasta adds a playful twist, capturing the spirit of Halloween. This recipe is designed to serve 4-6 people, making it the perfect centerpiece for a frightfully fun family meal or a ghastly gathering with friends.
Ingredients:
- 2 tablespoons olive oil
- 1 medium onion, diced
- 3 cloves garlic, minced
- 2 cups sliced mushrooms
- 2 large carrots, sliced
- 2 stalks celery, diced
- 3 medium potatoes, peeled and cubed
- 6 cups vegetable broth
- 1 cup spooky-shaped pasta
- 1 teaspoon dried thyme
- 1 teaspoon smoked paprika
- Salt and pepper to taste
- Fresh parsley, chopped (for garnish)
Cooking Instructions:
- Prepare the Vegetables: Begin by heating the olive oil in a large pot over medium heat. Add the diced onion and minced garlic, sautéing for about 3 minutes until they become translucent and fragrant.
- Add Vegetables: Stir in the sliced mushrooms, carrots, and celery. Cook for an additional 5 minutes, allowing the vegetables to soften slightly and release their flavors.
- Cook the Potatoes: Add the cubed potatoes to the pot, along with the vegetable broth. Stir in the dried thyme and smoked paprika. Increase the heat to bring the mixture to a boil.
- Simmer: Once boiling, reduce the heat to low, cover the pot, and let the soup simmer for about 20 minutes, or until the potatoes are tender when pierced with a fork.
- Add Pasta: Stir in the spooky-shaped pasta and continue to simmer for another 8-10 minutes, or until the pasta is cooked al dente.
- Season: Taste the soup and season with salt and pepper according to your preference.
- Serve: Ladle the Monster Mash Soup into bowls, garnish with freshly chopped parsley, and serve immediately.
Extra Tips:
For an extra-creamy version of Monster Mash Soup, consider adding a half cup of heavy cream or coconut milk just before serving.
If you prefer a thicker soup, you can mash some of the potatoes directly in the pot with a potato masher.
For an added boost of flavor, toss in a bay leaf during the simmering process and remove it before serving.
If you can’t find spooky-shaped pasta, any small pasta shape like shells or elbows will work just fine. Enjoy your monstrously delicious creation!
Devilish Deviled Eggs

Devilish Deviled Eggs are a spooky and delicious addition to your Halloween dinner spread. These creepy treats are a twist on the classic deviled eggs, designed to delight your guests with their eerie appearance and tantalizing flavors. Perfectly creamy and seasoned with a hint of spice, these eggs are an easy yet impressive appetizer that will keep your Halloween festivities fun and flavorful.
To create these devilish delights, you’ll transform ordinary hard-boiled eggs into a wickedly good snack by adding unique toppings and creative garnishes. This recipe serves 4-6 people, making it ideal for a small gathering or as part of a larger buffet. Whether you’re hosting a Halloween party or simply looking to enjoy a themed dinner with family, these Devilish Deviled Eggs are bound to be a hit.
Ingredients:
- 12 large eggs
- 1/2 cup mayonnaise
- 2 teaspoons Dijon mustard
- 1 teaspoon white vinegar
- Salt, to taste
- Black pepper, to taste
- 1/2 teaspoon smoked paprika
- 1/4 teaspoon cayenne pepper (optional for extra spice)
- Black olives (for garnish)
- Chives (for garnish)
- Red food coloring (optional)
Instructions:
- Boil the Eggs: Place the eggs in a large pot and cover them with cold water. Bring the water to a boil over high heat. Once boiling, remove the pot from the heat, cover it with a lid, and let the eggs sit for 10-12 minutes.
- Cool and Peel the Eggs: After the eggs have cooked, transfer them to a bowl of ice water to cool for about 5 minutes. Once cooled, gently peel the eggs and pat them dry with a paper towel.
- Prepare the Egg Halves: Slice each egg in half lengthwise and carefully remove the yolks, placing them in a medium-sized bowl. Set the egg whites aside on a serving platter.
- Make the Filling: Mash the egg yolks with a fork until they’re crumbly. Add mayonnaise, Dijon mustard, white vinegar, salt, black pepper, smoked paprika, and cayenne pepper (if using) to the yolks. Mix until smooth and well combined.
- Fill the Egg Whites: Spoon or pipe the yolk mixture back into the egg white halves, mounding it slightly. If you want to create a more Halloween-themed look, mix a few drops of red food coloring into the yolk mixture to give it a devilish hue before filling the whites.
- Garnish: Slice black olives into thin rings and place them on top of the filling to create “eyeballs”. For added effect, use chives to create “veins” or other eerie designs on the egg surface.
- Chill and Serve: Refrigerate the eggs for at least 30 minutes before serving to allow the flavors to meld. Serve chilled as part of your Halloween dinner spread.
Extra Tips:
When making Devilish Deviled Eggs, guarantee the eggs are peeled carefully to maintain smooth egg white halves for an attractive presentation.
For a more dramatic look, consider using a piping bag with a star tip to fill the eggs, creating a textured appearance.
If you want to add more Halloween flair, try experimenting with different food coloring shades or garnish options, such as red bell pepper cutouts for horns.
Keep the eggs chilled until serving to maintain their freshness and flavor.
Frankenstein’s Monster Burgers

Frankenstein’s Monster Burgers are a fun and spooky way to bring the spirit of Halloween to your dinner table. These burgers aren’t only visually striking but also deliciously satisfying, making them perfect for a Halloween gathering or a themed family dinner. With a little creativity and some simple ingredients, you can create a memorable meal that will delight both kids and adults alike.
The green-tinted burgers resemble Frankenstein’s monster and are sure to be a hit, whether you’re serving them as a main course or as part of a larger Halloween feast.
To make these burgers, you’ll start by preparing a flavorful beef patty mixture, which will be dyed a ghoulish green color. The patties are then grilled to perfection and topped with an assortment of spooky garnishes to mimic the look of Frankenstein’s monster. Serve them on a fresh bun with all your favorite burger toppings, and don’t forget to add some side dishes that complement the theme. This recipe yields enough for 4-6 people, making it ideal for a small party or a family meal.
Ingredients for 4-6 servings:
- 2 pounds ground beef
- 1 tablespoon Worcestershire sauce
- 1 teaspoon garlic powder
- 1 teaspoon onion powder
- Salt and pepper, to taste
- Green food coloring
- 6 slices of cheddar cheese
- 6 hamburger buns
- Lettuce leaves
- Tomato slices
- Sliced pickles
- Ketchup
- Mustard
- Black olives, for garnish
- Pretzel sticks or toothpicks, for garnish
Cooking Instructions:
- Prepare the Beef Mixture: In a large bowl, combine the ground beef, Worcestershire sauce, garlic powder, onion powder, salt, and pepper. Mix thoroughly until all ingredients are well incorporated.
- Tint the Mixture: Add a few drops of green food coloring to the beef mixture. Using your hands or a spatula, mix until the color is evenly distributed. Adjust the amount of food coloring to achieve the desired shade of green.
- Form the Patties: Divide the beef mixture into 6 equal portions. Shape each portion into a patty, making sure they’re slightly larger than the hamburger buns to account for shrinkage during cooking.
- Grill the Patties: Preheat a grill or stovetop griddle over medium-high heat. Once hot, place the green-tinted patties onto the grill. Cook for about 4-5 minutes per side, or until they reach your preferred level of doneness.
- Melt the Cheese: During the last minute of cooking, place a slice of cheddar cheese on each patty. Cover the grill or use a lid to help melt the cheese.
- Assemble the Burgers: Toast the hamburger buns, if desired. Place a lettuce leaf on the bottom bun, followed by a slice of tomato. Add the cooked patty with melted cheese on top.
- Decorate the Burgers: Use ketchup and mustard to draw a face on the cheese, mimicking Frankenstein’s facial features. Add sliced pickles as eyebrows and black olives for eyes. Use pretzel sticks or toothpicks to create bolts on the sides of the burger, just like Frankenstein’s monster.
- Serve and Enjoy: Place the decorated top bun on the burger and serve immediately with your choice of sides.
Extra Tips: When mixing the food coloring into the beef, it’s best to start with a small amount and add more as needed to achieve the perfect eerie green hue.
Be sure to handle the patties gently to maintain their shape, and use a meat thermometer to verify they’re cooked to a safe internal temperature (160°F for ground beef). If you’re serving these at a party, consider setting up a “build-your-own” station with various toppings and decorations, allowing guests to create their own monster masterpieces.
Jack-o’-Lantern Quesadillas

Jack-o’-Lantern Quesadillas are a fun and festive way to celebrate Halloween with a spooky twist on a classic favorite. These quesadillas feature tortillas carved with jack-o’-lantern faces, filled with a delicious cheesy mixture, and then toasted to crispy perfection. It’s a delightful dish that combines creativity and flavor, making it a perfect addition to your Halloween dinner table, whether you’re serving kids or adults.
This recipe not only adds a playful touch to your Halloween menu but also allows for versatility in filling options, making it a customizable dish that can cater to various taste preferences. The process of carving the tortillas is a fun activity that can involve the whole family, turning meal preparation into an engaging experience.
Whether you’re hosting a Halloween party or looking for a simple meal to enjoy at home, these Jack-o’-Lantern Quesadillas are sure to be a hit.
Ingredients for Jack-o’-Lantern Quesadillas (Serving Size: 4-6 people):
- 8 large flour tortillas
- 2 cups shredded cheddar cheese
- 1 cup shredded Monterey Jack cheese
- 1 cup cooked, shredded chicken (optional)
- 1/2 cup black beans, drained and rinsed
- 1/2 cup bell peppers, diced
- 1/4 cup chopped cilantro
- 1 teaspoon ground cumin
- 1 teaspoon chili powder
- Salt and pepper to taste
- Cooking spray or olive oil
Cooking Instructions:
- Prepare the Filling: In a large bowl, combine the shredded cheddar cheese, Monterey Jack cheese, shredded chicken, black beans, diced bell peppers, and chopped cilantro. Season with ground cumin, chili powder, salt, and pepper. Mix well to guarantee the spices are evenly distributed throughout the filling.
- Carve the Tortillas: Take half of the tortillas and, using a small, sharp knife, carefully cut out jack-o’-lantern faces. This can include eyes, a nose, and a mouth, but be creative! Confirm the designs are large enough to allow the filling to show through.
- Assemble the Quesadillas: Lay the uncarved tortillas flat on a clean surface. Evenly distribute the filling mixture over these tortillas, leaving a small border around the edges. Place the carved tortillas on top, aligning them carefully with the bottom tortilla.
- Cook the Quesadillas: Heat a non-stick skillet or griddle over medium heat and lightly coat with cooking spray or olive oil. Carefully place the assembled quesadillas on the skillet. Cook for about 3-4 minutes on each side, or until the tortillas are golden brown and the cheese has melted.
- Serve and Enjoy: Once the quesadillas are cooked, remove them from the skillet, let them cool slightly, and then cut into wedges. Serve warm with your favorite dipping sauces such as salsa, sour cream, or guacamole.
Extra Tips:
For an extra crispy texture, use a cast-iron skillet and press down on the quesadillas with a spatula while cooking. If you’re preparing these for children, consider using mild cheeses and mild chili powder to keep the spice level down.
Feel free to get creative with fillings by adding ingredients like corn, mushrooms, or jalapeños to cater to different tastes. If you’re short on time, pre-made rotisserie chicken can be an excellent shortcut for the filling. Enjoy experimenting with different jack-o’-lantern designs to make each quesadilla unique!
Skeleton Ribs

The combination of a well-seasoned marinade and a slow-cooking method makes these ribs fall-off-the-bone tender. Whether you’re hosting a Halloween party or simply looking to entertain your family with a fun and festive meal, Skeleton Ribs are a surefire hit. The recipe is designed to serve 4-6 people, making it ideal for a small gathering.
Let’s plunge into the ingredients and step-by-step instructions to create this ghoulishly delicious dish.
Ingredients (Serves 4-6):
- 2 racks of pork baby back ribs
- 1 cup barbecue sauce
- 1/4 cup apple cider vinegar
- 1/4 cup brown sugar
- 2 tablespoons smoked paprika
- 1 tablespoon garlic powder
- 1 tablespoon onion powder
- 1 teaspoon cayenne pepper
- Salt and pepper to taste
- 1 tablespoon olive oil
- 1 cup apple juice
Cooking Instructions:
- Prepare the Ribs:
- Start by removing the membrane from the back of the ribs. This is essential for maximum flavor absorption. Use a sharp knife to gently lift and peel it off.
- In a bowl, mix together the barbecue sauce, apple cider vinegar, brown sugar, smoked paprika, garlic powder, onion powder, cayenne pepper, salt, and pepper. Make certain the ingredients are well combined to form a smooth marinade.
- Place the ribs in a large dish or zip-top bag, and pour the marinade over them. Confirm the ribs are evenly coated by turning them in the marinade. Cover and refrigerate for at least 2 hours, or overnight for best results.
- Preheat your oven to 275°F (135°C). This low and slow cooking method will guarantee the ribs are tender and flavorful.
- Remove the ribs from the marinade and place them on a baking sheet lined with aluminum foil. Drizzle olive oil over the ribs and pour apple juice around them. Cover tightly with another sheet of foil.
- Bake the ribs in the preheated oven for 2.5 to 3 hours, or until the meat is tender and pulls away easily from the bones.
- For a charred finish, preheat your grill to medium-high heat. Grill the ribs for 5 minutes on each side, basting with additional barbecue sauce to enhance the flavor and achieve a nice glaze.
- Allow the ribs to rest for a few minutes before cutting them into individual portions. Serve with your favorite sides and enjoy your spooky Skeleton Ribs!
- 6 medium-sized beets
- 1/2 cup walnuts
- 4 oz goat cheese
- 1 small red onion
- 4 cups mixed salad greens (such as arugula, spinach, and romaine)
- 2 oranges
- 1/4 cup balsamic vinegar
- 1/4 cup olive oil
- 1 tablespoon honey
- Salt and pepper to taste
Extra Tips:
For an even more dramatic presentation, consider arranging the ribs on a platter in the shape of a ribcage.
To add an extra layer of flavor, try experimenting with different types of wood chips if you opt to grill the ribs at the end. Hickory or applewood chips are excellent choices that complement the sweetness of the marinade.
Finally, if you’re short on time, a slow cooker can be a great alternative for cooking the ribs, just make sure you finish them with a quick grill for that perfect char.
Bloody Beet Salad

Looking to add a spooky yet delicious twist to your Halloween dinner menu? Try this Bloody Beet Salad, a perfect combination of vibrant colors and earthy flavors that will surely delight your guests.
The deep, blood-red hue of the beets coupled with the tangy and slightly sweet dressing makes this salad a standout dish. It’s not only visually striking but also packed with nutrients, offering a healthy option amidst the Halloween sweets.
This salad is versatile and can be served as a starter or a side dish. The contrast of the beets with creamy goat cheese, crunchy walnuts, and fresh greens creates a symphony of textures. The addition of red onions and oranges adds another layer of flavor complexity, making it a revitalizing and balanced dish.
Serve this Bloody Beet Salad to surprise and impress your guests with its beauty and taste.
Ingredients for 4-6 servings:
Cooking Instructions:
- Prepare the Beets: Preheat your oven to 400°F (200°C). Scrub the beets clean under running water and pat dry. Wrap each beet individually in aluminum foil and place them on a baking sheet. Roast for about 45-60 minutes, or until they’re tender when pierced with a fork. Let the beets cool, then peel and slice them into thin rounds.
- Toast the Walnuts: While the beets are roasting, spread the walnuts on a baking sheet and toast in the oven for about 5-7 minutes, or until they’re lightly browned and fragrant. Keep an eye on them to avoid burning. Remove from the oven and let cool.
- Prepare the Dressing: In a small bowl, whisk together the balsamic vinegar, olive oil, honey, salt, and pepper until well combined.
- Assemble the Salad: In a large salad bowl, combine the mixed greens with sliced red onions. Peel and segment the oranges, removing any seeds, and add them to the bowl. Crumble the goat cheese over the top.
- Add Beets and Walnuts: Arrange the beet slices over the salad and sprinkle the toasted walnuts on top.
- Dress the Salad: Drizzle the balsamic dressing over the salad just before serving. Toss gently to guarantee even coating of the dressing on all ingredients.
Extra Tips:
To save time, you can roast the beets a day ahead and store them in the refrigerator. This will also allow the flavors to develop further.
When slicing the beets, wear gloves to prevent staining your hands. If goat cheese isn’t to your liking, you can substitute it with feta cheese or omit it for a dairy-free version.
Remember to taste the dressing before adding it to the salad, adjusting the seasoning as needed to suit your preferences.