
Hey there, lovely friends! 🎃 Are you ready to make your Halloween bash the talk of the town? I’ve conjured up 14 spook-tacular food ideas that will leave your guests spellbound. Think Monster Eyeball Tacos and Witch’s Fingers Breadsticks, each bursting with playful flavors and eerie charm. Let’s turn your party into a hauntingly delightful celebration everyone will remember!
Monster Eyeball Tacos
Looking to add a spooky twist to your Halloween party? Monster Eyeball Tacos are a fun and delicious way to do just that!
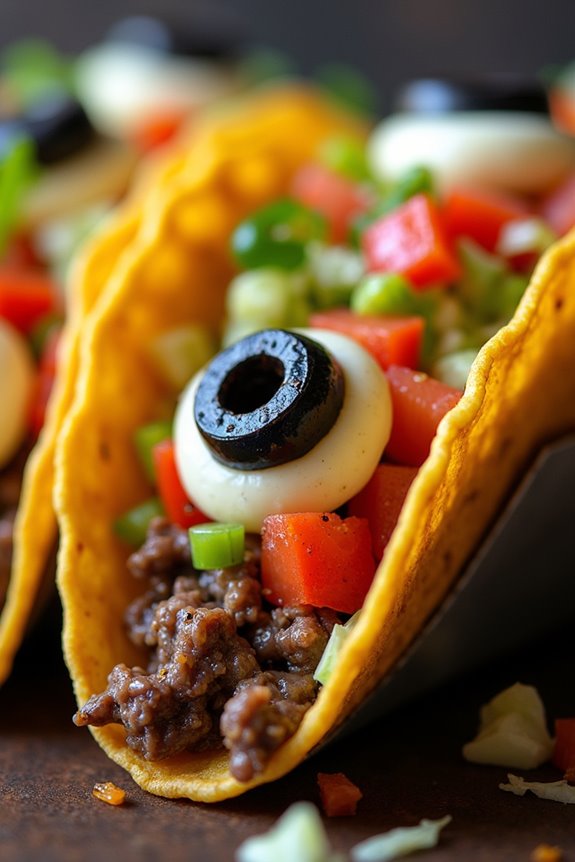
These tacos not only taste great, but also add a festive and creepy touch to your Halloween spread. Perfect for both kids and adults, these tacos are filled with flavorful ingredients and topped with a terrifyingly tasty garnish that resembles a creepy eyeball.
The secret to making these tacos so spooky lies in the assembly. The tacos are filled with seasoned beef, fresh vegetables, and cheese. To create the “eyeball” effect, you’ll use olives and cheese slices, giving the appearance of eerie eyes staring back at you from the plate. This recipe makes enough for 4-6 people, making it an ideal choice for a small gathering or a Halloween family dinner.
Ingredients for Monster Eyeball Tacos:
- 1 pound ground beef
- 1 packet taco seasoning
- 1/4 cup water
- 8 taco shells
- 1 cup shredded lettuce
- 1 cup diced tomatoes
- 1 cup shredded cheddar cheese
- 12 slices of Monterey Jack cheese (sliced into small rounds)
- 12 pitted black olives
- Salsa (optional)
Cooking Instructions:
- Cook the Beef: In a large skillet over medium heat, add the ground beef. Cook until browned, breaking it apart with a wooden spoon as it cooks. Drain excess fat if necessary.
- Season the Meat: Add the taco seasoning and 1/4 cup of water to the browned beef. Stir well to combine and let it simmer for about 5 minutes, allowing the flavors to meld.
- Prepare the Toppings: While the beef is simmering, wash and dice the tomatoes, shred the lettuce, and set them aside. Also, prepare the Monterey Jack cheese slices by cutting them into small rounds, about the size of the olives.
- Assemble the Tacos: Begin by filling the taco shells with a layer of seasoned beef. Top with shredded lettuce, diced tomatoes, and a sprinkle of cheddar cheese.
- Create the Eyeballs: To make the “eyeballs”, place a slice of Monterey Jack cheese over the taco filling, then top it with a black olive. Press gently to secure them in place.
- Serve and Enjoy: Arrange the Monster Eyeball Tacos on a serving platter. Serve them with salsa on the side, if desired.
Extra Tips:
To guarantee the cheese “eyeballs” stay in place, you can heat them slightly in the microwave or oven to melt them just a bit. This will help the olives stick better to the cheese.
You can also play around with the toppings to suit your taste. For added spookiness, consider using different colored tortillas or adding green bell peppers for a “monster” effect. Happy Halloween feasting!
Witch’s Fingers Breadsticks

Creating Witch’s Fingers Breadsticks is easier than it might seem, and it’s a fun activity to involve the whole family in. You can use pre-made pizza dough to save time, or make your own if you’re feeling adventurous. The key is to shape the dough into thin, finger-like sticks, and then add the finishing touches that transform them into creepy witch’s digits. With a few simple ingredients and some creative touches, you can whip up a batch of these spooky breadsticks in no time.
Ingredients (Serves 4-6)
- 1 pound pizza dough
- 24 whole blanched almonds
- 1 tablespoon olive oil
- 1 teaspoon salt
- Red food coloring
- 1/4 cup marinara sauce (optional for dipping)
Cooking Instructions
1. Preheat the Oven: Begin by preheating your oven to 375°F (190°C) and line a baking sheet with parchment paper to prevent sticking.
2. Prepare the Dough: Roll out the pizza dough on a lightly floured surface until it’s about 1/4 inch thick. Use a sharp knife or pizza cutter to slice the dough into 24 strips, each about 4-5 inches long.
3. Shape the Fingers: Gently roll each strip between your hands to shape them into long, thin fingers. Pinch one end of each strip to create a knobby, knuckle-like shape.
Use a knife to make small, shallow cuts around the knuckle area to enhance the appearance of knuckles.
4. Add the Fingernails: Press a blanched almond firmly into the tip of each dough finger to form the nail. Make sure it’s securely attached but not too deep to avoid detaching during baking.
5. Add Color: Using a small brush or a toothpick, dab a small amount of red food coloring around the almond to mimic blood, giving your witch’s fingers a realistic and creepy look.
6. Season and Bake: Place the formed fingers onto the prepared baking sheet. Brush them lightly with olive oil and sprinkle with salt for flavor.
Bake in the preheated oven for 15-20 minutes or until golden brown and firm to touch.
7. Serve: Once baked, allow the breadsticks to cool slightly. Serve warm with a side of marinara sauce for dipping, if desired.
Extra Tips
When shaping the fingers, make sure they’re relatively thin, as the dough will puff up slightly during baking.
To make them even creepier, you can add more depth to the knuckle lines by using a fork to press down gently before baking. If you’re making these with kids, let them have fun with the shapes and decorations for a personalized touch.
Finally, if you don’t have blanched almonds, you can use pumpkin seeds as an alternative for the nails, which works well for those with nut allergies.
Ghostly Mashed Potato Bites
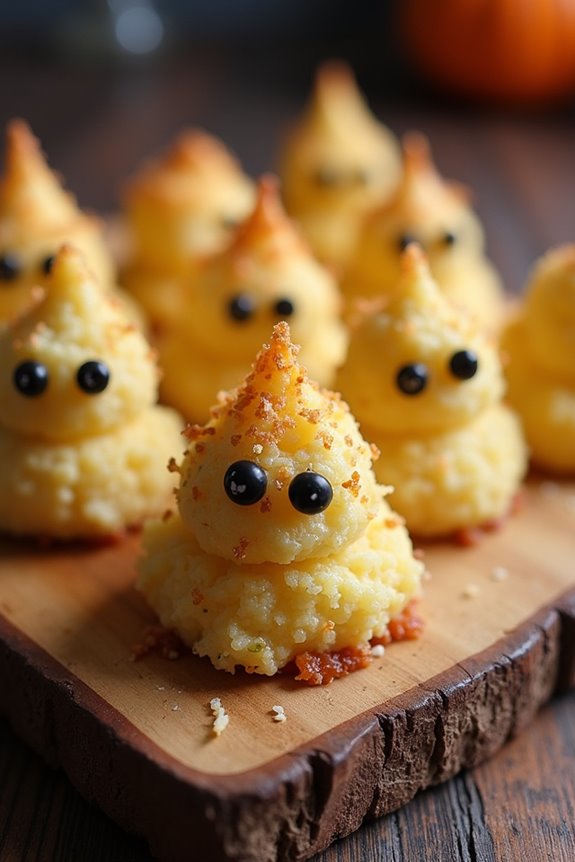
Halloween is a time for creativity and fun, not just in costumes and decorations but also in the food you serve at your parties. Ghostly Mashed Potato Bites are the perfect spooky addition to your Halloween menu. These delightful bites aren’t only a visual treat with their ghostly appearance but also a delicious snack that’s sure to be a hit among guests of all ages.
Made with creamy, buttery mashed potatoes and a few simple ingredients, these bites are easy to prepare and will add an eerie charm to your Halloween spread. The beauty of Ghostly Mashed Potato Bites lies in their simplicity and adaptability. You can prepare them ahead of time and store them until the party, ensuring you have more time to enjoy the festivities.
Whether you’re serving them as an appetizer or a side dish, these ghostly bites are a perfect way to incorporate the Halloween spirit into your food. Plus, they’re vegetarian-friendly, making them suitable for a wide range of dietary preferences. The following recipe yields enough for 4-6 people, making it an excellent choice for a small gathering.
Ingredients:
- 4 large potatoes, peeled and cubed
- 3 tablespoons unsalted butter
- 1/4 cup heavy cream
- Salt to taste
- Black pepper to taste
- 1/2 cup shredded cheddar cheese
- 1/4 cup sour cream
- 1/4 cup finely chopped chives
- 1/4 cup all-purpose flour
- 2 large eggs, beaten
- Panko breadcrumbs (about 1 cup)
- Black olives or peppercorns for eyes
- Cooking spray or oil for greasing
Cooking Instructions:
- Prepare the Potatoes:
- Begin by boiling the peeled and cubed potatoes in a large pot of salted water. Cook until they’re tender, which should take about 15-20 minutes. Drain the potatoes thoroughly and return them to the pot.
- Add butter, heavy cream, salt, and black pepper to the potatoes. Mash until smooth and creamy. Stir in the shredded cheddar cheese, sour cream, and chives until well combined. Allow the mixture to cool slightly.
- Once the mashed potatoes have cooled enough to handle, take a small amount and shape it into a ghost-like form, with a rounded top and a slightly tapered bottom. Repeat this process until all the mashed potatoes are used.
- Set up a breading station with three shallow bowls: one with all-purpose flour, one with beaten eggs, and one with panko breadcrumbs. Gently roll each potato ghost in flour, then dip in the egg, and finally coat with breadcrumbs.
- Preheat the oven to 400°F (200°C). Place the coated potato ghosts on a greased baking sheet. Spray them lightly with cooking spray or brush them with oil. Bake for 15-20 minutes or until golden brown and crisp.
- Remove the ghosts from the oven and allow them to cool slightly. Use small pieces of black olives or peppercorns to create eyes on each ghost.
- 10 large jalapeños
- 8 oz cream cheese, softened
- 1 cup shredded cheddar cheese
- 1 teaspoon garlic powder
- 1 teaspoon onion powder
- 1/2 teaspoon smoked paprika
- 1 package refrigerated crescent roll dough
- 20 candy eyeballs
- Salt and pepper to taste
Extra Tips:
For an added twist, you can incorporate different herbs or spices into the mashed potatoes for added flavor. Consider using garlic powder or a dash of paprika for a bit of heat.
If you prefer a smoother texture, you can use a potato ricer instead of a masher. To keep the ghosts from losing their shape during baking, make sure the mashed potatoes are cool before forming them, and chill them in the refrigerator for 30 minutes before coating and baking.
This recipe is quite forgiving, so feel free to experiment with different cheeses or mix-ins to suit your taste.
Mummy Jalapeño Poppers
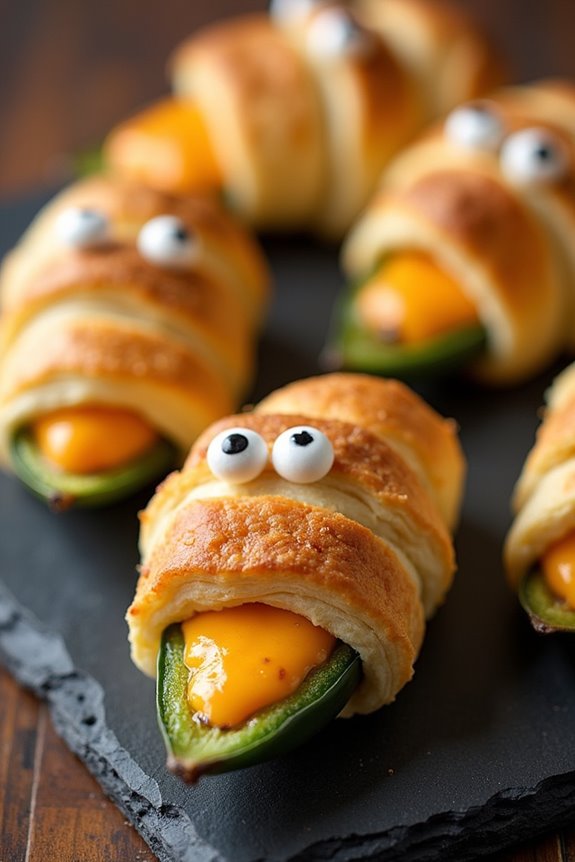
Mummy Jalapeño Poppers are the perfect spooky treat for your Halloween party. These delightful bites are a ghoulish twist on the classic jalapeño popper, with a fun and festive presentation that will impress your guests. Not only do they look like cute, wrapped mummies, but they also deliver a deliciously spicy and cheesy flavor that’s bound to be a hit.
The combination of cream cheese, cheddar, and jalapeños creates a rich, creamy filling with just the right amount of kick, all wrapped up in a golden, crispy crescent roll.
Preparing Mummy Jalapeño Poppers is both simple and fun, making them an ideal choice for party hosts who want to serve up something unique without spending hours in the kitchen. These poppers aren’t only visually appealing but also incredibly tasty. Perfect for a serving size of 4 to 6 people, this recipe will yield enough poppers to guarantee everyone gets to enjoy this Halloween-themed appetizer.
So, gather your ingredients, and let’s get cooking!
Ingredients:
Instructions:
- Preheat the Oven: Start by preheating your oven to 375°F (190°C). This guarantees the poppers will cook evenly and achieve a golden brown color.
- Prepare the Jalapeños: Slice each jalapeño in half lengthwise and remove the seeds and membranes. This will reduce the heat slightly and create a cavity for the filling.
- Make the Filling: In a medium bowl, mix together the softened cream cheese, shredded cheddar cheese, garlic powder, onion powder, smoked paprika, salt, and pepper. Stir until all ingredients are well combined.
- Stuff the Jalapeños: Using a spoon or piping bag, fill each jalapeño half with the cheese mixture. Be generous but guarantee the filling is level with the edges.
- Wrap the Mummies: Unroll the crescent roll dough and cut it into thin strips, about 1/4 inch wide. Wrap each stuffed jalapeño with the dough strips, leaving a small gap for the eyes at one end.
- Bake the Poppers: Place the wrapped jalapeños on a baking sheet lined with parchment paper. Bake in the preheated oven for 12-15 minutes or until the crescent dough is golden brown.
- Add the Candy Eyes: Once baked and slightly cooled, place two candy eyeballs onto each popper in the gap left by the dough. The heat from the poppers will help the eyes stick.
Extra Tips:
When working with jalapeños, consider wearing gloves to protect your hands from the spicy oils, which can cause irritation.
If you prefer a milder popper, you can soak the jalapeño halves in cold water for about 30 minutes before stuffing them to reduce the heat. Additionally, you can make these poppers ahead of time and store them in the refrigerator; simply reheat them in the oven before serving to keep the crescent dough crispy.
Enjoy your spooky Mummy Jalapeño Poppers!
Spider Web Dip
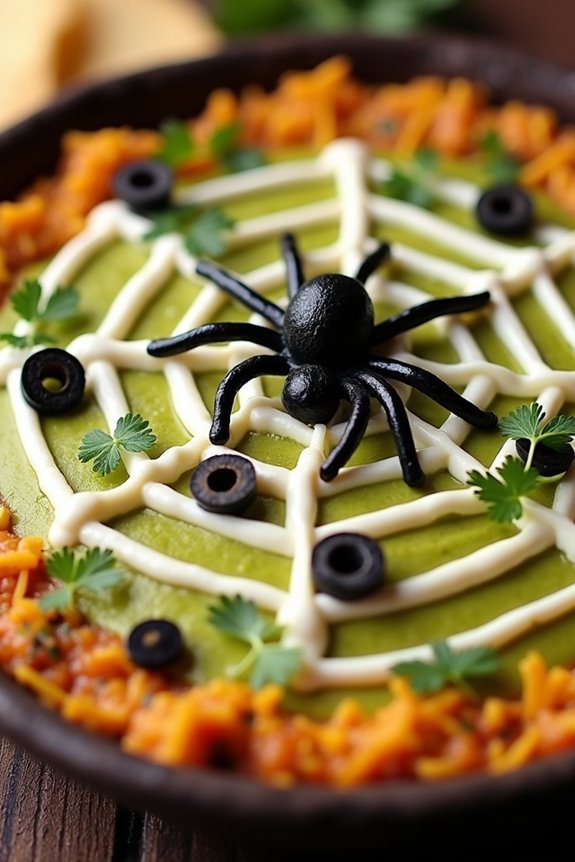
The Spider Web Dip is a spooky yet delicious appetizer perfect for your Halloween party. This eye-catching dish combines a creamy base with a touch of spice, topped with a web of sour cream that adds both flavor and flair. Not only is it simple to make, but it also provides a fun, thematic element to your holiday table. Serve it with a selection of chips or fresh vegetables for a dish that will delight guests of all ages.
Designed to serve 4-6 people, this dip can be easily adjusted for larger gatherings. The key is in the presentation; the spider web design is created using sour cream, which contrasts beautifully against the colorful background of the dip. This dish can be prepared in advance, allowing you to focus on other party preparations. With its vibrant appearance and rich taste, the Spider Web Dip is sure to be a hit at your next Halloween celebration.
Ingredients:
- 1 can (15 oz) black beans, drained and rinsed
- 1 cup salsa
- 1 cup sour cream (divided)
- 1 cup shredded cheddar cheese
- 1/2 cup guacamole
- 1/4 cup sliced black olives
- 1/4 cup chopped fresh cilantro
- Tortilla chips or fresh vegetables for serving
Instructions:
- Prepare the Base: In a medium-sized mixing bowl, mash the black beans until smooth. Stir in the salsa until well combined, creating a flavorful, chunky base for your dip.
- Layer the Dip: Spread the bean and salsa mixture evenly across the bottom of a shallow serving dish. On top, add a layer of guacamole, spreading it smoothly to cover the bean mixture.
- Add Cheese and Toppings: Sprinkle the shredded cheddar cheese evenly over the guacamole layer. Scatter the sliced black olives and chopped cilantro on top, distributing them evenly for a balanced flavor.
- Create the Spider Web: Spoon a quarter cup of sour cream into a small resealable plastic bag. Cut off a tiny corner of the bag to create a makeshift piping bag. Starting from the center of the dip, pipe a spiral of sour cream, gradually working your way outward to the edge of the dish.
- Draw the Web: Using a toothpick or the tip of a knife, gently drag lines from the center of the spiral to the edge, creating a web effect. Be careful not to disturb the layers underneath.
- Chill and Serve: Refrigerate the dip for at least 30 minutes before serving, allowing the flavors to meld together. Pair with tortilla chips or fresh veggies, and enjoy!
Extra Tips:
For the best results, use a shallow, wide dish to allow ample space for the spider web design. If you want to add a bit more spice, consider using a hotter salsa or adding chopped jalapeños into the bean mixture.
You can also customize the dip by adding layers of refried beans or diced tomatoes. To guarantee a smooth web, make sure the sour cream is at room temperature before piping. This fun appetizer can be prepared several hours in advance, making it a stress-free addition to your Halloween festivities.
Candy Corn Pizza

Halloween is the perfect time to get creative with your food, and what better way to do that than with a Candy Corn Pizza? This quirky and festive dish takes the classic pizza and gives it a sweet and spooky twist, making it an ideal choice for Halloween parties.
The pizza is topped with cheese in a pattern that mimics the iconic look of candy corn, delighting both the eyes and the taste buds of your guests. Whether you’re hosting a party for kids or adults, this Candy Corn Pizza is bound to be a hit with its playful appearance and delicious flavor.
This recipe serves 4-6 people and is a fun addition to your Halloween festivities. By using a mix of mozzarella, cheddar, and parmesan cheeses, you’ll achieve the perfect candy corn look. The base layer of mozzarella provides a creamy foundation, while the cheddar and parmesan mimic the yellow and white ends of the candy corn.
With a simple dough and sauce base, this pizza is easy to prepare and will add a festive touch to your holiday spread.
Ingredients:
- 1 pre-made pizza dough (or homemade if preferred)
- 1 cup pizza sauce
- 1 ½ cups shredded mozzarella cheese
- 1 cup shredded cheddar cheese
- ½ cup shredded parmesan cheese
- Olive oil for brushing
- Cornmeal for dusting
- Salt and pepper to taste
Instructions:
- Prepare the Dough: Preheat your oven to 450°F (232°C). Roll out the pizza dough on a floured surface to your desired thickness. Transfer the dough to a pizza stone or baking sheet that has been lightly dusted with cornmeal to prevent sticking.
- Add the Sauce: Spread a thin, even layer of pizza sauce over the dough, leaving about an inch of crust around the edges. This will guarantee every bite has a good balance of sauce and cheese.
- Layer the Cheese: Begin by sprinkling the mozzarella cheese over the entire pizza, covering the sauce completely. Next, create a ring of cheddar cheese around the outer edge of the pizza, leaving a small border of mozzarella visible. Finally, sprinkle the parmesan cheese in the center of the pizza to complete the candy corn effect.
- Season and Bake: Lightly brush the exposed crust with olive oil and sprinkle with a pinch of salt and pepper. Place the pizza in the preheated oven and bake for 10-12 minutes or until the crust is golden brown and the cheese is melted and bubbly.
- Slice and Serve: Remove the pizza from the oven and let it cool for a couple of minutes. Slice it into wedges and serve immediately. Enjoy the festive, cheesy goodness of your Candy Corn Pizza!
Extra Tips: To enhance the candy corn effect, make sure to use vibrant orange cheddar and a bright white parmesan. Depending on your preference, you can add toppings like pepperoni or olives, but be mindful that too many toppings can obscure the candy corn design.
If you’re making homemade dough, allow it to rise properly for a fluffier crust. Adjust the cheese quantities based on your preference for cheesiness and remember to watch the pizza closely as it bakes to prevent burning.
Frankenstein Guacamole
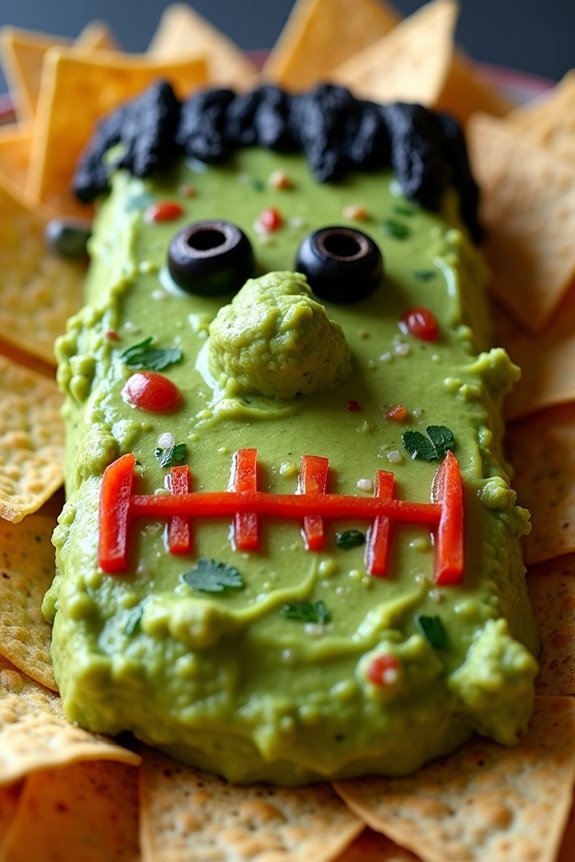
When it comes to Halloween parties, the food should be as exciting and spooky as the costumes! One creative and delicious option to contemplate is Frankenstein Guacamole. This dish not only adds a pop of color with its vibrant green hue but also brings a playful touch with its fun presentation. Shaped like the iconic monster, Frankenstein Guacamole is sure to be a hit among both kids and adults, providing a healthy snack option that’s both festive and flavorful.
Frankenstein Guacamole isn’t only simple to prepare but also customizable to suit your taste preferences. It involves crafting a classic guacamole with a twist: giving it the appearance of Frankenstein’s monster. This is achieved by adding decorations such as olives or bell peppers to mimic the monster’s features.
Whether you’re hosting a large gathering or a small get-together, this dish is perfect for serving 4-6 people, making it an ideal addition to your Halloween spread.
Ingredients for 4-6 servings:
- 4 ripe avocados
- 1 lime, juiced
- 1 teaspoon salt
- 1 small onion, finely chopped
- 2 Roma tomatoes, diced
- 1 tablespoon chopped fresh cilantro
- 1 clove garlic, minced
- Black olives (for decoration)
- Red or green bell pepper (for decoration)
- Tortilla chips (for serving)
Instructions:
- Prepare the Avocados: Cut the avocados in half, remove the pits, and scoop the flesh into a medium bowl. Use a fork to mash the avocados to your desired consistency.
- Add Lime Juice and Salt: Pour the freshly squeezed lime juice over the mashed avocados and sprinkle in the salt. Mix well to combine, ensuring the lime juice is evenly distributed to prevent browning.
- Mix in Vegetables: Add the finely chopped onion, diced tomatoes, chopped cilantro, and minced garlic to the avocado mixture. Stir everything together until well combined.
- Shape the Guacamole: Spoon the guacamole onto a serving platter and shape it into a rectangular or oval shape to mimic a face. Flatten the surface slightly with the back of a spoon.
- Create the Frankenstein Face: Use slices of black olives to form the eyes and mouth. Cut strips of bell pepper to create the “hair” and “stitches” on the face. Arrange them on the guacamole to complete the Frankenstein appearance.
- Serve: Arrange tortilla chips around the platter for easy dipping and serve immediately to enjoy the fresh flavors.
Extra Tips:
When preparing Frankenstein Guacamole, make sure the avocados are ripe to achieve a creamy texture. If you want to add a bit of heat, think about including a diced jalapeño pepper in the mix.
To prevent the guacamole from browning too quickly when exposed to air, cover it with plastic wrap, pressing the wrap directly onto the surface, until you’re ready to serve. Finally, encourage creativity by allowing guests to decorate their own Frankenstein face using the provided toppings!
Pumpkin Patch Dirt Cups
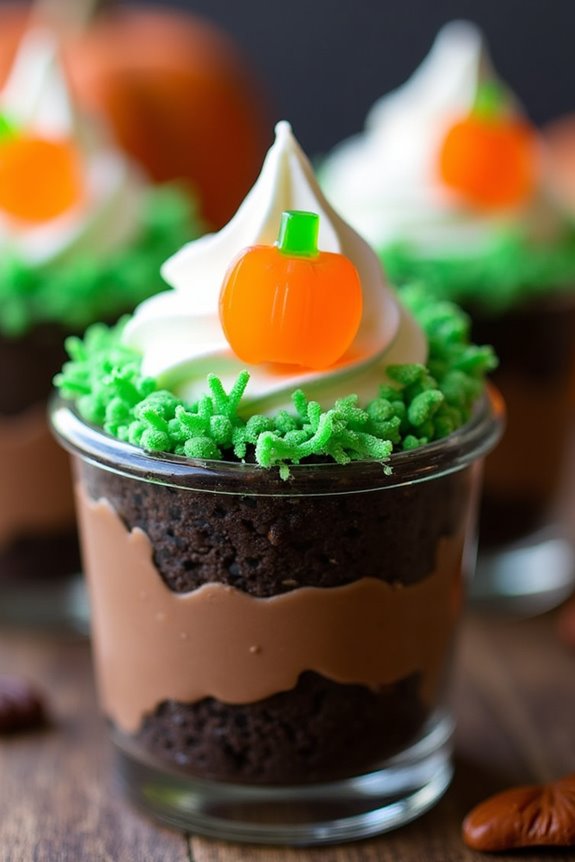
Pumpkin Patch Dirt Cups are a whimsical and delicious treat perfect for Halloween parties. These delightful cups combine the rich flavors of chocolate pudding, crushed cookies, and gummy candies to create a dessert that not only tastes amazing but also resembles a mini pumpkin patch.
They’re easy to make and are certain to be a hit with both kids and adults alike. With a few simple ingredients and a bit of creativity, you can bring a festive and fun dessert to your Halloween gathering.
The beauty of Pumpkin Patch Dirt Cups lies in their simplicity and versatility. You can quickly assemble these cups in advance, making them an ideal choice for a party where you want to focus more on entertaining your guests than spending time in the kitchen.
The layers of chocolate pudding and cookie crumbs mimic dirt, while the gummy pumpkins and candy corn add a vibrant touch, making them visually appealing and fun to eat. This recipe serves 4-6 people, depending on portion sizes, and can easily be doubled for a larger crowd.
Ingredients (serving size: 4-6 people):
- 2 cups chocolate pudding (store-bought or homemade)
- 10-12 chocolate sandwich cookies
- 1 package gummy pumpkins or candy corn
- 1 cup whipped cream or whipped topping
- 1/4 cup green sprinkles or shredded coconut dyed green
- Clear plastic cups or small mason jars for serving
Cooking Instructions:
- Prepare the Pudding: If you’re making homemade chocolate pudding, follow your recipe and allow it to cool. If you’re using store-bought pudding, verify it’s chilled in the refrigerator before assembly.
- Crush the Cookies: Place the chocolate sandwich cookies in a resealable plastic bag. Use a rolling pin or the back of a spoon to crush the cookies into fine crumbs, resembling dirt. Set aside.
- Layer the Cups: Begin by spooning a layer of chocolate pudding into the bottom of each clear cup or jar. Aim for about an inch of pudding.
- Add Cookie Crumbs: Sprinkle a generous layer of the crushed cookies over the pudding. This will represent the “dirt” in your pumpkin patch.
- Repeat Layers: Add another layer of chocolate pudding followed by more cookie crumbs. Continue layering until the cups are about 3/4 full, ending with a top layer of cookie crumbs.
- Decorate the Top: Place a dollop of whipped cream or whipped topping onto the top of each cup. Sprinkle the green sprinkles or dyed coconut around the whipped cream to mimic grass.
- Add Gummy Pumpkins: Place the gummy pumpkins or candy corn on top of the whipped cream, arranging them to look like a pumpkin patch.
- Chill and Serve: Refrigerate the assembled cups for at least 30 minutes before serving to allow the layers to set. Serve chilled and enjoy!
Extra Tips: For a more authentic grass effect, consider using shredded coconut dyed with green food coloring instead of green sprinkles. You can also get creative with the decorations by adding candy worms or other Halloween-themed candies to enhance the spooky theme.
If you prefer a healthier alternative, swap out the chocolate pudding for a homemade avocado chocolate mousse. Remember to adjust the quantities if you’re serving a larger crowd or if you want more generous portions. Enjoy your festive and fun Pumpkin Patch Dirt Cups!
Bloody Brain Gelatin Mold

The Bloody Brain Gelatin Mold is a spooky and delicious addition to any Halloween party. This creepy yet delectable treat is designed to mimic the appearance of a brain, complete with a blood-red hue that will intrigue your guests. As eerie as it looks, the gelatin mold is simple to prepare and promises to add a thrilling touch to your festive table.
It’s a perfect centerpiece, offering a fun and interactive way for party-goers to plunge into the Halloween spirit. Ideal for a gathering of 4-6 people, this Bloody Brain Gelatin Mold combines flavored gelatin with condensed milk to create a wobbly, brain-like texture. The addition of raspberry or strawberry syrup not only adds a gory effect but also brings a burst of flavor.
This recipe is sure to be a crowd-pleaser, enchanting both kids and adults with its unique presentation and delightful taste. Gather your ingredients and follow the instructions below to conjure up this frightfully fun treat.
Ingredients for 4-6 people:
- 2 packs (3 oz each) of strawberry or raspberry flavored gelatin
- 1 can (14 oz) of sweetened condensed milk
- 2 cups of boiling water
- 2 cups of cold water
- 1/2 cup of raspberry or strawberry syrup
- Cooking spray
- Brain-shaped gelatin mold
Instructions:
1. Prepare the Gelatin Mixture:
Begin by dissolving the flavored gelatin in 2 cups of boiling water. Stir well until completely dissolved. Once dissolved, add the 2 cups of cold water and mix thoroughly. Set aside to cool slightly.
2. Incorporate the Milk:
Add the sweetened condensed milk to the gelatin mixture and stir until fully combined. The milk will give the gelatin a cloudy appearance, perfect for mimicking the look of a brain.
3. Prepare the Mold:
Lightly coat the inside of the brain-shaped gelatin mold with cooking spray. This will guarantee that the gelatin releases easily once set.
4. Pour and Chill:
Carefully pour the gelatin mixture into the prepared mold. Cover the mold with plastic wrap and refrigerate for at least 4 hours, or until the gelatin is firm.
5. Unmold the Gelatin:
Once set, gently run a knife around the edges of the mold to loosen the gelatin. Place a serving plate over the mold and invert it, shaking gently until the gelatin releases onto the plate.
6. Add the Bloody Effect:
Drizzle raspberry or strawberry syrup over the top of the molded gelatin to create a “bloody” effect. Allow the syrup to drip down the sides for added drama.
Extra Tips:
When making the Bloody Brain Gelatin Mold, confirm that the gelatin is completely cooled to room temperature before adding the sweetened condensed milk to prevent curdling.
If you’re having trouble releasing the gelatin from the mold, dip the mold briefly in warm water (careful not to submerge it) to help loosen it. For an even more realistic appearance, consider adding a few drops of red food coloring to the syrup for a deeper, more vivid “blood” effect. Serve chilled and enjoy the eerie delight!
Vampire Bat Wings

Vampire Bat Wings are the perfect spooky appetizer for your Halloween party, combining the eerie allure of the supernatural with a deliciously savory taste that will leave your guests craving more.
These wings are marinated in a rich, dark sauce that gives them a hauntingly dark appearance, reminiscent of a vampire bat’s wings, making them both a visual and culinary treat. The taste is a delightful mix of sweet, spicy, and savory flavors that will surely be a hit among your party guests.
The dish isn’t only visually striking but also easy to prepare, making it an ideal choice for busy hosts looking to add a thematic touch to their Halloween spread. Whether you’re throwing a large Halloween bash or a small gathering with close friends, Vampire Bat Wings are sure to impress. This recipe serves 4-6 people, guaranteeing that everyone gets to sink their teeth into these deliciously dark wings.
Ingredients:
- 3 pounds chicken wings
- 1/2 cup soy sauce
- 1/4 cup balsamic vinegar
- 1/4 cup honey
- 2 tablespoons olive oil
- 1 tablespoon minced garlic
- 1 tablespoon grated fresh ginger
- 1 teaspoon smoked paprika
- 1 teaspoon ground black pepper
- 1/2 teaspoon cayenne pepper
- Fresh parsley for garnish (optional)
Cooking Instructions:
- Prepare the Marinade: In a large mixing bowl, combine the soy sauce, balsamic vinegar, honey, olive oil, minced garlic, grated ginger, smoked paprika, ground black pepper, and cayenne pepper. Whisk the ingredients together until they’re well-blended and the honey is fully dissolved.
- Marinate the Wings: Add the chicken wings to the bowl, making sure that each wing is thoroughly coated with the marinade. Cover the bowl with plastic wrap or a lid and let it marinate in the refrigerator for at least 2 hours, or overnight for best results. This allows the wings to absorb the flavors thoroughly.
- Preheat the Oven: About 30 minutes before cooking, preheat your oven to 400°F (200°C). Line a large baking sheet with aluminum foil or parchment paper to make cleanup easier.
- Arrange the Wings: Remove the wings from the marinade, letting any excess marinade drip off. Arrange them in a single layer on the prepared baking sheet, making sure they aren’t touching each other to promote even cooking.
- Bake the Wings: Place the baking sheet in the preheated oven and bake for 35-40 minutes, flipping the wings halfway through the cooking time. This helps guarantee that the wings cook evenly and develop a nice, crispy exterior.
- Serve: Once the wings are cooked through and have a dark, caramelized coating, remove them from the oven. Allow them to cool for a few minutes before serving. Garnish with fresh parsley if desired for a pop of color.
Extra Tips:
For an extra layer of flavor, you can reserve some of the marinade before adding the raw chicken and use it to baste the wings halfway through the cooking process. This will enhance the taste and give the wings an even deeper color.
If you prefer slightly crispier wings, you can broil them for an additional 3-5 minutes after baking, keeping a close eye to prevent burning. Remember to adjust the amount of cayenne pepper to your heat preference – you can reduce it for a milder taste or add more if you like your wings spicier.
Spooky Stuffed Peppers
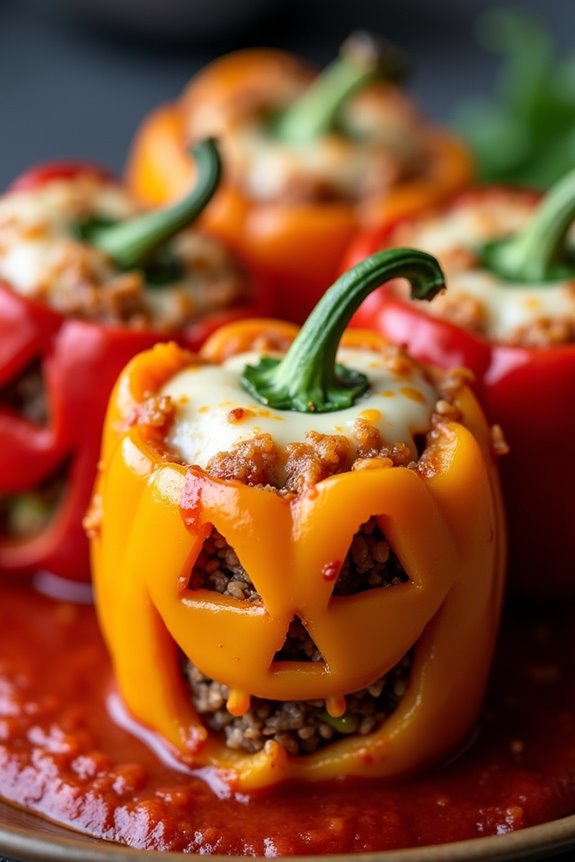
Get ready to add a dash of fright and flavor to your Halloween party with these Spooky Stuffed Peppers! A delightful blend of seasoned meat, rice, and vegetables, these peppers are carved with jack-o’-lantern faces to bring some spooky charm to your table. Perfect for both kids and adults, this dish isn’t only fun to make but also deliciously satisfying, making it an excellent centerpiece for your haunted gathering.
The best part about these Spooky Stuffed Peppers is their versatility. You can customize the stuffing to your liking, incorporating different meats, grains, or even making them vegetarian. This recipe is designed to serve 4-6 people, ensuring there’s plenty to go around for your ghostly guests. These peppers are sure to impress with their eerie appearance and savory taste.
Ingredients:
- 6 medium-sized bell peppers (orange or red)
- 1 pound ground beef or turkey
- 1 cup cooked rice
- 1 cup diced tomatoes (canned or fresh)
- 1 small onion, chopped
- 2 cloves garlic, minced
- 1 teaspoon Italian seasoning
- 1/2 teaspoon paprika
- Salt and pepper to taste
- 1 cup shredded mozzarella cheese
- 2 tablespoons olive oil
- 1 cup marinara sauce
Cooking Instructions:
- Prepare the Peppers: Wash the bell peppers thoroughly. Using a sharp knife, cut around the tops of the peppers to remove the stems, then scoop out the seeds and membranes. Carefully carve jack-o’-lantern faces into the side of each pepper for a spooky effect.
- Cook the Filling: In a large skillet, heat the olive oil over medium heat. Add the chopped onion and minced garlic, sautéing until the onion becomes translucent. Add the ground beef or turkey, cooking until browned. Drain any excess fat.
- Season the Mixture: Stir in the diced tomatoes, cooked rice, Italian seasoning, paprika, salt, and pepper. Mix well and let the flavors meld together by simmering for about 5 minutes.
- Stuff the Peppers: Preheat your oven to 375°F (190°C). Lightly grease a baking dish with olive oil. Fill each pepper with the meat and rice mixture, pressing down lightly to pack the filling. Top each pepper with shredded mozzarella cheese.
- Bake the Peppers: Pour the marinara sauce into the bottom of the baking dish around the peppers. Cover the dish with aluminum foil and bake in the preheated oven for 25 minutes. Remove the foil and bake for an additional 10 minutes, or until the cheese is melted and bubbly.
- Serve and Enjoy: Allow the peppers to cool slightly before serving. Arrange them on a platter for a festive presentation, and watch them disappear like magic at your party!
Extra Tips:
If you prefer a vegetarian version, substitute the meat with black beans or lentils. Feel free to add extra vegetables such as mushrooms, zucchini, or corn to the filling for added nutrition and flavor.
To make the carving process easier, use a small paring knife and make sure the peppers are firm and fresh. For a spicier kick, add a pinch of cayenne pepper or chopped jalapeños to the filling. Enjoy creating and serving these delightful Spooky Stuffed Peppers at your Halloween feast!
Zombie Meatball Skewers

Zombie Meatball Skewers are a spooky and delicious addition to any Halloween party spread. These eerie-looking appetizers are sure to be a hit with guests of all ages, offering a fun twist on traditional meatballs. The combination of savory meatballs, vibrant green pesto, and crunchy vegetables creates a delightful mix of flavors and textures that are perfect for a festive gathering.
Whether you’re hosting a costume party or simply enjoying a night in with friends, these skewers will add a spine-chilling touch to your celebration.
The key to making these Zombie Meatball Skewers truly haunting is in the presentation. By threading the meatballs onto skewers with colorful bell peppers and cherry tomatoes, and then drizzling them with a gruesome green pesto, you can create a dish that looks as frightful as it’s tasty. The pesto not only adds a ghoulish green color but also infuses the dish with a burst of fresh, herby flavor. This recipe will serve 4-6 people, making it a great option for small to medium-sized gatherings.
Ingredients:
- 1 pound ground beef or turkey
- 1/2 cup breadcrumbs
- 1/4 cup grated Parmesan cheese
- 1 egg
- 2 cloves garlic, minced
- Salt and pepper to taste
- 1 tablespoon Italian seasoning
- 1/2 cup basil pesto
- 1 green bell pepper, cut into chunks
- 1 red bell pepper, cut into chunks
- 1 cup cherry tomatoes
- Skewers (wooden or metal)
Instructions:
- Preheat the Oven: Preheat your oven to 400°F (200°C). This will guarantee that the meatballs cook evenly and develop a nice outer crust.
- Mix the Meatball Ingredients: In a large bowl, combine the ground beef or turkey, breadcrumbs, Parmesan cheese, egg, minced garlic, salt, pepper, and Italian seasoning. Mix until all the ingredients are well incorporated.
- Shape the Meatballs: Using your hands, shape the mixture into small, even-sized meatballs, approximately 1 inch in diameter. This should yield about 24 meatballs.
- Bake the Meatballs: Place the meatballs on a baking sheet lined with parchment paper or lightly greased. Bake in the preheated oven for about 15-20 minutes, or until they’re cooked through and slightly browned.
- Prepare the Skewers: While the meatballs are baking, cut the green and red bell peppers into chunks and set aside. Rinse the cherry tomatoes and pat them dry.
- Assemble the Skewers: Once the meatballs are cooked, remove them from the oven and allow them to cool slightly. Thread the meatballs onto the skewers, alternating with the bell pepper chunks and cherry tomatoes to create a colorful pattern.
- Add the Pesto: Drizzle the skewers with basil pesto, ensuring each meatball gets a coating of the green sauce for that zombie-like appearance.
- Serve: Arrange the skewers on a platter and serve warm, with the remaining pesto on the side for dipping.
Extra Tips:
To enhance the spooky presentation, consider using black or Halloween-themed skewers for an extra touch of eeriness. If you want to make the dish spicier, add a pinch of red pepper flakes to the meatball mixture.
These skewers can also be cooked on a grill for a smoky flavor. If using wooden skewers, soak them in water for at least 30 minutes before assembling to prevent burning. Enjoy your creepy culinary creation!
Eerie Eyeball Punch
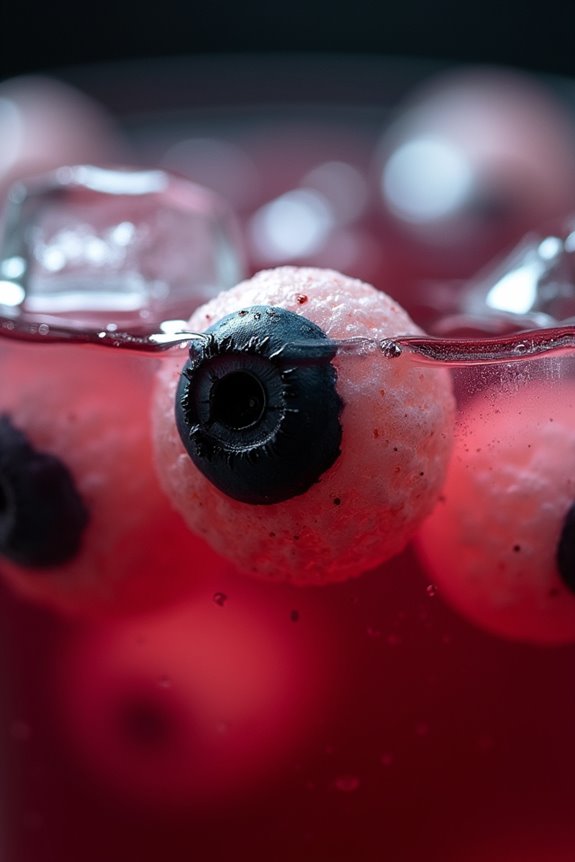
Eerie Eyeball Punch is the perfect addition to any Halloween party, providing a spooky twist to your beverage table. This vibrant and creepy concoction isn’t only delicious but also visually intriguing, making it a surefire hit with guests of all ages.
The punch is infused with a mix of fruity flavors, carbonated zing, and the unsettling yet fun sight of “eyeballs” floating within the bowl. Whether you’re hosting a kids’ gathering or an adult Halloween bash, this punch will add a touch of whimsy and fright to your festivities.
The secret to this punch lies in the creative use of lychees and blueberries to replicate eerie eyeballs that float in the punch, giving it an unsettlingly realistic look. The combination of the lychee’s translucent appearance and the dark blueberry center creates a striking effect, while the punch itself offers a delightful blend of citrusy and sweet flavors.
This Eerie Eyeball Punch serves 4-6 people and is sure to be the talk of the party, both for its taste and its ghoulish presentation.
Ingredients:
- 1 can (20 oz) lychees in syrup
- 1 pint fresh blueberries
- 4 cups cranberry juice
- 2 cups pineapple juice
- 2 cups lemon-lime soda (such as Sprite or 7-Up)
- 1 cup club soda
- 1/4 cup fresh lime juice
- Ice cubes
Instructions:
- Prepare the Eyeballs: Drain the can of lychees, reserving the syrup for later use. Carefully insert one blueberry into the hollow center of each lychee to create the “eyeballs.” Set these aside in the refrigerator to chill while you prepare the punch.
- Mix the Juices: In a large punch bowl or pitcher, combine the cranberry juice, pineapple juice, and fresh lime juice. Stir the mixture well to guarantee the flavors are blended evenly.
- Add Fizz: Gently pour in the lemon-lime soda and club soda to the juice mixture. Stir slowly to maintain the carbonation and avoid creating too much foam.
- Incorporate Ice: Add a generous amount of ice cubes to the punch bowl to keep the drink chilled and invigorating.
- Float the Eyeballs: Before serving, add the prepared lychee “eyeballs” into the punch. They’ll float on the surface, creating a spooky effect.
- Serve: Ladle the punch into individual cups, ensuring each serving contains at least one or two “eyeballs” for visual impact.
Extra Tips:
To enhance the eerie appearance of the punch, consider using a clear glass punch bowl or a black cauldron-style container for serving. This will allow the “eyeballs” to be prominently displayed.
If you want to make the punch more adult-friendly, add a splash of vodka or rum for an alcoholic version. Additionally, if you can’t find canned lychees, fresh lychees can be used, though they’re harder to work with.
For an added spooky touch, consider using dry ice carefully to create a foggy, haunting effect around the punch bowl—just be sure to handle it with care and never ingest it directly.
Creepy Crawly Cupcakes
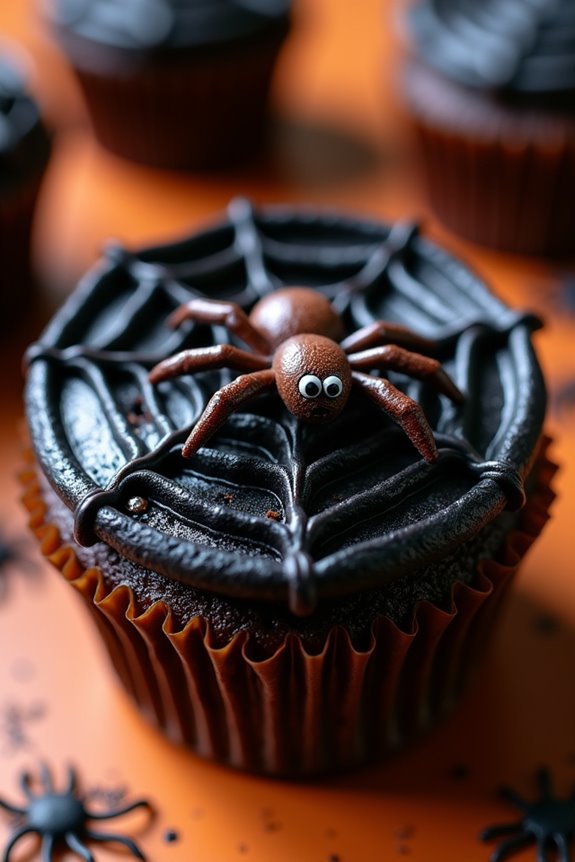
Halloween is the perfect time to let your culinary creativity shine, and what better way to delight and spook your guests than with Creepy Crawly Cupcakes? These themed treats aren’t only delicious but also visually enchanting, making them an excellent addition to any Halloween party spread.
With moist chocolate cupcakes as the base, they’re topped with a rich, velvety spider web frosting and adorned with candy spiders to complete the chilling effect.
These cupcakes are designed to be both easy to make and impressive to serve. The combination of flavors and textures creates a delightful experience for your taste buds, while the spooky decorations add a festive touch to your Halloween celebration.
Whether you’re hosting a small get-together or a big bash, these Creepy Crawly Cupcakes will surely be the highlight of your dessert table.
Ingredients (Serves 4-6 people):
- 1 1/2 cups all-purpose flour
- 1 cup granulated sugar
- 1/4 cup unsweetened cocoa powder
- 1 teaspoon baking powder
- 1/2 teaspoon baking soda
- 1/4 teaspoon salt
- 1/2 cup unsalted butter, melted
- 2 large eggs
- 1 teaspoon vanilla extract
- 1/2 cup buttermilk
- 1/2 cup hot water
- 1 cup chocolate chips
- 1 cup heavy cream
- 1 cup powdered sugar
- Black food coloring
- Candy spiders or gummy worms for decoration
Cooking Instructions:
- Preheat and Prepare: Preheat your oven to 350°F (175°C). Line a 12-cup muffin tin with cupcake liners.
- Mix Dry Ingredients: In a medium-sized bowl, whisk together the flour, sugar, cocoa powder, baking powder, baking soda, and salt until well combined.
- Combine Wet Ingredients: In a separate large bowl, mix the melted butter, eggs, vanilla extract, and buttermilk. Gradually add the dry ingredients to the wet mixture, stirring until just combined.
- Add Hot Water: Slowly pour in the hot water and mix until the batter is smooth and well-blended.
- Fill and Bake: Divide the batter evenly among the prepared cupcake liners, filling each about two-thirds full. Bake in the preheated oven for 18-20 minutes or until a toothpick inserted into the center comes out clean. Allow cupcakes to cool completely on a wire rack.
- Make Frosting: For the frosting, heat the heavy cream in a small saucepan until it just begins to simmer. Pour it over the chocolate chips in a heatproof bowl and let it sit for a minute, then stir until smooth. Stir in the powdered sugar and a few drops of black food coloring until the desired color is achieved.
- Frost and Decorate: Once the cupcakes are cooled, frost them with the black chocolate frosting. Use a piping bag or a spoon to create a spider web pattern on top. Finish by placing candy spiders or gummy worms on each cupcake for a creepy effect.
Extra Tips:
For a more dramatic effect, consider using different shades of food coloring to create a multicolored web design on the frosting.
If you want to enhance the spider effect, use edible eyes on the candy spiders for added spookiness.
To guarantee your cupcakes are extra moist and fluffy, be careful not to overmix the batter.