
Hey there, fellow Halloween enthusiasts! 🎃
If you’re anything like me, you know that the secret to a killer Halloween party is all in the menu. This year, let’s treat our guests to some ghoulishly delightful dishes like Creepy Crawly Pasta, Monster Meatballs, and Witch’s Brew Stew. These recipes are not just meals; they’re an experience that’s both enchanting and unforgettable. Ready to make this Halloween the most talked-about yet?
Creepy Crawly Pasta

Transform your Halloween dinner table into a spooky spectacle with Creepy Crawly Pasta, a delicious and eerie dish that will delight both kids and adults. This hauntingly good recipe combines the rich flavors of a classic pasta dish with a spooky twist—black spaghetti strands resembling wriggling worms and a hearty, blood-red tomato sauce.
The addition of olives, capers, and mozzarella balls adds a fun and flavorful touch, creating a visually striking meal that’s perfect for setting a chilling Halloween mood. Designed to serve 4-6 people, Creepy Crawly Pasta isn’t only visually enchanting but also incredibly easy to prepare.
This dish is ideal for a Halloween party, as it can be made quickly and allows you to spend more time enjoying the festivities. With its combination of savory ingredients and a touch of Halloween magic, this recipe is sure to become a favorite tradition for your spooky celebrations.
Ingredients:
- 500g black spaghetti (squid ink pasta)
- 2 tablespoons olive oil
- 3 cloves garlic, minced
- 1 medium onion, finely chopped
- 1 can (400g) crushed tomatoes
- 1 tablespoon tomato paste
- 1 teaspoon dried oregano
- 1 teaspoon dried basil
- Salt and black pepper to taste
- 1/2 cup pitted black olives, sliced
- 1/4 cup capers
- 1/2 cup fresh mozzarella balls (bocconcini), halved
- Fresh basil leaves for garnish
Cooking Instructions:
1. Cook the Pasta: Begin by bringing a large pot of salted water to a boil. Add the black spaghetti and cook according to package instructions, usually around 8-10 minutes, until al dente.
Once cooked, drain the pasta and set aside, reserving a cup of the pasta water.
2. Prepare the Sauce: In a large skillet, heat the olive oil over medium heat. Add the minced garlic and chopped onion, sautéing until the onion becomes translucent and the garlic is fragrant, approximately 3-4 minutes.
3. Add the Tomatoes: Stir in the crushed tomatoes and tomato paste, mixing well to combine. Season the sauce with dried oregano, dried basil, salt, and black pepper.
Allow the sauce to simmer gently for 10-15 minutes, stirring occasionally, until it thickens slightly.
4. Incorporate the Extras: Add the sliced black olives and capers to the sauce, stirring to evenly distribute. If the sauce becomes too thick, add a little of the reserved pasta water to reach your desired consistency.
5. Combine Pasta and Sauce: Add the cooked black spaghetti to the skillet, tossing it gently to coat the pasta evenly with the sauce.
Allow the pasta to absorb the flavors for another 2-3 minutes over low heat.
6. Serve: Transfer the Creepy Crawly Pasta to a large serving dish. Gently place the halved mozzarella balls on top, resembling eerie eyeballs.
Garnish with fresh basil leaves for an added touch of color and flavor. Serve immediately and enjoy the spooky delight.
Extra Tips:
For an even spookier presentation, consider adding a few edible decorations like gummy worms or plastic spiders (be sure they’re non-toxic and safe for food use) around the serving platter.
If black spaghetti is unavailable, you can use regular spaghetti and add a few drops of black food coloring to the boiling water for a similar effect.
To enhance the flavor profile, you can also add a pinch of red pepper flakes for a subtle heat that complements the rich tomato sauce.
Monster Meatballs

Transform your Halloween dinner into a spooky feast with these delicious Monster Meatballs. Perfect for a crowd, these meatballs aren’t only fun to make but also delightful to eat. Their monstrous appearance is sure to amuse both kids and adults, making them a fantastic centerpiece for your Halloween party spread.
With a blend of hearty beef and a touch of spice, Monster Meatballs offer a savory experience with every bite. The secret to the menacing look lies in their presentation — each meatball is dressed up with edible eyes, and a burst of tomato sauce gives them a blood-curdling finish. Not only are they frightfully fun to look at, but they also pack a flavorful punch, using a mix of fresh herbs and spices to create a taste that’s anything but ordinary.
Serve these up at your next Halloween gathering, and watch your guests come back for more.
Ingredients for 4-6 people:
- 1 pound ground beef
- 1/2 cup breadcrumbs
- 1/4 cup grated Parmesan cheese
- 1 large egg
- 2 cloves garlic, minced
- 1 tablespoon chopped fresh parsley
- 1 teaspoon dried oregano
- 1/2 teaspoon salt
- 1/4 teaspoon black pepper
- 10-12 mozzarella balls (bocconcini)
- 1 cup marinara sauce
- 1 tablespoon olive oil
- 12-15 black olives, sliced (for eyes)
- Fresh basil leaves (for garnish)
Cooking Instructions:
- Preheat the Oven: Start by preheating your oven to 375°F (190°C). This will guarantee that your meatballs cook evenly and thoroughly.
- Prepare the Meatball Mixture: In a large mixing bowl, combine the ground beef, breadcrumbs, Parmesan cheese, egg, minced garlic, parsley, oregano, salt, and black pepper. Mix well until all ingredients are thoroughly incorporated.
- Shape the Meatballs: Take a small handful of the meat mixture and form it into a ball, roughly the size of a golf ball. Press a mozzarella ball into the center, then cover completely with the meat mixture, making sure the cheese is fully enclosed. Repeat until all the meat mixture is used.
- Cook the Meatballs: Heat olive oil in a large skillet over medium heat. Add the meatballs and cook until they’re browned on all sides. This should take about 5-7 minutes.
- Bake the Meatballs: Transfer the browned meatballs to a baking dish. Pour the marinara sauce over the meatballs, ensuring they’re well coated. Place the dish in the preheated oven and bake for 20-25 minutes, or until the meatballs are cooked through and the cheese inside has melted.
- Decorate the Meatballs: Once cooked, remove the meatballs from the oven. Let them cool slightly before adding the eyes. Place a slice of black olive on each meatball to create the eyes.
- Serve and Garnish: Arrange the Monster Meatballs on a serving platter. Garnish with fresh basil leaves for a pop of color and serve with extra marinara sauce on the side for dipping.
Extra Tips:
To guarantee your Monster Meatballs stay juicy and flavorful, don’t overmix the meat mixture, as this can make the meatballs dense. If you prefer a spicier kick, you can add a pinch of red pepper flakes to the mixture.
For a gluten-free version, substitute the breadcrumbs with almond flour. Finally, get creative with your decorations — sliced red bell peppers or pimento-stuffed olives can add even more character to your monstrous creations.
Witch’s Brew Stew

Get ready to cast a spell over your Halloween guests with this enchanting Witch’s Brew Stew. This flavorful concoction is sure to warm the bones on a chilly October evening and provide that mysterious allure your party craves. With its rich and savory broth, tender vegetables, and heartwarming spices, this stew is perfect for creating a magical ambiance at your Halloween gathering.
Witch’s Brew Stew is a delightful and hearty dish designed to serve 4-6 people, making it an ideal choice for small parties or family dinners. The combination of ingredients not only brings out wonderful flavors but also creates a visually appealing dish that complements the spooky theme. The aromas of this stew will waft through your home, enticing your guests and setting the stage for an unforgettable Halloween night.
Ingredients:
- 2 tablespoons olive oil
- 1 large onion, chopped
- 2 cloves garlic, minced
- 1 pound beef stew meat, cubed
- 4 cups beef broth
- 2 cups water
- 2 large potatoes, peeled and diced
- 3 carrots, peeled and sliced
- 2 stalks celery, sliced
- 1 cup mushrooms, sliced
- 1 teaspoon salt
- 1/2 teaspoon black pepper
- 1 teaspoon dried thyme
- 1 teaspoon paprika
- 1 bay leaf
- 2 tablespoons tomato paste
- 1 cup frozen peas
- Fresh parsley, chopped (for garnish)
Instructions:
1. Prepare the Ingredients:
Start by prepping all your vegetables. Chop the onion, mince the garlic, cube the beef, and slice the potatoes, carrots, celery, and mushrooms. Having everything ready will streamline the cooking process.
2. Sauté the Aromatics:
In a large pot or Dutch oven, heat the olive oil over medium heat. Add the chopped onions and sauté until they become translucent, about 5 minutes. Stir in the minced garlic and cook for an additional minute until fragrant.
3. Brown the Beef:
Increase the heat to medium-high and add the cubed beef stew meat to the pot. Cook the meat, stirring occasionally, until all sides are browned.
4. Build the Base:
Pour in the beef broth and water, scraping the bottom of the pot to deglaze and incorporate all the flavorful bits. Add the diced potatoes, sliced carrots, celery, and mushrooms.
5. Season the Stew:
Stir in the salt, black pepper, dried thyme, paprika, and bay leaf. Add the tomato paste to the pot and mix well to combine. This will give the stew a rich color and depth of flavor.
6. Simmer the Stew:
Bring the mixture to a gentle boil, then reduce the heat to low. Cover the pot and let the stew simmer for 1.5 to 2 hours, or until the beef is tender and the flavors have melded together.
7. Finish and Serve:
About 10 minutes before serving, add the frozen peas to the stew and stir them in. Once the peas are heated through, remove the bay leaf. Serve the stew hot, garnished with chopped fresh parsley.
Extra Tips:
For an even richer flavor, consider browning the beef in batches to guarantee each piece is well-seared, as overcrowding the pot can lead to steaming instead.
The stew can also be made a day in advance; the flavors will deepen overnight, making it even more delicious.
If you prefer a thicker stew, mash some of the potatoes against the side of the pot before serving.
For a spookier presentation, serve the stew in small cauldrons or black bowls to maintain the Halloween theme.
Mummy-Wrapped Sausages

Mummy-Wrapped Sausages are a fun and spooky treat perfect for a Halloween party. These delicious little snacks aren’t only easy to make but also a definite hit with both kids and adults alike. The combination of savory sausages wrapped in golden, flaky pastry makes for a delightful appetizer or snack that fits right into your Halloween-themed festivities.
Whether you’re hosting a party or looking for a special treat for your family, these mummy-inspired bites are bound to impress.
The beauty of Mummy-Wrapped Sausages is in their simplicity and versatility. You can use a variety of sausages and even customize the type of pastry to suit your taste. The key is to have fun with the design, creating little “mummy” wraps with the dough that make the sausages look like they’re bandaged up in a spooky fashion.
With just a few ingredients and some creative wrapping, you’ll have a platter full of mummified sausages that look as good as they taste. This recipe serves 4-6 people, providing a delightful centerpiece for your Halloween party menu.
Ingredients:
- 12 cocktail sausages or mini hot dogs
- 1 sheet of puff pastry or crescent roll dough
- 1 egg, beaten
- 1 tablespoon of sesame seeds or poppy seeds (optional)
- Mustard or ketchup for eyes
Cooking Instructions:
- Preheat the Oven: Begin by preheating your oven to 375°F (190°C). This will guarantee that the puff pastry or crescent roll dough cooks evenly and turns golden brown.
- Prepare the Dough: Roll out the puff pastry or crescent roll dough on a lightly floured surface. Use a sharp knife or pizza cutter to slice the dough into thin strips, approximately 1/4 inch wide. These will be your “bandages.”
- Wrap the Sausages: Take each cocktail sausage and wrap it with the dough strips, leaving a small gap for the face. Overlap the dough slightly as you wrap it around the sausage to create a mummy-like effect.
- Egg Wash and Sprinkle: Place the wrapped sausages on a baking sheet lined with parchment paper. Brush each mummy with the beaten egg to help them achieve a golden color. If desired, sprinkle sesame or poppy seeds over them for added texture.
- Bake: Place the baking sheet in the preheated oven and bake for 15-20 minutes, or until the dough is puffed and golden brown. Keep an eye on them to make sure they don’t over-bake.
- Create the Eyes: Once the mummies are baked, remove them from the oven and let them cool slightly. Use a toothpick to add two small dots of mustard or ketchup on the exposed section of each sausage to create the eyes.
Extra Tips:
To add more variety to your Mummy-Wrapped Sausages, consider using different types of sausages such as chicken, turkey, or even vegetarian options. You can also experiment with different dough types, like phyllo for a crispier texture or whole wheat for a healthier twist.
If you’re preparing these in advance, you can wrap the sausages a few hours ahead of time and refrigerate them until you’re ready to bake. Just remember to bring them back to room temperature before baking to guarantee even cooking. Enjoy your spooky treats!
Spooky Stuffed Peppers

Spooky Stuffed Peppers are the perfect dish to add an eerie touch to your Halloween party dinner. These deliciously terrifying treats aren’t only visually engaging with their carved faces, but they also pack a flavorful punch that will delight your guests. The vibrant orange bell peppers serve as the edible canvases for your creative carving skills and are filled with a savory mixture of ground meat, rice, and spices.
Whether you’re hosting a gathering of adults or having a kid-friendly event, these stuffed peppers are sure to be a hit. The process of creating Spooky Stuffed Peppers is straightforward and fun, allowing you to get creative with the designs. You can carve the peppers to resemble classic jack-o’-lantern faces or come up with your own spooky or silly expressions.
The filling is hearty and comforting, making it a satisfying addition to your Halloween menu. This recipe is designed to serve 4-6 people, making sure that there’s plenty to go around for your guests. Let’s plunge into the ingredients and the step-by-step instructions to bring these Spooky Stuffed Peppers to life.
Ingredients (Serves 4-6)
- 6 medium orange bell peppers
- 1 pound ground beef or turkey
- 1 cup cooked rice
- 1 small onion, finely chopped
- 2 cloves garlic, minced
- 1 can (14 ounces) diced tomatoes, drained
- 1 cup shredded mozzarella cheese
- 2 tablespoons olive oil
- 1 teaspoon salt
- 1/2 teaspoon black pepper
- 1 teaspoon paprika
- 1 teaspoon dried oregano
- 1/2 teaspoon cumin
- 1 cup chicken or vegetable broth
Cooking Instructions
- Prepare the Peppers: Preheat your oven to 375°F (190°C). Carefully slice the tops off the bell peppers and remove the seeds and membranes. Set the tops aside for later.
- Carve the Peppers: Using a small paring knife, carve faces into the peppers to resemble jack-o’-lanterns. Be careful not to cut too large holes, as you want the filling to stay inside.
- Cook the Filling: In a large skillet over medium heat, add the olive oil and sauté the chopped onion and minced garlic until translucent, about 3-4 minutes. Add the ground beef or turkey, breaking it up with a spoon, and cook until browned.
- Mix the Stuffing: Stir in the diced tomatoes, cooked rice, salt, black pepper, paprika, oregano, and cumin. Cook for an additional 5 minutes, allowing the flavors to meld together.
- Stuff the Peppers: Spoon the beef and rice mixture into each carved pepper, filling them generously. Place the tops back onto the peppers.
- Bake the Peppers: Place the stuffed peppers upright in a baking dish. Pour the chicken or vegetable broth into the bottom of the dish to help steam the peppers. Cover the dish with aluminum foil.
- Cook: Bake in the preheated oven for 30 minutes. Remove the foil and sprinkle mozzarella cheese over the top of each pepper. Return to the oven and bake for an additional 10-15 minutes, or until the cheese is melted and bubbly.
- Serve: Remove the peppers from the oven and let them cool slightly before serving. Arrange them on a platter for a spooky Halloween presentation.
Extra Tips
When selecting bell peppers, choose ones that have a flat bottom to make sure they stand upright while baking. You can also use other colored peppers if you want to add more variety to your presentation.
For a vegetarian version, substitute the ground meat with black beans or mushrooms. If you’re looking for an extra kick, consider adding a pinch of cayenne pepper to the filling mix. Finally, be sure to save the pepper tops to use as lids, adding to the jack-o’-lantern effect.
Enjoy your Spooky Stuffed Peppers and have a hauntingly fun Halloween!
Ghostly Garlic Bread
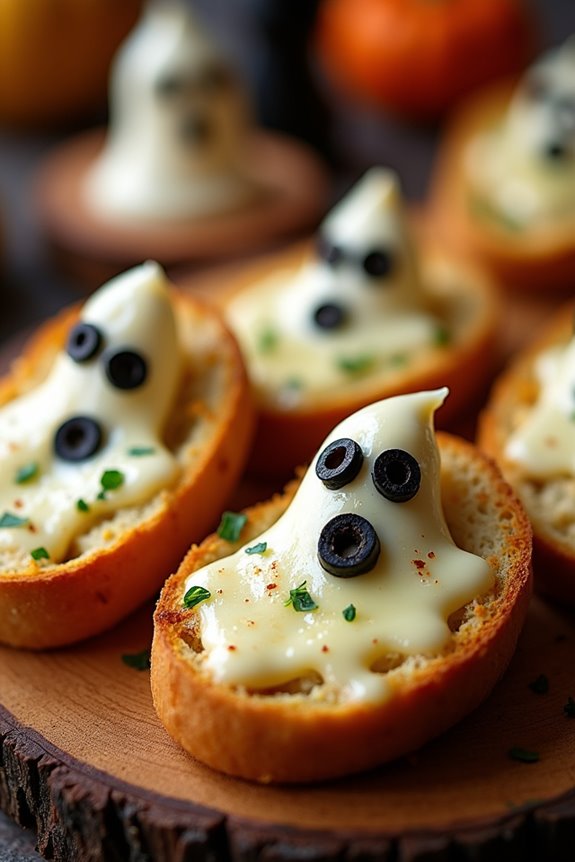
Looking to add a frightfully delicious touch to your Halloween party menu? Ghostly Garlic Bread is the perfect spooky side dish to accompany any main course. This eerie treat combines the classic flavors of garlic and butter with a playful twist that’s sure to delight both kids and adults alike.
With its ghostly shape and savory aroma, Ghostly Garlic Bread is as fun to make as it’s to eat. This recipe isn’t only easy to follow but also allows for creative variations. Whether you’re hosting a small gathering for 4-6 people or a larger party, this garlic bread will be a hit.
The secret lies in the use of simple ingredients to create a hauntingly delightful snack that can be enjoyed by all. Get ready to impress your guests with this ghoulishly good bread that will have them asking for more.
Ingredients (serving size: 4-6 people):
- 1 large French baguette or Italian loaf
- 1/2 cup unsalted butter, softened
- 4 cloves garlic, minced
- 1/4 cup fresh parsley, finely chopped
- 1 cup shredded mozzarella cheese
- 1/2 teaspoon salt
- 1/4 teaspoon black pepper
- 1/2 teaspoon dried Italian herbs (optional)
- Black olives, sliced (for ghost eyes)
Cooking Instructions:
- Preheat the Oven: Begin by preheating your oven to 375°F (190°C). This guarantees that the bread will bake evenly and achieve a golden crisp.
- Prepare the Bread: Slice the baguette or loaf into thick slices, about 1 to 1.5 inches thick. Arrange the slices on a lined baking sheet with the cut side up.
- Make the Garlic Butter: In a medium bowl, combine the softened butter, minced garlic, salt, pepper, and Italian herbs. Mix thoroughly until the ingredients are well incorporated.
- Spread the Butter: Generously spread the garlic butter mixture over each slice of bread, ensuring even coverage. This will infuse the bread with a rich, garlicky flavor.
- Add the Cheese: Sprinkle shredded mozzarella cheese evenly over the buttered slices. The cheese will melt into a gooey layer that complements the garlic butter.
- Bake the Bread: Place the baking sheet in the preheated oven and bake for 10-12 minutes, or until the cheese is bubbly and the edges of the bread are lightly browned.
- Create the Ghost Faces: Remove the bread from the oven. Using the sliced black olives, place two slices on each piece of bread to resemble ghost eyes.
- Serve Warm: Allow the Ghostly Garlic Bread to cool slightly before serving. Arrange on a platter and enjoy the hauntingly delicious flavors.
Extra Tips:
For an extra spooky effect, use a cookie cutter to shape the bread into ghostly figures before baking. This will add an extra touch of Halloween fun to your presentation.
If you prefer a spicier kick, add a pinch of red pepper flakes to the garlic butter mixture. For a more cheesy experience, consider adding a layer of parmesan cheese along with the mozzarella.
Ultimately, if you have any leftover garlic butter, it can be stored in the refrigerator for up to a week and used on other dishes.
Vampire Bat Wings

If you’re looking to add a spooky yet delicious touch to your Halloween party, Vampire Bat Wings are the perfect dish to serve. These wings are a fun, themed twist on the classic chicken wings, featuring a dark and savory glaze that not only looks eerie but tastes fantastic. The color and flavor come from a combination of soy sauce, balsamic vinegar, and dark spices, giving the wings a unique depth and an irresistible umami punch.
Not only do Vampire Bat Wings look the part, but they’re also incredibly easy to prepare, allowing you to focus on enjoying the festivities. These wings are sure to be a hit with both kids and adults alike, making them an ideal addition to your Halloween spread. With just a few simple steps, you’ll have a platter of deliciously dark wings ready to delight your guests.
Ingredients (Serves 4-6):
- 2 lbs chicken wings
- 1/2 cup soy sauce
- 1/4 cup balsamic vinegar
- 1/4 cup honey
- 2 tablespoons brown sugar
- 2 tablespoons olive oil
- 1 tablespoon garlic powder
- 1 teaspoon smoked paprika
- 1 teaspoon ground black pepper
- 1/2 teaspoon cayenne pepper
- 1/2 teaspoon salt
- Fresh parsley for garnish (optional)
Cooking Instructions:
- Prepare the Wings: Rinse the chicken wings under cold water and pat them dry with paper towels. Remove any excess moisture to facilitate even cooking and crispiness.
- Make the Marinade: In a large mixing bowl, combine soy sauce, balsamic vinegar, honey, brown sugar, olive oil, garlic powder, smoked paprika, black pepper, cayenne pepper, and salt. Stir the mixture until all ingredients are well combined, creating a smooth marinade.
- Marinate the Wings: Add the chicken wings to the marinade, making sure each wing is thoroughly coated. Cover the bowl with plastic wrap and refrigerate for at least 1 hour, or overnight for more intense flavor.
- Preheat the Oven: Preheat your oven to 400°F (200°C). Line a baking sheet with aluminum foil and place a wire rack on top.
- Bake the Wings: Arrange the marinated wings on the wire rack in a single layer, making sure they aren’t touching. This will allow the heat to circulate around the wings for even cooking. Bake for 25-30 minutes, turning halfway through, until the wings are fully cooked and have a nice dark glaze.
- Broil for Crispiness: For extra crispy wings, switch the oven to broil for the last 2-3 minutes of cooking. Keep a close eye on them to prevent burning.
- Garnish and Serve: Once cooked, remove the wings from the oven and let them rest for a few minutes. Garnish with fresh parsley if desired, and serve hot.
Extra Tips:
For the best results, let the wings marinate overnight to allow the flavors to fully penetrate the meat. If you prefer a less spicy version, reduce the amount of cayenne pepper or omit it altogether.
To facilitate even cooking, make sure your chicken wings are of similar size, and don’t overcrowd the baking sheet. Serving with a side of ranch or blue cheese dressing can add a creamy contrast to the savory and spicy wings. Enjoy these Vampire Bat Wings as a standout dish at your Halloween party!
Goblin Guacamole
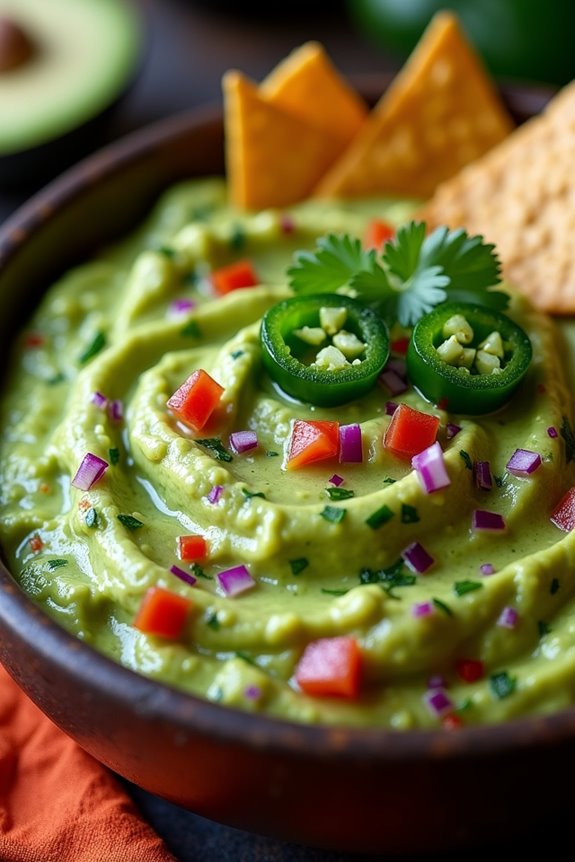
Elevate your Halloween party with a spooky and delicious bowl of Goblin Guacamole. This eerie twist on a classic favorite is perfect for setting the mood at your ghoulish gathering. The vibrant green color of the avocados is perfect for a Halloween theme, and with a few creative additions, this guacamole will become an unforgettable part of your celebration.
Goblin Guacamole not only looks festive but also delivers a burst of crisp flavors that your guests will love. Ideal for 4-6 people, this recipe combines creamy avocados with zesty lime juice, spicy jalapeños, and a touch of cilantro for a revitalizing dip that pairs perfectly with your favorite tortilla chips or veggie sticks.
Simple to prepare and irresistibly tasty, this guacamole will have your guests dipping in for more. The secret to a perfect Goblin Guacamole is balancing the flavors to achieve that classic taste while keeping it spooky enough for the holiday.
Ingredients (Serves 4-6):
- 4 ripe avocados
- 2 limes, juiced
- 1 medium tomato, finely chopped
- 1 small red onion, finely chopped
- 1-2 jalapeños, seeded and finely chopped
- 1/4 cup fresh cilantro, chopped
- 1 teaspoon salt
- 1/2 teaspoon black pepper
- 1/2 teaspoon garlic powder
- Tortilla chips or veggie sticks for serving
Instructions:
- Prepare the Avocados: Begin by slicing the avocados in half, removing the pits, and scooping the flesh into a large mixing bowl. Use a fork or a potato masher to mash the avocados to your desired consistency, whether you prefer it chunky or smooth.
- Add Lime Juice: Immediately pour the freshly squeezed lime juice over the mashed avocados. The lime juice not only adds a revitalizing tang but also helps prevent the avocados from turning brown.
- Mix in Vegetables: Add the chopped tomato, red onion, and jalapeños to the bowl. Stir the mixture gently to combine, ensuring the vegetables are evenly distributed throughout the guacamole.
- Season the Guacamole: Sprinkle in the chopped cilantro, salt, black pepper, and garlic powder. Stir everything together thoroughly to ensure the seasonings are well incorporated into the guacamole.
- Taste and Adjust: Taste the guacamole and adjust the seasoning as necessary. You can add more salt, lime juice, or jalapeño if desired, depending on your preference for saltiness, tanginess, or heat.
- Serve and Enjoy: Transfer the Goblin Guacamole to a serving bowl and pair it with tortilla chips or veggie sticks. For an extra spooky presentation, you can garnish the guacamole with additional cilantro or a few whole jalapeño slices.
Extra Tips:
For an even spookier presentation, consider serving the Goblin Guacamole in a hollowed-out pumpkin or a skull-shaped bowl. This dish is best enjoyed fresh but can be made a few hours in advance if stored with plastic wrap pressed directly onto the surface to minimize browning.
If you want to prepare it ahead of time, keep all the ingredients separate until just before serving to maintain the freshest flavors. Adjust the heat level by adding more or fewer jalapeños depending on your guests’ preferences. Enjoy your Halloween party with this ghoulishly good dip!
Eerie Eyeball Pizza

Eerie Eyeball Pizza is a spooky and delicious addition to any Halloween party menu. This fun twist on traditional pizza is as entertaining to make as it’s enjoyable to eat. With its ghoulish appearance, it will surely become a conversation starter and a favorite among both kids and adults. The combination of classic pizza flavors with a Halloween-inspired presentation makes it a must-try dish for your eerie festivities.
The concept of Eerie Eyeball Pizza revolves around creating a pizza that mimics the appearance of creepy eyeballs staring back at you. To accomplish this, we’ll use a variety of ingredients that not only taste great but also help create the eerie effect. The base will be a traditional pizza crust, topped with tomato sauce and cheese, and adorned with strategically placed mozzarella balls, olives, and peppers to create the eyeball effect. This recipe will serve 4-6 people, making it perfect for a small gathering or a family dinner.
Ingredients for Eerie Eyeball Pizza (serves 4-6):
- 1 large pizza dough (store-bought or homemade)
- 1 cup tomato pizza sauce
- 2 cups shredded mozzarella cheese
- 12 mini mozzarella balls
- 12 black olives, pitted and halved
- 1 green bell pepper, sliced into rings
- 1 red bell pepper, sliced into rings
- Olive oil for brushing
- Fresh basil leaves (optional, for garnish)
- Salt and pepper to taste
Cooking Instructions:
- Preheat the Oven: Start by preheating your oven to 475°F (245°C). This guarantees the crust gets crispy and the cheese melts perfectly.
- Prepare the Dough: Roll out the pizza dough on a lightly floured surface to your desired thickness. Transfer it to a lightly oiled pizza pan or a baking sheet.
- Add the Sauce and Cheese: Spread the tomato pizza sauce evenly over the dough, leaving a small border around the edges for the crust. Sprinkle the shredded mozzarella cheese on top of the sauce.
- Create the Eyeballs: Place the mini mozzarella balls on the pizza, spacing them evenly to guarantee each slice will have at least one. Press a halved black olive onto each mozzarella ball to form the pupil.
- Add the Bell Peppers: Arrange the slices of green and red bell peppers around the mozzarella balls to resemble bloodshot eyes. This will enhance the eerie look of the pizza.
- Season the Pizza: Lightly brush the edges of the crust with olive oil and season the whole pizza with a pinch of salt and pepper.
- Bake the Pizza: Place the pizza in the preheated oven and bake for 12-15 minutes, or until the crust is golden brown and the cheese is bubbly.
- Garnish and Serve: Remove the pizza from the oven and let it cool for a few minutes. Garnish with fresh basil leaves if desired, slice, and serve warm.
Extra Tips:
For an even spookier effect, you can use red or green food coloring to tint the mozzarella balls before placing the olives on top. This will give the eyeballs a more monstrous appearance.
If you prefer a different cheese or toppings, feel free to customize the pizza to your taste, but keep in mind that the mozzarella balls and olives are essential for creating the eyeball look.
To save time, you can prepare the toppings in advance and assemble the pizza just before baking. Enjoy crafting this eerie masterpiece and watch your guests delight in its creepy charm!
Devilish Deviled Eggs
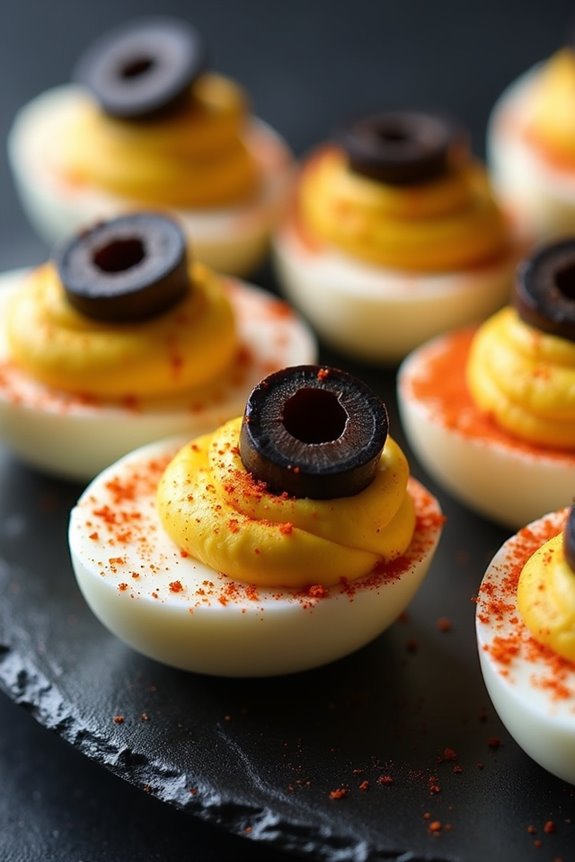
Deviled eggs are a classic party treat, but with a Halloween twist, they become devilishly delightful! These Devilish Deviled Eggs are the perfect addition to your Halloween party spread. With their spicy flavor and eerie appearance, they’ll be a surefire hit among your guests.
The creamy yolk filling, enhanced with a kick of heat, is piped back into the egg whites, turning these humble eggs into a spooky and savory snack. Perfect for serving 4-6 people, these deviled eggs aren’t only delicious but also easy to make.
The key is to balance the creamy texture with just the right amount of spice, creating a tantalizing bite that will keep everyone reaching for more. Whether you’re hosting a Halloween party or simply want to add a festive touch to your dinner table, these eggs are sure to impress.
Ingredients (Serves 4-6):
- 6 large eggs
- 3 tablespoons mayonnaise
- 1 teaspoon Dijon mustard
- 1 teaspoon apple cider vinegar
- 1/2 teaspoon garlic powder
- 1/4 teaspoon cayenne pepper
- Salt and black pepper to taste
- Paprika for garnish
- Sliced black olives for decoration
Cooking Instructions:
- Boil the Eggs: Place the eggs in a single layer in a saucepan and cover them with cold water. Bring the water to a boil over medium-high heat. Once boiling, remove the saucepan from the heat and cover it with a lid. Let the eggs sit for 10-12 minutes.
- Cool and Peel the Eggs: Carefully drain the hot water and transfer the eggs to a bowl of ice water. Allow them to cool for at least 5 minutes, which will make peeling easier. Peel the eggs gently to keep the whites intact.
- Prepare the Filling: Cut each egg in half lengthwise and remove the yolks, placing them in a separate bowl. Mash the yolks with a fork until smooth. Add mayonnaise, Dijon mustard, apple cider vinegar, garlic powder, cayenne pepper, salt, and black pepper to the yolks. Mix until the filling is creamy and well combined.
- Fill the Egg Whites: Spoon or pipe the yolk mixture back into the egg white halves, filling each cavity generously.
- Garnish and Serve: Sprinkle the filled eggs with paprika for a pop of color and a bit of additional flavor. For a spooky touch, place a slice of black olive on top of each egg to resemble an eye. Serve chilled.
Extra Tips:
For an extra spooky presentation, consider adding a few drops of red food coloring to the yolk mixture to give it a blood-red hue. If you prefer a milder version, adjust the amount of cayenne pepper to suit your taste.
These deviled eggs can be made a few hours in advance and stored in the refrigerator, which allows the flavors to meld together beautifully. Just be sure to cover them with plastic wrap to prevent them from drying out. Enjoy your Halloween festivities with this devilishly delicious appetizer!
Haunted Hot Chocolate

Aiming to add a touch of spookiness to your Halloween party menu? Search no further than this ghoulishly delightful Haunted Hot Chocolate. This eerie beverage is perfect for warming up your guests with its rich, velvety texture and spine-tingling flavors. The combination of dark chocolate and ghostly marshmallow toppings makes it a deliciously wicked treat that will leave everyone wanting more.
Gather around the cauldron as you whip up this enchanting brew, suitable for 4-6 people. With its simple preparation and haunting presentation, Haunted Hot Chocolate is sure to be a hit among both kids and adults alike. So, put on your witch’s hat, light a few candles, and prepare to bewitch your guests with this delightful concoction.
Ingredients (Serving Size: 4-6 people):
- 4 cups whole milk
- 1 cup heavy cream
- 8 oz dark chocolate, chopped
- 1/4 cup unsweetened cocoa powder
- 1/4 cup sugar
- 1 teaspoon vanilla extract
- 1/2 teaspoon ground cinnamon
- Pinch of salt
- Whipped cream, for topping
- Marshmallows, preferably ghost-shaped
- Halloween-themed sprinkles or edible glitter
Cooking Instructions:
- Prepare the Base: In a large saucepan, combine the whole milk and heavy cream. Place over medium heat and warm until the mixture begins to steam, but don’t let it come to a boil.
- Add the Chocolate: Reduce the heat to low and add the chopped dark chocolate. Stir continuously with a whisk until the chocolate is fully melted and the mixture is smooth.
- Incorporate Cocoa and Sugar: Gradually add the cocoa powder and sugar, whisking constantly to guarantee there are no lumps and the sugar is completely dissolved.
- Flavor it Up: Stir in the vanilla extract, ground cinnamon, and a pinch of salt. Keep whisking the mixture until everything is well combined and heated through.
- Serve: Remove the saucepan from heat. Pour the hot chocolate into mugs, leaving some space at the top for toppings.
- Add the Toppings: Top each mug with a generous dollop of whipped cream. Decorate with ghost-shaped marshmallows and sprinkle with Halloween-themed sprinkles or edible glitter for a hauntingly festive touch.
Extra Tips:
For an even richer flavor, consider using a mix of milk and dark chocolate. If you want to prepare the hot chocolate ahead of time, you can store it in the refrigerator and reheat it gently on the stove.
To create a spooky atmosphere, serve the Haunted Hot Chocolate in black or orange mugs and consider adding a cinnamon stick as a “stirring wand.” Remember to adjust the sweetness according to your preference, and if you have any leftover hot chocolate, it can be stored in the fridge for up to three days.
Graveyard Dirt Cake

Graveyard Dirt Cake is a delightfully spooky dessert that’s perfect for any Halloween party. This creepy creation isn’t only fun to make, but it’s also deliciously irresistible for both kids and adults. The cake is made to resemble a graveyard, complete with layers of chocolate pudding, crushed cookies, and gummy worms, giving it a realistic dirt-like appearance.
It’s a no-bake dessert, making it convenient and easy to prepare while still adding a festive touch to your celebration.
The base of the Graveyard Dirt Cake consists of creamy layers of chocolate pudding and whipped topping, interspersed with crushed chocolate sandwich cookies to mimic the look of dirt. The top is artfully decorated with various Halloween-themed candies to create a spooky graveyard scene. You can get creative with your decorations, using items such as candy tombstones, bone-shaped candies, and gummy worms to bring this eerie dessert to life.
This recipe serves approximately 4-6 people, making it an ideal centerpiece for your Halloween party dessert table.
Ingredients:
- 1 package (3.9 oz) instant chocolate pudding mix
- 2 cups cold milk
- 1 package (8 oz) cream cheese, softened
- 1/4 cup butter, softened
- 1 cup powdered sugar
- 1 container (8 oz) frozen whipped topping, thawed
- 1 package (14 oz) chocolate sandwich cookies
- Gummy worms and Halloween-themed candies (for decoration)
Cooking Instructions:
- Prepare the Pudding: In a medium-sized mixing bowl, combine the instant chocolate pudding mix with 2 cups of cold milk. Whisk together until the mixture is smooth and begins to thicken. Set aside in the refrigerator to chill as you prepare the other components.
- Create the Creamy Layer: In a separate large mixing bowl, beat the softened cream cheese and butter together until smooth and creamy. Gradually add the powdered sugar, continuing to beat until fully combined and the mixture is light and fluffy.
- Combine with Whipped Topping: Gently fold the whipped topping into the cream cheese mixture until well blended. Be careful not to deflate the mixture; it should remain light and airy.
- Crush the Cookies: Place the chocolate sandwich cookies in a large resealable plastic bag. Using a rolling pin or a heavy object, crush the cookies into fine crumbs. These will serve as the “dirt” layers in your cake.
- Assemble the Cake: In a deep serving dish or trifle bowl, start by spreading a layer of the pudding mixture, followed by a layer of the cream cheese mixture. Sprinkle a generous layer of crushed cookies over the top. Repeat these layers until all ingredients are used, finishing with a layer of cookie crumbs on top.
- Decorate the Graveyard: Use gummy worms, candy tombstones, and other Halloween-themed candies to decorate the top of your cake. Arrange them to resemble a spooky graveyard scene, letting your creativity shine.
- Chill Before Serving: Allow the Graveyard Dirt Cake to chill in the refrigerator for at least 2 hours before serving. This will help the layers set and the flavors meld together beautifully.
Extra Tips:
When preparing the Graveyard Dirt Cake, make sure to crush the cookies finely to achieve a realistic dirt effect. You can use a food processor for a quicker and more uniform result.
For an added touch of creativity, consider using edible markers to write spooky messages or names on candy tombstones. If you need to prepare the dessert in advance, the cake can be made a day ahead and stored in the refrigerator, but wait to add the gummy decorations until just before serving to prevent them from becoming soggy.