
As Halloween creeps closer, I’ve been conjuring up plans for the ultimate adult party, where the dishes are as enchanting as the costumes. Think of a spooky charcuterie board, devilishly delightful Witch’s Brew Cocktails, and Mummy Jalapeño Poppers that tantalize the taste buds. These are just a glimpse of the spine-tingling treats I’ve discovered. Each recipe is more magical than the last. I’m thrilled to reveal the secrets behind these Halloween delights.
Spooky Charcuterie Board
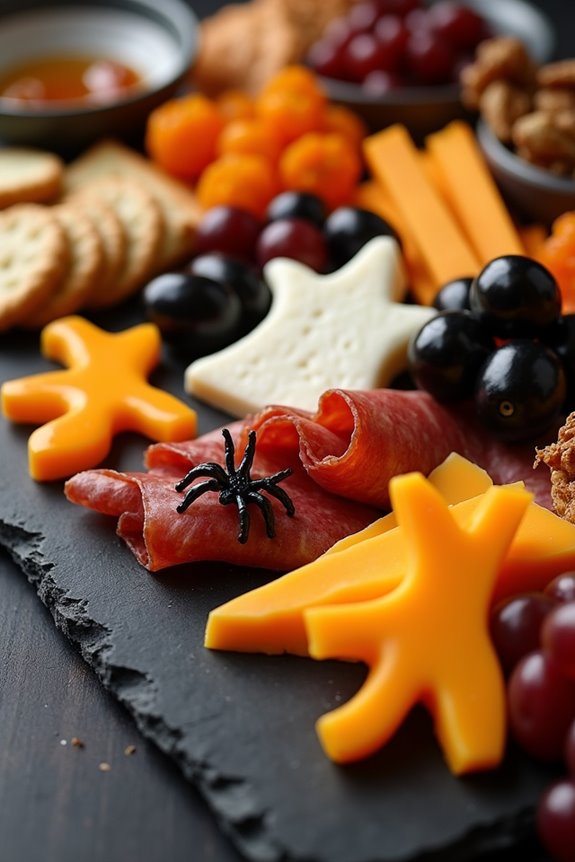
The Halloween season is the perfect time to get creative with your party food, and a Spooky Charcuterie Board is an excellent way to combine festive fun with delicious flavors. This board isn’t only visually striking with its eerie presentation but also offers a wide variety of flavors and textures to delight your adult guests. By incorporating a mix of cheeses, meats, fruits, nuts, and some Halloween-themed treats, you can create a centerpiece that’s both appetizing and fun to explore.
The beauty of a charcuterie board lies in its flexibility, allowing you to tailor the ingredients to suit your preferences while still achieving that spooky aesthetic. Think black olives as “eyeballs,” prosciutto “ghosts,” and a variety of cheeses cut into Halloween shapes. Adding in elements like dark chocolate, candied nuts, and fresh fruits can enhance the board’s visual appeal and taste. This Spooky Charcuterie Board is designed to serve 4-6 people, making it perfect for an intimate Halloween gathering.
Ingredients for 4-6 People:
- 8 oz. cheddar cheese, cut into Halloween shapes
- 8 oz. brie cheese, sliced
- 8 oz. prosciutto
- 8 oz. salami
- 1 cup black olives
- 1 cup green olives
- 1 cup seedless grapes, dark variety
- 1/2 cup dried apricots
- 1/2 cup candied nuts
- 4 oz. dark chocolate squares
- 1/2 cup assorted crackers
- 1/2 cup pretzel sticks
- 1/4 cup honey or fig jam
- Optional: small decorative plastic spiders or eyeballs for garnish
Cooking Instructions:
- Prepare the Cheeses: Use small Halloween-themed cookie cutters to cut the cheddar cheese into fun shapes like bats, ghosts, or pumpkins. Slice the brie cheese into wedges or other decorative shapes.
- Arrange the Meats: Fold the prosciutto and salami into loose ribbons or rolls, and place them strategically on the board to create a sense of movement and texture.
- Add the Olives and Grapes: Place the black and green olives in small bowls to resemble “eyeballs,” and scatter the dark grapes around the board to add contrast and freshness.
- Include the Dried Fruits and Nuts: Distribute the dried apricots and candied nuts in clusters across the board, providing sweet and crunchy options for your guests.
- Incorporate the Sweet Elements: Break the dark chocolate into smaller pieces and tuck them into spaces on the board. Add the crackers and pretzel sticks, making certain they’re easily accessible for guests.
- Finalize the Board: Add honey or fig jam in a small bowl for a sweet dipping option. Use small decorative plastic spiders or eyeballs to enhance the spooky theme, making certain they’re easily removable for eating.
- Present the Board: Arrange everything on a large, dark serving platter or board for the best visual impact. Confirm each element is visible and easily reachable.
Extra Tips:
When creating your Spooky Charcuterie Board, consider using a slate or dark wooden board to enhance the Halloween effect. Incorporating different heights with small bowls or stands can add dimension and interest to your presentation.
Remember to balance the flavors; the combination of sweet, salty, and savory should cater to a range of taste preferences. Finally, make certain to prepare this dish shortly before your guests arrive to maintain the freshness and presentation of the ingredients.
Witch’s Brew Cocktail

The Witch’s Brew Cocktail is a perfect potion for your Halloween party, designed to enchant your adult guests with its mysterious and enchanting flavors. This spooky drink combines bold spirits with a touch of sweetness and a splash of effervescence, creating a concoction that’s as delightful to sip as it’s to behold.
Serve this bewitching elixir in eerie glassware adorned with creepy garnishes to add an extra layer of spookiness to your gathering. Crafting the Witch’s Brew Cocktail is an easy yet impressive way to elevate your Halloween celebration. The vibrant hue of this cocktail, combined with its invigorating taste, will certainly become a conversation starter.
Ideal for a crowd of 4-6 people, this recipe guarantees that everyone gets to enjoy a glass of this hauntingly delicious drink. Let’s explore the ingredients and steps required to conjure up this enchanting brew.
Ingredients (Serves 4-6)
- 1 cup vodka
- 1/2 cup apple schnapps
- 1/2 cup blue curaçao
- 2 cups ginger ale
- 1 cup club soda
- Juice of 2 limes
- Ice cubes
- Lime slices, for garnish
- Black sugar, for rimming glasses
- Gummy worms or candy eyeballs, for garnish
Instructions
- Prepare the Glasses: Start by rimming the edges of your chosen glassware with black sugar. To do this, rub a lime wedge around the rim of each glass, then dip the rim into the black sugar to coat it evenly. This touch adds a spooky, festive flair to your presentation.
- Mix the Spirits: In a large pitcher or punch bowl, combine the vodka, apple schnapps, and blue curaçao. Stir gently until the ingredients are well mixed. The combination of these spirits will give your cocktail its distinctive color and flavor.
- Add the Bubbles: Pour in the ginger ale and club soda, and stir carefully to maintain the fizz. This step is vital for giving the cocktail its effervescent, bubbly texture, reminiscent of a witch’s bubbling cauldron.
- Citrus Twist: Squeeze the juice of two fresh limes into the mixture and stir again. The lime juice adds a tangy brightness that complements the sweet and fruity notes of the cocktail.
- Serve with Ice: Fill each sugar-rimmed glass with ice cubes, then pour the Witch’s Brew over the top, filling each glass about three-quarters full. Make sure each guest gets a balanced mix of the cocktail’s vibrant flavors.
- Garnish and Enjoy: Add a slice of lime to the rim of each glass and drop a few gummy worms or candy eyeballs into each drink for a playful, spooky touch. Serve immediately and watch your guests enjoy this magical brew.
Extra Tips
For an even more dramatic presentation, consider adding dry ice to the punch bowl just before serving (handle with care and verify it’s fully evaporated before drinking). This will create a foggy, mystical effect that enhances the Halloween atmosphere.
You can also experiment with different candy garnishes to match your party’s theme or to cater to your guests’ tastes. Remember to adjust the sweetness by varying the amounts of ginger ale and club soda according to your preference. Enjoy your supernatural soirée!
Mummy Jalapeño Poppers

Mummy Jalapeño Poppers are a spooky and delicious treat perfect for a Halloween party. These poppers add a festive twist to the classic jalapeño popper by wrapping them in crescent dough to mimic the look of a mummy. The combination of the spicy jalapeño, creamy cheese filling, and buttery dough creates a flavorful bite that’s certain to be a hit among adults looking to indulge in some themed snacks.
Whether you’re hosting a party or attending one, these poppers are easy to make and will bring a playful touch to your Halloween festivities.
The preparation involves hollowing out fresh jalapeños, filling them with a creamy cheese mixture, and then wrapping them with strips of crescent dough to create the mummy effect. The eyes are made using small pieces of olive or pepper, giving them a whimsical appearance. Baking the poppers brings out the flavors and guarantees the cheese is perfectly melted.
This recipe is designed to serve 4-6 people, making it ideal for small gatherings or as part of a larger spread of Halloween treats.
Ingredients for 4-6 servings:
- 10 fresh jalapeño peppers
- 8 oz cream cheese, softened
- 1 cup shredded cheddar cheese
- 1/2 teaspoon garlic powder
- 1/2 teaspoon onion powder
- 1/4 teaspoon salt
- 1 can (8 oz) refrigerated crescent roll dough
- 20 small pieces of black olive or red bell pepper for eyes
Instructions:
- Preheat your oven to 375°F (190°C) to guarantee it’s hot and ready for baking the poppers later on.
- Prepare the jalapeños by slicing each one in half lengthwise. Use a small spoon to carefully scoop out the seeds and membranes. This will reduce the heat, making the poppers more palatable for those sensitive to spice.
- In a medium bowl, mix together the cream cheese, shredded cheddar cheese, garlic powder, onion powder, and salt until the mixture is smooth and well combined.
- Fill each jalapeño half with the cheese mixture, ensuring it’s evenly distributed among all the peppers.
- Open the can of crescent roll dough and unroll it onto a flat surface. Use a sharp knife or pizza cutter to slice the dough into thin strips.
- Wrap each filled jalapeño half with the dough strips, leaving a small gap for the eyes. Place two small pieces of black olive or red bell pepper on each popper to create the eyes.
- Arrange the wrapped jalapeño poppers on a baking sheet lined with parchment paper or a silicone baking mat. Make sure they’re spaced evenly to promote even baking.
- Bake in the preheated oven for 12-15 minutes, or until the dough is golden brown and the cheese filling is bubbling.
- Remove from the oven and allow them to cool for a few minutes before serving. This guarantees that the fillings set slightly and are easier to handle.
Extra Tips:
For an added kick, consider mixing in a teaspoon of chopped pickled jalapeños or a dash of hot sauce into the cheese filling. If you prefer milder poppers, soak the jalapeño halves in cold water for 10 minutes after deseeding them to further reduce their heat.
Additionally, make sure to wear gloves when handling the jalapeños to avoid any irritation from the oils. These Mummy Jalapeño Poppers can be made a few hours in advance and baked just before serving, allowing you to enjoy the party without being stuck in the kitchen.
Bat Wing Chicken Drumettes

Bat Wing Chicken Drumettes are a spooky and delicious addition to your Halloween party menu for adults. These ominous-looking drumettes are sure to be a hit with their rich flavors and crispy texture. Perfectly seasoned and coated with a dark, savory glaze, these drumettes resemble eerie bat wings, making them both a visually striking and tasty treat.
The combination of soy sauce, balsamic vinegar, and dark spices gives them their signature midnight color and depth of flavor, while the oven-baking guarantees that they’re crispy on the outside and juicy on the inside.
This recipe is designed to serve 4-6 people, making it ideal for a small gathering or as part of a larger spread of Halloween-themed dishes. Whether you’re hosting a spooky soiree or a casual get-together, these Bat Wing Chicken Drumettes are sure to impress your guests. They’re simple to prepare and can be made ahead of time, allowing you to focus on enjoying the party.
Serve them with a complementary dipping sauce, and watch as your guests devour these tasty and sinister delights.
Ingredients (Serves 4-6)
- 2 pounds chicken drumettes
- 1/2 cup soy sauce
- 1/4 cup balsamic vinegar
- 2 tablespoons olive oil
- 2 tablespoons honey
- 1 tablespoon Worcestershire sauce
- 2 teaspoons garlic powder
- 1 teaspoon smoked paprika
- 1 teaspoon onion powder
- 1/2 teaspoon black pepper
- 1/2 teaspoon ground ginger
- 1/4 teaspoon cayenne pepper
- Black food coloring (optional)
Cooking Instructions
- Prepare the Marinade: In a medium-sized bowl, combine the soy sauce, balsamic vinegar, olive oil, honey, Worcestershire sauce, garlic powder, smoked paprika, onion powder, black pepper, ground ginger, and cayenne pepper. If you want to enhance the dark color, add a few drops of black food coloring and mix thoroughly.
- Marinate the Drumettes: Place the chicken drumettes in a large resealable plastic bag or a shallow dish. Pour the marinade over the drumettes, making certain they’re well coated. Seal the bag or cover the dish with plastic wrap. Refrigerate for at least 2 hours, or overnight for more intense flavor.
- Preheat the Oven: Preheat your oven to 400°F (200°C). Line a baking sheet with aluminum foil and place a wire rack on top. This will allow the drumettes to crisp up while baking.
- Arrange and Bake the Drumettes: Remove the drumettes from the marinade, letting any excess drip off. Arrange them in a single layer on the wire rack. Bake in the preheated oven for 25-30 minutes, turning once halfway through, until the drumettes are cooked through and have reached an internal temperature of 165°F (74°C).
- Caramelize and Serve: For an extra crispy and caramelized finish, you may broil the drumettes for an additional 2-3 minutes. Keep a close eye on them to prevent burning. Serve the drumettes hot with your favorite dipping sauce.
Extra Tips
When preparing Bat Wing Chicken Drumettes, it’s important to allow enough marinating time for the flavors to fully penetrate the meat. If you’re short on time, a minimum of 2 hours will suffice, but overnight marinating is recommended for the best results.
Using a wire rack when baking helps the drumettes cook evenly and become extra crispy. If you choose to use black food coloring, be cautious with the amount to avoid an overly strong color.
Finally, consider serving with a creamy dipping sauce, such as ranch or blue cheese, to complement the savory flavors of the drumettes.
Spider Web Deviled Eggs
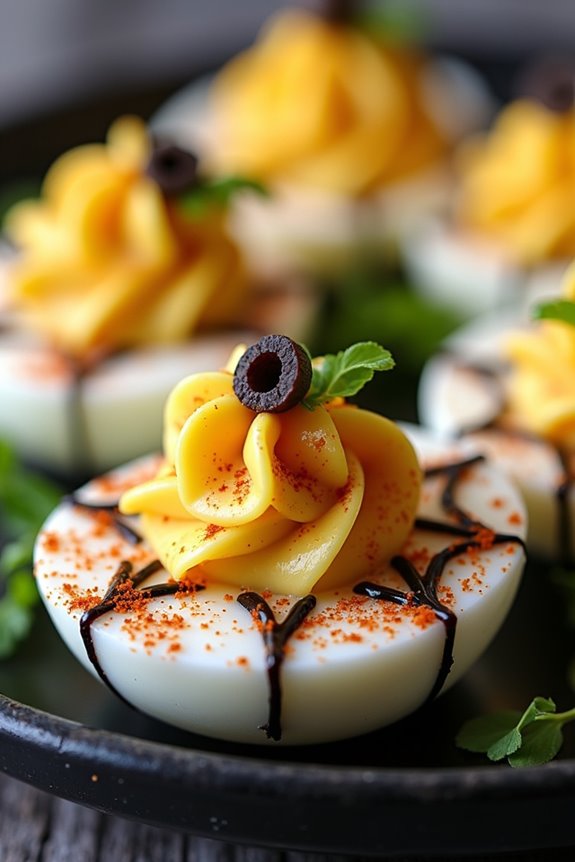
Spider Web Deviled Eggs are a spooky and delicious twist on the classic appetizer, making them perfect for any Halloween party. This recipe transforms the traditional deviled eggs into a visual treat that resembles a spider web, adding an eerie touch to your party spread. The creamy yolk filling is spiced and seasoned just right, providing a delightful contrast to the slightly tangy and eye-catching appearance of the egg whites.
This recipe serves 4-6 people, making it ideal for a small gathering. The secret to achieving the spider web effect lies in gently cracking the eggshells after boiling and soaking them in a dark, food-safe dye. Once peeled, the eggs reveal an intricate web-like pattern that’s sure to impress your guests. The deviled egg filling is then piped into the egg whites, completing the spine-chilling look that’s as delicious as it’s festive.
Ingredients for Spider Web Deviled Eggs (Serves 4-6):
- 6 large eggs
- 1 teaspoon black food coloring or a few drops of liquid black food coloring
- 1 tablespoon mayonnaise
- 1 teaspoon Dijon mustard
- 1 teaspoon white vinegar
- 1/4 teaspoon salt
- 1/4 teaspoon black pepper
- Paprika for garnish
- Optional: olives or parsley for decoration
Cooking Instructions:
- Boil the Eggs: Place the eggs in a saucepan and fill with enough cold water to cover them by about an inch. Bring the water to a boil, then remove the saucepan from heat, cover it, and let the eggs sit for 10 minutes.
- Prepare the Dye: In a small bowl, combine the black food coloring with 1 cup of water. If using liquid food coloring, add a few drops to achieve a dark color.
- Crack the Shells: Once the eggs have cooked, transfer them to a bowl of ice water and let them cool for 5 minutes. Gently crack the eggshells all over with the back of a spoon, making sure the shell remains intact on the egg but is cracked enough to allow the dye to seep through.
- Create the Spider Web Effect: Place the cracked eggs into the bowl with the black dye, making sure they’re fully submerged. Let them soak for at least 1 hour, or until the desired color intensity is achieved.
- Peel the Eggs: Remove the eggs from the dye and peel them carefully to reveal the spider web pattern on the egg whites.
- Prepare the Filling: Cut the eggs in half lengthwise and scoop out the yolks into a mixing bowl. Add the mayonnaise, Dijon mustard, white vinegar, salt, and black pepper to the yolks. Mash and mix until smooth.
- Assemble the Deviled Eggs: Spoon or pipe the yolk mixture back into the egg white halves. Use a piping bag for a more decorative presentation.
- Garnish: Lightly sprinkle paprika over the filled eggs for a pop of color. You can also add small slices of olives or a sprig of parsley for additional decoration.
Extra Tips:
To guarantee the best results, make sure your eggs aren’t too fresh, as older eggs peel more easily. If you’re short on time, you can prepare the eggs and filling a day in advance, storing them separately in the refrigerator and assembling them just before serving.
If you prefer a more intense spider web effect, let the eggs soak longer in the dye. Remember, the key to achieving a striking pattern is in the gentle cracking of the shells. Enjoy your spooky yet scrumptious spider web deviled eggs at your Halloween gathering!
Graveyard Taco Dip
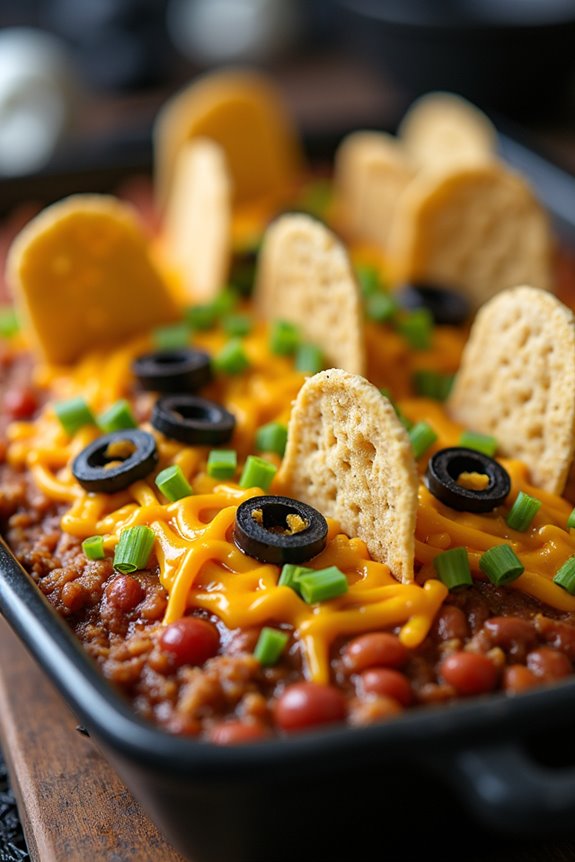
Graveyard Taco Dip is a spooky and delicious addition to your Halloween party spread, perfect for adults looking to indulge in savory flavors while embracing the festive spirit. This layered dip combines zesty and creamy elements to create a dish that not only delights the taste buds but also adds a ghostly charm to your table.
With its graveyard theme, this dip is garnished with edible tombstones and eerie decorations, making it a fun and interactive part of your party. The combination of seasoned beef, creamy refried beans, tangy salsa, and a variety of toppings makes this taco dip an irresistible treat.
The graveyard theme is achieved by using tortilla chips shaped like tombstones and other Halloween-themed decorations to create a visually striking centerpiece. This recipe serves 4-6 people, making it perfect for small gatherings or as a part of a larger buffet spread.
Ingredients:
- 1 lb ground beef
- 1 packet taco seasoning
- 1 can (16 oz) refried beans
- 1 cup sour cream
- 1 cup salsa
- 1 cup shredded cheddar cheese
- 1/2 cup sliced black olives
- 1/2 cup chopped green onions
- Tortilla chips (tombstone-shaped, if possible)
- Halloween-themed decorations (e.g., plastic spiders, skeletons)
Instructions:
- Cook the Ground Beef: In a large skillet over medium heat, cook the ground beef until it’s browned and fully cooked, breaking it apart with a spatula. Drain any excess fat.
- Add Taco Seasoning: Stir in the taco seasoning with the cooked beef according to the packet instructions (usually involves adding some water). Cook for an additional 2-3 minutes until well combined. Remove from heat.
- Prepare the Base Layer: Spread the refried beans evenly over the bottom of a large serving dish or a deep platter to create the first layer.
- Add the Beef Layer: Spread the seasoned beef on top of the refried beans, ensuring an even layer.
- Layer the Sour Cream: Gently spread the sour cream over the beef layer, taking care not to disturb the layers beneath.
- Add Salsa: Evenly distribute the salsa over the sour cream layer.
- Sprinkle Cheese: Generously sprinkle the shredded cheddar cheese over the salsa layer.
- Garnish: Top with sliced black olives and chopped green onions. Arrange the tortilla chips to resemble tombstones sticking out of the dip, creating a graveyard effect. Add any additional Halloween-themed decorations to enhance the spooky presentation.
Extra Tips:
To make your Graveyard Taco Dip even more eye-catching, consider using food-safe markers to write spooky names or messages on the tortilla chip tombstones.
If you’re short on time, you can prepare the beef and bean layers in advance and assemble the remaining layers just before serving. For added heat, include jalapeños or a spicy salsa.
Bloody Mary Shrimp Shooters
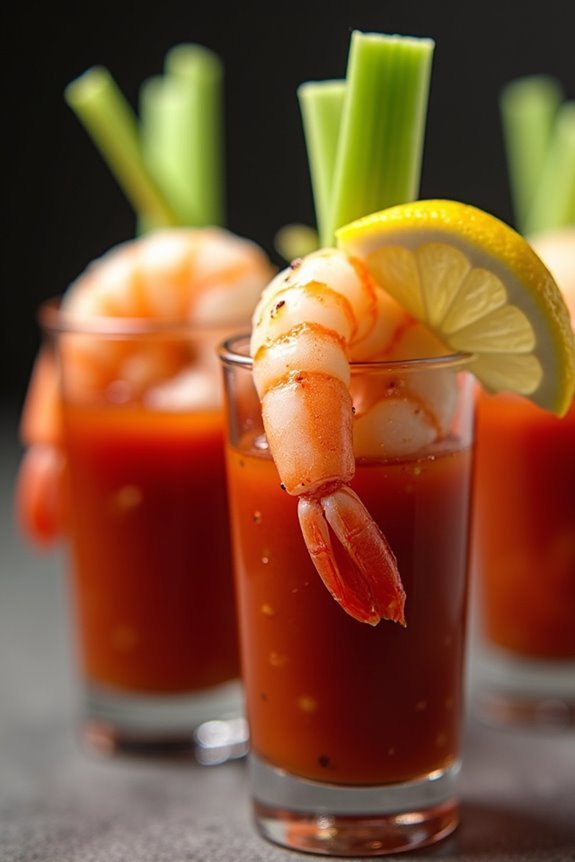
If you’re looking to add a sophisticated and spooky touch to your Halloween party, Bloody Mary Shrimp Shooters are the perfect appetizer. This dish combines the classic flavors of a Bloody Mary cocktail with succulent shrimp, served in shot glasses for a visually striking presentation that will impress your guests.
The vibrant red color and luscious taste make it an ideal addition to your adult Halloween gathering, offering a delightful mix of spicy, tangy, and savory flavors. Not only do these shooters look fantastic, but they’re also easy to prepare, allowing you to spend more time enjoying the party and less time in the kitchen.
The combination of vodka-infused cocktail sauce, fresh shrimp, and a hint of spice creates a tantalizing treat that’s sure to be a hit. Whether you’re hosting a full-fledged Halloween dinner or a casual cocktail party, these Bloody Mary Shrimp Shooters are a must-have on your menu.
Ingredients (Serving Size: 4-6 people):
- 1 pound large shrimp, peeled and deveined
- 1 cup tomato juice
- 1/4 cup vodka
- 1 tablespoon horseradish
- 1 tablespoon Worcestershire sauce
- 1 teaspoon hot sauce (adjust to taste)
- 1 tablespoon lemon juice
- Salt and pepper to taste
- 1 teaspoon celery salt
- Celery stalks for garnish
- Lemon wedges for garnish
- Ice
Cooking Instructions:
- Prepare the Shrimp: Fill a large pot with water and bring it to a boil. Add the shrimp and cook until they turn pink and opaque, about 2-3 minutes. Immediately transfer them to a bowl of ice water to stop the cooking process. Once cooled, remove from the ice water and pat dry with paper towels.
- Make the Cocktail Sauce: In a mixing bowl, combine the tomato juice, vodka, horseradish, Worcestershire sauce, hot sauce, lemon juice, celery salt, salt, and pepper. Stir well until all ingredients are fully integrated.
- Assemble the Shooters: Arrange shot glasses on a tray. Fill each glass halfway with the cocktail sauce mixture. Carefully place one or two shrimp over the rim of each glass.
- Garnish and Serve: Garnish each shooter with a small celery stalk and a lemon wedge. For an extra spooky touch, consider adding a dash of hot sauce on top for a blood-like effect. Serve immediately.
Extra Tips:
For a more robust flavor, consider marinating the shrimp in the cocktail sauce for an hour before assembling the shooters. This will allow the shrimp to soak up the delicious, spicy flavors of the sauce.
Additionally, adjust the level of spiciness to your liking by varying the amount of hot sauce and horseradish. If you’re preparing these ahead of time, keep the cocktail sauce and shrimp separate until just before serving to maintain freshness.
Finally, use high-quality vodka to guarantee the best possible flavor in your shooters.
Ghostly Caprese Salad

If you’re looking for a spooky yet sophisticated addition to your Halloween party menu, seek no further than the Ghostly Caprese Salad. This dish combines the classic elements of a traditional Caprese salad with a playful, ghostly twist, perfect for entertaining adults who appreciate both fine food and festive fun.
Fresh mozzarella balls are transformed into cute little ghosts with the help of some strategic olive placements, while juicy tomatoes and fragrant basil provide the perfect backdrop. This salad isn’t only visually appealing but also deliciously fresh, offering a delightful balance of flavors that will haunt your taste buds in the best way possible.
The Ghostly Caprese Salad is an easy yet impressive dish to prepare, making it an ideal choice for party hosts who want to spend more time enjoying their guests than slaving away in the kitchen. With just a handful of ingredients and a little bit of creativity, you can whip up this spooky salad in no time.
Whether you’re hosting a full-blown Halloween bash or a more intimate dinner party, this recipe is sure to be a hit with your adult guests, striking the perfect balance between eerie and elegant.
Ingredients (Serves 4-6):
- 16 ounces of fresh mozzarella balls (bocconcini or ciliegine)
- 4 large ripe tomatoes
- 1 cup fresh basil leaves
- 2 tablespoons balsamic glaze
- 2 tablespoons extra virgin olive oil
- Salt and freshly ground black pepper to taste
- 4 black olives (for ghost eyes and mouths)
- 8 wooden skewers or toothpicks (optional, for assembly)
Instructions:
- Prepare the Mozzarella Ghosts: Start by draining the mozzarella balls and patting them dry with paper towels to remove excess moisture. Cut the black olives into small pieces to create eyes and mouths. Attach two small olive pieces as eyes and one for the mouth onto each mozzarella ball using a dab of olive oil to help them stick. Arrange them on a large serving platter.
- Slice the Tomatoes: Wash and slice the tomatoes into thick rounds. Arrange the tomato slices around the mozzarella ghosts on the serving platter, creating a decorative pattern.
- Add the Basil Leaves: Tuck fresh basil leaves among the tomato slices and mozzarella ghosts. The vibrant green of the basil will add a fresh pop of color to the salad.
- Drizzle with Balsamic Glaze and Olive Oil: Evenly drizzle the balsamic glaze and olive oil over the entire salad. This will enhance the flavors and add a touch of elegance to the presentation.
- Season and Serve: Sprinkle the salad with a pinch of salt and freshly ground black pepper to taste. If using, insert a skewer or toothpick into each mozzarella ghost to help hold them in place. Serve immediately, or chill for a few minutes before serving to allow the flavors to meld together.
Extra Tips:
To make your Ghostly Caprese Salad even more festive, consider using heirloom tomatoes in various colors for a more visually striking presentation. If you want to prepare the salad ahead of time, keep the mozzarella and tomato slices separate in the refrigerator until just before serving. This will prevent the salad from becoming too watery.
Additionally, for a more intense flavor, you can marinate the mozzarella balls in olive oil with a few crushed garlic cloves and a sprig of fresh thyme for a couple of hours before assembling the salad.
Pumpkin Spice Martini

The Pumpkin Spice Martini is a festive and sophisticated cocktail that’s perfect for an adult Halloween party. This delightful drink blends the rich flavors of pumpkin spice with the smoothness of vodka, creating a seasonal cocktail that will impress your guests. Serve it chilled in a martini glass with a cinnamon sugar rim for that extra touch of elegance.
It’s not just a drink; it’s an experience that embodies the cozy and spicy notes of fall. This recipe yields enough for 4-6 people, making it ideal for a small gathering or a starter drink for a larger party. The combination of pumpkin puree, vanilla vodka, and warm spices creates a perfect balance of sweetness and warmth.
Top it off with a dollop of whipped cream and a sprinkle of nutmeg for the ultimate autumnal treat. Let’s plunge into the ingredients and steps needed to craft this enchanting cocktail.
Ingredients:
- 1 cup vanilla vodka
- 1/2 cup cream liqueur (such as Baileys)
- 1/2 cup pumpkin puree
- 1/4 cup maple syrup
- 1 tsp pumpkin pie spice
- Ice cubes
- Cinnamon sugar (for rimming)
- Whipped cream (optional, for garnish)
- Ground nutmeg (optional, for garnish)
Instructions:
- Prepare the Glasses: Begin by rimming your martini glasses with cinnamon sugar. To do this, run a lemon or orange wedge around the rim of each glass, then dip the rims into a shallow plate of cinnamon sugar. Set aside.
- Mix the Ingredients: In a cocktail shaker, combine the vanilla vodka, cream liqueur, pumpkin puree, maple syrup, and pumpkin pie spice. Add a generous amount of ice cubes to the shaker.
- Shake the Mixture: Secure the lid on the cocktail shaker and shake vigorously for about 30 seconds. This guarantees that the drink is well-mixed and chilled.
- Strain and Serve: Strain the mixture into the prepared martini glasses. Be careful not to disturb the cinnamon sugar rim.
- Garnish and Finish: Optionally, top each martini with a dollop of whipped cream and a light sprinkle of ground nutmeg for additional flavor and presentation.
Extra Tips:
For the best Pumpkin Spice Martini, verify that all ingredients are well chilled before mixing. This will help the drink maintain its revitalizing quality and prevent the ice from diluting the flavors too much.
If you prefer a stronger spice flavor, consider adding a pinch more of pumpkin pie spice. Additionally, if you wish to make a non-alcoholic version, replace the vodka and cream liqueur with a combination of milk and a splash of vanilla extract.
Finally, always taste your drink before serving and adjust the sweetness or spice to your preference. Enjoy responsibly!
Haunted Chocolate Bark

Haunted Chocolate Bark is a spooktacular treat perfect for adult Halloween parties, combining rich dark chocolate with eerie, delightful toppings. This simple yet effective recipe allows you to play with flavors and textures, making it a standout centerpiece on your Halloween dessert table.
The base of dark chocolate provides a decadent canvas, while the ghostly decorations release your creativity, allowing you to tailor the bark to your party’s theme. Whether it’s haunted houses or creepy crawlies, this chocolate bark will be a hit among your guests.
The versatility of this recipe means you can mix and match your favorite toppings. Think along the lines of crushed cookies for a graveyard effect, candy corn for an autumnal touch, or even a sprinkle of sea salt for a sophisticated twist. The key is to have fun and let your imagination run wild, while still focusing on creating a delicious treat.
This recipe serves 4-6 people, making it ideal for a small gathering or as part of a larger buffet spread.
Ingredients:
- 12 ounces dark chocolate, chopped
- 1/2 cup white chocolate chips
- 1/4 cup candy corn
- 1/4 cup mini marshmallows
- 1/4 cup crushed chocolate cookies
- 2 tablespoons edible candy eyes
- Optional: a sprinkle of sea salt or edible glitter
Instructions:
- Prepare Your Workspace: Line a baking sheet with parchment paper, making sure there’s enough overhang to easily remove the chocolate bark once it’s set.
- Melt the Dark Chocolate: In a microwave-safe bowl, melt the dark chocolate in 30-second intervals, stirring between each to guarantee even melting. Alternatively, use a double boiler on the stove for a more controlled melt. The chocolate should be smooth and glossy.
- Spread the Chocolate: Pour the melted dark chocolate onto the prepared baking sheet and use a spatula to spread it evenly into a rectangle about 1/4 inch thick.
- Melt the White Chocolate: Melt the white chocolate chips using the same method as the dark chocolate. Once melted, use a spoon to drizzle the white chocolate over the dark chocolate base, creating a spooky swirl or cobweb effect.
- Add Toppings: While the chocolate is still warm, sprinkle the candy corn, mini marshmallows, crushed cookies, and candy eyes across the surface. Press them lightly into the chocolate to guarantee they adhere as it sets.
- Set the Chocolate: Allow the chocolate bark to set at room temperature for 1-2 hours, or place it in the refrigerator for a quicker set time.
- Break and Serve: Once fully set, use your hands to break the bark into pieces. Arrange on a platter and serve to your guests.
Extra Tips:
When melting chocolate, be cautious not to overheat it as this can cause it to seize and become grainy. If using a microwave, always use short intervals and stir frequently.
Feel free to customize the toppings to suit your party theme, like using gummy worms for a creepy factor or adding nuts for a crunchy texture. For an extra spooky effect, consider using a touch of black food coloring in the white chocolate to create a ghostly gray swirl.
Monster Eyeball Cake Pops
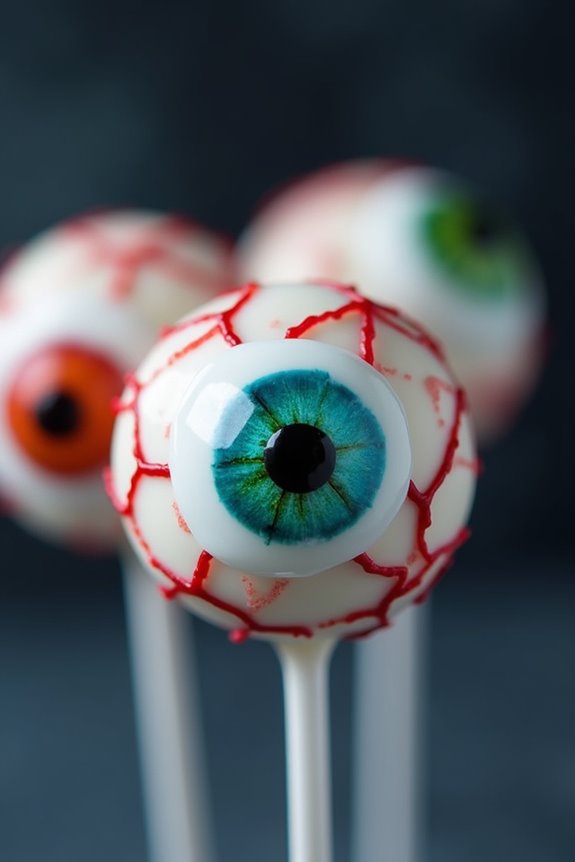
Spook up your Halloween party with these deliciously eerie Monster Eyeball Cake Pops! Perfect for adults who want to indulge in a fun and festive treat, these cake pops are as delightful to look at as they’re to eat. With a combination of rich cake, creamy frosting, and a ghoulish exterior, these cake pops are sure to be a hit at your Halloween gathering.
Whether you’re hosting a spooky soiree or just want to bring a little fright to your dessert table, these cake pops will add the perfect touch of Halloween magic.
The process begins with baking a moist cake that will later be crumbled and mixed with frosting to create a dough-like consistency. This mixture is then shaped into balls, dipped in candy coating, and decorated to resemble creepy eyeballs. Don’t worry if you’re not a professional baker; these Monster Eyeball Cake Pops are simple enough for anyone to make.
Just follow the recipe below, and you’ll have a batch of six to eight monstrously fun treats ready to serve.
Ingredients (Serves 4-6)
- 1 box of cake mix (any flavor)
- Ingredients needed for the cake mix (typically eggs, oil, and water)
- 1 cup of frosting (store-bought or homemade)
- 16 oz of white candy melts
- 24 lollipop sticks
- Edible food coloring pens (black, red, blue, green)
- Candy eyeballs or colored fondant
- Assorted sprinkles (optional)
Instructions
- Bake the Cake: Follow the instructions on the cake mix box to bake the cake. Once baked, let it cool completely. This will be the base for your cake pops.
- Prepare the Cake Mixture: Crumble the cooled cake into a large bowl. Add the frosting, a little at a time, mixing thoroughly until the cake and frosting are combined into a dough-like consistency.
- Shape the Cake Balls: Using your hands or a small cookie scoop, shape the mixture into 1-inch balls. Place them on a baking sheet lined with parchment paper. Once all the balls are shaped, refrigerate them for at least 30 minutes to firm up.
- Melt the Candy Coating: In a microwave-safe bowl, melt the white candy melts according to the package instructions. Stir until smooth.
- Assemble the Cake Pops: Dip one end of each lollipop stick into the melted candy coating and insert it halfway into each cake ball. This will help secure the stick in the cake pop. Allow the candy coating to set before proceeding.
- Coat the Cake Pops: Dip each cake ball into the melted candy coating, ensuring it’s completely covered. Gently tap off any excess coating and place upright in a styrofoam block or a cake pop holder to dry.
- Decorate the Eyeballs: Once the coating has set, use edible food coloring pens to draw veins and details on the cake pops, creating a realistic eyeball effect. Attach candy eyeballs or use colored fondant to make the iris, and let your creativity shine!
- Final Touches: If desired, add sprinkles or additional details to enhance the spooky appearance. Allow the decorations to set completely before serving.
Extra Tips
For best results, make sure your cake balls are cold but not frozen when dipping them in the candy coating, as this will help the coating set more quickly. If the candy coating becomes too thick, add a small amount of shortening or vegetable oil to thin it out.
Feel free to get creative with the decorations—use different colors and patterns to create a variety of eyeball designs. These cake pops can be made a day in advance and stored in the refrigerator, making them a convenient option for party planning.
Enjoy your creepy yet delicious Monster Eyeball Cake Pops!