
As Halloween approaches, I find myself enchanted by the idea of creating 13 spooky yet sweet sugar cookies that are sure to thrill and delight. Each cookie, from eerie cobwebs to ghostly gingersnaps, combines a touch of the macabre with irresistible flavors. Picture serving wicked witch hats or zombie brains that are as pleasing to the eyes as they are to the palate. I’m thrilled to unveil the secrets behind these magical treats, making your Halloween celebration both unforgettable and delicious. But there’s more to explore…
Creepy Cobweb Cookies
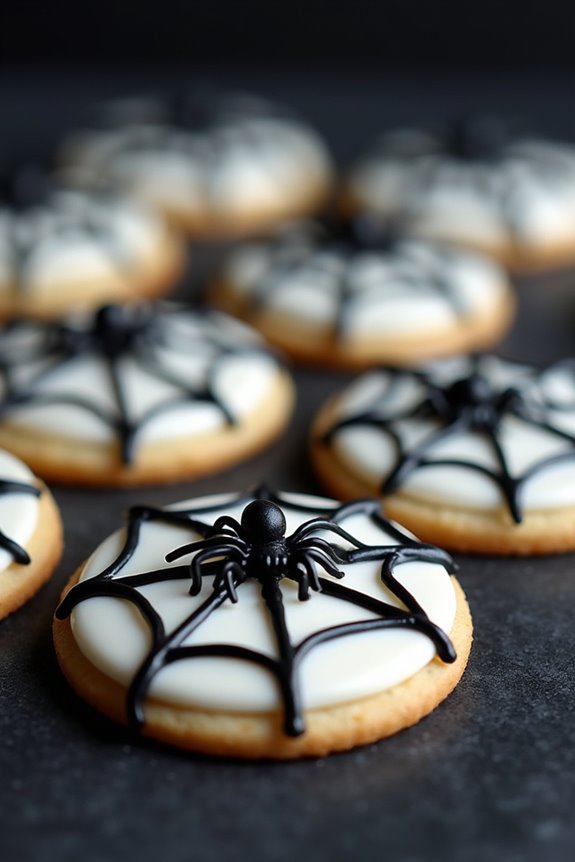
Creepy Cobweb Cookies are the perfect treat to spookify your Halloween festivities. These sugar cookies, adorned with intricate icing webs and decorative spiders, aren’t only hauntingly beautiful but also deliciously sweet. Whether you’re hosting a Halloween party or want to surprise your family with a festive treat, these cookies will surely captivate both eyes and taste buds.
The process of making Creepy Cobweb Cookies involves creating a classic sugar cookie base and decorating them with a simple yet striking royal icing. With a soft, buttery texture that melts in your mouth, these cookies serve as a perfect canvas for your spooky designs. The royal icing provides a smooth, glossy surface that hardens to create the perfect backdrop for your edible cobwebs.
Using a piping bag and a steady hand, you can transform your cookies into mini masterpieces. Gather your ingredients and follow the steps below to create a batch of these eerie delights, perfect for serving 4-6 people.
Ingredients
- 2 3/4 cups all-purpose flour
- 1 teaspoon baking soda
- 1/2 teaspoon baking powder
- 1 cup unsalted butter, softened
- 1 1/2 cups white sugar
- 1 egg
- 1 teaspoon vanilla extract
- 1/2 teaspoon almond extract
- Royal icing (for decorating)
- Black food coloring
- Plastic spider decorations (optional)
Instructions
- Prepare the Dough: In a medium bowl, whisk together the flour, baking soda, and baking powder. In a separate large bowl, cream the softened butter and sugar together until light and fluffy. Beat in the egg, vanilla extract, and almond extract until well combined.
- Combine Ingredients: Gradually blend the dry ingredients into the wet mixture. Mix until the dough forms and begins to pull away from the sides of the bowl. Divide the dough in half, wrap each half in plastic wrap, and refrigerate for at least 1 hour (or overnight) to firm up.
- Preheat and Roll: Preheat your oven to 375°F (190°C). Roll out the chilled dough on a lightly floured surface to about 1/4 inch thickness. Use a round cookie cutter to cut out shapes, and place the cookies 1 inch apart on ungreased baking sheets.
- Bake: Bake in the preheated oven for 8 to 10 minutes or until the edges are lightly golden. Allow the cookies to cool on the baking sheet for 5 minutes before transferring them to a wire rack to cool completely.
- Prepare the Icing: While the cookies cool, prepare the royal icing according to the package instructions. Divide the icing into two bowls, tinting one with black food coloring to create a contrasting color for the cobweb design.
- Decorate: Once the cookies are completely cooled, pipe a thin layer of white royal icing over each cookie. Immediately pipe concentric circles of black icing on top, then drag a toothpick from the center to the edge to create a cobweb effect.
- Finishing Touches: Allow the icing to dry completely. If desired, place small plastic spider decorations on the cookies for an extra creepy touch. Remove the spiders before eating.
Extra Tips
For the best results, verify your cookies are completely cool before icing to prevent the icing from becoming runny. When decorating, work quickly to create the cobweb design before the icing sets.
If you’re new to piping, practice on a piece of parchment paper before decorating the cookies. Store your Creepy Cobweb Cookies in an airtight container to keep them fresh and crisp for several days.
Haunting Eyeball Treats
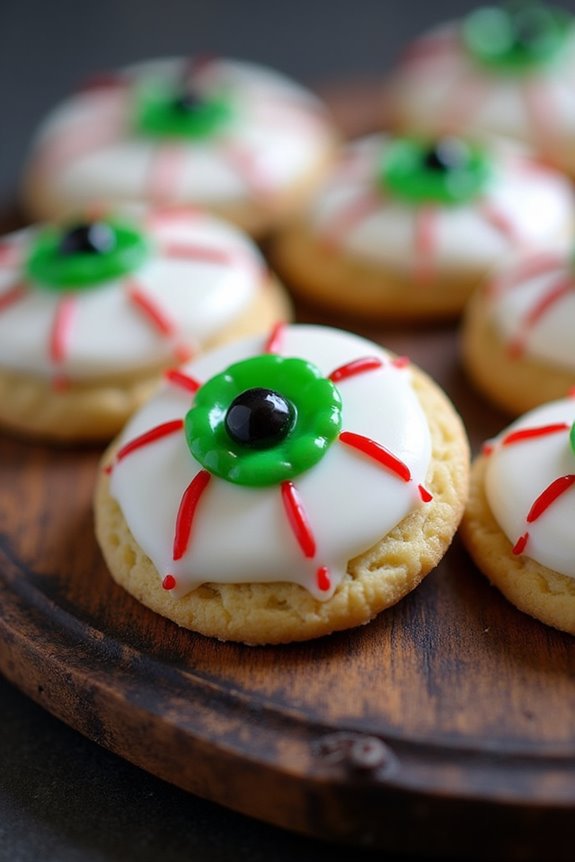
Halloween is the perfect time to get creative in the kitchen, and these Haunting Eyeball Treats make for a spooky and delicious addition to any festive gathering.
These treats are fundamentally sugar cookies that are decorated to look like eerie eyeballs, making them a fun and interactive project for both kids and adults. With vibrant colors and a sweet, buttery flavor, these cookies are sure to be a hit at your Halloween party or as a delightful surprise for trick-or-treaters.
The key to these Haunting Eyeball Treats lies in the decoration. Using a basic sugar cookie dough as the base, you’ll shape and bake cookies that are easy to work with and hold their shape well. After baking, the real fun begins as you transform these cookies into creepy eyeballs using colored icing and candy decorations.
Perfect for a serving size of 4-6 people, this recipe allows you to create a batch of approximately 24 cookies, depending on the size of your cookie cutter.
Ingredients
- 2 ¾ cups all-purpose flour
- 1 teaspoon baking powder
- ½ teaspoon salt
- 1 cup unsalted butter, softened
- 1 ½ cups granulated sugar
- 1 large egg
- 1 teaspoon vanilla extract
- Red gel food coloring
- Black gel food coloring
- Green or blue candy melts
- White candy melts
- Black candy-coated chocolates or black icing
Instructions
- Preheat and Prepare Dough: Preheat your oven to 350°F (175°C). In a medium bowl, whisk together the flour, baking powder, and salt. In a large bowl, cream together the softened butter and sugar until light and fluffy, approximately 2-3 minutes. Beat in the egg and vanilla extract until combined.
- Combine and Chill: Gradually add the dry ingredients into the wet ingredients, mixing until a dough forms. Divide the dough in half, wrap each portion in plastic wrap, and chill for at least 1 hour in the refrigerator.
- Roll and Cut: On a lightly floured surface, roll out one portion of the dough to about ¼-inch thickness. Use a round cookie cutter to cut out circles and place them on a baking sheet lined with parchment paper.
- Bake: Bake the cookies in the preheated oven for 8-10 minutes, or until the edges are lightly golden. Allow them to cool on the baking sheet for 5 minutes before transferring to a wire rack to cool completely.
- Decorate the Eyeballs: Once the cookies are cool, melt the white candy melts according to package instructions and coat the top of each cookie. Allow the coating to set slightly. Using the colored candy melts, create an iris in the center of each cookie, then use black gel food coloring or candy-coated chocolates to create a pupil.
- Add Details: For an extra spooky effect, use red gel food coloring to create bloodshot veins extending from the iris to the edges of the cookie.
Extra Tips
When working with gel food coloring, a little goes a long way, so start with a small amount and add more as needed to achieve the desired color.
If you don’t have candy melts, you can substitute with colored icing or edible markers for decorating. Make sure to work quickly when adding details to the candy melt coating, as it can set rapidly.
To save time, you can prepare the dough a day in advance and let it chill overnight. These cookies are best enjoyed fresh but can be stored in an airtight container for up to a week.
Mummy Wrapped Delights
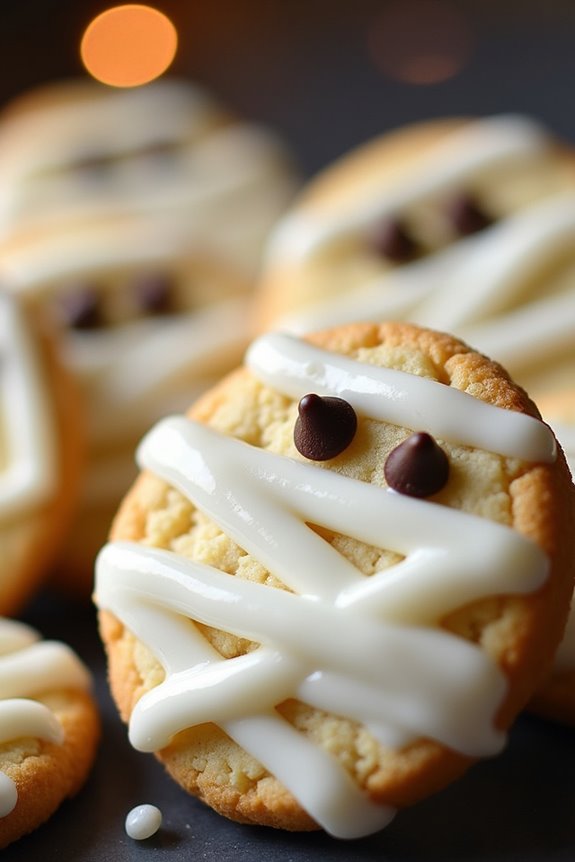
Halloween Sugar Cookies are a festive and delightful treat that are perfect for celebrating the spooky season. One of the most fun and creative variations of these cookies is the Mummy Wrapped Delights.
These cookies not only taste delicious with their buttery and sweet flavor, but they also bring a playful and eerie element to your Halloween spread with their intricate mummy wrapping design. Perfect for parties or as a family activity, these cookies are sure to impress both kids and adults alike.
The Mummy Wrapped Delights are fundamentally sugar cookies decorated to look like mummies, with white icing mimicking the bandages. This recipe is designed to make a batch that serves 4-6 people, allowing everyone to indulge in these spooky treats.
With a few basic ingredients and some creativity in decoration, you can whip up these amazing cookies in no time. Whether you’re a seasoned baker or a beginner, this recipe is easy to follow and a lot of fun!
Ingredients:
- 2 ¾ cups all-purpose flour
- 1 teaspoon baking soda
- ½ teaspoon baking powder
- 1 cup unsalted butter, softened
- 1 ½ cups granulated sugar
- 1 large egg
- 1 teaspoon vanilla extract
- ¼ teaspoon almond extract
- White royal icing or white chocolate for decoration
- Mini chocolate chips or black icing for eyes
Instructions:
- Preheat and Prepare: Begin by preheating your oven to 350°F (175°C). Line baking sheets with parchment paper to prevent sticking.
- Mix Dry Ingredients: In a medium bowl, whisk together the flour, baking soda, and baking powder. Set this mixture aside.
- Cream Butter and Sugar: In a large bowl, using a hand mixer or stand mixer, cream the softened butter and granulated sugar together until light and fluffy, about 3-4 minutes.
- Add Wet Ingredients: Beat in the egg, vanilla extract, and almond extract until everything is well combined.
- Combine Mixtures: Gradually add the dry ingredients to the wet mixture, mixing slowly until a dough forms. Make sure not to overmix.
- Shape Cookies: Roll the dough into tablespoon-sized balls and place them on the prepared baking sheets, spacing them about 2 inches apart. Flatten each ball slightly with your hand or a spatula.
- Bake: Bake the cookies in the preheated oven for 8-10 minutes, or until the edges are just beginning to turn golden. Don’t overbake as they’ll continue to cook slightly on the sheet.
- Cool: Remove the cookies from the oven and allow them to cool on the baking sheets for 5 minutes before transferring them to a wire rack to cool completely.
- Decorate: Once the cookies are completely cool, use the white royal icing or melted white chocolate to pipe mummy bandages across the cookies. Place mini chocolate chips or use black icing to create eyes on each cookie.
Extra Tips:
For the best results and to avoid spreading, it’s important to chill the cookie dough for at least an hour before baking. This helps the cookies maintain their shape.
When decorating, be creative with the mummy design; the more varied and random the bandages look, the spookier the cookies will appear.
Finally, verify that the cookies are fully cooled before decorating to prevent the icing or chocolate from melting. Enjoy your Mummy Wrapped Delights with a glass of milk or a spooky-themed drink!
Ghostly Gingersnaps

Halloween is the perfect time to whip up some spooky treats, and these Ghostly Gingersnaps will surely delight both the young and the young at heart. With their delightful spice and ghostly appearance, these cookies aren’t only delicious but also fun to make. The combination of ginger, cinnamon, and molasses will fill your kitchen with warm, inviting aromas, making these cookies a seasonal favorite.
These cookies are easy to prepare and perfect for a Halloween party or a cozy night in. They’ve a soft, chewy texture with just the right amount of crunch. Shaped like little ghosts, they can be decorated with simple icing to give them a hauntingly cute look. Invite your family or friends to join in the fun of decorating these ghostly figures, making it an enjoyable activity for all ages.
Ingredients (Serves 4-6):
- 2 cups all-purpose flour
- 1 teaspoon baking soda
- 1 teaspoon ground cinnamon
- 1 teaspoon ground ginger
- 1/2 teaspoon ground cloves
- 1/2 teaspoon salt
- 3/4 cup unsalted butter, softened
- 1 cup granulated sugar
- 1 large egg
- 1/4 cup molasses
- 1 teaspoon vanilla extract
- White icing for decoration
- Mini chocolate chips or black icing for eyes
Instructions:
- Preheat the Oven: Begin by preheating your oven to 350°F (175°C). This guarantees that your cookies bake evenly once they’re ready to go in.
- Prepare the Dry Ingredients: In a medium mixing bowl, whisk together the flour, baking soda, cinnamon, ginger, cloves, and salt. This step helps distribute the spices evenly throughout the dough.
- Cream the Butter and Sugar: In a large bowl, use a hand mixer or stand mixer to cream the softened butter and granulated sugar together until light and fluffy. This process typically takes about 3-4 minutes.
- Add Wet Ingredients: Beat in the egg, molasses, and vanilla extract to the butter-sugar mixture. Mix until fully incorporated, guaranteeing a smooth consistency.
- Combine Wet and Dry Mixtures: Gradually add the dry ingredients to the wet ingredients, mixing on low speed. Continue until the dough is well combined and no streaks of flour remain.
- Shape the Cookies: Roll tablespoons of dough into balls and place them onto a parchment-lined baking sheet. Flatten each ball slightly and shape into a ghostly figure using your fingers or a cookie cutter.
- Bake: Place the cookies in the preheated oven and bake for 8-10 minutes, or until the edges are set and slightly golden. Be careful not to overbake to maintain their chewy texture.
- Cool and Decorate: Allow the cookies to cool on the baking sheet for a few minutes before transferring them to a wire rack. Once completely cool, use white icing to outline the ghost shape and create facial features. Add mini chocolate chips or black icing to form eyes.
Extra Tips:
For the best results, make sure your butter is softened but not melted. This will help the cookies maintain their shape during baking.
You can customize the spiciness by adjusting the amount of ginger and cinnamon to suit your taste. If you don’t have a ghost-shaped cookie cutter, you can easily shape the cookies by hand.
Finally, store any leftover cookies in an airtight container to keep them fresh for up to a week. Enjoy your spooky, tasty creations!
Wicked Witch Hats

Indulge in the spooky spirit of Halloween with a batch of Wicked Witch Hats Halloween Sugar Cookies. These enchanting treats combine the classic sweetness of sugar cookies with a touch of whimsical Halloween flair. Perfect for parties, family gatherings, or simply to enjoy at home, these cookies are sure to cast a delightful spell on all who taste them.
With a crisp, buttery base and a vibrant, colorful decoration, they capture the essence of Halloween in every bite. Each Wicked Witch Hat is shaped like a classic witch’s hat, complete with a pointed top and brim. The cookies are decorated with rich, dark chocolate and a sprinkle of festive edible glitter or colored sugar, adding a magical touch.
Easy to make and even easier to enjoy, this recipe is designed for a serving size of 4-6 people, guaranteeing everyone can partake in the Halloween fun.
Ingredients (for 4-6 servings):
- 2 3/4 cups all-purpose flour
- 1 teaspoon baking powder
- 1/2 teaspoon baking soda
- 1 cup unsalted butter, softened
- 1 1/2 cups granulated sugar
- 1 large egg
- 1 teaspoon vanilla extract
- 1/2 teaspoon almond extract
- 1/4 teaspoon salt
- 1 cup dark chocolate chips
- Edible glitter or colored sugar for decoration
Cooking Instructions:
- Prepare the Dough: In a medium bowl, whisk together the flour, baking powder, baking soda, and salt. In a large mixing bowl, cream the softened butter and granulated sugar together until light and fluffy. Add the egg, vanilla extract, and almond extract, mixing until well combined.
- Combine Ingredients: Gradually add the dry ingredients to the wet ingredients, mixing on low speed until the dough forms. Make certain the dough is well combined but don’t overmix.
- Chill the Dough: Wrap the dough in plastic wrap and refrigerate for at least 1 hour. This step is essential for preventing the cookies from spreading too much when baking.
- Preheat and Shape: Preheat your oven to 350°F (175°C). Line two baking sheets with parchment paper. Roll out the chilled dough on a lightly floured surface to about 1/4 inch thickness. Use a witch hat cookie cutter to cut out shapes and place them on the prepared baking sheets.
- Bake the Cookies: Bake in the preheated oven for 8-10 minutes, or until the edges are lightly golden. Remove from the oven and let them cool on the baking sheets for 5 minutes before transferring to a wire rack to cool completely.
- Decorate the Cookies: Melt the dark chocolate chips in a microwave-safe bowl, stirring every 30 seconds until smooth. Dip the top of each cookie in the melted chocolate to create the hat’s point, then sprinkle with edible glitter or colored sugar for a magical finish.
- Set the Decoration: Allow the chocolate to set completely before serving. You can speed up this process by placing the cookies in the refrigerator for a few minutes.
Extra Tips: To guarantee your Wicked Witch Hats maintain their shape during baking, make sure the dough is thoroughly chilled before rolling and cutting. If you don’t have a witch hat cookie cutter, you can create a stencil from parchment paper and use a sharp knife to cut out the shapes.
Additionally, feel free to experiment with different colors of edible glitter or sugar to match your Halloween theme. These cookies can be stored in an airtight container for up to a week, maintaining their delightful crunch and flavor.
Frankenstein’s Monster Munchies
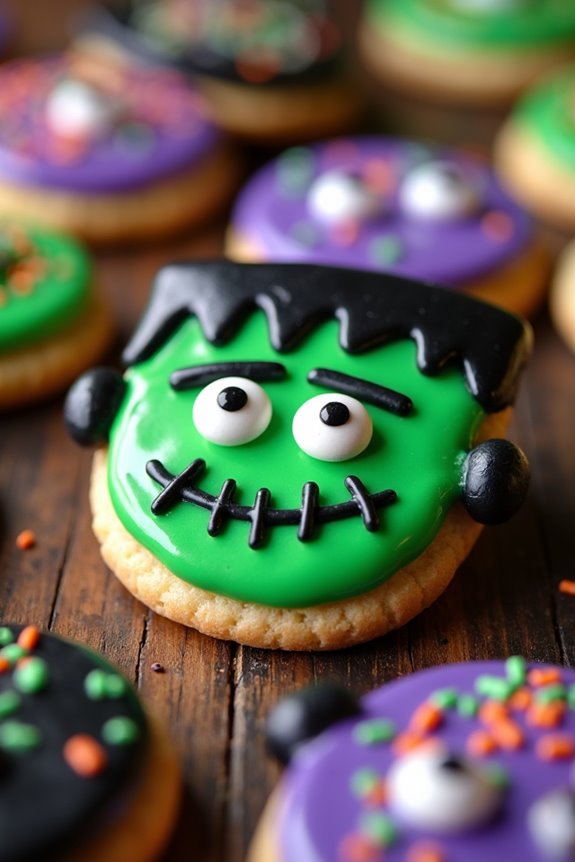
Halloween is the perfect time to release your creativity in the kitchen, and what better way than with a batch of Frankenstein’s Monster Munchies! These Halloween Sugar Cookies aren’t just a treat for the taste buds but a feast for the eyes, as each cookie comes to life with a monstrous flair.
These delicious, buttery sugar cookies are adorned with colorful icing and quirky decorations, making them a hit at any Halloween gathering. Whether you’re planning a spooky party or simply want to indulge in some festive fun, these cookies are bound to impress both kids and adults alike.
The secret to making these cookies truly monstrous lies in the decorating stage, where you can let your imagination run wild. The base is a classic sugar cookie recipe, providing the perfect canvas for your Halloween-themed creativity.
With a few simple ingredients and a splash of vibrant icing, you can transform ordinary cookies into delightful mini Frankensteins, complete with googly eyes and scary smiles. Prepare to have a blast in the kitchen as you whip up these frightful, fun, and absolutely delicious Halloween treats.
Ingredients (Serves 4-6):
- 2 ¾ cups all-purpose flour
- 1 teaspoon baking soda
- ½ teaspoon baking powder
- 1 cup unsalted butter, softened
- 1 ½ cups granulated sugar
- 1 egg
- 1 teaspoon vanilla extract
- Assorted food coloring (green, black, purple)
- Candy eyes
- Assorted Halloween sprinkles
- 1 tube black decorating gel
Instructions:
- Preheat and Prepare: Preheat your oven to 350°F (175°C). Line two baking sheets with parchment paper to prevent the cookies from sticking.
- Mix Dry Ingredients: In a medium bowl, whisk together the flour, baking soda, and baking powder. This guarantees that the leavening agents are evenly distributed throughout the flour.
- Cream Butter and Sugar: In a large bowl, cream together the softened butter and granulated sugar until the mixture is light and fluffy. This typically takes about 3-4 minutes using an electric mixer on medium speed.
- Add Egg and Vanilla: Beat in the egg and vanilla extract, mixing until everything is well combined and smooth.
- Combine with Dry Ingredients: Gradually add the dry ingredient mixture to the wet ingredients, mixing on low speed until a dough forms. Be sure to scrape down the sides of the bowl to incorporate all ingredients.
- Divide and Color Dough: Divide the dough into three equal parts. Add green food coloring to one portion, black to another, and leave the third portion as is. Knead the color into the dough until evenly distributed.
- Shape and Bake: Roll the dough into 1-inch balls and place them on the prepared baking sheets, leaving space between each cookie. Use your fingers to slightly flatten each ball into a disk. Bake in the preheated oven for 8-10 minutes, or until the edges are lightly golden.
- Cool Cookies: Remove the cookies from the oven and allow them to cool completely on a wire rack before decorating.
- Decorate: Once the cookies are cool, use the black decorating gel to draw stitches and scary faces. Attach candy eyes to the green cookies to create Frankenstein’s face. Use the purple and black cookies to make other Halloween-themed designs, using sprinkles for added detail.
Extra Tips: When working with food coloring, start with a small amount and gradually add more until you achieve the desired color intensity. If the dough becomes sticky, refrigerate it for 15-20 minutes to make handling easier.
For a professional touch, use a piping bag to apply the decorating gel. These cookies can be stored in an airtight container for up to a week, making them perfect for preparing in advance of your Halloween celebration. Enjoy your monstrous creations and have a spooktacular Halloween!
Vampire Fang Biscuits
Halloween is the perfect time to get creative in the kitchen, and what better treat to serve than Vampire Fang Biscuits? These fun and festive sugar cookies are shaped like fangs, perfect for adding a spooky touch to your Halloween party spread.
With a crisp bite and a sweet finish, these cookies are bound to be a hit with both kids and adults alike. Whether you’re hosting a Halloween bash or just want a themed treat for your family, these Vampire Fang Biscuits are a deliciously fun addition to your celebration.
To make these delightful cookies, you’ll start by creating a classic sugar cookie dough that will be cut into fang shapes using a specially designed cookie cutter or a DIY template. Once baked to golden perfection, a layer of red icing is added to mimic the look of blood, enhancing the vampire theme.
These cookies are as delightful to look at as they’re to eat, making them a perfect centerpiece for your Halloween dessert table.
Ingredients (Serves 4-6 people):
- 2 1/2 cups all-purpose flour
- 1/2 teaspoon baking powder
- 1/4 teaspoon salt
- 1 cup unsalted butter, softened
- 1 cup granulated sugar
- 1 large egg
- 1 teaspoon vanilla extract
- Red food coloring
- 1 1/2 cups powdered sugar
- 2-3 tablespoons milk
- 1 tube of red decorator gel
Cooking Instructions:
- Prepare the Dough: In a medium bowl, whisk together the all-purpose flour, baking powder, and salt. In a large bowl, cream the softened butter and granulated sugar together until light and fluffy.
- Beat in the egg and vanilla extract until well combined.
- Combine Ingredients: Gradually add the flour mixture to the butter mixture, mixing until a soft dough forms. Divide the dough into two portions, flatten each into a disk, wrap in plastic wrap, and chill for at least 1 hour.
- Preheat Oven: Preheat your oven to 350°F (175°C) and line two baking sheets with parchment paper.
- Shape the Cookies: Remove one dough disk from the fridge and roll it out on a floured surface to about 1/4-inch thickness. Use a fang-shaped cookie cutter or a knife to cut the dough into fang shapes.
- Place the cookies onto the prepared baking sheets.
- Bake the Cookies: Bake the cookies in the preheated oven for 10-12 minutes, or until the edges are lightly golden. Allow them to cool on the baking sheets for a few minutes before transferring to a wire rack to cool completely.
- Make the Icing: In a small bowl, mix the powdered sugar with 2 tablespoons of milk. Add more milk if needed to reach a smooth, spreadable consistency.
- Add a few drops of red food coloring and mix until you achieve your desired shade of red.
- Decorate the Cookies: Once the cookies are completely cool, spread a thin layer of red icing over the surface of each fang. Use the red decorator gel to add details, such as blood drips, for a more dramatic effect.
Extra Tips:
When rolling out the dough, ascertain your surface and rolling pin are well-floured to prevent sticking. If you don’t have a fang-shaped cutter, you can use a stencil to guide your cuts with a sharp knife.
For a more intense red icing, use gel food coloring, which provides a deeper color without altering the icing’s consistency. Remember to let the icing set completely before stacking the cookies for storage or serving to avoid smudging.
Enjoy your spooky and delicious Vampire Fang Biscuits this Halloween!
Jack-O’-Lantern Jumbles
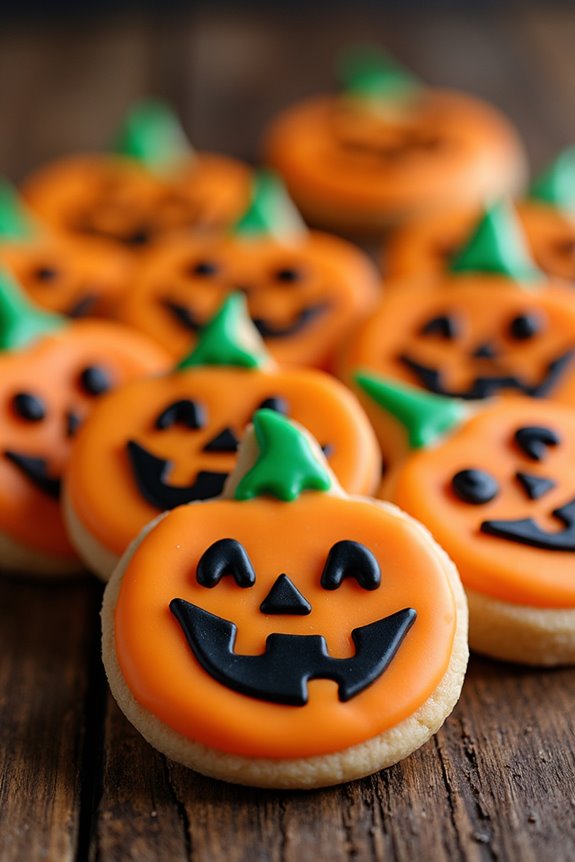
Transform your kitchen into a festive treat factory with these delightful Jack-O’-Lantern Jumbles. These Halloween sugar cookies are perfect for celebrating the spooky season with family and friends.
Whether you’re planning a Halloween party or simply want to enjoy a fun baking activity, these cookies are bound to bring smiles to faces young and old alike. With a buttery, sweet base and a touch of holiday spirit, these sugar cookies are shaped into charming jack-o’-lanterns that are as delicious as they’re fun to make.
The Jack-O’-Lantern Jumbles offer a playful twist on traditional sugar cookies, allowing you to express your creativity while indulging in a classic treat. This recipe yields approximately 24-30 cookies, making enough to serve 4-6 people.
Each cookie is decorated with colored icing to bring your pumpkin designs to life. The result is a batch of whimsical, delicious cookies that capture the essence of Halloween and are perfect for sharing or gifting.
Ingredients:
- 2 3/4 cups all-purpose flour
- 1 teaspoon baking soda
- 1/2 teaspoon baking powder
- 1 cup unsalted butter, softened
- 1 1/2 cups granulated sugar
- 1 egg
- 1 teaspoon vanilla extract
- 1/2 teaspoon almond extract
- Orange food coloring
- Green icing
- Black icing
Instructions:
- Prepare the Dough: Preheat your oven to 375°F (190°C). In a medium bowl, whisk together the all-purpose flour, baking soda, and baking powder. Set aside.
- Mix the Wet Ingredients: In a large bowl, cream the softened butter and granulated sugar together until light and fluffy. Beat in the egg, vanilla extract, and almond extract until well combined.
- Combine & Color: Gradually add the dry ingredients to the wet ingredients, mixing until a smooth dough forms. Add orange food coloring to the dough and mix until you achieve your desired shade for the pumpkin theme.
- Shape the Cookies: Roll the dough into small balls, about 1 inch in diameter, and place them on a baking sheet lined with parchment paper. Flatten each ball slightly with the palm of your hand or the bottom of a glass to create a pumpkin shape.
- Bake: Bake in the preheated oven for 8-10 minutes, or until the edges are lightly golden. Remove from the oven and allow the cookies to cool on the baking sheet for 5 minutes before transferring them to a wire rack to cool completely.
- Decorate: Once the cookies are completely cool, use green icing to create stems and leaves on top of each cookie. Use black icing to draw jack-o’-lantern faces, adding character and expression to each cookie.
Extra Tips:
For the best results, verify your butter is adequately softened; this helps create a smooth and uniform dough. If you prefer a more intense pumpkin color, add additional orange food coloring.
When decorating, you can use a piping bag or a small plastic bag with a corner snipped off for precise icing application. Let the icing set completely before stacking or storing the cookies to prevent smudging.
These Jack-O’-Lantern Jumbles can be stored in an airtight container for up to a week, making them a convenient make-ahead treat for Halloween festivities.
Spooky Skeleton Snacks

Halloween is the perfect time to get creative in the kitchen, and there’s no better way to do it than with some fun and spooky treats. Spooky Skeleton Snacks, a twist on classic Halloween sugar cookies, are sure to impress both kids and adults with their eerie charm and delicious taste.
These cookies aren’t only delightful to look at but are also easy to make, making them a fantastic addition to any Halloween party spread.
These cookies are made from a simple sugar cookie dough that’s rolled out, cut into skeleton shapes, and baked to perfection. Once cooled, they’re decorated with icing to highlight the spooky skeleton designs. This recipe yields 24 to 36 cookies, perfect for serving 4-6 people.
Whether you’re hosting a Halloween party or just want a fun baking project with the family, these Spooky Skeleton Snacks will definitely delight everyone with their spooky and delicious appeal.
Ingredients for Spooky Skeleton Snacks (Serving Size: 4-6 people)
- 3 cups all-purpose flour
- 1 teaspoon baking powder
- 1/2 teaspoon salt
- 1 cup unsalted butter, softened
- 1 cup granulated sugar
- 1 large egg
- 1 teaspoon vanilla extract
- 1/2 teaspoon almond extract (optional)
- Black icing gel or black food coloring
- White royal icing or white icing pen
Cooking Instructions
1. Prepare the Dough: In a medium bowl, whisk together the flour, baking powder, and salt. In a separate large mixing bowl, beat the softened butter and sugar together using an electric mixer until the mixture is light and fluffy, about 2-3 minutes.
Add the egg, vanilla extract, and almond extract, and mix until well combined.
2. Combine Ingredients: Gradually add the dry ingredients to the wet ingredients, mixing on low speed until the dough comes together. If the dough is too sticky, add a little more flour until it reaches the desired consistency.
3. Chill the Dough: Divide the dough in half, shape each half into a disk, and wrap them in plastic wrap. Chill in the refrigerator for at least 1 hour. This will make the dough easier to roll out and cut.
4. Roll and Cut: Preheat your oven to 350°F (175°C) and line baking sheets with parchment paper. Lightly flour a clean surface and roll out one disk of dough to about 1/4-inch thickness.
Use skeleton-shaped cookie cutters to cut out the cookies and place them on the prepared baking sheets.
5. Bake the Cookies: Bake in the preheated oven for 8-10 minutes or until the edges are lightly golden. Allow the cookies to cool on the baking sheet for a few minutes before transferring them to a wire rack to cool completely.
6. Decorate the Cookies: Once cooled, use black icing gel or black food coloring to draw on the skeleton bones. Use white royal icing or an icing pen to add details like eyes and ribs.
Let the icing set before serving.
Extra Tips
When rolling out cookie dough, make sure to flour your surface and rolling pin to prevent sticking. If the dough becomes too warm and difficult to work with, pop it back into the refrigerator for a few minutes to firm up.
Additionally, to guarantee even baking, try to roll the dough to a consistent thickness and keep a close eye on the cookies while they bake, as oven temperatures can vary.
These Spooky Skeleton Snacks can be stored in an airtight container for up to a week, making them a great make-ahead option for your Halloween festivities.
Graveyard Tombstone Tidbits
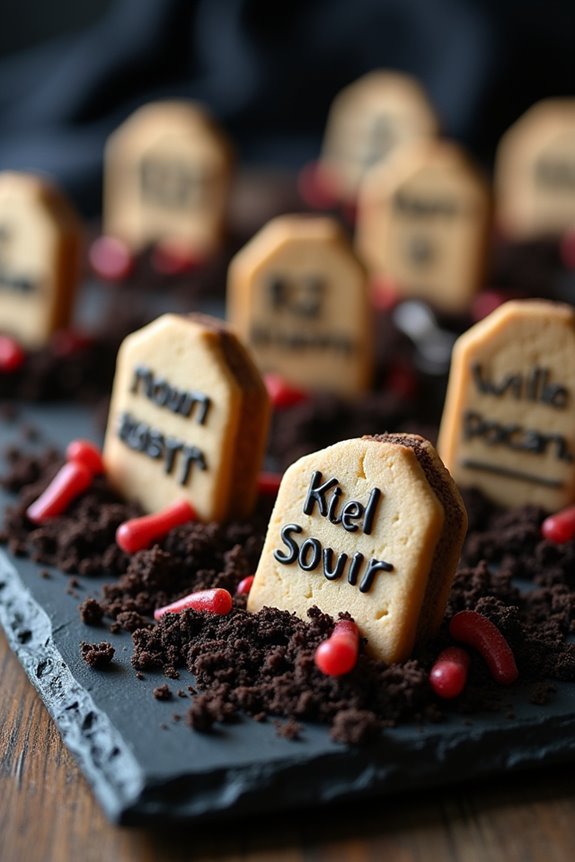
Halloween is the perfect time to let your creativity shine in the kitchen, and what better way to celebrate than with some spooktacular Graveyard Tombstone Tidbits? These sugar cookies aren’t only delicious but also provide a hauntingly fun addition to your Halloween treats. Perfect for parties or as a festive family baking project, these cookies will surely be a hit with both children and adults alike.
The key to these cookies is in the decoration, transforming simple sugar cookies into mini graveyards complete with tombstones and eerie embellishments. The base of the cookies is a classic sugar cookie recipe, which provides a sweet and buttery canvas for your ghostly designs. By using simple icing techniques and some creative toppings, you can personalize your graveyard cookies to fit any spooky theme.
Whether you opt for scary messages on your tombstones or add a sprinkle of edible dirt, these cookies are sure to impress. Plus, they’re a great way to get the whole family involved in the Halloween spirit. Below, you’ll find everything you need to create these hauntingly delicious treats for a gathering of 4-6 people.
Ingredients
- 2 ¾ cups all-purpose flour
- 1 teaspoon baking soda
- ½ teaspoon baking powder
- 1 cup unsalted butter, softened
- 1 ½ cups granulated sugar
- 1 egg
- 1 teaspoon vanilla extract
- ¼ teaspoon almond extract
- Black and grey food coloring
- Royal icing mix
- Chocolate sandwich cookies, crushed (for dirt)
- White chocolate chips or candy melts (for ghosts)
- Edible markers or food-safe fine tip brush and black food gel
Instructions
- Preheat and Prep: Preheat your oven to 375°F (190°C). Line a baking sheet with parchment paper to prevent sticking.
- Mix Dry Ingredients: In a medium bowl, whisk together the flour, baking soda, and baking powder. Set aside.
- Cream Butter and Sugar: In a large bowl, cream the softened butter and sugar together until light and fluffy. This should take about 2 to 3 minutes using an electric mixer.
- Incorporate Wet Ingredients: Beat in the egg, vanilla extract, and almond extract until well combined.
- Combine Dry and Wet: Gradually add the dry ingredients to the wet mixture, mixing until just combined. The dough should be soft but not sticky.
- Shape and Bake: Roll out the dough on a lightly floured surface to about ¼-inch thickness. Use a tombstone-shaped cookie cutter to cut out shapes and place them on the prepared baking sheet.
- Bake Cookies: Bake in the preheated oven for 8-10 minutes, or until the edges are lightly golden. Allow the cookies to cool on the baking sheet for a few minutes before transferring to a wire rack to cool completely.
- Prepare Icing: Prepare the royal icing as per the package instructions. Divide and color a portion with black and grey food coloring for tombstones.
- Decorate: Once the cookies are completely cool, use the black and grey icing to decorate the tombstones. Use edible markers or a fine tip brush with black food gel to add spooky messages.
- Add Final Touches: Crush chocolate sandwich cookies to create “dirt” and sprinkle around the base of each tombstone. Melt white chocolate chips or candy melts to create ghost shapes on the cookies.
Extra Tips
When working with royal icing, make certain that it has reached the right consistency for flooding or detailed work by adjusting the amount of water used.
For a more realistic graveyard look, consider adding small candy bones or gummy worms around the tombstones. If you don’t have a tombstone cookie cutter, you can easily shape rectangles and round the tops with a knife.
Most importantly, have fun and experiment with different designs and messages on your tombstones to make each cookie unique!
Black Cat Crunchies
Halloween Sugar Cookies are a delightful treat that brings a festive spirit to any Halloween gathering. These cookies aren’t only tasty but also fun to make, especially with themed shapes like pumpkins, ghosts, and the ever-popular Black Cat Crunchies.
These cookies are a perfect combination of buttery goodness and crisp texture, making them a favorite for both kids and adults during the spooky season. They can be decorated with icing, sprinkles, or left simple and elegant, allowing you to be as creative as you wish.
Black Cat Crunchies are a whimsical variation of traditional sugar cookies, offering a playful twist with their unique shape and color. The key to making these cookies stand out is using a cat-shaped cookie cutter and adding black food coloring to the dough.
Not only do they taste delicious, but they also serve as a perfect Halloween decoration for your dessert table. Whether you’re hosting a Halloween party or just enjoying a cozy evening at home, these cookies are sure to add a touch of magic to your celebration.
Ingredients:
- 1 cup unsalted butter, softened
- 1 cup granulated sugar
- 1 large egg
- 1 teaspoon vanilla extract
- 2 ½ cups all-purpose flour
- 1 teaspoon baking powder
- ½ teaspoon salt
- Black food coloring
- Black sanding sugar (optional)
Serves: 4-6 people
Cooking Instructions:
- Prepare the Dough: In a large mixing bowl, cream together the softened butter and sugar until light and fluffy. This should take about 2-3 minutes using an electric mixer on medium speed.
- Add Wet Ingredients: Beat in the egg and vanilla extract until well combined. Make sure to scrape down the sides of the bowl to guarantee everything is mixed together evenly.
- Mix Dry Ingredients: In a separate bowl, whisk together the flour, baking powder, and salt. Gradually add this mixture to the butter and sugar mixture, mixing on low speed until the dough begins to form.
- Color the Dough: Add black food coloring to the dough, a little at a time, until the desired color is achieved. Mix until the color is evenly distributed throughout the dough.
- Chill the Dough: Divide the dough into two discs, wrap them in plastic wrap, and refrigerate for at least 1 hour. This will make it easier to roll out and cut into shapes.
- Preheat and Prepare: Preheat your oven to 350°F (175°C). Line two baking sheets with parchment paper.
- Roll and Cut: On a lightly floured surface, roll out one dough disc to about ¼ inch thick. Use a cat-shaped cookie cutter to cut out shapes and place them on the prepared baking sheets.
- Decorate: If using, sprinkle black sanding sugar over the cookies for extra sparkle and crunch.
- Bake: Bake the cookies in the preheated oven for 10-12 minutes, or until the edges are just beginning to turn golden. Keep an eye on them to prevent over-baking.
- Cool: Allow the cookies to cool on the baking sheet for 5 minutes before transferring them to a wire rack to cool completely.
Extra Tips:
For the best results, make certain your butter is at room temperature, as this will help achieve a smooth and consistent dough. If you’re using food coloring, gel-based colors tend to provide a more vibrant shade without altering the dough’s consistency.
To maintain the shape of your cookies, avoid overworking the dough when rolling it out. Finally, feel free to get creative with your decorations—royal icing and edible markers can add extra details to your Black Cat Crunchies, making them even more festive.
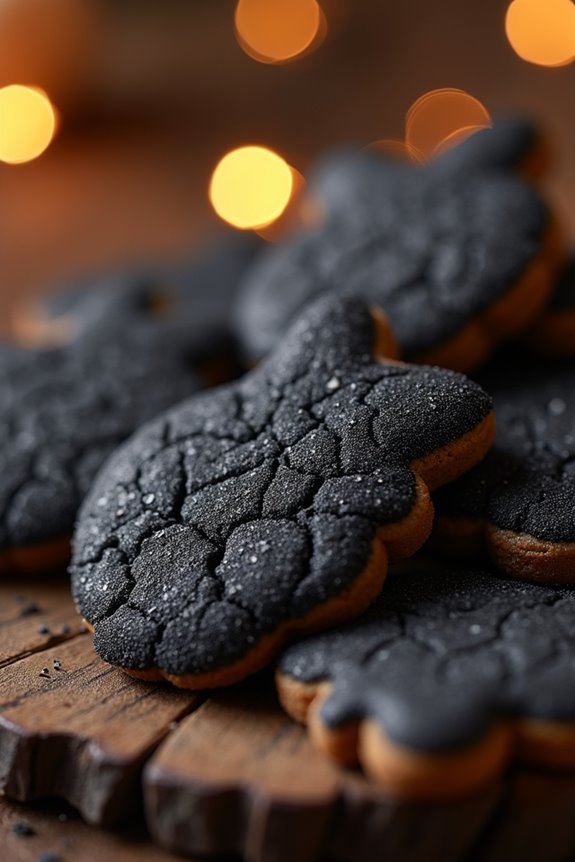
Batty Brown Butter Bites
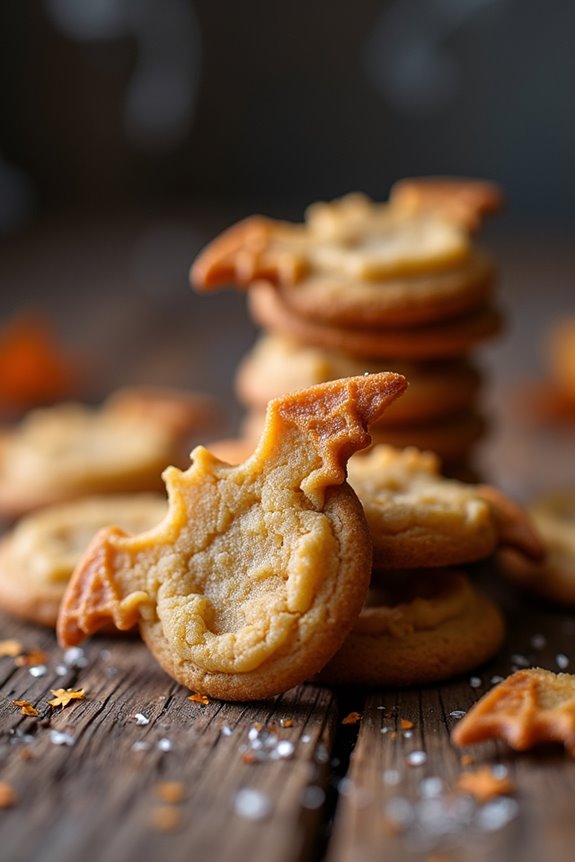
To make the Batty Brown Butter Bites, you’ll first brown the butter to enhance its flavor, then create the cookie dough, cut out bat shapes, and bake them to golden perfection. This recipe serves 4-6 people, making it ideal for a small Halloween gathering or family treat night. Follow the instructions carefully to guarantee your cookies are just the right amount of crispy on the outside and soft on the inside.
Ingredients (serving 4-6 people):
- 1 cup unsalted butter
- 1 cup granulated sugar
- 1 large egg
- 1 teaspoon vanilla extract
- 2 1/4 cups all-purpose flour
- 1/2 teaspoon baking soda
- 1/4 teaspoon salt
- Black gel food coloring (optional)
- Bat-shaped cookie cutter
Instructions:
- Brown the Butter: Place the unsalted butter in a saucepan over medium heat. Melt and cook the butter, stirring constantly, until it turns a golden brown color and releases a nutty aroma. This should take about 5-7 minutes. Remove from heat and let it cool slightly.
- Prepare the Dough: In a large mixing bowl, combine the cooled brown butter and granulated sugar. Beat until smooth and creamy. Add the egg and vanilla extract, mixing until fully incorporated.
- Mix Dry Ingredients: In a separate bowl, whisk together the all-purpose flour, baking soda, and salt. Gradually add these dry ingredients to the wet mixture, stirring until a dough forms. If desired, add a few drops of black gel food coloring to give your cookies a spooky Halloween vibe.
- Chill the Dough: Wrap the dough in plastic wrap and refrigerate for at least 30 minutes. This will make it easier to roll out and cut into shapes.
- Preheat and Prepare: Preheat your oven to 350°F (175°C). Line baking sheets with parchment paper.
- Roll and Cut: On a lightly floured surface, roll out the chilled dough to about 1/4 inch thickness. Use a bat-shaped cookie cutter to cut out cookies and transfer them to the prepared baking sheets.
- Bake: Bake in the preheated oven for 10-12 minutes, or until the edges are lightly golden. Allow the cookies to cool on the baking sheets for a few minutes before transferring them to a wire rack to cool completely.
- Decorate (Optional): If desired, use icing or edible glitter to add extra flair to your batty bites once they’ve cooled completely.
Extra Tips: When browning the butter, keep a close eye on it as it can go from perfectly golden to burnt in seconds.
Chilling the dough is essential for maintaining the shape of your cookies, so don’t skip this step. If you find the dough too sticky to handle, sprinkle a little extra flour on your rolling surface.
Finally, verify the cookies are fully cooled before applying any decorations to prevent them from melting off. Enjoy your spooky Batty Brown Butter Bites!
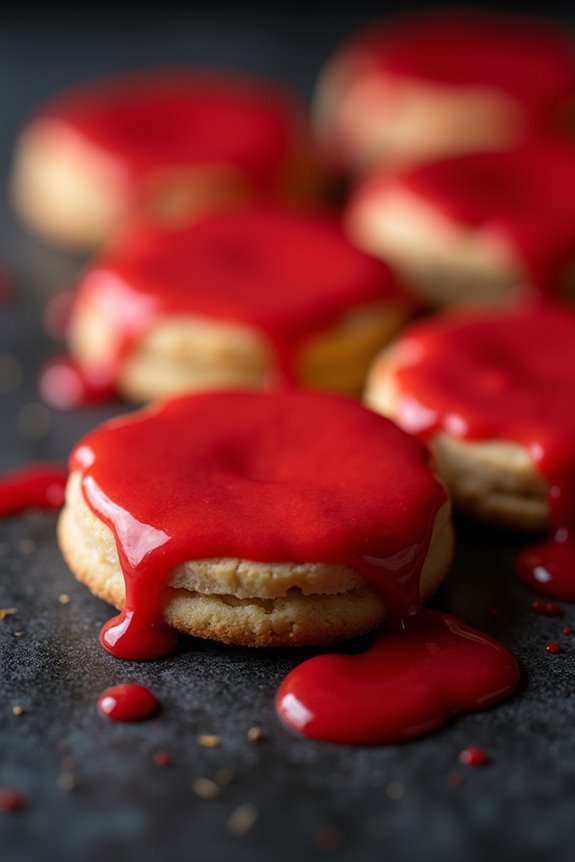
Zombie Brain Sugar Cookies
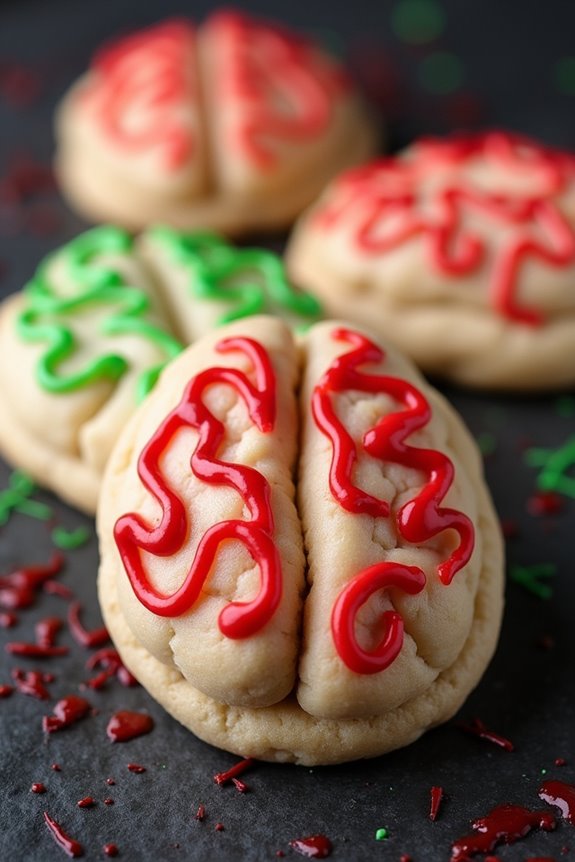
Halloween is the perfect time to indulge in some spooky-themed treats, and what could be more fitting than Zombie Brain Sugar Cookies? These delightfully eerie cookies aren’t only fun to make but also delicious to eat. Perfect for a Halloween party or as a ghoulish surprise for trick-or-treaters, these cookies will certainly be a memorable addition to your Halloween festivities.
With a rich, buttery base and a touch of almond extract for a subtle flavor, these cookies are then topped with a sweet and creepy glaze that mimics the look of zombie brains.
To create the Zombie Brain Sugar Cookies, you’ll start with a classic sugar cookie dough, which you’ll roll into balls and slightly flatten to resemble brain shapes. After baking, the cookies are decorated with a colorful icing to bring them to life. This recipe yields approximately 24-30 cookies, making it perfect for serving 4-6 people. Gather your ingredients and let the Halloween fun begin!
Ingredients:
- 1 cup unsalted butter, softened
- 1 cup granulated sugar
- 1 large egg
- 1 teaspoon vanilla extract
- 1/2 teaspoon almond extract
- 2 1/2 cups all-purpose flour
- 1 teaspoon baking powder
- 1/2 teaspoon salt
- Red and green food coloring
- 2 cups powdered sugar
- 3-4 tablespoons milk
- 1 tablespoon light corn syrup
Instructions:
- Prepare the Dough: In a large mixing bowl, cream together the softened butter and granulated sugar until light and fluffy. Add in the egg, vanilla extract, and almond extract, and mix until well combined.
- Combine Dry Ingredients: In a separate bowl, whisk together the all-purpose flour, baking powder, and salt. Gradually add the dry ingredients to the wet ingredients, mixing until a soft dough forms.
- Shape the Cookies: Preheat your oven to 350°F (175°C) and line a baking sheet with parchment paper. Roll the dough into 1-inch balls and place them on the prepared baking sheet. Gently press down on each ball to flatten slightly, shaping them to resemble small brains.
- Bake the Cookies: Bake the cookies for 10-12 minutes or until the edges are lightly golden. Remove them from the oven and allow them to cool completely on a wire rack.
- Prepare the Icing: In a medium mixing bowl, combine the powdered sugar, milk, and corn syrup to create a smooth icing. Divide the icing into two bowls. Add red food coloring to one bowl and green food coloring to the other, mixing until the colors are vibrant.
- Decorate the Cookies: Using a small piping bag or a zip-top bag with the corner snipped off, pipe the red icing over the cookies in squiggly lines to mimic brain patterns. Allow the icing to set slightly before adding a few green icing lines for a gory effect.
- Set the Cookies: Let the decorated cookies sit at room temperature until the icing is fully set and hardened before serving.
Extra Tips:
For an even spookier effect, you can add a few drops of black food coloring to some of the green icing to create a darker shade that adds depth to the brain design.
If you don’t have almond extract on hand, you can substitute it with more vanilla extract for a slightly different flavor profile.
Be sure to let the cookies cool completely before icing to prevent the glaze from melting off. Store any leftovers in an airtight container at room temperature for up to a week. Enjoy your creepy creations!