
As a culinary enthusiast, I adore crafting dishes that tantalize the taste buds and captivate the eyes. Halloween is the perfect time to whip up a feast that’s frightfully fun. Think Mummy Meatloaf and eerie Eyeball Spaghetti—there’s an endless array of enchanting possibilities. Are you curious about transforming your dinner table into a spooky spectacle? Join me on this ghoulishly gourmet journey!
Mummy Meatloaf
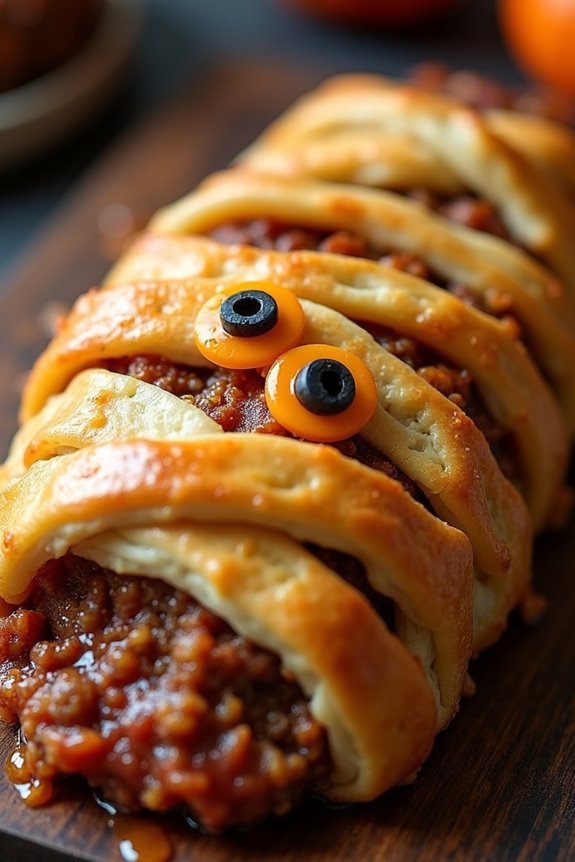
Mummy Meatloaf is a fun and spooky dish perfect for a Halloween-themed dinner. Transforming the classic meatloaf into a mummy is a creative way to get into the festive spirit while enjoying a hearty meal. This dish combines the comforting flavors of a traditional meatloaf with a playful presentation that resembles a wrapped mummy, making it a hit with both kids and adults alike.
The meatloaf itself is juicy and flavorful, featuring a blend of ground meats, spices, and other savory ingredients. Wrapped in strips of dough to mimic the ancient wrappings of a mummy, this dish not only looks the part but also tastes delicious. Whether you’re hosting a Halloween party or simply want to surprise your family with a thematic dinner, Mummy Meatloaf is certain to be a memorable addition to the table.
Ingredients (Serves 4-6)
- 1 1/2 pounds ground beef
- 1/2 pound ground pork
- 1 cup breadcrumbs
- 1/2 cup milk
- 1 egg
- 1 small onion, finely chopped
- 2 cloves garlic, minced
- 1 tablespoon Worcestershire sauce
- 1 tablespoon tomato paste
- 1 teaspoon salt
- 1/2 teaspoon black pepper
- 1/2 teaspoon dried oregano
- 1/2 teaspoon dried thyme
- 1 can (8 oz) refrigerated crescent roll dough
- 2 slices of cheese (for eyes)
- 4 black olives (for pupils)
Cooking Instructions
- Preheat the Oven: Preheat your oven to 350°F (175°C) to make sure it’s ready for baking the meatloaf.
- Prepare the Meat Mixture: In a large mixing bowl, combine ground beef, ground pork, breadcrumbs, milk, egg, onion, garlic, Worcestershire sauce, tomato paste, salt, pepper, oregano, and thyme. Mix thoroughly until all ingredients are well incorporated.
- Shape the Meatloaf: Transfer the meat mixture onto a baking sheet lined with parchment paper. Shape it into an oval loaf, about 10 inches long and 5 inches wide, resembling the body of a mummy.
- Wrap with Dough: Open the can of crescent roll dough and separate it into strips. Carefully wrap the strips around the meatloaf to mimic mummy bandages, leaving small gaps. Make sure the ends of the dough strips are tucked underneath the loaf.
- Create the Eyes: Cut small circles from the cheese slices to create eyes and place them on the top of the mummy’s “head.” Cut black olives into small pieces and place them on the cheese circles to serve as pupils.
- Bake the Meatloaf: Place the wrapped meatloaf in the preheated oven and bake for about 50-60 minutes, or until the internal temperature reaches 160°F (70°C). The dough should be golden brown and the meat cooked through.
- Let it Rest: Remove the meatloaf from the oven and let it rest for about 5-10 minutes before slicing. This allows the juices to redistribute, keeping the meatloaf moist.
Extra Tips
For a more intense flavor, consider adding a touch of barbecue sauce or ketchup on top of the meatloaf before wrapping it with dough. This can enhance the overall taste and provide a nice glaze under the mummy wrappings.
If you’re short on time, you can prepare the meatloaf mixture in advance and refrigerate it until you’re ready to shape and bake.
Finally, be sure to use a thermometer to check doneness, as overcooking can lead to a dry meatloaf.
Monster Mac and Cheese
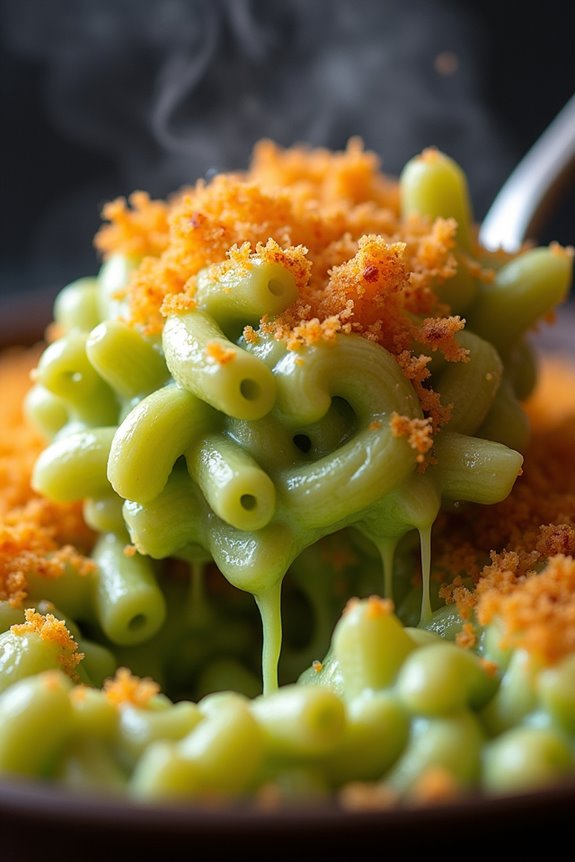
Get ready to thrill your taste buds with a spooky twist on a classic comfort food: Monster Mac and Cheese. This Halloween-themed dish is perfect for a festive dinner party or a fun family meal. Combining the creamy richness of traditional macaroni and cheese with a ghoulish green color, this dish is bound to enchant both kids and adults alike.
The vibrant hue is achieved naturally with spinach, making it a surprisingly nutritious treat amidst the candy-laden holiday. Designed to serve 4-6 people, Monster Mac and Cheese not only looks festive but also delivers in flavor. The recipe involves a smooth, cheesy sauce layered over al dente pasta, with an added touch of zing from garlic and a hint of spice from cayenne pepper.
This dish isn’t just about theatrics; it’s a deliciously satisfying meal that pairs well with the spooky season. So, don your apron and prepare to conjure up this monstrous delight in your kitchen.
Ingredients:
- 1 pound elbow macaroni
- 2 cups baby spinach leaves
- 2 tablespoons unsalted butter
- 2 tablespoons all-purpose flour
- 2 cups whole milk
- 2 cups shredded sharp cheddar cheese
- 1/2 cup grated Parmesan cheese
- 1 teaspoon garlic powder
- 1/4 teaspoon cayenne pepper
- Salt and pepper to taste
- 1/4 cup panko breadcrumbs
- 2 tablespoons olive oil
Cooking Instructions:
- Prepare the Pasta: Cook the elbow macaroni in a large pot of boiling salted water until just al dente, according to package instructions. Drain the pasta and set it aside.
- Blend the Spinach: While the pasta cooks, place the baby spinach in a blender with a splash of water. Blend until smooth to form a bright green spinach puree. Set aside.
- Make the Cheese Sauce: In a large saucepan, melt the butter over medium heat. Add the flour, whisking constantly for about 1-2 minutes to form a roux. Gradually whisk in the milk and continue to cook, stirring frequently, until the sauce thickens.
- Add Cheese and Seasoning: Stir in the cheddar and Parmesan cheeses until melted and smooth. Add the garlic powder, cayenne pepper, and the spinach puree to the cheese sauce. Season with salt and pepper to taste.
- Combine Pasta and Sauce: Add the cooked macaroni to the sauce, stirring until the pasta is evenly coated with the green cheesy mixture.
- Prepare Topping: In a small bowl, mix the panko breadcrumbs with olive oil. Sprinkle this mixture evenly over the top of the mac and cheese.
- Bake: Preheat your oven to 350°F (175°C). Transfer the mac and cheese to a greased baking dish and bake for 15-20 minutes or until the top is golden and crispy.
Extra Tips:
For a more intense green color, feel free to double the amount of spinach puree. You can also use different types of cheese, like mozzarella or Gruyère, for a variation in flavor.
If you want to add a bit more texture and protein, consider mixing in cooked chicken or crispy bacon before baking. When baking, keep an eye on the topping to guarantee it doesn’t burn; covering the dish with foil can help if it starts to brown too quickly.
Enjoy your Monster Mac and Cheese with a side of spooky fun!
Eyeball Spaghetti
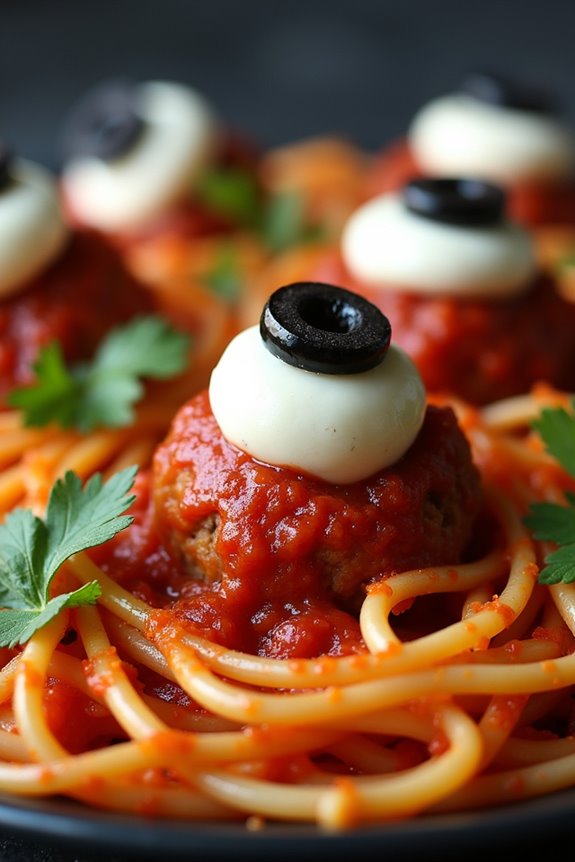
Halloween is the perfect time to get creative with your dinner menu, and Eyeball Spaghetti is a fun, spooky dish that’s sure to be a hit with both kids and adults. This dish combines classic spaghetti with a creepy twist, featuring “eyeballs” made from meatballs and mozzarella, creating an eerie yet delicious meal.
Not only is it visually appealing, but it also maintains the comforting flavors of traditional spaghetti and meatballs, making it a delightful addition to your Halloween festivities.
To make Eyeball Spaghetti, you’ll start by preparing your favorite meatball recipe but with a twist to transform them into eyeballs. Once the meatballs are cooked, you’ll adorn them with a slice of mozzarella and an olive slice to create the eyeball effect. The spaghetti is served with a rich tomato sauce that complements the flavors of the meatballs and adds to the Halloween theme with its bright red color. This dish serves 4-6 people, making it perfect for a small gathering or family dinner.
Ingredients:
- 1 pound spaghetti
- 1 ½ pounds ground beef or pork
- 1 cup bread crumbs
- 1 egg
- 1 teaspoon garlic powder
- 1 teaspoon onion powder
- 1 teaspoon dried oregano
- Salt and pepper to taste
- 2 cups marinara sauce
- 4 ounces mozzarella cheese, sliced into small rounds
- Black olives, sliced
- Fresh parsley for garnish (optional)
Instructions:
- Prepare the Meatballs: In a large mixing bowl, combine the ground beef or pork, bread crumbs, egg, garlic powder, onion powder, oregano, salt, and pepper. Mix well until all ingredients are thoroughly incorporated.
- Form the Eyeballs: Shape the meat mixture into 1-inch meatballs. Place them on a baking sheet lined with parchment paper.
- Cook the Meatballs: Preheat your oven to 375°F (190°C). Bake the meatballs for 20-25 minutes or until they’re cooked through and browned on the outside.
- Create the Eyeballs: Once the meatballs have cooled slightly, place a slice of mozzarella on top of each meatball. Press a slice of black olive into the center of the mozzarella to resemble an eyeball.
- Cook the Spaghetti: While the meatballs are baking, cook the spaghetti according to package instructions. Drain and set aside.
- Heat the Sauce: In a large saucepan, heat the marinara sauce over medium heat until warm.
- Combine the Ingredients: Add the cooked spaghetti to the saucepan with the marinara sauce and toss to coat the spaghetti evenly.
- Assemble the Dish: Serve the spaghetti on a large platter or individual plates. Place the eyeball meatballs on top of the spaghetti, arranging them to create a spooky presentation.
- Garnish and Serve: Garnish with fresh parsley if desired, and serve immediately.
Extra Tips:
For an even spookier effect, you can use different colored olives for the eyes, such as green olives with pimentos.
To make the dish even more nutritious, consider adding some sautéed spinach or zucchini to the sauce.
If you want to save time, you can use store-bought meatballs and simply modify them with the mozzarella and olives.
Remember to adjust the seasoning to your taste, especially if using pre-made components.
Enjoy this fun and festive dish, and have a hauntingly good Halloween!
Witch’s Brew Stew

Transform your Halloween dinner into a magical feast with this Witch’s Brew Stew, a hearty and delicious dish that looks as enchanting as it tastes. Perfect for a spooky gathering, this stew combines a blend of savory ingredients that simmer together to create a rich and flavorful concoction. The vibrant colors and aromas will captivate your guests, making it a memorable centerpiece for your Halloween-themed dinner.
The Witch’s Brew Stew is designed to serve 4-6 people, making it ideal for family gatherings or small parties. This dish features a variety of fresh vegetables, tender chunks of meat, and a mixture of herbs and spices that will transport your taste buds to a mystical world. The combination of textures and flavors in each spoonful will have you and your guests coming back for more.
Ingredients (Serves 4-6):
- 2 tablespoons olive oil
- 1 pound beef stew meat, cubed
- 1 large onion, chopped
- 3 cloves garlic, minced
- 2 carrots, sliced
- 2 potatoes, diced
- 1 cup chopped celery
- 1 green bell pepper, chopped
- 1 red bell pepper, chopped
- 1 (14.5 oz) can diced tomatoes
- 4 cups beef broth
- 1 tablespoon Worcestershire sauce
- 1 teaspoon dried thyme
- 1 teaspoon dried rosemary
- 1 bay leaf
- Salt and black pepper to taste
- 1 cup frozen peas
- 1 tablespoon cornstarch mixed with 2 tablespoons water
Cooking Instructions:
- Prepare the Pot: Heat the olive oil in a large pot over medium heat. This will prevent the meat from sticking and help it brown evenly.
- Brown the Meat: Add the cubed beef stew meat to the pot. Cook until all sides are browned, about 5-7 minutes. Remove the meat from the pot and set aside.
- Sauté the Aromatics: In the same pot, add the chopped onion and minced garlic. Sauté for 3-4 minutes until the onion becomes translucent and fragrant.
- Add Vegetables: Stir in the carrots, potatoes, celery, green bell pepper, and red bell pepper. Cook for another 5 minutes, allowing the vegetables to start softening.
- Combine Ingredients: Return the browned beef to the pot. Add the diced tomatoes, beef broth, Worcestershire sauce, thyme, rosemary, bay leaf, salt, and pepper. Stir well to combine all the ingredients.
- Simmer the Stew: Bring the mixture to a boil, then reduce the heat to low. Cover the pot and let the stew simmer for about 1.5 to 2 hours, or until the meat is tender and the flavors have melded together.
- Add Frozen Peas: About 10 minutes before serving, stir in the frozen peas. This will guarantee they remain bright green and retain a slight crunch.
- Thicken the Stew: If a thicker stew is desired, mix the cornstarch with water to create a slurry. Stir the slurry into the stew and cook for an additional 5 minutes to allow it to thicken.
Extra Tips:
For an added layer of flavor, you can marinate the beef stew meat in Worcestershire sauce and herbs for a couple of hours before cooking.
When browning the meat, make sure the pot isn’t overcrowded, as this can cause the meat to steam rather than brown.
If you prefer a spicier version, consider adding a pinch of cayenne pepper or a chopped jalapeño.
Finally, this stew can be made a day in advance, as it often tastes even better the next day after the flavors have had more time to meld together.
Ghostly White Pizza

If you’re looking to add a spooky twist to your Halloween dinner, the Ghostly White Pizza is an excellent choice. This eerie yet delicious dish is perfect for setting the mood for a festive evening. Featuring a hauntingly pale white sauce and a ghostly array of toppings, this pizza isn’t only visually enchanting but also irresistibly tasty. It’s an ideal dish to serve to friends and family during your Halloween gathering.
The Ghostly White Pizza combines a creamy white garlic sauce with a selection of white cheeses, mushrooms, and artichoke hearts to give it that spectral look. The toppings are strategically placed to create the appearance of ghostly faces, making it a fun and interactive dish to enjoy. Best of all, it’s easy to make and can be prepared in advance, allowing you to focus on enjoying the festivities. This recipe serves 4-6 people, making it perfect for a small party or family dinner.
Ingredients:
- 2 pre-made pizza crusts (12-inch each)
- 1 cup alfredo sauce
- 2 cups shredded mozzarella cheese
- 1 cup grated parmesan cheese
- 1 cup ricotta cheese
- 1 cup sliced mushrooms
- 1 cup canned artichoke hearts, drained and chopped
- 1 tablespoon olive oil
- 2 cloves garlic, minced
- Salt and pepper to taste
- Fresh basil leaves for garnish
Cooking Instructions:
1. Prepare the Oven and Crusts:
Preheat your oven to 450°F (232°C). Place the pizza crusts on two separate baking sheets or pizza stones.
2. Make the White Sauce:
In a small saucepan, heat the olive oil over medium heat. Add the minced garlic and sauté until fragrant, about 1 minute. Stir in the alfredo sauce and season with salt and pepper. Allow the sauce to heat through and then remove from the heat.
3. Assemble the Pizza:
Spread the prepared white sauce evenly over each pizza crust, leaving a small border around the edges. Sprinkle the mozzarella and parmesan cheeses evenly across the pizzas.
4. Add the Toppings:
Distribute the ricotta cheese in small dollops across the pizzas. Arrange the mushroom slices and artichoke hearts on top, creating ghost-like faces by using mushroom slices as eyes and artichoke pieces as spooky mouths.
5. Bake the Pizzas:
Place the pizzas in the oven and bake for 10-12 minutes, or until the cheese is bubbly and the crust is golden brown.
6. Garnish and Serve:
Once baked, remove the pizzas from the oven and let them cool slightly. Garnish with fresh basil leaves before slicing and serving.
Extra Tips:
For an even spookier effect, you can cut the toppings into more defined ghostly shapes using small cookie cutters or a sharp knife. If you prefer a more garlicky flavor, feel free to add extra garlic to the sauce. Additionally, you can experiment with other white toppings, such as onions or cauliflower, to enhance the spectral theme.
Remember to serve the Ghostly White Pizza hot for the best taste and texture — it’s sure to be a hit at your Halloween celebration!
Spider Web Soup
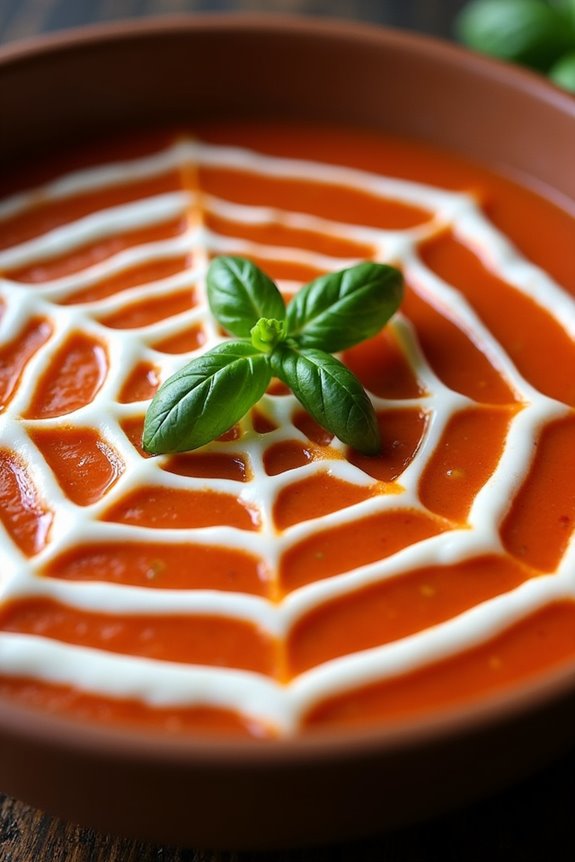
Spider Web Soup is a spooky and fun dish perfect for a Halloween-themed dinner. This soup isn’t only visually stunning with its eerie spider web design, but it’s also hearty and delicious, making it a great choice for a chilly October night.
The base of the soup is a rich and creamy tomato soup, which is then artistically decorated with a yogurt or sour cream spider web. This dish is sure to be a hit with both kids and adults alike, adding a fun and festive flair to your Halloween celebrations.
The key to accomplishing the perfect spider web effect is in the technique of creating the pattern with the cream. By using a simple piping method, you can transform a basic tomato soup into a Halloween masterpiece. This recipe serves 4-6 people, making it suitable for a small gathering or family dinner. It’s easy to prepare and can be made in advance, allowing you to enjoy the festivities without spending too much time in the kitchen.
Ingredients (serving size: 4-6 people):
- 2 tablespoons olive oil
- 1 medium onion, chopped
- 2 cloves garlic, minced
- 1 can (28 ounces) crushed tomatoes
- 3 cups vegetable broth
- 1 teaspoon sugar
- 1 teaspoon salt
- 1/2 teaspoon black pepper
- 1/4 teaspoon red pepper flakes (optional)
- 1/2 cup heavy cream
- 1/2 cup plain Greek yogurt or sour cream
- Fresh basil leaves for garnish (optional)
Cooking Instructions:
- Prepare the Base: In a large pot, heat the olive oil over medium heat. Add the chopped onion and minced garlic, and sauté until the onion is translucent, about 5 minutes.
- Cook the Tomatoes: Add the crushed tomatoes, vegetable broth, sugar, salt, black pepper, and red pepper flakes (if using) to the pot. Stir well to combine.
- Simmer the Soup: Bring the mixture to a boil, then reduce the heat to low. Cover and let it simmer for 20 minutes, allowing the flavors to meld together.
- Blend Until Smooth: Use an immersion blender to puree the soup until smooth. Alternatively, you can carefully transfer the soup to a blender in batches and blend until smooth, then return it to the pot.
- Add Cream: Stir in the heavy cream, mixing well to create a creamy consistency. Heat for an additional 5 minutes.
- Create the Spider Web: In a small bowl, mix the Greek yogurt or sour cream with a few tablespoons of water to thin it out slightly. Transfer the mixture to a piping bag or a plastic bag with a small corner snipped off.
- Decorate: Pipe concentric circles of the yogurt mixture on top of each soup serving. Use a toothpick or skewer to drag lines from the center of the circles outward to create a spider web effect.
- Garnish and Serve: Garnish with fresh basil leaves if desired, and serve immediately.
Extra Tips: For an even more dramatic effect, consider adding a few drops of black food coloring to the yogurt or sour cream before piping to create a more defined spider web.
If you prefer a spicier soup, feel free to increase the amount of red pepper flakes. The soup can be made a day in advance and stored in the refrigerator; just reheat it gently before serving. Adjust the thickness of the yogurt mixture as needed to facilitate it piping smoothly without becoming too runny.
Creepy-Crawly Tacos

Embrace the spooky spirit of Halloween by serving up a dish that blends delicious flavors with an eerie twist: Creepy-Crawly Tacos. This fun and festive recipe is perfect for a themed dinner party or a family meal that will delight both kids and adults alike. By using a mix of traditional taco ingredients and some creative garnishes, you can create a memorable dining experience that looks like it crawled straight out of a haunted kitchen.
With a little imagination and some simple ingredients, these tacos will be the star of your Halloween feast. The key to making these tacos truly creepy-crawly is in the presentation. Start with your favorite taco base, add some spicy ground beef, and load it up with toppings that resemble spooky creatures. Black olives can be sliced to mimic spiders, and green bell peppers can be cut into slithery snake shapes.
A sprinkle of shredded purple cabbage adds a mysterious color, while dollops of sour cream and salsa give the tacos a ghostly finish. Not only are these tacos visually appealing, but they also pack a punch of flavor that will satisfy even the bravest of appetites.
Ingredients (serving size: 4-6 people):
- 1 lb ground beef
- 1 packet taco seasoning
- 12 small corn or flour taco shells
- 1 cup shredded cheddar cheese
- 1 cup shredded purple cabbage
- 1 cup black olives, sliced
- 1 green bell pepper, sliced into thin strips
- 1/2 cup salsa
- 1/2 cup sour cream
- 1 cup shredded lettuce
- 1 tomato, diced
- Olive oil for cooking
Cooking Instructions:
- Prepare the Ground Beef: Heat a tablespoon of olive oil in a skillet over medium heat. Add the ground beef and cook until browned, breaking it apart with a wooden spoon as it cooks. Drain any excess fat and return the beef to the skillet.
- Season the Beef: Add the taco seasoning to the cooked beef, along with 1/4 cup of water. Stir to combine and let the mixture simmer for about 5 minutes, ensuring the beef is well-coated in seasoning.
- Prepare the Taco Shells: While the beef is simmering, warm the taco shells according to the package instructions. This usually involves wrapping them in foil and heating them in the oven for a few minutes.
- Assemble the Tacos: Start by placing a layer of the seasoned beef into each taco shell. Top with shredded cheddar cheese to let it melt slightly over the warm beef.
- Add the Toppings: Stack the tacos with shredded lettuce, diced tomatoes, and shredded purple cabbage for a pop of eerie color. Arrange the sliced black olives to resemble spiders, and position the bell pepper strips to look like slithering snakes.
- Finish with Sauces: Add a dollop of sour cream and a spoonful of salsa to each taco for a ghostly touch. Serve immediately while everything is fresh and warm.
Extra Tips:
For an added spooky effect, you can use cookie cutters to shape your veggies into fun Halloween shapes such as bats or pumpkins. Consider using different colored tortilla chips on the side to enhance the Halloween theme.
If you want to make the meal even more interactive, set up a taco bar where guests can build their own Creepy-Crawly Tacos, selecting from a variety of toppings and sauces. Remember to keep the atmosphere light and fun, and let your creativity flow when designing these ghoulishly good tacos!
Bloody Finger Hot Dogs

Bloody Finger Hot Dogs are a spooky and fun addition to any Halloween-themed dinner party. This dish takes the classic hot dog and transforms it into a creepy, yet delicious finger-like creation. The visual appeal of these hot dogs is a conversation starter and a hit with both kids and adults. The key to this dish is in the presentation, where the hot dog is made to look like a severed finger, complete with a “bloody” ketchup topping.
The preparation of Bloody Finger Hot Dogs is relatively simple, making it an ideal recipe for a Halloween gathering. All you need is a few common ingredients and a bit of creativity to bring this gory snack to life. The hot dogs are carefully carved to resemble fingers, with strategically placed cuts to mimic knuckles and nail beds. With a little bit of ketchup to act as the “blood,” these hot dogs aren’t only fun to look at, but also delicious to eat.
Ingredients (serving size: 4-6 people):
- 8 hot dogs
- 8 hot dog buns
- Ketchup
- Yellow mustard (optional)
- 8 slices of cheese (optional)
- 1 small onion (optional, for added texture)
Cooking Instructions:
- Prepare the Hot Dogs: Begin by taking each hot dog and using a small knife to make small cuts to create knuckles, and a deeper cut at one end to form the nail bed. Be careful not to cut all the way through the hot dog.
- Boil or Grill the Hot Dogs: Cook the hot dogs either by boiling them in water until heated through, or by grilling them for a few minutes until they’re nicely browned.
- Prepare the Buns: While the hot dogs are cooking, lightly toast the hot dog buns. You can do this by placing them in the oven at 350°F (175°C) for about 5 minutes or until lightly crispy.
- Assemble the Bloody Fingers: Place each cooked hot dog into a bun. Use ketchup to squeeze a generous amount on the end of the hot dog to resemble blood. You can also add a dab of ketchup on the nail bed for added effect. If desired, use a small piece of onion as a “fingernail” and place it in the cut at the end of the hot dog.
- Optional Cheese and Mustard: If you want to add cheese, place a slice inside the bun before adding the hot dog. A squirt of mustard can also be used for added flavor if desired.
Extra Tips:
To enhance the eerie effect, consider serving the Bloody Finger Hot Dogs on a large platter lined with lettuce leaves to simulate a graveyard. Adding some plastic spiders or fake cobwebs around the serving area can also heighten the Halloween atmosphere.
If you’re making these for children, consider using turkey or chicken hot dogs as a healthier option. Be sure to supervise any kids who might be helping with the preparation, especially when using a knife to carve the hot dogs.
Bat Wing Drumsticks
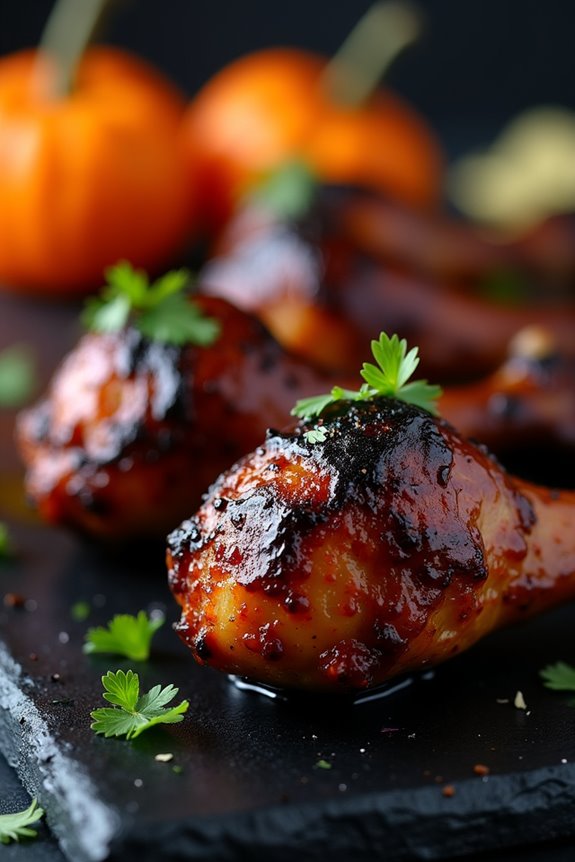
Transform your Halloween dinner into a spooky affair with these Bat Wing Drumsticks. This dish adds a touch of eerie elegance to your table, with chicken drumsticks dyed black to resemble bat wings. The flavor is a delightful mix of smoky and savory, making it perfect for both kids and adults.
Serve these drumsticks with a side of roasted vegetables or mashed potatoes to complete the meal. This fun and festive dish is sure to be a hit at your Halloween gathering.
The secret to the dark, mysterious color of these drumsticks is in the marinade, which includes soy sauce and food-grade black food coloring. The drumsticks are marinated for several hours to guarantee they’re packed with flavor and then baked to perfection.
This recipe serves 4-6 people, making it ideal for a small party or family dinner. Enjoy the thrill of serving up something that looks spooky but tastes absolutely delicious!
Ingredients:
- 12 chicken drumsticks
- 1 cup soy sauce
- 1/4 cup honey
- 2 tablespoons olive oil
- 2 tablespoons apple cider vinegar
- 1 tablespoon smoked paprika
- 1 teaspoon garlic powder
- 1 teaspoon onion powder
- 1 teaspoon black pepper
- 2 teaspoons salt
- 1 teaspoon liquid smoke (optional)
- Black food coloring (food-grade)
- Fresh parsley for garnish (optional)
Cooking Instructions:
- Prepare the Marinade: In a large bowl, combine the soy sauce, honey, olive oil, apple cider vinegar, smoked paprika, garlic powder, onion powder, black pepper, salt, and liquid smoke. Mix well until all ingredients are thoroughly combined.
- Add Black Coloring: Add a few drops of black food coloring to the marinade and stir until you achieve a dark, consistent color. The amount of food coloring may vary based on the brand, so adjust as needed to reach your desired shade.
- Marinate the Drumsticks: Place the chicken drumsticks in a large resealable plastic bag or a shallow dish. Pour the marinade over the drumsticks, guaranteeing they’re fully coated. Seal the bag or cover the dish and refrigerate for at least 4 hours, preferably overnight, to allow the flavors to penetrate the meat.
- Preheat the Oven: Preheat your oven to 400°F (200°C). Line a baking sheet with aluminum foil and set a wire rack on top. This will allow the drumsticks to cook evenly and become crispy.
- Bake the Drumsticks: Remove the drumsticks from the marinade and arrange them on the wire rack. Discard the remaining marinade. Bake in the preheated oven for 35-40 minutes, or until the internal temperature of the chicken reaches 165°F (74°C) and the skin is crispy and slightly charred.
- Serve and Garnish: Once cooked, remove the drumsticks from the oven and let them rest for a few minutes. Garnish with fresh parsley if desired and serve hot.
Extra Tips:
For an even spookier presentation, consider serving these drumsticks on a black platter or alongside other Halloween-themed dishes. If you prefer a smokier flavor, increase the amount of liquid smoke in the marinade.
Remember to wear gloves when handling the food coloring to avoid staining your hands. If you have leftover drumsticks, they can be refrigerated and reheated the next day, maintaining their delicious flavor and texture. Enjoy your Halloween feast with these tantalizing Bat Wing Drumsticks!
Zombie Brain Casserole
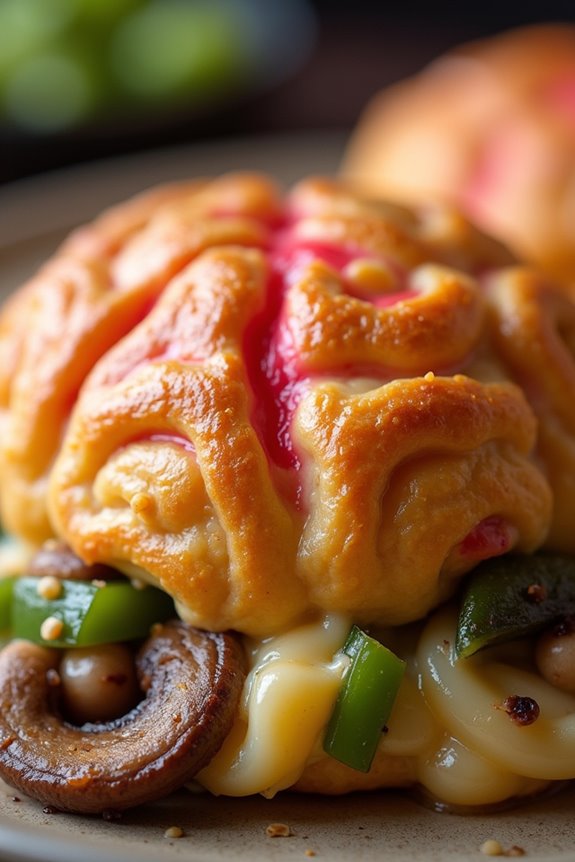
Zombie Brain Casserole is a perfect Halloween-themed dinner dish that’s both spooky and delicious. This dish is designed to resemble a brain, making it a conversation starter at any Halloween gathering. Despite its eerie appearance, the casserole is a mouth-watering combination of hearty ingredients that will leave your guests wanting more. The rich flavors and creative presentation make it a must-have on your Halloween menu.
This dish isn’t only fun to make but also relatively simple, making it suitable for both experienced cooks and kitchen novices. The Zombie Brain Casserole combines ground meat, vegetables, and seasonings, topped with a unique layer that gives it the brain-like appearance. It’s a fantastic way to get into the Halloween spirit while serving up a meal that’s satisfying and filling. This recipe serves 4-6 people, making it ideal for a small Halloween gathering.
Ingredients:
- 1 pound ground beef or turkey
- 1 onion, finely chopped
- 2 cloves garlic, minced
- 1 cup mushrooms, chopped
- 1 bell pepper, chopped
- 2 cups marinara sauce
- 1 teaspoon Italian seasoning
- Salt and pepper to taste
- 1 cup mozzarella cheese, shredded
- 1 package refrigerated crescent roll dough
- Red food coloring
Cooking Instructions:
- Preheat Oven: Begin by preheating your oven to 375°F (190°C). This guarantees that your casserole will bake evenly once it’s assembled.
- Cook the Meat: In a large skillet over medium heat, cook the ground beef or turkey until browned. Confirm the meat is fully cooked, breaking it apart into smaller pieces with a spatula as it cooks.
- Add Vegetables: Add the chopped onion, garlic, mushrooms, and bell pepper to the skillet. Sauté together with the meat until the vegetables are tender, which should take about 5 minutes.
- Season: Stir in the marinara sauce and Italian seasoning. Season with salt and pepper to taste. Allow the mixture to simmer for 5 minutes, letting the flavors meld together.
- Prepare Baking Dish: Transfer the meat and vegetable mixture into a greased 9×13 inch baking dish, spreading it out evenly. Sprinkle the shredded mozzarella cheese over the top.
- Create Brain Top: Unroll the crescent roll dough and cut it into strips. Arrange the strips over the casserole in a crisscross pattern to mimic the folds of a brain. Be creative with your design!
- Add Color: Mix a few drops of red food coloring with a little water and brush it lightly over the dough strips. This will give the top a slightly pink hue, enhancing the brain-like appearance.
- Bake: Place the casserole in the preheated oven and bake for 20-25 minutes, or until the dough is golden brown and cooked through.
- Serve: Allow the casserole to cool slightly before serving. This will make it easier to cut and serve portions.
Extra Tips: For added flavor, consider adding a splash of red wine to the meat mixture when simmering. If you prefer a spicier casserole, add chili flakes or a chopped jalapeño to the vegetable mix.
Make sure not to overdo the food coloring; a little goes a long way, and you want the color to be subtle yet effective. Finally, if you have leftovers, this casserole reheats well, making it a convenient option for post-Halloween meals.
Vampire Bite Burgers

Sink your teeth into a spooky Halloween feast with these Vampire Bite Burgers. Perfectly juicy beef patties are paired with a rich tomato-garlic sauce, creating a blood-red appearance that’s sure to impress your ghoulish guests.
These burgers aren’t only visually striking but also packed with flavor, making them ideal for a festive dinner. Serve them up with a side of crispy “fang fries” or a leafy “witch’s salad” for a complete Halloween-themed meal.
The secret to these burgers lies in the tangy tomato-garlic sauce, which mimics the look of vampire bites. By adding just a touch of red food coloring to the sauce, you can enhance the blood-red effect, while the garlic adds a punch of flavor reminiscent of traditional vampire lore.
The burgers themselves are seasoned with a blend of spices to complement the sauce, guaranteeing every bite is as delightful as it’s frightful. Gather your ingredients and get ready to create a spine-chilling meal that will be talked about long after Halloween night.
Ingredients (Serving Size: 4-6 People)
- 2 pounds ground beef
- 1 tablespoon Worcestershire sauce
- 1 teaspoon garlic powder
- 1 teaspoon onion powder
- Salt and pepper to taste
- 6 hamburger buns
- 6 slices of cheddar cheese
- 2 tablespoons olive oil
- 1 cup tomato sauce
- 3 cloves garlic, minced
- 1 teaspoon sugar
- 1 tablespoon balsamic vinegar
- A few drops of red food coloring
- Lettuce, tomato slices, and pickles for serving
Cooking Instructions
- Prepare the Beef Patties: In a large mixing bowl, combine the ground beef, Worcestershire sauce, garlic powder, onion powder, salt, and pepper. Mix until all ingredients are well incorporated. Form the mixture into 6 evenly sized patties.
- Cook the Patties: Heat a grill or a large skillet over medium-high heat. Add a tablespoon of olive oil to prevent sticking. Cook the patties for about 4-5 minutes on each side, or until they reach your desired level of doneness. Place a slice of cheddar cheese on each patty during the final minute of cooking to allow it to melt.
- Make the Vampire Sauce: In a small saucepan over medium heat, add the remaining tablespoon of olive oil. Sauté the minced garlic until fragrant, about 1-2 minutes. Stir in the tomato sauce, sugar, and balsamic vinegar. Bring the mixture to a simmer and cook for 5 minutes. Add a few drops of red food coloring to achieve a blood-red hue.
- Assemble the Burgers: Toast the hamburger buns on the grill or in a toaster. Place a lettuce leaf on the bottom half of each bun, followed by a tomato slice and a beef patty with melted cheese. Drizzle the vampire sauce generously over the patty. Top with pickles and cover with the top half of the bun.
- Serve and Enjoy: Serve the Vampire Bite Burgers immediately while they’re hot. Pair them with your choice of side dishes for a complete Halloween-themed meal.
Extra Tips
To make sure your Vampire Bite Burgers are a hit, consider using fresh, high-quality beef for the patties to maximize flavor and juiciness. The addition of cheese is optional, but it adds a creamy texture that complements the tangy sauce.
If you’re not a fan of red food coloring, you can skip it and rely on the natural color of the tomato sauce. Finally, for an extra Halloween touch, use cookie cutters to shape the cheese slices into bats or other spooky shapes before placing them on the patties. Enjoy your eerie creation!
Jack-o’-Lantern Stuffed Peppers
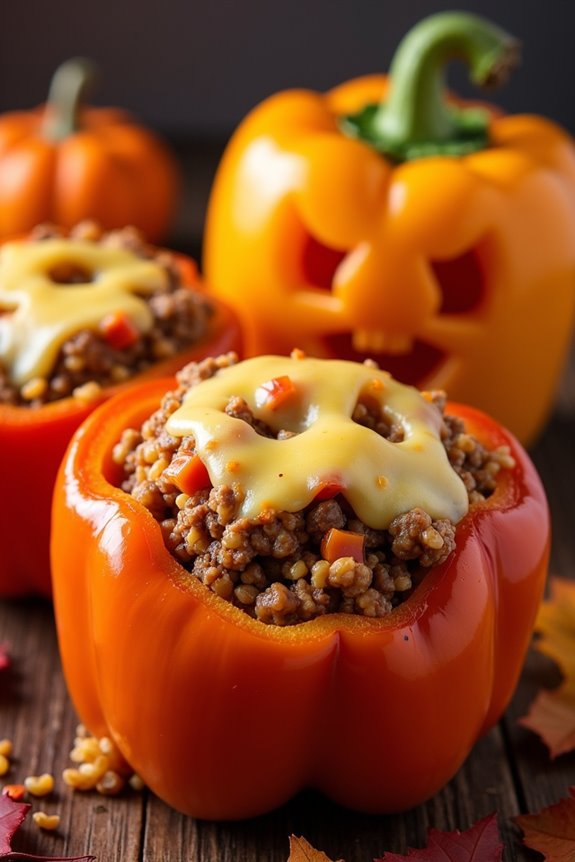
Get into the Halloween spirit with these delightful Jack-o’-Lantern Stuffed Peppers, a festive and flavorful dish perfect for a themed dinner.
These bell peppers are carved to resemble mini pumpkins, filled with a savory mixture of rice, ground meat, and vegetables, and baked to perfection. Not only are they visually appealing, but they also offer a nutritious and filling meal that will satisfy both adults and kids alike.
The Jack-o’-Lantern Stuffed Peppers are a great way to incorporate seasonal fun into your dining experience. The carved faces add a touch of whimsy, while the hearty stuffing provides a delicious blend of flavors and textures.
This recipe serves 4-6 people, making it an ideal choice for a Halloween gathering or family dinner. Whether you’re hosting a party or simply enjoying a themed meal at home, these peppers are sure to impress.
Ingredients:
- 4-6 medium orange bell peppers
- 1 pound ground beef or turkey
- 1 cup cooked rice
- 1 small onion, chopped
- 2 cloves garlic, minced
- 1 cup canned diced tomatoes, drained
- 1 cup shredded cheddar cheese
- 1 teaspoon Italian seasoning
- Salt and pepper to taste
- 2 tablespoons olive oil
Cooking Instructions:
- Preheat the Oven: Begin by preheating your oven to 375°F (190°C). This will guarantee that your peppers cook evenly throughout the process.
- Prepare the Peppers: Cut the tops off the bell peppers and remove the seeds and membranes inside. Rinse them under cold water to clean thoroughly. With a small knife, carefully carve jack-o’-lantern faces into the side of each pepper.
- Cook the Filling: In a large skillet over medium heat, add the olive oil. Once heated, add chopped onions and minced garlic, sautéing until the onions are translucent. Add the ground meat, cooking until browned and fully cooked. Drain any excess fat.
- Combine Ingredients: To the cooked meat mixture, add the cooked rice, diced tomatoes, Italian seasoning, salt, and pepper. Stir well to combine all the ingredients and let simmer for 5 minutes.
- Stuff the Peppers: Carefully fill each carved pepper with the meat and rice mixture. Place the filled peppers upright in a baking dish.
- Bake the Peppers: Cover the baking dish with aluminum foil and bake in the preheated oven for 30 minutes. Remove the foil, sprinkle each pepper with shredded cheddar cheese, and bake for an additional 10 minutes, or until the cheese is melted and bubbly.
- Serve and Enjoy: Remove the peppers from the oven and let them cool slightly before serving. Arrange them on a platter for a festive presentation.
Extra Tips:
When carving the peppers, take care to make the cuts large enough so they don’t close up during baking, but not too large that the filling spills out.
If you prefer a vegetarian option, substitute the ground meat with mushrooms or more vegetables. Additionally, for added flavor, consider incorporating other spices such as cumin or paprika into the stuffing mixture.
If you have any leftover stuffing, it can be served on the side or kept for another meal. Enjoy your spooky, delicious creation!
Haunted Graveyard Shepherd’s Pie
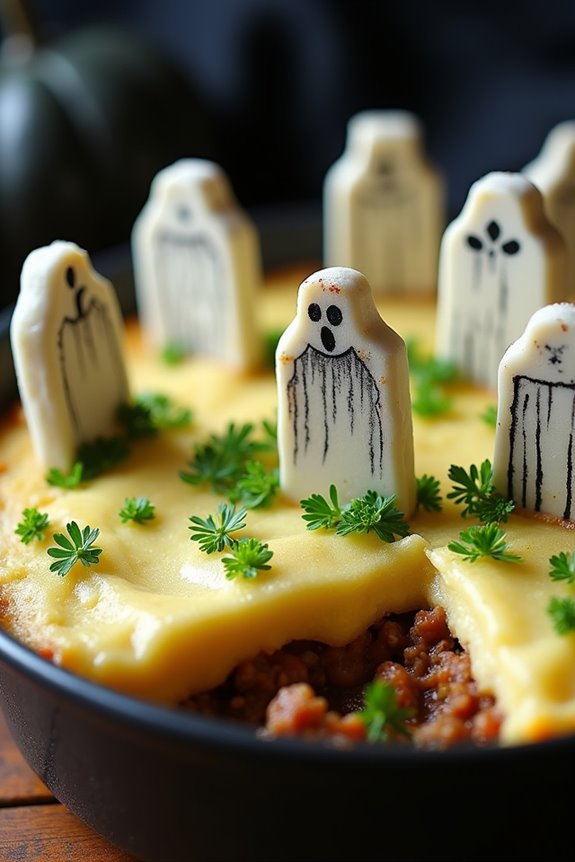
Halloween is the perfect time to get creative in the kitchen, and what better way to celebrate than with a spooky take on a classic comfort food? Introducing the Haunted Graveyard Shepherd’s Pie, a dish that combines the hearty flavors of traditional shepherd’s pie with a spooky, Halloween twist.
This dish is perfect for a Halloween-themed dinner party or a fun family meal that brings a bit of fright to the table. With a mashed potato topping sculpted into creepy gravestones and a filling that’s rich and flavorful, this culinary creation is sure to be a hit among adults and children alike.
The Haunted Graveyard Shepherd’s Pie is both a feast for the eyes and the taste buds. The base of the pie consists of a savory meat and vegetable mixture, topped with a creamy layer of mashed potatoes. The mashed potatoes are shaped into eerie gravestones and ghosts, giving the pie its haunted appearance.
This dish not only provides a delicious meal but also offers an opportunity for creativity in the kitchen, allowing you to get into the Halloween spirit. Let’s plunge into the recipe to create this spooky yet comforting dish.
Ingredients (Serving Size: 4-6 people)
- 1 tablespoon olive oil
- 1 medium onion, diced
- 2 cloves garlic, minced
- 1 pound ground beef or lamb
- 1 cup carrots, diced
- 1 cup peas
- 2 tablespoons tomato paste
- 1 tablespoon Worcestershire sauce
- 1 cup beef or vegetable broth
- Salt and pepper to taste
- 4 cups mashed potatoes
- Black food coloring (optional)
- Fresh parsley for garnish
Cooking Instructions
- Preheat and Prepare: Preheat your oven to 400°F (200°C). While the oven is heating, prepare the mashed potatoes if you haven’t already. You can add a few drops of black food coloring to the potatoes to give them a more haunted look.
- Cook the Meat Filling: In a large skillet, heat the olive oil over medium heat. Add the diced onion and minced garlic, sautéing until the onion becomes translucent. Add the ground beef or lamb, and cook until browned, breaking it up with a spoon as it cooks.
- Add Vegetables and Sauce: Stir in the diced carrots and peas. Add the tomato paste, Worcestershire sauce, and broth. Season with salt and pepper to taste. Let the mixture simmer for about 10 minutes, allowing the flavors to meld together and the sauce to thicken slightly.
- Assemble the Pie: Transfer the meat and vegetable mixture into a baking dish, spreading it evenly across the bottom. Spoon the mashed potatoes on top, smoothing them out to cover the filling completely.
- Create the Graveyard Scene: Using a fork or spoon, sculpt the mashed potatoes to resemble gravestones and ghosts. You can get creative with the details, adding cracks or inscriptions to the gravestones if desired.
- Bake and Garnish: Place the assembled pie in the preheated oven and bake for about 20-25 minutes, or until the mashed potatoes are slightly golden on top. Remove from the oven and let it cool for a few minutes. Before serving, sprinkle with fresh parsley to resemble grass in the haunted graveyard.
Extra Tips
For an even spookier effect, consider using mashed sweet potatoes for a vibrant orange color, or mix in some spinach puree for a creepy green hue. If you don’t have black food coloring, you can use cocoa powder to darken parts of your mashed potato gravestones.
To make it more family-friendly, you can also involve the kids in shaping the gravestones and ghosts. Remember, the key to this dish is creativity, so don’t be afraid to add your own spooky touches to the Haunted Graveyard Shepherd’s Pie!
Devilish Deviled Eggs

Nothing says Halloween like a spooky twist on classic dishes, and Devilish Deviled Eggs are a perfect way to add a little fright to your festive gathering. These eggs aren’t only delicious but also visually striking, making them an excellent centerpiece for your Halloween-themed dinner.
With their rich and creamy filling, tinted with a touch of food coloring, they resemble eerie eyeballs that are sure to captivate both kids and adults alike. The secret to these devilish eggs is in the vivid, creepy appearance combined with the delightful taste that deviled eggs are known for.
The filling is made from the yolks of hard-boiled eggs mixed with mayonnaise, mustard, and a hint of paprika for a smoky kick. Topped with sliced olives to complete the “eyeball” look, they’re as fun to make as they’re to eat. Whether you’re hosting a Halloween party or simply want to surprise your family with a hauntingly good appetizer, these eggs will steal the show.
Ingredients (Serves 4-6):
- 12 large eggs
- 1/2 cup mayonnaise
- 1 tablespoon Dijon mustard
- 1 teaspoon white vinegar
- 1/4 teaspoon smoked paprika
- Salt and pepper to taste
- Red and green food coloring
- 6 pitted black olives, sliced
- Fresh parsley or chives for garnish (optional)
Instructions:
- Boil the Eggs: Place the eggs in a large pot and cover them with cold water by about an inch. Bring to a boil over medium-high heat. Once boiling, remove from heat, cover, and let sit for 10-12 minutes. Transfer the eggs to a bowl of ice water to cool completely.
- Prepare the Eggs: Once cool, peel the eggs and slice them in half lengthwise. Carefully remove the yolks and place them in a separate mixing bowl. Arrange the egg whites on a serving platter.
- Make the Filling: To the egg yolks, add mayonnaise, Dijon mustard, vinegar, smoked paprika, salt, and pepper. Mash the mixture with a fork until smooth and creamy. If desired, add a drop of red food coloring to give the filling a devilish hue.
- Color the Egg Whites: In small bowls, mix green food coloring with a little water. Dip the egg whites briefly in the colored water, allowing them to absorb a hint of eerie green. Remove and pat dry with paper towels.
- Fill the Egg Whites: Spoon or pipe the yolk mixture back into the colored egg white halves. Confirm each egg half is generously filled.
- Create the Eyeballs: Place a sliced black olive on top of each filled egg half to mimic an eyeball’s pupil. For added effect, you can use a toothpick to draw “veins” with a thin line of red food coloring.
- Garnish and Serve: If desired, garnish with chopped parsley or chives for an extra touch of color. Serve immediately or refrigerate until ready to serve.
Extra Tips:
For perfectly hard-boiled eggs, start with cold water and allow them to sit in the hot water off the heat for exactly 10-12 minutes. This prevents overcooking and the unsightly green ring around the yolks.
When coloring the egg whites, lightly dipping them ensures they don’t become too saturated with dye, maintaining an appetizing appearance. Finally, use a piping bag for filling the eggs to achieve a neat and professional look. Enjoy your Halloween feast with these delightfully devilish treats!