
With Halloween just around the corner, it’s time to conjure up some magical kitchen fun for the kiddos.
These spooky-themed recipes are sure to cast a spell on your little ones, making mealtime both thrilling and delicious.
From Monster Mash Meatballs with quirky olive eyes to Ghostly Mini Pizzas topped with adorable mozzarella ghosts, there’s something enchanting for every tiny taste bud.
Get ready to transform your kitchen into a haunted culinary haven that will have everyone shrieking with delight.
I can’t wait to share these eerie yet scrumptious creations with you!
Monster Mash Meatballs

Monster Mash Meatballs are the perfect Halloween treat to delight young trick-or-treaters. This spooky dish transforms an ordinary meal into a fun and creative experience, with meatballs masquerading as ghastly monsters. Their googly olive eyes and a tangy tomato sauce make them an instant favorite among kids. Serve them on a bed of spaghetti or alongside mashed potatoes for a complete meal that will satisfy even the pickiest of eaters.
The secret to these Monster Mash Meatballs is in the presentation. By using simple ingredients and a bit of creativity, you can turn a mundane weeknight meal into an exciting Halloween event. Not only are these meatballs delicious, but they also provide a fun way for kids to get involved in the kitchen. Let them help shape the meatballs or place the olive eyes, and watch their excitement grow as their culinary creations come to life.
Ingredients for 4-6 servings:
- 1 pound ground beef
- 1/2 cup breadcrumbs
- 1/4 cup grated Parmesan cheese
- 1 egg
- 2 cloves garlic, minced
- 1 teaspoon dried oregano
- Salt and pepper to taste
- 1 cup marinara sauce
- 12-18 black olives, halved
- 1 tablespoon olive oil
- Cooked spaghetti or mashed potatoes (for serving)
Cooking Instructions:
- Preheat Oven: Preheat your oven to 375°F (190°C). This will guarantee that the meatballs cook evenly.
- Prepare Meatball Mixture: In a large bowl, combine the ground beef, breadcrumbs, Parmesan cheese, egg, minced garlic, oregano, salt, and pepper. Mix everything together until well combined. Be careful not to overmix, as this can make the meatballs tough.
- Shape the Meatballs: Take a small amount of the meat mixture and roll it into a ball about the size of a golf ball. Repeat until all the mixture is used. You should have around 12-18 meatballs, depending on the size.
- Brown the Meatballs: In a large skillet, heat the olive oil over medium heat. Add the meatballs and cook for about 5 minutes, turning them occasionally until they’re browned on all sides.
- Bake the Meatballs: Transfer the browned meatballs to a baking dish. Pour the marinara sauce over the meatballs, making sure they’re well covered. Bake in the preheated oven for 15-20 minutes, or until the meatballs are cooked through.
- Decorate with Olive Eyes: Once out of the oven, place two olive halves on each meatball to create the “monster eyes.” You can use toothpicks to help them stay in place if needed.
- Serve: Serve the Monster Mash Meatballs over a bed of spaghetti or with mashed potatoes. Spoon extra sauce over the top for added flavor.
Extra Tips:
For a healthier version, consider using ground turkey or chicken instead of beef. You can also sneak in some veggies by finely grating a carrot or zucchini into the meatball mixture.
To make the dish even more festive, use food coloring to dye the mashed potatoes green or orange. And remember, the key to engaging kids is in the fun of assembly, so encourage them to get creative with their monster meatball designs!
Ghostly Mini Pizzas
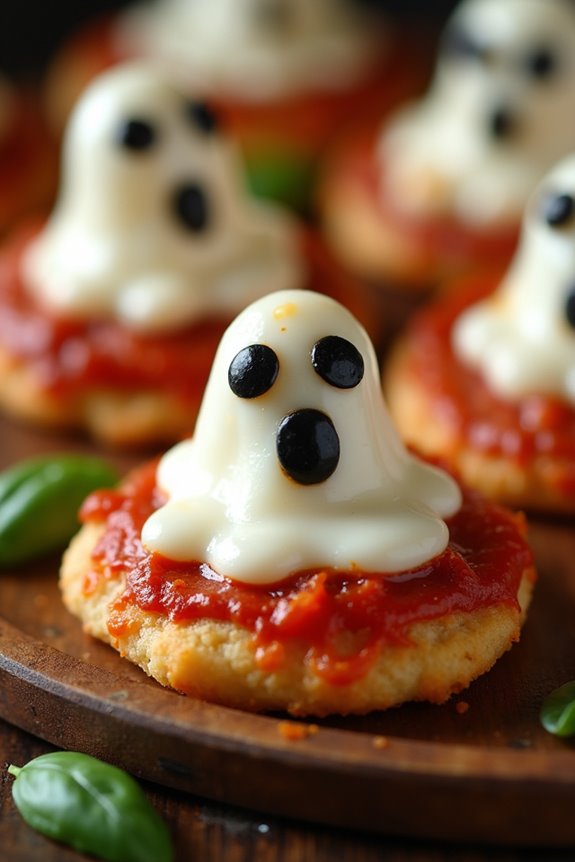
Ghostly Mini Pizzas are a spooktacular treat perfect for getting kids into the Halloween spirit. These hauntingly delightful pizzas aren’t only easy to make but also a fun activity for children who love to participate in the kitchen. Each mini pizza is topped with a ghostly mozzarella cheese shape, adding a playful twist to a classic favorite.
They’re ideal for a Halloween party or a themed family dinner, providing a delicious and visually exciting meal that will thrill kids and adults alike. The simplicity of Ghostly Mini Pizzas makes them a great option for busy parents who want to prepare a festive meal without too much hassle.
By using pre-made pizza dough and simple toppings, you can have these mini masterpieces ready in no time. The process of cutting ghost shapes out of mozzarella cheese can be a fun and creative task for children, encouraging them to use their imagination while learning basic cooking skills.
These pizzas aren’t only a treat for the taste buds but also a fantastic way to have fun with food during the Halloween season.
Ingredients (Serving Size: 4-6 people):
- 6 mini pizza crusts or English muffins
- 1 cup pizza sauce
- 12 slices of mozzarella cheese
- 1 cup shredded mozzarella cheese
- 12 black olives
- 1 tablespoon olive oil
- Fresh basil leaves for garnish (optional)
Cooking Instructions:
- Prepare the Pizza Base: Preheat your oven to 375°F (190°C). Place the mini pizza crusts or English muffin halves on a baking sheet lined with parchment paper, and brush them lightly with olive oil to guarantee a crispy crust.
- Add the Sauce: Spread a generous spoonful of pizza sauce evenly on each mini crust, making sure to cover the entire surface but leaving a small border around the edge for the crust.
- Create Ghosts: Using a ghost-shaped cookie cutter, cut ghost shapes out of the mozzarella cheese slices. If you don’t have a cookie cutter, you can use a small knife to carefully cut out ghost shapes by hand.
- Assemble the Pizzas: Place one or two mozzarella ghost shapes on each mini pizza, depending on their size. Sprinkle a small amount of shredded mozzarella cheese around the ghost shapes to enhance the cheesy flavor.
- Add Olive Eyes: Slice the black olives into small pieces to create eyes for the ghost shapes. Place two olive pieces on each ghost to give them a spooky expression.
- Bake: Place the baking sheet in the preheated oven and bake for about 10-12 minutes, or until the cheese is melted and bubbly, and the edges of the crust are golden brown.
- Serve: Remove from the oven and allow to cool slightly. Garnish with fresh basil leaves if desired, and serve your Ghostly Mini Pizzas warm.
Extra Tips: To save time, you can prepare the pizza sauce and cut out the ghost shapes ahead of time, storing them in the refrigerator until you’re ready to assemble the pizzas.
If you want to add more variety, consider using different toppings like pepperoni or bell peppers, but keep the focus on the ghostly theme for maximum Halloween fun. These pizzas are best served fresh out of the oven, but you can reheat them in a toaster oven to restore their crispy texture if needed.
Witch’s Brew Soup
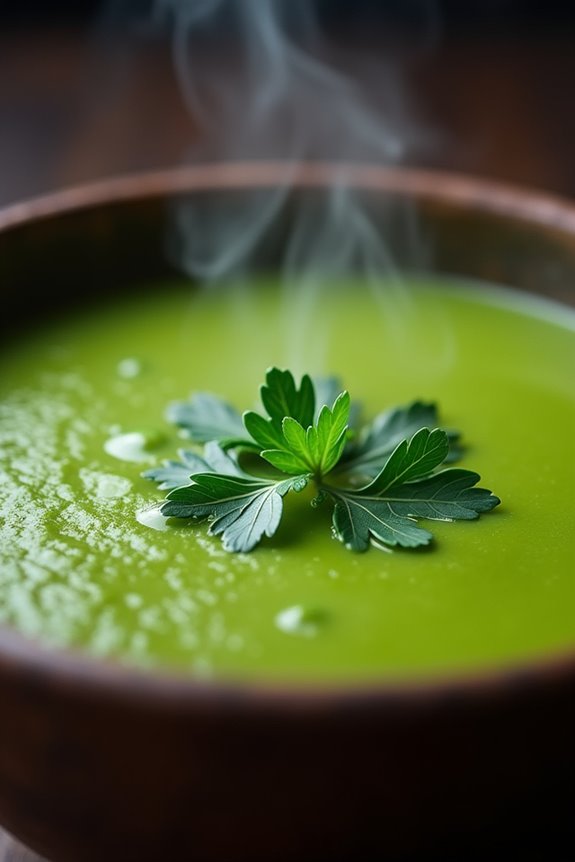
Halloween is the perfect time to get creative in the kitchen, especially when it comes to making spooky, fun, and delicious dishes for kids. Witch’s Brew Soup is an enchanting concoction that’s not only tasty but also visually engrossing with its vibrant green color and whimsical ingredients. This soup is packed with nutrients, making it a healthy choice for a Halloween-themed meal.
With a hint of magic, this dish is sure to be a hit with little ones, as they imagine themselves sipping on a potion crafted by a friendly witch.
The beauty of Witch’s Brew Soup lies in its simplicity and versatility. It’s a great way to sneak in some vegetables while keeping the meal exciting for kids. The soup can be made in advance and reheated, making it a convenient option for busy parents. The recipe’s adaptable nature also allows you to add or substitute ingredients based on your children’s preferences, ensuring that everyone enjoys the Halloween feast.
Serve it with some crusty bread or garlic breadsticks to make it a complete and satisfying meal.
Ingredients (Serves 4-6)
- 2 tablespoons olive oil
- 1 medium onion, chopped
- 2 cloves garlic, minced
- 4 cups vegetable broth
- 2 cups chopped broccoli
- 1 cup chopped spinach
- 1 cup frozen peas
- 1 cup diced potatoes
- 1 teaspoon dried thyme
- 1 teaspoon dried parsley
- Salt and pepper to taste
- 1/2 cup heavy cream (optional)
- Edible green food coloring (optional)
Cooking Instructions
- Prepare the Base: In a large pot, heat the olive oil over medium heat. Add the chopped onion and sauté for about 5 minutes until translucent. Stir in the minced garlic and cook for an additional minute until fragrant.
- Add Vegetables: Pour in the vegetable broth and bring it to a gentle boil. Add the chopped broccoli, spinach, frozen peas, and diced potatoes to the pot. Stir in the dried thyme and parsley. Season with salt and pepper to taste.
- Simmer the Soup: Reduce the heat to low, cover the pot, and let the soup simmer for 20-25 minutes, or until the vegetables are tender.
- Blend the Soup: Use an immersion blender to blend the soup until smooth. If you prefer a chunkier texture, you can pulse it a few times to retain some vegetable pieces.
- Add Cream (Optional): If using, stir in the heavy cream to add richness and a creamy texture to the soup. Adjust seasoning if necessary.
- Color the Soup (Optional): To give the soup a more magical appearance, add a few drops of edible green food coloring. Stir well until you achieve the desired shade.
- Serve: Ladle the soup into bowls and serve hot. You can garnish with a sprinkle of parsley or a drizzle of cream for an added touch.
Extra Tips
For a more interactive experience, consider serving the soup in cauldron-like bowls or with fun Halloween-themed utensils. If your kids enjoy a bit of a kick, you can add a pinch of cayenne pepper for a subtle heat.
To make the soup even more appealing, consider using Halloween-shaped croutons or floating a few slices of black olives on top for “eye of newt” flair. Remember, the goal is to make the meal fun and engaging, so feel free to experiment with additional decorations or serving ideas to enhance the Halloween theme.
Creepy Crawly Spaghetti
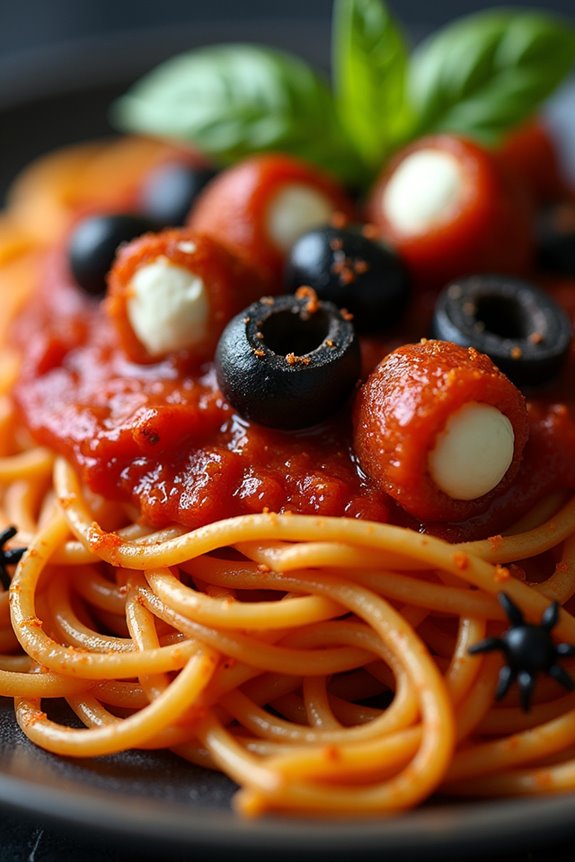
Creepy Crawly Spaghetti is a fantastic Halloween-themed dish that will delight kids with its spooky appearance and delicious taste. This savory dish combines classic spaghetti with a ghoulish twist, incorporating ingredients that mimic creepy crawlies and eerie elements to make mealtime fun and festive.
Whether you’re hosting a Halloween party or simply want to surprise your little ones with a whimsical dinner, this recipe will definitely be a hit and add a touch of spookiness to your Halloween celebrations.
This recipe serves 4-6 people and is perfect for those looking to add some Halloween spirit to their dining table. The Creepy Crawly Spaghetti features a rich tomato sauce with cleverly disguised “worms” made from spaghetti, topped with olive “spiders” and meatball “eyeballs” to create an eerie yet appetizing dish.
The flavors are both familiar and exciting, making it a great way to introduce children to new tastes and textures in a fun and engaging way.
Ingredients:
- 500g spaghetti
- 1 jar (24 oz) tomato pasta sauce
- 1 lb ground beef or turkey
- 1 egg
- 1/4 cup breadcrumbs
- 1/4 cup grated Parmesan cheese
- 1 teaspoon Italian seasoning
- Salt and pepper to taste
- 1/2 cup black olives, pitted
- 1/4 cup mozzarella cheese, cut into small cubes
- 1 tablespoon olive oil
- Fresh basil leaves for garnish (optional)
Instructions:
1. Prepare the Meatball “Eyeballs”: In a large mixing bowl, combine the ground beef or turkey, egg, breadcrumbs, Parmesan cheese, Italian seasoning, salt, and pepper. Mix well until all ingredients are evenly incorporated. Roll the mixture into small meatballs, about the size of a golf ball.
2. Cook the Meatballs: In a large skillet, heat the olive oil over medium heat. Add the meatballs and cook until they’re browned on all sides and cooked through, about 10-12 minutes. Remove from heat and set aside.
3. Cook the Spaghetti: In a large pot, bring salted water to a boil. Add the spaghetti and cook according to package instructions until al dente. Drain and set aside.
4. Prepare the Sauce: In the same skillet used for the meatballs, pour the tomato pasta sauce and heat over medium-low heat. Stir occasionally until the sauce is warm.
5. Assemble the Creepy Crawly Spaghetti: Add the cooked spaghetti to the skillet with the tomato sauce, stirring to coat the pasta evenly. Place the meatballs on top, and insert a small cube of mozzarella cheese into each meatball to resemble an eyeball.
For extra creepiness, slice the black olives into halves and place them around the spaghetti to mimic spiders.
6. Serve: Transfer the Creepy Crawly Spaghetti to a large serving dish or individual plates. Garnish with fresh basil leaves if desired. Serve warm and watch the kids enjoy their spooky dinner.
Extra Tips:
For an even spookier presentation, consider adding a few drops of black food coloring to the cooked spaghetti to create black “worms.”
When shaping the meatballs, inserting a small piece of pitted black olive into the cheese cube can enhance the eyeball effect. If your kids are sensitive to spice, verify that the tomato sauce is mild or use a homemade version to control the heat.
Additionally, involving children in the assembly process can make the meal even more enjoyable and exciting for them.
Frankenstein’s Veggie Platter
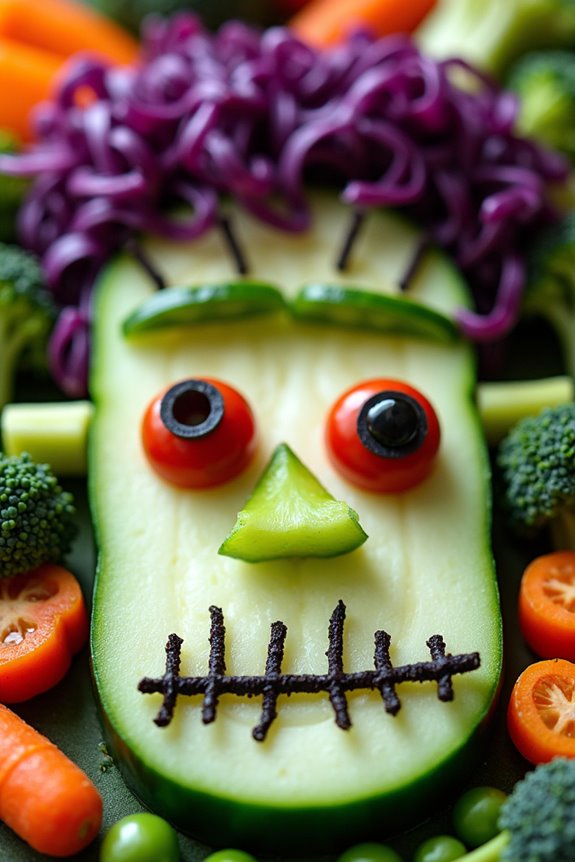
Frankenstein’s Veggie Platter is a fun and healthy Halloween-themed dish that’s perfect for kids. This dish brings together a variety of fresh vegetables arranged creatively to resemble Frankenstein’s monster. It isn’t only visually appealing but also encourages children to eat their veggies by transforming them into something playful and exciting.
The mixture of colors and textures from the vegetables adds to the fun, making it an excellent centerpiece for any Halloween party. To make this dish, you’ll need to gather an assortment of vegetables that can be easily shaped and arranged. The idea is to use the green vegetables to build the face and the purple, orange, and red vegetables to add details like hair and facial features.
Serve it with a side of hummus or ranch dressing for dipping, and you have a nutritious snack that kids will love to devour. Here is the list of ingredients and detailed instructions to create your own Frankenstein’s Veggie Platter for 4-6 people.
Ingredients:
- 1 large cucumber
- 1 green bell pepper
- 1 head of broccoli
- 1 cup of baby carrots
- 1 cup of cherry tomatoes
- 1 small purple cabbage
- 1 small bunch of black olives
- 1 cup of sugar snap peas
- 1 container of hummus or ranch dressing
Instructions:
- Prepare the Base: Begin by slicing the cucumber into thin rounds. Arrange these cucumber slices in an oval shape on a large platter to form Frankenstein’s face.
- Create the Hair: Chop the purple cabbage into thin strips. Arrange these strips at the top of the cucumber oval to create the hair, ensuring it looks wild and untamed.
- Add the Facial Features: Slice the green bell pepper into thin strips and use them to outline the face. Place two cherry tomatoes as the eyes. Cut one olive in half and place each half in the center of the cherry tomatoes to create pupils.
- Make the Mouth and Nose: Use additional olive slices to create a stitch-like mouth by arranging them in a zigzag pattern. For the nose, cut a small piece of cucumber and place it in the center of the face.
- Finish with Details: To create the bolts on Frankenstein’s neck, use broccoli florets on each side of the face. Arrange the baby carrots and sugar snap peas around the platter as additional snacks and decoration.
- Serve with Dip: Place a small bowl of hummus or ranch dressing on the side of the platter for dipping.
Extra Tips: To make the veggie platter even more fun and interactive, you can involve your kids in the assembly process. They can help with placing the veggies and creating the face, which will make them more excited to eat it.
Additionally, using a variety of dips can add more flavor options. If you’re making this ahead of time, cover the platter with plastic wrap and refrigerate to keep the vegetables fresh and crisp until serving.
Mummy Hot Dogs

Mummy Hot Dogs are a fun and spooky treat perfect for Halloween celebrations with kids. This dish combines the classic taste of hot dogs with a festive twist, making it an exciting addition to any Halloween menu. The hot dogs are wrapped in crescent roll dough to resemble mummies, complete with little eyes that give them a playful, eerie appearance. Not only do they look great, but they’re also delicious and simple to make, guaranteeing that both kids and adults will enjoy them.
These Mummy Hot Dogs are ideal for a Halloween party or a themed family dinner, offering a delightful way to engage children in the kitchen. The recipe is straightforward and easy to follow, making it a great opportunity for young chefs to help out with the preparation. Whether you’re planning a small gathering or a larger event, these Mummy Hot Dogs will surely be a hit, bringing smiles to everyone’s faces as they dig into these adorable, edible mummies.
Ingredients (Serving Size: 4-6 people)
- 8 hot dogs
- 1 can (8 oz) refrigerated crescent roll dough
- 1 egg, beaten
- Mustard or ketchup (for decorating)
Cooking Instructions
- Preheat the Oven: Begin by preheating your oven to 375°F (190°C). This guarantees that the oven is hot enough to bake the crescent dough evenly and gives the Mummy Hot Dogs a golden-brown finish.
- Prepare the Dough: Open the can of crescent roll dough and unroll it on a clean surface. Cut the dough into thin strips, approximately 1/4 inch wide. Depending on the number of hot dogs, you may need to cut additional strips if necessary.
- Wrap the Hot Dogs: Take each hot dog and wrap it with the dough strips, leaving a small gap for the face. Overlap the strips slightly to create a mummy effect, and press the ends of the dough to seal. Continue wrapping until all hot dogs are covered.
- Add the Egg Wash: Place the wrapped hot dogs on a baking sheet lined with parchment paper. Brush the dough with the beaten egg to give it a glossy finish once baked.
- Bake: Place the baking sheet in the preheated oven and bake for about 12-15 minutes, or until the dough becomes golden brown and the hot dogs are heated through.
- Decorate the Mummies: Remove the baked Mummy Hot Dogs from the oven and let them cool slightly. Use mustard or ketchup to dot small eyes onto the exposed section of each hot dog, completing the mummy look.
Extra Tips
For an added touch, you can use candy eyes instead of mustard or ketchup for a more defined look. If you’re serving a large group, consider doubling the recipe. Additionally, try using different types of sausages or cheese-filled hot dogs for variety.
Remember to supervise children closely if they’re helping with the preparation, especially when using sharp tools or handling the hot oven. Enjoy your spooky, tasty creation!
Spooky Spider Cupcakes
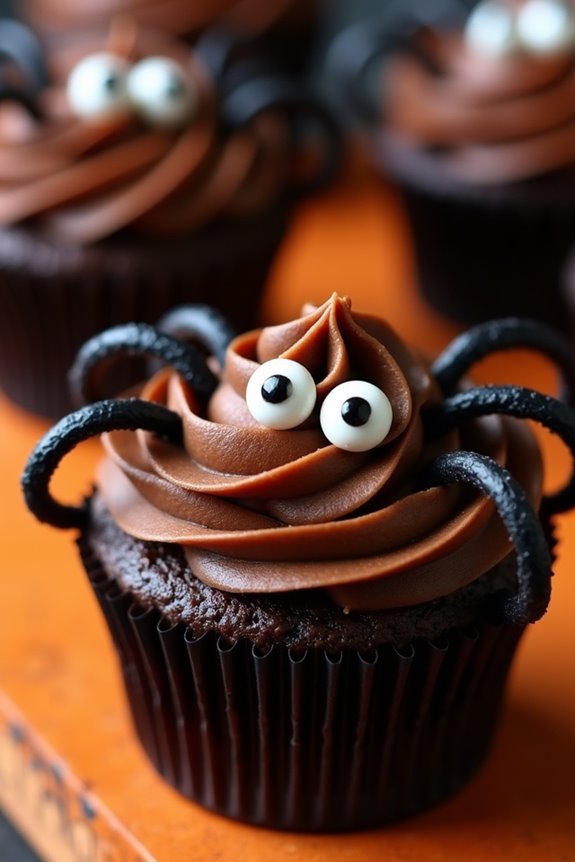
Celebrate Halloween with these Spooky Spider Cupcakes that are sure to delight and maybe even give a fun fright to children and adults alike! These cupcakes not only look the part but also taste delicious, making them a perfect addition to any Halloween party spread. The combination of dark chocolate cupcakes with a rich chocolate frosting and creative spider decorations will catch the eye and the taste buds of your little ghouls and goblins.
Creating these cupcakes is as fun as it’s easy. With simple ingredients and a bit of creativity, you can transform ordinary cupcakes into eerie treats. The recipe involves making chocolate cupcakes from scratch, but feel free to use a boxed mix if you’re short on time. The spider decorations are made using chocolate frosting, black licorice, and candy eyes, making it a fun activity for kids to join in. This recipe serves 4-6 people, making about 12 cupcakes.
Ingredients:
- 1 cup all-purpose flour
- 1/3 cup unsweetened cocoa powder
- 1/2 teaspoon baking soda
- 1/4 teaspoon baking powder
- 1/4 teaspoon salt
- 1/2 cup unsalted butter, softened
- 1 cup granulated sugar
- 2 large eggs
- 1 teaspoon vanilla extract
- 1/2 cup buttermilk
- 1 cup chocolate frosting
- Black licorice strings
- Candy eyes
Instructions:
- Preheat and Prepare: Preheat your oven to 350°F (175°C). Line a 12-cup muffin tin with cupcake liners.
- Mix Dry Ingredients: In a medium bowl, whisk together the flour, cocoa powder, baking soda, baking powder, and salt. Set aside.
- Cream Butter and Sugar: In a large bowl, beat the butter and sugar together on medium speed until light and fluffy, about 3 minutes.
- Add Eggs and Vanilla: Add the eggs one at a time, beating well after each addition. Mix in the vanilla extract.
- Combine Wet and Dry: Gradually add the dry ingredients to the wet mixture, alternating with the buttermilk. Begin and end with the dry ingredients. Mix until just combined.
- Fill Cupcake Liners: Divide the batter evenly among the prepared liners, filling each about two-thirds full.
- Bake: Bake in the preheated oven for 18-20 minutes, or until a toothpick inserted into the center of a cupcake comes out clean. Let the cupcakes cool in the pan for 5 minutes, then transfer to a wire rack to cool completely.
- Decorate: Once the cupcakes are completely cool, spread the chocolate frosting on top. Use the black licorice strings to create spider legs, pressing them into the frosting. Place two candy eyes on each cupcake to complete the spider face.
Extra Tips:
For an added spooky effect, you can use red or orange frosting to make the spider eyes look even more eerie. If you don’t have buttermilk, you can make a substitute by adding a teaspoon of vinegar or lemon juice to half a cup of milk and letting it sit for 5 minutes.
Also, feel free to use different candy types to create unique spider faces—let your imagination run wild! These cupcakes can be stored in an airtight container for up to three days, making them a great make-ahead treat for your Halloween festivities.
Eyeball Deviled Eggs
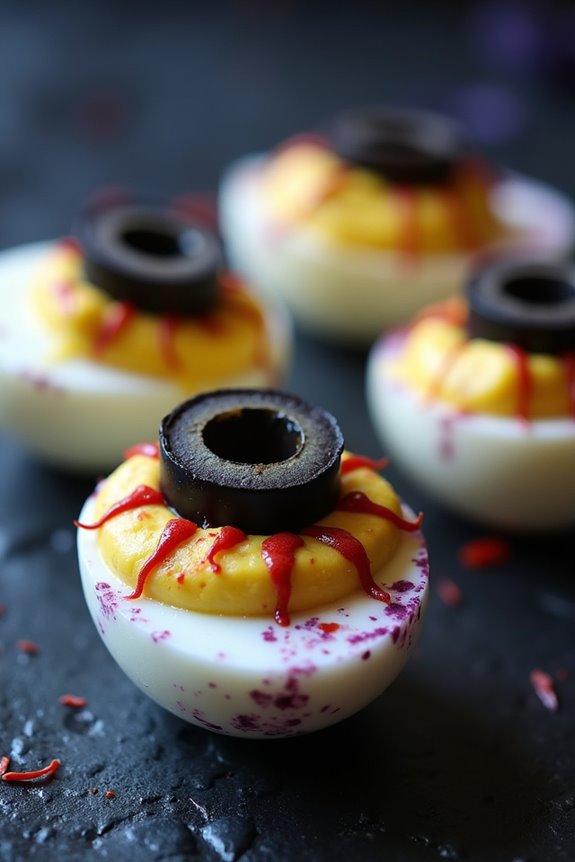
If you’re looking to serve a spooky and fun dish at your Halloween party, these Eyeball Deviled Eggs are sure to be a hit with the kids. Not only are they delicious, but they also add a chilling touch to your party table with their eerie appearance.
These deviled eggs are transformed into creepy eyeballs with the use of food coloring and creative garnishes, making them perfect for any Halloween celebration. The creamy filling of these deviled eggs is seasoned just right to balance the tanginess of the mustard and the richness of the mayonnaise, ensuring that they aren’t only spooky, but also flavorful.
These eggs are easy to prepare and can be made in advance, making them a convenient choice for busy parents. Let’s explore the ingredients and step-by-step instructions to create this ghoulish culinary masterpiece.
Ingredients (Serves 4-6):
- 6 large eggs
- 1/4 cup mayonnaise
- 1 teaspoon Dijon mustard
- Salt and pepper to taste
- Red and blue food coloring
- 6 black olives, pitted
- 1 small red pepper
Instructions:
- Boil the Eggs: Place the eggs in a single layer in a saucepan and cover them with water. Bring the water to a rolling boil over medium-high heat. Once boiling, remove the saucepan from the heat, cover it with a lid, and let the eggs sit for about 10-12 minutes.
- Cool and Peel: Drain the hot water from the saucepan and transfer the eggs to a bowl filled with ice water. Allow them to cool for at least 5 minutes. Once cooled, gently peel the eggs and set them aside.
- Prepare the Filling: Cut each egg in half lengthwise and carefully remove the yolks, placing them in a small bowl. Mash the yolks with a fork, then mix in the mayonnaise, Dijon mustard, salt, and pepper until smooth.
- Color the Whites: Place the egg white halves in a shallow dish and add enough water to cover them. Add a few drops of red and blue food coloring to create a creepy, bruised appearance. Let them soak for about 5 minutes, then remove and dry them with a paper towel.
- Fill the Eggs: Spoon or pipe the yolk mixture back into each colored egg white half. Smooth the tops with a spoon.
- Create the Iris and Pupil: Slice the black olives into small circles and place one slice in the center of each filled egg half to create the pupil. Cut the red pepper into thin strips and arrange them around the olive slices to mimic bloodshot lines.
Extra Tips:
For a more dramatic effect, you can use a toothpick dipped in red food coloring to draw additional veins on the egg whites. If you’re preparing these in advance, keep the filled eggs covered in the refrigerator until ready to serve.
The food coloring might slightly stain your hands, so wearing gloves can help minimize any unwanted spooky effects!
Bat Wing Chicken Tenders
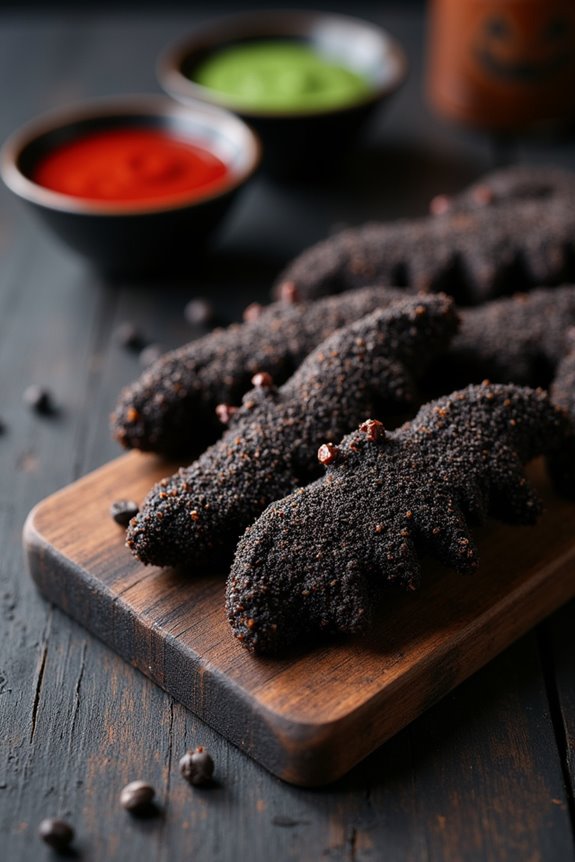
Get ready to spook your little ones with a frightfully fun dish – Bat Wing Chicken Tenders! This Halloween-themed recipe will transform ordinary chicken tenders into a ghastly delight with a dark, crispy coating that resembles the wings of a bat. Not only do these tenders look the part, but they’re also perfectly seasoned and deliciously crispy, guaranteeing that your kids will be asking for seconds.
Perfect for a Halloween party or a fun family dinner, these bat wing tenders are sure to be a hit. The secret to achieving the bat-like appearance lies in the use of black food coloring and a special breading mixture that coats the chicken, creating an eerie yet appetizing look. The tenders are then baked to perfection, making them a healthier alternative to fried chicken while still delivering all the crunch and flavor your family craves.
Serve them with a side of blood-red ketchup or a monster-green dipping sauce for an extra spooky touch.
Ingredients (serves 4-6):
- 2 pounds of chicken tenders
- 1 cup of buttermilk
- 1 tablespoon of hot sauce
- Black food coloring
- 1 cup of all-purpose flour
- 1 cup of panko breadcrumbs
- 1/2 cup of cornmeal
- 1 tablespoon of garlic powder
- 1 tablespoon of onion powder
- 1 teaspoon of smoked paprika
- 1 teaspoon of salt
- 1/2 teaspoon of black pepper
- Cooking spray
Cooking Instructions:
- Marinate the Chicken: In a large bowl, combine the buttermilk and hot sauce. Add a few drops of black food coloring until the mixture is a dark, even color. Submerge the chicken tenders in the mixture, confirming they’re fully coated. Cover and refrigerate for at least 1 hour to let the chicken absorb the flavors.
- Prepare the Breading: Preheat your oven to 400°F (200°C). In a shallow dish, mix together the flour, panko breadcrumbs, cornmeal, garlic powder, onion powder, smoked paprika, salt, and black pepper. Add a few more drops of black food coloring to the dry mix, stirring well until the mixture is uniformly dark.
- Coat the Chicken: Remove the marinated chicken tenders from the refrigerator. One by one, dredge each tender in the breading mixture, pressing down to confirm the coating sticks well.
- Bake the Tenders: Place the coated chicken tenders on a baking sheet lined with parchment paper. Lightly spray the tops with cooking spray to help them crisp up. Bake in the preheated oven for 20-25 minutes, or until the tenders are cooked through and the coating is crispy.
- Serve and Enjoy: Once baked, remove the tenders from the oven and let them cool slightly. Serve with your choice of dipping sauces and watch as your kids delight in their spooky meal.
Extra Tips:
For an extra crispy texture, you can double-coat the chicken tenders by dipping them back into the buttermilk mixture and then into the breading once more before baking.
If you prefer a deeper color, adjust the amount of black food coloring to achieve the desired shade. Additionally, you can experiment with different spices in the breading to suit your family’s taste preferences.
Pumpkin Patch Brownies

Delight your little ghouls and goblins this Halloween with a batch of Pumpkin Patch Brownies. These delicious treats combine the rich, fudgy goodness of classic brownies with a festive flair. Each brownie is topped with a pumpkin candy, transforming your dessert table into a charming pumpkin patch. Perfect for Halloween parties or as an after-school treat, these brownies are sure to be a hit with kids and adults alike.
Not only do these brownies look festive, but they also taste heavenly. The contrast between the deep chocolate flavor of the brownies and the sweet, creamy pumpkin candies creates a delightful experience in every bite. The recipe is simple to follow, making it a fun project to tackle with children or a quick preparation for busy parents. Gather your spooky ingredients and get ready to bake up a storm!
Ingredients (Serves 4-6):
- 1 cup unsalted butter
- 2 cups granulated sugar
- 4 large eggs
- 1 teaspoon vanilla extract
- 1 cup all-purpose flour
- 1/2 cup unsweetened cocoa powder
- 1/2 teaspoon salt
- 1 cup semi-sweet chocolate chips
- 12 pumpkin-shaped candies (like candy corn pumpkins or chocolate pumpkins)
- 1/4 cup green icing or melted white chocolate dyed green (for decoration)
Instructions:
- Preheat the Oven: Preheat your oven to 350°F (175°C) and lightly grease a 9×13-inch baking pan or line it with parchment paper, ensuring easy removal after baking.
- Melt Butter and Chocolate: In a large saucepan over medium heat, melt the butter. Remove from heat and stir in the granulated sugar. Allow the mixture to cool slightly, then add the eggs, one at a time, beating well after each addition. Stir in the vanilla extract.
- Combine Dry Ingredients: In a separate bowl, whisk together the flour, cocoa powder, and salt. Gradually add the dry ingredients to the wet mixture, stirring until just combined. Be careful not to over-mix.
- Fold in Chocolate Chips: Gently fold in the semi-sweet chocolate chips, ensuring they’re evenly distributed throughout the batter.
- Pour and Bake: Pour the brownie batter into the prepared baking pan, spreading it evenly with a spatula. Bake in the preheated oven for 25-30 minutes, or until a toothpick inserted into the center comes out with a few moist crumbs.
- Cool and Decorate: Allow the brownies to cool completely in the pan on a wire rack. Once cooled, cut the brownies into squares. Place a pumpkin candy on top of each square. Use the green icing to add vines or leaves around the pumpkins for a more authentic pumpkin patch look.
Extra Tips:
For an extra gooey and rich brownie, consider slightly under-baking the brownies by a minute or two. If you prefer a more cake-like texture, bake the brownies a little longer.
When cutting the brownies, use a sharp knife dipped in warm water for clean edges. If you want to get creative, you can also add crushed Oreo cookies to the batter for a “dirt” effect in your pumpkin patch. Enjoy these spooktacular treats with a glass of milk or a warm cup of cocoa!
Zombie Finger Cookies

Zombie Finger Cookies are a spooky and fun treat that’s perfect for Halloween festivities, especially for kids. These eerie cookies are shaped like creepy fingers, complete with almond nails and a red jam “blood” effect for added fright. They’re not only visually entertaining but also delicious, making them a hit at any Halloween party or gathering. Kids will love the gory yet playful appearance of these cookies, and adults will appreciate the buttery, sweet taste that accompanies the gruesome look.
To make these Zombie Finger Cookies, you’ll be crafting a simple shortbread dough that’s easy to handle and shape. The dough is subtly flavored with vanilla and almond extract, which complements the crunchy almond “nails” that adorn each finger. To enhance the gory appearance, a touch of strawberry or raspberry jam is used to simulate dripping blood. This recipe yields about 24-30 cookies, making it suitable for a serving size of 4-6 people, depending on how many fingers each person dares to devour.
Ingredients:
- 1 cup unsalted butter, softened
- 1 cup powdered sugar
- 1 large egg
- 1 teaspoon vanilla extract
- 1 teaspoon almond extract
- 2 2/3 cups all-purpose flour
- 1 teaspoon baking powder
- 1 teaspoon salt
- 30 whole blanched almonds
- Red food coloring
- 1/4 cup strawberry or raspberry jam
Cooking Instructions:
- Preheat and Prepare Baking Sheet: Preheat your oven to 325°F (165°C). Line a baking sheet with parchment paper to prevent the cookies from sticking and to make cleanup easier.
- Make the Dough: In a large mixing bowl, cream together the softened butter and powdered sugar until light and fluffy. Beat in the egg, vanilla extract, and almond extract until well combined.
- Combine Dry Ingredients: In another bowl, whisk together the all-purpose flour, baking powder, and salt. Gradually add the dry ingredients to the butter mixture, mixing until a smooth dough forms.
- Shape the Fingers: Take a tablespoon of dough and roll it into a finger-like shape, about 3-4 inches long. Pinch the dough in two places to create the appearance of knuckles and use a knife to create small lines on the knuckles for a realistic effect.
- Add the Nails and Bake: Press an almond into one end of each finger to create the appearance of a fingernail. Place the shaped fingers on the prepared baking sheet. Bake in the preheated oven for 20-25 minutes or until lightly golden.
- Decorate with Blood: While the cookies are baking, mix a few drops of red food coloring into the jam to create a blood-like consistency. Once the cookies are done and slightly cooled, remove the almond, add a small drop of jam on the nail bed, and replace the almond, allowing the jam to ooze out slightly for a bloody effect.
- Serve: Allow the cookies to cool completely before serving, confirming the jam has set a little for that perfect gory look.
Extra Tips:
When shaping the cookies, confirm they aren’t too thin as they may break easily once baked. If the dough becomes too soft to handle, refrigerate it for about 15 minutes before shaping.
For an even more realistic look, use a small amount of cocoa powder or food coloring to add shading to the knuckles and wrinkles, enhancing the creepy effect. These cookies can be stored in an airtight container for up to a week, making them a convenient make-ahead treat for your Halloween celebrations.
Haunted Forest Salad
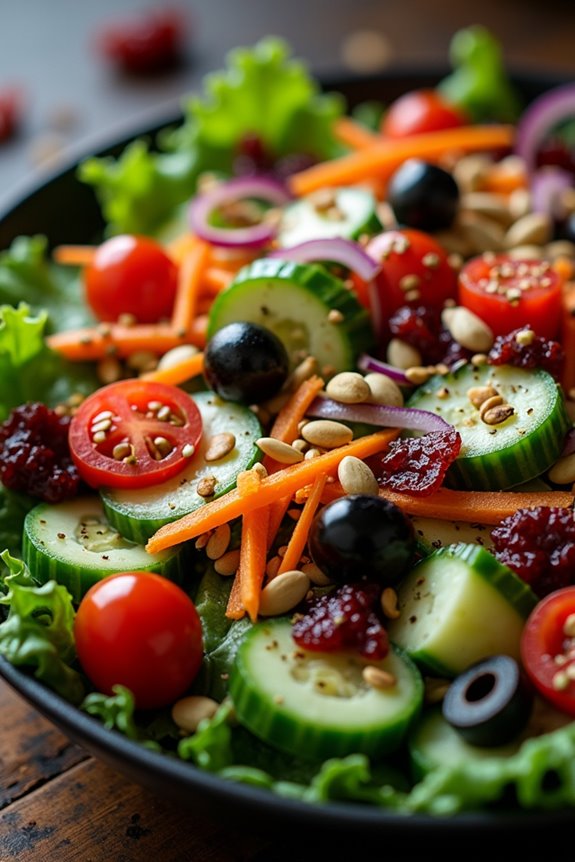
Delight your little ghouls and goblins with a spooky yet nutritious Halloween-themed dish: the Haunted Forest Salad. This eerie creation combines vibrant greens, crispy veggies, and a touch of Halloween magic to create a fun and healthy meal that kids will love.
The salad features a forest floor of mixed greens, mysterious vegetables masquerading as creepy creatures, and a hint of sweetness from dried fruits, all tied together with a tangy dressing that will have your kids asking for seconds.
Perfect for a Halloween party or a family dinner, the Haunted Forest Salad is designed to serve 4-6 people. This dish not only pleases the eyes and taste buds but also sneaks in a healthy dose of vegetables and nutrients.
With simple preparation, you can involve your kids in creating this spooky masterpiece, turning meal prep into a fun and engaging activity. Read on for the ingredient list and step-by-step instructions to bring this haunted forest to life!
Ingredients:
- 6 cups mixed leafy greens (such as spinach, kale, and arugula)
- 1 cup cherry tomatoes
- 1 cup cucumber, sliced
- 1/2 cup black olives
- 1/2 cup dried cranberries
- 1/2 cup pumpkin seeds
- 1/2 cup shredded carrots
- 1/4 cup red onion, thinly sliced
- 1/4 cup feta cheese, crumbled (optional)
- 1/3 cup balsamic vinaigrette dressing
Instructions:
- Prepare the Vegetables: Wash and dry the mixed leafy greens thoroughly. Slice the cherry tomatoes in half, cut the cucumber into thin rounds, and thinly slice the red onion. These will form the base of your haunted forest.
- Assemble the Salad Base: In a large salad bowl, combine the mixed greens, cherry tomatoes, cucumber slices, and red onion. Toss gently to guarantee even distribution.
- Add Spooky Elements: Scatter the black olives, shredded carrots, and dried cranberries over the greens. These elements represent creepy creatures and fallen leaves on the forest floor.
- Incorporate Crunch and Flavor: Sprinkle the pumpkin seeds evenly over the salad to add a crunchy texture. If desired, add crumbled feta cheese for a tangy flavor contrast.
- Dress the Salad: Just before serving, drizzle the balsamic vinaigrette dressing over the salad. Toss the salad gently to coat all ingredients with the dressing.
- Serve: Arrange the Haunted Forest Salad in a serving bowl or platter. For added effect, you can use Halloween-themed serving utensils or dishes.
Extra Tips:
For an added Halloween touch, consider carving spooky faces into the cherry tomatoes using a small paring knife, or arranging the black olives to resemble spiders crawling through the forest.
You can also allow your kids to help with the preparation by letting them choose and add their favorite toppings, making the experience both creative and engaging.
If preparing in advance, keep the dressing separate and add just before serving to prevent the greens from wilting. Enjoy this eerie and delightful salad as a fun way to celebrate the Halloween season with your family!
Vampire Blood Smoothies

Creating an exciting and spooky Halloween treat for kids can be both fun and nutritious with this Vampire Blood Smoothie. This vibrant red smoothie isn’t only visually appealing but also packed with vitamins and minerals. Perfect for a Halloween party or a healthy after-school snack, the Vampire Blood Smoothie combines sweet and tangy flavors with a silky texture that kids will love. The deep red color comes naturally from a blend of fruits and vegetables, which can be a clever way to sneak in some extra nutrients.
The Vampire Blood Smoothie is an easy-to-make recipe that requires just a few ingredients and a blender. The combination of strawberries, raspberries, and beetroot gives the smoothie its signature blood-red color, while bananas and yogurt add creaminess. A splash of apple juice provides a hint of sweetness and helps achieve the perfect consistency. This recipe is great for involving kids in the kitchen, allowing them to measure out the ingredients and witness the magical transformation of fruits into a spooky smoothie.
Ingredients (Serves 4-6)
- 2 cups fresh strawberries, hulled
- 1 cup fresh or frozen raspberries
- 1 medium beetroot, peeled and chopped
- 2 ripe bananas
- 1 cup plain or vanilla yogurt
- 1 cup apple juice
- 1 tablespoon honey (optional)
- Ice cubes (optional)
Instructions
- Prepare the Ingredients: Begin by washing the strawberries and raspberries thoroughly. Hull the strawberries and set them aside. Peel the beetroot carefully, as the red juice can stain, and chop it into small pieces for easier blending.
- Blend the Fruits and Vegetables: Add the strawberries, raspberries, chopped beetroot, and bananas to a blender. Blend on high speed until the mixture is smooth and creamy. This might take about 1-2 minutes depending on the power of your blender.
- Add Liquid Ingredients: Pour in the yogurt and apple juice. If you prefer a sweeter smoothie, add the honey at this stage. Blend again until all ingredients are well combined and the smoothie reaches a smooth, pourable consistency.
- Adjust Consistency: If the smoothie is too thick, add a little more apple juice or a few ice cubes and blend again. If it’s too thin, add a few more pieces of banana or a spoonful of yogurt to thicken it.
- Serve and Enjoy: Pour the smoothie into glasses and serve immediately. For an extra spooky touch, consider serving with a straw decorated with Halloween-themed stickers or using black or red straws.
Extra Tips
When making the Vampire Blood Smoothie, consider using fresh, ripe fruits for the best flavor and natural sweetness. If using frozen raspberries, you might need to adjust the amount of ice cubes to achieve your desired consistency.
Be careful when handling beetroot as it can stain surfaces and clothing; using gloves or handling it over a sink can prevent messes. If you want to make this recipe dairy-free, substitute the yogurt with a plant-based alternative like coconut or almond yogurt.
This recipe is highly versatile, so feel free to adjust the ingredients based on your taste preferences or dietary needs.
Jack-o’-Lantern Quesadillas
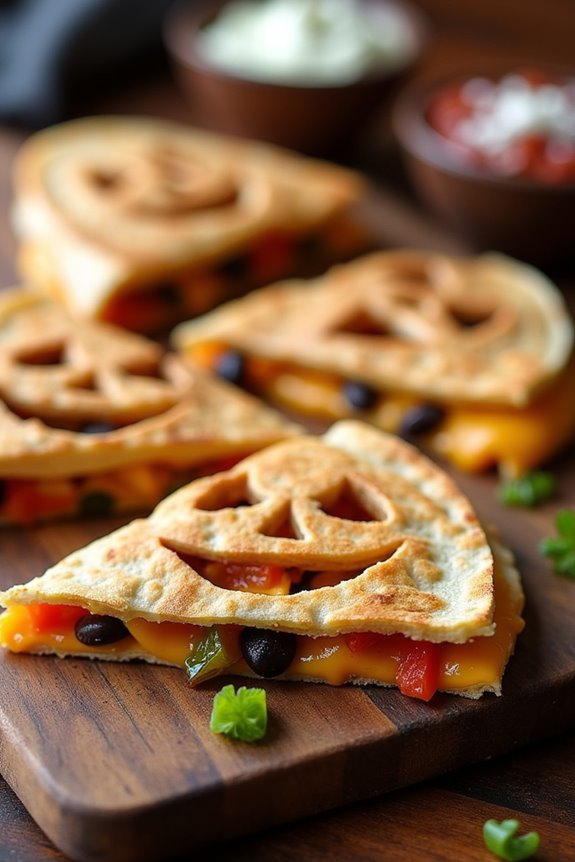
Looking for a fun and festive way to celebrate Halloween with the kids? Jack-o’-Lantern Quesadillas are a delicious and creative dish that’s perfect for the spooky season. This recipe transforms a classic quesadilla into a delightfully eerie treat by carving out a jack-o’-lantern face on a golden tortilla. Not only is this dish visually appealing, but it also bursts with cheesy goodness and a hint of spookiness that kids will adore.
Whether you’re hosting a Halloween party or simply want to surprise your family with a themed dinner, these quesadillas are guaranteed to be a hit.
These quesadillas are incredibly versatile and can be customized to suit your family’s taste preferences. You can stick to the traditional cheese filling or add a variety of other ingredients like seasoned chicken, beans, or colorful bell peppers to enhance both the flavor and the nutritional value.
The preparation is simple and involves ingredients you likely already have in your kitchen. Plus, the activity of carving out the jack-o’-lantern faces can be a fun, interactive experience for the whole family. Gather around the kitchen and let your creativity shine with these delectable Jack-o’-Lantern Quesadillas!
Ingredients (Serves 4-6 people):
- 8 large flour tortillas
- 2 cups shredded cheddar cheese
- 1 cup cooked and shredded chicken (optional)
- 1/2 cup canned black beans, drained and rinsed
- 1/2 cup diced bell peppers (any color)
- 1 tablespoon butter
- Cooking spray
- Salsa, for serving
- Sour cream, for serving
Cooking Instructions:
- Prepare the Filling: In a medium bowl, combine the shredded cheddar cheese, cooked chicken (if using), black beans, and diced bell peppers. Mix until well combined and set aside.
- Carve the Faces: Lay out half of the tortillas on a clean surface. Using a small sharp knife, carefully cut out jack-o’-lantern faces on each tortilla. Get creative and carve out eyes, a nose, and a spooky smile. Confirm the cuts aren’t too large to prevent the filling from falling out.
- Assemble the Quesadillas: Place the remaining tortillas on a flat surface. Evenly distribute the cheese mixture over these tortillas, leaving a small border around the edges. Top each filled tortilla with a carved tortilla face, pressing gently to adhere them together.
- Cook the Quesadillas: Heat a large non-stick skillet over medium heat and add a small amount of butter. Once melted, carefully place a quesadilla in the skillet. Cook for 2-3 minutes on each side, or until the tortillas are golden brown and the cheese has melted. Repeat with the remaining quesadillas, adding more butter as needed.
- Serve and Enjoy: Once cooked, transfer the quesadillas to a cutting board and let them cool slightly. Cut each quesadilla into wedges and serve with salsa and sour cream on the side for dipping.
Extra Tips:
When carving the jack-o’-lantern faces, be gentle to avoid tearing the tortillas. You can use cookie cutters to create fun shapes if you’re not comfortable using a knife.
For an added Halloween touch, consider using orange-colored tortillas or mixing in a bit of pumpkin puree with the cheese for a subtly sweet twist. Remember, it’s all about having fun and getting creative, so let the kids join in the carving process and make it a festive family activity!
Skeleton Bone Breadsticks

Get ready to delight the little goblins and ghouls in your life with these eerie yet delicious Skeleton Bone Breadsticks. Perfect for a Halloween party or a spooky dinner at home, these breadsticks are shaped to resemble bones, making them both fun and festive.
Made with simple ingredients, they’re easy to prepare and sure to be a hit with kids and adults alike. Serve them with marinara or a cheesy dip for a complete Halloween-themed snack.
The breadsticks are made from a basic dough that’s twisted and pinched into bone shapes. Once baked, they’re perfectly crisp on the outside and soft on the inside. You can sprinkle them with garlic powder and Parmesan cheese for extra flavor, or keep them plain for picky eaters.
These bony breadsticks aren’t only a treat for the taste buds but also a great way to engage kids in the kitchen, making the preparation process both fun and educational.
Ingredients (Serves 4-6):
- 1 1/2 cups warm water (110°F)
- 2 1/4 teaspoons active dry yeast
- 2 tablespoons sugar
- 3 1/2 cups all-purpose flour
- 1 teaspoon salt
- 1/4 cup unsalted butter, melted
- 1 tablespoon garlic powder
- 1/4 cup grated Parmesan cheese (optional)
- Marinara sauce or cheese dip (for serving)
Instructions:
- Prepare the Dough: In a large mixing bowl, combine the warm water, yeast, and sugar. Stir gently and let it sit for 5 minutes or until the mixture becomes frothy, indicating that the yeast is activated.
- Mix Ingredients: Add the flour, salt, and melted butter to the yeast mixture. Using a wooden spoon or a dough hook attachment on a stand mixer, mix the ingredients until a smooth dough forms. If the dough is too sticky, add a little more flour, one tablespoon at a time.
- Knead the Dough: Turn the dough out onto a lightly floured surface and knead for about 5-7 minutes until it’s smooth and elastic. This helps develop the gluten for chewy breadsticks.
- Let the Dough Rise: Place the dough in a lightly oiled bowl, cover it with a damp cloth, and let it rise in a warm place for about 1 hour or until it has doubled in size.
- Shape the Breadsticks: Preheat your oven to 400°F (200°C). Punch down the dough and divide it into 12 equal pieces. Roll each piece into a 6-inch rope and twist the ends to resemble bone shapes.
- Prepare for Baking: Arrange the shaped breadsticks on a baking sheet lined with parchment paper. Brush them lightly with melted butter and sprinkle with garlic powder and Parmesan cheese if using.
- Bake: Bake in the preheated oven for 12-15 minutes or until the breadsticks are golden brown and cooked through.
- Serve: Remove from the oven and let cool slightly before serving with marinara sauce or a cheesy dip.
Extra Tips:
For extra flavor, you can brush the breadsticks with garlic butter right after they come out of the oven.
If you want to make the breadsticks ahead of time, you can prepare the dough and shape the breadsticks, then freeze them on a tray. Once frozen, transfer them to a zip-lock bag and store them in the freezer.
When ready to bake, let them thaw at room temperature for 30 minutes before baking as directed. This dish is versatile and can be adjusted to suit different taste preferences by adding herbs or spices to the dough.