
When it comes to throwing a memorable Halloween bash, the food is just as important as the costumes and decorations.
Picture a table filled with eerie delights like Witch’s Brew Stew and Mummy Hot Dogs.
Each dish is a visual feast for the senses.
I’m about to share 13 spine-tingling food ideas that will transform your party into a culinary haunted house.
Ready to discover how these ghoulish goodies can enchant your guests?
Witch’s Brew Stew
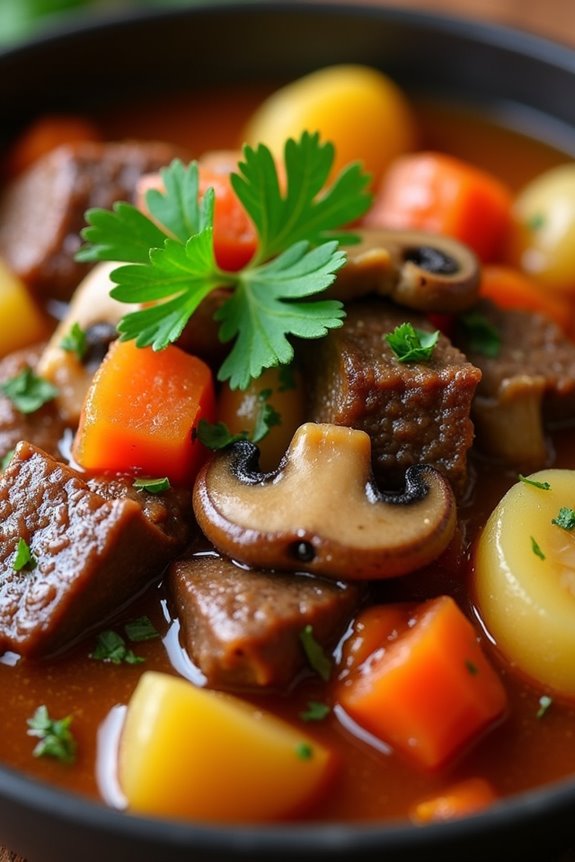
Imagine a bubbling cauldron of flavors, where each spoonful is a delightful balance of earthy, robust, and slightly sweet notes. The transformation of simple ingredients into a bewitching meal is what makes the Witch’s Brew Stew a must-have addition to your Halloween menu. Not only is it easy to prepare, but it also provides a nourishing and satisfying experience that complements the festive spirit of the holiday.
Ingredients (serving size: 4-6 people):
- 2 pounds beef stew meat, cut into 1-inch cubes
- 2 tablespoons olive oil
- 1 large onion, chopped
- 3 cloves garlic, minced
- 2 carrots, sliced
- 2 stalks celery, sliced
- 3 potatoes, peeled and diced
- 1 cup mushrooms, sliced
- 1 can (14 oz) diced tomatoes
- 4 cups beef broth
- 1 tablespoon Worcestershire sauce
- 2 teaspoons dried thyme
- 1 teaspoon dried rosemary
- 1 teaspoon salt
- 1/2 teaspoon black pepper
- 1 bay leaf
- 1/4 cup fresh parsley, chopped
Instructions:
- Brown the Meat: In a large pot or Dutch oven, heat the olive oil over medium-high heat. Add the beef cubes and brown them on all sides, working in batches if necessary. Once browned, remove the meat and set it aside.
- Sauté Vegetables: In the same pot, add the chopped onion and sauté until it becomes translucent. Add the garlic and cook for another minute, ensuring it doesn’t burn.
- Add Remaining Vegetables: Stir in the carrots, celery, potatoes, and mushrooms. Cook for about 5 minutes, stirring occasionally, until the vegetables begin to soften.
- Combine Ingredients: Return the browned beef to the pot. Add the diced tomatoes, beef broth, and Worcestershire sauce. Stir well to combine all ingredients.
- Season and Simmer: Add the thyme, rosemary, salt, pepper, and bay leaf to the pot. Bring the stew to a boil, then reduce the heat to low. Cover and let it simmer for about 1.5 to 2 hours, or until the meat is tender and the flavors have melded together.
- Finish with Fresh Herbs: Before serving, remove the bay leaf and stir in the fresh parsley. Taste and adjust seasoning if necessary.
Extra Tips: For an even richer flavor, consider making the stew a day in advance. This allows the flavors to develop further. If you prefer a thicker stew, mix 1 tablespoon of cornstarch with 2 tablespoons of water and stir it into the stew during the last 15 minutes of cooking.
Serve the Witch’s Brew Stew with crusty bread or over a bed of mashed potatoes for a complete Halloween feast.
Mummy Hot Dogs
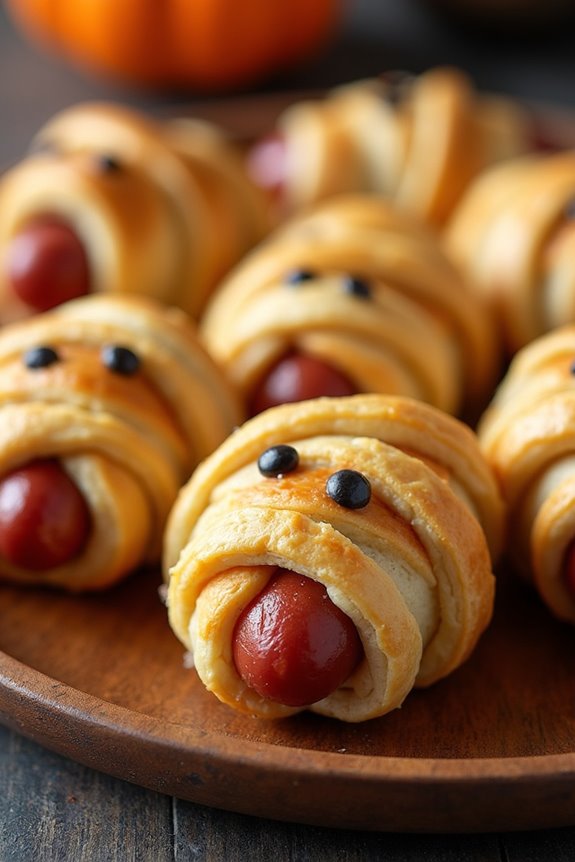
Mummy Hot Dogs are a spooktacular addition to any Halloween party spread! These fun and festive snacks aren’t only adorable but also incredibly easy to make. Perfect for kids and adults alike, Mummy Hot Dogs combine the savory taste of your favorite hot dogs with the buttery, flaky goodness of crescent roll dough. Wrapped up to resemble cute little mummies, these hot dogs are bound to be a hit at your Halloween gathering.
Plus, they require minimal ingredients and time, making them a stress-free option for party hosts.
The concept is simple: wrap hot dogs in strips of crescent roll dough to mimic a mummy’s bandages, bake them until golden brown, and add little mustard or ketchup dots for eyes. Mummy Hot Dogs make a delightful appetizer or snack that’s both delicious and entertaining. Whether you’re hosting a Halloween party or just looking for a fun dinner idea for the family, these creative hot dogs are a must-try!
Ingredients (Serving Size: 4-6 people):
- 1 package (8 count) of hot dogs
- 1 can of refrigerated crescent roll dough
- Mustard or ketchup (for the eyes)
- Cooking spray or parchment paper
Instructions:
- Preheat the Oven: Begin by preheating your oven to 375°F (190°C). This will guarantee that the Mummy Hot Dogs cook evenly and achieve the perfect golden brown color.
- Prepare the Dough: Unroll the crescent roll dough on a clean surface. Using a sharp knife or a pizza cutter, slice the dough into thin strips, roughly 1/4 inch wide. These strips will act as the mummy bandages.
- Wrap the Hot Dogs: Take one hot dog and begin wrapping it with the dough strips, leaving a small gap near the top for the eyes. Overlap the strips slightly to give the appearance of wrapped bandages. Repeat this process for each hot dog.
- Arrange and Bake: Place the wrapped hot dogs on a baking sheet lined with parchment paper or lightly sprayed with cooking spray to prevent sticking. Bake in the preheated oven for 10-15 minutes, or until the dough is golden brown and cooked through.
- Add the Eyes: Once baked, remove the Mummy Hot Dogs from the oven and let them cool slightly. Use a small amount of mustard or ketchup to dot small eyes near the top of each mummy.
- Serve and Enjoy: Arrange the Mummy Hot Dogs on a serving platter and watch them disappear as your guests enjoy these whimsical Halloween treats!
Extra Tips:
To add more personality to your Mummy Hot Dogs, consider experimenting with different types of sausages or hot dogs, like cheese-stuffed or smoked varieties. If you’re serving these to a crowd, you can easily double or triple the recipe.
Be sure to keep an eye on the oven to avoid overbaking, as the dough can quickly turn from golden to overly brown. For a fun presentation, serve with a variety of dipping sauces such as ketchup, mustard, or even a spicy sriracha mayo.
Pumpkin Cheese Ball

When it comes to Halloween-themed culinary delights, a Pumpkin Cheese Ball is a fun and festive choice that makes for a perfect centerpiece at any spooky gathering. This dish cleverly mimics the look of a pumpkin while delivering a delightful blend of flavors and textures. The combination of cream cheese, cheddar, and spices creates a savory treat that’s sure to please a crowd. The bright orange hue is achieved naturally with cheddar cheese, and the whole ensemble is garnished with a pretzel rod “stem” to complete the pumpkin illusion.
The Pumpkin Cheese Ball isn’t only visually appealing but also incredibly easy to prepare, making it a great option for busy hosts who want to impress their guests without spending hours in the kitchen. It’s an ideal addition to any Halloween buffet and pairs well with crackers, vegetable sticks, and even apple slices.
Let’s explore the ingredients and steps needed to create this delicious and whimsical dish that serves approximately 4-6 people.
Ingredients:
- 16 oz cream cheese, softened
- 2 cups shredded sharp cheddar cheese
- 1 packet (1 oz) ranch dressing mix
- 1/2 teaspoon garlic powder
- 1/4 teaspoon smoked paprika
- 1/4 teaspoon cayenne pepper (optional, for a little heat)
- 1/4 cup finely chopped green onions
- 1/4 cup finely chopped parsley
- 1 cup crushed cheese-flavored crackers
- 1 pretzel rod (for stem)
- Crackers or vegetable sticks for serving
Cooking Instructions:
- Prepare the Cheese Mixture: In a large mixing bowl, combine the softened cream cheese, shredded cheddar cheese, ranch dressing mix, garlic powder, smoked paprika, and cayenne pepper. Use an electric mixer to blend the ingredients until smooth and well combined.
- Add Fresh Ingredients: Stir in the finely chopped green onions and parsley into the cheese mixture using a spatula or wooden spoon. Confirm that these ingredients are evenly distributed throughout the mixture.
- Shape the Cheese Ball: Transfer the cheese mixture onto a large piece of plastic wrap. Gather the wrap around the cheese mixture and shape it into a ball. Try to form it into a slightly flattened sphere to mimic the shape of a pumpkin.
- Chill the Cheese Ball: Place the wrapped cheese ball in the refrigerator for at least two hours or until firm. Chilling will make it easier to handle and help it maintain its shape.
- Coat with Crushed Crackers: Once the cheese ball is firm, remove it from the refrigerator and unwrap it. Roll the cheese ball in the crushed cheese-flavored crackers until it’s fully coated. This will add a nice crunchy texture and enhance the pumpkin appearance.
- Add the Stem: Insert the pretzel rod into the top center of the cheese ball to act as the pumpkin stem. Press down gently to confirm it stays in place.
- Serve and Enjoy: Arrange the Pumpkin Cheese Ball on a serving platter surrounded by crackers or vegetable sticks. Serve immediately or keep refrigerated until ready to serve.
Extra Tips:
For an extra decorative touch, consider using a toothpick to create vertical lines along the sides of the cheese ball, mimicking the ridges of a pumpkin.
If you prefer a spicier version, feel free to increase the amount of cayenne pepper or add a dash of hot sauce to the cheese mixture. Additionally, if serving at a large party, you can easily double the recipe to accommodate more guests.
Remember to let the cheese ball soften at room temperature for a few minutes before serving to make it easier to spread.
Spider Web Pizza

Halloween is the perfect time to get creative in the kitchen and surprise your family and friends with dishes that are as delightful as they’re spooky. One such dish that combines fun with flavor is the Spider Web Pizza. This pizza isn’t just tasty, but it also adds a festive touch to your Halloween spread. Its web-like design, made using gooey cheese, resembles a spider’s lair, making it a hit with both kids and adults.
To make Spider Web Pizza, you’ll start with a classic pizza base, topped with your choice of savory ingredients. The magic happens with the cheese, which you’ll artfully arrange to mimic a spider web. This dish is perfect for a Halloween party or a cozy family night in, offering a delicious blend of flavors with a creative twist. Here’s how you can make this spooky treat for 4-6 people.
Ingredients:
- 1 large pizza dough (store-bought or homemade)
- 1 cup pizza sauce
- 2 cups shredded mozzarella cheese
- 1/2 cup sliced black olives
- 1/2 cup pepperoni slices
- 1 cup cooked and crumbled sausage (optional)
- 1/4 cup grated Parmesan cheese
- 1 tablespoon olive oil
- Basil leaves for garnish
- Salt and pepper to taste
Cooking Instructions:
- Preheat the Oven: Start by preheating your oven to 475°F (245°C). This guarantees that your pizza cooks evenly and develops a nice, crispy crust.
- Prepare the Dough: Roll out the pizza dough on a lightly floured surface to your desired thickness. Transfer the dough onto a pizza stone or baking sheet that’s been lightly greased with olive oil.
- Add the Sauce: Spread the pizza sauce evenly over the dough, leaving a small border around the edges for the crust. Season with a pinch of salt and pepper for added flavor.
- Layer the Toppings: Evenly distribute the pepperoni slices, crumbled sausage, and black olives over the sauce. You can customize this step by adding other toppings of your choice.
- Create the Spider Web: To form the spider web, place the mozzarella cheese in a piping bag or a plastic sandwich bag with a small corner cut off. Pipe the cheese in concentric circles over the toppings, starting from the center and working your way outwards. Connect the circles with straight lines to form a web pattern.
- Bake the Pizza: Place the pizza in the preheated oven and bake for about 12-15 minutes, or until the cheese is bubbly and the crust is golden brown.
- Finish and Serve: Remove the pizza from the oven and sprinkle with grated Parmesan cheese. Garnish with basil leaves for a fresh touch. Slice and serve hot.
Extra Tips:
For the best results, verify that the dough is at room temperature before rolling it out, as this makes it easier to work with. If you don’t have a piping bag for the cheese, a simple plastic sandwich bag will suffice—just snip a very small corner off to control the cheese flow.
You can also experiment with different cheeses like provolone or cheddar for added flavor, and add some hot sauce or red pepper flakes for a spicy kick. Finally, serving the pizza with a side of marinara sauce can complement the flavors and provide a delicious dipping option.
Ghostly Deviled Eggs
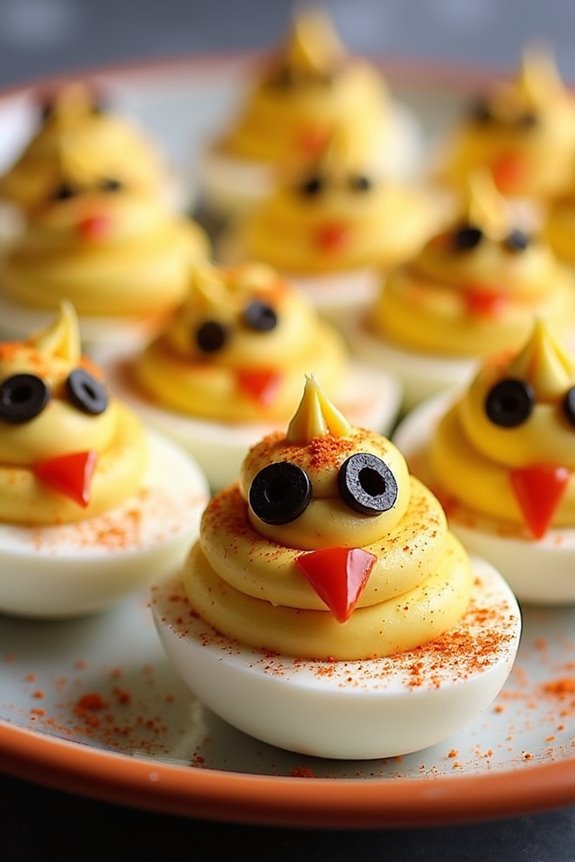
Transform your classic deviled eggs into a spooky, crowd-pleasing treat with this Ghostly Deviled Eggs recipe, perfect for your Halloween party spread. This dish combines the much-loved flavors of traditional deviled eggs with a creative twist that will delight both kids and adults. The ghostly appearance is achieved by using simple ingredients to create eyes and mouths, giving these eggs a playful and eerie look.
Not only are these Ghostly Deviled Eggs visually appealing, but they’re also incredibly delicious and easy to make. With a creamy yolk filling flavored with tangy mustard and smooth mayonnaise, these eggs pack a flavorful punch. The addition of olive slices for eyes and a little paprika for a hint of spice makes this recipe a festive treat everyone will enjoy. Serve them as an appetizer or as part of your Halloween buffet.
Ingredients for 4-6 people:
- 12 large eggs
- 1/2 cup mayonnaise
- 2 teaspoons yellow mustard
- Salt and pepper to taste
- 24 small black olive slices (for eyes)
- 12 small triangle-shaped pieces of red bell pepper (for mouths)
- Paprika (optional)
Cooking Instructions:
- Boil the Eggs: Place the eggs in a large saucepan and cover them with cold water. Bring the water to a boil over medium-high heat. Once boiling, remove the pan from the heat, cover it with a lid, and let the eggs sit for 10-12 minutes.
- Cool and Peel: Drain the hot water and transfer the eggs to a bowl of ice water to cool them quickly. Once cooled, carefully peel the eggs and set them aside.
- Prepare the Egg Halves: Slice each egg in half lengthwise. Gently remove the yolks and place them in a medium-sized mixing bowl. Arrange the egg whites on a serving platter.
- Make the Filling: Mash the yolks with a fork until smooth. Add mayonnaise, mustard, salt, and pepper to the yolks and mix until well combined and creamy.
- Fill the Egg Halves: Spoon or pipe the yolk mixture back into the egg white halves, creating a small mound in each.
- Decorate the Ghosts: For each egg, place two olive slices as eyes and a small piece of red bell pepper as the mouth on the yolk mixture. Sprinkle lightly with paprika if desired.
- Chill and Serve: Refrigerate the decorated deviled eggs for at least 30 minutes before serving to allow the flavors to meld.
Extra Tips:
When peeling the eggs, it’s helpful to gently tap them on a hard surface and roll them to crack the shell, making it easier to remove.
If you’re not a fan of olives or red bell pepper, get creative with other edible decorations like capers for eyes or a small piece of chive for a mouth.
For a smoother filling, you can use a piping bag with a star tip to fill the egg whites, which adds an extra touch of elegance to this spooky dish.
Monster Mash Guacamole
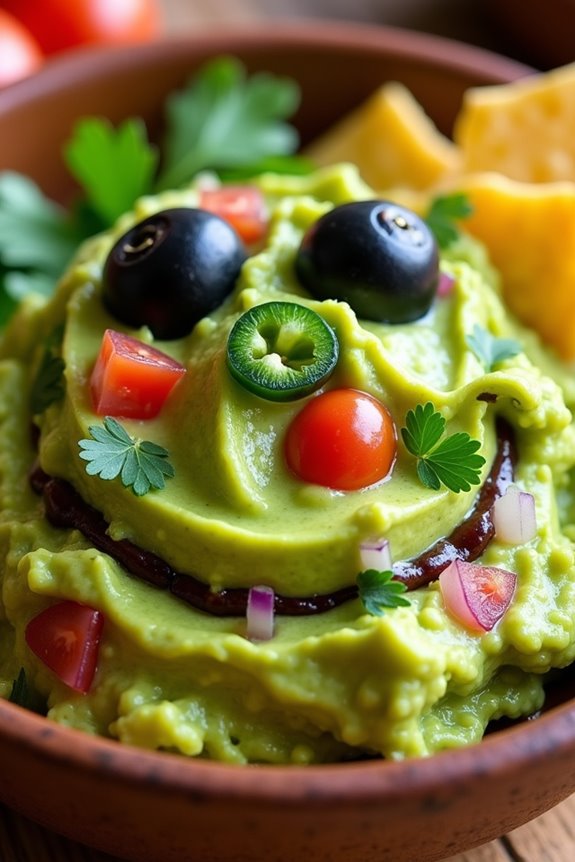
Monster Mash Guacamole is a ghoulishly delightful twist on the classic avocado dish, perfect for your Halloween festivities. This vibrant green dip isn’t only delicious but also visually intriguing, making it an ideal centerpiece for your spooky spread. The creamy texture of ripe avocados combined with zesty lime, fresh cilantro, and a hint of spice creates a flavorful concoction that’s sure to bewitch your taste buds.
Whether you’re hosting a Halloween party or just want to add a bit of frightful fun to your family meal, Monster Mash Guacamole is a guaranteed hit. This dish is easy to prepare and takes minimal time, allowing you to focus on other aspects of your Halloween celebration. The key to this recipe lies in its freshness, so make certain to use ripe avocados and fresh ingredients.
To make it even more festive, you can create a monster face using cut-up vegetables or tortilla chips. Serve it with an assortment of chips, crackers, or veggie sticks, and watch it disappear as quickly as a ghost in the night.
Ingredients (Serves 4-6):
- 4 ripe avocados
- 1 lime, juiced
- 1 small red onion, finely chopped
- 1 medium tomato, diced
- 2 cloves garlic, minced
- 1 jalapeño, seeded and finely chopped
- 1/4 cup fresh cilantro, chopped
- Salt to taste
- Black olives or tortilla chips for monster decoration
Cooking Instructions:
- Prepare the Avocados: Cut the avocados in half, remove the pits, and scoop the flesh into a large mixing bowl. Use a fork or potato masher to mash the avocados to your desired consistency, whether you prefer it chunky or smooth.
- Add Lime Juice: Immediately pour the lime juice over the mashed avocados. This not only adds a fresh, zesty flavor but also helps prevent the avocado from browning.
- Combine Ingredients: Add the finely chopped red onion, diced tomato, minced garlic, and chopped jalapeño to the bowl. Mix everything together until well combined.
- Season and Mix: Sprinkle salt to taste and fold in the freshly chopped cilantro. Stir the mixture gently to guarantee an even distribution of flavors.
- Decorate: To create a monster face, use black olives or tortilla chips to form eyes, a nose, and a mouth on the surface of the guacamole.
- Serve: Transfer the Monster Mash Guacamole to a serving bowl and present it with a variety of dippers like tortilla chips, crackers, or veggie sticks.
Extra Tips:
For the best flavor, make the guacamole just before serving, as it tastes freshest when recently prepared. If you need to make it ahead of time, press a piece of plastic wrap directly onto the surface of the guacamole to limit air exposure and refrigerate it until ready to serve.
If you want to adjust the spice level, you can add more or less jalapeño according to your preference, or include a few drops of hot sauce for extra kick. For a more festive presentation, consider placing the guacamole in a hollowed-out pumpkin or squash.
Bloody Eyeball Punch
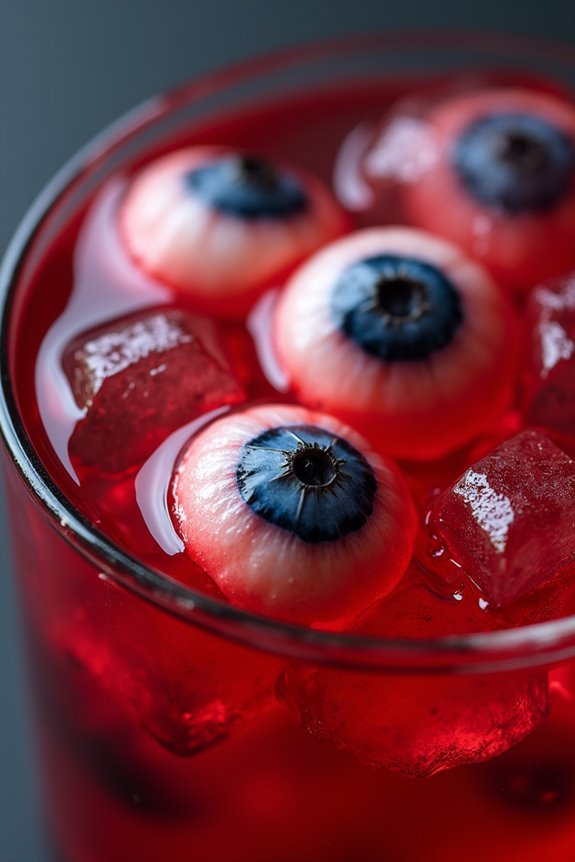
This Halloween, serve a spine-chilling drink that will leave your guests both terrified and thrilled with the “Bloody Eyeball Punch.” Aptly named for its eerie appearance, this punch is a perfect addition to any spooky gathering, delivering both flavor and fright. The punch combines a medley of vibrant red juices with lychee and blueberry “eyeballs” that float ominously in the bowl. It’s a fun and freaky treat that’s sure to make your Halloween party unforgettable.
The Bloody Eyeball Punch not only looks the part but tastes deliciously invigorating. The sweet and tart notes of cranberry and cherry juices blend seamlessly with the citrus zing of lemonade, creating a concoction that’s both refreshing and creepy. The lychee and blueberry eyeballs add a unique texture and striking visual element that will have your guests doing a double-take before bravely taking a sip. The punch is perfect for serving 4-6 people, making it an ideal choice for small gatherings or as a featured drink at larger parties.
Ingredients (Serving Size: 4-6 people):
- 1 can of lychees in syrup
- 1 pint of fresh blueberries
- 2 cups cranberry juice
- 2 cups cherry juice
- 1 cup lemonade
- 1 cup club soda
- Ice cubes
- Red food coloring (optional)
- Halloween-themed plastic eyeballs for decoration (optional)
Instructions:
- Prepare the Eyeballs: Drain the syrup from the can of lychees but reserve a small amount for added sweetness in the punch. Insert a blueberry into the hollow center of each lychee, creating the eyeball effect. Set aside the prepared lychee eyeballs.
- Mix the Punch Base: In a large punch bowl or pitcher, combine the cranberry juice, cherry juice, and lemonade. Stir the mixture well to guarantee all the juices are blended evenly.
- Add Carbonation: Carefully pour in the club soda, stirring gently to maintain the carbonation. This will add a fizzy element to your punch, making it more invigorating.
- Infuse with Eyeballs: Gently place the lychee and blueberry eyeballs into the punch. They’ll float to the top, creating a spooky appearance.
- Add Ice and Color (Optional): If desired, add a few drops of red food coloring to enhance the blood-like hue of the punch. Add ice cubes to keep the punch chilled.
- Decorate and Serve: For an extra creepy touch, place Halloween-themed plastic eyeballs around the punch bowl. Serve the punch in clear glasses to showcase the eerie eyeballs within.
Extra Tips:
To take your Bloody Eyeball Punch to the next level, consider freezing some of the punch mixture in an ice cube tray with blueberries inside. This will keep your punch chilled without diluting its flavor when the ice melts.
If you prefer a stronger punch, substitute half of the club soda with sparkling wine or champagne for an adult version. Additionally, you can experiment with different fruit juices to adjust the sweetness and tartness to your liking.
Remember to keep the punch bowl in a cool area to maintain its invigorating temperature throughout your Halloween event.
Vampire Bat Wings
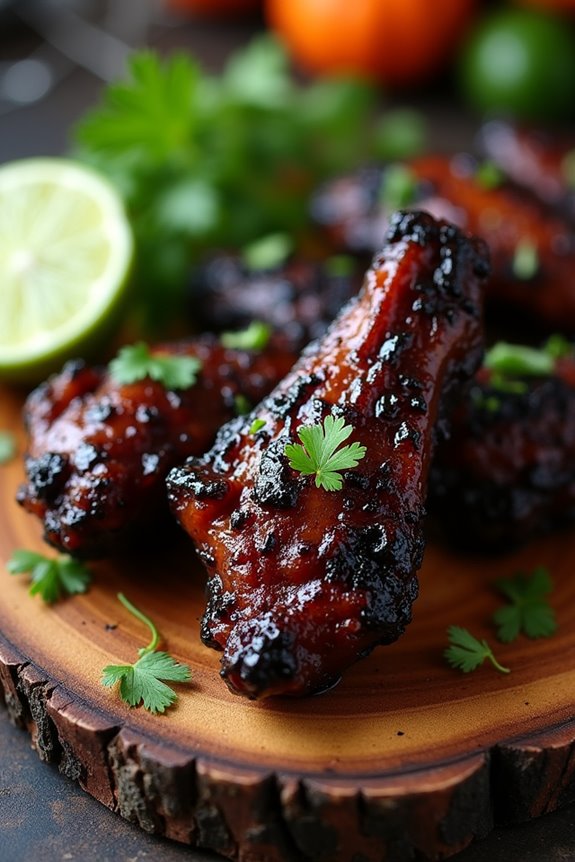
Halloween is the perfect time to indulge in some spooky-themed treats, and Vampire Bat Wings are a fun and delicious way to add a little fright to your festivities. These wings aren’t only visually intriguing but also pack a punch in flavor. The deep, dark hue of these chicken wings is achieved by using a combination of soy sauce and balsamic glaze, making them an eerie addition to your Halloween spread.
Whether you’re hosting a gathering or simply enjoying a themed dinner at home, these wings are sure to be a hit with both adults and kids alike. Inspired by the mysterious and dark nature of vampires, these wings are both savory and slightly sweet, offering a tantalizing taste experience. The marinade allows the wings to soak up rich flavors overnight, guaranteeing they’re juicy and tender once cooked.
They’re then baked to perfection, resulting in a crispy exterior that complements the succulent meat inside. Slip into your vampire costume, set the table with some cobwebs, and get ready for a dish that’s as delightfully spooky as it’s delicious.
Ingredients (Serves 4-6):
- 3 pounds of chicken wings
- 1 cup soy sauce
- 1/2 cup balsamic glaze
- 1/4 cup honey
- 4 cloves garlic, minced
- 1 tablespoon ginger, minced
- 1 tablespoon sesame oil
- 1 teaspoon black food coloring (optional)
- 1 teaspoon freshly ground black pepper
- 1 teaspoon salt
- 1 teaspoon red pepper flakes (optional)
- Fresh cilantro for garnish
- Lime wedges for serving
Instructions:
- Prepare the Marinade: In a large mixing bowl, combine soy sauce, balsamic glaze, honey, minced garlic, minced ginger, sesame oil, black food coloring (if using), black pepper, salt, and red pepper flakes. Whisk together until well blended.
- Marinate the Wings: Add the chicken wings to the marinade, ensuring that each piece is thoroughly coated. Cover the bowl with plastic wrap or transfer the wings to a large zip-lock bag. Marinate in the refrigerator for at least 4 hours, preferably overnight, to allow the flavors to infuse the meat.
- Preheat the Oven: Preheat your oven to 400°F (200°C). Line a large baking sheet with aluminum foil and place a wire rack on top. This will help the wings cook evenly and achieve a crispy texture.
- Arrange the Wings: Remove the wings from the marinade, allowing any excess to drip off. Place the wings in a single layer on the wire rack. Reserve the marinade for basting.
- Bake the Wings: Bake the wings in the preheated oven for 25 minutes. After 25 minutes, remove them from the oven and turn each wing over. Baste with the reserved marinade and return to the oven for another 20-25 minutes, or until the wings are cooked through and the skin is crispy.
- Serve and Garnish: Remove the wings from the oven and transfer them to a serving platter. Garnish with fresh cilantro and serve with lime wedges on the side for an added zesty flavor.
Extra Tips:
For an even more intense black color, consider using squid ink or activated charcoal powder as a natural food coloring alternative. If you prefer your wings spicier, feel free to increase the red pepper flakes or add a dash of hot sauce to the marinade.
When basting, guarantee that the reserved marinade is cooked by either boiling it for a few minutes or using it solely for the first basting to avoid cross-contamination. These wings pair perfectly with a side of blue cheese or ranch dressing for dipping. Enjoy your spooky and scrumptious Vampire Bat Wings!
Creepy-Crawly Cupcakes

Celebrate Halloween with these delightfully eerie Creepy-Crawly Cupcakes. Perfect for a spooky party, these cupcakes are both fun to make and delicious to eat. With rich chocolate cupcakes as the base, they’re topped with a ghoulishly green frosting and creepy-crawly decorations that will send shivers down your spine.
Ideal for serving 4-6 people, these cupcakes are sure to be a hit among kids and adults alike, adding a fun and festive touch to your Halloween menu.
The chocolate cupcakes are moist and flavorful, providing the perfect backdrop for the colorful and spooky toppings. The green frosting is made using a simple buttercream recipe with a hint of green food coloring to achieve that eerie hue.
Decorative options like gummy worms, black licorice, and candy eyes complete these cupcakes, turning them into a deliciously creepy treat. Whether you’re hosting a Halloween party or simply want to surprise the family, these Creepy-Crawly Cupcakes are a must-try this spooky season.
Ingredients (serving size: 4-6 people):
- 1 cup all-purpose flour
- 1 cup granulated sugar
- 1/2 cup unsweetened cocoa powder
- 1 teaspoon baking powder
- 1/2 teaspoon baking soda
- 1/4 teaspoon salt
- 1/2 cup unsalted butter, melted
- 2 large eggs
- 1 teaspoon vanilla extract
- 1/2 cup milk
- 1 cup softened unsalted butter (for frosting)
- 3 cups powdered sugar (for frosting)
- 2 teaspoons vanilla extract (for frosting)
- 2-3 tablespoons milk (for frosting)
- Green food coloring
- Gummy worms
- Black licorice strands
- Candy eyes
Cooking Instructions:
- Prepare the Cupcake Batter:
- Preheat your oven to 350°F (175°C) and line a muffin tin with cupcake liners. In a large bowl, whisk together the flour, sugar, cocoa powder, baking powder, baking soda, and salt until well combined.
- In another bowl, whisk together the melted butter, eggs, vanilla extract, and milk. Gradually add this mixture to the dry ingredients, stirring until just combined and smooth.
- Divide the batter evenly among the cupcake liners, filling each about two-thirds full. Bake in the preheated oven for 18-20 minutes, or until a toothpick inserted into the center comes out clean. Allow the cupcakes to cool completely on a wire rack.
- In a large bowl, beat the softened butter with an electric mixer until creamy. Gradually add the powdered sugar, vanilla extract, and milk, beating until smooth and fluffy. Add green food coloring a few drops at a time until the desired shade is achieved.
- Once the cupcakes are completely cool, pipe or spread the green frosting on top. Decorate with gummy worms, black licorice strands for spider legs, and candy eyes for a creepy-crawly effect.
- 6 cups Rice Krispies cereal
- 3 tablespoons unsalted butter
- 1 package (10 oz) marshmallows
- Green food coloring
- 1 cup mini chocolate chips
- 1/2 cup candy eyes
- 1/2 cup chocolate sprinkles
- Black decorating gel or icing
- 1 teaspoon vanilla extract
Extra Tips:
When making the frosting, make certain that the butter is at the right temperature, ideally softened but not melted, to achieve a smooth and creamy consistency.
If the frosting is too thick, add a little more milk, one teaspoon at a time, until you reach the desired consistency. Likewise, if it’s too thin, add more powdered sugar.
For an added touch, consider placing a small piece of parchment paper under each gummy worm to prevent them from sticking to the frosting and make them easier to remove when eating. Enjoy your spooky treats!
Frankenstein Rice Krispie Treats
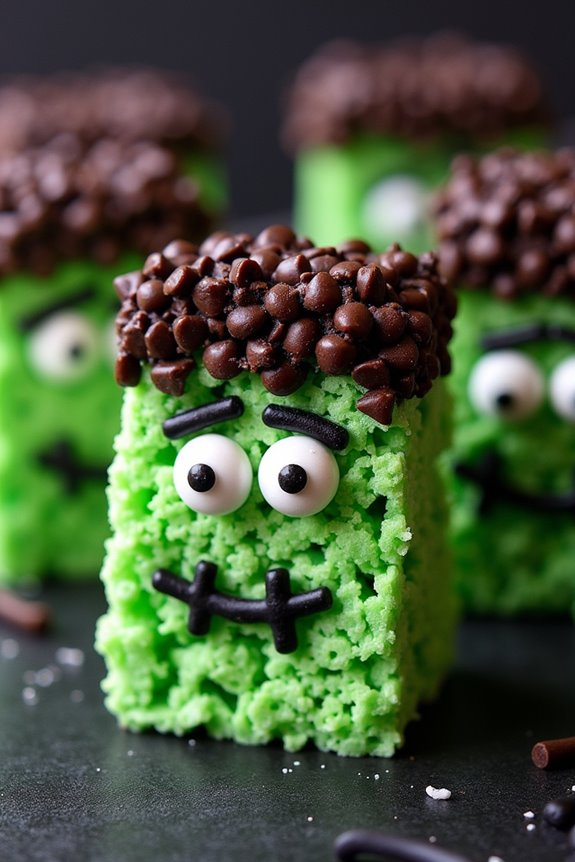
Frankenstein Rice Krispie Treats are a fun and spooky addition to any Halloween party spread. These adorable yet eerie snacks take the classic Rice Krispie treat to a whole new level with a ghoulish twist. The vibrant green color, silly candy eyes, and chocolate hair give these treats a playful and monstrous appearance that’s sure to delight both kids and adults alike.
Whether you’re hosting a Halloween gathering or just want a fun project to do with the family, Frankenstein Rice Krispie Treats are simple to make and sure to be a hit.
These treats aren’t just about appearances; they also deliver on taste. The combination of gooey marshmallow, crispy cereal, and a hint of chocolate makes for an irresistible snack. Plus, they’re incredibly easy to prepare, requiring just a few ingredients and minimal time. You can even get creative with different decorations to give each Frankenstein its own unique personality.
This recipe will yield enough treats to serve 4-6 people, making it perfect for a small party or a family treat night.
Ingredients (serves 4-6):
Cooking Instructions:
- Prepare the Pan: Line a 9×13-inch baking pan with parchment paper or lightly grease it with cooking spray. This will make it easier to remove the treats later.
- Melt the Butter and Marshmallows: In a large saucepan, melt the butter over low heat. Once melted, add the marshmallows and stir continuously until they’re completely melted and smooth.
- Add Color and Flavor: Remove the saucepan from heat and stir in the vanilla extract. Add several drops of green food coloring to achieve a bright Frankenstein-green hue. Stir until the color is evenly distributed.
- Combine with Cereal: Gradually add the Rice Krispies cereal to the melted marshmallow mixture, stirring well to coat all the cereal evenly.
- Form the Treats: Pour the mixture into the prepared baking pan. Press it down gently with a spatula or your hands (lightly greased) to make an even layer. Allow it to cool and set for about 30 minutes.
- Cut and Decorate: Once set, cut the treats into rectangles to form the body of Frankenstein. On one end of each rectangle, apply a layer of mini chocolate chips or chocolate sprinkles to create the hair. Use the black decorating gel to draw a mouth and scars, and attach candy eyes to complete the face.
- Serve and Enjoy: Arrange the completed Frankenstein Rice Krispie Treats on a platter and serve them at your Halloween gathering.
Extra Tips:
For a more detailed and defined look, use a toothpick to help position the candy eyes and create precise lines with the decorating gel. If you’re making these treats with kids, it can be fun to let them personalize their own Frankenstein faces with different expressions or accessories.
Additionally, if you want to make the treats ahead of time, store them in an airtight container to keep them fresh. Remember, the key to a successful Frankenstein Rice Krispie Treat is having fun with the decorating process!
Cauldron Popcorn Mix
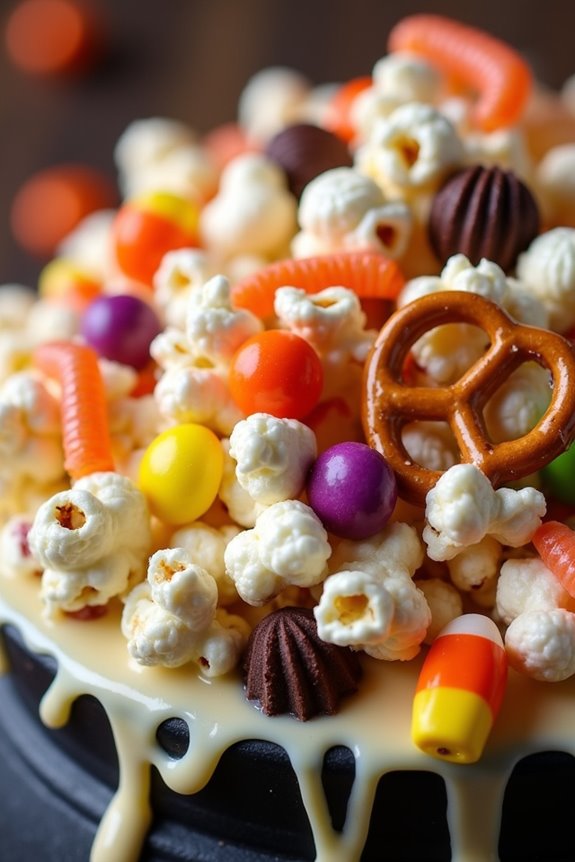
Cauldron Popcorn Mix is a delightful Halloween treat that combines the perfect balance of sweet, salty, and spooky. This festive snack mix isn’t only easy to prepare but also fun to serve, making it an excellent choice for Halloween parties or a cozy movie night with friends and family.
The mix features a variety of textures and flavors, from crunchy popcorn and pretzels to sweet candies and chocolate, all brought together in a vibrant and playful presentation that resembles a witch’s bubbling cauldron.
To create this bewitching treat, you’ll start by preparing a batch of freshly popped popcorn. Next, you’ll add an assortment of colorful candies and other mix-ins to create a truly enchanting mixture. The result is a snack that’s visually appealing and irresistibly delicious, embodying the playful spirit of Halloween.
Whether you’re looking to impress your guests or simply enjoy a festive treat, this Cauldron Popcorn Mix is sure to be a hit.
Ingredients (for 4-6 people):
- 8 cups popped popcorn
- 2 cups mini pretzels
- 1 cup candy corn
- 1 cup chocolate-covered candies (e.g., M&M’s)
- 1 cup mini marshmallows
- 1/2 cup gummy worms
- 1/2 cup peanuts (optional)
- 1/4 cup melted white chocolate
Cooking Instructions:
- Prepare the Popcorn: Start by popping your popcorn. You can use an air popper or stovetop method. Once popped, spread the popcorn on a large baking sheet lined with parchment paper to cool.
- Combine Ingredients: In a large mixing bowl, combine the cooled popcorn, mini pretzels, candy corn, chocolate-covered candies, mini marshmallows, gummy worms, and peanuts (if using). Toss the ingredients gently to guarantee an even distribution.
- Add the White Chocolate: Drizzle the melted white chocolate over the popcorn mixture. Use a spatula or your hands to gently fold the mixture, making certain the white chocolate coats the ingredients evenly. Allow the mix to sit for a few minutes so the chocolate can set.
- Serve: Transfer the Cauldron Popcorn Mix to a large serving bowl or individual cups for guests to enjoy. Decorate the bowl or serving area with Halloween-themed accessories for an extra festive touch.
Extra Tips:
When making your Cauldron Popcorn Mix, feel free to customize the ingredients based on your preferences or dietary restrictions. You can substitute or add different types of candies, nuts, or even dried fruit to suit your taste.
If you’re serving this mix at a party, consider using themed bowls or containers to enhance the Halloween ambiance. To keep the popcorn fresh, store any leftovers in an airtight container at room temperature for up to a week.
Skeleton Veggie Platter
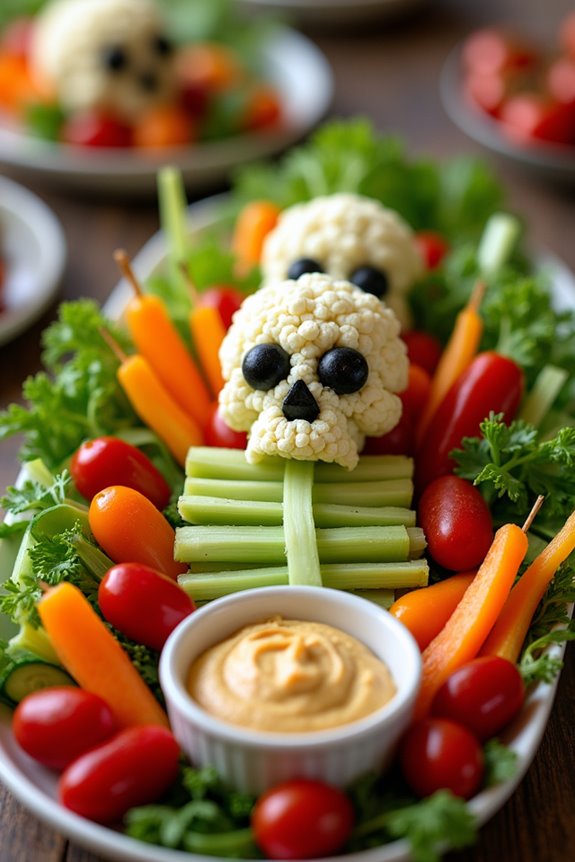
Get ready to impress your Halloween party guests with a creative and healthy Skeleton Veggie Platter. This spooky platter isn’t only a feast for the eyes but also a nutritious treat that everyone can enjoy. By artfully arranging a variety of colorful vegetables in the shape of a skeleton, you can create a delightful and eye-catching centerpiece for your Halloween table.
This easy-to-make dish is perfect for serving 4-6 people and offers a rejuvenating balance to the sweet treats typically enjoyed during the holiday. The Skeleton Veggie Platter is a versatile dish that allows you to use your favorite vegetables and dips. It’s a great way to encourage both kids and adults to eat more vegetables while having fun.
The key to this dish is selecting a variety of vegetables that offer different colors, textures, and flavors. You can even customize the platter with your preferred dips, such as hummus, ranch, or tzatziki, to make it even more enticing. Follow the recipe below to create this festive and nutritious Halloween treat.
Ingredients:
- 1 head of cauliflower
- 1 bunch of celery
- 1 large cucumber
- 2 red bell peppers
- 1 yellow bell pepper
- 1 pint cherry tomatoes
- 1 bunch of baby carrots
- 1 small container of black olives
- 1 small container of hummus (or dip of choice)
- 1 pack of pretzel sticks
Instructions:
- Prepare the Vegetables:
- Wash all the vegetables thoroughly under cold water.
- Cut the cauliflower into small florets.
- Slice the celery into thin sticks.
- Cut the cucumber into thin rounds.
- Remove the seeds from the bell peppers and slice them into strips.
- Halve the cherry tomatoes.
- On a large platter or cutting board, start by placing the cauliflower florets in the shape of a skull at the top.
- Use black olives to form the eyes and nose on the cauliflower skull.
- Arrange the celery sticks vertically to form the spine and ribs.
- Use cucumber rounds to form the pelvis area below the spine.
- For the arms, place bell pepper strips extending from the ribs, using the yellow bell pepper for the upper arms and red for the forearms.
- Place baby carrots as fingers at the end of the pepper strips.
- Use pretzel sticks as the leg bones starting from the pelvis, and add more red bell pepper strips for the lower legs.
- Finish with baby carrots at the end for the toes.
- Fill in any gaps with cherry tomatoes to add color and fill out the shape.
- Place a small bowl of hummus or your preferred dip at the bottom of the platter for easy dipping.
- 1 cup unsalted butter
- 2 cups granulated sugar
- 4 large eggs
- 1 cup all-purpose flour
- 3/4 cup unsweetened cocoa powder
- 1/2 teaspoon salt
- 1 teaspoon vanilla extract
- 1/2 teaspoon baking powder
- 1 cup semi-sweet chocolate chips
- 1 cup chocolate frosting
- 6-8 chocolate sandwich cookies (crushed)
- Various Halloween candies (e.g., gummy worms, candy corn, marshmallow ghosts)
- Small pretzel sticks
- Edible marker (optional, for writing on cookies)
Extra Tips:
When arranging your Skeleton Veggie Platter, try to use a large, flat surface to make it easier to shape and display the skeleton. Remember that the platter can be customized with any vegetables you have on hand, so feel free to be creative with your selections.
If you want to add an extra spooky touch, consider using small cookie cutters to shape some of the vegetables into Halloween-themed shapes like ghosts or pumpkins. This dish can be prepared a few hours in advance and stored in the refrigerator, just make sure to cover it with plastic wrap to keep the vegetables fresh.
Haunted Graveyard Brownies
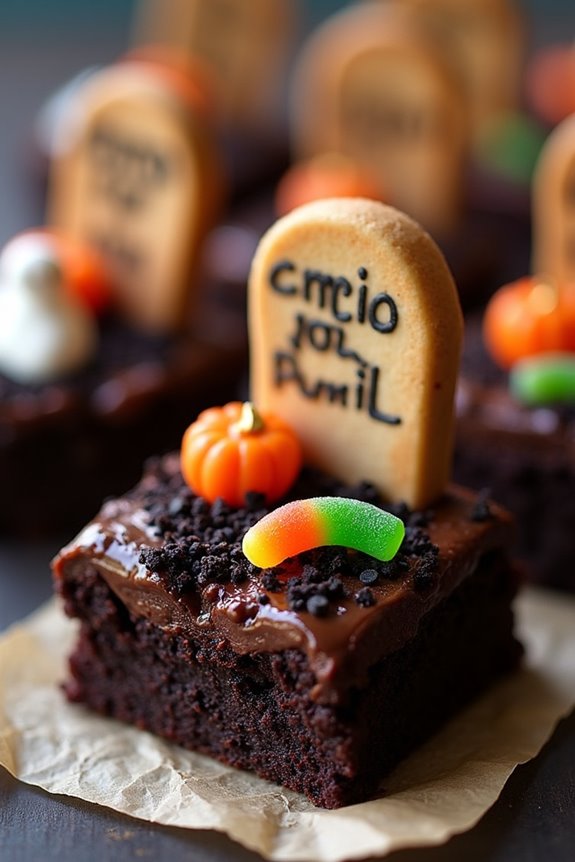
Nothing says Halloween quite like a spooky treat that’s as delightful to eat as it’s to look at. Haunted Graveyard Brownies are the perfect dessert to bring a touch of eerie elegance to your Halloween festivities. These brownies are moist, fudgy, and topped with a hauntingly delicious graveyard scene that will enchant both kids and adults alike. The base of the brownies is rich and chocolatey, providing a perfect foundation for the ghostly decorations that will take center stage.
Creating a haunted graveyard scene on top of your brownies is surprisingly simple and allows for plenty of creativity. You can use different candies and decorations to personalize your haunted scene. Whether you use Halloween-themed gummies, candy corn pumpkins, or even crushed cookies for dirt, the possibilities are endless.
These Haunted Graveyard Brownies are an opportunity to let your imagination run wild while crafting a deliciously spooky treat that’s sure to be the highlight of your Halloween spread.
Ingredients (Serving Size: 4-6 people):
Instructions:
- Preheat the Oven: Start by preheating your oven to 350°F (175°C). Grease a 9×13-inch baking pan or line it with parchment paper for easy removal.
- Prepare the Brownie Batter: In a large mixing bowl, melt the butter and allow it to cool slightly. Add the sugar and mix until well combined. Beat in the eggs one at a time, followed by the vanilla extract.
- Combine Dry Ingredients: In a separate bowl, whisk together the flour, cocoa powder, salt, and baking powder. Gradually add the dry ingredients to the wet mixture, stirring until just combined. Fold in the chocolate chips.
- Bake the Brownies: Pour the batter into the prepared baking pan, spreading it evenly. Bake in the preheated oven for 25-30 minutes or until a toothpick inserted into the center comes out with a few moist crumbs. Let the brownies cool completely in the pan on a wire rack.
- Decorate the Graveyard Scene: Once the brownies are cool, spread a layer of chocolate frosting evenly over the top. Sprinkle crushed chocolate sandwich cookies over the frosting to resemble dirt.
- Create the Graveyard: Use Halloween candies to create a graveyard scene. Insert small pretzel sticks as makeshift grave markers. If using an edible marker, write spooky messages on cookies to use as tombstones. Add gummy worms and candy corn for extra flair.
- Serve and Enjoy: Cut the brownies into squares and serve. Enjoy watching your guests delight in the spooky scene before devouring the delicious treat.
Extra Tips: When decorating the Haunted Graveyard Brownies, feel free to get creative with the decorations. You can use different types of candies and cookies to create various elements of your graveyard.
If you want to make the brownies ahead of time, you can freeze them unfrosted for up to a month. Just be sure to add the frosting and decorations after thawing them to maintain the freshness of the decorations. Enjoy the process and remember, the spookier, the better!