
Hey lovely readers! 🎃
With Halloween just around the corner, I’ve been brewing up some bewitchingly delicious treats that your guests will absolutely adore. Picture Ghostly Meringue Pops haunting your dessert table, Monster Eyeball Cupcakes giving you a cheeky stare, and Witch’s Finger Pretzels ready for a nibble. Each creation adds a unique and spooky twist to your festive spread. Get ready for a Halloween feast that’s as fun as it is tasty! 👻🕸
Ghostly Meringue Pops
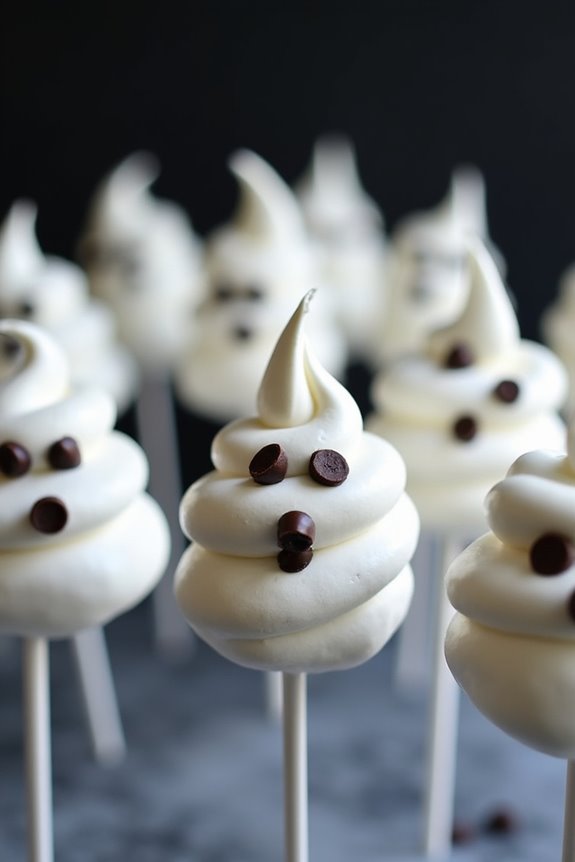
Ghostly Meringue Pops are the perfect sweet treat to spook your guests at any Halloween party. These delightful confections aren’t only visually eerie but also melt-in-your-mouth delicious. With their crisp exterior and soft, chewy interior, these meringue pops are sure to be a hit among both children and adults.
They’re shaped into ghostly figures and placed on lollipop sticks, making them easy to serve and fun to eat. Creating these spooky treats involves whipping up a simple meringue mixture, piping it into ghostly shapes, and then baking them to perfection. The key to achieving their ghostly appearance is in the shaping and the addition of tiny chocolate eyes.
With a little patience and creativity, you can transform basic ingredients into a hauntingly delightful dessert that’s perfect for any Halloween gathering.
Ingredients for Ghostly Meringue Pops (Serves 4-6):
- 4 large egg whites
- 1 cup granulated sugar
- 1 teaspoon vanilla extract
- 1/4 teaspoon cream of tartar
- Pinch of salt
- Mini chocolate chips, for eyes
- Lollipop sticks
Cooking Instructions:
- Prepare the Baking Sheet: Preheat your oven to 225°F (110°C). Line a baking sheet with parchment paper or a silicone baking mat to prevent sticking.
- Whip the Egg Whites: In a large, clean mixing bowl, add the egg whites and cream of tartar. Using an electric mixer on medium speed, beat the egg whites until they become frothy.
- Add Sugar and Flavoring: Gradually add the granulated sugar, about 1 tablespoon at a time, while continuing to beat the mixture. Increase the mixer speed to high and continue beating until stiff, glossy peaks form. This should take about 5-7 minutes. Add the vanilla extract and a pinch of salt, and beat briefly to incorporate.
- Pipe the Meringue: Transfer the meringue mixture into a piping bag fitted with a large round tip. Pipe the meringue onto the prepared baking sheet in ghostly shapes, about 3 inches tall. Leave some space between each ghost for the air to circulate.
- Add the Eyes: Gently press two mini chocolate chips into each ghost to create eyes.
- Bake the Meringues: Place the baking sheet in the preheated oven and bake for about 1.5 hours. The meringues should be firm to the touch but still white. Turn off the oven and leave the meringues inside to cool completely, about 1 hour, to prevent cracking.
- Attach the Lollipop Sticks: Once cooled, carefully remove the meringue ghosts from the baking sheet. Insert a lollipop stick into the base of each ghost.
Extra Tips:
To guarantee your Ghostly Meringue Pops turn out perfectly, make sure to use a clean, grease-free bowl and utensils, as any fat can prevent the egg whites from whipping properly.
It’s also important not to rush the baking process; low and slow baking is key to achieving the perfect texture. If the meringues start to brown, reduce the oven temperature slightly.
Finally, store any leftovers in an airtight container to keep them fresh and crisp for a few days.
Spooky Spider Cookies
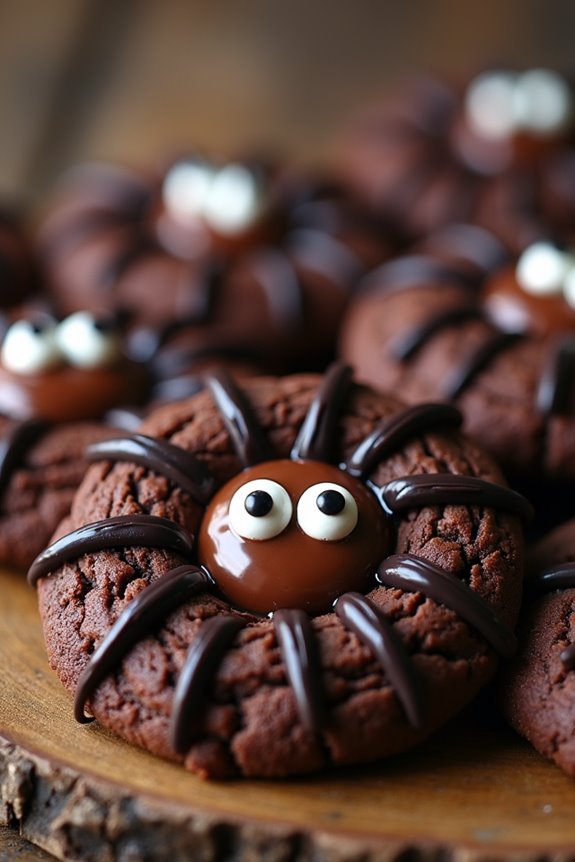
Spooky Spider Cookies are the perfect treat for Halloween parties, combining a playful design with delicious flavors that both kids and adults will love. These cookies aren’t only fun to make but also a great way to get into the Halloween spirit. With their cute and creepy appearance, these spider-shaped treats are sure to be a hit at any festive gathering. The combination of chocolate cookies and chocolate candy makes these spiders both delightful to look at and tasty to eat.
This recipe yields approximately 4-6 servings, which makes it ideal for a small party or family gathering. The cookie dough is easy to prepare, and the decorating process is a fun activity that can involve the whole family. Once baked, these cookies can be stored in an airtight container, allowing you to make them ahead of time and focus on other party preparations.
Ingredients:
- 1 cup unsalted butter, softened
- 1 cup granulated sugar
- 1 cup brown sugar, packed
- 2 large eggs
- 1 teaspoon vanilla extract
- 2 3/4 cups all-purpose flour
- 1/2 cup unsweetened cocoa powder
- 1 teaspoon baking soda
- 1/2 teaspoon salt
- 1/4 cup milk
- 1 cup chocolate chips
- 24 round chocolate-covered candies (like malt balls or chocolate truffles)
- 48 candy eyes
Instructions:
- Preheat the Oven: Start by preheating your oven to 350°F (175°C) and line two baking sheets with parchment paper to prevent sticking.
- Prepare the Dough: In a large mixing bowl, cream together the softened butter, granulated sugar, and brown sugar until light and fluffy. Add the eggs one at a time, mixing well after each addition, then stir in the vanilla extract.
- Mix Dry Ingredients: In another bowl, whisk together the flour, cocoa powder, baking soda, and salt. Gradually add the dry ingredients to the butter mixture, alternating with the milk, until just combined.
- Add Chocolate Chips: Fold in the chocolate chips with a spatula or wooden spoon, ensuring they’re evenly distributed throughout the dough.
- Shape the Cookies: Using a tablespoon, scoop rounded amounts of dough and roll them into balls. Place them on the prepared baking sheets, spacing them about 2 inches apart.
- Bake the Cookies: Bake the cookies in the preheated oven for 10-12 minutes until they’re set and the edges are firm. Allow them to cool on the baking sheet for 5 minutes before transferring them to a wire rack.
- Decorate the Cookies: While the cookies are still warm, gently press a chocolate-covered candy into the center of each cookie. Position two candy eyes on each candy to create the spider’s face.
- Finish the Spiders: Once the cookies are completely cool, use a small amount of melted chocolate (or frosting) to draw legs extending from the chocolate candy to complete the spider look.
Extra Tips: To make sure your Spooky Spider Cookies maintain their shape, chill the cookie dough in the refrigerator for about 30 minutes before baking. This step helps prevent the cookies from spreading too much in the oven.
If you want to add a little extra flair, consider using colored candy eyes or sprinkle edible glitter over the finished cookies for a magical touch. Remember, the cookies are fragile when warm, so handle them carefully when transferring them from the baking sheet to the cooling rack. Enjoy your Halloween festivities with these delightful and eerie treats!
Monster Eyeball Cupcakes

Monster Eyeball Cupcakes are the perfect spooky treat to delight and frighten your guests at any Halloween party. These eerie cupcakes aren’t only visually striking with their creepy candy eyeballs and colorful frosting, but they’re also deliciously moist and chocolatey.
Whether you’re hosting a haunted house party or a costume gathering, these cupcakes will surely be a hit with both kids and adults, adding a fun and festive touch to your party spread.
The cupcakes are made from a rich chocolate batter and topped with vibrant green frosting to resemble monster skin. For the finishing touch, candy eyeballs are strategically placed on top, creating the illusion of monster eyes staring back at you.
With a balance of sweetness and spookiness, Monster Eyeball Cupcakes can be a showstopper centerpiece on your Halloween dessert table. This recipe yields 12 cupcakes, making it suitable for a serving size of 4-6 people.
Ingredients:
- 1 cup all-purpose flour
- 1 cup granulated sugar
- 1/3 cup unsweetened cocoa powder
- 1 teaspoon baking powder
- 1/2 teaspoon baking soda
- 1/4 teaspoon salt
- 1/2 cup whole milk
- 1/4 cup vegetable oil
- 1 large egg
- 1 teaspoon vanilla extract
- 1/2 cup boiling water
- 1 cup butter, softened (for frosting)
- 4 cups powdered sugar (for frosting)
- 1/4 cup milk (for frosting)
- Green food coloring
- Candy eyeballs
Instructions:
- Preheat the Oven: Preheat your oven to 350°F (175°C) and line a 12-cup muffin tin with cupcake liners.
- Mix Dry Ingredients: In a large mixing bowl, combine the flour, granulated sugar, cocoa powder, baking powder, baking soda, and salt.
- Combine Wet Ingredients: In a separate bowl, whisk together the milk, vegetable oil, egg, and vanilla extract until well combined.
- Create Batter: Gradually add the wet ingredients to the dry mixture, stirring until the batter is smooth. Carefully stir in the boiling water until the batter is well combined. The batter will be thin.
- Bake the Cupcakes: Pour the batter evenly into the prepared cupcake liners, filling each about two-thirds full. Bake for 18-20 minutes, or until a toothpick inserted into the center comes out clean. Allow the cupcakes to cool completely on a wire rack.
- Prepare the Frosting: In a large bowl, beat the softened butter until creamy. Gradually add the powdered sugar, beating until smooth. Add the milk and beat until fluffy. Stir in the green food coloring until you achieve your desired shade of green.
- Decorate the Cupcakes: Once the cupcakes are cool, pipe or spread the green frosting onto each one. Place candy eyeballs on top of the frosting in a random pattern to create monster eyes.
- Serve and Enjoy: Arrange the cupcakes on a serving platter and watch your guests enjoy these spooky treats!
Extra Tips:
When adding food coloring to the frosting, start with a small amount and gradually increase until you reach the desired vibrant green shade.
If you want your monster eyeballs to look more realistic, consider using a small brush to add red food coloring veins around the eyeballs.
To save time, you can bake the cupcakes a day in advance and store them in an airtight container, frosting them just before serving.
Enjoy these fun and festive Monster Eyeball Cupcakes, and watch them disappear quickly at your Halloween party!
Witch’s Finger Pretzels
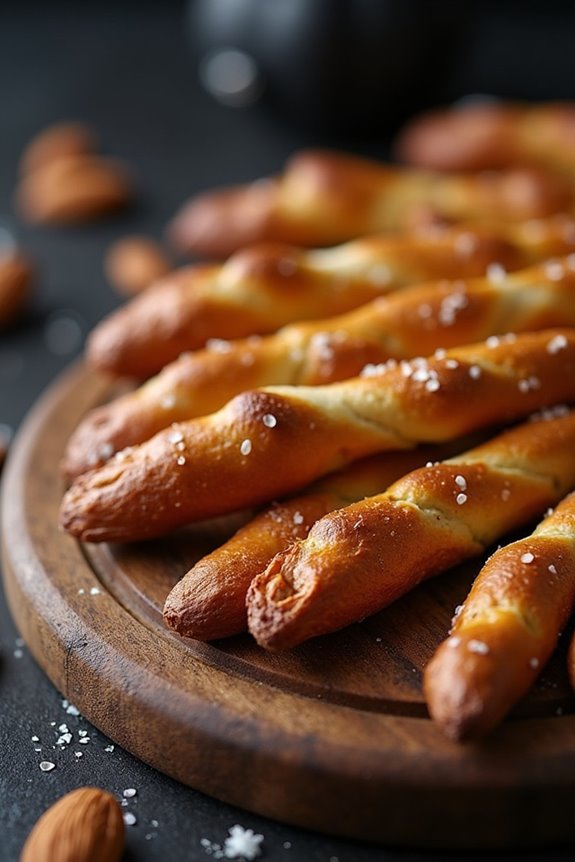
Spook up your Halloween party with a batch of Witch’s Finger Pretzels, a savory treat that’s sure to add a touch of eerie fun to your festivities. These delightful pretzels are cleverly designed to resemble the gnarled fingers of a witch, complete with an almond “fingernail” and a sprinkle of sea salt for a finishing touch. Perfect for a crowd, these pretzels aren’t only fun to look at but also deliciously crunchy and satisfying, making them a hit among both kids and adults.
Crafting Witch’s Finger Pretzels is a fun and interactive process that can easily be turned into a group activity. The dough is easy to work with, and shaping each finger allows for a bit of creativity.
Whether you prefer long and slender fingers or short and stubby ones, each pretzel is unique. Once baked, the pretzels take on a golden hue and a delightful crunch, while the almond fingernail adds a touch of realism that’s sure to get a few gasps and giggles from your guests.
Ingredients (Serves 4-6):
- 2 1/4 teaspoons active dry yeast
- 1 1/2 cups warm water (110°F/45°C)
- 1 tablespoon sugar
- 1 teaspoon salt
- 4 cups all-purpose flour
- 1/4 cup baking soda
- 1 egg, beaten
- 12 blanched almonds
- Coarse sea salt, for sprinkling
Cooking Instructions:
- Activate the Yeast: In a large mixing bowl, combine the warm water, sugar, and yeast. Stir gently and let it sit for about 5 minutes, or until the mixture becomes frothy. This step verifies that the yeast is active and ready to work its magic on the dough.
- Prepare the Dough: Add the salt and gradually mix in the flour, one cup at a time, until a dough forms. Knead the dough on a lightly floured surface for about 5-7 minutes, until it’s smooth and elastic. This step helps develop the gluten, which gives the pretzels their chewy texture.
- Shape the Fingers: Divide the dough into 12 equal pieces. Roll each piece into a 4-5 inch long finger shape, making sure to create knuckle-like ridges by squeezing the dough lightly in two places along its length. Press an almond into the tip of each finger to form the nail.
- Prepare the Baking Soda Bath: Preheat your oven to 450°F (232°C). In a large pot, bring 10 cups of water and the baking soda to a boil. Carefully dip each finger into the boiling soda bath for about 30 seconds. This step is vital as it gives the pretzels their distinctive crust. Remove with a slotted spoon and place on a baking sheet lined with parchment paper.
- Egg Wash and Bake: Brush each pretzel finger with the beaten egg to give them a nice sheen. Sprinkle them lightly with coarse sea salt. Bake in the preheated oven for 12-15 minutes, or until they’re golden brown.
- Cool and Serve: Allow the pretzels to cool slightly on a wire rack before serving. This cooling period lets them firm up a bit more, enhancing their crunchiness.
Extra Tips:
For an extra spooky touch, you can add some green food coloring to the dough for a witchy, green hue.
Feel free to experiment with different shapes and sizes for the fingers; after all, no two witch’s fingers should look exactly alike! If you want to make the process even more fun for kids, let them help with shaping the dough and adding the almonds.
Pumpkin Patch Brownies
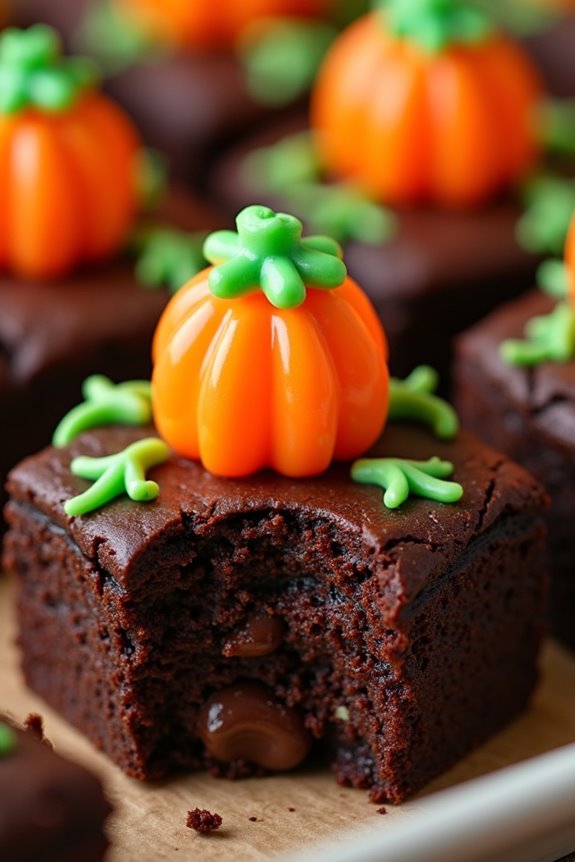
Pumpkin Patch Brownies are a delightful treat that perfectly encapsulates the spirit of Halloween. These rich, chocolatey brownies are topped with festive candy pumpkins and green icing vines to mimic a charming pumpkin patch. The combination of decadent chocolate and playful decorations will surely make these brownies the star of any Halloween party. Not only are they visually appealing, but they’re also incredibly delicious, making them a guaranteed hit among kids and adults alike.
These brownies are perfect for a Halloween gathering, whether you’re hosting a party or attending one. Their unique design can also be a fun activity to do with children as they can help decorate the brownies with the candy pumpkins and icing. You’ll enjoy the warm, gooey center of the brownie paired with the sugary crunch of the decorative toppings, making for a treat that’s as fun to make as it’s to eat.
Let’s plunge into this spooky yet scrumptious recipe that’s sure to bring a little Halloween magic to your table.
Ingredients (Serving size: 4-6 people):
- 1 cup (2 sticks) unsalted butter
- 2 cups granulated sugar
- 1 cup all-purpose flour
- 1 cup unsweetened cocoa powder
- 1 teaspoon baking powder
- 1/4 teaspoon salt
- 4 large eggs
- 1 teaspoon vanilla extract
- 1 cup semi-sweet chocolate chips
- 1 cup mini candy pumpkins
- Green icing or frosting for decoration
Cooking Instructions:
- Preheat the Oven: Start by preheating your oven to 350°F (175°C). Grease a 9×13-inch baking pan with butter or non-stick spray to make sure the brownies don’t stick.
- Melt the Butter: In a medium saucepan, melt the butter over low heat. Once melted, remove it from the heat and stir in the sugar until the mixture is smooth and well combined.
- Mix Dry Ingredients: In a separate bowl, sift together the flour, cocoa powder, baking powder, and salt. This makes certain all dry ingredients are evenly distributed and lump-free.
- Combine Ingredients: Add the dry ingredients to the butter and sugar mixture, stirring until just combined. Be careful not to overmix to keep the brownies tender.
- Add Eggs and Vanilla: Whisk in the eggs one at a time, ensuring each egg is fully incorporated before adding the next. Stir in the vanilla extract and mix until smooth.
- Add Chocolate Chips: Fold in the chocolate chips gently, distributing them evenly throughout the batter.
- Bake the Brownies: Pour the batter into the prepared baking pan, spreading it evenly. Bake for 25-30 minutes or until a toothpick inserted into the center comes out with a few moist crumbs.
- Cool and Decorate: Allow the brownies to cool completely in the pan on a wire rack. Once cooled, cut into squares and begin decorating by placing mini candy pumpkins on top. Use the green icing to create vines around the pumpkins, mimicking a pumpkin patch.
Extra Tips:
When making Pumpkin Patch Brownies, be sure to let the brownies cool completely before decorating to prevent the icing from melting. If you’re pressed for time, placing the brownies in the refrigerator for a short time can speed up the cooling process.
For an extra festive touch, consider using additional Halloween-themed candies or sprinkles along with the candy pumpkins. These brownies can be stored in an airtight container for up to three days, making them a great make-ahead treat for your Halloween festivities.
Creepy Caramel Apples
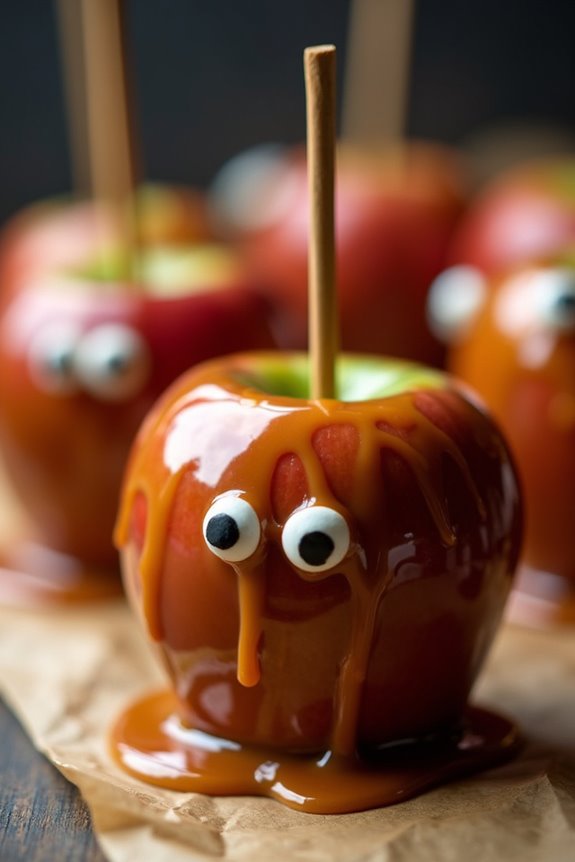
Creepy Caramel Apples are the perfect Halloween treat, combining the classic taste of tart apples with rich, chewy caramel and a touch of spooky flair. This recipe is perfect for a Halloween party, as it offers both a delicious snack and a festive piece of edible decor.
With just a few ingredients and simple steps, you can create an impressive dessert that’s certain to delight both kids and adults alike. This recipe yields enough Creepy Caramel Apples to serve 4-6 people, making them a great addition to any Halloween gathering.
The process involves coating fresh apples with a silky layer of caramel, then giving them a spooky twist with decorations. They’re fun to make, and even more fun to eat, providing a blend of flavors and textures that will have your guests reaching for seconds.
Ingredients (serves 4-6):
- 6 medium-sized tart apples
- 1 cup heavy cream
- 1 cup granulated sugar
- 1/2 cup light corn syrup
- 1/4 cup unsalted butter
- 1 teaspoon vanilla extract
- Black food coloring (optional, for a spooky effect)
- 6 wooden sticks or skewers
- Edible eyes or Halloween-themed sprinkles (optional, for decoration)
Cooking Instructions:
1. Prepare the Apples: Wash and dry the apples thoroughly to guarantee the caramel sticks properly. Insert a wooden stick or skewer into the top of each apple. Line a baking sheet with parchment paper to place the apples on once coated.
2. Make the Caramel: In a medium-sized saucepan, combine the heavy cream, granulated sugar, corn syrup, and unsalted butter. Heat over medium heat, stirring constantly, until the mixture begins to boil.
Continue boiling without stirring until the mixture reaches 245°F (118°C) on a candy thermometer, then remove from heat.
3. Add Flavoring: Stir in the vanilla extract. If you want to give your caramel a spooky look, add a few drops of black food coloring and mix until the color is evenly distributed.
4. Coat the Apples: Dip each apple into the hot caramel, turning to coat evenly. Allow excess caramel to drip off before placing each apple onto the prepared parchment paper.
Work quickly as the caramel will begin to set.
5. Decorate (Optional): While the caramel is still slightly warm, press edible eyes or Halloween-themed sprinkles into the caramel for a creepy effect. Allow the apples to cool completely on the parchment paper.
6. Set the Caramel: Let the apples sit at room temperature until the caramel is fully set, about 30 minutes.
Extra Tips:
When preparing Creepy Caramel Apples, it’s important to work quickly when coating the apples, as the caramel can harden as it cools.
If the caramel becomes too thick, gently reheat it over low heat to return it to a dipping consistency. Additionally, you can experiment with different decorations to match your Halloween theme, such as using red food coloring for a “bloody” effect or adding crushed nuts for extra crunch.
Make sure the apples are completely dry before dipping to guarantee the caramel adheres properly.
Bloody Red Velvet Cake Pops

For a Halloween party that will leave your guests delightfully spooked, these Bloody Red Velvet Cake Pops are an absolute must. With their rich, velvety texture and blood-red appearance, they fit perfectly into the eerie theme of the night. Not only are they visually enthralling, but they also offer a delicious mix of flavors that will satisfy even the most discerning sweet tooth.
These cake pops are a fun and interactive treat that both kids and adults will enjoy making and eating. The process of creating Bloody Red Velvet Cake Pops might seem a bit challenging at first, but with a little patience and creativity, you’ll find it both rewarding and entertaining.
The cake pops are fundamentally red velvet cake crumbled and mixed with cream cheese frosting, then shaped into balls, coated with candy melts, and decorated to resemble blood droplets. This recipe is designed to serve 4-6 people, making it perfect for a small gathering or as part of a larger spread of Halloween goodies.
Ingredients:
- 1 box red velvet cake mix
- Ingredients required for the cake mix (usually eggs, oil, and water)
- 1 cup cream cheese frosting
- 2 cups red candy melts
- 1 tablespoon vegetable shortening
- Black decorating gel (for effect)
- Lollipop sticks
- Styrofoam block (for drying)
Instructions:
- Bake the Cake: Preheat your oven according to the instructions on the red velvet cake mix box. Prepare the cake batter by mixing the cake mix with eggs, oil, and water as directed. Pour the batter into a greased cake pan and bake as instructed. Allow the cake to cool completely on a wire rack.
- Make the Cake Balls: Once the cake has cooled, crumble it into fine crumbs in a large mixing bowl. Add the cream cheese frosting gradually, mixing until the crumbs are moist enough to hold together but not too sticky. Roll the mixture into 1-inch balls and place them on a baking sheet lined with parchment paper.
- Prepare the Candy Coating: In a microwave-safe bowl, melt the red candy melts with the vegetable shortening in 30-second intervals, stirring in between, until smooth.
- Insert the Sticks: Dip the tip of each lollipop stick into the melted candy and insert it halfway into a cake ball. This will help the stick adhere to the cake pop. Repeat with all the cake balls.
- Coat the Cake Pops: Dip each cake pop into the melted candy, swirling gently to confirm an even coat. Gently tap off any excess candy. Insert the sticks into a Styrofoam block to hold the cake pops upright while they dry.
- Decorate: Once the coating has set, use black decorating gel to add spooky designs or blood drip effects on the cake pops for an extra Halloween touch.
- Let Set: Allow the cake pops to set completely at room temperature before serving.
For the best results, verify that the cake is completely cooled before crumbling, as warm cake can become too sticky. If the cake pops begin to crack after inserting the sticks, they may be too large; try making smaller balls.
Adding a tablespoon of shortening to the candy melts helps achieve a smoother, more manageable coating without altering the taste. These cake pops can be made a day in advance and stored in an airtight container to keep them fresh and ready for your spooky celebration.
Ghoulish Graveyard Dirt Cups
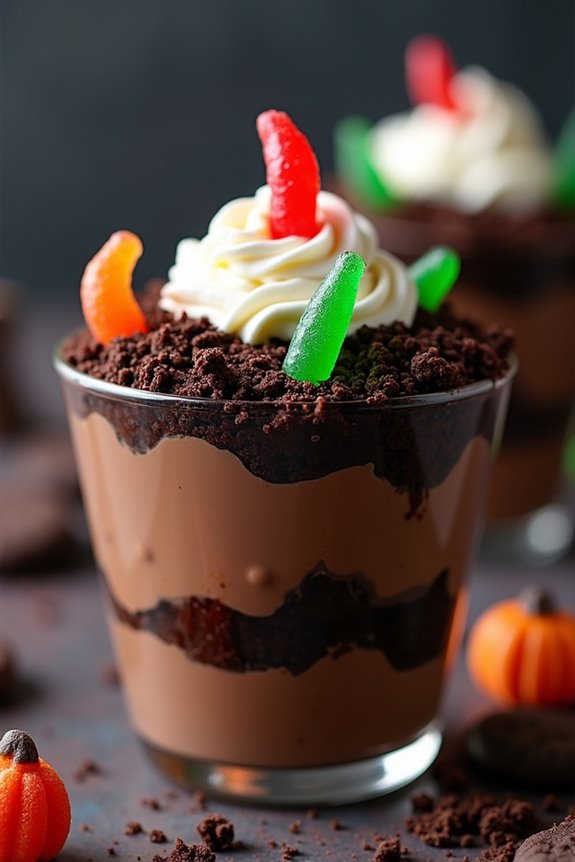
Ghoulish Graveyard Dirt Cups are a spook-tacular treat that will send shivers down your guests’ spines while delighting their taste buds. These eerie desserts combine creamy layers of chocolate pudding with crumbled chocolate cookies to create an edible “dirt” that perfectly captures the essence of a haunted graveyard.
Topped with gummy worms and decorated to resemble a creepy cemetery scene, these dirt cups are as fun to make as they’re to eat, making them an excellent choice for your Halloween party spread. Perfect for serving 4-6 people, Ghoulish Graveyard Dirt Cups aren’t only delicious but also easy to assemble, allowing you to focus more on enjoying your party.
With a combination of store-bought ingredients and a touch of creative flair, these cups are sure to be a hit with both kids and adults alike. Whether you’re hosting a Halloween party or simply want to add a festive touch to your family dinner, this recipe is a fantastic way to celebrate the spooky season.
Ingredients:
- 1 package (3.9 oz) instant chocolate pudding mix
- 2 cups cold milk
- 1 package (14.3 oz) chocolate sandwich cookies
- 1 cup whipped topping
- 1 package gummy worms
- 6 small clear cups or jars
- Optional: candy pumpkins or tombstone-shaped cookies for decoration
Instructions:
- Prepare the Pudding: In a mixing bowl, whisk together the instant chocolate pudding mix and cold milk until the mixture thickens, which should take about 2 minutes. Set the pudding aside to allow it to continue setting while you prepare the cookies.
- Crush the Cookies: Place the chocolate sandwich cookies in a resealable plastic bag and crush them using a rolling pin or the bottom of a heavy pan until they resemble coarse crumbs. These will form the “dirt” layers for your cups.
- Assemble the Dirt Cups: Start by adding a layer of cookie crumbs at the bottom of each cup. Follow this with a layer of chocolate pudding, then a dollop of whipped topping. Repeat the layers, finishing with a final layer of cookie crumbs on the top.
- Decorate with Gummy Worms: Insert a few gummy worms into the top layer of cookie crumbs in each cup, allowing them to dangle over the edge like they’re crawling out of the dirt. Optionally, you can add candy pumpkins or tombstone-shaped cookies to enhance the graveyard theme.
- Chill and Serve: Place the assembled dirt cups in the refrigerator to chill for at least 30 minutes before serving. This will allow the flavors to meld together and the pudding to firm up slightly.
Extra Tips:
For a more personalized touch, consider using food-safe markers to write spooky messages on any tombstone-shaped cookies you decide to add.
If you want to make the dessert extra spooky, mix a few drops of green food coloring into the whipped topping for an eerie effect. Additionally, if you prefer a homemade touch, you can make your own chocolate pudding from scratch instead of using the instant mix.
Finally, for an adult version, try adding a splash of your favorite liqueur to the pudding mixture for a boozy twist on this Halloween classic.
Bat Wing Dip
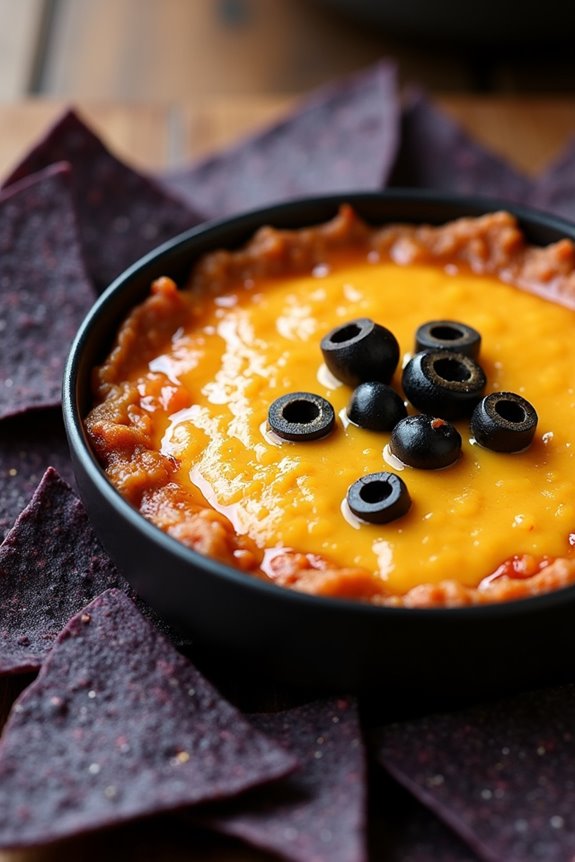
Bat Wing Dip is a spooky and delicious addition to any Halloween party spread. This eerie appetizer combines savory, cheesy goodness with a ghoulish presentation that’s sure to delight your guests. The dip is made with a blend of cream cheese, sour cream, and cheddar cheese, which is then spiced up with a hint of garlic and pepper. The highlight comes from using blue corn tortilla chips to mimic bat wings, creating a visually striking dish that ties perfectly with the Halloween theme.
Perfect for a serving size of 4-6 people, Bat Wing Dip isn’t only easy to prepare but also a crowd-pleaser. It’s an ideal choice for those looking to balance flavor with festive fun. The creamy texture combined with the crunch of the blue corn chips provides a delightful contrast, making it a hit at any gathering. Serve it warm to fully enjoy the melted cheese and the robust flavors.
Ingredients
- 8 ounces cream cheese, softened
- 1 cup sour cream
- 1 1/2 cups shredded cheddar cheese
- 1 teaspoon garlic powder
- 1/2 teaspoon black pepper
- 1/4 teaspoon salt
- 1 can (4 ounces) green chilies, diced
- 1/2 cup sliced black olives
- Blue corn tortilla chips
Cooking Instructions
- Preheat the Oven: Set your oven to 350°F (175°C) to prepare for baking the dip.
- Mix the Base: In a medium-sized mixing bowl, combine the softened cream cheese and sour cream. Stir until the mixture is smooth and well blended.
- Add Flavor: Incorporate the shredded cheddar cheese, garlic powder, black pepper, and salt into the cream cheese mixture. Mix until the ingredients are evenly distributed.
- Stir in Extras: Add the diced green chilies and half of the sliced black olives into the cheese mixture. Stir until everything is well combined.
- Transfer to Baking Dish: Pour the mixture into an oven-safe baking dish, spreading it evenly. Top the dip with the remaining black olives for added flavor and garnish.
- Bake: Place the baking dish in the preheated oven and bake for 20-25 minutes, or until the dip is bubbly and the edges are slightly golden.
- Serve with Chips: Remove the dip from the oven and let it cool slightly before serving. Arrange the blue corn tortilla chips around the dish to mimic bat wings.
Extra Tips
For an even spookier presentation, you can garnish the dip with edible eyes or a drizzle of hot sauce for a blood-like effect. Be sure to use high-quality blue corn tortilla chips for the best visual effect and taste.
If you prefer a spicier dip, consider adding a dash of cayenne pepper or diced jalapeños. This dish is best served warm, so keep it in a warming dish if your party extends over several hours. Enjoy the creepy yet delicious Bat Wing Dip at your Halloween party!
Chocolate-Covered Pretzel Bones
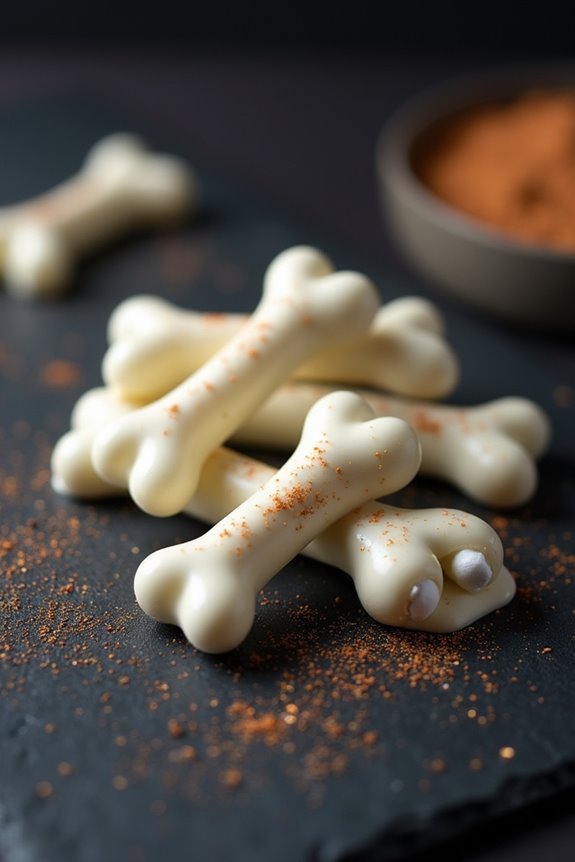
Chocolate-Covered Pretzel Bones are a delicious and spooky treat that are perfect for any Halloween party. These fun snacks combine the salty crunch of pretzels with the rich, creamy texture of chocolate, all shaped to look like eerie bones. Not only are they simple to make, but they also add a playful element to your Halloween spread.
Whether you’re hosting a party for friends, family, or a classroom of little ghouls and goblins, these pretzel bones are certain to impress and delight.
The process for making Chocolate-Covered Pretzel Bones involves a few basic ingredients and some creativity. By using a combination of pretzel sticks and mini marshmallows, you can easily craft bone-shaped treats that are both delectable and visually intriguing.
Once assembled, the pretzel bones are dipped in melted chocolate and left to set, resulting in a treat that’s both sweet and savory. Serve them up on a platter, and watch your guests enjoy this delightful combination of flavors and textures.
Ingredients (serving size: 4-6 people):
- 24 pretzel sticks
- 48 mini marshmallows
- 1 cup white chocolate chips
- 1 tablespoon coconut oil
Instructions:
- Prepare the Bones: Begin by assembling the bones. Take two mini marshmallows and press one onto each end of a pretzel stick. The marshmallows will form the rounded ends of the bones.
- Melt the Chocolate: In a microwave-safe bowl, combine the white chocolate chips and coconut oil. Microwave in 30-second intervals, stirring in between, until the chocolate is completely melted and smooth. Be careful not to overheat the chocolate.
- Dip the Bones: Using a fork or a toothpick, dip each pretzel bone into the melted chocolate, making sure it’s completely coated. Allow any excess chocolate to drip off.
- Set the Bones: Place the chocolate-covered pretzel bones on a baking sheet lined with parchment paper. Allow them to set at room temperature until the chocolate has fully hardened, or speed up the process by placing them in the refrigerator for about 15 minutes.
- Serve: Once the chocolate has set, arrange the bones on a serving platter and enjoy your spooky treat!
Extra Tips:
For an extra spooky touch, consider using dark chocolate instead of white chocolate to create “burnt” bones. You can also use food coloring to tint the chocolate coating to match your Halloween theme.
If you want to add a bit of flair, sprinkle some edible glitter or colored sugar on the bones before the chocolate sets. Remember to work quickly when dipping the bones into the chocolate to guarantee an even coating, and if the chocolate begins to harden while you’re working, simply reheat it briefly in the microwave.
Haunted House Gingerbread Cookies
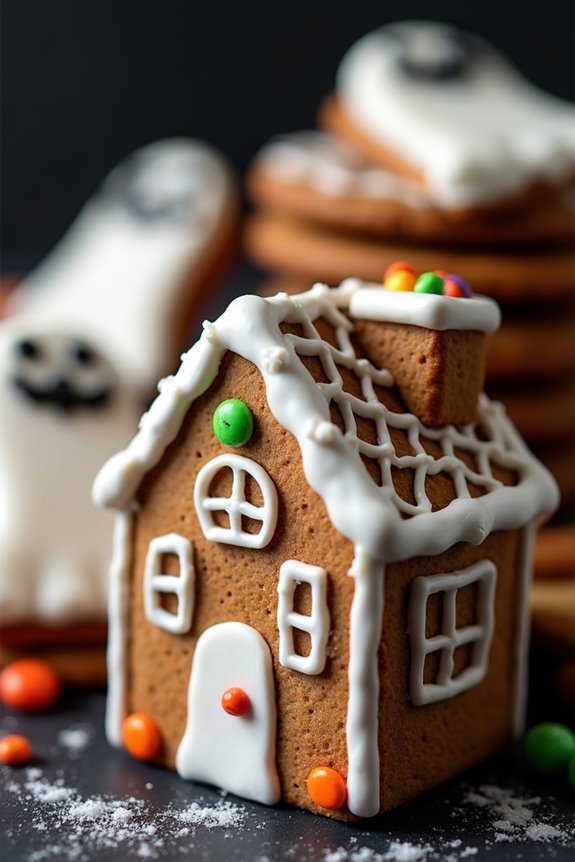
Haunted House Gingerbread Cookies are a delightful Halloween treat that combines the spookiness of a haunted house with the comforting flavors of gingerbread. These cookies are perfect for Halloween parties, offering a creative and tasty way to celebrate the season. With a mix of rich spices and decorative icing, these cookies are bound to be a hit among both children and adults.
The recipe is designed to be fun and engaging, allowing you to customize the appearance of your haunted houses to match your Halloween theme. Crafting these Haunted House Gingerbread Cookies involves making a flavorful gingerbread dough, cutting it into spooky house shapes, and decorating each cookie to your heart’s content.
This recipe is suitable for a serving size of 4-6 people, guaranteeing that everyone at your party gets a chance to enjoy these ghoulishly good cookies. Whether you’re an experienced baker or a novice, this recipe provides a step-by-step guide to help you create your very own haunted gingerbread houses.
Ingredients for Haunted House Gingerbread Cookies (serving size: 4-6 people):
- 3 cups all-purpose flour
- 1 teaspoon baking soda
- 1/2 teaspoon baking powder
- 1 tablespoon ground ginger
- 1 tablespoon ground cinnamon
- 1/2 teaspoon ground cloves
- 1/2 teaspoon salt
- 3/4 cup unsalted butter, softened
- 3/4 cup packed dark brown sugar
- 1 large egg
- 1/2 cup molasses
- 1 teaspoon vanilla extract
- Icing and assorted candies for decoration
Cooking Instructions:
- Preheat the Oven: Start by preheating your oven to 350°F (175°C). This guarantees that your cookies bake evenly and achieve the perfect texture.
- Mix Dry Ingredients: In a large bowl, whisk together the flour, baking soda, baking powder, ginger, cinnamon, cloves, and salt. Set this dry mixture aside.
- Cream Butter and Sugar: In a separate bowl, use an electric mixer to cream the softened butter and dark brown sugar until the mixture is light and fluffy. This should take about 3-4 minutes.
- Add Wet Ingredients: Beat in the egg, followed by the molasses and vanilla extract. Mix until all ingredients are well combined.
- Combine Mixtures: Gradually add the dry ingredients to the wet ingredients, mixing on low speed until a dough forms. Confirm the dough is well-combined but don’t overmix.
- Chill the Dough: Divide the dough into two portions, flatten each into a disk, and wrap in plastic wrap. Chill in the refrigerator for at least 1 hour to make it easier to roll out.
- Roll and Cut: On a lightly floured surface, roll out each dough disk to about 1/4 inch thickness. Use haunted house-shaped cookie cutters to cut out the shapes. Re-roll scraps to cut additional shapes.
- Bake the Cookies: Place the cut-out cookies onto baking sheets lined with parchment paper, leaving about 1 inch of space between each. Bake in the preheated oven for 8-10 minutes, or until the edges are firm. Let cool completely on wire racks.
- Decorate: Once cooled, use icing and assorted candies to decorate your gingerbread haunted houses. Get creative with spooky designs, adding windows, doors, and ghostly figures.
Extra Tips:
To confirm your Haunted House Gingerbread Cookies are as spooky as they’re delicious, consider using royal icing for detailed decorations that hold their shape. If you don’t have haunted house cookie cutters, use a sharp knife to cut out your desired shapes freehand.
When rolling out the dough, lightly flour your rolling pin to prevent sticking. Finally, allow the cookies to cool completely before decorating to prevent the icing from melting. Enjoy the process and let your creativity shine!
Vampire Bite Donuts
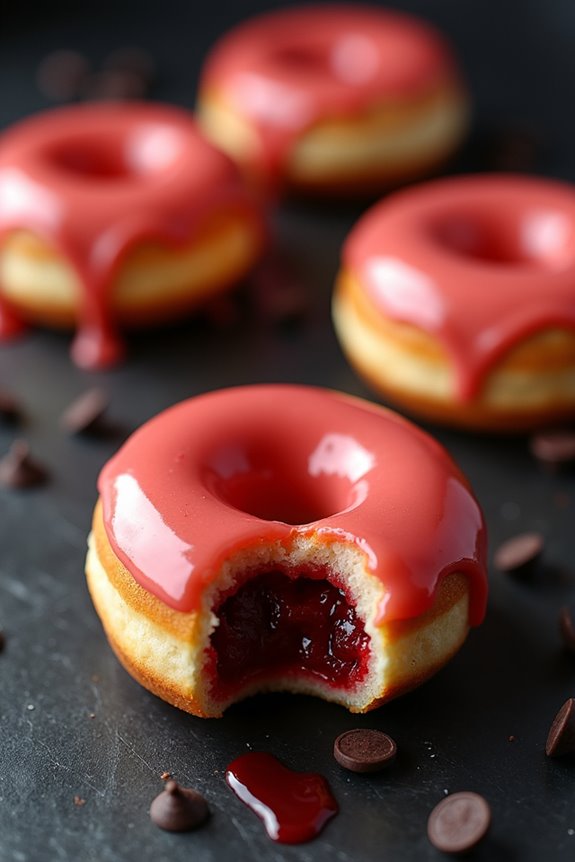
Get ready to sink your teeth into these deliciously spooky Vampire Bite Donuts! Perfect for Halloween parties, these donuts are a fun and festive way to celebrate the holiday with a touch of the macabre. The combination of soft, fluffy donuts filled with a vibrant red jam and topped with a simple sugar glaze makes them irresistible.
With a playful bite mark design, these treats are sure to be a hit with both kids and adults alike. Designed to serve 4-6 people, this recipe is easy to follow and can be made in the comfort of your own kitchen. Whether you’re hosting a Halloween bash or simply indulging in some festive fun, these Vampire Bite Donuts are a delightful addition to your party spread.
Gather your ingredients and follow the steps below to create these hauntingly delicious treats.
Ingredients:
- 2 cups all-purpose flour
- 1/2 cup granulated sugar
- 1 tablespoon baking powder
- 1/2 teaspoon salt
- 1/2 cup milk
- 1/4 cup unsalted butter, melted
- 2 large eggs
- 1 teaspoon vanilla extract
- 1 cup strawberry or raspberry jam (for filling)
- 2 cups powdered sugar
- 3 tablespoons milk (for glaze)
- Red food coloring
- Chocolate chips or red gel icing (for bite marks)
Cooking Instructions:
- Prepare the Dough: In a large mixing bowl, whisk together the flour, granulated sugar, baking powder, and salt. In a separate bowl, combine the milk, melted butter, eggs, and vanilla extract. Gradually add the wet ingredients to the dry ingredients, mixing until a smooth dough forms.
- Shape and Fry the Donuts: On a floured surface, roll out the dough to about 1/2-inch thickness. Use a donut cutter or two different-sized circular cutters to cut out donut shapes. Heat oil in a deep fryer or large pot to 350°F (175°C). Carefully fry the donuts in batches until golden brown, about 2-3 minutes per side. Remove and drain on a paper towel-lined plate.
- Fill the Donuts: Once the donuts are cool enough to handle, use a small knife or a skewer to create a small hole on the side of each donut. Fill a piping bag with the strawberry or raspberry jam and pipe the jam into the center of each donut until filled.
- Prepare the Glaze: In a bowl, mix the powdered sugar and 3 tablespoons of milk until smooth. Add a few drops of red food coloring to achieve a desired blood-red hue. Dip the top of each donut into the glaze and allow the excess to drip off.
- Create Vampire Bite Marks: Use chocolate chips or red gel icing to add two small dots on each donut to represent the vampire bite marks. Let the donuts set for a few minutes before serving.
Extra Tips:
To enhance the presentation, you can add a few drops of red food coloring to the jam filling for a more vibrant appearance when bitten into.
If you don’t have a donut cutter, a biscuit cutter or a round glass can be used to cut the dough, and a smaller circle, like a bottle cap, can be used for the center hole.
For a spooky touch, serve the donuts on a Halloween-themed platter or with a drizzle of red icing for an extra “bloody” effect. Enjoy these Vampire Bite Donuts fresh to experience the perfect combination of crispy exterior and soft, jammy interior.
Zombie Brain Jello Shots
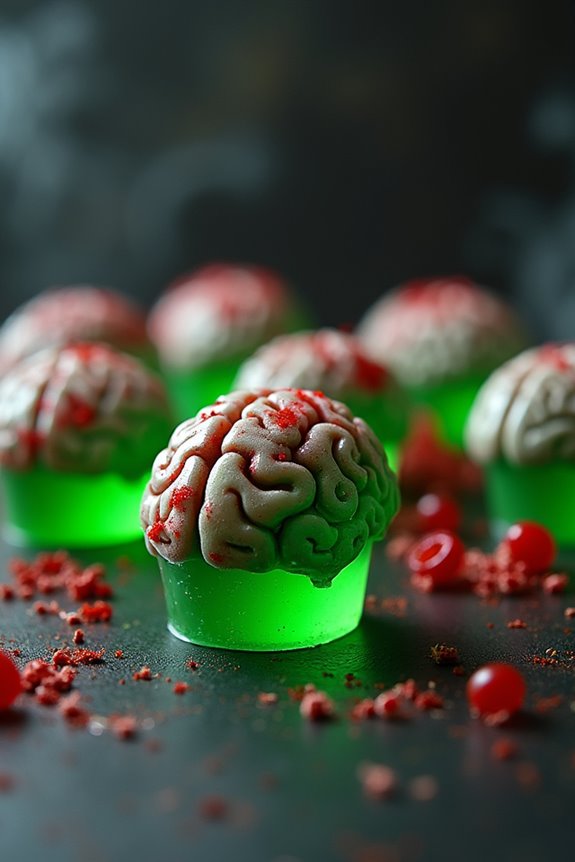
If you’re looking to add a touch of ghoulish fun to your Halloween party, these Zombie Brain Jello Shots are the perfect treat. With their eerie appearance and delicious taste, they’ll surely be a hit among your guests.
These shots aren’t only easy to make but also allow you to get creative with presentation, making them look like real zombie brains. Whether you’re hosting a large gathering or a small get-together, these jello shots will bring a spooky twist to your party snacks.
The key to making these Zombie Brain Jello Shots is in the details. By using a brain-shaped mold, you can create a realistic look, while the combination of flavored gelatin and alcohol provides a delightful kick.
The use of food coloring can enhance the creepy appearance, making them even more appealing to your party-goers. Follow the recipe below to create a batch that serves 4-6 people and watch as your guests are both impressed and slightly spooked by these tantalizing treats.
Ingredients:
- 1 package (3 oz) of flavored gelatin (preferably lime or raspberry)
- 1 cup boiling water
- 1/2 cup cold water
- 1/2 cup vodka
- Red and green food coloring
- Non-stick cooking spray
- Brain-shaped silicone mold
Instructions:
- Prepare the Mold:
- Lightly spray the brain-shaped silicone mold with non-stick cooking spray. This will guarantee the jello shots can be easily removed once set.
- In a mixing bowl, dissolve the package of flavored gelatin in 1 cup of boiling water. Stir well until the gelatin is completely dissolved, which should take about two minutes.
- Add 1/2 cup of cold water to the gelatin mixture, followed by 1/2 cup of vodka. Stir the mixture thoroughly to guarantee the alcohol is evenly distributed.
- Add a few drops of red and green food coloring to the gelatin mix. Stir until you achieve a murky, brain-like color. Feel free to adjust the colors to your preference.
- Carefully pour the gelatin mixture into the prepared brain-shaped mold, guaranteeing it fills all the nooks and crannies for a realistic brain appearance.
- Place the mold in the refrigerator and allow it to chill for at least 3-4 hours, or until the gelatin is fully set and firm to the touch.
- Once set, gently remove the jello shots from the mold. You can serve them directly on a platter, or place them individually in small cups for easy handling.
- 4 cups apple cider
- 2 cups cranberry juice
- 1 cup sparkling water
- 1/4 cup lemon juice
- 1/2 cup pomegranate seeds (optional)
- 1-2 cups ice cubes
- 1 small piece of dry ice (for visual effect, optional)
- Apple slices for garnish
Extra Tips:
For an extra spooky effect, consider adding gummy worms or candy eyeballs to the gelatin mixture before it sets. This can add additional texture and surprise elements for your guests.
If you prefer a non-alcoholic version, simply replace the vodka with an equal amount of cold water. Additionally, guarantee your guests consume these responsibly, as the alcohol content can sneak up on you in such a fun and delicious form!
Poison Apple Punch
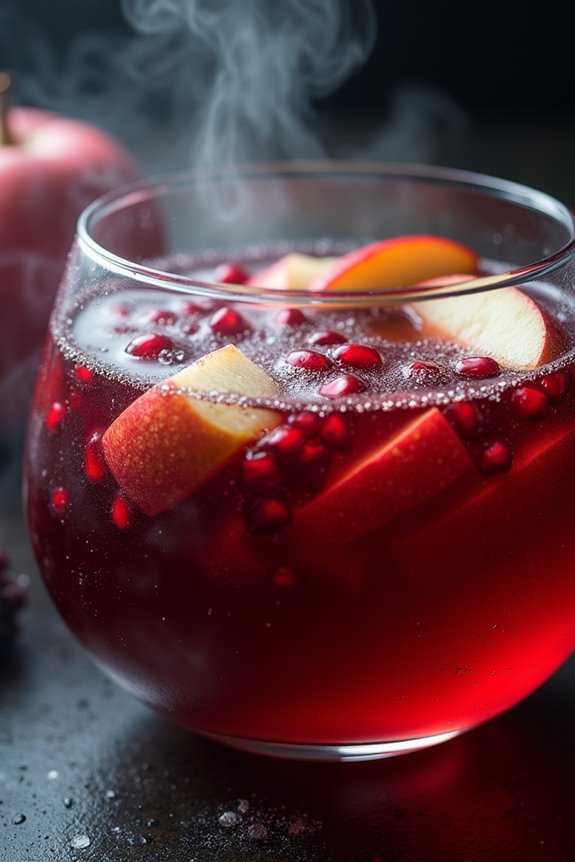
Create a spellbinding beverage for your Halloween bash with a recipe for Poison Apple Punch. This spine-chilling concoction is sure to be a hit with both kids and adults, adding a touch of eerie elegance to your party. Not only does it look the part with its dark and mysterious hue, but it also delivers a delightful combination of flavors that evoke the spirit of the season. A perfect balance of sweet and tart, this punch is as delicious as it’s eye-catching.
The Poison Apple Punch is a crowd-pleaser that combines apple cider, cranberry juice, and a hint of lemon for an extra zing. The inclusion of dry ice takes this drink to the next level, creating a misty, bubbling effect that will leave your guests mesmerized. Whether you’re hosting a ghoulish get-together or a fun family gathering, this punch will certainly be the centerpiece of your spooky spread.
Ingredients (Serves 4-6):
Instructions:
- Prepare the Base: In a large punch bowl, combine the apple cider, cranberry juice, and lemon juice. Stir well to mix all the flavors together. This combination will serve as the flavorful base of your punch.
- Add Sparkle: Slowly pour in the sparkling water. This will add a fizzy element to your punch, giving it an extra rejuvenating taste. Stir gently to make sure everything is evenly mixed.
- Ice and Garnish: Add the ice cubes to the punch to keep it chilled. For an extra pop of color and texture, add pomegranate seeds and apple slices. These garnishes not only enhance the flavor but also contribute to the eerie aesthetic of the drink.
- Create the Smoke Effect: If using, carefully place the small piece of dry ice into the punch just before serving. This will create a dramatic, foggy effect as the dry ice reacts with the liquid. Be sure to handle dry ice with gloves and use it in a well-ventilated area.
- Serve the Punch: Once the punch is ready, ladle it into individual glasses. Make sure that the dry ice is fully evaporated before serving to avoid any injury. Garnish each glass with an apple slice on the rim for a spooky touch.
Extra Tips:
When using dry ice, remember to handle it with care using protective gloves or tongs, as direct contact can cause burns. Use only food-grade dry ice, and let it dissipate completely in the punch before serving to guests.
If serving to children, you may want to omit the dry ice or ensure adult supervision. Adjust the sweetness by using more or less cranberry juice according to your taste. For an adult version, consider adding a splash of spiced rum or apple brandy to the punch.