
As Halloween draws near, my mind buzzes with ideas for meals that are both enchanting and nourishing. This is the perfect time to let your creativity shine in the kitchen, turning ordinary dinners into festive treats. Think witchy black bean burgers or a cauldron quinoa salad to charm your family and friends. These dishes capture the Halloween spirit while keeping health in focus. Ready to whip up some ghoulishly good meals?
Spooky Stuffed Bell Peppers
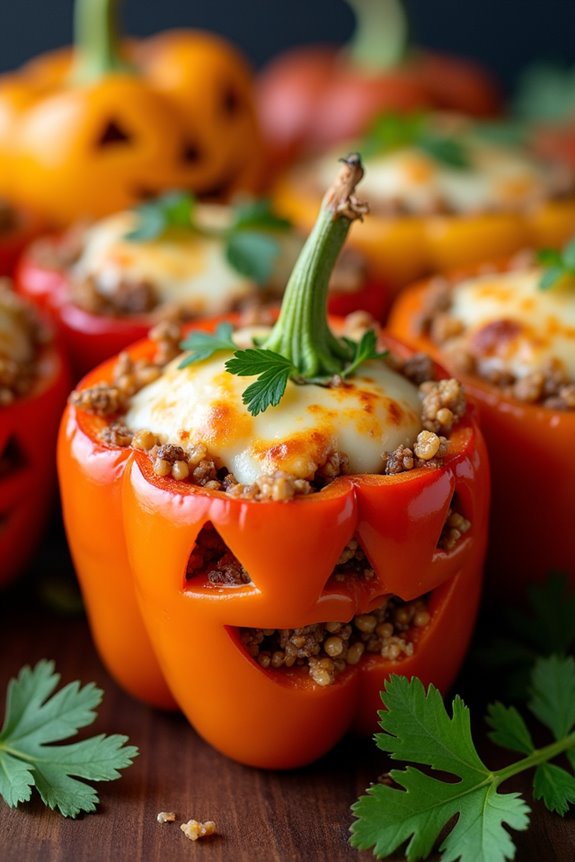
Spooky Stuffed Bell Peppers are a delightfully eerie twist on a classic dish, perfect for a Halloween dinner that’s both healthy and fun. These bell peppers are carved to look like mini jack-o’-lanterns, adding a festive touch to your dinner table.
Filled with a savory mixture of lean ground turkey, quinoa, and fresh vegetables, these stuffed peppers aren’t only visually appealing but also packed with nutrients. They make for a satisfying meal that will please both kids and adults alike, offering a balanced combination of protein, fiber, and vitamins.
The vibrant colors of the bell peppers—orange, yellow, and red—add to the Halloween theme, while the aromatic herbs and spices enhance the savory filling. As you bake these cute and creepy stuffed peppers, the aroma will fill your kitchen, creating an inviting atmosphere for your Halloween festivities.
Whether you’re hosting a party or simply enjoying a themed dinner with family, these Spooky Stuffed Bell Peppers will surely be a hit. Here’s how to make them for 4-6 people:
Ingredients:
- 6 medium bell peppers (preferably orange, red, or yellow)
- 1 pound lean ground turkey
- 1 cup cooked quinoa
- 1 medium onion, finely chopped
- 2 cloves garlic, minced
- 1 cup canned diced tomatoes, drained
- 1 cup shredded mozzarella cheese
- 1 tablespoon olive oil
- 1 teaspoon dried oregano
- 1 teaspoon smoked paprika
- Salt and pepper to taste
- Fresh parsley, chopped (for garnish)
Cooking Instructions:
- Prepare the Peppers: Preheat your oven to 375°F (190°C). Cut the tops off the bell peppers and remove the seeds and membranes. Using a small sharp knife, carve small jack-o’-lantern faces into one side of each pepper. Lightly brush the outside with olive oil and set them aside.
- Cook the Filling: In a large skillet, heat the olive oil over medium heat. Add the chopped onion and garlic, sautéing until the onion becomes translucent. Add the ground turkey, breaking it apart with a spoon, and cook until browned.
- Combine Ingredients: Stir in the diced tomatoes, cooked quinoa, oregano, smoked paprika, salt, and pepper. Let the mixture cook for another 5 minutes to allow the flavors to meld together. Remove from heat and stir in half of the shredded mozzarella cheese.
- Stuff the Peppers: Spoon the turkey and quinoa mixture into each carved bell pepper until they’re filled to the top. Place the stuffed peppers upright in a baking dish. Sprinkle the remaining mozzarella cheese evenly over the top of each pepper.
- Bake: Cover the baking dish with foil and bake in the preheated oven for 30 minutes. Remove the foil and bake for an additional 10-15 minutes, or until the peppers are tender and the cheese is bubbly and golden brown.
- Serve: Remove the peppers from the oven and let them cool slightly. Garnish with fresh parsley before serving, if desired.
Extra Tips:
For added flavor, consider using a mixture of different colored peppers to make the presentation more vibrant. If you want to add a bit more heat, try incorporating a diced jalapeño into the filling.
Additionally, if you’re short on time, the filling can be prepared a day in advance and stored in the refrigerator, making the final assembly and baking process quick and easy. Enjoy your Spooky Stuffed Bell Peppers as a fun and nutritious Halloween meal!
Witchy Black Bean Burgers

Witchy Black Bean Burgers are a spooktacular addition to any Halloween dinner, offering a deliciously eerie twist on the classic veggie burger. Packed with protein-rich black beans and a medley of spices, these burgers aren’t only healthy but also visually striking, thanks to their dark, rich hue. Perfect for serving at your Halloween feast, these burgers are sure to captivate both kids and adults alike with their bewitching appearance and savory taste.
The secret to these magical burgers lies in the blend of ingredients that create a balance of flavors and textures. The black beans provide a hearty base, while breadcrumbs help bind the mixture together, creating a satisfying patty. With the addition of spices like cumin and paprika, these burgers are imbued with a hint of smokiness and warmth, making them a cozy option for a chilly October night.
Whether served on a bun with your favorite toppings or alongside a fresh salad, these Witchy Black Bean Burgers are a versatile and nutritious dish that will have everyone under their spell.
Ingredients (Serves 4-6):
- 2 cans (15 oz each) black beans, drained and rinsed
- 1 red onion, finely chopped
- 3 cloves garlic, minced
- 1 cup breadcrumbs
- 2 teaspoons ground cumin
- 1 teaspoon smoked paprika
- 1/2 teaspoon chili powder
- 1/4 teaspoon salt
- 1/4 teaspoon black pepper
- 1/4 cup fresh cilantro, chopped
- 1 tablespoon olive oil
- 1 egg, lightly beaten
- Buns and toppings of choice (lettuce, tomato, avocado, etc.)
Cooking Instructions:
- Prepare the Beans: Begin by draining and rinsing the black beans thoroughly. Place them in a large mixing bowl and mash them using a fork or potato masher until they form a chunky paste. This should leave some beans partially whole for texture.
- Mix the Ingredients: Add the chopped red onion, minced garlic, breadcrumbs, ground cumin, smoked paprika, chili powder, salt, black pepper, and chopped cilantro to the mashed black beans. Mix well to guarantee that all ingredients are evenly distributed.
- Bind the Mixture: Incorporate the beaten egg into the black bean mixture, stirring until the mixture is moist and sticky but not too wet. The egg will help bind the ingredients together, making it easier to form patties.
- Form the Patties: Divide the mixture into 4-6 equal portions, depending on the desired size of the burgers. Shape each portion into a patty, pressing firmly to make sure they hold together during cooking.
- Cook the Burgers: Heat olive oil in a large skillet over medium heat. Once the oil is hot, carefully place the patties in the skillet. Cook for about 4-5 minutes on each side, or until they’re golden brown and heated through.
- Assemble and Serve: Once cooked, remove the patties from the skillet and allow them to rest for a minute. Serve the Witchy Black Bean Burgers on buns with your choice of toppings such as lettuce, tomato, and avocado for added flavor and texture.
Extra Tips:
For an extra layer of flavor, consider adding a teaspoon of chipotle sauce to the mixture for a smoky kick. If you prefer a vegan version, replace the egg with a flax egg by mixing one tablespoon of flaxseed meal with three tablespoons of water and letting it sit for a few minutes until it thickens.
To guarantee the burgers don’t fall apart, make sure to press the patties firmly when shaping them, and handle them gently when flipping in the skillet. Serve with a side of sweet potato fries or a fresh green salad to complete your Halloween-themed meal.
Pumpkin-Curry Soup
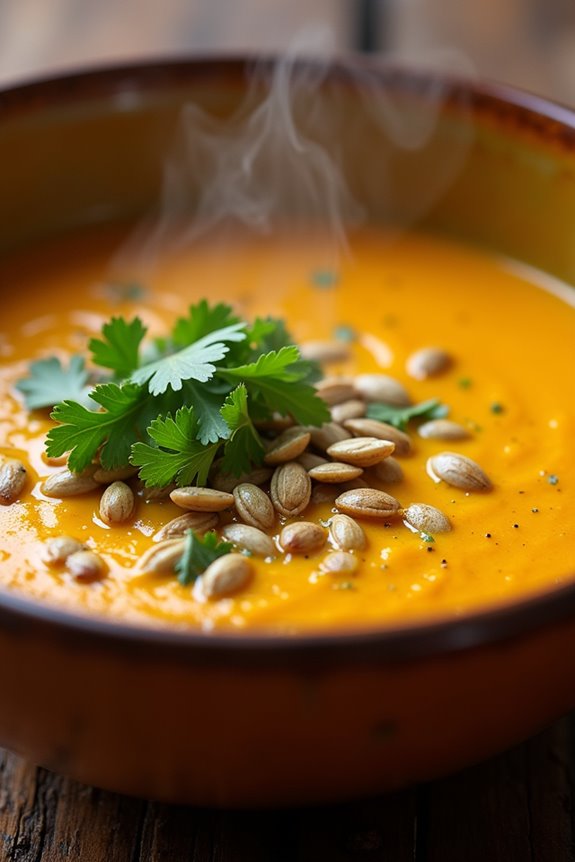
Celebrate Halloween with a delicious and healthy meal by preparing a warming bowl of Pumpkin-Curry Soup. This dish combines the rich and creamy texture of pumpkin with the exotic flavors of curry, making it a perfect complement to the autumn chill. Not only will it satisfy your taste buds, but it also boasts a wealth of nutrients, including vitamins A and C, potassium, and fiber, all of which are important for maintaining good health.
Whether you’re hosting a Halloween party or just looking for a cozy meal, this soup is sure to be a crowd-pleaser. The fusion of savory spices and the natural sweetness of pumpkin creates a harmonious balance that’s both comforting and invigorating. The preparation of this soup is straightforward, allowing you to spend less time in the kitchen and more time enjoying the Halloween festivities.
Below is a detailed recipe, including all the ingredients and instructions needed to serve 4-6 people.
Ingredients:
- 2 tablespoons olive oil
- 1 medium onion, chopped
- 2 cloves garlic, minced
- 1 tablespoon fresh ginger, grated
- 2 teaspoons curry powder
- 1 teaspoon ground cumin
- 1/2 teaspoon ground coriander
- 1/4 teaspoon cayenne pepper (adjust to taste)
- 4 cups pumpkin puree (canned or fresh)
- 4 cups vegetable broth
- 1 can (14 oz) coconut milk
- Salt and pepper to taste
- Fresh cilantro, chopped (for garnish)
- Pumpkin seeds (for garnish)
Instructions:
- Prepare the Aromatics: Heat the olive oil in a large pot over medium heat. Add the chopped onion and sauté until it becomes translucent, about 5 minutes. Stir in the minced garlic and grated ginger, cooking for an additional 2 minutes until fragrant.
- Add the Spices: Sprinkle in the curry powder, ground cumin, ground coriander, and cayenne pepper. Stir well to coat the onion mixture with the spices, allowing the flavors to meld together for about 1 minute.
- Incorporate the Pumpkin: Add the pumpkin puree to the pot and stir to combine it with the spiced onion mixture. Cook for 2-3 minutes, letting the pumpkin absorb the spices.
- Pour in the Liquids: Slowly add the vegetable broth and coconut milk to the pot, stirring continuously to guarantee a smooth consistency. Bring the mixture to a gentle simmer over medium heat.
- Simmer the Soup: Reduce the heat to low and let the soup simmer uncovered for about 20 minutes, stirring occasionally. This will allow the flavors to fully develop and the soup to thicken slightly.
- Season and Blend: Season the soup with salt and pepper to taste. If you prefer a smoother texture, use an immersion blender to puree the soup directly in the pot until it reaches your desired consistency.
- Serve and Garnish: Ladle the soup into bowls and garnish with chopped fresh cilantro and pumpkin seeds for added flavor and texture. Serve hot and enjoy!
Extra Tips:
For a richer flavor, consider roasting fresh pumpkin pieces with a drizzle of olive oil and a sprinkle of spices before pureeing them for the soup. This will add depth and a slightly caramelized taste.
If you like your soup on the spicier side, feel free to increase the amount of cayenne pepper or add a pinch of chili flakes. Additionally, this soup can be prepared in advance and stored in the refrigerator for up to 3 days, making it a convenient option for busy Halloween evenings. Reheat gently on the stove before serving, and add a splash of coconut milk if it needs thinning.
Mummy Meatloaf
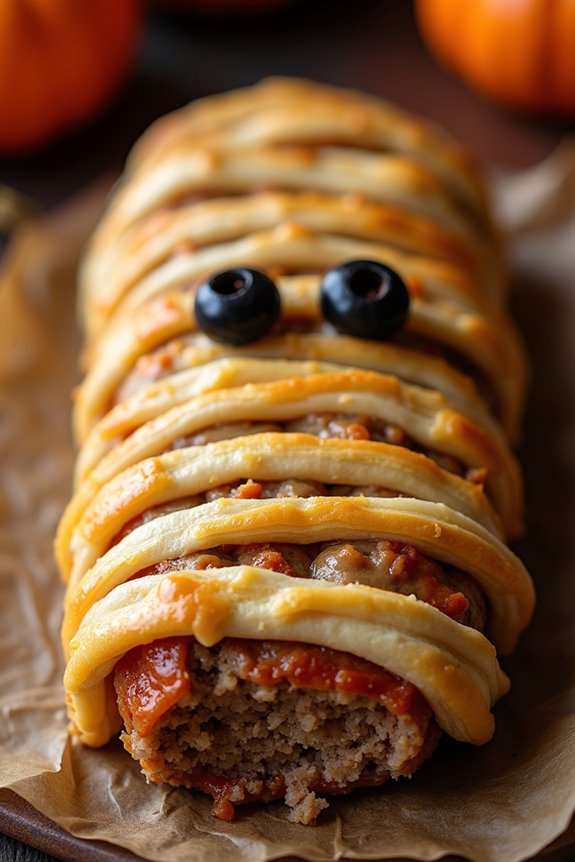
Transform your traditional meatloaf into a spooky centerpiece with this Mummy Meatloaf recipe, perfect for a Halloween dinner that’s both fun and delicious. By wrapping your meatloaf in strips of dough to mimic the look of a mummy, you create a dish that’s certain to delight both kids and adults alike.
Despite its fun appearance, this meatloaf is packed with flavor and nutrients, making it a healthy option for a festive meal. This Mummy Meatloaf is crafted with lean ground beef, vegetables, and a blend of spices to provide a hearty and nutritious dish. The use of phyllo or crescent dough for the mummy wrappings adds a delightful texture without overwhelming calories.
Served with a side of vegetables or a fresh salad, this dish can be the centerpiece of a Halloween-themed dinner for a serving size of 4-6 people.
Ingredients (Serves 4-6):
- 2 pounds lean ground beef
- 1 cup breadcrumbs
- 1/2 cup milk
- 2 eggs
- 1 medium onion, finely chopped
- 1 red bell pepper, finely chopped
- 2 cloves garlic, minced
- 1 tablespoon Worcestershire sauce
- 1 teaspoon salt
- 1/2 teaspoon black pepper
- 1/2 cup ketchup
- 1/4 cup mustard
- 1 package phyllo dough or crescent roll dough
- 2 olives, halved (for eyes)
Instructions:
- Preheat the Oven: Start by preheating your oven to 350°F (175°C). This will guarantee it’s at the right temperature when the meatloaf is ready to be baked.
- Prepare the Meatloaf Mixture: In a large mixing bowl, combine the ground beef, breadcrumbs, milk, eggs, onion, bell pepper, garlic, Worcestershire sauce, salt, and black pepper. Mix thoroughly until all ingredients are well incorporated.
- Shape the Meatloaf: Transfer the meat mixture onto a baking sheet lined with parchment paper. Shape it into an oval loaf, resembling the body of a mummy.
- Mix the Sauce: In a small bowl, combine the ketchup and mustard. Spread this sauce evenly over the top of the meatloaf, adding flavor and helping the dough stick.
- Wrap the Mummy: Take your phyllo or crescent dough and cut into thin strips. Carefully wrap these strips around the meatloaf to mimic mummy bandages, leaving small gaps for a realistic appearance.
- Add the Eyes: Place the olive halves onto the top of the meatloaf to create the mummy’s eyes.
- Bake: Place the wrapped meatloaf in the preheated oven and bake for about 60 minutes, or until the internal temperature reaches 160°F (71°C) and the dough is golden brown.
- Serve: Remove from oven and let it rest for 5 minutes before slicing and serving.
Extra Tips:
For a crispy texture, brush the dough strips with a little melted butter or olive oil before baking. You can also swap the olives with small circles of cheese or even pepperoni for the eyes if preferred.
For a spicier kick, add a bit of hot sauce into the ketchup and mustard mixture. If you’d like to make your mummy meatloaf ahead of time, prepare the meat mixture and refrigerate, then wrap and bake it fresh before serving.
Cauldron Quinoa Salad
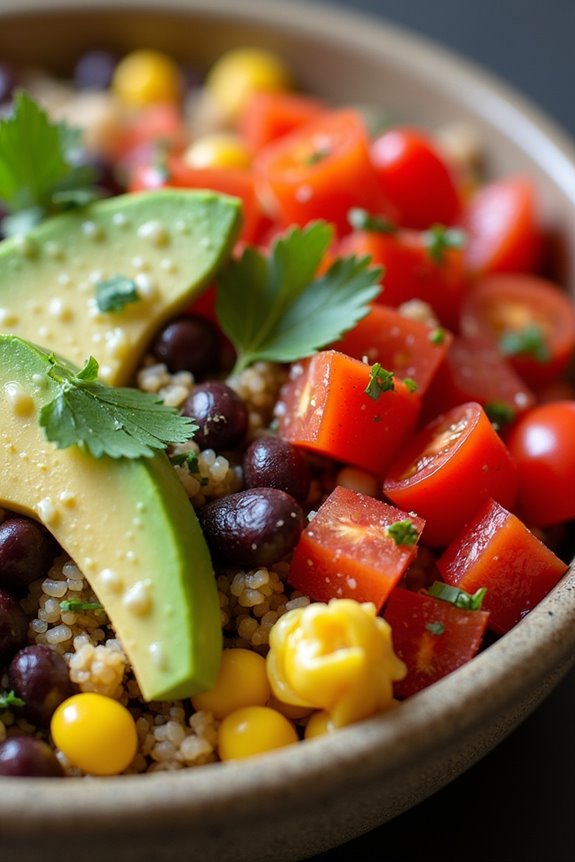
Transform your Halloween dinner table into a feast of flavors and colors with the enchanting Cauldron Quinoa Salad. This vibrant dish is both nutritious and festive, making it a perfect addition to your Healthy Halloween Dinners menu. The combination of quinoa’s nutty taste and the colorful array of vegetables makes this salad not only a visual delight but also a nourishing meal.
Serve it in a large bowl to mimic a bubbling cauldron, and watch your guests be spellbound by its taste and appearance. Packed with protein and fiber, quinoa serves as a perfect base, while the addition of black beans, sweet corn, and fresh vegetables guarantees a balance of flavors and nutrients. The tangy lime dressing adds a zesty kick, tying all the components together in a symphony of taste.
This Cauldron Quinoa Salad is designed to serve 4-6 people, making it a hearty and healthy choice for your spooky celebrations.
Ingredients (serving size: 4-6 people):
- 1 cup quinoa
- 2 cups water or vegetable broth
- 1 can (15 oz) black beans, drained and rinsed
- 1 cup sweet corn kernels (fresh, frozen, or canned)
- 1 red bell pepper, diced
- 1 cup cherry tomatoes, halved
- 1 small red onion, finely chopped
- 1 avocado, diced
- 1/4 cup fresh cilantro, chopped
- Juice of 2 limes
- 3 tablespoons olive oil
- 1 teaspoon ground cumin
- Salt and pepper to taste
Cooking Instructions:
- Rinse the Quinoa: Start by rinsing the quinoa under cold water using a fine-mesh sieve to remove its natural coating, which can taste bitter.
- Cook the Quinoa: In a medium saucepan, combine the rinsed quinoa with 2 cups of water or vegetable broth. Bring to a boil, then reduce the heat to low, cover, and let it simmer for 15 minutes or until the quinoa is tender and the liquid is absorbed.
- Fluff and Cool: Once cooked, remove the quinoa from heat and allow it to sit covered for an additional 5 minutes. Fluff it with a fork and set it aside to cool.
- Prepare the Dressing: In a small bowl, whisk together the lime juice, olive oil, ground cumin, salt, and pepper. Adjust the seasoning according to your taste.
- Combine Ingredients: In a large serving bowl, combine the cooked and cooled quinoa, black beans, sweet corn, red bell pepper, cherry tomatoes, red onion, avocado, and cilantro.
- Dress the Salad: Pour the prepared lime dressing over the quinoa mixture. Gently toss all the ingredients until well combined, making sure the dressing coats the salad evenly.
- Serve: Transfer the salad to a large serving bowl that resembles a cauldron for a thematic touch. Garnish with additional cilantro or lime wedges if desired.
Extra Tips:
To enhance the flavors of the Cauldron Quinoa Salad, prepare it a few hours in advance and let it chill in the refrigerator. This allows the ingredients to marinate and the flavors to meld beautifully.
If you’re preparing it ahead of time, add the avocado just before serving to prevent it from browning. For an extra spooky presentation, serve the salad in a carved-out pumpkin or a black cauldron bowl to captivate your guests and keep the Halloween theme alive.
Ghostly Chicken Chili

Ghostly Chicken Chili is a spooktacular twist on a classic dish, perfect for a Halloween celebration with family and friends. This hearty and flavorful chili is packed with lean chicken, white beans, and a medley of spices that deliver a warming, comforting meal ideal for a chilly autumn night. The ghostly element comes in the form of a creamy, white broth that sets the stage for a hauntingly delicious dinner.
Whether you’re fueling up before a night of trick-or-treating or hosting a Halloween gathering, this Ghostly Chicken Chili will be a hit with both kids and adults alike. Not only is this dish delicious, but it’s also a healthy option that doesn’t skimp on flavor. By using lean chicken and plenty of vegetables, you can enjoy a guilt-free meal that’s both satisfying and nutritious.
The rich, creamy base is achieved without the use of heavy cream, making it a lighter alternative to traditional chili recipes. The addition of white beans provides a boost of protein and fiber, ensuring that everyone stays full and satisfied well into the night. Serve this spooky dish with a side of crusty bread or over a bed of rice to complete the meal.
Ingredients (Serves 4-6):
- 2 tablespoons olive oil
- 1 medium onion, chopped
- 2 garlic cloves, minced
- 1 pound chicken breast, diced
- 1 teaspoon ground cumin
- 1 teaspoon paprika
- 1 teaspoon chili powder
- 1/2 teaspoon cayenne pepper
- Salt and pepper to taste
- 4 cups chicken broth
- 2 cans (15 ounces each) white beans, drained and rinsed
- 1 can (4 ounces) diced green chilies
- 1 cup corn kernels (fresh or frozen)
- 1/2 cup sour cream
- 1/4 cup fresh cilantro, chopped
- Optional toppings: sliced jalapenos, shredded cheese, avocado slices
Cooking Instructions:
- Prepare the Base: Heat the olive oil in a large pot over medium heat. Add the chopped onion and sauté until translucent, about 5 minutes. Stir in the minced garlic and cook for an additional 1 minute until fragrant.
- Cook the Chicken: Add the diced chicken breast to the pot. Season with cumin, paprika, chili powder, cayenne pepper, salt, and pepper. Cook until the chicken is browned and cooked through, about 8-10 minutes.
- Simmer the Chili: Pour in the chicken broth and bring the mixture to a boil. Reduce the heat to low and add the white beans, diced green chilies, and corn. Stir to combine and let the chili simmer for 20 minutes, allowing the flavors to meld together.
- Add Creaminess: Stir in the sour cream, ensuring it’s fully incorporated into the chili. This will give the dish its signature ghostly appearance. Adjust seasoning with more salt and pepper if needed.
- Serve: Ladle the Ghostly Chicken Chili into bowls and garnish with fresh cilantro. Add optional toppings such as sliced jalapenos, shredded cheese, or avocado slices for extra flavor and texture.
Extra Tips:
For an even richer flavor, consider roasting the chicken breast before adding it to the chili. This can add a depth of flavor that complements the spices beautifully.
If you prefer a thicker chili, mash some of the white beans before adding them to the pot. This will naturally thicken the broth without needing additional thickeners.
To save time, you can use rotisserie chicken instead of raw chicken breast. Simply shred the chicken and add it during the simmering step.
Finally, this chili can be made a day in advance, as the flavors often improve overnight, making it an excellent option for meal prep or entertaining.
Monster Mash Shepherd’s Pie

Celebrate Halloween with a fun and nutritious meal by preparing Monster Mash Shepherd’s Pie. This dish combines the comforting elements of a classic shepherd’s pie with a spooky twist, perfect for the holiday. Layered with savory ground meat, a medley of vegetables, and a topping of mashed sweet potatoes, this pie provides both flavor and nutrition. By using sweet potatoes, you not only introduce a vibrant color reminiscent of pumpkins but also boost the dish with vitamins and fiber.
The Monster Mash Shepherd’s Pie is designed to serve 4-6 people, making it ideal for a family dinner or small gathering. The harmonious blend of spices, herbs, and vegetables guarantees that every bite is deliciously ghoulish. Whether you’re hosting a Halloween party or simply want a festive meal, this recipe will surely be a hit. Let’s plunge into the ingredients and steps to create this spooky and satisfying dish.
Ingredients (Serves 4-6):
- 1 tablespoon olive oil
- 1 onion, chopped
- 2 cloves garlic, minced
- 1 pound ground beef or turkey
- 1 teaspoon salt
- 1/2 teaspoon black pepper
- 1 teaspoon dried thyme
- 1 teaspoon smoked paprika
- 2 cups frozen mixed vegetables (peas, carrots, corn)
- 2 tablespoons tomato paste
- 1 cup beef or chicken broth
- 4 large sweet potatoes, peeled and cubed
- 1/4 cup milk
- 2 tablespoons butter
- 1/4 teaspoon nutmeg
- 1/4 cup shredded cheddar cheese (optional)
- Fresh parsley for garnish
Cooking Instructions:
- Prepare the Sweet Potato Mash: Start by boiling a large pot of water. Add the cubed sweet potatoes and cook for about 15-20 minutes until they’re tender. Drain the water and return the sweet potatoes to the pot. Add milk, butter, and nutmeg, and mash until smooth. Set aside.
- Cook the Meat Filling: In a large skillet, heat olive oil over medium heat. Add the chopped onion and minced garlic, sautéing until the onion becomes translucent. Add the ground beef or turkey, salt, black pepper, thyme, and smoked paprika. Cook until the meat is browned and fully cooked.
- Add Vegetables and Sauce: Stir in the frozen mixed vegetables, tomato paste, and broth to the meat mixture. Reduce the heat to low and let it simmer for about 10 minutes until the sauce has thickened and the vegetables are heated through.
- Assemble the Pie: Preheat your oven to 375°F (190°C). In a baking dish, spread the meat and vegetable mixture evenly. Spoon the mashed sweet potatoes over the top, spreading them to cover the filling completely. If desired, sprinkle shredded cheddar cheese over the mashed potatoes for added flavor.
- Bake the Pie: Place the baking dish in the preheated oven and bake for 20-25 minutes until the top is golden and the cheese is melted and bubbly. Remove from the oven and let it cool slightly before serving.
- Garnish and Serve: Garnish the Monster Mash Shepherd’s Pie with fresh parsley before serving. Enjoy your Halloween-themed dinner!
Extra Tips:
For a vegetarian version of Monster Mash Shepherd’s Pie, substitute the ground meat with lentils or a plant-based meat alternative. You can also add other seasonal vegetables, such as zucchini or bell peppers, to the filling for more flavor and nutrition.
If you prefer a creamier mash, consider adding a touch more milk or a dollop of sour cream. To make the dish even more festive, use cookie cutters to shape the mashed sweet potatoes into spooky patterns before baking.
This dish can also be prepared a day in advance and baked before serving, making it a convenient option for a busy Halloween night.
Jack-o’-Lantern Stuffed Squash
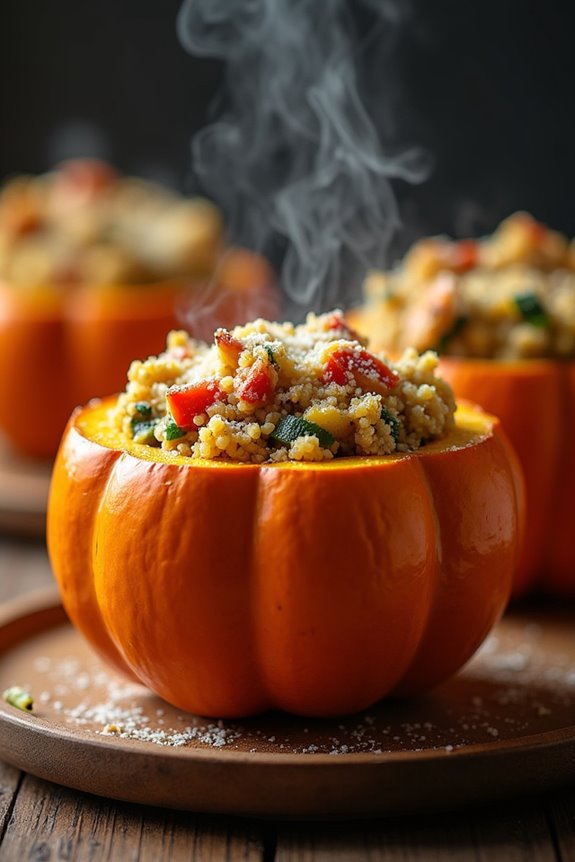
Celebrate a healthy Halloween with a delightful twist on the traditional jack-o’-lantern! The Jack-o’-Lantern Stuffed Squash combines the festive spirit of Halloween with a nutritious meal option that’s both delicious and visually appealing. By hollowing out small pumpkins or squashes and filling them with a savory mixture of grains, vegetables, and spices, this dish is perfect for a family dinner or a hauntingly fun gathering with friends.
Not only does it make for a stunning centerpiece, but it also offers a nutritious alternative to the usual Halloween treats. This recipe is ideal for serving 4-6 people and is a wonderful way to enjoy seasonal produce while incorporating a fun, spooky element into your meal.
You can easily customize the filling to suit your preferences, whether you prefer a vegetarian option or want to add some protein with sausage or ground turkey. The playful presentation and hearty flavors make Jack-o’-Lantern Stuffed Squash a hit with guests of all ages, guaranteeing your Halloween dinner is both memorable and satisfying.
Ingredients for 4-6 servings:
- 4 small pumpkins or acorn squashes
- 1 cup quinoa
- 2 cups vegetable broth
- 1 tablespoon olive oil
- 1 onion, finely chopped
- 2 cloves garlic, minced
- 1 red bell pepper, diced
- 1 zucchini, diced
- 1 cup mushrooms, chopped
- 1 teaspoon dried thyme
- 1 teaspoon dried oregano
- Salt and pepper to taste
- 1/2 cup grated Parmesan cheese
- Optional: 1 cup cooked sausage or ground turkey
Cooking Instructions:
- Prepare the Squash: Preheat your oven to 375°F (190°C). Carefully cut the top off each pumpkin or squash to create a lid. Scoop out the seeds and strings from the inside. Lightly brush the inside of each squash with olive oil and sprinkle with salt and pepper. Place the squashes on a baking sheet and bake for 20 minutes to slightly soften them.
- Cook the Quinoa: While the squashes are baking, rinse the quinoa under cold water. In a medium saucepan, bring the vegetable broth to a boil. Add the quinoa, reduce the heat to low, cover, and let it simmer for about 15 minutes or until the quinoa is cooked and the liquid is absorbed. Fluff with a fork and set aside.
- Sauté the Vegetables: In a large skillet, heat the olive oil over medium heat. Add the chopped onion and garlic, and sauté until the onion becomes translucent. Stir in the red bell pepper, zucchini, and mushrooms. Cook for about 5 minutes, or until the vegetables are tender.
- Combine the Filling: Add the cooked quinoa to the skillet with the vegetables. Stir in the thyme, oregano, salt, and pepper. If using, add in the cooked sausage or ground turkey. Mix well to combine all ingredients.
- Stuff the Squashes: Remove the squashes from the oven. Carefully fill each squash with the quinoa and vegetable mixture. Sprinkle grated Parmesan cheese on top of each stuffed squash.
- Bake the Stuffed Squashes: Place the filled squashes back into the oven and bake for an additional 15-20 minutes, or until the squashes are tender and the cheese is melted and golden brown.
- Serve and Enjoy: Once baked, remove the squashes from the oven. Allow them to cool slightly before serving. Replace the lids for a festive presentation and serve warm.
Extra Tips:
When choosing your pumpkins or squashes, look for ones that are uniform in size to guarantee even cooking. If you’re short on time, you can prepare the filling a day in advance and simply stuff and bake the squashes on the day of your event.
Feel free to experiment with the filling ingredients by incorporating nuts, dried fruits, or different types of cheese to suit your taste. Finally, remember to save the scooped-out seeds for roasting as a healthy snack!
Vampire Veggie Pizza

Vampire Veggie Pizza is a delightful and spooky twist on a classic favorite, perfect for a Halloween dinner that keeps things both fun and nutritious. This dish combines the vibrant colors of fresh vegetables with the rich flavors of a classic pizza, all presented with a playful Halloween theme. Not only is this pizza visually appealing, but it also provides a healthy serving of vitamins and nutrients, making it an excellent choice for a festive family meal.
Crafting a Vampire Veggie Pizza involves using fresh, colorful vegetables to create a vampire face on your pizza. The recipe guarantees that everyone in the family, even the little ghouls and goblins, can enjoy a hearty meal that’s both delicious and engaging. Whether you’re hosting a Halloween party or simply looking to enjoy a themed dinner, this dish is sure to be a hit with both adults and children alike.
Ingredients for 4-6 People:
- 1 large pizza dough
- 1 cup pizza sauce
- 2 cups shredded mozzarella cheese
- 1 red bell pepper
- 1 yellow bell pepper
- 1 small red onion
- 1 cup black olives
- 1 cup cherry tomatoes
- 1 small zucchini
- 1 tablespoon olive oil
- 1 teaspoon dried oregano
- 1 teaspoon garlic powder
- Salt and pepper to taste
Cooking Instructions:
- Preheat the Oven: Begin by preheating your oven to 475°F (245°C). This guarantees that the pizza will cook evenly and the crust will achieve a nice, crispy texture.
- Prepare the Dough: Roll out the pizza dough on a lightly floured surface to your desired thickness. Transfer it onto a baking sheet or pizza stone.
- Add the Sauce: Spread the pizza sauce evenly over the dough, leaving a small border around the edges for the crust.
- Layer the Cheese: Sprinkle the shredded mozzarella cheese over the sauce-covered dough. Guarantee that the cheese is evenly distributed to create a gooey, melty layer.
- Create the Vampire Face: Slice the red and yellow bell peppers into thin strips. Arrange them on the pizza to form the hair and fangs of the vampire. Use slices of red onion to create eyes, halved cherry tomatoes for the nose, and sliced black olives to form the mouth.
- Add Extra Vegetables: Thinly slice the zucchini and arrange it around the vampire face as a collar or additional details. This will add more texture and color to the pizza.
- Season the Pizza: Drizzle olive oil over the top of the pizza, then sprinkle with dried oregano, garlic powder, salt, and pepper.
- Bake the Pizza: Place the pizza in the preheated oven and bake for 12-15 minutes, or until the crust is golden brown and the cheese is bubbling and slightly browned.
- Cool and Serve: Once baked, remove the pizza from the oven and let it cool for a few minutes before slicing. Serve warm and enjoy your Vampire Veggie Pizza.
Extra Tips:
When making your Vampire Veggie Pizza, feel free to get creative with the toppings to customize the vampire’s face to your liking. Consider using different vegetables or adding herbs like basil for more flavor.
If you prefer a thinner crust, roll the dough out to a finer thickness, but be cautious of cooking times as thinner crusts may cook faster. Additionally, for a gluten-free option, substitute the pizza dough with a cauliflower crust. Enjoy the process of decorating your pizza, and let your imagination run wild!
Creepy-Crawly Zucchini Noodles
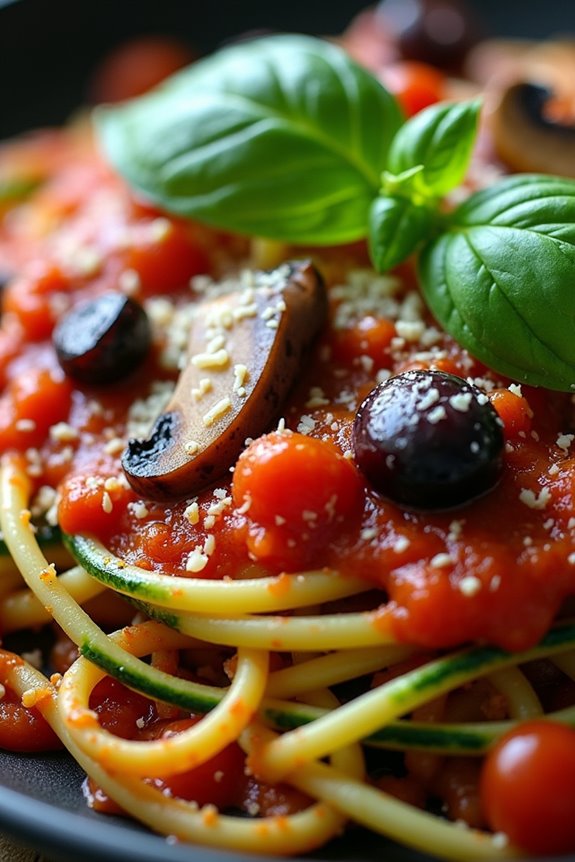
Transform your Halloween dinner into a fun and healthy experience with Creepy-Crawly Zucchini Noodles. This dish offers a spooky twist on the traditional pasta dinner by substituting regular noodles with zucchini noodles, also known as zoodles. The vibrant green color of the zucchini mimics the eerie look of creepy crawlies, while the fresh vegetables and savory sauce make it a delicious and guilt-free meal. Perfect for a festive gathering or a family dinner, this dish will surely be a hit with both kids and adults.
Zucchini noodles are a great low-carb option that pairs well with a variety of ingredients. In this recipe, we’ll be using a savory garlic and tomato sauce to complement the natural flavors of the zucchini. The addition of olives and mushrooms creates a satisfying texture and adds to the creepy appearance of the dish. Served warm, these Creepy-Crawly Zucchini Noodles are a Halloween treat that doesn’t compromise on nutrition or flavor.
Ingredients (Serves 4-6):
- 4 medium zucchinis
- 2 tablespoons olive oil
- 4 cloves garlic, minced
- 1 can (14 oz) diced tomatoes
- 1 cup sliced mushrooms
- 1/2 cup black olives, sliced
- 1 teaspoon dried oregano
- 1 teaspoon dried basil
- Salt and pepper to taste
- 1/4 cup grated Parmesan cheese (optional)
- Fresh basil leaves for garnish
Cooking Instructions:
- Prepare the Zoodles: Use a spiralizer or a julienne peeler to turn the zucchinis into noodles. Set aside in a bowl.
- Sauté the Garlic: In a large skillet, heat the olive oil over medium heat. Add the minced garlic and sauté for about 1-2 minutes until fragrant.
- Cook the Sauce: Add the diced tomatoes (with juice), sliced mushrooms, and black olives to the skillet. Stir in the dried oregano and basil. Let the mixture simmer for 5-7 minutes until the mushrooms are tender and the sauce is slightly thickened. Season with salt and pepper to taste.
- Combine Zoodles and Sauce: Gently add the zucchini noodles to the skillet, tossing them with the tomato sauce until they’re well coated. Cook for 3-4 minutes, stirring occasionally, until the zoodles are tender but still have a slight crunch.
- Serve: Transfer the Creepy-Crawly Zucchini Noodles to a serving platter. Sprinkle with grated Parmesan cheese if using, and garnish with fresh basil leaves.
Extra Tips:
For the best texture, avoid overcooking the zucchini noodles, as they can quickly become mushy. If you don’t have a spiralizer, a julienne peeler or a vegetable peeler can work as well, though the noodles may be slightly wider.
Feel free to add your favorite spooky elements to the dish, like red pepper flakes for a fiery kick or roasted pumpkin seeds for added crunch. This recipe is also easily adjustable for larger gatherings; simply increase the ingredients proportionally. Enjoy your healthy Halloween feast!
Fiendish Fish Tacos

Turn your Halloween dinner into a spooktacular affair with Fiendish Fish Tacos. This recipe combines the fresh and vibrant flavors of fish tacos with a touch of Halloween magic, making it a perfect addition to your festive menu. The recipe utilizes flaky white fish, a variety of colorful vegetables, and a slightly spicy, creamy sauce to create an exciting and healthy dish that will delight both adults and children alike.
The Fiendish Fish Tacos aren’t only delicious but also easy to prepare, making them a great choice for a fun family meal or a Halloween party. With a serving size of 4-6 people, these tacos are perfect for sharing. The dish can be served with spooky sides or simply enjoyed on its own. The combination of textures and flavors will have everyone coming back for more, ensuring your Halloween dinner is a memorable one.
Ingredients (serves 4-6):
- 1 1/2 lbs white fish fillets (such as cod or tilapia)
- 1 tablespoon olive oil
- 1 teaspoon smoked paprika
- 1 teaspoon garlic powder
- 1/2 teaspoon cumin
- Salt and pepper to taste
- 1 cup red cabbage, finely shredded
- 1 cup green cabbage, finely shredded
- 1/2 cup carrots, grated
- 1/4 cup red onion, finely chopped
- 1 jalapeño, finely chopped (optional)
- Juice of 1 lime
- 1/4 cup mayonnaise
- 2 tablespoons sour cream
- 1 teaspoon hot sauce (adjust to taste)
- 8-10 small corn tortillas
- Fresh cilantro leaves for garnish
- Lime wedges for serving
Instructions:
- Prepare the Fish: Preheat your oven to 375°F (190°C). Line a baking sheet with parchment paper. Place the fish fillets on the sheet and drizzle with olive oil. Sprinkle smoked paprika, garlic powder, cumin, salt, and pepper evenly over the fish.
- Bake the Fish: Bake the seasoned fish in the preheated oven for 15-20 minutes, or until the fish is opaque and flakes easily with a fork. Remove from the oven and use a fork to gently break the fish into bite-sized pieces.
- Make the Slaw: In a large bowl, combine the red and green cabbage, carrots, red onion, and jalapeño (if using). Squeeze the juice of one lime over the mixture and toss to combine.
- Prepare the Sauce: In a small bowl, mix together the mayonnaise, sour cream, and hot sauce. Adjust the hot sauce to your preferred level of spiciness.
- Warm the Tortillas: Heat a dry skillet over medium heat. Warm each tortilla in the skillet for about 30 seconds on each side, until soft and pliable.
- Assemble the Tacos: Place a generous amount of the slaw on each tortilla, followed by pieces of the baked fish. Drizzle the creamy sauce on top and garnish with fresh cilantro leaves. Serve immediately with lime wedges on the side.
Extra Tips:
To enhance the flavor of the fish, you can marinate it in lime juice, olive oil, and spices for 20-30 minutes before baking. For a crunchy texture, consider adding some toasted pumpkin seeds or crushed tortilla chips to the slaw.
If you prefer grilled fish, you can cook the fillets on a grill over medium-high heat for about 3-4 minutes per side. Customize the slaw and sauce to your taste by adjusting the spice levels or adding other herbs and spices.
Enjoy these Fiendish Fish Tacos as a festive and nutritious meal that perfectly captures the spirit of Halloween.
Haunted Harvest Bowl
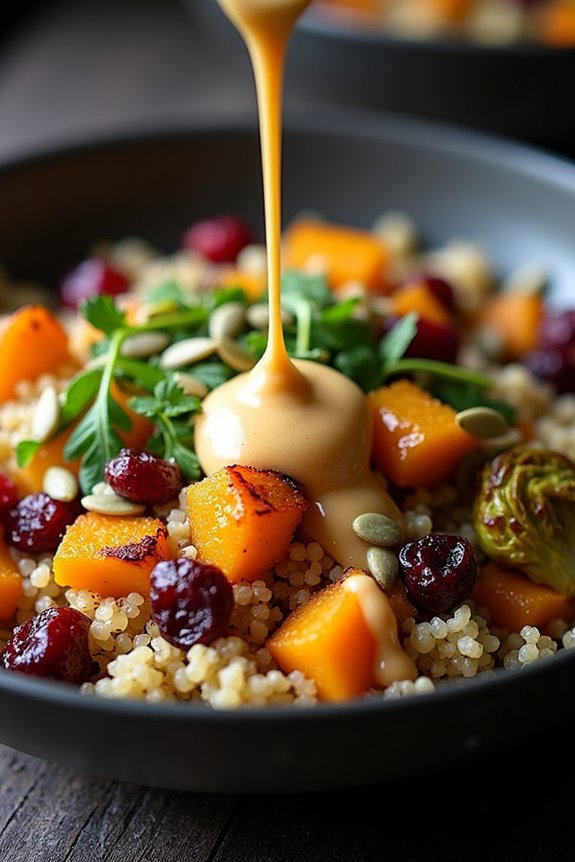
Celebrate Halloween with a spooky twist by serving a Haunted Harvest Bowl, a wholesome and delicious dinner option that keeps the festivities alive while guaranteeing a healthy meal. This dish combines the rich flavors of roasted vegetables, hearty grains, and a zesty dressing to create a satisfying and nourishing meal. Perfect for a Halloween gathering or a fun family dinner, the Haunted Harvest Bowl is sure to be a hit with both adults and kids alike.
Its vibrant colors and seasonal ingredients not only make it visually appealing but also pack a nutritious punch, keeping your energy levels high for all the Halloween fun.
The Haunted Harvest Bowl incorporates a variety of textures and flavors, making it a well-rounded dish that highlights the best of fall produce. Roasted butternut squash and Brussels sprouts add a caramelized sweetness, while quinoa provides a protein-rich base that ties everything together. Topped with a creamy tahini dressing, the bowl is finished with a sprinkle of crunchy pumpkin seeds, adding an extra layer of flavor and nutrition.
This recipe serves 4-6 people, making it ideal for a family meal or a small Halloween party.
Ingredients for 4-6 servings:
- 1 medium butternut squash, peeled and cubed
- 1 pound Brussels sprouts, halved
- 2 tablespoons olive oil
- Salt and pepper to taste
- 1 cup quinoa
- 2 cups vegetable broth
- 1/2 cup dried cranberries
- 1/4 cup pumpkin seeds
- 1/4 cup fresh parsley, chopped
For the Tahini Dressing:
- 1/4 cup tahini
- 2 tablespoons lemon juice
- 1 tablespoon maple syrup
- 1 clove garlic, minced
- 3-4 tablespoons water (to thin)
- Salt to taste
Cooking Instructions:
- Prepare the Vegetables: Preheat your oven to 400°F (200°C). Place the cubed butternut squash and halved Brussels sprouts on a baking sheet. Drizzle with olive oil, and season with salt and pepper. Toss to coat the vegetables evenly.
- Roast the Vegetables: Roast the vegetables in the preheated oven for 25-30 minutes, or until they’re tender and golden brown, stirring halfway through to guarantee even cooking.
- Cook the Quinoa: While the vegetables are roasting, rinse the quinoa under cold water. In a medium saucepan, combine the quinoa and vegetable broth. Bring to a boil, then reduce the heat to low, cover, and simmer for 15 minutes or until the quinoa is cooked and the broth is absorbed. Fluff with a fork and set aside.
- Prepare the Tahini Dressing: In a small bowl, whisk together the tahini, lemon juice, maple syrup, minced garlic, and a pinch of salt. Gradually add water, one tablespoon at a time, until the dressing reaches your desired consistency.
- Assemble the Bowl: In a large serving bowl, combine the cooked quinoa, roasted vegetables, dried cranberries, and chopped parsley. Drizzle with the tahini dressing and toss gently to combine.
- Finish with Pumpkin Seeds: Sprinkle the pumpkin seeds over the top just before serving for added crunch and flavor.
Extra Tips:
For a more festive presentation, consider serving the Haunted Harvest Bowl in hollowed-out mini pumpkins or squash bowls. You can also customize the bowl with additional toppings like feta cheese or avocado for extra creaminess.
Adjust the tahini dressing to your taste by adding more lemon juice for tanginess or maple syrup for sweetness. Remember to taste and season with salt as needed to balance the flavors.
This dish isn’t only a treat for the taste buds but also a feast for the eyes, perfect for a healthy Halloween celebration.
Bewitching Beet Burgers

Elevate your Halloween dinner with these vibrant and healthy Bewitching Beet Burgers. Perfect for a spooky gathering or a festive family meal, these burgers offer a delightful combination of earthy beets, hearty black beans, and aromatic spices. Packed with nutrients and bursting with flavor, these beet burgers are a nutritious alternative to traditional meat patties, making them a hit among both vegetarians and meat-lovers alike.
These beet burgers not only captivate with their rich color but also provide a satisfying texture that will leave everyone wanting more. Whether served with a side of sweet potato fries or nestled in a whole-grain bun with your favorite toppings, these burgers are sure to charm your taste buds. Let’s craft a spellbinding meal that balances health with indulgence for a Halloween dinner to remember.
Ingredients (Serves 4-6):
- 2 large beets, peeled and grated
- 1 can (15 oz) black beans, drained and rinsed
- 1 cup cooked quinoa
- 1/2 cup rolled oats
- 1/2 cup breadcrumbs
- 1 small red onion, finely chopped
- 2 cloves garlic, minced
- 1 tablespoon olive oil
- 1 tablespoon soy sauce
- 1 teaspoon ground cumin
- 1 teaspoon smoked paprika
- 1/2 teaspoon salt
- 1/4 teaspoon black pepper
- 1 egg (or flax egg for vegan option)
- Olive oil spray for cooking
Cooking Instructions:
- Prepare the Ingredients: Begin by peeling and grating the beets, finely chopping the onion, and mincing the garlic. Preheat the oven to 375°F (190°C) and line a baking sheet with parchment paper.
- Cook Quinoa: If not already cooked, prepare the quinoa according to package instructions. Once cooked, set aside to cool.
- Mash the Black Beans: In a large mixing bowl, mash the black beans with a fork or potato masher until mostly smooth, leaving some beans whole for texture.
- Combine Ingredients: Add the grated beets, cooked quinoa, onion, garlic, rolled oats, breadcrumbs, olive oil, soy sauce, ground cumin, smoked paprika, salt, and pepper to the mashed beans. Mix well to combine.
- Bind the Mixture: Add the egg (or flax egg) to the mixture and stir until everything is evenly incorporated. The mixture should be sticky but hold together when pressed.
- Form the Patties: Using your hands, shape the mixture into patties, about 1/2 inch thick. You should get 4-6 patties depending on size preference.
- Cook the Burgers: Heat a non-stick skillet over medium heat and lightly spray with olive oil. Cook the beet burgers for about 3-5 minutes on each side, until they develop a golden crust. Alternatively, bake them on the prepared baking sheet for 20-25 minutes, flipping halfway through.
- Serve: Once cooked, serve the beet burgers on buns with your choice of toppings such as lettuce, tomato, avocado, and a spread of hummus or spicy mayo.
Extra Tips:
For the best texture, verify the beets are grated finely, and the black beans are well-mashed to help bind the patties. If the mixture feels too wet, add a bit more breadcrumbs or oats.
These burgers can be made ahead of time and stored in the refrigerator for up to three days or frozen for later use. When reheating, allow them to thaw completely if frozen, and warm them up in a skillet to regain their crispy texture. Enjoy your healthy, Halloween-themed meal with family and friends!
Franken-tastic Stuffed Mushrooms

Franken-tastic Stuffed Mushrooms are a spook-tacular addition to your Halloween dinner table! These delightful bites aren’t only visually appealing, resembling little Frankenstein heads, but they’re also packed with nutrients and flavor. Perfect for setting the mood on a chilly October evening, these stuffed mushrooms combine the earthy taste of mushrooms with a savory filling that will tantalize your taste buds.
Whether you’re hosting a Halloween bash or simply enjoying a themed meal with family, these stuffed mushrooms will surely be a hit among guests of all ages. The beauty of this dish lies in its simplicity and flexibility. You can prepare the Franken-tastic Stuffed Mushrooms ahead of time and bake them just before serving, making it convenient for any busy host.
The filling, made from a blend of fresh ingredients, brings out the natural flavors of the mushrooms, while a touch of creativity with decoration turns these mushrooms into amusing little Frankensteins. Get ready to impress your guests with a dish that’s as fun to look at as it’s delicious to eat!
Ingredients (Serves 4-6):
- 24 large button mushrooms
- 1 tablespoon olive oil
- 1 medium onion, finely chopped
- 2 cloves garlic, minced
- 1 red bell pepper, finely chopped
- 1/2 cup breadcrumbs
- 1/2 cup grated Parmesan cheese
- 1/4 cup chopped fresh parsley
- Salt and pepper to taste
- 1 egg, lightly beaten
- 1/4 cup cream cheese, softened
- Black olives, sliced (for decoration)
- Chives (for decoration)
Cooking Instructions:
- Preheat the Oven: Start by preheating your oven to 375°F (190°C). This will guarantee that your mushrooms bake evenly and achieve the perfect texture.
- Prepare the Mushrooms: Remove the stems from the mushrooms and set them aside. Clean the mushroom caps with a damp paper towel to remove any dirt. Place the caps on a baking sheet lined with parchment paper.
- Make the Filling: Heat the olive oil in a pan over medium heat. Add the chopped onion and garlic, sautéing until the onion becomes translucent. Add the red bell pepper and continue to cook for another 3-4 minutes until soft.
- Combine Ingredients: Finely chop the reserved mushroom stems. In a mixing bowl, combine the sautéed vegetables, chopped mushroom stems, breadcrumbs, Parmesan cheese, parsley, salt, pepper, beaten egg, and cream cheese. Mix until all ingredients are well combined.
- Stuff the Mushrooms: Spoon the filling into each mushroom cap, pressing gently to confirm it’s compact and won’t spill over during baking.
- Bake the Mushrooms: Place the stuffed mushrooms in the preheated oven and bake for 20-25 minutes, or until the tops are golden brown and the mushrooms are tender.
- Decorate: Once baked, let the mushrooms cool slightly. Use slices of black olives to create eyes and small pieces of chives for hair, giving each mushroom a fun Frankenstein face.
Extra Tips:
When preparing Franken-tastic Stuffed Mushrooms, feel free to experiment with the ingredients. You can add chopped nuts or different herbs to the filling for an additional burst of flavor.
It’s important to clean the mushrooms gently to keep them intact, and if they’re particularly large, you may need to adjust the baking time slightly. Finally, if you’re making these in advance, simply prepare the mushrooms and filling, then stuff and store them in the refrigerator until you’re ready to bake. This way, you can enjoy the festivities without being tied to the kitchen!