
Halloween is creeping up, and I’ve got some spooktacular cookie ideas that are perfect for your festive gatherings. From Ghoulish Ghost Cookies with their adorably spooky expressions to Bloodshot Eyeball Cookies that’ll keep everyone intrigued, there’s something for every Halloween lover. And don’t forget the Creepy Crawly Spider Cookies, adding just the right amount of eerie fun. These treats are bound to enchant your guests. Ready to discover more hauntingly delicious creations?
Ghoulish Ghost Cookies

Ghoulish Ghost Cookies are the perfect spooky treat for any Halloween celebration. These delightful cookies aren’t only fun to make, but they also bring a bit of eerie charm to your table. With their ghostly shape and a touch of sweetness, they’ll surely be a hit with both kids and adults.
The cookies are decorated with a simple sugar glaze to give them a hauntingly beautiful finish, and a few chocolate chips are used to create the ghostly faces. Whether you’re hosting a Halloween party or just enjoying a festive baking day, these cookies are sure to add a ghostly touch to your festivities.
To make these Ghoulish Ghost Cookies, you’ll need to start with a basic sugar cookie dough, which will be rolled out and cut into ghost shapes. Once baked to perfection, the cookies are cooled before being decorated with a smooth icing glaze. This recipe is designed to serve 4-6 people, offering plenty of ghostly treats for everyone.
Ingredients:
- 2 3/4 cups all-purpose flour
- 1 teaspoon baking powder
- 1/2 teaspoon salt
- 1 cup unsalted butter, softened
- 1 1/2 cups granulated sugar
- 1 large egg
- 1 teaspoon vanilla extract
- 1/2 teaspoon almond extract
- 1 1/2 cups powdered sugar
- 2-3 tablespoons milk
- 1 teaspoon vanilla extract (for glaze)
- Chocolate chips (for decorating)
Instructions:
- Prepare the Dough: In a medium bowl, whisk together the flour, baking powder, and salt. In a large bowl, beat the softened butter and granulated sugar together until light and fluffy. Add the egg, vanilla extract, and almond extract, and mix until well combined. Gradually add the dry ingredients to the wet ingredients, mixing until a dough forms.
- Chill the Dough: Divide the dough into two portions, flatten each into a disk, wrap in plastic wrap, and refrigerate for at least 1 hour. This will make the dough easier to roll out and cut.
- Preheat the Oven: Preheat your oven to 350°F (175°C) and line two baking sheets with parchment paper.
- Roll and Cut the Dough: On a lightly floured surface, roll out one disk of dough to about 1/4 inch thickness. Use a ghost-shaped cookie cutter to cut out the cookies. Place them on the prepared baking sheets, leaving some space between each cookie.
- Bake the Cookies: Bake the cookies in the preheated oven for 8-10 minutes, or until the edges are lightly golden. Allow the cookies to cool on the baking sheets for a few minutes before transferring them to a wire rack to cool completely.
- Prepare the Glaze: In a small bowl, mix the powdered sugar, milk, and vanilla extract until smooth. Adjust the consistency as needed by adding more milk or powdered sugar.
- Decorate the Cookies: Once the cookies are completely cool, use a spoon or a small piping bag to spread or pipe the glaze over the cookies. Place chocolate chips on the glaze to create the eyes and mouth of the ghosts. Allow the glaze to set before serving.
Extra Tips: When rolling out the dough, it’s important to work quickly to prevent it from becoming too soft, which can make it difficult to handle. If you find the dough is getting too sticky, simply return it to the refrigerator for a few minutes to firm up.
For a more intense vanilla flavor, consider using vanilla bean paste in the glaze. Additionally, if you’re short on time, you can prepare the dough in advance and freeze it for up to a month, then simply thaw and bake as needed.
Creepy Crawly Spider Cookies

Halloween is the perfect time to get creative in the kitchen, and what better way to celebrate than with some Creepy Crawly Spider Cookies? These delicious treats aren’t only festive but also fun to make with family and friends. The cookies are topped with edible spiders made from chocolate and candy, making them a delightful addition to any Halloween party or event.
Whether you’re looking to impress your guests or simply want to enjoy some spooky sweets, these cookies are bound to be a hit.
The Creepy Crawly Spider Cookies aren’t just about appearance; they’re also incredibly tasty. The base of the cookie is a rich, buttery dough that pairs perfectly with the chocolatey spiders on top. The combination of textures and flavors makes for a delectable treat that children and adults alike will enjoy.
This recipe is designed to serve 4-6 people, but can easily be doubled if you’re expecting a larger crowd.
Ingredients (serves 4-6):
- 1 cup unsalted butter, softened
- 1 cup granulated sugar
- 1 cup brown sugar, packed
- 2 large eggs
- 1 teaspoon vanilla extract
- 3 cups all-purpose flour
- 1 teaspoon baking soda
- 1/2 teaspoon salt
- 1 cup semi-sweet chocolate chips
- 1 cup chocolate-covered peanuts or malt balls
- 1 cup mini chocolate chips
- Edible candy eyes
Cooking Instructions:
- Preheat the Oven: Start by preheating your oven to 350°F (175°C). This will guarantee that the cookies bake evenly.
- Prepare the Dough: In a large mixing bowl, cream together the softened butter, granulated sugar, and brown sugar until light and fluffy. Add the eggs one at a time, mixing well after each addition. Stir in the vanilla extract.
- Mix Dry Ingredients: In a separate bowl, whisk together the all-purpose flour, baking soda, and salt.
- Combine Ingredients: Gradually add the dry ingredients to the wet ingredients, mixing until just combined. Stir in the semi-sweet chocolate chips.
- Shape the Cookies: Scoop tablespoon-sized amounts of dough onto a baking sheet lined with parchment paper, leaving enough space between each cookie to allow for spreading.
- Bake the Cookies: Place the baking sheet in the preheated oven and bake for 10-12 minutes, or until the edges of the cookies are golden brown.
- Create the Spiders: While the cookies are still warm, press a chocolate-covered peanut or malt ball into the center of each cookie. Arrange eight mini chocolate chips around each “body” to form spider legs.
- Add the Eyes: Use a small amount of melted chocolate or frosting to attach edible candy eyes to each spider body.
- Cool and Serve: Allow the cookies to cool on the baking sheet for a few minutes before transferring them to a wire rack to cool completely. Serve and enjoy your Creepy Crawly Spider Cookies!
Extra Tips:
When making Creepy Crawly Spider Cookies, it’s important to work quickly when adding the spiders, as the cookies need to be warm for the chocolate-covered peanuts to adhere properly.
If the cookies cool too much, you can gently reheat them in the oven for a minute to soften them up again. Additionally, feel free to experiment with different types of candy for the spider bodies and eyes to suit your taste and creativity.
Happy Halloween baking!
Bloodshot Eyeball Cookies

Halloween is the perfect time to embrace all things spooky and eerie, and what better way to do that than with a batch of Bloodshot Eyeball Cookies? These creepy treats are sure to be a hit at any Halloween gathering, combining delicious sugar cookies with a hauntingly realistic design. The cookies resemble bloodshot eyeballs, complete with a vibrant red icing and a candy “iris” to complete the effect.
Perfect for a themed party or just for some festive fun, these cookies are both visually striking and delightfully tasty.
To make your own Bloodshot Eyeball Cookies, you’ll begin by preparing a classic sugar cookie dough. This dough will be rolled into balls to form the base of the eyeballs. Once baked, the cookies are topped with a white icing to mimic the sclera of the eye, and a colored candy is used for the iris. To create the bloodshot effect, red icing is piped around the edges, creating a chilling appearance that’s perfect for Halloween.
This recipe yields approximately 24 cookies, making it suitable for a serving size of 4-6 people.
Ingredients:
- 2 1/2 cups all-purpose flour
- 1 cup unsalted butter, softened
- 1 cup granulated sugar
- 1 large egg
- 1 teaspoon vanilla extract
- 1/2 teaspoon baking powder
- 1/4 teaspoon salt
- 2 cups powdered sugar
- 3-4 tablespoons milk
- Red food coloring
- Assorted colored candies (like M&M’s or Skittles)
- Black edible marker or gel for detailing
Instructions:
- Prepare the Dough: In a large mixing bowl, beat together the softened butter and granulated sugar until light and fluffy. Add the egg and vanilla extract, mixing until well combined. In a separate bowl, whisk together the flour, baking powder, and salt. Gradually add the dry ingredients to the wet ingredients, mixing until a dough forms.
- Shape the Cookies: Preheat your oven to 350°F (175°C). Roll the dough into small balls, approximately 1 inch in diameter, and place them on a baking sheet lined with parchment paper. Gently flatten each ball with your hand.
- Bake the Cookies: Place the baking sheet in the preheated oven and bake for 10-12 minutes, or until the edges are lightly golden. Remove from the oven and allow the cookies to cool completely on a wire rack.
- Prepare the Icing: In a medium bowl, mix the powdered sugar with 3 tablespoons of milk to create a smooth icing. Add more milk if necessary to reach the desired consistency. Divide the icing into two portions, coloring one portion with a few drops of red food coloring.
- Decorate the Cookies: Once the cookies are cool, spread a layer of white icing on each cookie. Place a colored candy in the center of each cookie to represent the iris. Using a small piping bag or a plastic bag with the corner snipped off, pipe red icing around the edges to create the bloodshot effect.
- Add Details: Use an edible black marker or gel to add a small dot in the center of the candy, completing the pupil of the eyeball.
- Allow to Set: Let the icing set completely before serving, ensuring the decorations stay intact.
Extra Tips:
To make your Bloodshot Eyeball Cookies even spookier, consider using different colored candies for a variety of eye colors, or add a touch of dark chocolate or cocoa powder to the dough for a richer flavor.
When piping the red icing, practice on a spare piece of parchment to get the right consistency and design. If your cookies spread too much during baking, chill the dough balls for 15 minutes before shaping and baking.
Store the cookies in an airtight container to keep them fresh and delicious until your Halloween festivities begin!
Wicked Witch Hat Cookies

Wicked Witch Hat Cookies are a delightful treat perfect for adding a touch of magic to your Halloween festivities. These whimsical cookies not only look enchanting with their pointed hats and vibrant colors, but they also taste delicious with a combination of sweet and rich flavors. Ideal for a Halloween party or just a fun baking project with the family, these cookies will surely cast a spell on all who taste them.
Crafted with ingredients that are easy to find, these cookies bring together the best of Halloween creativity and baking. The process of making Wicked Witch Hat Cookies is straightforward, making it a great recipe for bakers of all skill levels. With a little bit of imagination and some simple ingredients, you can create a batch of cookies that are as charming as they’re tasty.
The cookies are shaped like witch hats and decorated with colorful icing and candies to give them a festive look. Whether you’re serving them at a Halloween gathering or giving them as gifts, these cookies are sure to be a hit.
Ingredients for Wicked Witch Hat Cookies (serving size: 4-6 people):
- 1 cup unsalted butter, softened
- 1 cup granulated sugar
- 1 large egg
- 1 teaspoon vanilla extract
- 2 1/2 cups all-purpose flour
- 1 teaspoon baking powder
- 1/2 teaspoon salt
- Black food coloring
- 1 cup dark chocolate chips
- 1/2 cup heavy cream
- Candy melts (in Halloween colors such as orange, purple, and green)
- Assorted Halloween candies (like candy corn or small chocolate candies)
Instructions:
- Prepare the Dough: In a large mixing bowl, cream together the softened butter and granulated sugar until light and fluffy. Add the egg and vanilla extract, and mix well until combined. In a separate bowl, whisk together the flour, baking powder, and salt. Gradually add the dry ingredients to the wet ingredients, mixing until the dough comes together.
- Add Color and Chill: Add black food coloring to the dough and knead until you achieve a uniform color throughout. Wrap the dough in plastic wrap and refrigerate for at least 1 hour. This will make the dough easier to handle and shape.
- Shape and Bake: Preheat your oven to 350°F (175°C). Roll out the chilled dough on a lightly floured surface to a thickness of about 1/4 inch. Use a round cookie cutter to cut out circles, which will form the base of the witch hats. Place the circles on a baking sheet lined with parchment paper. Bake for 8-10 minutes, or until the edges are lightly golden. Remove from the oven and let cool completely.
- Create the Hat Tips: While the bases are cooling, make the hat tips. Melt the dark chocolate chips and heavy cream together in a microwave-safe bowl, stirring every 30 seconds until smooth. Let the mixture cool slightly, then transfer it to a piping bag. Pipe small mounds onto a parchment-lined tray, shaping them into pointed cone-like tips. Refrigerate until set.
- Assemble the Hats: Once the hat tips are set, melt the candy melts according to package instructions. Attach the chocolate hat tips to the cookie bases using a small dab of melted candy as glue. Decorate the hats with additional melted candy melts and assorted candies to create festive designs.
Extra Tips:
When making Wicked Witch Hat Cookies, it’s crucial to use gel-based food coloring for a more vibrant and saturated black hue without altering the dough’s consistency. If your dough becomes too sticky to work with, dust your work surface with a little extra flour or chill the dough briefly to firm it up.
For an extra touch of whimsy, consider adding edible glitter or sprinkles to the hats. Store the cookies in an airtight container to keep them fresh and prevent them from softening. Enjoy the magical process and have fun experimenting with different colors and decorations!
Haunted House Gingerbread Cookies

Haunted House Gingerbread Cookies are a spooky twist on the classic gingerbread house, perfect for celebrating Halloween with family and friends. These intricately decorated cookies combine the rich, spicy flavors of gingerbread with the creativity of a haunted house theme. Not only do they serve as a delicious treat, but they also make for a fun and engaging activity to share with loved ones during the Halloween season.
Creating Haunted House Gingerbread Cookies involves making a sturdy, flavorful gingerbread dough that can hold its shape, and then decorating it with royal icing and spooky embellishments. This recipe serves 4-6 people, guaranteeing there’s enough for everyone to enjoy. Each bite is a delightful mix of spice and sweetness, with the added excitement of custom decorations that bring each haunted house to life.
Ingredients:
- 3 1/4 cups all-purpose flour
- 3/4 teaspoon baking soda
- 1 tablespoon ground ginger
- 1 tablespoon ground cinnamon
- 1/2 teaspoon ground cloves
- 1/4 teaspoon ground nutmeg
- 1/4 teaspoon salt
- 3/4 cup unsalted butter, softened
- 1/2 cup packed dark-brown sugar
- 1 large egg
- 1/2 cup unsulfured molasses
- 2 teaspoons vanilla extract
- Royal icing (for decoration)
- Edible decorations (e.g., candy eyes, colored sugar, sprinkles)
Instructions:
- Prepare the Dough: In a large bowl, whisk together the flour, baking soda, ginger, cinnamon, cloves, nutmeg, and salt. In a separate bowl, beat the butter and brown sugar with an electric mixer until light and fluffy. Add the egg, molasses, and vanilla extract, mixing until well combined.
- Combine Ingredients: Gradually add the dry ingredients to the wet ingredients, mixing until a dough forms. Divide the dough in half, flatten each piece into a disk, wrap them in plastic wrap, and refrigerate for at least 1 hour or until firm.
- Preheat Oven: Preheat your oven to 350°F (175°C). Line baking sheets with parchment paper.
- Roll Out the Dough: On a lightly floured surface, roll out one disk of dough to about 1/4-inch thickness. Use a haunted house cookie cutter or a knife to cut out shapes. Repeat with the remaining dough.
- Bake the Cookies: Place the cut-out cookies onto the prepared baking sheets, spacing them about 1 inch apart. Bake for 8-10 minutes or until the edges are firm and the centers are set. Let them cool completely on wire racks.
- Decorate: Once cooled, use royal icing to decorate the cookies, creating spooky designs like cobwebs, ghosts, or jack-o’-lantern faces. Add edible decorations to bring your haunted houses to life.
- Set the Icing: Allow the decorated cookies to sit at room temperature until the icing is completely set, about 2 hours.
Extra Tips:
When working with gingerbread dough, it’s crucial to keep it chilled to prevent sticking and make sure it holds its shape during baking. If the dough becomes too soft as you work with it, simply return it to the refrigerator for a few minutes.
For a more stable structure, use a thicker royal icing to “glue” pieces together and let it dry completely before adding additional decorations. Have fun with your designs—let your imagination run wild with spooky and creative ideas for your Haunted House Gingerbread Cookies!
Mummy Wrapped Cookies

Mummy Wrapped Cookies are a fun and spooky treat perfect for Halloween celebrations. These cookies aren’t only delicious but also visually appealing with their mummy-like appearance. The concept is simple: cookies wrapped with strips of icing that resemble mummy bandages. They make a delightful addition to any Halloween party, providing both a sweet treat and a bit of festive flair.
To create the perfect Mummy Wrapped Cookies, you’ll need a basic sugar cookie base and some creative decorating skills. The sugar cookies provide the ideal canvas for the mummy design, which is achieved through carefully piping white icing onto the cooled cookies. This recipe yields about 24-30 cookies, making it perfect for serving a group of 4-6 people, depending on how many cookies each person enjoys.
Ingredients
- 2 ¾ cups all-purpose flour
- 1 teaspoon baking soda
- ½ teaspoon baking powder
- 1 cup unsalted butter, softened
- 1 ½ cups white sugar
- 1 egg
- 1 teaspoon vanilla extract
- ¼ teaspoon almond extract
- 2 tablespoons milk
- White icing (store-bought or homemade)
- Edible candy eyes
Instructions
- Preheat and Prepare: Preheat your oven to 375°F (190°C). Line two baking sheets with parchment paper or silicone baking mats to prevent sticking.
- Mix Dry Ingredients: In a medium-sized bowl, whisk together the flour, baking soda, and baking powder. Set aside.
- Cream Butter and Sugar: In a large bowl, cream together the softened butter and sugar until light and fluffy. This should take about 2-3 minutes using an electric mixer.
- Add Wet Ingredients: Beat in the egg, vanilla extract, and almond extract until fully combined. Slowly add in the milk, mixing until smooth.
- Combine Dry and Wet Ingredients: Gradually add the dry ingredients to the butter mixture, stirring until just combined. Be careful not to overmix.
- Shape the Cookies: Scoop tablespoon-sized amounts of dough and roll them into balls. Place them on the prepared baking sheets about 2 inches apart to allow for spreading.
- Bake: Bake in the preheated oven for 8-10 minutes, or until the edges are slightly golden. Remove from the oven and allow cookies to cool on the baking sheets for a few minutes before transferring them to wire racks to cool completely.
- Decorate: Once cooled, use a piping bag fitted with a small round tip to pipe strips of white icing across each cookie, mimicking mummy bandages. Leave small gaps for the eyes. Place two candy eyes on each cookie to complete the mummy effect.
Extra Tips
When preparing the icing, verify it’s at the right consistency for piping. If it’s too thick, add a little water; if it’s too thin, add a bit more powdered sugar.
When decorating, start with a few practice cookies to get comfortable with the piping technique. If you don’t have a piping bag, a resealable plastic bag with the corner snipped off works as a great alternative.
Finally, store any leftover cookies in an airtight container to keep them fresh and delicious.
Jack-o’-Lantern Sugar Cookies

Celebrate the spirit of Halloween with these delightful Jack-o’-Lantern Sugar Cookies. Perfect for a festive gathering or a fun family baking activity, these cookies aren’t only a treat for the taste buds but also a feast for the eyes. With their iconic pumpkin shape and vibrant orange icing, these cookies capture the essence of the season.
Whether you’re an experienced baker or a novice in the kitchen, this recipe is certain to bring smiles to everyone who takes a bite. Crafted to serve 4-6 people, this recipe balances a buttery, sweet flavor with a delightful crunch. The cookies are shaped into charming jack-o’-lanterns using a simple cookie cutter, and the decoration process allows for endless creativity.
You can choose to make them as simple or as detailed as you like. Brighten up your Halloween party or surprise your loved ones with these cheerful and delicious cookies!
Ingredients (serves 4-6):
- 2 3/4 cups all-purpose flour
- 1 teaspoon baking soda
- 1/2 teaspoon baking powder
- 1 cup unsalted butter, softened
- 1 1/2 cups white sugar
- 1 egg
- 1 teaspoon vanilla extract
- 1/2 teaspoon almond extract
- Orange food coloring
- Black icing or edible gel
- Pumpkin-shaped cookie cutter
Instructions:
- Preheat and Prepare: Preheat your oven to 375°F (190°C). Line two baking sheets with parchment paper to prevent sticking and guarantee even baking.
- Mix Dry Ingredients: In a medium-sized bowl, combine the all-purpose flour, baking soda, and baking powder. Stir together until well mixed.
- Cream Butter and Sugar: In a large mixing bowl, cream together the softened butter and white sugar until the mixture is light and fluffy. This should take about 3-4 minutes using an electric mixer on medium speed.
- Add Wet Ingredients: Beat in the egg, vanilla extract, and almond extract to the creamed butter and sugar mixture. Mix until everything is fully incorporated.
- Combine Ingredients: Gradually add the dry ingredients to the wet ingredients, mixing on low speed until a soft dough forms. Add orange food coloring to the dough and mix until the desired shade is reached.
- Roll and Cut Dough: On a lightly floured surface, roll out the dough to about 1/4 inch thickness. Use a pumpkin-shaped cookie cutter to cut out cookies and place them onto the prepared baking sheets, leaving space between each cookie.
- Bake: Bake the cookies in the preheated oven for 8-10 minutes or until the edges are just starting to turn golden. Remove from the oven and let them cool on the baking sheet for a few minutes before transferring to a wire rack to cool completely.
- Decorate: Once the cookies have cooled, use black icing or edible gel to draw jack-o’-lantern faces on each cookie. Get creative with your designs!
Extra Tips:
For an extra flavor boost, consider adding a pinch of cinnamon or nutmeg to the dough to give your Jack-o’-Lantern Sugar Cookies a subtle, autumnal spice.
If you want to save time, the cookie dough can be prepared a day in advance and stored in the refrigerator, tightly wrapped, until you’re ready to bake. Rolling the dough between two sheets of parchment paper can also help prevent sticking and make cleanup easier. Enjoy your Halloween baking!
Monster Mashup Cookies

Monster Mashup Cookies are the perfect treat to add a spooky twist to your Halloween festivities. These cookies aren’t only delicious but also fun to make, combining different flavors and textures to create a delightful surprise in every bite. With a gooey, chewy center and crisp edges, these cookies bring together the best of both worlds, making them a hit with kids and adults alike.
Whether you’re hosting a Halloween party or just looking for a fun baking project to enjoy with your family, these Monster Mashup Cookies are bound to be a crowd-pleaser.
The secret to these cookies lies in their colorful and monstrous appearance. By incorporating a variety of mix-ins like chocolate chips, candies, and nuts, you can customize the cookies to suit your taste and create an eye-catching display.
The contrasting colors and textures make them not just a treat for the taste buds but also for the eyes. With a little creativity and a dash of imagination, you can transform a simple cookie dough into a spooky masterpiece that’s perfect for any Halloween gathering.
Ingredients (Serves 4-6 people):
- 1 cup unsalted butter, softened
- 1 cup granulated sugar
- 1 cup brown sugar, packed
- 2 large eggs
- 1 teaspoon vanilla extract
- 2 ¾ cups all-purpose flour
- 1 teaspoon baking soda
- ½ teaspoon baking powder
- ½ teaspoon salt
- 1 cup semisweet chocolate chips
- 1 cup candy-coated chocolate pieces (e.g., M&Ms)
- ½ cup mini marshmallows
- ½ cup chopped nuts (optional)
- Assorted food coloring (optional)
Cooking Instructions:
- Preheat the Oven: Preheat your oven to 350°F (175°C) and line a baking sheet with parchment paper to prevent the cookies from sticking.
- Cream the Butter and Sugars: In a large mixing bowl, beat together the softened butter, granulated sugar, and brown sugar until the mixture is creamy and smooth.
- Add the Wet Ingredients: Mix in the eggs one at a time, confirming each egg is fully incorporated before adding the next. Stir in the vanilla extract.
- Combine the Dry Ingredients: In a separate bowl, whisk together the flour, baking soda, baking powder, and salt. Gradually add this dry mixture to the wet ingredients, mixing until just combined to avoid overworking the dough.
- Create the Monster Mix: Gently fold in the chocolate chips, candy-coated chocolate pieces, mini marshmallows, and chopped nuts (if using). If desired, divide the dough into portions and mix in a few drops of food coloring to create vibrant, monster-like colors.
- Shape the Cookies: Scoop tablespoon-sized portions of the dough onto the prepared baking sheet, leaving enough space between each cookie to allow for spreading during baking.
- Bake: Place the baking sheet in the preheated oven and bake for 10-12 minutes, or until the edges are lightly golden. Be careful not to overbake as the centers should remain soft.
- Cool and Serve: Allow the cookies to cool on the baking sheet for a few minutes before transferring them to a wire rack to cool completely. Serve and enjoy your spooky Monster Mashup Cookies!
Extra Tips:
For an extra spooky touch, you can add edible googly eyes or decorate the cookies with icing to give them character.
If you want to make the cookies even more colorful, consider using different types of candy pieces or adding sprinkles. To keep the cookies soft and chewy, store them in an airtight container once they’ve completely cooled.
Bat-winged Chocolate Cookies

As Halloween approaches, there’s no better time to indulge in some spooky-themed treats. The Bat-winged Chocolate Cookies are perfect for any ghoulish gathering or for simply treating yourself to something whimsically eerie.
These cookies not only deliver the rich, deep flavors of chocolate but are also cleverly designed with bat wings, making them a hit among both kids and adults alike. The combination of cocoa and vanilla with a touch of darkness from black food coloring makes these cookies as delicious as they’re visually striking.
Preparing these Bat-winged Chocolate Cookies offers a fun baking experience for families and friends. The dough is simple to mix and shape, allowing even novice bakers to create stunning results with minimal effort.
The key to these cookies is their distinctive shape, which is achieved using a bat-shaped cookie cutter—an essential tool for this recipe. Whether you’re planning a Halloween party or just looking to create some festive fun, these cookies are sure to enchant your guests and leave them craving more.
Ingredients (serving size: 4-6 people):
- 1 cup unsalted butter, softened
- 1 cup granulated sugar
- 1 large egg
- 1 teaspoon vanilla extract
- 1 3/4 cups all-purpose flour
- 3/4 cup unsweetened cocoa powder
- 1/2 teaspoon baking powder
- 1/4 teaspoon salt
- Black food coloring (gel preferred)
- Powdered sugar for dusting (optional)
Cooking Instructions:
- Preheat the Oven: Begin by preheating your oven to 350°F (175°C). Line two baking sheets with parchment paper to guarantee the cookies don’t stick.
- Cream the Butter and Sugar: In a large mixing bowl, beat the softened butter and granulated sugar together until the mixture is light and fluffy. This should take about 2-3 minutes with an electric mixer.
- Add Wet Ingredients: Add the egg and vanilla extract to the butter-sugar mixture, and mix until fully incorporated. If using black food coloring, add it gradually until the desired darkness is achieved.
- Mix Dry Ingredients: In a separate bowl, whisk together the all-purpose flour, cocoa powder, baking powder, and salt. Gradually add this dry mixture to the wet ingredients, mixing until a smooth dough forms.
- Chill the Dough: Wrap the dough in plastic wrap and refrigerate for at least 30 minutes. This will make it easier to roll out and cut into shapes.
- Roll and Cut the Dough: On a lightly floured surface, roll out the chilled dough to about 1/4 inch thickness. Use a bat-shaped cookie cutter to cut out the cookies and transfer them to the prepared baking sheets.
- Bake: Place the baking sheets in the preheated oven and bake for 10-12 minutes. Keep a close eye on them, as baking times may vary depending on your oven.
- Cool the Cookies: Allow the cookies to cool on the baking sheets for about 5 minutes before transferring them to wire racks to cool completely. Dust with powdered sugar if desired for a spooky effect.
Extra Tips:
When crafting these Bat-winged Chocolate Cookies, verify your dough is well-chilled before rolling it out. This prevents it from becoming too sticky and difficult to shape.
If you don’t have black food coloring, you can use dark cocoa powder for a similar effect, though the color may be slightly lighter. Additionally, keep an eye on the baking time, as over-baking can lead to hard cookies.
These cookies are perfect for decorating, so feel free to add your own creative touches with icing or edible glitter to enhance their Halloween appeal.
Spooky Skeleton Bone Cookies
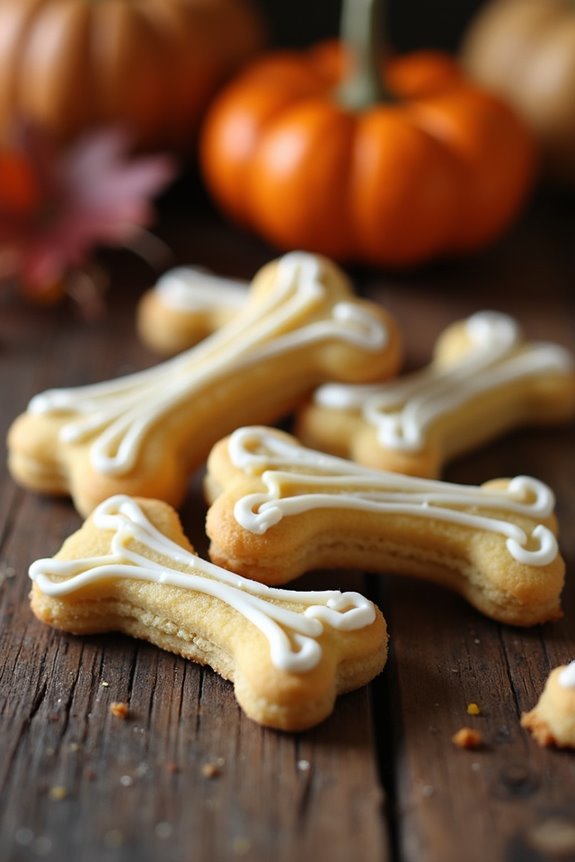
Creating the perfect Halloween treat can be both fun and delicious with Spooky Skeleton Bone Cookies. These cookies aren’t only visually appealing but also incredibly tasty, making them a hit at any Halloween gathering. Shaped like eerie bones, these cookies are sure to add a spooky touch to your dessert table.
The dough is easy to work with, and the end result is a crispy, buttery cookie that pairs perfectly with a glass of milk or a cup of hot cocoa. To make these cookies even more festive, a simple white icing is used to decorate and accentuate the bone shape. This recipe yields enough cookies to serve 4-6 people, making it perfect for a small party or gathering.
With a few simple ingredients and some creativity, you can whip up these Spooky Skeleton Bone Cookies in no time. Here’s what you’ll need:
Ingredients:
- 2 cups all-purpose flour
- 1/2 teaspoon baking powder
- 1/4 teaspoon salt
- 1/2 cup unsalted butter, softened
- 3/4 cup granulated sugar
- 1 large egg
- 1 teaspoon vanilla extract
- 1 tablespoon milk
- 1 cup powdered sugar
- 2-3 tablespoons milk (for icing)
- 1/2 teaspoon vanilla extract (for icing)
Cooking Instructions:
- Prepare the Dough: In a medium-sized bowl, whisk together the all-purpose flour, baking powder, and salt. In a separate large bowl, cream the softened butter and granulated sugar until light and fluffy. Beat in the egg and vanilla extract, mixing well until combined.
- Combine Ingredients: Gradually add the dry ingredients to the wet ingredients, alternating with the tablespoon of milk, mixing until a dough forms. The dough should be soft but not sticky. If it feels too sticky, add a little more flour.
- Chill the Dough: Shape the dough into a disk, wrap it in plastic wrap, and refrigerate for about 1 hour. This will make it easier to roll out and cut into shapes.
- Preheat and Prepare: Preheat your oven to 350°F (175°C) and line two baking sheets with parchment paper.
- Roll and Shape: On a lightly floured surface, roll out the dough to about 1/4-inch thickness. Use a bone-shaped cookie cutter to cut out shapes and place them on the prepared baking sheets, leaving about an inch between each cookie.
- Bake the Cookies: Bake in the preheated oven for 10-12 minutes or until the edges are lightly golden. Remove from the oven and allow the cookies to cool completely on a wire rack.
- Make the Icing: In a small bowl, whisk together the powdered sugar, 2-3 tablespoons of milk, and 1/2 teaspoon vanilla extract until smooth. The icing should be thick enough to hold its shape but thin enough to pipe.
- Decorate: Once the cookies are cool, transfer the icing to a piping bag or a ziplock bag with a small corner snipped off. Pipe the icing onto the cookies to highlight the bone shapes and add any additional decorations as desired.
Extra Tips: For an extra spooky effect, you can add a few drops of black food coloring to the icing to create cracks or details on the bones. If you’re short on time, consider buying pre-made icing; however, homemade icing always provides a fresher taste.
Be sure to handle the dough gently to avoid overworking it, which can result in tough cookies. Finally, remember to store any leftover cookies in an airtight container to maintain their crispness.