
As Halloween draws near, I can’t help but get excited about crafting treats that are not only delicious but also utterly charming. Picture vibrant Monster Marshmallow Pops and spooky Creepy Crawly Cupcakes, perfect for little hands and big imaginations. These delightful snacks bring together creativity and flavor in the most magical way. Ready for some festive inspiration? Let’s explore these enchanting snacks that will surely make your Halloween gathering unforgettable!
Monster Marshmallow Pops
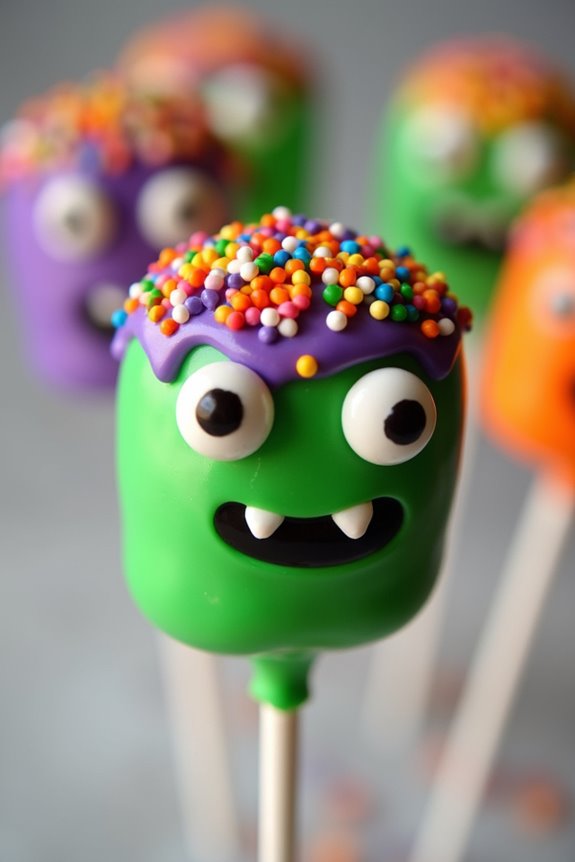
Get ready to delight the little monsters in your life with these fun and festive Monster Marshmallow Pops! Perfect for a Halloween party or a spooky snack, these treats are both simple to make and delightfully creepy.
With just a few ingredients and some creativity, you can transform ordinary marshmallows into a ghoulishly good time for kids. These pops aren’t only a treat to eat, but also a fun craft to create, making them a perfect activity to engage little hands and imaginations.
The beauty of Monster Marshmallow Pops is that they’re highly customizable. You can use a variety of candy melts and toppings to create your own unique monster designs. Whether you want to make them cute or creepy, the choice is yours!
Plus, they’re a great way to involve kids in the kitchen, teaching them simple cooking skills and encouraging their artistic side. With a serving size of 4-6 people, this recipe is perfect for a small gathering of friends or family.
Ingredients:
- 12 large marshmallows
- 1 cup green candy melts
- 1 cup purple candy melts
- 1 cup orange candy melts
- 12 lollipop sticks
- Candy eyes
- Assorted sprinkles
- Edible markers (optional)
Instructions:
- Prepare the Workstation: Line a baking sheet with parchment paper. This will be where you place the marshmallow pops to set after decorating.
- Melt the Candy: In separate bowls, melt the green, purple, and orange candy melts according to the package instructions. Stir until smooth and fully melted.
- Insert Lollipop Sticks: Insert a lollipop stick into each marshmallow, making sure it’s secure but not poking through the top.
- Coat the Marshmallows: Dip each marshmallow into the melted candy, turning to coat completely. Allow any excess candy to drip off before placing it on the parchment paper.
- Attach the Eyes: Quickly press candy eyes onto each marshmallow while the candy coating is still wet so they adhere properly.
- Decorate the Monsters: Use assorted sprinkles to create hair, scars, or other monster features. If using edible markers, wait until the candy coating is set to draw additional features.
- Let Them Set: Allow the decorated marshmallows to sit at room temperature until the candy coating has fully set.
Extra Tips:
To guarantee the candy melts smoothly, avoid overheating them, as this can cause the texture to become clumpy. If you find the candy melts too thick, add a teaspoon of vegetable oil to thin it out.
Additionally, if you’re planning these for a party, consider preparing the bases ahead of time and setting up a decorating station for the kids to let their creativity shine.
Finally, store any leftover pops in an airtight container to keep them fresh until serving.
Creepy Crawly Cupcakes

Halloween is a time of year when creativity knows no bounds, and what better way to celebrate than with some delightfully spooky treats? Creepy Crawly Cupcakes make for an exciting and delicious addition to any Halloween gathering, especially for kids.
These cupcakes combine rich chocolate flavors with fun, edible decorations that resemble creepy crawlies, guaranteeing that they not only taste great but also look the part. With a bit of imagination and a few simple ingredients, you can create these ghoulish goodies that will thrill and delight your little ghosts and goblins.
The fun of making Creepy Crawly Cupcakes lies as much in the preparation as in the eating. This recipe serves 4-6 people, making it perfect for a small Halloween party or family gathering.
The cupcakes themselves are made from a classic chocolate base, providing a rich and moist foundation. The real magic, however, is in the decoration. Topped with chocolate frosting and adorned with gummy worms and candy eyes, these cupcakes are sure to become the highlight of any spooky celebration.
Now, let’s explore the list of ingredients and the simple steps needed to bring these creepy crawlies to life.
Ingredients (Serves 4-6 people):
- 1 cup all-purpose flour
- 1 cup granulated sugar
- 1/3 cup unsweetened cocoa powder
- 1/2 teaspoon baking powder
- 1/2 teaspoon baking soda
- 1/4 teaspoon salt
- 1/2 cup milk
- 1/4 cup vegetable oil
- 1 large egg
- 1 teaspoon vanilla extract
- 1/2 cup boiling water
- 1 cup chocolate frosting
- 12 gummy worms
- 12 candy eyes
- Optional: edible glitter or sprinkles for extra effect
Instructions:
- Preheat the Oven: Start by preheating your oven to 350°F (175°C) to make sure it’s ready for baking. Line a muffin tin with cupcake liners to keep the cupcakes from sticking.
- Mix Dry Ingredients: In a large mixing bowl, combine the all-purpose flour, granulated sugar, cocoa powder, baking powder, baking soda, and salt. Mix them together until fully combined.
- Combine Wet Ingredients: In another bowl, whisk together the milk, vegetable oil, egg, and vanilla extract. Confirm that the egg is well incorporated into the mixture.
- Create the Batter: Gradually add the wet ingredients to the dry ingredients, mixing gently. Once combined, slowly stir in the boiling water. This will create a thin batter, which is normal for this recipe.
- Fill the Cupcake Liners: Pour the batter evenly into the cupcake liners, filling each about two-thirds full to allow for rising.
- Bake: Place the muffin tin in the preheated oven and bake for 18-20 minutes, or until a toothpick inserted into the center of a cupcake comes out clean.
- Cool the Cupcakes: Remove the cupcakes from the oven and let them cool in the tin for about 5 minutes. Then, transfer them to a wire rack to cool completely before frosting.
- Decorate: Once cooled, spread a generous amount of chocolate frosting on each cupcake. Place two gummy worms on each cupcake to resemble creepy crawlies. Add candy eyes to enhance the spooky effect. Optionally, sprinkle edible glitter or sprinkles for extra flair.
Extra Tips:
For an even spookier effect, try using different colored gummy worms or add a few drops of food coloring to the frosting to make it a ghastly green or blood-red hue.
If you’re baking with kids, let them have fun decorating their own cupcakes. It’s a great way to engage them in the kitchen and let their creativity shine.
Remember that the boiling water in the batter is essential for keeping the cupcakes moist and fluffy, so don’t skip this step. Enjoy the delightful screams and giggles as your Creepy Crawly Cupcakes steal the show at your Halloween festivities!
Witch’s Hat Cookies
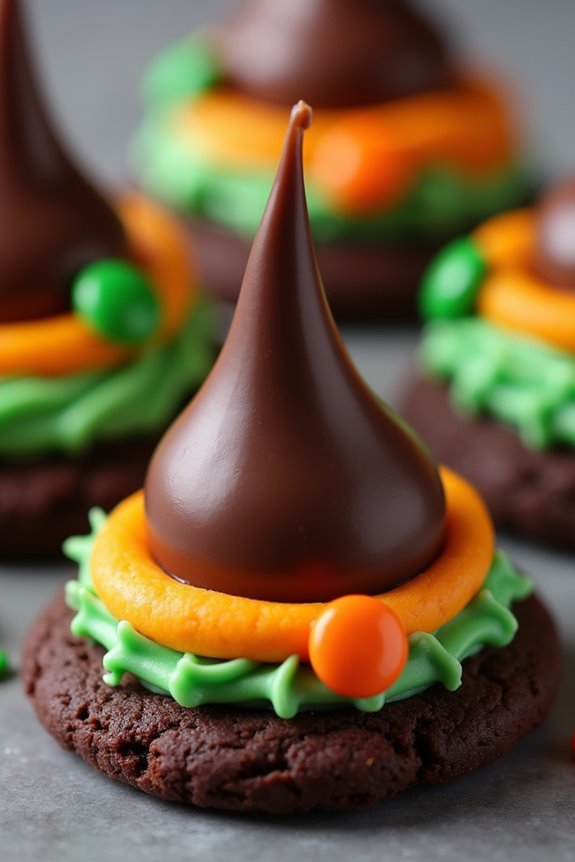
Witch’s Hat Cookies are a delightful and spooky treat perfect for Halloween gatherings with kids. These whimsical cookies aren’t only fun to make but also incredibly delicious, combining chocolate, cookies, and a touch of creativity. They make for a perfect activity to engage children in the kitchen, encouraging them to express their creativity while preparing a festive snack. Each cookie resembles a witch’s hat, complete with a candy “buckle” to add an extra touch of charm.
This recipe is easy to follow and requires minimal ingredients, making it an ideal choice for busy parents looking to whip up a quick Halloween snack. The Witch’s Hat Cookies aren’t only a visual treat but also a hit when it comes to taste, appealing to both kids and adults alike. The combination of chocolate kisses, cookies, and decorative icing creates a delightful contrast of flavors and textures that are sure to please everyone’s taste buds. This recipe serves 4-6 people, making it perfect for small parties or family gatherings.
Ingredients:
- 12 round chocolate cookies (e.g. Oreos or similar)
- 12 chocolate kisses
- 1/2 cup of chocolate frosting
- 1 tube of colored decorating icing (orange or green recommended)
- 12 small candy pieces for decoration (optional)
Instructions:
- Prepare the Cookies: Begin by laying out the 12 round chocolate cookies on a flat surface. These will serve as the base of the witch’s hat.
- Attach the Chocolate Kisses: Using a small spoon or a piping bag, place a small dollop of chocolate frosting in the center of each cookie. This frosting will act as the adhesive to hold the chocolate kiss in place.
- Place the Chocolate Kisses: Gently press a chocolate kiss onto the frosting on each cookie. Confirm that the flat side of the kiss is firmly attached to the cookie so it stands upright like the point of a witch’s hat.
- Decorate the Base: Using the colored decorating icing, pipe a thin line around the base of each chocolate kiss where it meets the cookie. This will look like a band around the hat. You can also add a small dot of icing on the band and use it to attach a small candy piece if desired.
- Let Set: Allow the Witch’s Hat Cookies to sit for at least 15-20 minutes to ascertain the frosting and icing have set properly, securing the kisses in place.
Extra Tips:
When preparing Witch’s Hat Cookies, it’s important to let the kids get involved, especially with the decorating phase, as it can be a fun and creative activity.
Confirm that the frosting used is thick enough to hold the chocolate kisses securely; if it’s too runny, the kisses may slide off.
Also, consider using different colors of icing for a more vibrant look, or even experimenting with different types of candy for the hat’s buckle.
If you want to prepare these cookies in advance, store them in an airtight container to maintain their freshness until serving time.
Ghostly Rice Krispie Treats
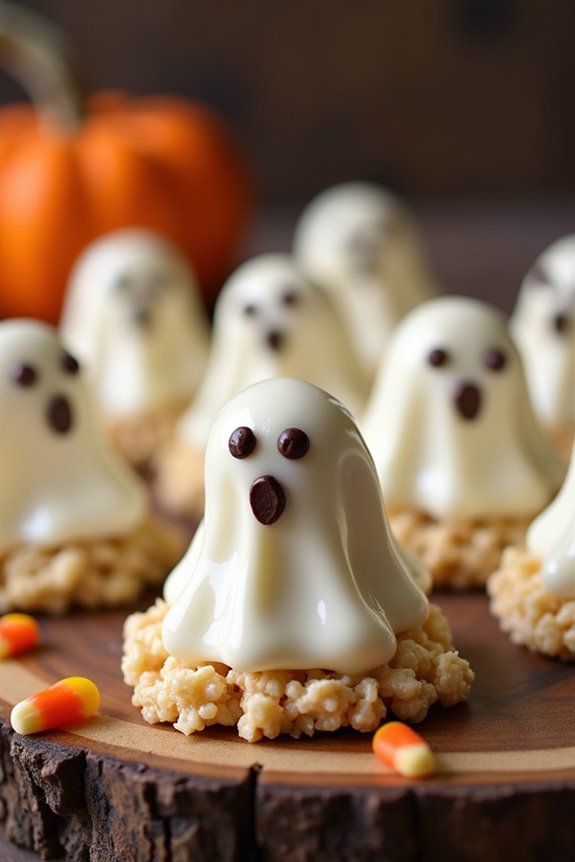
Halloween is a magical time for kids, full of costumes, spooky stories, and of course, delicious treats. One of the favorite snacks during this festive season is Ghostly Rice Krispie Treats. These delightful snacks aren’t only fun to make but also a hit among children and adults alike. The gooey marshmallow combined with crispy rice cereal, all shaped into adorable ghostly figures, makes for a perfect Halloween treat that’s both easy to prepare and pleasing to the eye.
Creating Ghostly Rice Krispie Treats is a fantastic way to involve your kids in the kitchen. This recipe is simple, requiring minimal ingredients and no baking, making it an ideal activity for little hands. It’s a creative way to get into the Halloween spirit, allowing children to mold and decorate their ghostly figures with icing and sprinkles. Whether you’re hosting a Halloween party or just looking for a fun snack to share, these treats are sure to be a crowd-pleaser.
Ingredients (serving size: 4-6 people):
- 6 cups of Rice Krispies cereal
- 1 package (10 oz) of mini marshmallows
- 3 tablespoons of unsalted butter
- 1 teaspoon of vanilla extract
- White chocolate chips or candy coating (for decorating)
- Mini chocolate chips or black icing (for ghost eyes and mouth)
Cooking Instructions:
- Prepare the Materials: Begin by lining a baking sheet with parchment paper or a non-stick silicone mat. This will prevent the treats from sticking as they cool.
- Melt the Butter and Marshmallows: In a large saucepan, melt the butter over low heat. Once melted, add the mini marshmallows and stir continuously until they’re completely melted and the mixture is smooth. Remove from heat and stir in the vanilla extract for added flavor.
- Mix in the Cereal: Quickly add the Rice Krispies cereal to the melted marshmallow mixture. Stir until all the cereal is evenly coated with the marshmallow mixture.
- Shape the Ghosts: Using a buttered or greased spoon, scoop out portions of the mixture and shape them into ghostly figures on the prepared baking sheet. You can get creative with the shapes, making each ghost unique.
- Decorate the Ghosts: Melt the white chocolate chips or candy coating according to package instructions. Use a spoon or piping bag to drizzle it over each ghost, giving them a glossy finish. Place mini chocolate chips or use black icing to create eyes and a mouth on each ghost.
- Set and Serve: Allow the treats to cool and set for about 30 minutes at room temperature. Once set, your Ghostly Rice Krispie Treats are ready to be served and enjoyed.
Extra Tips:
For best results, work quickly when shaping the ghosts, as the marshmallow mixture can harden as it cools. If you find the mixture sticking to your hands, lightly grease them with butter or cooking spray.
To add more Halloween fun, consider using different colored icing or edible glitter to give your ghosts extra personality. These treats are best enjoyed fresh but can be stored in an airtight container for up to two days.
Spooky Spiderweb Brownies
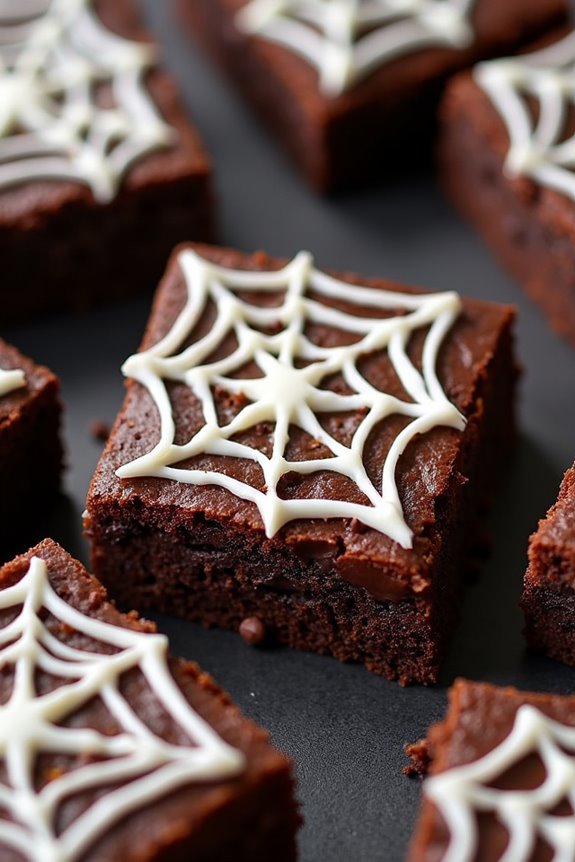
Halloween is the perfect time to get creative in the kitchen with fun and festive treats that will delight the young ones. Spooky Spiderweb Brownies are a delicious and visually enchanting dessert that brings a little bit of magic and mystery to any Halloween gathering.
These brownies are rich, fudgy, and topped with a spiderweb pattern that will have kids reaching for more. Plus, they’re surprisingly simple to make!
Making Spooky Spiderweb Brownies is a fun activity that you can enjoy with your kids, turning baking into a bonding experience. The process involves creating a batch of decadent brownies and then decorating them with a simple yet striking spiderweb design using white chocolate or icing.
Perfect for a serving size of 4-6 people, these brownies can be a centerpiece at your Halloween party or a delightful surprise in your children’s lunchbox.
Ingredients (for 4-6 servings):
- 1 cup unsalted butter, melted
- 2 cups granulated sugar
- 4 large eggs
- 1 teaspoon vanilla extract
- 1 cup all-purpose flour
- 1/2 cup unsweetened cocoa powder
- 1/4 teaspoon salt
- 1/2 teaspoon baking powder
- 1/2 cup semi-sweet chocolate chips
- 1/2 cup white chocolate chips or 1/2 cup white icing
Instructions:
- Preheat the Oven: Begin by preheating your oven to 350°F (175°C). Grease a 9×13 inch baking dish or line it with parchment paper to prevent the brownies from sticking.
- Mix the Batter: In a large mixing bowl, combine the melted butter and granulated sugar, stirring until well blended. Add the eggs one at a time, mixing well after each addition. Stir in the vanilla extract for added flavor.
- Combine Dry Ingredients: In a separate bowl, sift together the all-purpose flour, cocoa powder, salt, and baking powder. Gradually add this dry mixture to the wet ingredients, stirring until just combined. Be careful not to overmix, as this can make the brownies tough.
- Add Chocolate Chips: Fold in the semi-sweet chocolate chips to the batter, making sure they’re evenly distributed. This will give your brownies little bursts of chocolate flavor in every bite.
- Bake the Brownies: Pour the batter into the prepared baking dish, spreading it evenly. Bake in the preheated oven for 25-30 minutes, or until a toothpick inserted in the center comes out mostly clean with a few moist crumbs attached.
- Create the Spiderweb: Once baked, let the brownies cool completely in the pan. Melt the white chocolate chips in a microwave-safe bowl, heating in 20-second intervals and stirring in between until smooth. Alternatively, prepare white icing. Transfer the melted chocolate or icing to a piping bag or a plastic sandwich bag with a small corner cut off.
- Decorate: To make the spiderweb, pipe a spiral starting from the center of the brownies and working outward. Use a toothpick to draw lines from the center of the spiral to the edges, creating a web pattern.
Extra Tips: For an extra spooky touch, consider adding small plastic spiders (making sure they’re removed before eating) or edible sugar spiders on top of the spiderweb design.
If you prefer a less sweet option, dark chocolate chips can be used instead of semi-sweet. Additionally, if you’re short on time, you can use a boxed brownie mix as a base and focus on the spiderweb decoration.
Franken-Fudge Bites
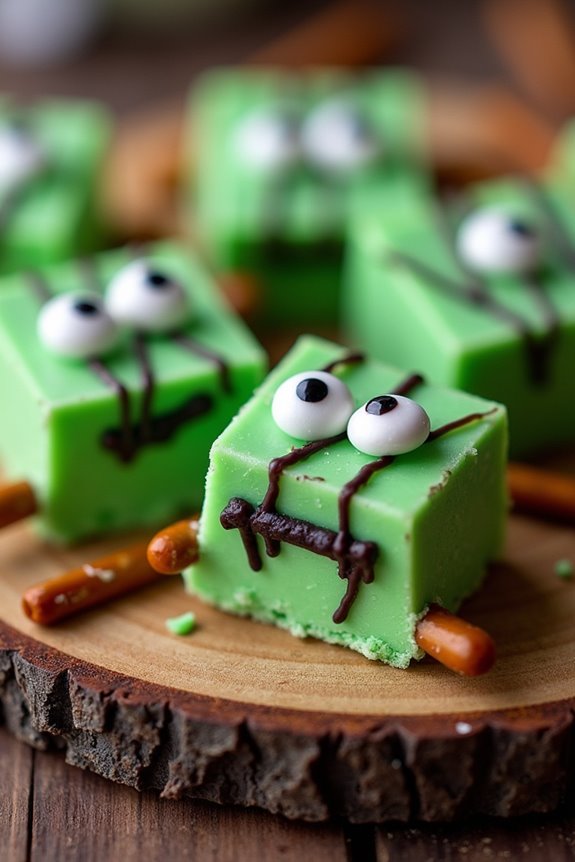
Franken-Fudge Bites are a spooky and delicious treat perfect for any Halloween celebration. These bite-sized delights combine the creamy richness of fudge with a playful monster-themed appearance. Not only are they a hit with kids, but they also bring out the inner child in adults.
With a few simple ingredients, you can whip up these treats and add an extra dose of fun to your Halloween party. Whether you’re hosting a gathering or just looking for a festive treat to enjoy at home, Franken-Fudge Bites are certain to be a crowd-pleaser.
Creating Franken-Fudge Bites is an enjoyable activity that allows for creativity in decorating. You can customize each “Frankenstein” with different expressions and features, making it a fun project for kids to participate in. The recipe yields enough bites to serve 4-6 people, making it ideal for a small group.
These bites aren’t only delightful to look at but also melt-in-your-mouth delicious, making them a perfect addition to your Halloween snack table.
Ingredients (serves 4-6):
- 2 cups semisweet chocolate chips
- 1 (14-ounce) can sweetened condensed milk
- 1 teaspoon vanilla extract
- 2 tablespoons unsalted butter
- Green food coloring
- Candy eyes
- Pretzel sticks
- Black decorating gel
Cooking Instructions:
1. Prepare the Fudge Base:
In a medium saucepan, combine the chocolate chips, sweetened condensed milk, and butter. Place the saucepan over low heat, stirring constantly until the chocolate is completely melted and the mixture is smooth. Remove from heat and stir in the vanilla extract.
2. Color the Fudge:
Allow the mixture to cool slightly, then add a few drops of green food coloring and stir well until the color is evenly distributed. Add more food coloring if needed to achieve the desired shade of green.
3. Set the Fudge:
Line an 8×8-inch baking dish with parchment paper. Pour the green fudge mixture into the dish, spreading it evenly. Refrigerate for at least 2 hours or until the fudge is firm.
4. Cut and Decorate:
Once the fudge is set, remove it from the refrigerator and cut it into small squares. Press candy eyes onto each square to create a face. Use pretzel sticks to make “Frankenstein bolts” by inserting them into the sides of each fudge piece.
5. Add Final Details:
Use black decorating gel to draw a mouth and stitches on each fudge bite to complete the Frankenstein look. Be creative with the expressions!
Extra Tips:
When making Franken-Fudge Bites, make sure that the fudge mixture isn’t too hot when adding the food coloring to prevent it from seizing.
If you find the mixture hardening quickly while decorating, allow it to sit at room temperature for a few minutes to soften slightly.
Experiment with different candy decorations, such as mini marshmallows for hair or red gel for bloodshot eyes, to give each monster a unique personality.
Mummy Pretzel Sticks
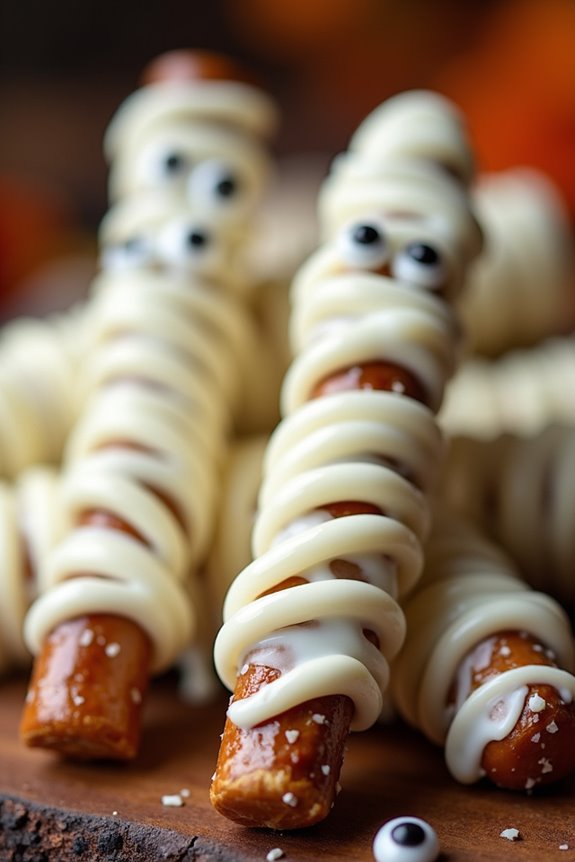
Mummy Pretzel Sticks are a spooktacular treat that’s perfect for Halloween celebrations with kids. These fun and festive snacks aren’t only easy to make but also add a touch of creepiness to your party table. With just a few simple ingredients, you can transform ordinary pretzel rods into adorable mummy treats that will delight children and adults alike.
The combination of sweet and salty flavors make these Mummy Pretzel Sticks impossible to resist, and they’re an excellent addition to any Halloween party spread. Involving the kids in making Mummy Pretzel Sticks can be a fantastic Halloween activity. The process is simple enough for little hands to help with, whether it’s dipping the pretzels or adding candy eyes.
Plus, these treats can be customized with different colors or decorations to match any spooky theme you choose. Whether you’re hosting a party or just want a fun kitchen project, these Mummy Pretzel Sticks are sure to be a hit!
Ingredients (Serves 4-6 people):
- 12 large pretzel rods
- 1 cup white chocolate chips or candy melts
- 24 candy eyes
- 1 teaspoon coconut oil or vegetable shortening (optional)
Cooking Instructions:
- Prepare the Ingredients: Gather all your ingredients and line a baking sheet with parchment paper. This will make clean-up easier and prevent the chocolate from sticking to the surface.
- Melt the Chocolate: In a microwave-safe bowl, combine the white chocolate chips with the coconut oil or vegetable shortening. Heat in the microwave in 30-second intervals, stirring in between, until the chocolate is smooth and fully melted. Be careful not to overheat the chocolate, as it can seize up.
- Coat the Pretzels: Dip each pretzel rod into the melted chocolate, using a spoon to help cover about two-thirds of the pretzel. Allow any excess chocolate to drip off before placing the pretzel on the prepared baking sheet.
- Add the Candy Eyes: While the chocolate is still wet, place two candy eyes on each pretzel rod. Make sure they’re positioned near the top of the coated area to resemble a mummy.
- Create the Mummy Wrapping: Transfer the remaining melted chocolate into a small piping bag or a ziplock bag with a tiny corner snipped off. Drizzle the chocolate back and forth over the coated part of the pretzel to create the mummy’s bandage effect.
- Set the Chocolate: Allow the pretzels to sit until the chocolate has completely hardened. You can speed up this process by placing the baking sheet in the refrigerator for about 10-15 minutes.
- Serve: Once the chocolate is set, your Mummy Pretzel Sticks are ready to be enjoyed!
Extra Tips:
For added texture and flavor, consider sprinkling some crushed nuts or sprinkles on the chocolate before it sets. You can also use dark or milk chocolate for a different look and taste. If you don’t have candy eyes, mini chocolate chips can be used as a substitute.
Remember to store any leftover Mummy Pretzel Sticks in an airtight container to keep them fresh and crunchy. Enjoy your spooky creations!
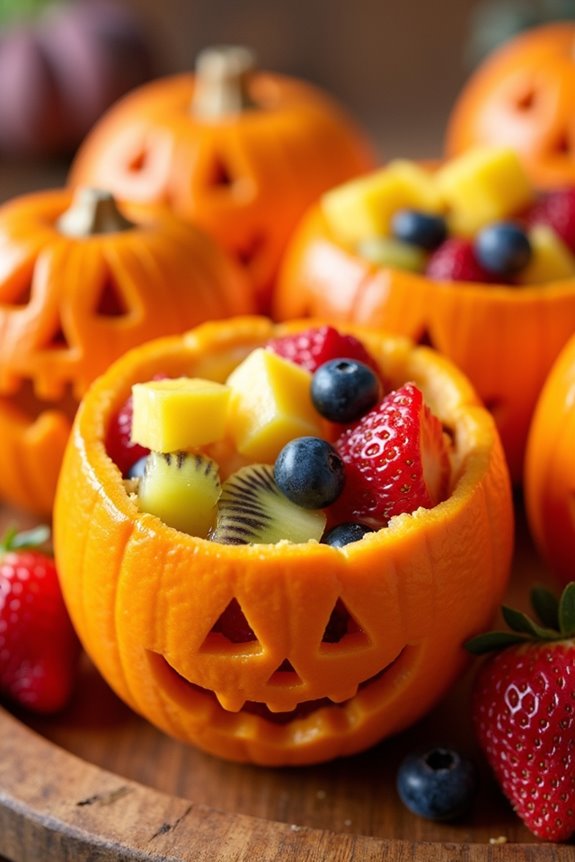
Jack-O’-Lantern Fruit Cups
Halloween is a time for fun, creativity, and of course, delicious treats. If you’re looking for a healthy yet festive snack for your kids this Halloween, Jack-O’-Lantern Fruit Cups are a perfect choice. This recipe combines the fun of carving with the nutritional benefits of fresh fruit.
These adorable fruit cups not only add a splash of color to your Halloween spread but also help balance out the candy overload that comes with the holiday. Plus, they’re super easy to make and a great way to involve your kids in the kitchen.
These Jack-O’-Lantern Fruit Cups are made using oranges as the base, which are carved into mini pumpkins. The inside of the oranges is then filled with a delightful mix of fresh fruits, making for a rejuvenating and eye-catching treat. This recipe is designed to serve 4-6 people, making it perfect for a small Halloween party or family gathering.
With just a few simple ingredients and steps, you’ll have a fun and healthy Halloween snack that kids will love.
Ingredients (Serves 4-6):
- 6 medium-sized oranges
- 1 cup diced strawberries
- 1 cup diced pineapple
- 1 cup blueberries
- 1 cup diced kiwi
- 1 tablespoon lemon juice
- 1 tablespoon honey (optional)
Instructions:
- Prepare the Oranges: Start by washing the oranges thoroughly. Using a sharp knife, slice off the top quarter of each orange. Set aside the tops as they’ll serve as the lids for your fruit cups.
- Hollow Out the Oranges: Carefully scoop out the inside of the oranges using a spoon, being cautious not to pierce the skin. Set the orange flesh aside in a bowl (you can use this later in your fruit mix or for juice).
- Carve Faces: Using a small paring knife, gently carve Jack-O’-Lantern faces into one side of each orange. Be creative with your designs, but make sure the cuts go through the skin to create the desired effect.
- Prepare the Fruit Mix: In a large bowl, combine the diced strawberries, pineapple, blueberries, and kiwi. Add the lemon juice and honey (if using) to the fruit and mix well to coat the fruit with the juice.
- Fill the Fruit Cups: Fill each hollowed orange with the mixed fruit, packing it gently to make sure they’re full.
- Assemble and Serve: Place the tops back on the oranges, slightly askew, to give the appearance of little pumpkin lids. Arrange the Jack-O’-Lantern Fruit Cups on a serving platter and serve immediately or refrigerate until ready to serve.
Extra Tips:
When carving the faces into the oranges, make sure to keep the designs simple to avoid tearing the orange skin. You can use a toothpick to sketch your design before cutting.
If you’re making these ahead of time, keep the fruit cups refrigerated to maintain freshness. Feel free to switch up the fruit mix based on your kids’ preferences or seasonal availability.
For an added touch, sprinkle some cinnamon or nutmeg over the fruit before sealing the cups. Enjoy the fun and festivity these Jack-O’-Lantern Fruit Cups bring to your Halloween celebration!
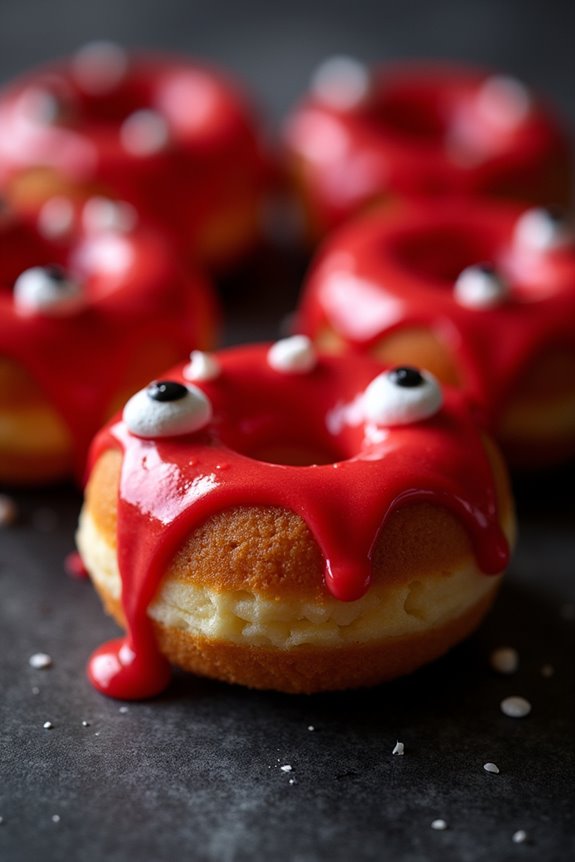
Vampire Donut Bites
Halloween is a time for spooky fun and delicious treats, and Vampire Donut Bites are a perfect addition to your festive celebration. These delightful snacks are both easy to make and a big hit with kids, thanks to their fun design and delicious taste.
Vampire Donut Bites are fundamentally mini donuts creatively transformed into little vampire faces, complete with fangs and a bloody glaze. This recipe provides a playful twist on traditional donuts, making them an ideal treat for a Halloween party or a fun family activity.
The process of making Vampire Donut Bites involves preparing a simple donut batter, frying them to golden perfection, and then decorating them with a vivid red glaze and candy accents to bring the vampire theme to life. These treats aren’t only visually appealing but also satisfyingly sweet, combining the fluffy texture of donuts with the playful spookiness of Halloween.
This recipe serves 4-6 people, perfect for a small gathering or a family snack.
Ingredients
- 2 cups all-purpose flour
- 1/2 cup granulated sugar
- 1 tablespoon baking powder
- 1/2 teaspoon salt
- 1/4 teaspoon ground nutmeg
- 3/4 cup milk
- 2 large eggs
- 1 teaspoon vanilla extract
- 1/4 cup unsalted butter, melted
- Vegetable oil, for frying
- 1 cup powdered sugar
- 2-3 tablespoons milk (for the glaze)
- Red food coloring
- Mini marshmallows
- Black gel icing
- Slivered almonds
Instructions
- Prepare the Donut Batter: In a large bowl, whisk together the flour, granulated sugar, baking powder, salt, and nutmeg. In another bowl, mix the milk, eggs, vanilla extract, and melted butter. Combine the wet and dry ingredients until you have a smooth batter.
- Heat the Oil: In a deep frying pan or pot, heat about 2 inches of vegetable oil to 350°F (175°C). Use a thermometer to maintain the temperature so the donuts cook evenly.
- Fry the Donuts: Using a small cookie scoop or a spoon, carefully drop spoonfuls of batter into the hot oil. Fry the donuts in batches for about 2-3 minutes on each side or until they turn golden brown. Remove with a slotted spoon and drain on paper towels.
- Make the Glaze: In a small bowl, whisk together the powdered sugar and 2-3 tablespoons of milk until you have a smooth glaze. Add a few drops of red food coloring and stir until you achieve the desired shade of red.
- Decorate the Donuts: Once the donuts have cooled slightly, dip each one into the red glaze, letting the excess drip off. Cut the mini marshmallows in half and place two halves on each donut to create vampire eyes. Use the black gel icing to dot pupils on each marshmallow. Insert two slivered almonds into the front of each donut for fangs.
- Serve and Enjoy: Allow the glaze to set for a few minutes before serving. Arrange the Vampire Donut Bites on a spooky platter and watch them disappear at your Halloween gathering!
Extra Tips
When making Vampire Donut Bites, ensuring the oil is at the correct temperature is essential for achieving the perfect texture. If the oil is too hot, the donuts may brown too quickly on the outside while remaining undercooked inside. Conversely, if the oil is too cool, the donuts may absorb too much oil and become greasy.
Additionally, for an extra festive touch, consider using edible glitter or sprinkles to add sparkle to the glaze, making your vampire creations even more eye-catching.
Candy Corn Parfaits
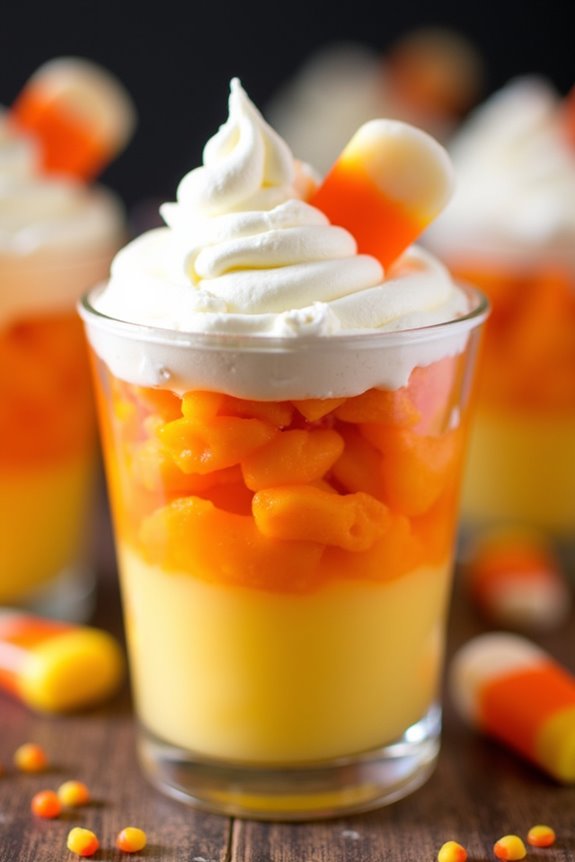
Candy Corn Parfaits are a delightful and festive treat, perfect for Halloween celebrations. This layered dessert mimics the iconic colors of candy corn, combining the flavors of pineapple, orange, and creamy whipped topping to create a vibrant and delicious snack your kids will love.
These parfaits aren’t only visually appealing but also incredibly easy to make, making them an ideal choice for busy parents looking to add a touch of Halloween magic to their snack table.
Each layer of the Candy Corn Parfait is designed to represent the colors of candy corn: bright yellow, orange, and white. The yellow layer is a sweet pineapple pudding, the orange layer is made from tangy mandarin oranges, and the white layer is a fluffy whipped topping.
This simple yet effective combination creates a revitalizing, fruity dessert that looks just as good as it tastes. This recipe serves 4-6 people, making it perfect for a small Halloween gathering or a fun family treat.
Ingredients:
- 1 box (3.4 oz) instant vanilla pudding mix
- 2 cups cold milk
- 1 cup crushed pineapple, drained
- 2 cups mandarin oranges, drained
- 1 tub (8 oz) whipped topping (e.g., Cool Whip)
- Candy corn pieces for garnish (optional)
Instructions:
1. Prepare the Pudding: In a medium-sized mixing bowl, combine the instant vanilla pudding mix with 2 cups of cold milk. Whisk for about 2 minutes until the mixture is smooth and begins to thicken.
Once thickened, fold in the crushed pineapple until fully incorporated, creating the yellow layer.
2. Layer the Parfaits: Using clear plastic cups or small glass jars, spoon an even amount of the pineapple pudding into the bottom of each cup to form the first layer.
Next, evenly distribute the drained mandarin oranges on top of the pudding layer to create the orange layer.
3. Add the Whipped Topping: Carefully spoon or pipe the whipped topping over the mandarin oranges, forming the final white layer.
Smooth out the top with the back of a spoon or a spatula for an even look.
4. Garnish and Chill: If desired, top each parfait with a few pieces of candy corn for added decoration.
Refrigerate the parfaits for at least 30 minutes before serving to allow the layers to set and the flavors to meld.
Extra Tips:
For the best presentation, use clear cups or jars to showcase the layered effect of the parfait.
Make sure to drain the pineapple and mandarin oranges thoroughly to prevent excess liquid from diluting the pudding and whipped topping layers.
If you’re preparing these parfaits in advance, assemble them up to a day ahead and store them in the refrigerator to keep them fresh.
Finally, if you want to add a bit more fun, consider incorporating colored sprinkles or edible glitter on top for a festive touch!
Skeleton Sugar Cookies
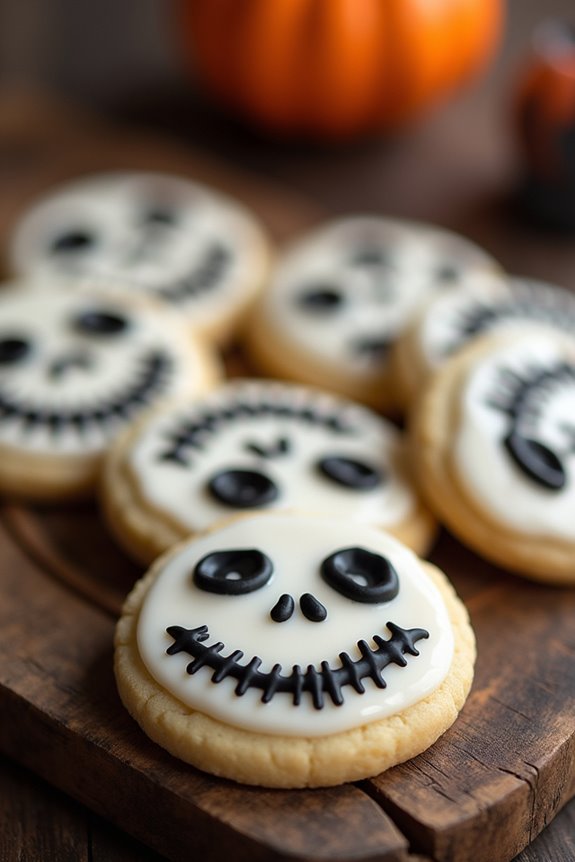
Skeleton Sugar Cookies are the perfect spooky treat to get kids excited about Halloween. These adorable cookies are shaped like skeletons and decorated with a simple icing to highlight the bones. Not only are they fun to make, but they’re also deliciously sweet and buttery, making them a hit with children and adults alike.
Whether you’re hosting a Halloween party or just looking for a fun baking activity to do with your kids, these cookies will surely be a festive addition to your celebration.
The key to making these Skeleton Sugar Cookies is a basic sugar cookie dough that holds its shape well during baking. Once baked, the cookies are decorated with royal icing to create the skeleton design. You can get creative with the decorations, allowing kids to draw their own skeletons or faces on the cookies.
This recipe makes enough for 4-6 people, ensuring there’s plenty to share. So, gather your ingredients and get ready to bake up a batch of these spooky treats!
Ingredients (Serves 4-6):
- 2 1/2 cups all-purpose flour
- 1/2 teaspoon baking powder
- 1/4 teaspoon salt
- 3/4 cup unsalted butter, softened
- 1 cup granulated sugar
- 1 large egg
- 1 teaspoon vanilla extract
- 1/2 teaspoon almond extract (optional)
- 2 cups powdered sugar
- 2 tablespoons meringue powder
- 5-6 tablespoons warm water
- Black food coloring
Instructions:
- Prepare the Dough: In a medium bowl, whisk together the flour, baking powder, and salt. In a separate large bowl, beat the butter and granulated sugar with an electric mixer until light and fluffy (about 2-3 minutes). Add the egg, vanilla extract, and almond extract (if using) to the butter mixture, and mix until combined.
- Combine Ingredients: Gradually add the dry ingredients to the wet ingredients, mixing until a dough forms. If the dough is too sticky, add a little more flour until it’s manageable. Divide the dough into two discs, wrap each in plastic wrap, and refrigerate for at least 1 hour.
- Preheat and Roll: Preheat your oven to 350°F (175°C). Line two baking sheets with parchment paper. On a lightly floured surface, roll out one disc of dough to about 1/4-inch thickness. Use skeleton-shaped cookie cutters to cut out shapes, and place them on the prepared baking sheets. Repeat with the second disc of dough.
- Bake: Bake the cookies in the preheated oven for 8-10 minutes or until the edges are just starting to turn golden. Allow the cookies to cool on the baking sheets for 5 minutes before transferring them to a wire rack to cool completely.
- Prepare Royal Icing: In a medium bowl, whisk together the powdered sugar, meringue powder, and warm water until smooth. The icing should be thick enough to hold its shape but thin enough to pipe easily. Divide the icing and mix a small portion with black food coloring for the skeleton details.
- Decorate the Cookies: Fill a piping bag fitted with a small round tip with the white icing. Pipe the skeleton design onto each cookie. Use the black icing to add additional details, such as eyes or a mouth. Allow the icing to set completely before serving.
Extra Tips: When rolling out the dough, make sure to sprinkle enough flour on your surface and rolling pin to prevent sticking. If you don’t have skeleton cookie cutters, you can use a gingerbread man cutter and draw the skeleton details with icing.
For an extra pop of color, consider adding a few drops of food coloring to the dough itself. Let your kids get involved in the decorating process; it’s a great way to let them express their creativity and get into the Halloween spirit!