
Hey there, lovely friends! 🎃 As I plan my ultimate adults-only Halloween bash, I can’t wait to share some spine-chilling culinary creations that will leave your guests spellbound. How about serving Spooky Black Pasta with Squid Ink? It’s as mysterious as it is delicious. Or maybe a Bloody Mary Shrimp Cocktail for a savory twist? These dishes promise to elevate your party atmosphere and make your Halloween gathering unforgettable. 🍷🕸
Spooky Black Pasta With Squid Ink
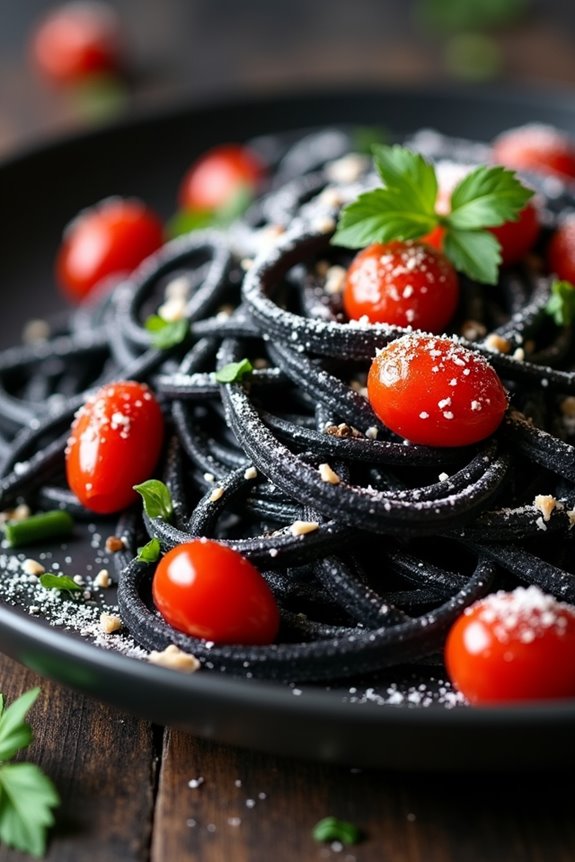
If you’re looking to impress your guests with a unique and chilling Halloween meal, try this Spooky Black Pasta with Squid Ink. This dish not only delivers a stunning visual impact with its deep, black noodles but also offers a sophisticated flavor profile that’s sure to delight seafood lovers.
The pasta’s dark hue, achieved by incorporating squid ink, provides a subtle briny taste that pairs beautifully with the garlic and cherry tomato sauce. Perfect for a Halloween dinner party, this dish combines the eerie aesthetic of the season with a deliciously rich and savory experience.
The key to mastering this dish is in the balance of flavors and presentation. The squid ink, while potent in color, offers a gentle sea essence that should be complemented, not overpowered, by the other ingredients. Fresh garlic, ripe cherry tomatoes, and a touch of chili flakes create a robust sauce that enhances, rather than overwhelms, the squid ink pasta.
Garnishing with fresh parsley and grated parmesan adds a touch of freshness and creaminess, rounding out the dish. Serve this to your guests and watch as they marvel at the mysterious allure of the black pasta.
Ingredients (Serves 4-6):
- 400g squid ink pasta
- 4 tablespoons olive oil
- 4 cloves garlic, minced
- 1/2 teaspoon red chili flakes
- 250g cherry tomatoes, halved
- 120ml dry white wine
- Salt and pepper, to taste
- Fresh parsley, chopped, for garnish
- Freshly grated parmesan cheese, for serving
Cooking Instructions:
- Cook the Pasta: Bring a large pot of salted water to a boil. Add the squid ink pasta and cook according to the package instructions until al dente. Reserve 1 cup of the pasta water, then drain the pasta and set it aside.
- Prepare the Sauce: In a large skillet, heat the olive oil over medium heat. Add the minced garlic and red chili flakes, and sauté for about 1-2 minutes until the garlic is fragrant but not browned.
- Add the Tomatoes: Add the halved cherry tomatoes to the skillet and stir. Cook for about 5 minutes, allowing the tomatoes to soften and release their juices.
- Deglaze with Wine: Pour in the dry white wine and bring to a simmer. Cook for an additional 3-4 minutes until the wine has reduced by half.
- Combine Pasta and Sauce: Add the cooked pasta to the skillet, tossing to coat it in the sauce. If the sauce seems too thick, gradually add some reserved pasta water until the desired consistency is achieved.
- Season and Serve: Season with salt and pepper to taste. Remove the skillet from the heat, and sprinkle the pasta with chopped parsley. Serve immediately, topped with freshly grated parmesan cheese.
Extra Tips:
For the best results, use high-quality squid ink pasta to guarantee the right texture and flavor. If you can’t find ready-made squid ink pasta, you can make your own by incorporating squid ink into homemade pasta dough.
Be cautious with the amount of reserved pasta water added to the sauce; start with a little and add more as needed to achieve the perfect creamy consistency. Finally, don’t skip the parsley and parmesan; these elements add a necessary brightness and depth to the dish, balancing the rich flavors of the squid ink.
Bloody Mary Shrimp Cocktail
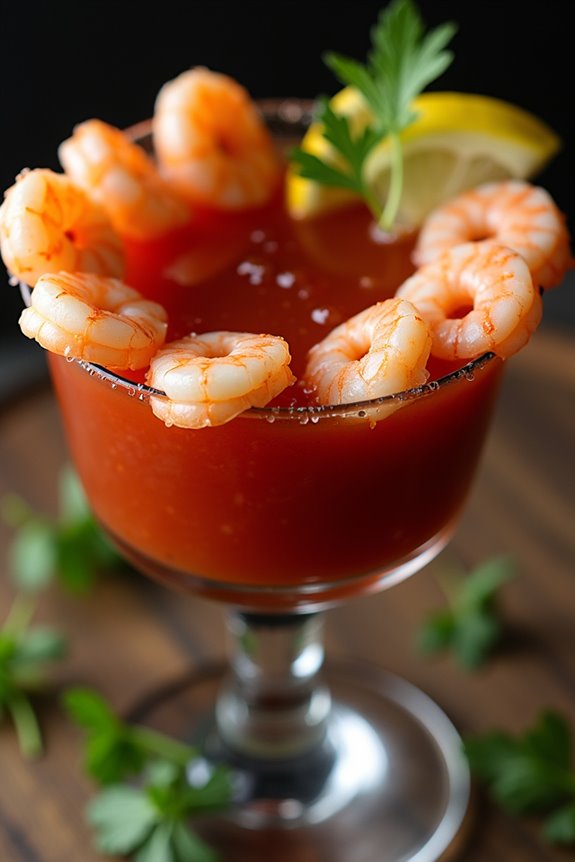
Halloween is the perfect time to indulge in culinary creativity, and a Bloody Mary Shrimp Cocktail is a spooktacular way to delight your guests. This dish combines the classic flavors of a Bloody Mary cocktail with the elegance of a shrimp cocktail, resulting in a savory and slightly spicy appetizer that will set the tone for a festive evening.
The vibrant red hue of the cocktail sauce adds a gory touch, perfect for the eerie ambiance of Halloween.
To create this delicious dish, you’ll start by preparing a flavorful cocktail sauce, infused with the classic ingredients of a Bloody Mary, including vodka, Worcestershire sauce, and a hint of horseradish. Fresh, succulent shrimp are then cooked to perfection and paired with this zesty sauce, offering a tantalizing combination of textures and flavors.
The result is a visually striking appetizer that’s as delicious as it’s dramatic, perfect for a Halloween gathering of 4-6 people.
Ingredients:
- 1 pound large shrimp, peeled and deveined
- 2 tablespoons olive oil
- Salt and pepper to taste
- 1 cup tomato juice
- 1/4 cup vodka
- 2 tablespoons Worcestershire sauce
- 1 tablespoon horseradish
- Juice of 1 lemon
- 1 teaspoon hot sauce (adjust to taste)
- 1 teaspoon celery salt
- Lemon wedges for garnish
- Fresh parsley for garnish
Instructions:
- Prepare the Shrimp: Start by rinsing the shrimp under cold water. Pat them dry with paper towels. Season the shrimp with salt and pepper and then toss them in olive oil to make sure they’re fully coated.
- Cook the Shrimp: Heat a large skillet over medium-high heat. Add the shrimp to the skillet in a single layer. Cook for about 2 minutes on each side, or until they turn pink and opaque. Be careful not to overcook them. Remove the shrimp from the skillet and set aside to cool.
- Make the Cocktail Sauce: In a mixing bowl, combine the tomato juice, vodka, Worcestershire sauce, horseradish, lemon juice, hot sauce, and celery salt. Whisk the ingredients together until they’re well blended. Adjust the seasoning with more hot sauce or celery salt if needed.
- Assemble the Cocktail: Once the shrimp have cooled, arrange them around the rim of a cocktail glass or shallow dish. Pour the Bloody Mary cocktail sauce into the center. For a spooky presentation, you can garnish with lemon wedges and a sprinkle of fresh parsley.
- Serve and Enjoy: Serve the Bloody Mary Shrimp Cocktail immediately, while the shrimp are fresh and the sauce is chilled. Enjoy this appetizer with your guests as you celebrate Halloween.
Extra Tips:
For the best results, use fresh shrimp if possible, as they tend to have a better texture and flavor than frozen ones. If you prefer a non-alcoholic version, you can omit the vodka and adjust the other ingredients to taste.
Additionally, you can experiment with the level of spiciness by adjusting the amount of hot sauce and horseradish. Finally, be sure to chill the cocktail sauce before serving, as it enhances the dish’s invigorating quality.
Pumpkin and Sage Risotto
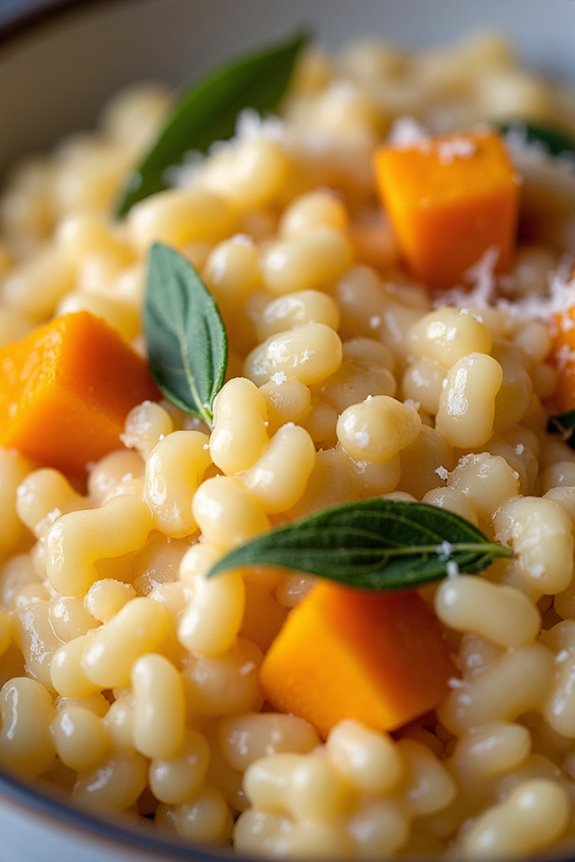
Pumpkin and Sage Risotto is a delicious and heartwarming dish that perfectly captures the essence of autumn with its rich flavors and creamy texture. This risotto combines the subtle sweetness of pumpkin with the earthy aroma of fresh sage, creating a delightful harmony that’s both comforting and elegant. Ideal for a Halloween feast or a cozy evening meal, this dish brings a touch of sophistication to your table without being overly complicated to prepare.
The key to a perfect risotto lies in the slow cooking process, allowing the rice to absorb flavorful broth while gradually releasing its starches for a creamy consistency. In this recipe, we utilize arborio rice, which is renowned for its ability to create the perfect risotto texture. The addition of roasted pumpkin not only enhances the dish with its vibrant color but also provides a natural sweetness that balances beautifully with the savory notes of sage. This Pumpkin and Sage Risotto recipe serves 4-6 people.
Ingredients:
- 1 small pumpkin, peeled and cubed
- 2 tablespoons olive oil
- Salt and pepper to taste
- 1 tablespoon unsalted butter
- 1 small onion, finely chopped
- 2 cloves garlic, minced
- 1 1/2 cups arborio rice
- 1/2 cup dry white wine
- 5 cups vegetable or chicken broth
- 1/2 cup grated Parmesan cheese
- 1 tablespoon fresh sage, chopped
- Additional sage leaves for garnish (optional)
Instructions:
- Prepare the Pumpkin: Preheat your oven to 400°F (200°C). Spread the cubed pumpkin on a baking sheet, drizzle with 1 tablespoon of olive oil, and season with salt and pepper. Roast for 20-25 minutes until the pumpkin is tender and slightly caramelized. Set aside.
- Prepare the Broth: In a saucepan, heat the vegetable or chicken broth and keep it warm over low heat. This will guarantee that when added to the rice, it maintains a consistent cooking temperature.
- Sauté the Aromatics: In a large pan, heat the remaining tablespoon of olive oil and the butter over medium heat. Add the chopped onion and cook until translucent, about 5 minutes. Add the minced garlic and cook for another minute until fragrant.
- Cook the Rice: Add the arborio rice to the pan, stirring to coat the rice grains with the oil and butter. Cook for 2 minutes until the rice is lightly toasted. Pour in the white wine and stir until the wine is fully absorbed by the rice.
- Add the Broth Gradually: Begin adding the warm broth to the rice, one ladleful at a time. Stir frequently, allowing each addition to be absorbed before adding the next. Continue this process until the rice is creamy and cooked to al dente, about 18-20 minutes.
- Incorporate the Pumpkin: Gently fold in the roasted pumpkin cubes and chopped fresh sage into the risotto. Cook for an additional 2-3 minutes to heat through and meld the flavors.
- Finish with Parmesan: Remove the pan from heat and stir in the grated Parmesan cheese until melted and creamy. Adjust seasoning with salt and pepper to taste.
- Serve: Serve the risotto hot, garnished with additional sage leaves if desired.
Extra Tips: For the best results, use a heavy-bottomed pan to help distribute heat evenly while cooking the risotto. Stirring frequently is essential to achieving the creamy texture, so be patient and attentive. If you prefer a more intense sage flavor, you can infuse the broth with additional sage during the warming process. Finally, don’t rush the resting time; letting the risotto sit for a couple of minutes before serving allows the flavors to fully develop.
Witch’s Brew Cheese Fondue
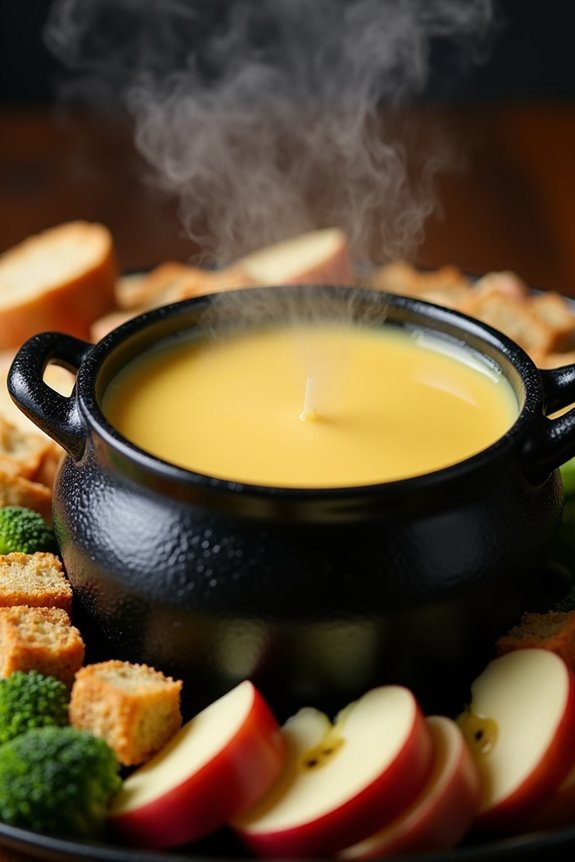
Transform your Halloween party into a cauldron of delectable flavors with this Witch’s Brew Cheese Fondue. Perfect for a gathering of 4-6 people, this magical dish is sure to cast a spell on your taste buds with its creamy, cheesy goodness. Serve it in a black cauldron-like pot for a truly bewitching presentation, and watch as your guests delight in dipping an assortment of treats into this bubbling brew.
Whether you’re hosting a spooky soirée or a cozy night in with friends, this fondue is the perfect way to celebrate the season.
This fondue combines a blend of sharp cheddar and creamy Gruyère cheeses with a hint of garlic and a splash of dry white wine, creating a harmonious mix of flavors. The addition of a little nutmeg adds a subtle autumnal warmth, while a touch of mustard powder introduces a gentle tang.
Accompany this luscious dip with an array of dippables such as crusty bread cubes, crisp apple slices, or lightly steamed vegetables, and you’ll have a party appetizer that’s as entertaining as it’s delicious.
Ingredients (serving size: 4-6 people):
- 1 clove garlic, halved
- 1 cup dry white wine
- 1 tablespoon lemon juice
- 8 ounces sharp cheddar cheese, grated
- 8 ounces Gruyère cheese, grated
- 1 tablespoon cornstarch
- 1/4 teaspoon mustard powder
- 1/4 teaspoon ground nutmeg
- Salt and pepper to taste
- Assorted dippables (e.g., bread cubes, apple slices, steamed broccoli)
Cooking Instructions:
- Prepare the Pot: Rub the inside of a fondue pot or medium-sized saucepan with the cut sides of the garlic clove. This will infuse the pot with a mild garlic flavor.
- Heat the Liquid: In the prepared pot, combine the white wine and lemon juice. Heat over medium heat until it begins to simmer gently. Don’t bring it to a boil, as this can affect the texture of the cheese.
- Mix the Cheese: In a medium bowl, toss the grated cheddar and Gruyère cheeses with the cornstarch until well coated. This will help thicken the fondue and prevent the cheese from clumping.
- Melt the Cheese: Gradually add the cheese mixture to the simmering wine, stirring constantly with a wooden spoon in a figure-eight motion. Allow each addition to melt completely before adding more.
- Season the Fondue: Once the cheese is fully melted and smooth, stir in the mustard powder and nutmeg. Taste and season with salt and pepper as desired.
- Serve: Transfer the fondue to a fondue pot with a flame underneath to keep it warm, and arrange the assorted dippables around it. Encourage your guests to dip and enjoy!
Extra Tips:
When making Witch’s Brew Cheese Fondue, it’s crucial to maintain a consistent low heat to prevent the cheese from separating.
If the fondue becomes too thick, simply add a little more wine to adjust the consistency. Be sure to keep stirring during the melting process to guarantee a smooth texture.
If you find the fondue begins to cool and solidify too quickly, consider using a small candle or tea light under the pot to maintain the ideal dipping consistency throughout your gathering.
Enjoy the enchanting experience of this savory treat!
Vampire Bat Wings

Transform your Halloween party into a spine-chilling feast with our Vampire Bat Wings recipe. These dark, spicy, and delicious wings aren’t only a visual treat but also a tantalizing addition to your menu. Their eerie black color is both intriguing and appetizing, making them perfect for a night of Halloween fun. The secret to their spooky hue is black food coloring, which gives these wings a sinister yet inviting appearance.
Our Vampire Bat Wings are seasoned to perfection with a blend of spices that will tingle your taste buds. This recipe serves 4-6 people, making it ideal for a small gathering of ghouls and goblins. Whether you’re hosting a Halloween party or just want to enjoy a themed night in, these wings will surely be the star of the evening.
Ingredients:
- 2 pounds (about 1 kg) chicken wings
- 3 tablespoons soy sauce
- 2 tablespoons honey
- 1 tablespoon olive oil
- 4 cloves garlic, minced
- 1 teaspoon ground ginger
- 1 teaspoon smoked paprika
- 1 teaspoon onion powder
- 1 teaspoon salt
- 1/2 teaspoon black pepper
- 1 tablespoon black food coloring
- 1 tablespoon white sesame seeds (optional, for garnish)
- Fresh cilantro leaves (optional, for garnish)
Instructions:
- Prepare the Marinade: In a large mixing bowl, combine the soy sauce, honey, olive oil, minced garlic, ground ginger, smoked paprika, onion powder, salt, and black pepper. Stir well to guarantee all ingredients are thoroughly mixed.
- Add the Food Coloring: Gently stir in the black food coloring until the marinade turns a deep, consistent black. Adjust the amount of food coloring if necessary to achieve the desired color.
- Marinate the Wings: Add the chicken wings to the bowl, guaranteeing each wing is fully coated with the marinade. Cover the bowl with plastic wrap and refrigerate for at least 2 hours, allowing the flavors to meld and the color to set into the wings.
- Preheat the Oven: Preheat your oven to 400°F (200°C). Line a baking sheet with aluminum foil and place a wire rack on top. This setup will help the wings cook evenly.
- Arrange and Bake: Remove the wings from the marinade, allowing any excess to drip off. Arrange the wings in a single layer on the wire rack. Bake in the preheated oven for 35-40 minutes, or until the wings are cooked through and the skin is crispy.
- Garnish and Serve: Once baked, remove the wings from the oven and let them rest for a few minutes. Optionally, sprinkle white sesame seeds and fresh cilantro leaves over the wings for added texture and flavor. Serve hot and enjoy the spooky delight!
Extra Tips:
For an extra crispy texture, you can broil the wings for an additional 3-5 minutes after baking. Keep a close eye to prevent burning.
If you’re preparing these Vampire Bat Wings ahead of time, you can marinate them overnight for an even deeper flavor.
Adjust the spice level by adding more or less smoked paprika and black pepper according to your preference.
Finally, serve with a dipping sauce like ranch or blue cheese for a cooling contrast to the spicy wings.
Mummified Brie With Cranberry Sauce
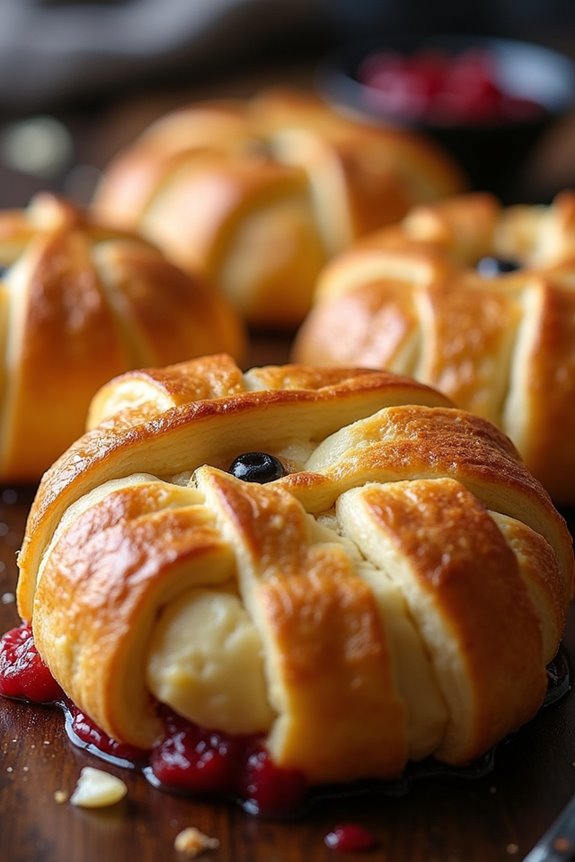
Mummified Brie With Cranberry Sauce is a spooky yet sophisticated appetizer perfect for your Halloween gatherings. This dish combines the creaminess of melted Brie cheese with the tartness of cranberry sauce, all wrapped in a flaky puff pastry that resembles a mummy.
It’s not only visually intriguing but also a delight to the taste buds, making it an excellent choice for impressing your guests with minimal effort. Serve it warm and watch as your guests unwrap the pastry to reveal the gooey, cheesy goodness inside.
The combination of the buttery puff pastry, rich Brie, and sweet-tart cranberry sauce creates a harmonious flavor profile that’s hard to resist. The presentation is what sets this dish apart, as the puff pastry is creatively wrapped around the Brie to mimic a mummy’s bandages, complete with two almond sliver eyes peeking through.
This makes it an ideal centerpiece for your Halloween snack table, and its delicious taste will keep everyone coming back for more.
Ingredients:
- 1 sheet of puff pastry, thawed
- 1 wheel of Brie cheese (approximately 8 ounces)
- 1/3 cup cranberry sauce
- 1 egg
- 1 tablespoon water
- 2 slivered almonds
Serving Size: 4-6 people
Cooking Instructions:
- Preheat the Oven: Start by preheating your oven to 375°F (190°C). This guarantees that the oven is at the right temperature when you’re ready to bake the mummified Brie.
- Prepare the Puff Pastry: Roll out the thawed puff pastry sheet on a lightly floured surface. Use a sharp knife or a pizza cutter to cut the pastry into long strips, approximately 1 inch wide.
- Assemble the Brie: Place the Brie wheel in the center of a baking sheet lined with parchment paper. Carefully spread the cranberry sauce over the top of the Brie, ensuring an even layer.
- Wrap the Brie: Take the strips of puff pastry and wrap them around the Brie in a crisscross pattern, leaving a small opening for the “mummy’s eyes.” Make sure the strips overlap and cover the entire wheel. This will help hold in the cranberry sauce as it bakes.
- Add the Eyes: Insert the slivered almonds into the opening as eyes, giving the mummy a playful look.
- Egg Wash: In a small bowl, beat the egg with a tablespoon of water to create an egg wash. Brush this mixture over the wrapped pastry to give it a golden, shiny finish once baked.
- Bake: Place the baking sheet in the preheated oven and bake for about 20-25 minutes, or until the pastry is golden brown and puffed up.
- Serve: Remove from the oven and let it cool for a few minutes before serving. This allows the cheese to firm up slightly, making it easier to slice.
Extra Tips:
For a more personalized touch, you can substitute the cranberry sauce with fig jam or apricot preserves if you prefer a different flavor profile. Confirm the puff pastry is well-thawed before using; otherwise, it might crack when wrapping.
Keep an eye on the baking time as ovens can vary; you want the pastry to be golden but not too dark. Serve the Mummified Brie with slices of baguette or crackers to complete the appetizer experience.
Charred Cauldron Veggie Platter
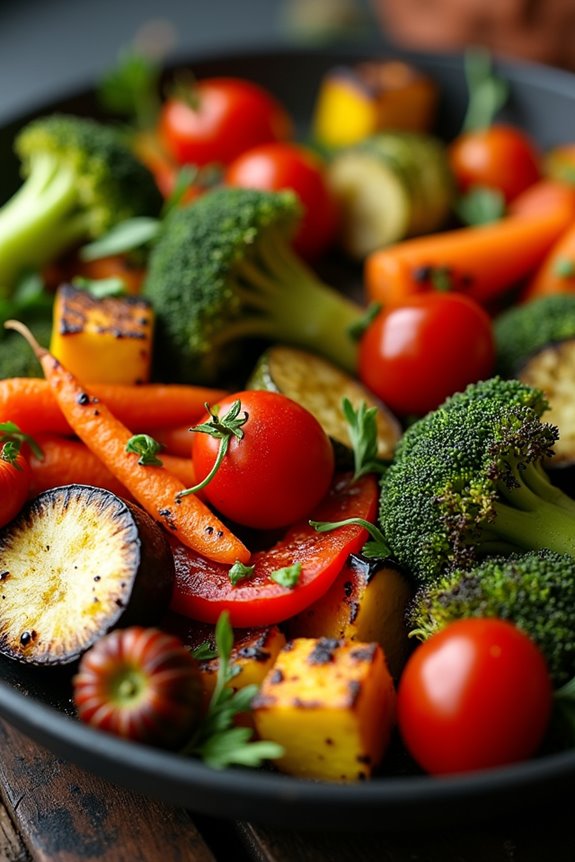
Transform your Halloween gathering with a spooky and nutritious Charred Cauldron Veggie Platter. This dish not only serves as a delicious appetizer but also adds a mystical touch to your Halloween spread. The vibrant array of vegetables is roasted to perfection, giving them a slightly charred, smoky flavor that pleases both the eyes and the taste buds.
Whether you’re hosting a party or just want to enjoy a themed meal with your family, this veggie platter is the perfect choice.
The Charred Cauldron Veggie Platter is easy to make and requires minimal preparation time. The key is in selecting a variety of colorful vegetables and seasoning them just right to enhance their natural flavors. The slight charring adds a layer of depth to the taste, making each bite a delightful experience.
Serve it as an appetizer or a side dish, and it’s sure to be a hit with kids and adults alike.
Ingredients (Serves 4-6):
- 1 large head of broccoli, cut into florets
- 2 bell peppers (one red, one yellow), sliced
- 2 medium carrots, peeled and cut into sticks
- 1 small zucchini, sliced
- 1 small eggplant, cut into cubes
- 8-10 cherry tomatoes
- 2 tablespoons olive oil
- 1 teaspoon smoked paprika
- 1 teaspoon garlic powder
- Salt and pepper to taste
- Fresh parsley for garnish
Cooking Instructions:
- Preheat the Oven: Begin by preheating your oven to 425°F (220°C) to guarantee it’s hot enough to properly roast and char the vegetables.
- Prepare the Vegetables: Wash all the vegetables thoroughly. Cut the broccoli into florets, slice the bell peppers, carrots, and zucchini, and cube the eggplant. Leave the cherry tomatoes whole as they’ll burst and add juiciness during roasting.
- Season the Vegetables: In a large mixing bowl, combine the prepared vegetables. Drizzle with olive oil, then sprinkle with smoked paprika, garlic powder, salt, and pepper. Toss everything together until the vegetables are evenly coated with the seasoning.
- Roast the Vegetables: Spread the seasoned vegetables on a large baking sheet in a single layer. This guarantees even roasting. Place the baking sheet in the preheated oven and roast for 20-25 minutes, stirring halfway through. The vegetables should be tender and slightly charred on the edges.
- Garnish and Serve: Once the vegetables are roasted, remove them from the oven and let them cool slightly. Transfer to a serving platter and garnish with fresh parsley for a pop of color. Serve warm or at room temperature.
Extra Tips:
For an added touch of Halloween flair, consider carving small jack-o’-lantern faces into the bell pepper slices before roasting.
You can also serve the veggies with a side of your favorite dip, such as hummus or a garlic aioli, to complement the smoky flavors. If you want to add a little more heat, sprinkle some red pepper flakes over the vegetables before roasting.
Smoky Ghost Pepper Salsa
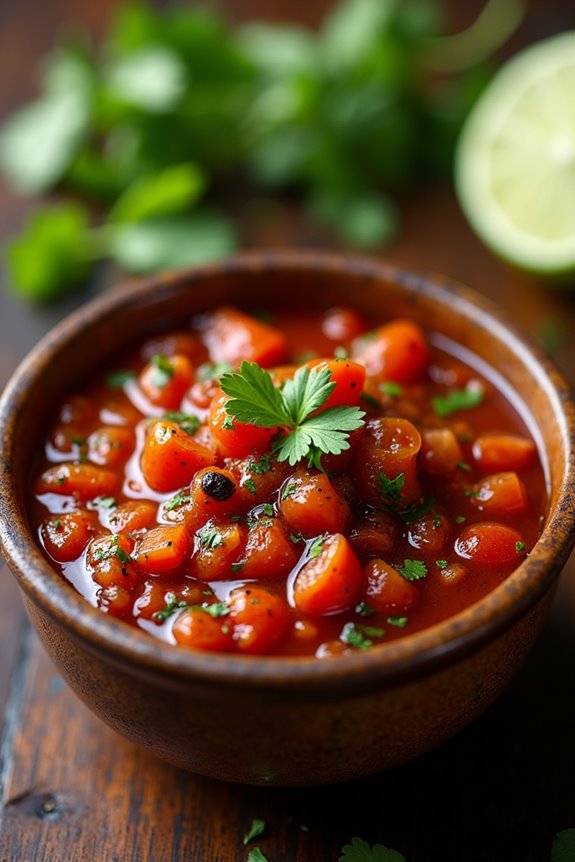
Spice up your Halloween festivities with a fiery and flavorful Smoky Ghost Pepper Salsa. This tantalizing salsa combines the intense heat of ghost peppers with the smoky richness of roasted tomatoes and spices, making it the perfect accompaniment for tortilla chips or a zesty topping for grilled meats.
Its bold color and robust flavor make it a striking addition to any Halloween spread, ensuring your guests experience a thrilling culinary adventure.
Ghost peppers, also known as Bhut Jolokia, are renowned for their extreme spiciness, so this salsa isn’t for the faint of heart. However, when balanced with the right ingredients, their heat can be tamed to create a salsa that’s both enjoyable and memorable.
The addition of fresh lime juice, cilantro, and a hint of garlic brings invigorating notes to the dish, while the smoky undertones add depth and complexity. Whether you’re hosting a Halloween party or looking to up the ante on your festive snacks, this Smoky Ghost Pepper Salsa is sure to be a crowd-pleaser.
Ingredients (Serves 4-6):
- 2 large tomatoes
- 2 ghost peppers
- 1 small onion
- 2 cloves of garlic
- 1 tablespoon olive oil
- 1 teaspoon smoked paprika
- 1 teaspoon salt
- 1/2 teaspoon black pepper
- Juice of 1 lime
- 1/4 cup fresh cilantro leaves
Cooking Instructions:
- Prepare the Ingredients: Start by washing the tomatoes, ghost peppers, and cilantro. Chop the tomatoes into quarters and finely chop the cilantro. Peel the onion and garlic cloves, then chop the onion into quarters.
- Roast the Vegetables: Preheat your oven to 400°F (200°C). Place the chopped tomatoes, ghost peppers, onion, and garlic cloves on a baking sheet. Drizzle them with olive oil, then sprinkle with smoked paprika, salt, and black pepper. Toss to coat evenly.
- Bake Until Charred: Roast the vegetables in the preheated oven for 20-25 minutes, or until the tomatoes and peppers are slightly charred and the onion is soft. Remove from the oven and let them cool for a few minutes.
- Blend the Salsa: Transfer the roasted vegetables into a blender or food processor. Add the lime juice and fresh cilantro leaves. Pulse the mixture until it reaches your desired consistency. For a chunkier salsa, pulse a few times, or blend longer for a smoother texture.
- Adjust Seasoning: Taste the salsa and adjust the seasoning if necessary. You can add more salt, lime juice, or cilantro according to your preference.
- Serve and Enjoy: Pour the Smoky Ghost Pepper Salsa into a serving bowl and garnish with additional cilantro leaves if desired. Serve with tortilla chips or as a condiment with your favorite dishes.
Extra Tips: When handling ghost peppers, it’s essential to wear gloves to protect your skin from their intense heat. Avoid touching your face or eyes, and wash your hands thoroughly afterward.
If you prefer a milder salsa, you can reduce the number of ghost peppers or substitute with a milder chili pepper. To intensify the smoky flavor, consider grilling the vegetables instead of roasting them in the oven.
This salsa can be made in advance and stored in the refrigerator for up to three days, allowing the flavors to meld even further.
Poison Apple Sangria

Indulge in a bewitching drink this Halloween with Poison Apple Sangria, a delicious concoction that’s as eerie as it’s enticing. This spooky-themed beverage combines the crisp sweetness of apples with the rich taste of red wine, resulting in a drink that’s both invigorating and hauntingly festive. Perfect for a Halloween party or a night in with friends, this cocktail will surely add a touch of magic to your celebrations.
The Poison Apple Sangria isn’t only visually striking with its deep red hue and floating apple slices but also incredibly easy to make. The blend of apple cider, red wine, and a hint of brandy creates a drink that seamlessly balances fruitiness with a slight boozy kick. Enjoy this sangria served over ice with a garnish of apple slices for an extra festive touch. Here’s how you can craft this enchanting drink for a group of 4-6 people.
Ingredients:
- 1 bottle (750ml) of red wine
- 2 cups of apple cider
- 1/2 cup of brandy
- 1/4 cup of orange liqueur
- 3 tablespoons of honey
- 1 teaspoon of cinnamon
- 2 apples, thinly sliced
- 1 orange, thinly sliced
- 1 cup of club soda
Instructions:
- Prepare the Base: In a large pitcher, combine the red wine, apple cider, brandy, and orange liqueur. Stir the mixture well to verify the alcohols are blended evenly.
- Sweeten and Spice: Add the honey and cinnamon to the pitcher. Stir until the honey is completely dissolved and the cinnamon is well distributed throughout the mixture.
- Add the Fruit: Place the apple and orange slices into the pitcher. These not only infuse the sangria with their flavors but also add to the visual appeal of the drink.
- Chill: Cover the pitcher and refrigerate the sangria for at least 2 hours. This allows the flavors to meld together beautifully.
- Serve: Before serving, add the club soda to the pitcher and gently stir. Pour the sangria into glasses filled with ice, making sure each glass gets some fruit slices.
- Garnish: For an extra touch of Halloween flair, garnish each glass with a slice of apple on the rim.
Extra Tips:
For a more potent flavor, prepare the sangria the night before your event and let it sit in the refrigerator overnight. This extended chilling time will enhance the infusion of flavors.
If you prefer a sweeter sangria, adjust the amount of honey to taste. Additionally, you can experiment with different types of apples for varied flavors and textures.
Remember to always serve Poison Apple Sangria well-chilled for the ultimate invigorating experience.
Zombie Brain Panna Cotta
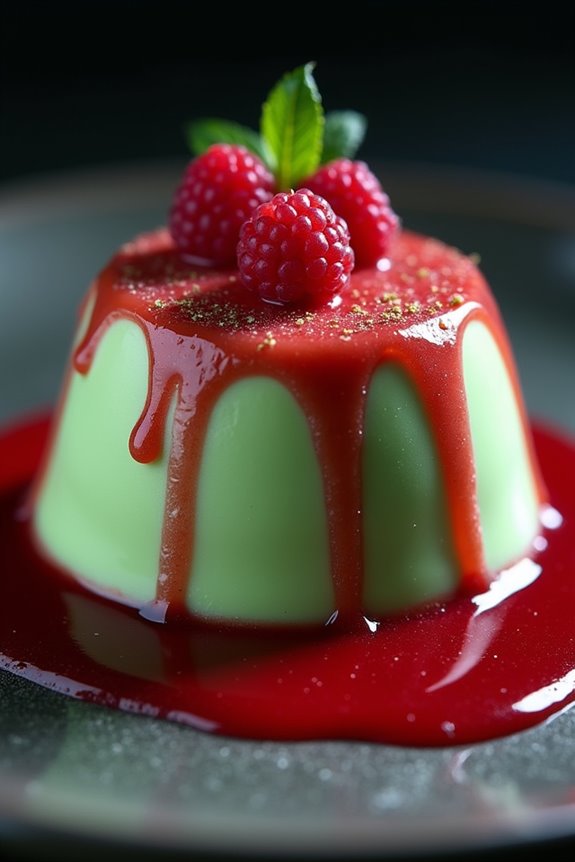
Indulge in a spooky culinary adventure with Zombie Brain Panna Cotta, a dessert that combines eerie aesthetics with delicious flavors. This gory yet delightful treat is perfect for Halloween gatherings, providing a fun and creepy experience for both kids and adults.
The panna cotta’s creamy texture, combined with a vibrant topping, creates an eye-catching dish that resembles a zombie brain. The vanilla-flavored base is complemented by a gruesome-looking raspberry sauce, making it a delectable and haunting centerpiece for your Halloween table.
Perfect for a serving size of 4-6 people, this recipe is sure to impress your guests with both its appearance and taste. The preparation process involves creating a smooth panna cotta mixture, allowing it to set, and then adorning it with a striking raspberry sauce.
Whether you’re hosting a Halloween party or simply enjoying a frightful night in, this Zombie Brain Panna Cotta will add a touch of macabre magic to your festivities.
Ingredients for 4-6 servings:
- 2 cups heavy cream
- 1 cup whole milk
- 1/2 cup granulated sugar
- 2 teaspoons vanilla extract
- 1 packet (about 2 1/4 teaspoons) unflavored gelatin
- 1/4 cup cold water
- 1 1/2 cups fresh or frozen raspberries
- 1/4 cup sugar (for raspberry sauce)
- 2 tablespoons lemon juice
- Green food coloring (optional)
- Red food coloring (for raspberry sauce)
Cooking Instructions:
- Prepare the Gelatin: In a small bowl, sprinkle the gelatin over the cold water and let it sit for 5-10 minutes until it softens and blooms.
- Create the Panna Cotta Base: In a medium saucepan, combine the heavy cream, whole milk, and granulated sugar. Heat the mixture over medium heat, stirring occasionally, until the sugar dissolves and the mixture is hot but not boiling.
- Incorporate Gelatin: Remove the saucepan from heat and add the softened gelatin, stirring until it completely dissolves. Stir in the vanilla extract and a few drops of green food coloring if desired, to give the panna cotta a ghoulish hue.
- Pour and Set: Pour the mixture into brain-shaped molds or small serving cups. Allow them to cool to room temperature, then cover with plastic wrap and refrigerate for at least 4 hours or until fully set.
- Prepare Raspberry Sauce: In a small saucepan, combine the raspberries, 1/4 cup sugar, and lemon juice. Cook over medium heat, stirring occasionally, until the raspberries break down and the sauce thickens, about 10 minutes. Strain the sauce through a fine-mesh sieve to remove seeds and add a few drops of red food coloring for a blood-like appearance.
- Serve the Panna Cotta: Once set, unmold the panna cotta onto serving plates or serve directly in cups. Drizzle with the prepared raspberry sauce, allowing it to cascade like blood over the panna cotta.
Extra Tips:
To achieve the best results, make certain that the gelatin is fully dissolved in the cream mixture to avoid any lumps. If using fresh raspberries, taste the sauce and adjust the sugar as needed, depending on the fruit’s natural sweetness.
For a more dramatic effect, consider adding a touch of edible glitter or silver dragees as brain “veins” on top of the panna cotta. Make sure to prepare the dessert a day in advance, allowing ample time for it to set and for the flavors to meld together beautifully.
Black Magic Chocolate Mousse

Indulge in the dark delights of Halloween with our Black Magic Chocolate Mousse, a dessert that perfectly captures the mysterious and enchanting spirit of the holiday. This rich and creamy mousse combines deep, dark chocolate with a hint of espresso to create a dessert that’s as decadent as it’s bewitching. Perfect for a Halloween gathering or as a treat for your family, this mousse will captivate both the young and the old with its silky texture and intense flavor.
Creating this magical dessert is easier than it seems, making it a fantastic choice for home cooks who want to impress their guests without spending hours in the kitchen. With a few simple ingredients and some chilling time, you’ll have a dessert that’s ready to cast a spell on anyone who takes a bite. The following recipe serves 4-6 people, making it ideal for a small party or an intimate dinner.
Ingredients:
- 8 ounces dark chocolate (70% cocoa or higher), chopped
- 3 tablespoons unsalted butter
- 1 tablespoon espresso powder
- 4 large eggs, separated
- 1/4 cup granulated sugar
- 1 teaspoon vanilla extract
- 1/2 cup heavy cream
- A pinch of salt
- Optional: whipped cream and chocolate shavings for garnish
Instructions:
- Melt the Chocolate and Butter: In a heatproof bowl set over a pot of simmering water, combine the chopped dark chocolate and unsalted butter. Stir occasionally until fully melted and smooth. Remove from heat and stir in the espresso powder. Let the mixture cool slightly.
- Prepare the Egg Mixture: In a separate bowl, whisk together the egg yolks, half of the granulated sugar, and vanilla extract until the mixture is pale and thick. Gradually mix in the melted chocolate mixture until well combined.
- Beat the Egg Whites: In another clean, dry bowl, whisk the egg whites and a pinch of salt until soft peaks form. Gradually add the remaining sugar and continue to beat until stiff peaks form.
- Fold the Mixtures: Gently fold the beaten egg whites into the chocolate mixture in three batches, being careful not to deflate the airy whites.
- Whip the Cream: In a clean bowl, whip the heavy cream until soft peaks form. Fold the whipped cream into the chocolate mixture until no white streaks remain.
- Chill the Mousse: Spoon the mousse into individual serving glasses or bowls. Cover with plastic wrap and refrigerate for at least 2 hours, or until set.
- Serve and Garnish: Before serving, optionally top with a dollop of whipped cream and a sprinkle of chocolate shavings for an extra touch of elegance.
Extra Tips: To guarantee the mousse achieves the perfect texture, make sure all your mixing bowls are clean and dry, especially when whipping the egg whites. If any grease or moisture is present, it can prevent the whites from achieving the necessary volume.
For a more intense flavor, consider adding a splash of coffee liqueur to the chocolate mixture. Finally, be patient during the folding process; gentle folding helps maintain the airiness of the mousse for a light, fluffy finish.
Eerie Eyeball Caprese Skewers
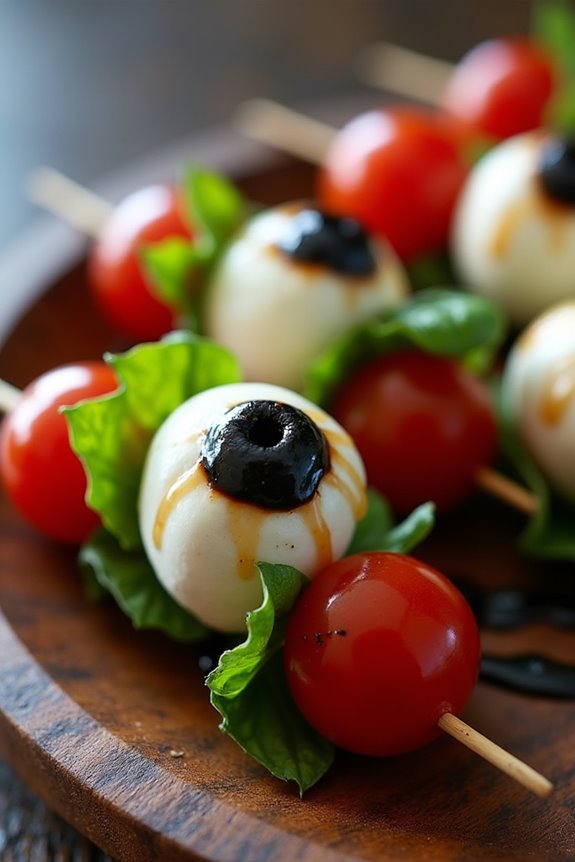
Eerie Eyeball Caprese Skewers are a spooky twist on the classic Italian appetizer, perfect for adding a touch of creepiness to your Halloween gathering. These skewers aren’t only fun and festive but also delicious and easy to make. The combination of fresh mozzarella, cherry tomatoes, and basil leaves mirrors the beloved flavors of a traditional Caprese salad, while the olive “eyeballs” provide a hauntingly delightful touch. This recipe is a foolproof way to impress your guests with both taste and creativity.
Ideal for a serving size of 4-6 people, these skewers can be prepared in advance, allowing you to focus on other party preparations. Each skewer is carefully crafted to resemble eerie eyeballs staring back at your guests, making them an excellent conversation starter. Whether you’re hosting a Halloween party or simply want to surprise your family with a spooky appetizer, these Eerie Eyeball Caprese Skewers are the perfect choice.
Ingredients:
- 20 cherry tomatoes
- 20 small fresh mozzarella balls (bocconcini)
- 10 large black olives
- 20 fresh basil leaves
- 2 tablespoons balsamic glaze
- Salt and pepper to taste
- 20 wooden or bamboo skewers
Cooking Instructions:
- Prepare the Ingredients: Begin by rinsing the cherry tomatoes and fresh basil leaves under cold water, then pat them dry with a paper towel. Drain the mozzarella balls and set them aside. Slice each black olive in half lengthwise.
- Assemble the Skewers: Take a skewer and start by threading a cherry tomato onto it. Next, add a basil leaf, followed by a mozzarella ball. Place one olive half on top of the mozzarella ball to create the “eyeball” effect. Repeat this process until all skewers are assembled.
- Season the Skewers: Arrange the skewers on a serving platter or tray. Drizzle the balsamic glaze evenly over the skewers, making certain each one gets a touch of sweetness. Sprinkle a pinch of salt and pepper over the skewers for added flavor.
- Chill Before Serving: For the best flavor, refrigerate the skewers for at least 30 minutes before serving. This allows the flavors to meld together beautifully and guarantees the mozzarella stays firm.
Extra Tips:
To enhance the visual effect of the eyeballs, try using a small melon baller to scoop out a tiny portion of the mozzarella ball before placing the olive half on top. This creates a more pronounced eye shape.
Additionally, if you prefer a sharper taste, consider using marinated mozzarella balls for added flavor depth. Remember, these skewers can be made a few hours in advance, making them a hassle-free addition to your Halloween menu. Store them in the refrigerator until you’re ready to serve to maintain their freshness and visual appeal.
Sinister Stuffed Mushrooms
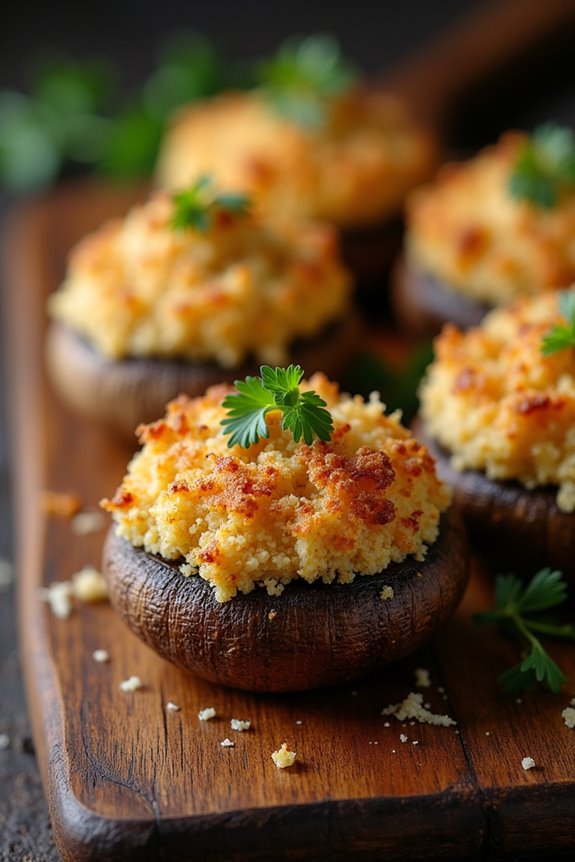
Sinister Stuffed Mushrooms are the perfect addition to your Halloween spread, offering a deliciously eerie twist to a classic appetizer. These bite-sized treats aren’t only visually appealing but are packed with flavor, making them a hit at any spooky gathering. The combination of savory ingredients such as garlic, herbs, and cheese melds together to create a filling that’s both creamy and rich, while the mushrooms themselves provide a tender and earthy base.
Whether you’re hosting a Halloween party or simply looking to add a bit of frightful fun to your dinner table, these stuffed mushrooms are sure to delight your guests.
The dish is designed to serve 4-6 people, making it ideal for small gatherings or as part of a larger feast. To begin, fresh mushrooms are hollowed out to create little edible vessels for the savory stuffing. The filling, a mix of sautéed onions, garlic, cream cheese, and herbs, is spooned into the mushroom caps before they’re baked to perfection. The result is a tantalizing appetizer that’s crispy on top and tender on the inside, delivering a perfect blend of textures and flavors.
Ingredients (Serves 4-6):
- 24 large button mushrooms
- 2 tablespoons olive oil
- 1 small onion, finely chopped
- 2 cloves garlic, minced
- 1/2 cup cream cheese, softened
- 1/4 cup grated Parmesan cheese
- 1/4 cup breadcrumbs
- 2 tablespoons chopped fresh parsley
- 1 teaspoon dried thyme
- Salt and pepper to taste
- Additional Parmesan cheese for topping (optional)
Cooking Instructions:
- Prepare the Mushrooms: Preheat your oven to 375°F (190°C). Gently clean the mushrooms with a damp paper towel. Carefully remove the stems and set the caps aside. Finely chop the stems for the stuffing.
- Sauté the Vegetables: In a skillet over medium heat, add the olive oil. Once hot, sauté the chopped onion and garlic until they become translucent and aromatic, about 3-4 minutes. Add the chopped mushroom stems and continue cooking for another 2 minutes.
- Make the Filling: In a mixing bowl, combine the sautéed vegetables with cream cheese, Parmesan cheese, breadcrumbs, parsley, thyme, salt, and pepper. Mix until all ingredients are well incorporated.
- Stuff the Mushrooms: Spoon the filling evenly into each mushroom cap, pressing down slightly to confirm the filling stays in place. Place the stuffed mushrooms on a baking sheet lined with parchment paper.
- Bake the Mushrooms: Bake in the preheated oven for 20-25 minutes, or until the tops are golden brown and the mushrooms are tender. If desired, sprinkle additional Parmesan cheese on top during the final 5 minutes of baking for an extra cheesy finish.
- Serve: Once baked, allow the mushrooms to cool slightly before serving. Arrange them on a platter for a ghoulish display.
Extra Tips:
When choosing mushrooms, opt for ones that are firm and have a uniform size to promote even cooking. Feel free to experiment with the filling by adding ingredients like crumbled bacon or chopped nuts for additional flavor and texture.
If you want to make them spicier, a pinch of cayenne pepper can add a nice heat to the dish. Finally, these mushrooms can be prepared a day in advance and stored in the refrigerator; just pop them in the oven to bake right before serving.
Bewitching Beetroot Hummus
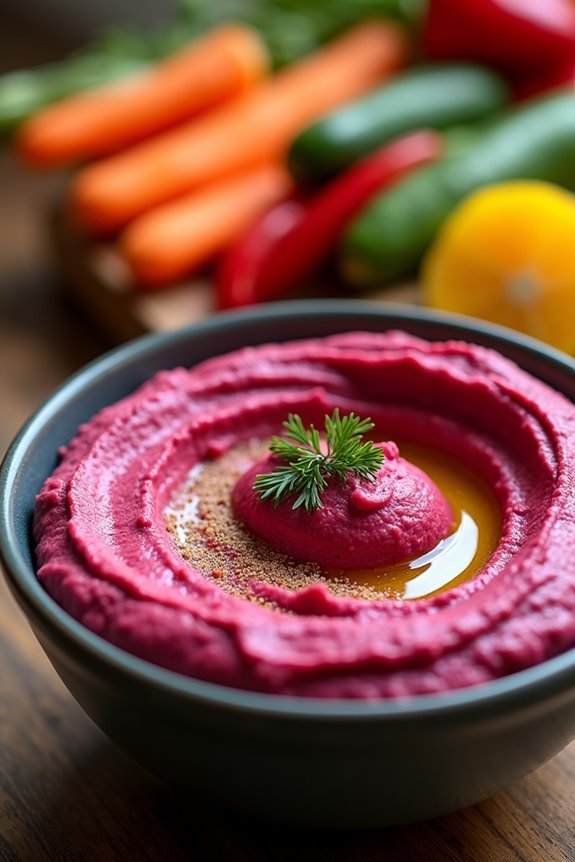
This Halloween, surprise your guests with a spooky yet nutritious treat – Bewitching Beetroot Hummus. This vibrant pink dip isn’t only eye-catching but also packed with nutrients, thanks to the star ingredient: beets. The sweetness of the roasted beets is perfectly balanced by the creamy texture of chickpeas and the tangy notes of lemon juice, making it a delicious and healthy addition to your Halloween spread.
Whether served with veggie sticks, pita bread, or crackers, this hummus is sure to be a hit at any gathering. Preparing Bewitching Beetroot Hummus is as easy as it’s rewarding. The earthy flavor of the beetroot combined with the classic hummus ingredients creates a unique and festive dish. Not only does it stand out on a table full of treats, but it’s also an excellent way to incorporate more vegetables into your celebration.
This recipe yields enough to serve 4-6 people, making it perfect for a small party or family gathering.
Ingredients:
- 2 medium beetroots, roasted and peeled
- 1 can (15 oz) chickpeas, drained and rinsed
- 3 tablespoons tahini
- 2 tablespoons olive oil
- 2 tablespoons lemon juice
- 1 clove garlic, minced
- 1 teaspoon ground cumin
- Salt and pepper to taste
- Pita bread or vegetable sticks for serving
Cooking Instructions:
- Roast the Beetroots: Preheat your oven to 400°F (200°C). Wrap each beetroot in aluminum foil and place them on a baking sheet. Roast for about 45-60 minutes, or until they’re tender when pierced with a fork. Allow them to cool before peeling.
- Prepare the Hummus Base: In a food processor, combine the roasted beetroots, chickpeas, tahini, olive oil, lemon juice, garlic, and cumin.
- Blend the Ingredients: Process the ingredients on high speed until smooth and creamy. You may need to stop occasionally to scrape down the sides of the processor to guarantee all ingredients are well incorporated.
- Season the Hummus: Taste the hummus and season with salt and pepper according to your preference. If the hummus is too thick, you can add a tablespoon of water or more olive oil to achieve the desired consistency.
- Serve: Spoon the beetroot hummus into a serving bowl. Drizzle with a little olive oil and garnish with additional cumin or chopped fresh herbs if desired. Serve with pita bread or an assortment of vegetable sticks.
Extra Tips:
For the best results, make sure that the beetroots are fully roasted as this will enhance their sweetness and make them easier to blend into a smooth hummus.
You can also experiment with different toppings to add texture and flavor, such as roasted seeds, nuts, or a sprinkle of feta cheese. If you prefer a stronger garlic flavor, consider roasting the garlic alongside the beetroots.
Enjoy this vibrant dish as a healthy snack or a festive appetizer that fits perfectly with the Halloween theme!
Dark Chocolate Skulls With Sea Salt

Dark Chocolate Skulls With Sea Salt are the perfect treat to add a spooky yet sophisticated touch to your Halloween festivities.
These eerie chocolate creations not only look impressive but also deliver an irresistible blend of rich dark chocolate and a hint of sea salt that tantalizes the taste buds. Ideal for a Halloween party or a cozy night in, these skulls will delight both children and adults alike with their haunting appearance and exquisite flavor.
Making these chocolate skulls is surprisingly straightforward, requiring just a few ingredients and a bit of patience.
The key to achieving the perfect skull shape is using a silicone skull mold, which guarantees that the chocolate sets beautifully and releases easily. This recipe makes enough for 4-6 people, allowing everyone to indulge in this devilishly delightful treat.
Ingredients (Serves 4-6)
- 12 ounces of high-quality dark chocolate (70% cocoa or higher)
- 1 tablespoon of coconut oil
- 1/2 teaspoon of sea salt
- Optional: edible gold dust for decoration
Instructions
- Prepare the Mold: Begin by verifying your silicone skull mold is clean and completely dry. Any moisture can affect the texture of the chocolate.
- Melt the Chocolate: Break the dark chocolate into small pieces to guarantee even melting. Place the chocolate and coconut oil in a heatproof bowl. Set the bowl over a pot of simmering water, ensuring the bottom of the bowl doesn’t touch the water. Stir frequently until the chocolate is completely melted and smooth.
- Add Sea Salt: Once the chocolate is melted, remove the bowl from the heat and stir in the sea salt, ensuring it’s evenly distributed throughout the chocolate.
- Fill the Molds: Carefully spoon the melted chocolate into the skull molds, filling them up to the top. Gently tap the mold on the countertop a few times to remove any air bubbles.
- Chill the Chocolate: Place the filled mold in the refrigerator for at least 1 hour, or until the chocolate is completely set and firm to the touch.
- Unmold the Skulls: Once set, gently peel the silicone mold away from the chocolate skulls. Handle them carefully to avoid any breakage.
- Decorate (Optional): If desired, use a small brush to lightly dust the chocolate skulls with edible gold dust for an extra touch of glamour.
Extra Tips
When melting chocolate, be sure to keep the heat low to prevent it from seizing or burning.
If you don’t have coconut oil, you can substitute it with another neutral oil, but avoid using butter as it can alter the texture.
To achieve a glossy finish, consider tempering the chocolate before pouring it into the molds, which will give your skulls a professional look.
Store the finished skulls in a cool, dry place to maintain their shape and texture until you’re ready to serve them.