
Hey there, lovely readers! 🎃
This Halloween, let’s sprinkle some magic into our office gatherings with treats that are as enchanting as they are delicious.
Picture the joy on your coworkers’ faces when they spot whimsical Witch’s Brew Cupcakes or charming Mummy Rice Krispie Treats lighting up the break room table.
These delightful bites promise to boost the holiday spirit and add a touch of festivity to our workdays.
Ready to bring some sweetness to your Halloween celebrations? 🍬
Witch’s Brew Cupcakes
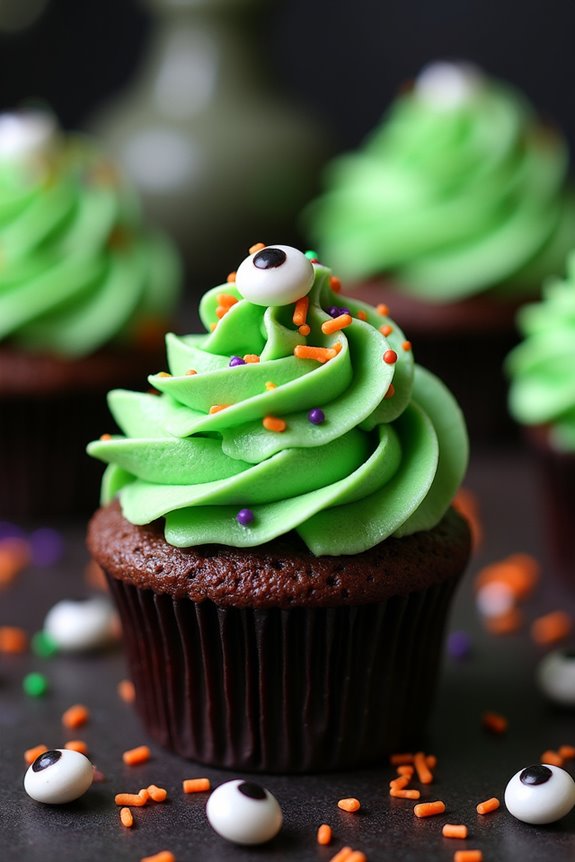
Witch’s Brew Cupcakes are the perfect Halloween treat to delight your coworkers with a touch of spooky sweetness. These cupcakes blend a rich chocolate base with a magical twist, topped with a vibrant green frosting that mimics a bubbling cauldron of witch’s brew. The addition of edible decorations, such as candy eyeballs and sprinkles, transforms these cupcakes into a festive treat that captures the essence of Halloween fun.
Easy to bake and decorate, Witch’s Brew Cupcakes are sure to be a hit at the office or any Halloween gathering. The key to these cupcakes lies in their enchanting presentation and deliciously moist texture. By using high-quality cocoa powder and a pinch of espresso powder, you can enhance the chocolate flavor, making each bite a decadent experience.
The green frosting is achieved with food coloring, and the decorations can be customized to suit your Halloween theme. Whether you’re an experienced baker or a novice in the kitchen, this recipe will guide you through creating a batch of cupcakes that your coworkers will talk about long after Halloween has passed.
Ingredients (Serves 4-6 people):
- 1 cup all-purpose flour
- 1 cup granulated sugar
- 1/3 cup cocoa powder
- 1/2 teaspoon baking soda
- 1/4 teaspoon salt
- 1/3 cup vegetable oil
- 1 large egg
- 1 teaspoon vanilla extract
- 1/2 cup buttermilk
- 1/2 teaspoon espresso powder (optional)
- Green food coloring
- 1/2 cup unsalted butter, softened
- 2 cups powdered sugar
- 2 tablespoons milk
- Candy eyeballs and Halloween sprinkles for decoration
Instructions:
- Preheat the oven to 350°F (175°C). Line a cupcake pan with 12 cupcake liners.
- Mix dry ingredients: In a large mixing bowl, whisk together the flour, sugar, cocoa powder, baking soda, salt, and espresso powder (if using).
- Combine wet ingredients: In a separate bowl, mix the vegetable oil, egg, and vanilla extract until well blended. Gradually add the buttermilk, stirring until smooth.
- Combine mixtures: Slowly add the wet ingredients to the dry ingredients, mixing until just combined. Be careful not to overmix.
- Fill cupcake liners: Divide the batter evenly among the cupcake liners, filling each about two-thirds full.
- Bake: Place the cupcake pan in the oven and bake for 18-20 minutes, or until a toothpick inserted into the center of a cupcake comes out clean. Allow cupcakes to cool completely on a wire rack.
- Prepare frosting: In a medium bowl, beat the softened butter until creamy. Gradually add powdered sugar, milk, and a few drops of green food coloring. Beat until the frosting is smooth and fluffy. Adjust the color by adding more food coloring if necessary.
- Decorate: Using a piping bag or a spatula, frost the cooled cupcakes with the green frosting. Decorate with candy eyeballs and Halloween sprinkles to create the look of a bubbling witch’s brew.
Extra Tips:
When making the frosting, start with a few drops of food coloring and gradually add more to achieve your desired shade of green. If you don’t have buttermilk on hand, you can make a substitute by adding a tablespoon of lemon juice or white vinegar to a measuring cup and filling it with milk to the 1/2 cup mark. Let it sit for a few minutes before use.
Additionally, for a more intense chocolate flavor, consider using Dutch-processed cocoa powder. Remember, the key to successful frosting is ensuring the cupcakes are completely cool before decorating, preventing the frosting from melting. Enjoy crafting these magical treats!
Mummy Rice Krispie Treats
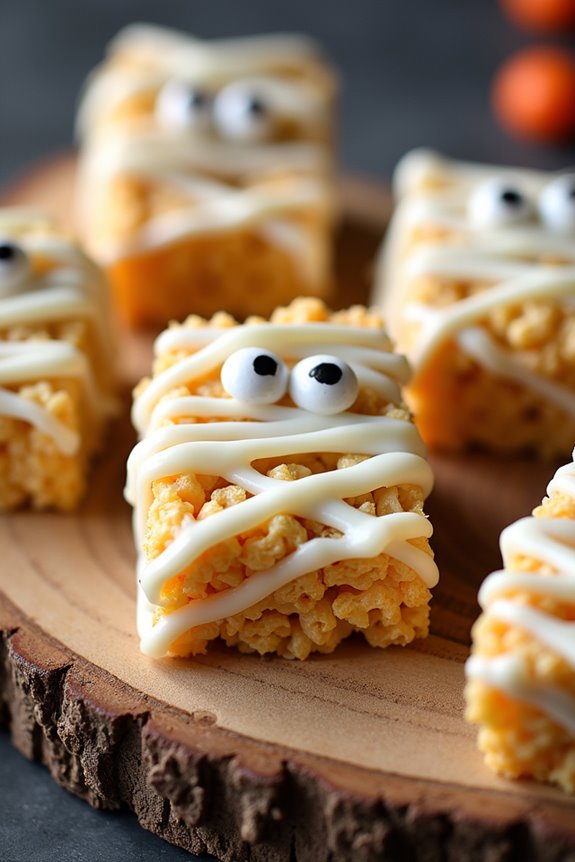
Mummy Rice Krispie Treats are a delightful and spooky treat perfect for sharing with coworkers during the Halloween season. These cute and tasty confections are a creative twist on the classic Rice Krispie Treats, transformed into playful mummies with the help of white chocolate and candy eyes. They aren’t only fun to make but also a great way to get into the Halloween spirit while enjoying a delicious snack.
These treats are easy to prepare and require minimal ingredients, making them an excellent choice for a quick and festive treat. Mummy Rice Krispie Treats are sure to be a hit at any office gathering, adding a whimsical touch to your Halloween celebrations. With their gooey marshmallow and crispy rice cereal base, topped with a sweet white chocolate coating, these mummies will satisfy any sweet tooth.
Ingredients (serves 4-6):
- 6 cups Rice Krispies cereal
- 4 tablespoons unsalted butter
- 10 ounces mini marshmallows
- 1 teaspoon vanilla extract
- 1 cup white chocolate or white candy melts
- Candy eyes
Cooking Instructions:
- Prepare the Pan: Start by lining a 9×13-inch baking dish with parchment paper or lightly grease it with butter to prevent sticking.
- Melt the Marshmallows: In a large saucepan, melt the butter over low heat. Once melted, add the mini marshmallows and stir continuously until they’re completely melted and smooth. Remove the saucepan from heat and stir in the vanilla extract.
- Combine with Cereal: Add the Rice Krispies cereal to the melted marshmallow mixture. Stir until the cereal is fully coated and evenly mixed.
- Shape the Treats: Press the mixture evenly into the prepared baking dish using a buttered spatula or your hands (be careful, as it may still be warm). Allow it to cool for about 15-20 minutes.
- Cut and Prepare for Decoration: Once cooled, cut the Rice Krispie mixture into rectangular bars, about 2 inches by 4 inches in size.
- Melt the White Chocolate: In a microwave-safe bowl, melt the white chocolate or candy melts in 30-second intervals, stirring in between, until smooth and fully melted.
- Decorate the Mummies: Dip the top of each Rice Krispie bar into the melted white chocolate, allowing excess to drip off. Use a spoon to drizzle additional white chocolate over the top in a crisscross pattern to create the mummy effect.
- Add Candy Eyes: Before the white chocolate sets, place two candy eyes on each bar to complete the mummy look.
- Set the Treats: Allow the decorated treats to set at room temperature until the chocolate is firm. This usually takes about 20-30 minutes.
Extra Tips:
For a smoother and more professional finish, use a piping bag to drizzle the white chocolate over the treats. If you don’t have candy eyes, small chocolate chips or edible markers can be used for the eyes as an alternative.
These treats can be made a day in advance and stored in an airtight container, making them a convenient option for busy schedules. If you’re feeling extra creative, try adding a few drops of food coloring to the marshmallow mixture for a more vibrant look.
Spooky Spider Cookies
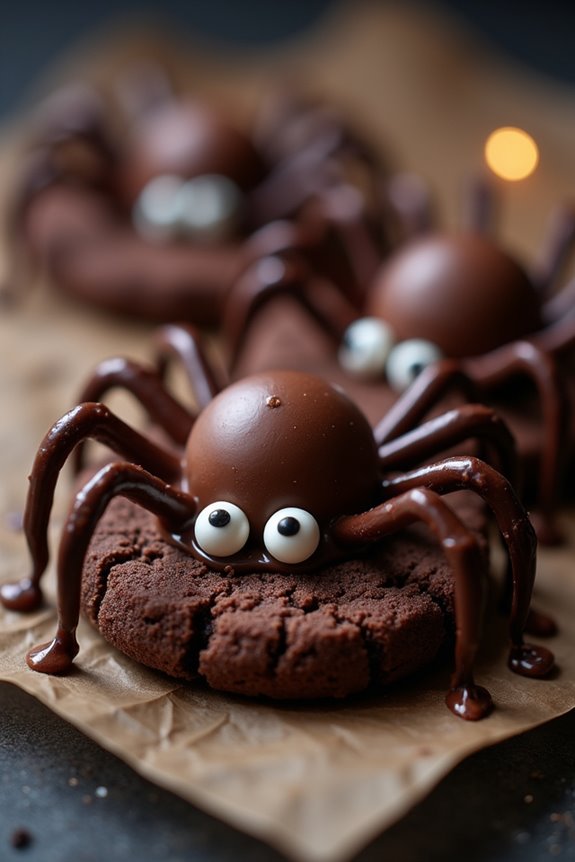
Spooky Spider Cookies are a delightfully creepy treat perfect for sharing with coworkers during Halloween. These cookies not only look impressive with their spider-like appearance but also pack a delicious chocolatey punch. They’re a great conversation starter and will definitely add some festive fun to the office. The recipe is straightforward and can be made in advance, guaranteeing you have one less thing to worry about during your Halloween celebrations.
The cookies are fundamentally a classic chocolate cookie base topped with a chocolate truffle or candy that acts as the spider’s body, with melted chocolate or icing forming the legs. When planning to serve Spooky Spider Cookies to coworkers, you should aim to make enough for everyone to enjoy, so this recipe is designed to yield about 24-30 cookies, serving 4-6 people comfortably. Whether you’re a seasoned baker or a beginner, these cookies are sure to impress and satisfy.
Ingredients for Spooky Spider Cookies (Serves 4-6):
- 1 cup unsalted butter, softened
- 1 cup granulated sugar
- 1 cup packed brown sugar
- 2 large eggs
- 2 teaspoons vanilla extract
- 2 3/4 cups all-purpose flour
- 3/4 cup unsweetened cocoa powder
- 1 teaspoon baking soda
- 1/2 teaspoon salt
- 24-30 chocolate truffles or round chocolate candies
- 1/2 cup chocolate chips, melted (for spider legs)
- Edible candy eyes (optional)
Cooking Instructions:
- Preheat and Prep: Preheat your oven to 350°F (175°C). Line two baking sheets with parchment paper to prevent sticking.
- Cream the Butter and Sugars: In a large mixing bowl, cream together the unsalted butter, granulated sugar, and brown sugar until light and fluffy. This should take about 3-4 minutes using an electric mixer.
- Add Eggs and Vanilla: Beat in the eggs one at a time, followed by the vanilla extract, guaranteeing each ingredient is well incorporated. This helps in achieving a smooth cookie dough.
- Combine Dry Ingredients: In a separate bowl, whisk together the all-purpose flour, cocoa powder, baking soda, and salt. Gradually add this dry mixture to the wet ingredients, mixing until just combined to avoid overworking the dough.
- Shape the Cookies: Use a tablespoon to scoop dough balls and place them onto the prepared baking sheets, leaving about 2 inches between each cookie as they’ll spread while baking.
- Bake the Cookies: Bake in the preheated oven for 10-12 minutes. The cookies should be set but still slightly soft in the centers.
- Add the Spider Bodies: Immediately after removing the cookies from the oven, gently press a chocolate truffle or candy into the center of each cookie to form the spider’s body. Allow the cookies to cool on the baking sheet for 10 minutes before transferring to a wire rack to cool completely.
- Create Spider Legs: Once the cookies are completely cooled, melt the chocolate chips in a microwave or double boiler. Transfer the melted chocolate to a piping bag or use a small spoon to draw legs extending from the chocolate truffles on each cookie.
- Add Eyes: For an extra spooky touch, attach edible candy eyes to the chocolate truffles using a small dab of melted chocolate as glue.
Extra Tips:
To guarantee your Spooky Spider Cookies turn out perfectly, make sure your butter is truly at room temperature before beginning. This will help the ingredients combine more easily and result in a smoother dough.
If you can’t find edible candy eyes, you can use small dots of white icing for a similar effect. If you want to make these cookies ahead of time, they can be stored in an airtight container at room temperature for up to one week.
For an even spookier presentation, serve the cookies on a Halloween-themed platter or decorate the serving area with fake cobwebs and plastic spiders.
Frankenstein Marshmallow Pops
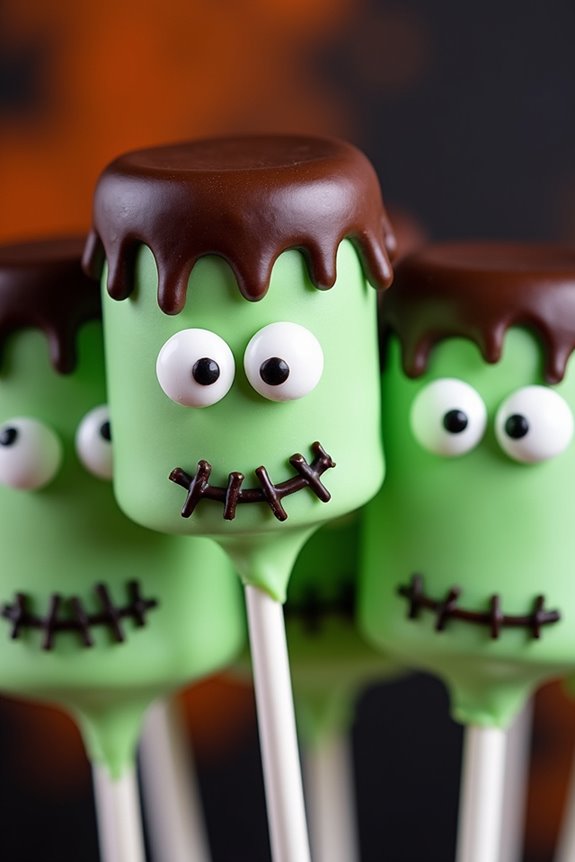
Frankenstein Marshmallow Pops are a fun and festive treat that’s perfect for sharing with coworkers during the Halloween season. These adorable creations aren’t only easy to make but also a delightful addition to any office Halloween party.
With just a few ingredients and a bit of creativity, you can transform ordinary marshmallows into cute and spooky treats that everyone will love. These pops are inspired by the classic Frankenstein monster, featuring green marshmallow heads with chocolate hair and candy eyes.
They’re not only enjoyable to make but also provide a great opportunity for creativity as you decorate each pop to your liking. Whether you’re a seasoned baker or a novice in the kitchen, these Frankenstein Marshmallow Pops are a surefire way to impress your colleagues with your festive spirit and culinary skills.
Ingredients (Serving Size: 4-6 people):
- 12 large marshmallows
- 1 cup of green candy melts
- 1/2 cup of chocolate chips
- 24 candy eyes
- 12 lollipop sticks
- Black icing or edible marker
- Wax paper
- Styrofoam block or cake pop stand
Cooking Instructions:
- Prepare the Marshmallows: Insert a lollipop stick into each marshmallow, guaranteeing it’s secure but not piercing through the other end. This will serve as the base for your pops.
- Melt the Green Candy: In a microwave-safe bowl, melt the green candy melts according to the package instructions. Typically, this involves heating in 30-second intervals, stirring in between, until completely melted and smooth.
- Coat the Marshmallows: Dip each marshmallow into the melted green candy until fully coated. Allow excess to drip off and place them upright on wax paper to set.
- Create Frankenstein’s Hair: Once the green coating is set, melt the chocolate chips in a separate microwave-safe bowl. Dip the top of each marshmallow into the melted chocolate to create Frankenstein’s hair. Return them to the wax paper to set.
- Add the Eyes: Before the chocolate sets completely, press two candy eyes onto each marshmallow pop.
- Draw the Face: Use black icing or an edible marker to draw a mouth and stitches on each Frankenstein pop for a more detailed look.
- Let Them Set: Place the pops in a Styrofoam block or a cake pop stand to allow the coatings to set completely.
Extra Tips:
To guarantee your Frankenstein Marshmallow Pops turn out perfectly, make sure the candy melts aren’t overheated, as this can cause clumping. If the candy coating is too thick, adding a teaspoon of vegetable shortening can help achieve a smoother consistency.
Be creative with the facial expressions to give each Frankenstein pop its unique character, making them more fun and personalized. Also, consider using different colors for the hair or adding sprinkles for extra flair.
Pumpkin Patch Brownies
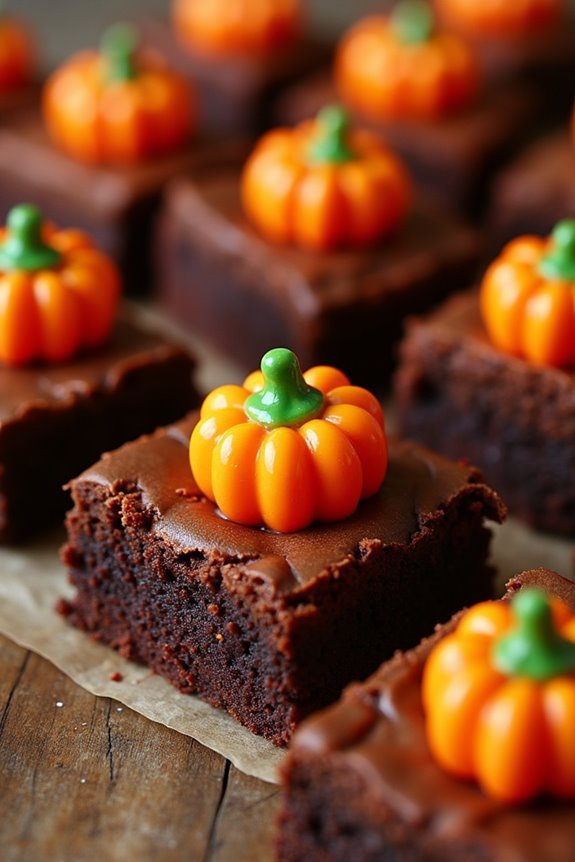
Halloween is the perfect time to indulge in delicious treats, and Pumpkin Patch Brownies are a festive and delightful way to celebrate with your coworkers. Combining the rich, chocolatey goodness of brownies with a hint of pumpkin spice, these treats are bound to be a hit at any office celebration.
The addition of cute pumpkin decorations on top adds a whimsical touch that captures the spirit of the holiday, making them as visually appealing as they’re tasty.
These Pumpkin Patch Brownies aren’t only delicious but also surprisingly easy to prepare. They require only a few basic ingredients and can be made in under an hour, making them an ideal choice for busy individuals looking to share some Halloween cheer at work.
The recipe serves 4-6 people, guaranteeing there’s enough to go around for everyone to enjoy a sweet and spooky treat.
Ingredients (Serves 4-6):
- 1 cup all-purpose flour
- 1 cup granulated sugar
- 2/3 cup unsweetened cocoa powder
- 1/2 teaspoon baking powder
- 1/4 teaspoon salt
- 1/2 cup unsalted butter, melted
- 2 large eggs
- 1 teaspoon vanilla extract
- 1/4 cup canned pumpkin puree
- 1 teaspoon pumpkin pie spice
- 12-16 candy pumpkins (for decoration)
Instructions:
- Preheat the Oven: Begin by preheating your oven to 350°F (175°C). This guarantees that your brownies will bake evenly and develop a nice, chewy texture.
- Prepare the Baking Pan: Grease an 8×8-inch baking pan or line it with parchment paper. This will prevent the brownies from sticking and make them easier to remove once baked.
- Mix Dry Ingredients: In a medium bowl, whisk together the flour, sugar, cocoa powder, baking powder, and salt. Make sure these ingredients are well combined to avoid any clumps.
- Combine Wet Ingredients: In a separate large bowl, whisk together the melted butter, eggs, and vanilla extract until smooth. Add the pumpkin puree and pumpkin pie spice, mixing until fully incorporated.
- Combine Wet and Dry Ingredients: Gradually add the dry ingredient mixture to the wet ingredients, stirring until just combined. Be careful not to overmix, as this can make the brownies tough.
- Pour into Pan: Pour the brownie batter into the prepared baking pan, spreading it evenly with a spatula.
- Bake the Brownies: Place the pan in the preheated oven and bake for 25-30 minutes. Check for doneness by inserting a toothpick into the center; it should come out with a few moist crumbs attached.
- Cool and Decorate: Allow the brownies to cool completely in the pan on a wire rack. Once cooled, cut them into squares and top each brownie with a candy pumpkin to create the pumpkin patch effect.
Extra Tips:
For an extra festive touch, consider adding a sprinkle of orange or green colored sugar on top of the brownies before baking to give them a Halloween-themed sparkle.
If you want to enhance the pumpkin flavor, you can increase the amount of pumpkin pie spice to taste. Additionally, if you’re serving these at an office party, consider using cupcake liners to portion out individual servings for easy sharing.
Enjoy your spooky and sweet Pumpkin Patch Brownies with your coworkers!
Candy Corn Bark
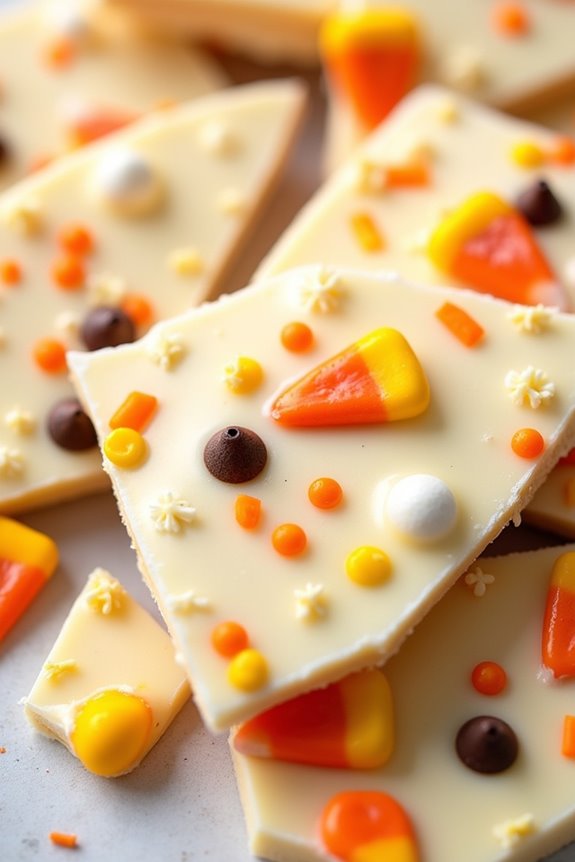
This recipe yields enough Candy Corn Bark to serve 4-6 people, guaranteeing that there’s plenty to go around for everyone in the office.
Whether it’s to brighten up the break room or to add a touch of Halloween spirit to your desk, this treat is sure to be a hit. With just a few simple ingredients and easy-to-follow steps, you’ll have a batch of this festive bark ready in no time.
Ingredients for Candy Corn Bark (Serving size: 4-6 people):
- 12 ounces of white chocolate chips
- 1 cup of candy corn
- 1/4 cup of orange sprinkles
- 1/4 cup of yellow sprinkles
- 1/4 cup of mini chocolate chips
Cooking Instructions:
- Prepare the Baking Sheet: Line a baking sheet with parchment paper. This will prevent the bark from sticking and make it easier to remove once it has set.
- Melt the White Chocolate: In a microwave-safe bowl, melt the white chocolate chips in the microwave in 30-second intervals, stirring in between each interval until the chocolate is smooth and fully melted.
- Spread the Chocolate: Pour the melted white chocolate onto the prepared baking sheet. Use a spatula to spread it evenly into a thin layer, about 1/4 inch thick.
- Add the Toppings: While the chocolate is still warm and soft, sprinkle the candy corn, orange sprinkles, yellow sprinkles, and mini chocolate chips evenly over the top. Gently press the toppings into the chocolate to guarantee they adhere.
- Set the Bark: Allow the chocolate to cool and set completely. You can speed up this process by placing the baking sheet in the refrigerator for about 30 minutes.
- Break into Pieces: Once the chocolate is set, use your hands to break the bark into pieces of your desired size.
- Serve and Enjoy: Arrange the pieces on a festive platter and serve to your coworkers.
Extra Tips: For best results, guarantee that no water or moisture comes into contact with the white chocolate while melting, as this can cause the chocolate to seize.
If you prefer a different flavor, you can substitute dark or milk chocolate for the white chocolate. Additionally, feel free to get creative with the toppings; chopped nuts, pretzels, or other festive candies can add unique textures and flavors to your bark.
Store any leftovers in an airtight container at room temperature to keep the chocolate from losing its crisp texture.
Ghostly Pretzel Rods
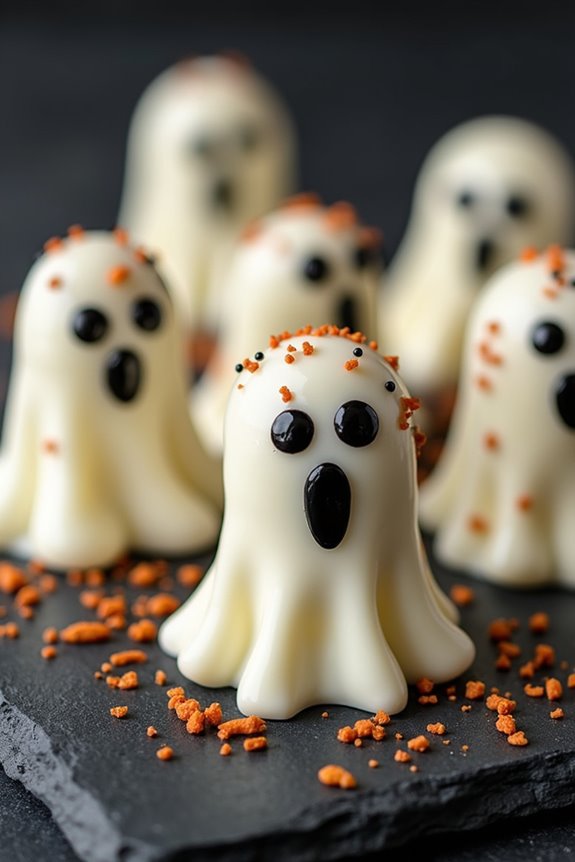
Halloween is a time for spooky fun and delicious treats, and Ghostly Pretzel Rods are the perfect snack to share with your coworkers. These delightful sweets combine the salty crunch of pretzel rods with the smooth sweetness of white chocolate, all topped off with a ghostly design that’s sure to bring a smile to anyone’s face.
Whether you’re hosting a Halloween office party or just want to surprise your colleagues with a festive treat, these Ghostly Pretzel Rods are both easy to make and a hit among all ages.
The beauty of this recipe lies in its simplicity, requiring only a few ingredients and minimal preparation time. With their ghostly appearance and irresistible taste, these pretzel rods are sure to become a Halloween favorite. The white chocolate coating not only gives them a spooky look but also adds a rich flavor that perfectly complements the pretzel’s crunch.
Let’s jump into the recipe and create a batch of these hauntingly delicious treats for 4-6 people.
Ingredients:
- 12 large pretzel rods
- 2 cups white chocolate chips or melting wafers
- 1 tablespoon coconut oil (optional)
- Black decorating gel or edible marker
- Orange and black sprinkles (optional)
Instructions:
- Prepare the Workspace: Line a baking sheet with parchment paper or a silicone baking mat. This will provide a non-stick surface for the pretzel rods to dry on after they’ve been coated in chocolate.
- Melt the Chocolate: In a microwave-safe bowl, combine the white chocolate chips with the coconut oil. Microwave in 30-second intervals, stirring between each interval, until the chocolate is completely melted and smooth. If you prefer, you can also melt the chocolate using a double boiler on the stove.
- Dip the Pretzel Rods: Hold a pretzel rod by one end and dip it into the melted white chocolate, covering about two-thirds of the rod. Allow any excess chocolate to drip back into the bowl. For a smooth coating, gently tap the pretzel rod against the edge of the bowl.
- Decorate the Ghosts: Before the chocolate hardens, place the dipped pretzel rods onto the prepared baking sheet. Use black decorating gel or an edible marker to create ghostly faces on the chocolate-coated part of the pretzel. If desired, sprinkle orange and black sprinkles around the face area to add a festive touch.
- Cool and Set: Allow the pretzel rods to cool at room temperature until the chocolate is completely set. For faster setting, you can place them in the refrigerator for 15-20 minutes.
- Serve and Enjoy: Once the chocolate has hardened, your Ghostly Pretzel Rods are ready to be served. Arrange them in a festive jar or on a platter for a spooky and delicious Halloween display.
Extra Tips:
To guarantee the chocolate adheres well to the pretzels, make sure the pretzel rods are dry and free from any salt residue before dipping.
Adding coconut oil to the white chocolate is optional but recommended as it helps thin the chocolate for smoother dipping and gives it a glossy finish.
If you’re planning to transport these treats to the office, consider packaging them individually in treat bags tied with Halloween-themed ribbon for an extra festive presentation.
Vampire Bite Red Velvet Cupcakes
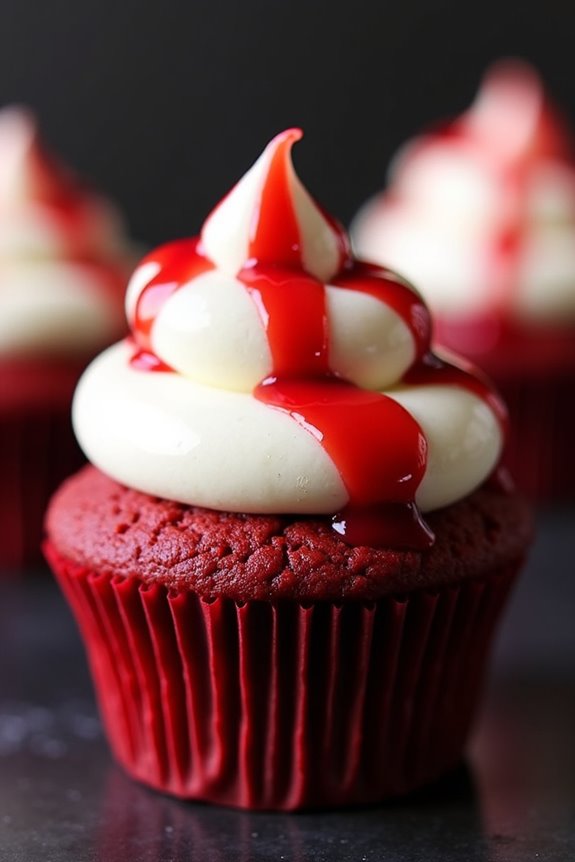
Looking for a spooky yet tantalizing treat to surprise your coworkers this Halloween? These Vampire Bite Red Velvet Cupcakes are perfect to bring a bit of fun and fright to the office. With their deep red color and delicious cream cheese frosting, these cupcakes are both visually striking and irresistibly tasty. The addition of “vampire bite” marks, made with red gel coloring, adds a playful and eerie twist, making them a hit with both the young and the young-at-heart.
The rich flavor of red velvet combined with the creamy sweetness of the frosting creates a dessert that’s decadent and satisfying. These cupcakes are designed to be easy to transport and share, making them an ideal choice for a Halloween office party or a festive treat to brighten up your coworkers’ day. Whether you’re a baking novice or a seasoned pro, this recipe is straightforward and fun, guaranteeing you’ll have a batch of spooky delights ready in no time.
Ingredients for 4-6 people:
- 1 1/4 cups all-purpose flour
- 1 cup granulated sugar
- 1 tablespoon unsweetened cocoa powder
- 1/2 teaspoon baking soda
- 1/2 teaspoon salt
- 1/2 cup vegetable oil
- 1/2 cup buttermilk
- 1 large egg
- 1 tablespoon red food coloring
- 1/2 teaspoon vanilla extract
- 1/2 teaspoon white vinegar
For the frosting:
- 4 ounces cream cheese, softened
- 4 tablespoons unsalted butter, softened
- 2 cups powdered sugar
- 1/2 teaspoon vanilla extract
To decorate:
– Red gel food coloring
Cooking Instructions:
- Preheat the Oven: Begin by preheating your oven to 350°F (175°C). Line a 12-cup muffin tin with cupcake liners and set aside.
- Mix Dry Ingredients: In a medium bowl, whisk together the all-purpose flour, sugar, cocoa powder, baking soda, and salt.
- Prepare Wet Ingredients: In a separate large bowl, combine the vegetable oil, buttermilk, egg, red food coloring, vanilla extract, and white vinegar. Whisk until the mixture is smooth.
- Combine Ingredients: Gradually add the dry ingredients to the wet ingredients, stirring gently until just combined. Don’t overmix.
- Fill the Cupcake Liners: Divide the batter evenly among the cupcake liners, filling each about two-thirds full.
- Bake the Cupcakes: Place the muffin tin in the preheated oven and bake for 18-20 minutes, or until a toothpick inserted into the center of a cupcake comes out clean.
- Cool the Cupcakes: Allow the cupcakes to cool in the pan for 5 minutes before transferring them to a wire rack to cool completely.
- Make the Frosting: While the cupcakes are cooling, beat the cream cheese and butter together in a medium bowl until smooth. Gradually add the powdered sugar and vanilla extract, beating until the frosting is creamy and well combined.
- Frost the Cupcakes: Once the cupcakes are completely cool, spread or pipe the cream cheese frosting onto each cupcake.
- Create Vampire Bites: Use a toothpick to gently poke two small holes near the center of each frosted cupcake. With a small brush or the tip of a skewer, apply a few drops of red gel food coloring near each hole to resemble vampire bite marks with a trickle of “blood.”
Extra Tips:
For a richer flavor, you can substitute half of the vegetable oil with melted butter. If you don’t have buttermilk on hand, you can create a substitute by mixing 1/2 cup of milk with 1/2 tablespoon of lemon juice or white vinegar and letting it sit for about 5 minutes.
When creating the vampire bite marks, be careful not to overdo the red gel, as a little goes a long way in achieving that eerie effect. Finally, make sure the cupcakes are completely cool before frosting, as any warmth can cause the frosting to melt. Enjoy your spooky yet delicious treats!
Monster Eye Donuts
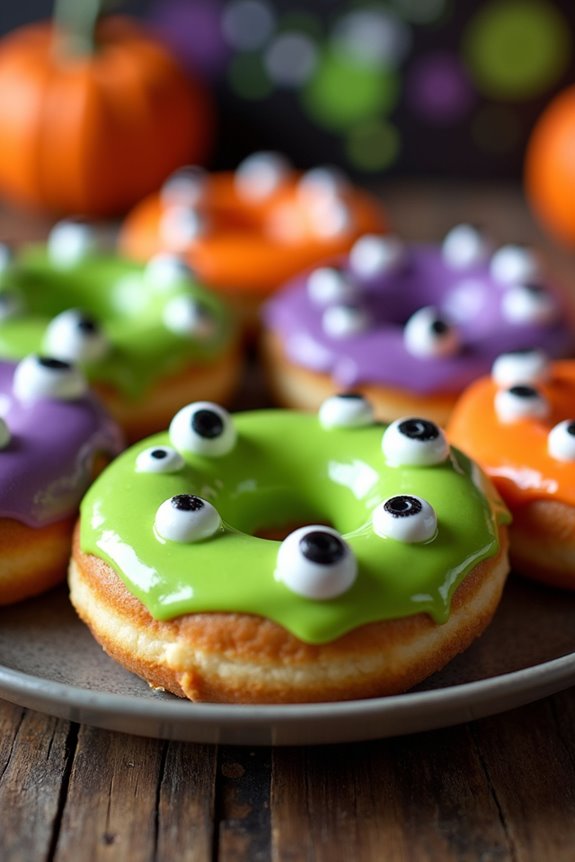
Halloween is the perfect time to surprise your coworkers with some spooky treats, and Monster Eye Donuts are a fun and delicious option that are bound to be a hit. These delightful donuts aren’t only visually appealing with their playful googly eyes, but they also make for a scrumptious snack that combines the classic taste of donuts with a festive twist.
Whether you’re planning a Halloween party at the office or just want to bring a bit of seasonal cheer to your coworkers, these Monster Eye Donuts are a surefire way to impress.
The great thing about this recipe is that it’s simple to make, allowing you to whip up a batch in no time. You can choose to make the donuts from scratch or use store-bought ones to save time. Decorating them is the fun part, where you can let your creativity shine by using vibrant colored icing and edible eyeballs to create the monster faces.
This recipe serves 4-6 people, making it ideal for a small group of coworkers to enjoy.
Ingredients (for 4-6 people):
- 12 plain donuts (homemade or store-bought)
- 2 cups of powdered sugar
- 4 tablespoons of milk
- Food coloring (green, purple, and orange)
- Edible candy eyes (various sizes)
- Sprinkles (optional)
Instructions:
1. Prepare the Donuts:
Begin by laying out your donuts on a wire rack with a baking sheet underneath to catch any dripping icing. If you’re using homemade donuts, make sure they’re completely cooled before decorating.
2. Make the Icing:
In a medium-sized bowl, combine the powdered sugar and milk. Stir until the mixture is smooth and reaches a thick yet pourable consistency. Divide the icing into three separate bowls.
3. Add Food Coloring:
Add a few drops of food coloring to each bowl to create different colored icings. One bowl should be green, another purple, and the last one orange. Mix each bowl thoroughly until the color is evenly distributed.
4. Dip the Donuts:
Take each donut and dip the top half into one of the colored icings. Allow any excess icing to drip off before placing the donut back onto the wire rack. Repeat for all donuts, guaranteeing you have a variety of colors.
5. Decorate with Candy Eyes:
While the icing is still wet, place the edible candy eyes on top of the donuts. You can use different sizes and arrange them in creative ways to give each donut a unique monster face. Optionally, sprinkle some colorful sprinkles for extra decoration.
6. Let the Icing Set:
Allow the icing to set completely before serving. This usually takes about 15-20 minutes. The donuts can be stored in an airtight container if not serving immediately.
Extra Tips:
When making Monster Eye Donuts, it’s important to verify that the icing isn’t too runny, as this will cause it to slide off the donuts. Adjust the consistency by adding more powdered sugar if necessary.
If you prefer extra flavor, consider adding a drop of vanilla extract to the icing. Finally, make sure you have plenty of candy eyes on hand; they tend to be a popular feature, and more eyes can make your monsters even more fun and quirky!
Caramel Apple Slices
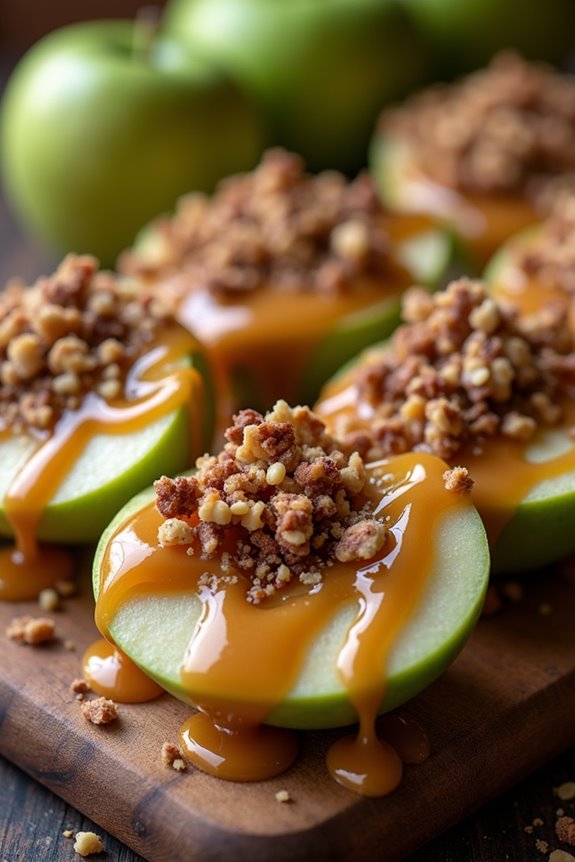
Caramel apple slices are a delightful twist on the classic caramel apple, offering the perfect balance of tart and sweet flavors. These easy-to-handle treats are perfect for sharing with coworkers during Halloween festivities. By slicing the apples and dipping them into a luscious homemade caramel sauce, you can create a snack that’s both enjoyable to eat and simple to prepare. With a few additional toppings, such as crushed nuts or chocolate drizzle, these treats can be customized to suit everyone’s tastes.
Creating caramel apple slices is an enjoyable activity that can be done in advance, allowing you to focus on other aspects of your Halloween celebration. The key to perfecting this recipe is selecting the right type of apple – a firm, tart variety like Granny Smith works wonders against the sweet, rich caramel. Make sure you have all your ingredients ready and follow the steps carefully for a seamless cooking experience. This recipe serves 4-6 people, making it the perfect size for a small office gathering.
Ingredients for Caramel Apple Slices (Serves 4-6):
- 4 large Granny Smith apples
- 1 cup granulated sugar
- 1/4 cup unsalted butter
- 1/2 cup heavy cream
- 1/4 teaspoon salt
- 1 teaspoon vanilla extract
- 1/2 cup chopped nuts (optional)
- 1/4 cup mini chocolate chips or melted chocolate (optional)
- Popsicle sticks or skewers
Cooking Instructions:
- Prepare the Apples: Wash and dry the apples thoroughly. Cut each apple into thick slices, about 1/2 inch wide. Remove any seeds and core pieces. Insert a popsicle stick or skewer into each slice for easy handling.
- Make the Caramel Sauce: In a medium saucepan over medium heat, combine the granulated sugar and butter. Stir continuously until the mixture melts and turns a rich amber color, about 5-7 minutes. Be careful not to burn the sugar.
- Add Cream and Flavorings: Slowly add the heavy cream while stirring constantly. The mixture will bubble vigorously, so take care to avoid splatters. Once combined, stir in the salt and vanilla extract. Continue to stir until the caramel is smooth and slightly thickened.
- Cool the Caramel: Remove the saucepan from heat and let the caramel cool for a minute or two. This will help it thicken slightly, making it easier to coat the apple slices.
- Dip the Apple Slices: Carefully dip each apple slice into the caramel sauce, coating it evenly. Allow any excess caramel to drip off before placing the slice on a parchment-lined baking sheet.
- Add Toppings (Optional): While the caramel is still tacky, sprinkle the slices with chopped nuts or drizzle with melted chocolate. This step is optional but adds delightful texture and flavor.
- Set the Caramel: Let the caramel apple slices sit at room temperature or refrigerate them for about 30 minutes to allow the caramel to set properly.
Extra Tips:
When making caramel, it’s crucial to keep a close eye on the sugar as it melts to prevent burning. If you’re new to caramel-making, consider using a candy thermometer to make certain the sugar reaches the right temperature for caramelization.
Additionally, make sure the apple slices are completely dry before dipping them in caramel, as moisture can prevent the caramel from adhering properly. If you want to store the caramel apple slices for more than a few hours, keep them refrigerated to maintain freshness and prevent the caramel from becoming too sticky.
Zombie Finger Breadsticks

Zombie Finger Breadsticks are a spooky and delicious treat perfect for sharing with your coworkers on Halloween. These ghoulish breadsticks resemble creepy fingers, complete with knobby knuckles and eerie almond fingernails. They aren’t only fun to make but also quite easy, using simple ingredients that deliver a delightful combination of flavors and textures.
Serve these Zombie Finger Breadsticks with a side of marinara “blood” sauce for a truly gruesome snack that will surely be a hit at the office.
To make these breadsticks, you’ll need a basic bread dough, which you can either make from scratch or purchase ready-made from the store. Shaping the dough into tapered finger shapes and adding almond slices for nails is what gives these breadsticks their ghastly appearance. The addition of herbs and spices adds depth of flavor and makes them irresistible.
With the following recipe, you’ll be able to whip up a batch that serves 4-6 people, making it perfect for a small office gathering or Halloween party.
Ingredients:
- 500g bread flour
- 7g instant yeast
- 1 teaspoon salt
- 1 tablespoon sugar
- 300ml warm water
- 2 tablespoons olive oil
- 1 tablespoon mixed Italian herbs
- 1 egg, beaten (for egg wash)
- 24-30 whole blanched almonds
- Marinara sauce (for dipping)
Cooking Instructions:
- Prepare the Dough: In a large bowl, combine the bread flour, instant yeast, salt, and sugar. Mix well. Gradually add the warm water and olive oil to the dry ingredients, mixing until a dough begins to form.
- Knead the Dough: Transfer the dough to a lightly floured surface and knead for about 8-10 minutes until the dough is smooth and elastic. If the dough is sticky, sprinkle a little more flour as needed.
- Let the Dough Rise: Place the dough in a lightly oiled bowl, cover it with a damp cloth, and let it rise in a warm place for about 1 hour or until it doubles in size.
- Shape the Fingers: Once the dough has risen, punch it down to release air and divide it into 24-30 equal pieces. Roll each piece into a long, thin rope, about the thickness of a finger, tapering one end to resemble a fingertip.
- Add the Nails: Press a whole blanched almond into the tapered end of each dough piece to create a fingernail. Use a small knife to make knuckle lines and wrinkles for a more realistic look.
- Prepare for Baking: Preheat your oven to 200°C (390°F). Place the shaped breadsticks onto a baking sheet lined with parchment paper. Brush each breadstick with the beaten egg to give them a nice golden color.
- Bake the Breadsticks: Sprinkle the breadsticks with the mixed Italian herbs for added flavor. Bake in the preheated oven for 15-20 minutes or until they’re golden brown and firm to the touch.
- Serve: Remove the breadsticks from the oven and allow them to cool slightly. Serve warm with marinara sauce for dipping.
Extra Tips:
For a more pronounced flavor, you can add grated Parmesan cheese to the dough or sprinkle it on top before baking. If you want your breadsticks to have an extra creepy touch, consider adding a small amount of food coloring to the dough for a more ghoulish appearance.
The key to perfectly shaped finger breadsticks is to guarantee they aren’t too thick, as they’ll expand during baking. If you have leftover dough, it can be stored in the refrigerator for up to two days or frozen for future use.
Skeleton Hot Dog Mummies
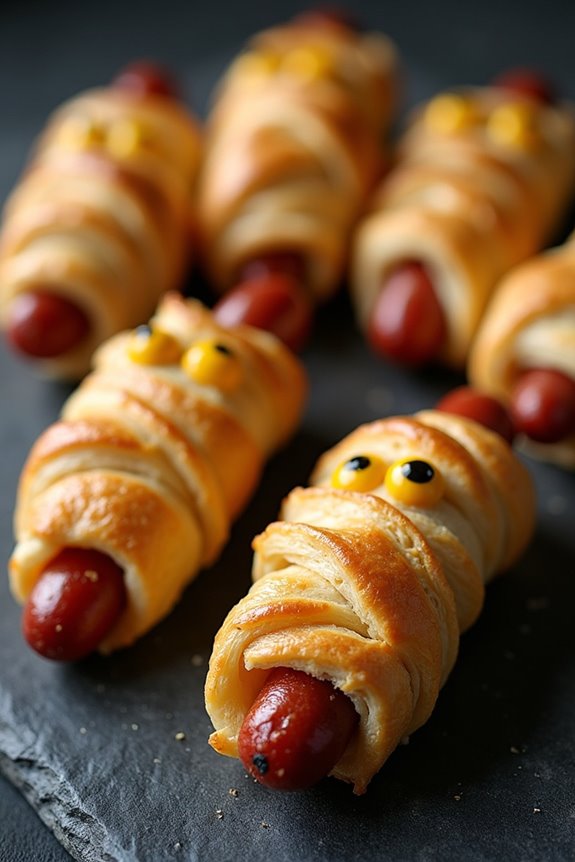
Looking for a spooktacular treat to bring to the office Halloween party? Skeleton Hot Dog Mummies are a delightful and fun recipe that will certainly be a hit among your coworkers.
These cute and creepy snacks aren’t only easy to make but also deliciously satisfying. Wrapped in flaky crescent dough and baked to perfection, these hot dog mummies are perfect for a festive gathering and are bound to add a touch of Halloween spirit to your office festivities.
This recipe is designed to serve 4-6 people, making it ideal for a small office celebration or as part of a larger spread of Halloween treats. The combination of savory hot dogs and buttery pastry isn’t only visually appealing but also incredibly tasty.
Whether you’re a seasoned cook or a beginner in the kitchen, this recipe is simple to follow and certain to impress your coworkers.
Ingredients:
- 1 can of refrigerated crescent roll dough
- 8 hot dogs
- Yellow mustard (for decorating)
- All-purpose flour (for dusting)
- Cooking spray or parchment paper
Cooking Instructions:
- Preheat the Oven: Start by preheating your oven to 375°F (190°C). This guarantees that your mummies bake evenly and come out golden brown.
- Prepare the Baking Sheet: Line a baking sheet with parchment paper or lightly grease it with cooking spray. This will prevent the mummies from sticking and make cleanup easier.
- Roll Out the Dough: Dust a clean surface with a little all-purpose flour and roll out the crescent roll dough. Use a rolling pin if necessary to make the dough even and smooth.
- Cut the Dough: Using a pizza cutter or a sharp knife, cut the dough into thin strips about 1/4 inch wide. These strips will be used to wrap the hot dogs.
- Wrap the Hot Dogs: Take a hot dog and start wrapping it with the dough strips, leaving a small gap near one end for the face. Overlap the strips slightly to create a mummy-like appearance. Repeat this process for each hot dog.
- Bake the Mummies: Place the wrapped hot dogs on the prepared baking sheet. Bake in the preheated oven for 12-15 minutes, or until the dough is golden brown and cooked through.
- Decorate the Mummies: Once out of the oven, let them cool for a few minutes. Use yellow mustard to dot eyes near the exposed end of the hot dogs, giving them a playful mummy face.
Extra Tips:
For a crispier texture, you can brush the dough with a little bit of melted butter before baking.
If you want to add some extra flavor, try sprinkling a bit of garlic powder or shredded cheese on the dough strips before wrapping the hot dogs.
Also, feel free to use different types of sausages if you prefer. Just make sure to keep an eye on the baking time, as thicker sausages may require a few extra minutes in the oven.
Enjoy serving these fun and festive treats at your Halloween office party!
Bewitched Popcorn Mix

Halloween is a time for fun, frights, and of course, tasty treats! If you’re seeking to surprise your coworkers with a spooky snack that captures the essence of the season, search no more than Bewitched Popcorn Mix. This delightful concoction combines sweet and savory elements with a hint of Halloween magic to create a treat that’s both delicious and visually enchanting.
Perfect for an office party or simply to share a bit of holiday spirit, this popcorn mix is sure to leave your coworkers spellbound. Making Bewitched Popcorn Mix couldn’t be easier, and it requires just a few ingredients that are mixed together to create a snack that’s as enjoyable to make as it’s to eat.
With a serving size of 4-6 people, this recipe guarantees there’s enough to go around, so gather your ingredients and get ready to enchant your colleagues with this magical munchie.
Ingredients (for 4-6 servings):
- 8 cups popped popcorn
- 1 cup candy corn
- 1 cup pretzel sticks
- 1 cup roasted peanuts
- 1 cup chocolate candies (like M&Ms)
- 1/2 cup melted white chocolate
- 1/2 teaspoon orange food coloring
- Halloween-themed sprinkles
Cooking Instructions:
- Prepare the Popcorn: Start by popping your popcorn according to your preferred method. You can use microwave popcorn, stovetop, or an air popper. Once popped, spread the popcorn evenly on a large baking sheet lined with parchment paper.
- Mix Candy and Nuts: In a large mixing bowl, combine the candy corn, pretzel sticks, roasted peanuts, and chocolate candies. Stir until evenly mixed.
- Color the Chocolate: In a small bowl, mix the melted white chocolate with the orange food coloring until you achieve a vibrant orange hue. This will add a festive touch to your popcorn mix.
- Combine Ingredients: Drizzle the colored white chocolate over the popcorn on the baking sheet. Use a spatula to gently toss and coat the popcorn with the chocolate, guaranteeing an even distribution.
- Add Sprinkles: While the chocolate is still wet, sprinkle the Halloween-themed sprinkles over the popcorn. The sprinkles will adhere to the chocolate, adding a fun, festive appearance.
- Finish and Cool: Allow the popcorn mix to sit for about 15-20 minutes or until the chocolate has fully set. Once hardened, break the mix into clusters and transfer it to a large serving bowl.
Extra Tips:
For the best results, make sure the popcorn is completely cool before mixing it with the chocolate to prevent any melting. If you’re planning to make this snack in advance, store it in an airtight container to maintain its freshness and crunchiness.
Feel free to customize the mix by adding dried fruit or different types of nuts based on your preferences. Finally, if you want to make it extra spooky, consider using black or purple food coloring for the chocolate. This versatile treat is perfect for any Halloween celebration and is bound to be a hit with your coworkers!
Ghoulish Green Smoothies
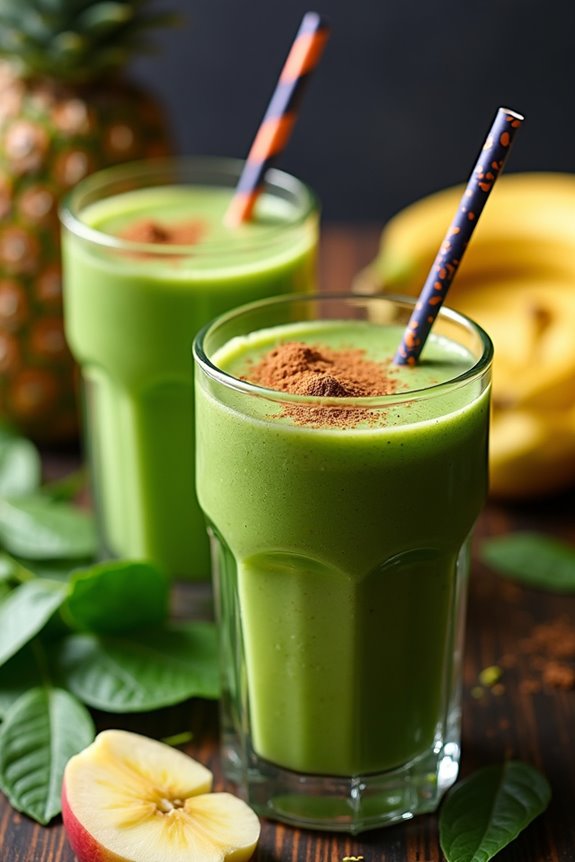
Treat your coworkers to a spooktacular and healthy Halloween surprise with these Ghoulish Green Smoothies. Perfectly themed for the holiday, these vibrant green drinks aren’t only visually appealing but also packed with nutrients to help you power through the day. The combination of fresh fruits and vegetables guarantees a naturally sweet taste, while the spooky green color comes from nutrient-rich spinach, making this beverage both festive and nourishing.
Ideal for a healthy Halloween treat, these smoothies are quick to prepare and can be made in advance, allowing you to focus on other holiday festivities. Whether you’re hosting a Halloween office party or simply want to add a fun twist to your regular workday, these Ghoulish Green Smoothies will surely be a hit among your colleagues.
Ingredients (Serves 4-6):
- 2 cups fresh spinach leaves
- 2 ripe bananas
- 1 cup pineapple chunks (fresh or canned)
- 1 large apple, cored and chopped
- 1 cup Greek yogurt or coconut yogurt (for a vegan option)
- 1 cup almond milk or any preferred milk
- 1 tablespoon honey or maple syrup (optional)
- 1 teaspoon vanilla extract
- 1/2 teaspoon ground cinnamon
- Ice cubes (optional, for a colder smoothie)
Instructions:
- Prepare the Ingredients: Start by washing the spinach leaves thoroughly to remove any dirt or residue. Peel and slice the bananas, and if using fresh pineapple, chop it into chunks. Core and chop the apple into small pieces.
- Blend the Base: In a blender, add the spinach, bananas, pineapple chunks, apple, and Greek yogurt. Blend on a low setting until the mixture starts to become smooth.
- Add Liquid and Flavorings: Pour in the almond milk, vanilla extract, and honey or maple syrup (if using). Add the ground cinnamon for a hint of spice.
- Blend Until Smooth: Increase the blender speed to high and continue to blend until the mixture is completely smooth and creamy. If you prefer a colder smoothie, add a few ice cubes and blend again until they’re fully incorporated.
- Serve and Enjoy: Pour the Ghoulish Green Smoothie into glasses and serve immediately for the freshest taste. If you’re preparing in advance, store the smoothie in an airtight container in the refrigerator and give it a quick stir before serving.
Extra Tips: For an extra ghoulish touch, consider serving the smoothies in clear cups with Halloween-themed straws or adding a rim of black sugar to the glasses. If you find the smoothie too thick, simply add more almond milk to reach your desired consistency. Experiment with different fruits like kiwi or mango to customize the flavor to your liking. Adjust the sweetness level by altering the amount of honey or syrup, or leave it out entirely for a more natural taste.
Haunted Chocolate-Covered Strawberries
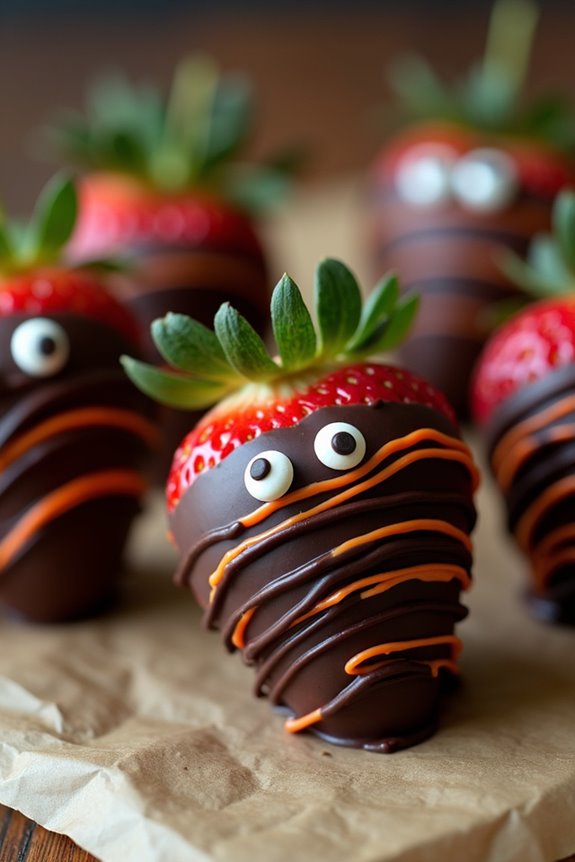
Looking to make a spooky yet delicious treat for your coworkers this Halloween? Haunted Chocolate-Covered Strawberries are the perfect choice! These sweet and eerie delights aren’t only easy to prepare but also a fun way to get into the Halloween spirit.
The combination of fresh strawberries and rich chocolate, with a touch of ghostly decoration, makes these treats both delightful and visually appealing. Perfect for an office party or simply to surprise your coworkers with a festive snack, Haunted Chocolate-Covered Strawberries will surely be a hit.
The process of making these haunted treats is straightforward and requires only a few ingredients. You’ll need fresh strawberries, high-quality chocolate for melting, and a few decorative items to give your strawberries that haunted appearance.
The best part is that this recipe can be completed in less than an hour, leaving you with plenty of time to enjoy the festivities. Let’s plunge into the ingredients and steps to create this spine-chilling, delicious treat for 4-6 people.
Ingredients for 4-6 servings:
- 1 pound of fresh strawberries
- 8 ounces of dark chocolate chips (or your preferred chocolate)
- 4 ounces of white chocolate chips
- Black and orange food coloring gel
- Edible candy eyes or mini chocolate chips for decoration
Instructions:
- Prepare the Strawberries: Begin by washing the strawberries thoroughly and gently pat them dry with a paper towel. Make sure they’re completely dry to guarantee the chocolate adheres well.
- Melt the Dark Chocolate: In a microwave-safe bowl, melt the dark chocolate chips in 30-second intervals, stirring in between each interval until smooth. You can also melt the chocolate using a double boiler if preferred.
- Dip the Strawberries: Hold each strawberry by the stem and dip it into the melted dark chocolate, covering about two-thirds of the fruit. Place the dipped strawberries on a baking sheet lined with parchment paper to set.
- Prepare the White Chocolate: Melt the white chocolate chips in a similar fashion as the dark chocolate. Once melted, divide the white chocolate into two small bowls. Add a few drops of black food coloring to one bowl and orange food coloring to the other, stirring until the colors are evenly mixed.
- Decorate the Strawberries: Using a small piping bag or a plastic sandwich bag with a tiny corner snipped off, drizzle the colored white chocolate over the dark chocolate-dipped strawberries to create ghostly patterns. Add edible candy eyes or mini chocolate chips to give the strawberries a spooky face.
- Let Them Set: Allow the decorated strawberries to set at room temperature or place them in the refrigerator for quicker setting.
Extra Tips: When working with chocolate, be sure to avoid any contact with water as it can cause the chocolate to seize and become unusable. If you’re using food coloring, gel-based colors are the best choice as they won’t alter the consistency of the chocolate.
Additionally, if you don’t have candy eyes, you can use mini chocolate chips as a substitute, pressing them gently into the chocolate before it sets. For an extra touch of Halloween flair, consider adding a sprinkle of edible glitter or a drizzle of contrasting chocolate for added visual effect. Enjoy your spooky creations!