
Hosting a Halloween party? 🎃 I’ve got you covered with some hauntingly delightful dessert ideas. This year, I’ve put together a tantalizing lineup of 11 treats that will wow your guests. From melt-in-your-mouth Ghostly Meringue Cookies to the fun and spooky Monster Eyeball Cake Pops, each recipe is designed to enchant both the eyes and taste buds. Ready to add some magic to your spooky gathering? 🍬👻
Ghostly Meringue Cookies

Ghostly Meringue Cookies are a spooktacular treat perfect for your Halloween parties. These airy, sweet cookies are shaped like little ghosts, making them not only delicious but also visually charming and festive. With a little bit of creativity, you can bring a ghostly touch to your dessert table that will leave your guests both impressed and delighted.
The meringue cookies are crisp on the outside and slightly chewy on the inside, creating a delightful texture that pairs wonderfully with their subtly sweet flavor.
Creating Ghostly Meringue Cookies requires a few simple ingredients and some basic baking skills. The key to achieving the perfect meringue is to guarantee your egg whites are whipped to stiff peaks, which will help the cookies hold their ghostly shape during baking. Be sure to have a piping bag or a plastic bag with a corner snipped off to pipe the meringue into ghost shapes.
These cookies are a great make-ahead option, as they can be stored in an airtight container for several days, making them ideal for party planning.
Ingredients (Serves 4-6):
- 4 large egg whites
- 1 cup granulated sugar
- 1/4 teaspoon cream of tartar
- 1/2 teaspoon vanilla extract
- Mini chocolate chips or black decorating gel for eyes
Instructions:
- Preheat the Oven: Preheat your oven to 225°F (107°C). Line two baking sheets with parchment paper to prevent the meringues from sticking.
- Prepare the Egg Whites: In a large, clean, and dry mixing bowl, add the egg whites and cream of tartar. Guarantee no yolk is present as this can prevent the egg whites from whipping properly.
- Whip the Egg Whites: Using an electric mixer, begin whipping the egg whites on medium speed until frothy. Gradually increase the speed to high and continue beating until soft peaks form.
- Add Sugar and Vanilla: Gradually add the sugar, one tablespoon at a time, while continuing to beat on high speed until the sugar dissolves completely, and stiff glossy peaks form. This should take about 5-7 minutes. Add the vanilla extract and mix until just combined.
- Pipe the Meringues: Transfer the meringue mixture into a piping bag fitted with a round tip or a plastic bag with a corner snipped off. Pipe ghost shapes onto the prepared baking sheets, leaving some space between each ghost.
- Add Eyes: While the meringue is still wet, gently press two mini chocolate chips or use black decorating gel to create eyes on each ghost.
- Bake the Meringues: Place the baking sheets in the preheated oven and bake for 1 hour. After baking, turn off the oven and allow the meringues to cool inside the oven for at least another hour. This helps them dry out completely, which is essential for a light, airy texture.
- Store the Meringues: Once cooled, store the Ghostly Meringue Cookies in an airtight container at room temperature, where they’ll stay fresh for several days.
Extra Tips:
When making meringues, it’s vital to guarantee that the mixing bowl and beaters are completely clean and free of any grease or residue, as this can hinder the egg whites from whipping properly.
Also, be patient while adding the sugar—it’s important to add it gradually to guarantee it dissolves completely, which contributes to the meringues’ smooth texture. If you’re in a humid environment, consider using a dehumidifier or air conditioning to help the meringues dry properly, as humidity can affect their texture.
Enjoy crafting your spooky yet adorable Ghostly Meringue Cookies for a hauntingly delightful Halloween treat!
Witch’s Brew Cupcakes
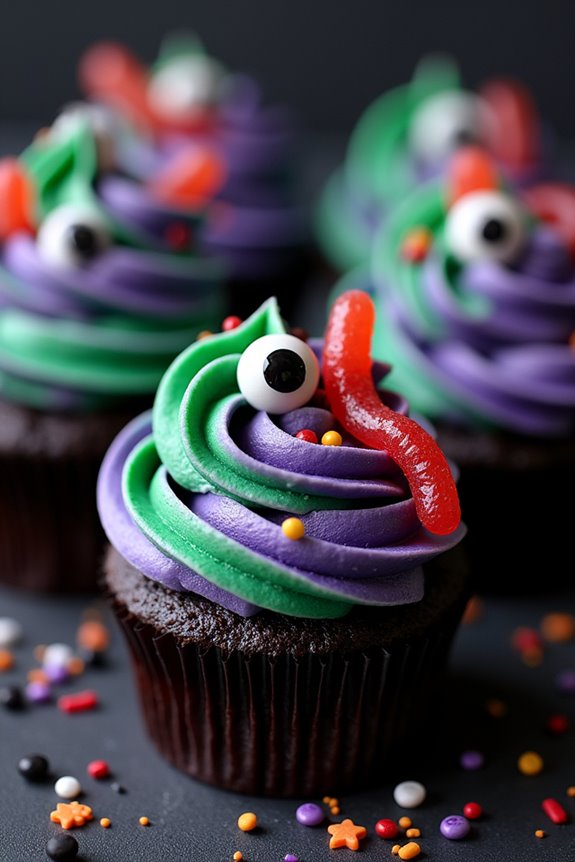
Bring a spellbinding touch to your Halloween festivities with these delightful Witch’s Brew Cupcakes. These whimsical treats are perfect for capturing the eerie yet playful spirit of Halloween. With their vibrant colors and bewitching flavors, Witch’s Brew Cupcakes will enchant both kids and adults at your party.
The cupcakes consist of a moist and fluffy base, topped with a swirl of eye-catching frosting that resembles a witch’s bubbling cauldron. Decorated with fun Halloween-themed toppings, these cupcakes are sure to be a hit at any gathering.
The magic begins with a simple vanilla cupcake recipe infused with a hint of green food coloring to evoke the mysterious look of a witch’s brew. The frosting is a luscious buttercream, dyed in deep purples and greens, creating a swirling effect that mimics the look of a bubbling potion. Topped with candy eyes, gummy worms, and sprinkles, these cupcakes aren’t only delicious but also a feast for the eyes.
This recipe makes enough to serve 4-6 people, making it perfect for a small gathering or as part of a larger dessert spread.
Ingredients:
- 1 cup all-purpose flour
- 1/2 cup granulated sugar
- 1/4 cup unsalted butter, softened
- 1/2 cup milk
- 1 large egg
- 1 teaspoon vanilla extract
- 1 teaspoon baking powder
- 1/4 teaspoon salt
- Green food coloring
For the Frosting:
- 1/2 cup unsalted butter, softened
- 2 cups powdered sugar
- 2-3 tablespoons milk
- 1 teaspoon vanilla extract
- Purple and green food coloring
For Decoration:
- Candy eyes
- Gummy worms
- Halloween sprinkles
Instructions:
- Preheat your oven to 350°F (175°C) and line a muffin tin with cupcake liners.
- In a large mixing bowl, cream together the softened butter and granulated sugar until light and fluffy. This usually takes about 2-3 minutes.
- Add the egg and vanilla extract to the butter-sugar mixture, beating well until fully combined.
- In another bowl, whisk together the flour, baking powder, and salt. Gradually add these dry ingredients to the wet mixture, alternating with the milk. Mix until just combined. Be careful not to overmix.
- Add a few drops of green food coloring to the batter and stir until you achieve your desired shade of green.
- Divide the batter evenly among the prepared cupcake liners, filling each about two-thirds full.
- Bake in the preheated oven for 18-20 minutes, or until a toothpick inserted into the center of a cupcake comes out clean. Allow the cupcakes to cool completely on a wire rack.
- For the frosting, beat the softened butter in a bowl until smooth. Gradually add the powdered sugar, one cup at a time, while continuing to beat the mixture.
- Add the vanilla extract and 2 tablespoons of milk, beating until the frosting is light and fluffy. If needed, add an additional tablespoon of milk for desired consistency.
- Divide the frosting into two separate bowls. Color one portion with purple food coloring and the other with green food coloring.
- Using a piping bag fitted with a star tip, alternate between the two colors to create a swirl effect on top of each cooled cupcake.
- Decorate the frosted cupcakes with candy eyes, gummy worms, and Halloween sprinkles for a fun, spooky touch.
Extra Tips:
To guarantee your Witch’s Brew Cupcakes have the perfect texture, make sure all ingredients are at room temperature before beginning. This will help them blend more smoothly, resulting in a lighter and fluffier cupcake.
If you want to add an extra layer of flavor, consider incorporating a drop or two of peppermint or almond extract into the batter. For an added creative twist, use edible glitter or luster dust on the frosting to give your cupcakes a magical sparkle.
Bloody Berry Cheesecake
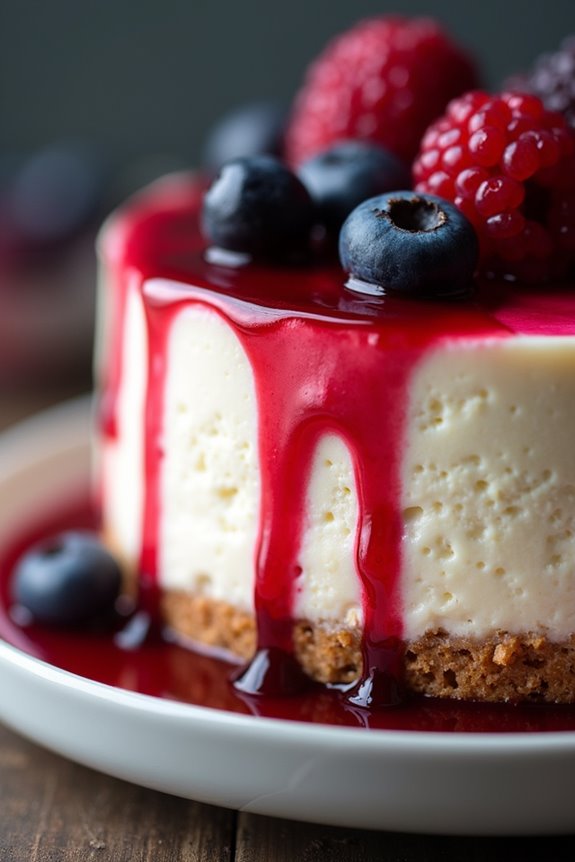
Get ready to spook your guests with this sinfully delicious Bloody Berry Cheesecake, perfect for any Halloween party! This dessert isn’t only hauntingly beautiful with its gory berry topping, but it’s also incredibly scrumptious. The smooth and creamy cheesecake is complemented by a rich graham cracker crust, creating the perfect backdrop for the vibrant “bloody” berry sauce.
Whether you’re hosting a chilling get-together or attending a Halloween potluck, this cheesecake will surely be the star of the show.
The magic of this dessert lies in its presentation. The cheesecake base is simple and classic, allowing the flavors of the tart berries to shine through. The berry topping, made from a mix of fresh or frozen berries, creates a striking contrast against the creamy white cheesecake, resembling a gory but delightful treat. Not only does it look amazing, but it also provides a burst of fruity flavor with every bite.
This recipe serves 4-6 people, making it ideal for small gatherings or as a part of a larger dessert spread.
Ingredients:
- 1 ½ cups graham cracker crumbs
- ½ cup unsalted butter, melted
- ¼ cup granulated sugar
- 24 oz cream cheese, softened
- 1 cup granulated sugar
- 1 tsp vanilla extract
- 3 large eggs
- 1 cup sour cream
- 1 cup mixed berries (raspberries, strawberries, and blueberries)
- ½ cup granulated sugar (for berry sauce)
- 1 tbsp lemon juice
- 1 tbsp cornstarch
- 2 tbsp water
Cooking Instructions:
- Preheat and Prepare Crust: Preheat your oven to 325°F (160°C). In a mixing bowl, combine the graham cracker crumbs, melted butter, and ¼ cup granulated sugar. Mix well until the crumbs are evenly coated with butter. Press the mixture firmly onto the bottom of a 9-inch springform pan to form the crust. Bake for 10 minutes, then remove from the oven and let it cool.
- Make the Cheesecake Filling: In a large mixing bowl, beat the softened cream cheese until smooth and creamy. Gradually add 1 cup of granulated sugar and continue beating until well combined. Mix in the vanilla extract. Add the eggs one at a time, beating well after each addition. Finally, fold in the sour cream until the mixture is smooth.
- Bake the Cheesecake: Pour the cream cheese mixture over the cooled crust, spreading it evenly. Bake in the preheated oven for about 50-60 minutes or until the center is set but still slightly jiggly. Turn off the oven and leave the cheesecake inside with the door slightly ajar for another hour. Remove from the oven and let it cool completely at room temperature before refrigerating for at least 4 hours or overnight.
- Prepare the Bloody Berry Sauce: In a small saucepan, combine the mixed berries, ½ cup granulated sugar, and lemon juice. Cook over medium heat until the berries release their juices and the mixture starts to simmer. In a separate small bowl, dissolve the cornstarch in water, then add it to the berry mixture. Stir constantly until the sauce thickens slightly. Remove from heat and let it cool.
- Assemble and Serve: Once the cheesecake is chilled, remove it from the springform pan and place it on a serving platter. Pour the cooled berry sauce over the top, letting it drip down the sides for a “bloody” effect. Slice and serve your spooky masterpiece to your guests.
Extra Tips:
For a perfectly smooth cheesecake, verify all your ingredients are at room temperature before mixing. This helps prevent lumps in the batter.
If using frozen berries for the sauce, thaw them first and drain any excess liquid to avoid a watery sauce. If you want a firmer cheesecake, consider adding one more tablespoon of cornstarch to the filling.
Finally, using a hot knife when slicing will help achieve clean, neat slices for a beautiful presentation. Enjoy your hauntingly delicious dessert!
Spooky Spiderweb Brownies
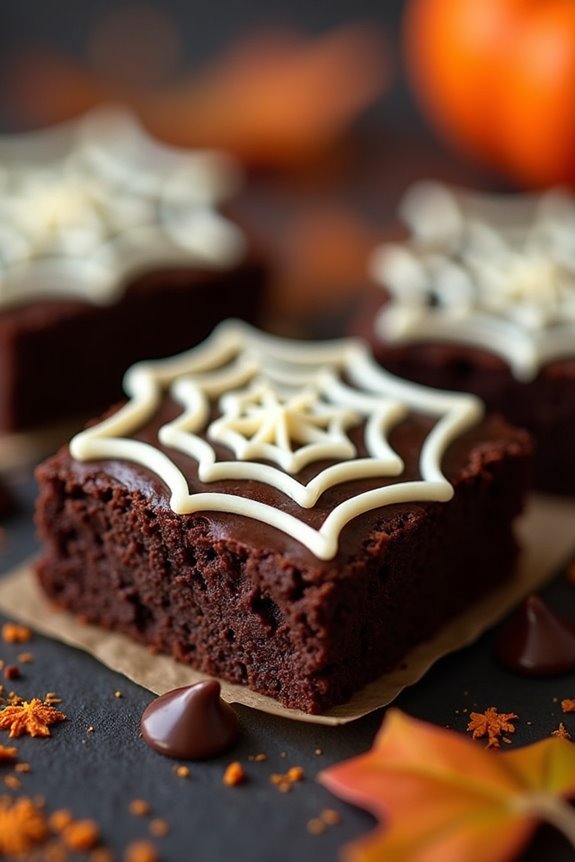
These brownies begin with a moist, fudgy base made from high-quality cocoa powder and chocolate chips, ensuring a deep chocolate flavor. The spiderweb design is achieved with a simple cream cheese mixture, swirled on top to mimic the eerie patterns of a web.
With just a bit of patience and creativity, you can transform simple ingredients into a festive treat that’s as delightful to look at as it’s to eat. Here’s how you can make these Spooky Spiderweb Brownies for a gathering of 4-6 people.
Ingredients:
- 1/2 cup unsalted butter
- 1 cup granulated sugar
- 2 large eggs
- 1 teaspoon vanilla extract
- 1/3 cup unsweetened cocoa powder
- 1/2 cup all-purpose flour
- 1/4 teaspoon salt
- 1/4 teaspoon baking powder
- 1/2 cup semi-sweet chocolate chips
- 4 oz cream cheese, softened
- 1/4 cup powdered sugar
- 1 tablespoon milk
Instructions:
1. Preheat the Oven: Begin by preheating your oven to 350°F (175°C). Line an 8×8-inch baking pan with parchment paper, leaving some overhang for easy removal.
2. Prepare the Brownie Batter****: In a medium saucepan, melt the butter over low heat. Remove from heat and stir in the sugar, eggs, and vanilla extract until well combined.
In a separate bowl, sift together the cocoa powder, flour, salt, and baking powder. Gradually add the dry ingredients to the wet mixture, stirring gently until a thick batter forms. Fold in the chocolate chips.
3. Make the Cream Cheese Mixture: In a small bowl, beat the softened cream cheese, powdered sugar, and milk until smooth and creamy. Transfer this mixture to a piping bag or a zip-top bag with a small corner snipped off.
4. Assemble the Brownies: Pour the brownie batter into the prepared baking pan, spreading it evenly with a spatula. Using the cream cheese mixture, pipe concentric circles on top of the brownie batter, starting from the center and working outward.
5. Create the Spiderweb Design: Using a toothpick or a skewer, gently drag lines from the center of the circles towards the edges of the pan, creating a spiderweb effect.
6. Bake the Brownies: Place the pan in the preheated oven and bake for 25-30 minutes, or until a toothpick inserted into the center comes out with moist crumbs attached. Avoid overbaking to maintain a fudgy texture.
7. Cool and Serve: Allow the brownies to cool completely in the pan on a wire rack. Once cooled, lift them out using the parchment overhang and cut into squares to serve.
Extra Tips: For best results, make sure your cream cheese is fully softened before mixing to avoid lumps in the spiderweb design.
If you don’t have a piping bag, a resealable plastic bag with a small corner cut off works just as well for piping the cream cheese mixture. Also, feel free to get creative with additional decorations—consider adding plastic spider rings or edible glitter for an extra spooky touch.
Monster Eyeball Cake Pops
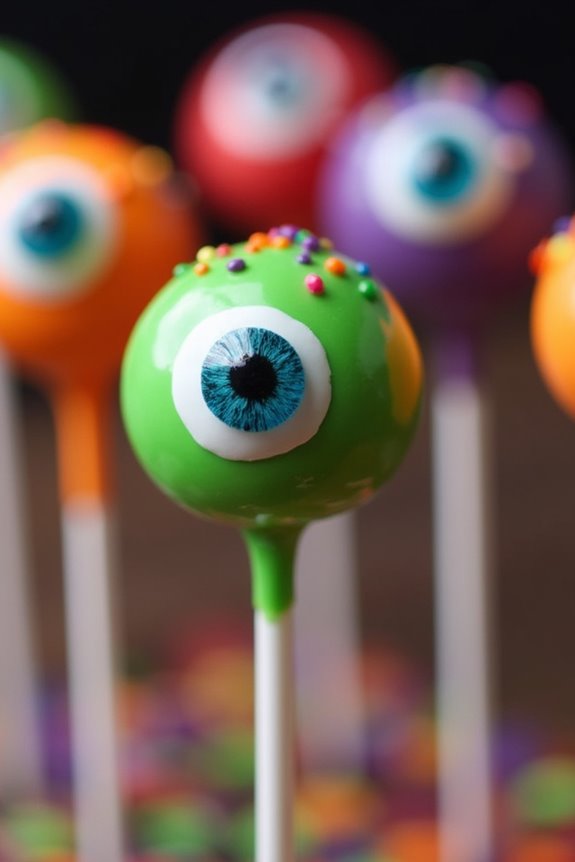
Get ready to spook your guests with these deliciously eerie Monster Eyeball Cake Pops! Perfect for a Halloween party, these cake pops not only satisfy your sweet tooth but also add a touch of playful fright to your festive spread. Made with a moist cake base, creamy frosting, and a shockingly fun candy eyeball, these treats are certain to be the highlight of your dessert table.
Whether you’re hosting a party for kids or adults, these Monster Eyeball Cake Pops are the perfect blend of creepy and cute.
Creating these cake pops requires some basic baking skills and a bit of creativity. The process involves baking a cake, crumbling it, and mixing it with frosting to form the balls, which are then coated with candy melts and decorated with candy eyeballs. The end result is a batch of vibrant, monster-themed cake pops that are as tasty as they’re fun to look at.
This recipe serves 4-6 people, making it ideal for a small to medium-sized gathering.
Ingredients:
- 1 box of cake mix (any flavor)
- Ingredients required for the cake mix (e.g., eggs, oil, water)
- 1/2 cup of frosting (store-bought or homemade)
- 24 oz of candy melts (various colors)
- 12-15 candy eyeballs
- 12-15 lollipop sticks
- Sprinkles (optional, for added decoration)
Instructions:
- Prepare and Bake the Cake: Follow the instructions on the cake mix box to prepare your cake. Bake the cake in a 9×13 inch pan, and let it cool completely.
- Crumble the Cake: Once the cake is cooled, use your hands to crumble the entire cake into fine crumbs in a large bowl.
- Mix with Frosting: Add about 1/2 cup of frosting to the cake crumbs. Mix it thoroughly until the mixture holds together well when squeezed. You may need to adjust the amount of frosting based on the texture of your cake.
- Shape the Cake Balls: Scoop out small portions of the cake mixture and roll them into balls about 1.5 inches in diameter. Place them on a baking sheet lined with parchment paper. You should have around 12-15 balls.
- Chill the Cake Balls: Place the cake balls in the refrigerator for about 30 minutes to firm up.
- Melt the Candy Melts: While the cake balls are chilling, melt the candy melts according to the package instructions. You can use different colors to make your monster eyeballs more vibrant.
- Insert Lollipop Sticks: Dip the tip of each lollipop stick into the melted candy and then insert it halfway into each cake ball. This helps secure the stick in the ball.
- Coat the Cake Pops: Carefully dip each cake ball into the melted candy, ensuring it’s fully coated. Allow any excess candy to drip off.
- Add the Eyeballs: Before the candy coating sets, gently press a candy eyeball onto each cake pop. Hold it in place for a few seconds to confirm it sticks.
- Decorate: If desired, add sprinkles or additional decorations to your cake pops for extra flair. Let them set by standing them in a styrofoam block or a cake pop holder.
Extra Tips:
To guarantee your Monster Eyeball Cake Pops remain perfectly round and don’t fall off the stick, make sure your cake mixture isn’t too wet with frosting. Start with less frosting and add more only if needed.
When melting your candy melts, if they’re too thick, you can add a small amount of vegetable oil to thin the consistency, making it easier to coat the cake pops evenly. Additionally, confirm that the cake balls are adequately chilled before dipping them in the melted candy to help maintain their shape during the coating process.
Enjoy your spooky, fun, and delicious creation!
Creepy Crawly Chocolate Bark
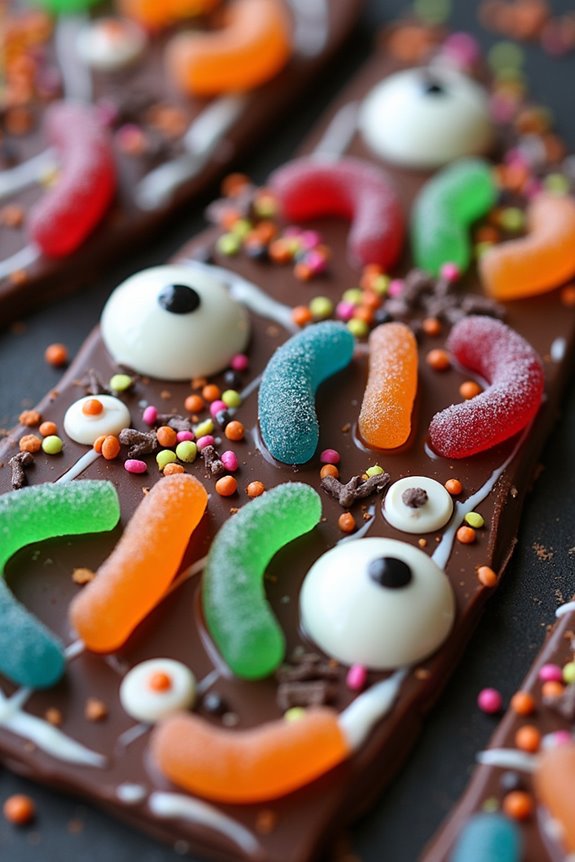
Creepy Crawly Chocolate Bark is a spooktacular treat that’s perfect for any Halloween party. This dessert combines rich, creamy chocolate with a variety of colorful and creepy toppings that will delight both kids and adults alike. The best part about this recipe is its versatility—you can easily swap out ingredients based on personal preferences or dietary restrictions, and it’s simple enough for even novice bakers to tackle. Not only is it visually striking, but it also offers a fun mix of textures and flavors that will leave your guests crawling back for more.
This chocolate bark is a fantastic centerpiece for any Halloween spread, with its eerie appearance enhanced by gummy worms, candy eyes, and sprinkles. It’s a no-bake recipe, making it an excellent choice for those who want to prepare something delicious without spending hours in the kitchen. The dark chocolate base provides a rich contrast to the vibrant toppings, creating an eye-catching and mouth-watering dessert. Whether you’re hosting a haunted house or a casual get-together, Creepy Crawly Chocolate Bark is sure to be a hit.
Ingredients (serving size: 4-6 people):
- 2 cups dark chocolate chips
- 1/2 cup white chocolate chips
- 1/2 cup assorted gummy worms
- 1/4 cup candy eyeballs
- 1/4 cup Halloween-themed sprinkles
- 1 tablespoon coconut oil
Instructions:
- Prepare the Baking Sheet: Line a large baking sheet with parchment paper. This will prevent the chocolate from sticking and make it easier to remove once it has set.
- Melt the Chocolate: In a microwave-safe bowl, combine the dark chocolate chips and 1 tablespoon of coconut oil. Microwave in 30-second intervals, stirring between each, until the chocolate is fully melted and smooth.
- Spread the Chocolate: Pour the melted dark chocolate onto the prepared baking sheet. Use a spatula to spread it into an even layer, approximately 1/4 inch thick.
- Add White Chocolate: Melt the white chocolate chips in a separate bowl using the same method. Once melted, drizzle the white chocolate over the dark chocolate layer using a spoon or piping bag to create a marbled effect.
- Decorate with Toppings: While the chocolate is still warm, scatter the gummy worms, candy eyeballs, and Halloween-themed sprinkles evenly over the top. Press them lightly into the chocolate to verify they adhere.
- Set the Chocolate: Place the baking sheet in the refrigerator and allow the chocolate to set completely, about 30 minutes to 1 hour.
- Break into Pieces: Once the chocolate is fully set, remove it from the refrigerator and break it into irregular pieces. Serve immediately or store in an airtight container until ready to enjoy.
Extra Tips:
For best results, make sure all your toppings are ready to go before you start melting the chocolate, as the chocolate can set quickly once spread.
Feel free to get creative with your toppings—crushed cookies or pretzels can add an extra layer of flavor and texture. If you prefer milk or white chocolate to dark chocolate, you can easily substitute it, just remember to monitor the sweetness level.
Finally, if you’re making this treat ahead of time, store it in a cool, dry place to prevent the chocolate from melting.
Haunted Pumpkin Pudding Cups
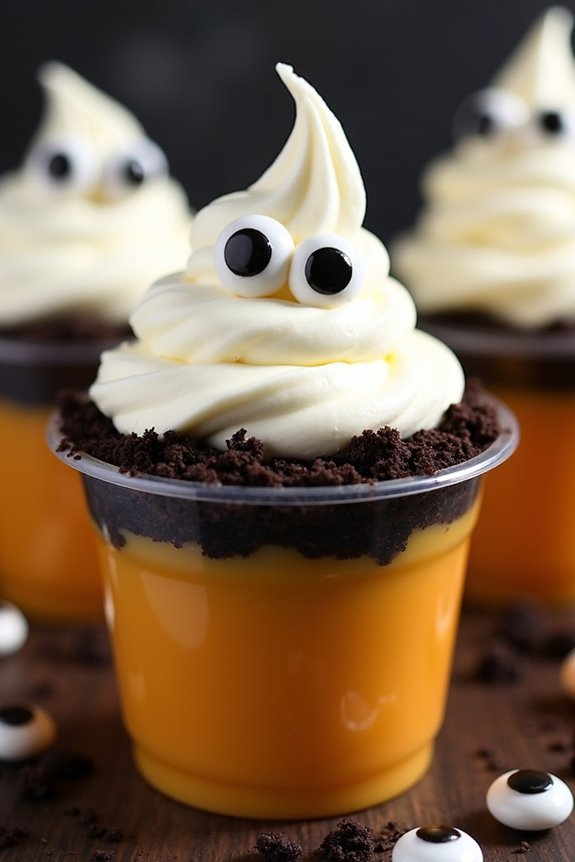
The best part about Haunted Pumpkin Pudding Cups is that they require minimal effort and time, making them a great last-minute dessert option. You can prepare them ahead of time, allowing you to focus on other party preparations.
With their adorable ghostly decorations, these pudding cups aren’t only a treat for the taste buds but also a delight for the eyes. Gather your ingredients and follow this simple recipe to bring a touch of Halloween magic to your dessert table.
Ingredients (serves 4-6):
- 1 package (3.4 oz) instant vanilla pudding mix
- 2 cups cold milk
- 1 cup canned pumpkin puree
- 1 teaspoon pumpkin pie spice
- 1/2 teaspoon vanilla extract
- 1 cup crushed chocolate sandwich cookies (like Oreos)
- 12 candy eyeballs
- Whipped cream (for topping)
- 6 clear plastic cups (for serving)
Cooking Instructions:
- Prepare the Pudding: In a large mixing bowl, combine the instant vanilla pudding mix with the cold milk. Use a whisk to blend the mixture until it’s smooth and begins to thicken, which should take about 2 minutes.
- Add Pumpkin Flavor: Mix in the canned pumpkin puree, pumpkin pie spice, and vanilla extract into the pudding. Whisk until all the ingredients are fully incorporated and the mixture is smooth and creamy.
- Chill the Pudding: Cover the bowl with plastic wrap and refrigerate the pudding mixture for at least 30 minutes. This allows the pudding to set properly and enhances the flavors.
- Crush the Cookies: While the pudding chills, place the chocolate sandwich cookies in a resealable plastic bag. Use a rolling pin to crush them into fine crumbs.
- Assemble the Cups: Once the pudding has set, divide it evenly among the clear plastic cups. Sprinkle a generous layer of crushed cookies on top of each pudding cup to resemble “dirt.”
- Add Whipped Topping: Pipe or spoon a dollop of whipped cream onto each pudding cup, creating a ghostly shape.
- Decorate: Place two candy eyeballs on the whipped cream to form a ghost face. Adjust the position of the eyes to give each ghost its own unique expression.
- Serve: Your Haunted Pumpkin Pudding Cups are ready to be served. Keep them refrigerated until you’re ready to delight your guests.
Extra Tips:
For an extra spooky touch, consider using black food coloring to tint the whipped cream for a more eerie ghost appearance.
You can also create variations by using different pudding flavors or adding a layer of colored gelatin underneath the pudding for a surprise effect. If you’re making these for a larger crowd, simply double the ingredients.
Vampire Bite Red Velvet Trifle
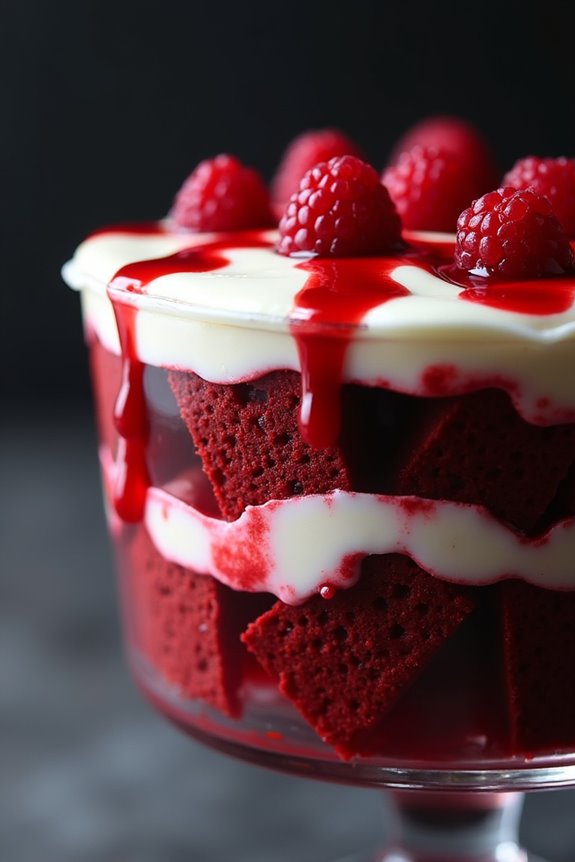
Indulge your guests with a spooky yet delightful dessert this Halloween by serving up Vampire Bite Red Velvet Trifle. This eerie treat layers rich red velvet cake with a luscious cream cheese filling and a blood-like raspberry sauce, creating a visually striking and mouthwatering dessert that’s sure to be the talk of your Halloween party.
The deep red hues of the cake and sauce, paired with the creamy white filling, mimic a vampire’s bite, making it perfect for the occasion. Not only is it delicious, but it also adds a gory yet sophisticated touch to your dessert table.
This dessert isn’t just about the looks; it’s a decadent combination of flavors and textures. The moistness of the red velvet cake, the smoothness of the cream cheese, and the tangy sweetness of the raspberry sauce create a harmonious blend that tantalizes the taste buds.
With a serving size of 4-6 people, this trifle is perfect for small gatherings, ensuring everyone gets a generous helping of this eerie concoction. Whether you’re hosting a full-blown Halloween party or just want something special to enjoy with family, this Vampire Bite Red Velvet Trifle is a must-try.
Ingredients (Serving Size: 4-6)
- 1 box of red velvet cake mix (plus ingredients as per box instructions)
- 1 cup heavy whipping cream
- 8 oz cream cheese, softened
- 1 cup powdered sugar
- 1 teaspoon vanilla extract
- 1 cup raspberries, fresh or frozen
- 1/2 cup granulated sugar
- 1 tablespoon lemon juice
- 1 tablespoon cornstarch
- 1/4 cup water
- Red gel food coloring (optional)
Cooking Instructions
1. Prepare the Red Velvet Cake: Start by baking the red velvet cake according to the instructions on the box. Once baked, let it cool completely. Slice the cake into small cubes once it has cooled.
2. Make the Cream Cheese Filling: In a large mixing bowl, beat the softened cream cheese with powdered sugar and vanilla extract until smooth and creamy. In a separate bowl, whip the heavy whipping cream until stiff peaks form. Gently fold the whipped cream into the cream cheese mixture until well combined. Set aside.
3. Prepare the Raspberry Sauce: In a small saucepan, combine raspberries, granulated sugar, lemon juice, and water. Cook over medium heat, stirring occasionally, until the raspberries break down.
In a small bowl, mix cornstarch with a tablespoon of water to make a slurry, then add it to the saucepan. Stir until the sauce thickens. Strain the sauce through a fine sieve to remove seeds, if desired. Add a few drops of red gel food coloring for a more vivid “blood” effect, if desired. Let it cool.
4. Assemble the Trifle: In a trifle bowl or individual serving glasses, start by layering cubes of red velvet cake at the bottom. Next, spoon a layer of the cream cheese filling over the cake cubes. Drizzle some raspberry sauce over the cream cheese layer.
Repeat the layers until all components are used, finishing with a drizzle of raspberry sauce on top.
5. Chill and Serve: Refrigerate the trifle for at least an hour before serving to allow the flavors to meld together. Serve chilled and watch your guests delight in each “bloody” bite.
Extra Tips
For an added visual effect, consider using clear glassware to showcase the vibrant layers of the trifle. You can also garnish the top with whole raspberries or spooky Halloween-themed decorations, such as candy vampire teeth or edible glitter, to enhance the theme.
If you’re short on time, you can use store-bought red velvet cake or pre-made raspberry sauce to speed up the preparation process. This dish is versatile, allowing you to adjust sweetness and flavor intensity according to your preference.
Bewitched Caramel Apples
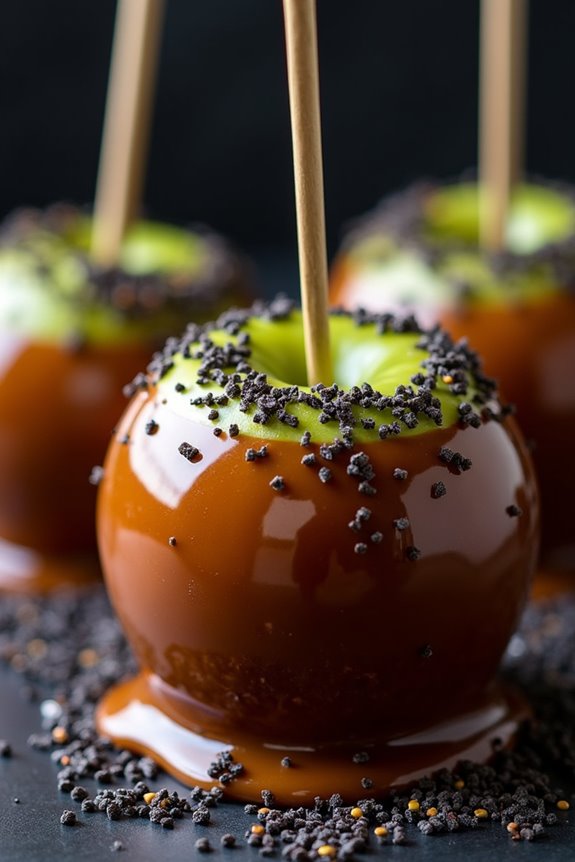
To make these Bewitched Caramel Apples, you’ll need a few simple ingredients and some creativity to give them a hauntingly delightful look. The recipe is straightforward, and the result is a deliciously fun treat that both kids and adults will enjoy. Get ready to impress your guests with these bewitching caramel apples that serve 4-6 people.
Ingredients:
- 6 medium apples (Granny Smith or Honeycrisp preferred)
- 1 cup of granulated sugar
- ½ cup of light corn syrup
- ½ cup of unsalted butter
- 1 cup of sweetened condensed milk
- 1 teaspoon of vanilla extract
- 1 teaspoon of black food coloring gel (optional)
- 6 wooden sticks or skewers
- Halloween-themed sprinkles or edible glitter (optional)
Instructions:
- Prepare the Apples: Wash and thoroughly dry the apples to remove any waxy coating. Insert a wooden stick into the stem end of each apple, making sure it’s secure.
- Make the Caramel: In a medium saucepan over medium heat, combine the sugar, corn syrup, butter, and sweetened condensed milk. Stir continuously until the mixture comes to a boil.
- Cook the Caramel: Once boiling, reduce the heat to low. Continue stirring constantly to prevent burning. Cook until the caramel reaches a temperature of 245°F (118°C) on a candy thermometer, which should take about 10-15 minutes.
- Add Flavor and Color: Remove the saucepan from heat and stir in the vanilla extract. If desired, add the black food coloring gel and stir until evenly distributed.
- Dip the Apples: Carefully dip each apple into the hot caramel, turning to coat evenly. Allow the excess caramel to drip off before placing the apple on a parchment-lined baking sheet.
- Decorate: While the caramel is still warm and sticky, sprinkle the apples with Halloween-themed sprinkles or edible glitter for a festive touch.
- Set the Caramel: Allow the caramel apples to cool and set at room temperature for about 30 minutes before serving.
Extra Tips:
For a smoother caramel finish, make certain the apples are completely dry before dipping. You can also experiment with different food coloring gels to create a variety of spooky colors, such as deep purple or blood red.
If you’re making these in advance, store them in the refrigerator to keep the caramel from melting, but let them return to room temperature before serving for the best flavor and texture.
Black Cat Macarons
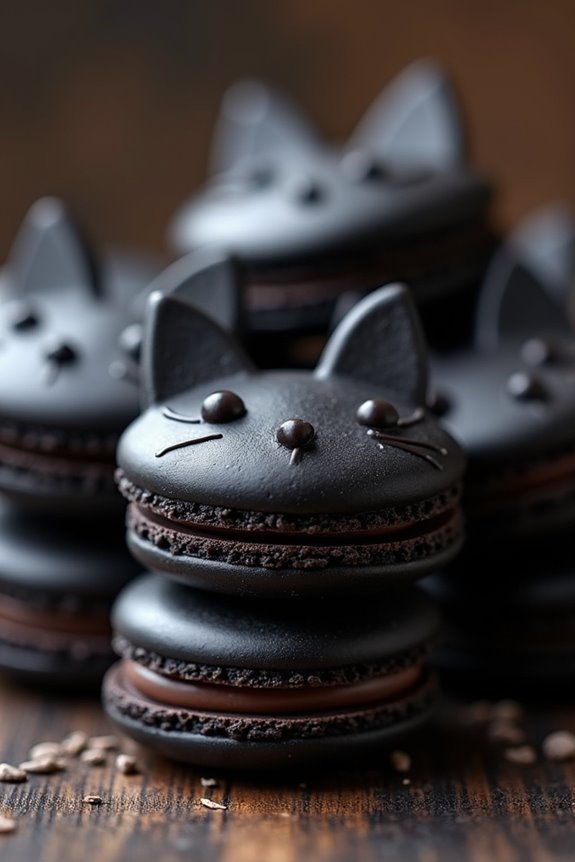
Halloween is the perfect time to bring out your culinary creativity, and Black Cat Macarons are a delightful way to add a spooky yet playful touch to your dessert table. These whimsical treats aren’t only visually appealing but also irresistibly delicious. Perfectly crisp on the outside and chewy on the inside, these macarons are filled with a rich chocolate ganache and decorated to resemble adorable black cats. They’re sure to be a hit at your Halloween party, enchanting both kids and adults alike.
To create these charming macarons, you’ll need to master the art of macaron-making, which involves precision and patience. The process begins with making the macaron shells, which are tinted black and shaped into cute feline faces. The magic continues with a creamy ganache filling that adds a luscious depth of flavor. With a little creativity and some steady piping skills, you’ll soon be serving up a tray of Black Cat Macarons that will impress your guests and make your Halloween celebration even more memorable.
Ingredients (serves 4-6):
- 120g almond flour
- 200g powdered sugar
- 100g egg whites (about 3 large eggs)
- 50g granulated sugar
- 1/4 teaspoon cream of tartar
- Black gel food coloring
- 100g dark chocolate, chopped
- 100ml heavy cream
- Black edible marker or gel icing
- White edible marker or gel icing
Instructions:
- Prepare the Dry Ingredients: In a large bowl, sift together the almond flour and powdered sugar. This guarantees a smooth and even macaron shell. Set aside.
- Make the Meringue: In a clean, dry mixing bowl, beat the egg whites until foamy. Add cream of tartar and continue to beat until soft peaks form. Gradually add granulated sugar and beat until stiff peaks form. Add a few drops of black gel food coloring and mix until the color is fully incorporated.
- Combine Ingredients: Gently fold the almond flour mixture into the meringue in three additions. Be careful not to overmix. The batter should flow in thick ribbons and, when dropped, should slowly melt back into itself.
- Pipe the Macarons: Transfer the batter to a piping bag fitted with a round tip. Pipe small circles onto a baking sheet lined with parchment paper. Gently tap the baking sheet on the counter to release any air bubbles. Let the macarons rest at room temperature for 30-60 minutes until a skin forms on the surface.
- Bake the Macarons: Preheat the oven to 300°F (150°C). Bake the macarons for 15-18 minutes. They shouldn’t brown. Let them cool completely on the baking sheet.
- Prepare the Ganache: In a small saucepan, heat the heavy cream until it just begins to simmer. Pour over the chopped dark chocolate and let sit for 5 minutes. Stir until smooth, then let cool to thicken.
- Assemble the Macarons: Pair the macaron shells by size. Pipe a small amount of ganache onto one shell and sandwich with another. Use the black and white edible markers or gel icing to draw cat faces and ears on each macaron.
Extra Tips:
When making macarons, precision is vital. Weigh your ingredients accurately, and make certain your mixing bowl and utensils are clean and dry to achieve the perfect meringue.
If you’re new to macarons, practice patience when folding the batter and piping the shells. If you don’t have a steady hand, consider using a template under your parchment paper to guide your piping.
Additionally, allow the macarons to mature in the refrigerator for a day before serving, as this enhances the flavor and texture. Happy Halloween baking!
Graveyard Dirt Pudding Cups
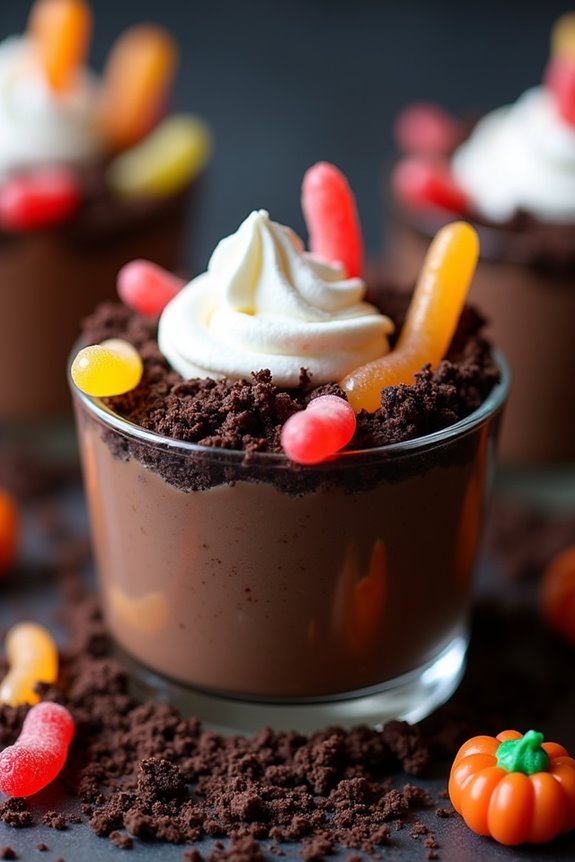
Graveyard Dirt Pudding Cups are the perfect spooky treat for your Halloween party! These eerie and delicious dessert cups aren’t only fun to make but also a hit among both kids and adults. Combining layers of creamy chocolate pudding, crushed chocolate cookies, and gummy worms, they create a delightful illusion of a creepy graveyard.
The best part is, they require no baking, making them a quick and easy option for any host looking to delight their guests with a spooky surprise. This recipe makes enough for 4-6 people, making them ideal for small gatherings or as part of a larger dessert table. Each cup is a perfect individual portion, allowing your guests to enjoy their own personalized graveyard creation.
The combination of pudding and cookies creates a rich, chocolatey base that pairs perfectly with the chewy gummy worms for a fun textural contrast. These Graveyard Dirt Pudding Cups are sure to be the talk of your Halloween party!
Ingredients (Serves 4-6):
- 2 cups cold milk
- 1 package (3.9 ounces) instant chocolate pudding mix
- 1 package (14 ounces) chocolate sandwich cookies
- 1 cup whipped topping
- 12-18 gummy worms
- Optional: small candy pumpkins or tombstone decorations
Instructions:
- Prepare the Pudding: In a large mixing bowl, whisk together the cold milk and instant chocolate pudding mix for about 2 minutes. Let it sit for 5 minutes until it thickens.
- Crush the Cookies: While the pudding is setting, place the chocolate sandwich cookies in a zip-top bag. Seal the bag and crush the cookies using a rolling pin until they resemble fine crumbs. These will form the “dirt” layer.
- Layer the Cups: Start by spooning an even layer of crushed cookies into the bottom of each cup. Next, add a generous layer of chocolate pudding on top of the cookie crumbs. Then, add another layer of cookie crumbs to resemble dirt. Repeat layers if using larger cups.
- Add Toppings: Spoon a dollop of whipped topping onto each cup, then insert a few gummy worms so they appear to be crawling out of the dirt. Add any additional decorations, like candy pumpkins or tombstone-shaped cookies, to enhance the graveyard look.
- Chill and Serve: Refrigerate the cups for at least 30 minutes before serving to allow the pudding to set fully and the flavors to meld together. Serve with a spoon and watch your guests enjoy the spooky treat!
Extra Tips:
For an extra touch of creativity, use a small amount of melted chocolate to write names or spooky words on the tombstone decorations before placing them into the cups.
If you want to add more depth to the flavors, consider mixing a tablespoon of instant coffee granules into the pudding mix to enhance the chocolate flavor. You can also experiment with different flavors of pudding or cookies to suit your taste preferences.