
As Halloween draws near, it’s time to start planning those adorable and festive desserts that kids absolutely adore. Last year, my little ones and I had a blast making ghostly cupcakes, and seeing their faces light up with excitement was priceless. There’s something truly magical about turning simple ingredients into spooky creations like mummy Rice Krispie treats and witch hat cookies. Are you ready to discover some new delightful recipes for your Halloween celebration? Let’s make this holiday extra special with treats that will enchant both kids and adults alike!
Ghostly Cupcakes
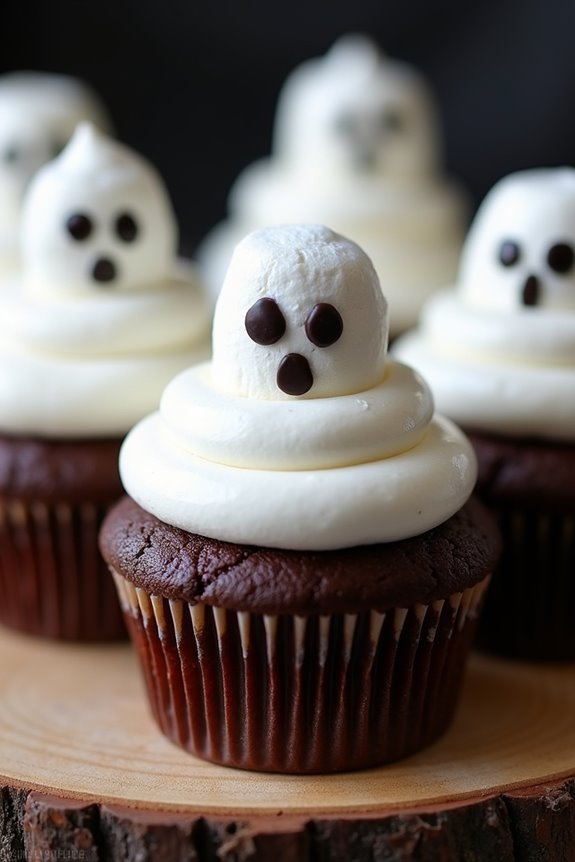
Transform a simple batch of cupcakes into a spooky Halloween treat with our Ghostly Cupcakes. These delightful desserts are perfect for kids, combining fun and flavor in one hauntingly delicious package.
Imagine a soft, moist cupcake topped with a spooky marshmallow ghost, perfect for a Halloween party or a sweet treat for trick-or-treaters. This recipe is easy to follow and allows for creativity, as kids can add their own spooky touches to each cupcake.
The Ghostly Cupcakes aren’t only fun to make but also offer an opportunity for children to engage in the kitchen. By involving them in the baking process, you can turn this recipe into a fun family activity that everyone will enjoy.
Plus, these cupcakes are designed to serve 4-6 people, making them ideal for small gatherings or family celebrations. So, gather your little chefs and let’s whip up some ghostly delights!
Ingredients for Ghostly Cupcakes (Serves 4-6):
- 1 cup all-purpose flour
- 1/2 cup granulated sugar
- 1/4 cup unsweetened cocoa powder
- 1 teaspoon baking powder
- 1/4 teaspoon baking soda
- 1/4 teaspoon salt
- 1/2 cup milk
- 1/4 cup vegetable oil
- 1 large egg
- 1 teaspoon vanilla extract
- 12 large marshmallows
- 1 cup white frosting
- Black decorating gel
Instructions:
- Preheat the Oven: Preheat your oven to 350°F (175°C) and line a muffin tin with cupcake liners.
- Mix Dry Ingredients: In a large bowl, sift together the flour, sugar, cocoa powder, baking powder, baking soda, and salt.
- Combine Wet Ingredients: In a separate bowl, mix the milk, vegetable oil, egg, and vanilla extract until well blended.
- Create the Batter: Gradually add the wet ingredients to the dry ingredients, stirring until just combined. Be careful not to overmix, as this can lead to dense cupcakes.
- Fill the Cupcake Liners: Divide the batter evenly among the prepared muffin cups, filling each about two-thirds full.
- Bake: Place the muffin tin in the oven and bake for 15-18 minutes, or until a toothpick inserted into the center of a cupcake comes out clean.
- Cool: Allow the cupcakes to cool in the pan for 5 minutes, then transfer them to a wire rack to cool completely.
- Create Ghosts: Once cooled, spread a layer of white frosting over each cupcake. Top each cupcake with a marshmallow, pressing down slightly to secure it.
- Decorate: Use the black decorating gel to draw ghostly faces on each marshmallow, adding eyes and a mouth to give them character.
Extra Tips:
For an extra spooky touch, consider using colored frosting or edible glitter to add some shine to your Ghostly Cupcakes.
If you want to add more flavor, try incorporating a teaspoon of instant coffee granules into the batter for a mocha twist.
Additionally, make sure your cupcakes are completely cooled before decorating, as warm cupcakes can cause the frosting to melt and lose its shape.
Finally, let the kids use their imagination when drawing faces on the marshmallow ghosts; the more unique, the better!
Mummy Rice Krispie Treats
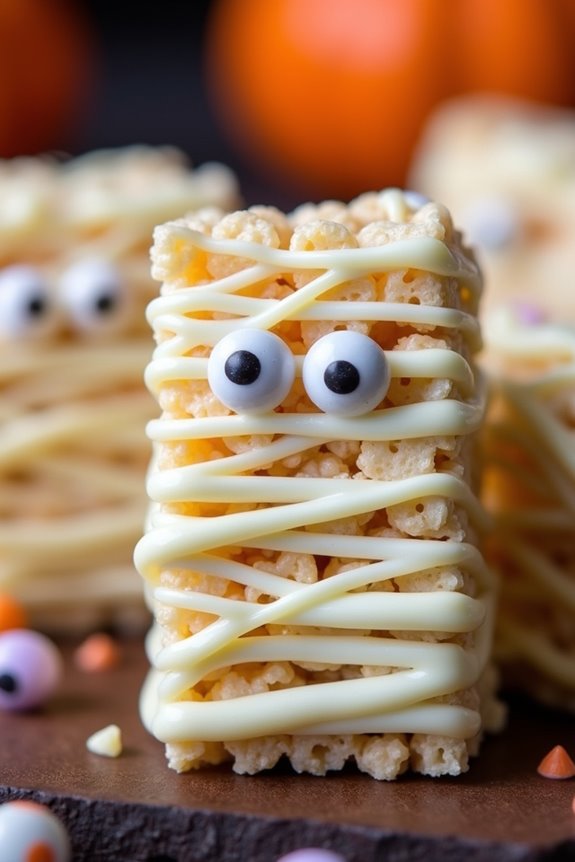
Mummy Rice Krispie Treats are a spooky and delicious way to add some Halloween fun to your dessert table. These treats aren’t only a hit with kids but also a nostalgic favorite for adults. Combining the classic taste of Rice Krispie treats with a playful mummy design, they’re sure to be a highlight of any Halloween celebration.
The process of making them is simple and involves just a few ingredients and steps, making it a perfect activity for the whole family to enjoy. Not only are Mummy Rice Krispie Treats easy to make, but they’re also a versatile dessert that can be customized with different colors and decorations to suit your Halloween theme.
The basic concept involves creating the traditional Rice Krispie treats, then adding white chocolate or candy melts to give them a mummy-like appearance. With a few candy eyes, these treats come to life, making them both cute and creepy. This recipe makes enough for 4-6 people, perfect for a small party or family gathering.
Ingredients:
- 3 tablespoons butter
- 1 package (10 oz, about 40) marshmallows
- 6 cups Rice Krispies cereal
- 1 cup white chocolate chips or white candy melts
- Candy eyes
- Parchment paper
- Cooking spray
Cooking Instructions:
- Prepare the Pan: Start by lining a 9×13-inch baking dish with parchment paper and lightly spraying it with cooking spray. This will prevent the Rice Krispie mixture from sticking.
- Melt the Butter and Marshmallows: In a large saucepan over low heat, melt 3 tablespoons of butter. Once melted, add the marshmallows and stir continuously until they’re completely melted and smooth.
- Combine with Cereal: Remove the saucepan from the heat and immediately add the 6 cups of Rice Krispies cereal. Stir the mixture until all the cereal is well coated with the marshmallow mixture.
- Transfer to Baking Dish: Pour the mixture into the prepared baking dish. Gently press it down evenly using a spatula or your hands (lightly buttered or sprayed to prevent sticking).
- Cool and Cut: Allow the Rice Krispie treats to cool at room temperature for about 30 minutes. Once set, cut them into rectangular bars.
- Melt the White Chocolate: While the treats are cooling, melt 1 cup of white chocolate chips or candy melts in a microwave-safe bowl. Heat in 30-second intervals, stirring in between, until fully melted and smooth.
- Decorate the Mummies: Drizzle the melted white chocolate over the Rice Krispie bars in a zig-zag pattern to resemble mummy bandages. Add candy eyes while the chocolate is still wet to guarantee they stick.
- Set and Serve: Allow the chocolate to set completely before serving. This can be sped up by placing the treats in the refrigerator for a few minutes.
Extra Tips:
To confirm your Mummy Rice Krispie Treats look their best, make sure the white chocolate or candy melts are melted to the perfect consistency. If your chocolate is too thick, add a teaspoon of vegetable oil to thin it out.
When drizzling the chocolate, use a piping bag for more control, or a ziplock bag with a tiny corner snipped off works just as well. For an extra Halloween touch, consider adding a drop of food coloring to the white chocolate to give your mummies a more eerie look.
Enjoy these treats with your little ghouls and goblins for a frightfully fun Halloween!
Witch Hat Cookies
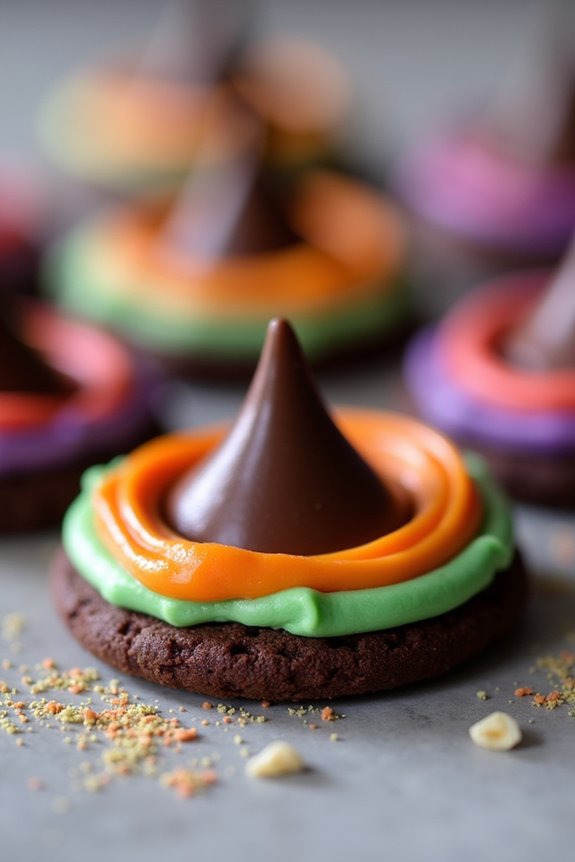
Witch Hat Cookies are a fun and festive Halloween treat that kids will love making and eating. These charming cookies aren’t only easy to assemble but also add a touch of magic to any Halloween party or gathering. The combination of store-bought ingredients makes them a quick and simple project that even young children can help prepare.
With a little imagination and creativity, these cookies will certainly become a Halloween favorite for the whole family. Perfect for a serving size of 4-6 people, these Witch Hat Cookies are made using simple ingredients that capture the essence of Halloween.
The base of each hat is a chocolate wafer cookie, topped with a colorful icing band and a sweet chocolate kiss. The end result is a delightful and whimsical treat that looks just like a witch’s hat, complete with a brim and a pointy top. Whether served as a dessert or a party favor, these cookies are sure to enchant kids and adults alike.
Ingredients:
- 12 chocolate wafer cookies
- 12 chocolate kisses
- 1 tube of orange icing
- 1 tube of green icing
- 1 tube of purple icing
Instructions:
- Prepare the Ingredients: Begin by unwrapping the chocolate kisses and arranging the chocolate wafer cookies on a clean, flat surface. Make sure you have all three colors of icing ready to use.
- Apply the Icing: Choose one color of icing to start with. Pipe a small circle of icing in the center of each chocolate wafer cookie. This will act as the adhesive to hold the chocolate kiss in place.
- Attach the Chocolate Kisses: Gently press one chocolate kiss onto the icing circle in the center of each cookie. Make sure the pointed part of the kiss is facing up to mimic the top of a witch’s hat. Allow the icing to set slightly so the chocolate kiss is secure.
- Decorate the Hat Brim: Use the remaining colors of icing to draw a thin band around the base of the chocolate kiss where it meets the cookie. This adds a decorative touch to mimic a hat band. You can alternate colors for a more vibrant display or choose a single color to keep it simple.
- Allow to Set: Let the completed cookies sit for a few minutes to allow the icing to harden slightly. This will make them easier to handle and serve without risking the decorations smudging.
Extra Tips:
For a more personalized touch, consider adding edible glitter or small candy decorations to the icing band for extra flair. If you find that the cookies are sliding, try chilling them in the refrigerator for a few minutes to help the icing set more firmly.
These Witch Hat Cookies can be made a day in advance and stored in an airtight container to keep them fresh for your Halloween celebration. Encourage kids to get creative with the icing colors and designs, making each witch hat unique!
Pumpkin Patch Brownies
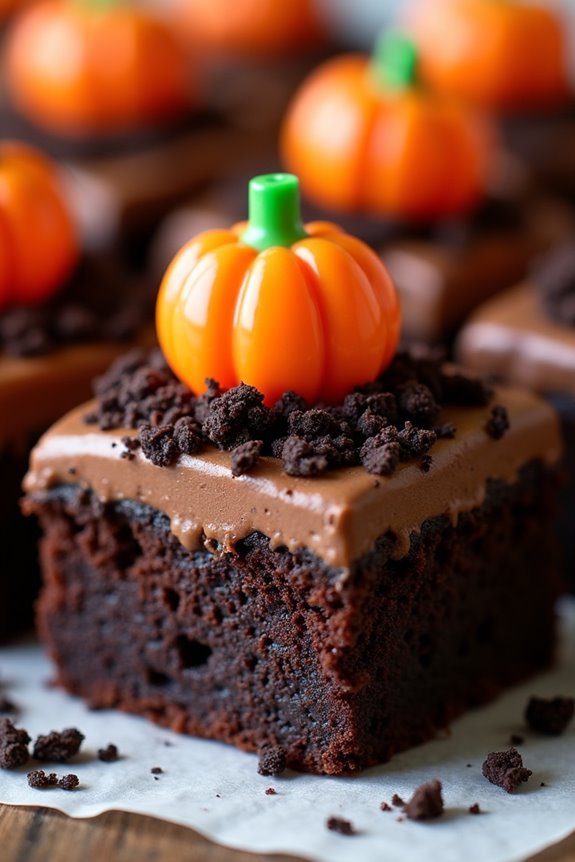
Pumpkin Patch Brownies are a delightful Halloween treat that are perfect for kids and adults alike. These brownies aren’t only deliciously chocolatey, but they also come with a fun twist: a pumpkin patch theme that makes them ideal for any Halloween gathering.
The brownies are topped with chocolate icing and decorated to resemble a miniature pumpkin patch, complete with candy pumpkins and crushed cookie “dirt,” which will spark any child’s imagination and make dessert time amusing.
This recipe yields a serving size of 4-6 people, making it an excellent choice for a small Halloween party or family gathering. The brownies are rich and fudgy, with a hint of cinnamon to complement the fall flavors of the pumpkin decorations.
Whether you’re hosting a Halloween party or just want to surprise your kids with a themed dessert, these Pumpkin Patch Brownies are sure to be a hit. Now, let’s gather the ingredients and get started on making this festive treat.
Ingredients for Pumpkin Patch Brownies (serving size: 4-6 people):
- 1/2 cup unsalted butter
- 1 cup granulated sugar
- 2 large eggs
- 1 teaspoon vanilla extract
- 1/3 cup unsweetened cocoa powder
- 1/2 cup all-purpose flour
- 1/4 teaspoon salt
- 1/4 teaspoon ground cinnamon
- 1/4 teaspoon baking powder
- 1 cup chocolate frosting
- 1/2 cup crushed chocolate sandwich cookies (for “dirt”)
- 8-12 candy pumpkins
Instructions:
- Preheat the Oven: Preheat your oven to 350°F (175°C). Grease an 8×8-inch baking pan with non-stick cooking spray or line it with parchment paper for easy removal.
- Prepare the Brownie Batter: In a medium saucepan, melt the butter over low heat. Remove from heat and stir in the sugar, eggs, and vanilla extract until well combined.
- Mix Dry Ingredients: In a separate bowl, whisk together the cocoa powder, flour, salt, ground cinnamon, and baking powder. Gradually add this mixture to the butter mixture, stirring until smooth and well incorporated.
- Bake the Brownies: Pour the brownie batter into the prepared baking pan and spread it evenly. Bake in the preheated oven for 20-25 minutes, or until a toothpick inserted into the center comes out with moist crumbs. Don’t overbake.
- Cool and Frost: Allow the brownies to cool completely in the pan on a wire rack. Once cooled, spread the chocolate frosting evenly over the top of the brownies.
- Decorate the Pumpkin Patch: Sprinkle the crushed chocolate sandwich cookies over the frosted brownies to create the appearance of “dirt.” Place the candy pumpkins on top, pressing them lightly into the frosting to secure them in place.
Extra Tips:
For an added touch, you can use green icing or candy melts to create vines and leaves around the candy pumpkins, enhancing the pumpkin patch effect.
If you prefer a less sweet brownie, reduce the sugar to 3/4 cup. When decorating, involve kids in the process to make it a fun and interactive activity.
Adjust the number of candy pumpkins based on the size of your brownies to guarantee each piece has at least one pumpkin. Enjoy your festive Pumpkin Patch Brownies and have a spooktacular Halloween!
Monster Marshmallow Pops
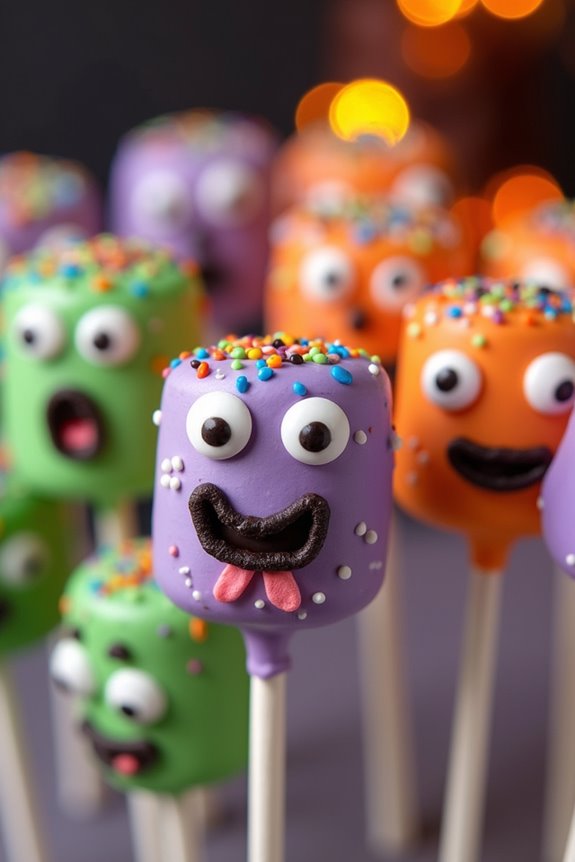
Monster Marshmallow Pops are the perfect spooky treat to delight kids during Halloween festivities. These fun and easy-to-make treats combine fluffy marshmallows, colorful candy melts, and a variety of edible decorations to create adorable monster faces. Not only are they a hit with the kids, but they also encourage creativity as children can personalize their own monster designs.
Whether you’re hosting a Halloween party or just looking for a fun afternoon activity, these Monster Marshmallow Pops are sure to be a crowd-pleaser. This recipe serves 4-6 people and is perfect for kids to join in on the decorating fun. The marshmallow pops are made by dipping marshmallows into vibrant candy melts and then using candies, sprinkles, and icing to bring the monster faces to life.
With a few simple ingredients and some imagination, you can create a variety of monster expressions that are both delicious and entertaining. Gather your ingredients and let’s get started on these monstrously delightful desserts!
Ingredients:
- 12 large marshmallows
- 1 cup green candy melts
- 1 cup purple candy melts
- 1 cup orange candy melts
- 1 tablespoon vegetable oil (divided)
- Assorted candy eyes
- Assorted sprinkles
- Edible markers
- Lollipop sticks
Instructions:
- Prepare the Candy Melts: In three separate microwave-safe bowls, place the green, purple, and orange candy melts. Add about 1 teaspoon of vegetable oil to each bowl to help with the melting process. Microwave each bowl in 30-second intervals, stirring in between, until the candy melts are completely smooth and melted.
- Insert the Lollipop Sticks: Take the lollipop sticks and carefully push one into each marshmallow, making sure it’s secure but not poking through the top.
- Dip the Marshmallows: Dip each marshmallow into the melted candy, using a spoon to help coat it evenly if necessary. Allow any excess candy to drip back into the bowl.
- Decorate the Marshmallows: Before the candy coating hardens, press candy eyes, use edible markers, and add sprinkles to create unique monster faces on each marshmallow pop. Let your imagination run wild!
- Let them Set: Place the decorated marshmallow pops upright in a block of styrofoam or an empty egg carton to set and harden completely. This should take about 10-15 minutes.
- Serve: Once the candy coating is firm, your Monster Marshmallow Pops are ready to serve. Enjoy these delightful treats with family and friends!
Extra Tips:
To make the decorating process easier and more fun, prepare a variety of decorations in small bowls so kids can easily access them. If the candy melts start to harden while you’re decorating, simply remelt them in the microwave for a few seconds.
You can also use other colors of candy melts or add different edible decorations like gummy worms or licorice to create even more unique monster designs. Remember, there’s no right or wrong way to design your monsters – let creativity and fun lead the way!
Spider Web Sugar Cookies
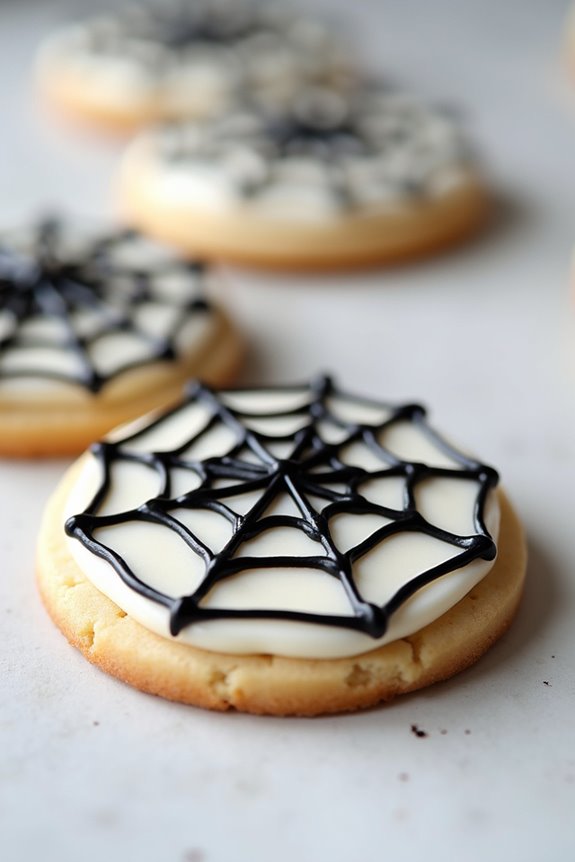
Spider Web Sugar Cookies are the perfect Halloween treat for kids, combining the classic, sweet flavor of sugar cookies with a spooky, fun design. These cookies aren’t only delicious but also a great activity to engage the little ones in creative baking. With a simple sugar cookie base and an easy-to-make icing, you can create intricate spider web patterns that will delight children and adults alike.
Whether you’re throwing a Halloween party or just looking to make a festive snack, these cookies are bound to be a hit.
The beauty of Spider Web Sugar Cookies lies in their simplicity and versatility. The sugar cookie dough can be prepared in advance, allowing more time for decorating — the part that kids love the most. The web design is made using a simple icing technique that even beginners can master.
Involving kids in the cookie-making process, from mixing the dough to drawing the webs, can be a wonderful way to spend a Halloween afternoon together. Plus, these cookies can be customized with different colors and designs, making every batch unique.
Ingredients for 4-6 Servings
- 2 3/4 cups all-purpose flour
- 1 teaspoon baking soda
- 1/2 teaspoon baking powder
- 1 cup unsalted butter, softened
- 1 1/2 cups white sugar
- 1 egg
- 1 teaspoon vanilla extract
- 1/2 teaspoon almond extract (optional)
- Black gel food coloring (for the web)
- 2 cups powdered sugar
- 3-4 tablespoons milk
Cooking Instructions
- Prepare the Dough: Preheat your oven to 375°F (190°C). In a small bowl, mix the flour, baking soda, and baking powder. In a larger bowl, cream together the butter and sugar until light and fluffy. Beat in the egg, vanilla extract, and almond extract if using.
- Mix the Dough: Gradually blend in the dry ingredients until the dough comes together. Roll rounded teaspoons of dough into balls and place them onto ungreased cookie sheets, flattening them slightly.
- Bake the Cookies: Bake cookies in the preheated oven for 8 to 10 minutes, or until golden. Let them cool on the cookie sheets for about 2 minutes before transferring them to wire racks to cool completely.
- Prepare the Icing: In a medium bowl, mix the powdered sugar and milk until smooth. The icing should be thick but spreadable. Divide the icing into two bowls, leaving one bowl plain white and adding black gel food coloring to the other bowl.
- Decorate the Cookies: Once the cookies are completely cooled, spread a thin layer of white icing over each cookie. Fill a piping bag with the black icing and draw three concentric circles on top of the white icing. Using a toothpick, drag lines from the center of the cookie outward to create a web effect.
- Set and Serve: Allow the icing to set for about 30 minutes. Once the icing is firm, the cookies are ready to serve or store in an airtight container.
Extra Tips
For a more vibrant spider web effect, ascertain that the white icing layer is smooth and even before adding the black icing. If you want a more intense color, you can add more black gel food coloring to the icing, but start with small amounts to avoid over-coloring.
Additionally, if the icing is too thick to pipe, add a little more milk, a teaspoon at a time, until it reaches the desired consistency. Remember, involving kids in the decorating process can be messy but fun, so prepare a clean-up plan in advance!
Candy Corn Pretzel Bites
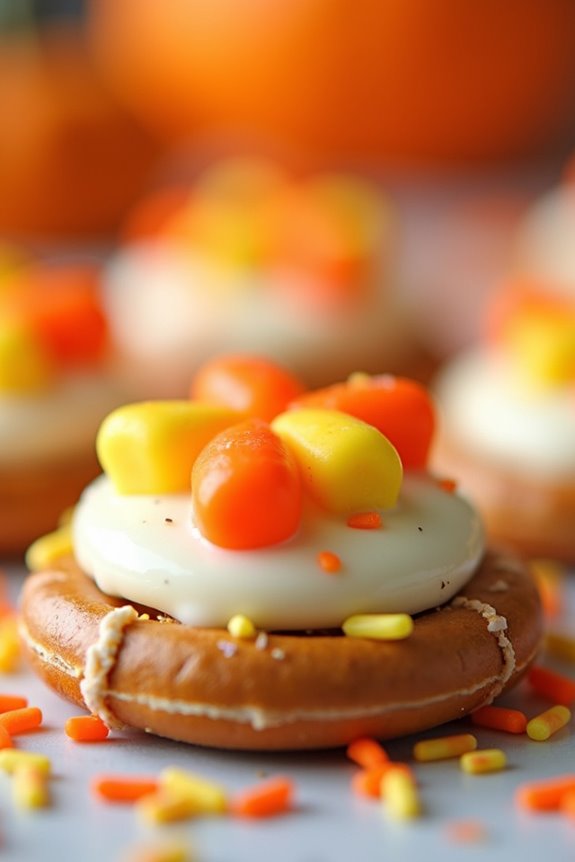
Halloween is a wonderful time to get creative in the kitchen, especially when it comes to making treats that are as fun to look at as they’re to eat. Candy Corn Pretzel Bites are a perfect example of a sweet and salty treat that kids will absolutely love. These delightful bites aren’t only visually appealing with their bright colors resembling candy corn, but they’re also incredibly easy to make, requiring minimal ingredients and effort.
Perfect for Halloween parties or a fun family activity, these treats are destined to be a hit among children and adults alike. The combination of the crunchy pretzel, the sweetness of the candy corn, and the creamy texture of chocolate makes these bites irresistible. They’re also a great way to get the kids involved in the kitchen, as they can help with placing the candy corn and drizzling the chocolate.
With just a few steps, you can create a festive snack that captures the spirit of Halloween. Here is how you can make a batch of Candy Corn Pretzel Bites that serves 4-6 people.
Ingredients:
- 1 bag of mini pretzels
- 1 bag of candy corn
- 1 cup of white chocolate chips
- 1 tablespoon of vegetable oil
- Orange and yellow sprinkles (optional)
Cooking Instructions:
- Prepare the Baking Sheet: Line a baking sheet with parchment paper or a silicone baking mat. This will prevent the pretzels from sticking and make for easy cleanup.
- Melt the Chocolate: In a microwave-safe bowl, combine the white chocolate chips and vegetable oil. Microwave in 30-second intervals, stirring after each, until the chocolate is completely melted and smooth.
- Arrange the Pretzels: Place mini pretzels on the prepared baking sheet, spacing them out evenly. Each pretzel will serve as the base for the candy corn bites.
- Add the Chocolate: Using a spoon, drizzle a small amount of melted white chocolate over each pretzel. Make sure to cover the center of the pretzel well, as this will act as the “glue” for the candy corn.
- Place the Candy Corn: Immediately place three pieces of candy corn onto the melted chocolate on each pretzel, arranging them to resemble a flower or a triangle. Press them gently to affirm they stick.
- Add Sprinkles (Optional): If using, sprinkle the orange and yellow sprinkles over the top of the candy corn while the chocolate is still wet.
- Set the Pretzel Bites: Allow the pretzel bites to sit at room temperature or place them in the refrigerator for about 15-20 minutes until the chocolate has hardened and set.
- Serve and Enjoy: Once set, remove the pretzel bites from the baking sheet and arrange them on a serving platter. They’re now ready to be enjoyed!
Extra Tips:
When melting the chocolate, be careful not to overheat it as this can cause it to seize and become unusable. Stirring frequently and heating in short intervals is key to achieving a smooth consistency.
If you prefer a different type of chocolate, milk or dark chocolate can also be used for a richer flavor. For storing leftovers, keep the pretzel bites in an airtight container at room temperature; they should stay fresh for up to a week.
If you want to add a bit more flair, consider using different shaped pretzels or experimenting with colored chocolates for a unique twist.
Frankenstein Pudding Cups
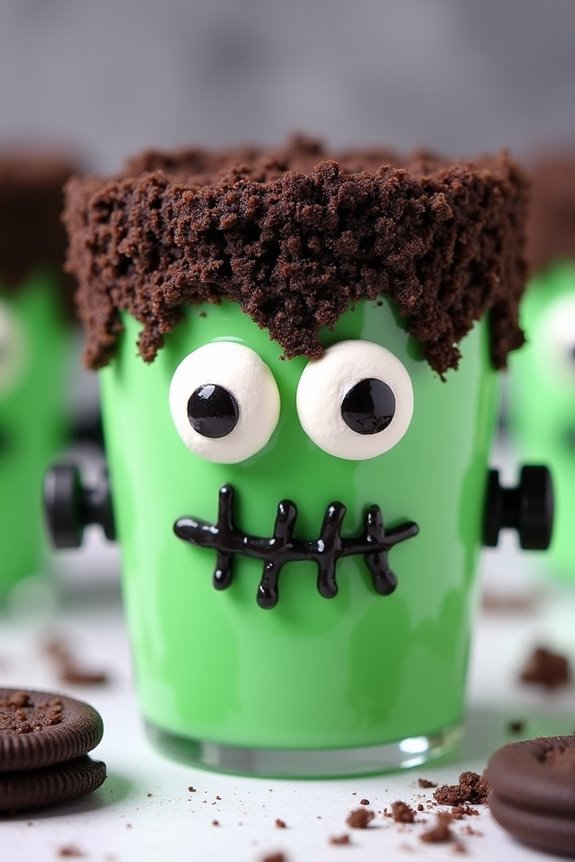
Halloween is the perfect time to get creative in the kitchen, especially when it comes to making fun and spooky treats for kids. One delightful option is Frankenstein Pudding Cups, which aren’t only easy to prepare but also a hit with children. These pudding cups combine the delicious flavors of chocolate and vanilla pudding with a touch of green food coloring to bring Frankenstein’s monster to life in a cute and edible form.
With some clever use of decorations, you can easily transform simple pudding cups into a memorable Halloween dessert that will have kids screaming with delight. Ideal for a Halloween party or just a fun family evening, these Frankenstein Pudding Cups are both delicious and visually appealing.
The process is straightforward and involves minimal preparation time, making it perfect for those who want to whip up something festive without spending hours in the kitchen. The ingredients are easy to find and the steps are simple enough for kids to help out, making it a fun family activity. This recipe serves 4-6 people, guaranteeing there’s enough for everyone to enjoy.
Ingredients:
- 1 box (3.4 oz) instant vanilla pudding mix
- 1 box (3.4 oz) instant chocolate pudding mix
- 2 cups cold milk
- Green food coloring
- 6-8 clear plastic cups
- 1 cup crushed chocolate cookies (e.g., Oreos)
- Black decorating gel
- Mini marshmallows
- Candy eyes
- Edible markers (optional)
Instructions:
- Prepare the Vanilla Pudding: In a medium-sized mixing bowl, combine the vanilla pudding mix with 1 cup of cold milk. Whisk for about 2 minutes until the pudding begins to thicken. Add a few drops of green food coloring to achieve the desired shade of green for Frankenstein’s face. Stir well to guarantee an even color and set aside.
- Prepare the Chocolate Pudding: In another mixing bowl, combine the chocolate pudding mix with the remaining 1 cup of cold milk. Whisk for about 2 minutes until thickened. This will serve as the “hair” for your Frankenstein Pudding Cups.
- Assemble the Cups: Begin by spooning an even layer of green vanilla pudding into the bottom of each clear plastic cup to create the face. Next, add a layer of the crushed chocolate cookies on top of the green pudding to create a textured “hair” effect.
- Decorate Frankenstein’s Face: Use the black decorating gel to draw a mouth and stitch marks on the green pudding layer. Place candy eyes on the face and press mini marshmallows into the sides of the cups to represent bolts. If desired, use edible markers to add additional facial details.
- Serve: Place the assembled cups in the refrigerator for at least 30 minutes to allow the pudding to fully set. Serve chilled to your delighted guests.
Extra Tips:
To make the decorating process easier, you can prepare the pudding cups a few hours ahead of time and store them in the refrigerator. When ready to serve, simply add the final decorative touches.
If you want to mix things up, try using different colored food gels or edible markers for unique Frankenstein expressions. Encourage kids to get involved with decorating their own cups, which can be a fun and engaging activity.
Finally, for an extra spooky touch, add a few gummy worms crawling out of the “hair” or around the cup.
Bat-Shaped Chocolate Bark
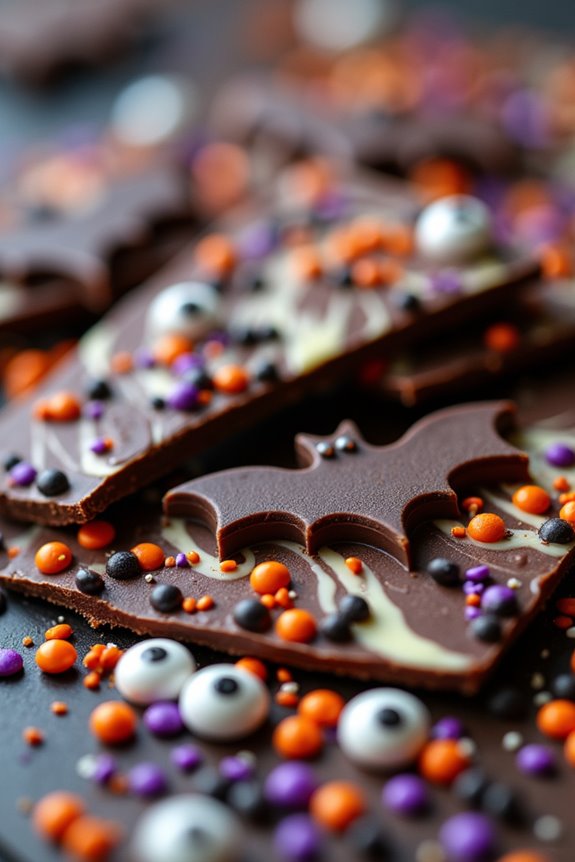
Halloween is the perfect time to get creative in the kitchen, especially when it comes to sweet treats for kids. If you’re looking to add a little spookiness to your dessert table, Bat-Shaped Chocolate Bark is a fantastic choice. Not only is it deliciously rich and chocolatey, but it also offers a fun and festive activity for the whole family.
This recipe transforms simple chocolate bark into a Halloween masterpiece with the help of bat-shaped cookie cutters and a few colorful toppings. This Bat-Shaped Chocolate Bark is designed to serve 4-6 people, making it an excellent choice for small gatherings or a family treat.
The recipe is straightforward, requiring only a few ingredients and minimal preparation time. The combination of dark chocolate, white chocolate, and a variety of fun toppings will surely delight kids and adults alike. Let’s explore the ingredients and steps needed to create this spooky sweet delight.
Ingredients:
- 8 ounces of high-quality dark chocolate
- 4 ounces of white chocolate
- Assorted Halloween-themed sprinkles (e.g., orange, black, purple)
- Edible eyes or candy eyeballs
- Parchment paper
- Bat-shaped cookie cutters
Cooking Instructions:
- Prepare the Baking Sheet: Line a baking sheet with parchment paper. This will prevent the chocolate from sticking and make it easier to remove once it has set.
- Melt the Dark Chocolate: Break the dark chocolate into small pieces and place them in a microwave-safe bowl. Microwave in 20-second intervals, stirring in between, until the chocolate is completely melted and smooth.
- Spread the Chocolate: Pour the melted dark chocolate onto the prepared baking sheet. Use a spatula to spread it evenly, aiming for a thickness of about 1/4 inch.
- Add White Chocolate: Melt the white chocolate using the same method as the dark chocolate. Drizzle the melted white chocolate over the dark chocolate layer in a random pattern. Use a toothpick or skewer to create swirls by dragging it through both chocolates.
- Decorate: While the chocolate is still soft, scatter the Halloween-themed sprinkles and edible eyes over the surface. Press them down gently into the chocolate to make sure they stick.
- Cut Out Shapes: Allow the chocolate to set slightly but not completely harden (approximately 15-20 minutes in a cool room). Once the chocolate is firm but still pliable, use the bat-shaped cookie cutters to cut out bat shapes. If the chocolate becomes too hard, use a warm, damp cloth to gently heat the cutter before pressing it into the chocolate.
- Set Completely: Allow the chocolate to harden fully at room temperature or place it in the refrigerator for faster setting.
- Serve: Once set, gently remove the bat-shaped chocolate pieces from the parchment paper. Arrange them on a serving plate for a spooky presentation.
Extra Tips:
When making Bat-Shaped Chocolate Bark, it’s important to work relatively quickly once the chocolate is melted, as it begins to set as it cools. If you’re having trouble with the chocolate hardening too fast, try working in smaller batches.
Additionally, if you prefer a more vibrant look, consider using colored candy melts instead of white chocolate for the drizzle. Finally, when using cookie cutters, make sure the chocolate is firm enough to hold its shape but not so hard that it’s difficult to cut through. Enjoy your Halloween-themed treat!
Eyeball Cake Pops
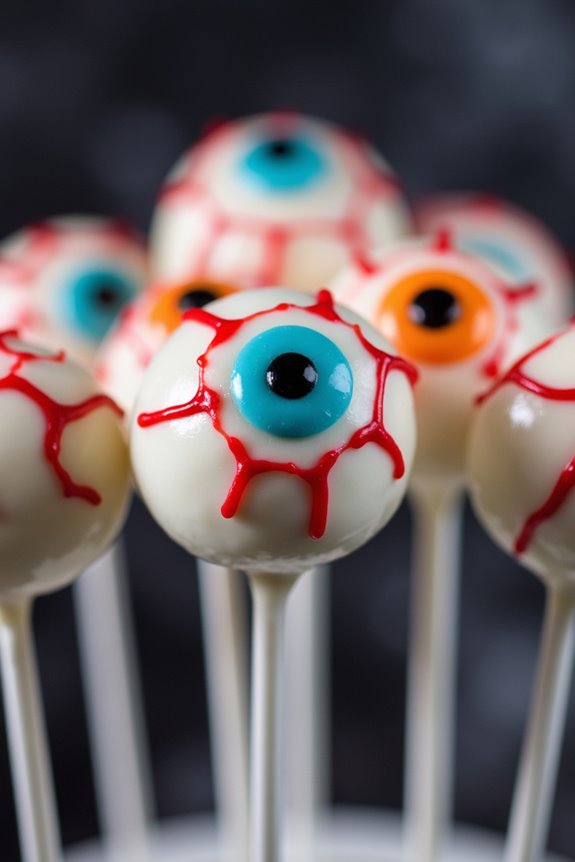
Halloween is a time for spooky treats, and Eyeball Cake Pops are the perfect eerie dessert to delight kids. These cake pops aren’t only delicious but also fun to make and decorate, making them an ideal Halloween activity for families. With their creepy yet colorful appearance, they’re sure to be a hit at any Halloween party.
The combination of moist cake and creamy frosting, coated in candy melts and decorated with edible ink or candy eyes, creates a delightful treat that’s both festive and tasty.
Making Eyeball Cake Pops involves a few simple steps, starting with baking a cake, crumbling it, and mixing it with frosting to form balls. These balls are then chilled, coated in candy melts, and finally decorated to resemble spooky eyeballs. This recipe serves 4-6 people and provides a fun way to get kids involved in the kitchen, allowing them to release their creativity in decorating their cake pops.
Ingredients:
- 1 box of cake mix (any flavor)
- Ingredients required for the cake mix (usually eggs, oil, and water)
- 1 cup frosting (store-bought or homemade)
- 12 oz white candy melts
- 24 lollipop sticks
- Edible food coloring pens or colored gel for detailing
- Candy eyes
- Red gel icing for veins
Instructions:
- Bake the Cake: Follow the instructions on your box of cake mix to bake a cake. Once finished, allow it to cool completely.
- Crumble the Cake: Once cooled, crumble the cake into a large bowl, breaking it into fine crumbs using your hands or a fork.
- Mix with Frosting: Add the frosting to the crumbled cake and mix thoroughly until it reaches a dough-like consistency. You want the mixture to be moist enough to hold the shape of a ball.
- Form Cake Balls: Roll the cake mixture into small golf ball-sized balls and place them on a baking sheet lined with parchment paper. Insert a lollipop stick into each ball. Once all balls are formed and sticks are inserted, refrigerate for at least 2 hours to firm up.
- Melt Candy Melts: Melt the white candy melts in a microwave-safe bowl according to package instructions. Stir until smooth.
- Coat Cake Pops: Dip each cake ball into the melted candy, making sure it’s completely coated. Allow excess to drip off before placing the cake pop upright in a styrofoam block or cake pop stand to dry.
- Decorate: Once the candy coating is set, use edible food coloring pens or colored gel to draw a colored iris and pupil on each cake pop. Attach candy eyes in the center using a dab of candy melt. Use red gel icing to draw thin lines radiating out from the eye for a veiny look.
- Serve: Allow the decorations to set before serving.
Extra Tips:
To guarantee the cake pops remain secure on the sticks, dip the tip of each stick in a bit of melted candy before inserting it into the cake ball. This acts as a glue to hold the stick in place.
Additionally, make sure the cake balls are chilled enough before dipping; if they’re too warm, they might fall off the stick. For added variety, use different colors of candy melts or draw additional spooky designs on the eyeballs to personalize them further.
Vampire Donuts
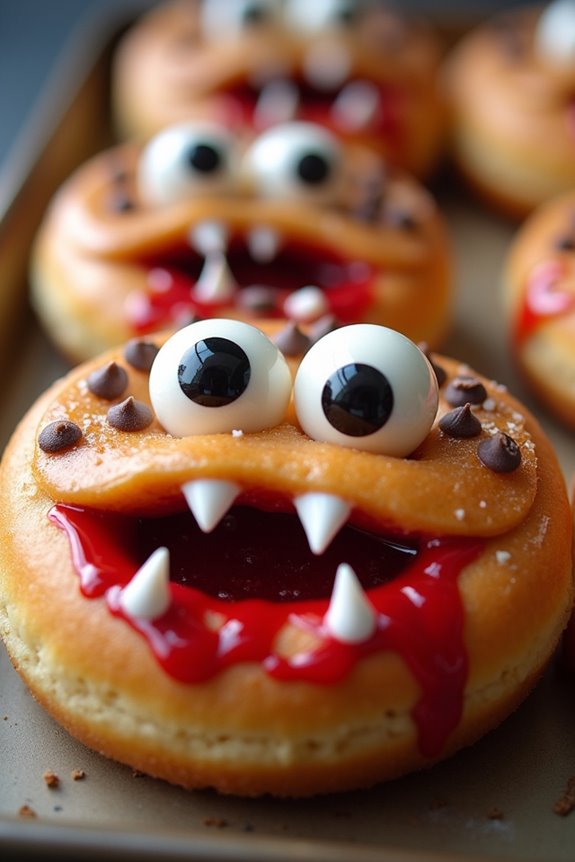
Halloween is the perfect time for kids to indulge in spooky, themed treats, and Vampire Donuts fit the bill perfectly. These adorable, slightly eerie donuts aren’t only fun to look at but also delicious to eat. They offer a clever twist on the traditional donut by transforming them into playful vampire faces, complete with fangs and blood-red jam.
Whether you’re hosting a Halloween party or simply want to surprise your little ones with a festive snack, Vampire Donuts are sure to delight.
The best part about Vampire Donuts is that they require minimal effort and only a few ingredients, making them an ideal project for kids to get involved in. You can use store-bought plain donuts to save time, or make your own if you prefer the homemade touch. The transformation process is quick and simple, involving just a few decorative elements like plastic vampire teeth and some chocolate.
Let’s get started on creating these spooky, yet scrumptious treats for 4-6 people.
Ingredients:
- 6 plain glazed donuts
- 6 pairs of plastic vampire teeth
- 1/2 cup strawberry or raspberry jam
- 1/4 cup mini chocolate chips
- 1/4 cup candy eyes (or make your own with white chocolate and black icing)
- Red gel icing
Instructions:
- Prepare the Donuts: If using store-bought donuts, verify they’re fresh and at room temperature. If making your own, allow them to cool completely before starting the decoration.
- Create the Mouth: Take each donut and gently press a pair of plastic vampire teeth into the center, creating an open mouth effect. Adjust the teeth so that they fit snugly without tearing the donut.
- Add the Blood: Using a small spoon, carefully spoon a little strawberry or raspberry jam around the edges of the vampire teeth to mimic the look of blood. Be careful not to overfill, or it may drip excessively.
- Attach the Eyes: Place two candy eyes above the vampire teeth on each donut. If you’re using white chocolate, pipe small circles onto the donut and add a dot of black icing for pupils.
- Detail with Chocolate Chips: Place mini chocolate chips around the top of the donut for added texture and design. This can enhance the spooky face effect.
- Add Final Touches: Use red gel icing to add any additional details you like, such as drips of blood or accents around the eyes and mouth.
Extra Tips:
When working with children, consider using edible markers to allow them to draw on their own designs, making the activity more interactive.
If the plastic vampire teeth are too large for the donut hole, gently stretch the donut or choose smaller teeth. Always supervise young children when handling small decorative elements like candy eyes and chocolate chips to prevent choking hazards.
Finally, store any leftover donuts in an airtight container at room temperature to maintain freshness.
Skeleton Gingerbread Men
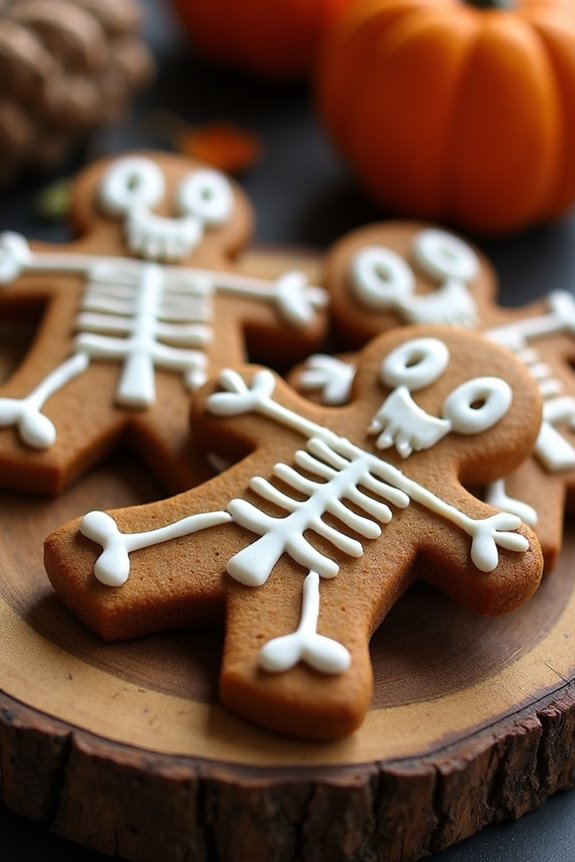
Skeleton Gingerbread Men are a fun and spooky twist on the classic gingerbread cookie, perfect for Halloween festivities with kids. These cookies not only taste deliciously warm and spicy but also provide an enjoyable activity as children get to decorate them as little skeletons. The process of making these cookies is as exciting as eating them, allowing kids to release their creativity by drawing bones and skulls with icing.
These cookies can serve as both a delightful treat and a festive decoration for Halloween parties. Creating Skeleton Gingerbread Men is a wonderful way to bond with your kids in the kitchen. The recipe involves making traditional gingerbread dough, cutting out gingerbread men, and baking them to perfection.
Once cooled, kids can have a blast piping skeleton designs onto the cookies. These cookies are ideal for a serving size of 4-6 people, making certain everyone gets to enjoy a piece of the fun. Below are the ingredients and instructions you need to bring these spooky treats to life.
Ingredients (Serves 4-6):
- 3 cups all-purpose flour
- 3/4 teaspoon baking soda
- 1 tablespoon ground ginger
- 1 tablespoon ground cinnamon
- 1/2 teaspoon ground cloves
- 1/2 teaspoon ground nutmeg
- 1/2 teaspoon salt
- 1/2 cup unsalted butter, softened
- 1/2 cup packed dark-brown sugar
- 1 large egg
- 1/2 cup unsulfured molasses
- White icing or royal icing for decorating
Instructions:
1. Prepare the Dry Ingredients:
In a large bowl, whisk together the flour, baking soda, ginger, cinnamon, cloves, nutmeg, and salt. This combination of spices will give your gingerbread men their characteristic warm and spicy flavor.
2. Mix the Wet Ingredients:
In a separate bowl, use an electric mixer to cream the softened butter and brown sugar until light and fluffy. Add the egg and molasses, and mix until fully incorporated.
3. Combine the Ingredients:
Gradually add the dry ingredients to the wet mixture, mixing on low speed until the dough forms. Confirm that all ingredients are well combined, creating a smooth and slightly sticky dough.
4. Chill the Dough:
Divide the dough into two discs, wrap them in plastic wrap, and refrigerate for at least 2 hours. Chilling the dough makes it easier to roll out and cut into shapes.
5. Preheat and Prepare:
Preheat your oven to 350°F (175°C). Line baking sheets with parchment paper to prevent sticking.
6. Roll and Cut:
Roll out the dough on a lightly floured surface to about 1/4-inch thickness. Use a gingerbread man cookie cutter to cut out shapes, and place them on the prepared baking sheets, leaving space between each cookie.
7. Bake:
Bake the cookies in the preheated oven for 8-10 minutes, or until the edges are firm. Let them cool on the baking sheets for a few minutes before transferring them to a wire rack to cool completely.
8. Decorate:
Once cooled, use white icing or royal icing to draw skeleton designs on the gingerbread men. Encourage the kids to get creative with their designs!
Extra Tips:
When making Skeleton Gingerbread Men, confirm that your dough is well chilled; this prevents the cookies from spreading too much while baking. If you don’t have a gingerbread man cutter, you can use any cookie cutter shape you prefer and still draw skeletons on them.
For decorating, if you don’t have a piping bag, a small plastic bag with a tiny snip in one corner works perfectly for icing. Make sure to let the icing set completely before stacking or storing the cookies to avoid smudging the designs.
Haunted House Graham Crackers
Haunted House Graham Crackers are a spooky and fun Halloween treat that kids will love to both make and eat. This delightful dessert involves creating a mini haunted house using graham crackers as the base, which are then decorated with various candies and frosting to add festive flair.
It’s a perfect activity for a Halloween party or a fun weekend project with the kids, as it promotes creativity and results in a sweet, edible masterpiece.
The best part about Haunted House Graham Crackers is that they’re easy to assemble and require minimal baking. The graham crackers serve as the main structure, while the icing acts as the glue to hold everything together.
This treat allows children to use their imagination as they decorate their haunted houses with an assortment of colorful candies, chocolate chips, and sprinkles. Not only do these haunted houses look impressive, but they also taste delicious, making them a hit for any Halloween occasion.
Ingredients (Serving Size: 4-6 people):
- 12 graham crackers
- 1 cup of royal icing or store-bought frosting
- Assorted candies (e.g., gummy worms, candy corn, mini marshmallows, chocolate chips)
- Black licorice strings
- 1 tube of black decorating gel
- Edible eyes
- Sprinkles
Cooking Instructions:
- Prepare the Base: Lay out a flat surface covered with parchment paper to build your haunted houses on. Snap some of the graham crackers into squares and rectangles to create walls and a roof.
- Build the Structure: Using the royal icing as glue, attach four graham cracker squares together to form the walls of the house. Allow the icing to set slightly so the structure is stable.
- Add the Roof: Attach two rectangle pieces of graham crackers on top of the structure to form a triangular roof. Use additional icing to secure the roof firmly in place.
- Decorate the Haunted House: Begin decorating the house using the assorted candies. Use the black licorice strings to create window panes or spider webs. Place edible eyes on the roof or walls for a spooky effect.
- Add Details: Use the black decorating gel to draw door outlines, spooky faces, or other creepy designs on the graham crackers. Add sprinkles for extra color and texture.
- Let it Set: Allow the haunted houses to sit for about 30 minutes to an hour to let the icing harden and the candies stay in place.
Extra Tips:
For best results, assemble the haunted houses in a cool, dry place to guarantee the icing sets properly. If you’re using store-bought frosting, you may need to add more powdered sugar to thicken it so it holds the structure together.
Encourage kids to be creative and explore different candy combinations to personalize their haunted houses. If the graham crackers start to crumble, you can reinforce them by spreading a thin layer of icing on the back before assembling.
Enjoy the process and the tasty results!
Candy Apple Monsters
Candy Apple Monsters are a frightfully fun treat to make with your kids this Halloween! This recipe combines the classic candy apple with spooky monster decorations to create a delicious and visually exciting dessert. Perfect for a Halloween party or a fun family activity, these Candy Apple Monsters are bound to delight both the young and young at heart.
The process involves coating juicy apples in a sweet candy shell and then decorating them with an array of spooky features to create your very own monster masterpiece. Making Candy Apple Monsters is a great way to let your creativity flow. You can use various candies, food coloring, and edible decorations to personalize each apple.
Whether you’re aiming for a friendly monster or a more terrifying creature, this recipe offers endless possibilities. Plus, it’s a great opportunity to get the kids involved in the kitchen for some hands-on fun. With just a few simple steps, you can create a memorable Halloween dessert that’s as fun to make as it’s to eat.
Ingredients (Serves 4-6):
- 6 medium apples (Granny Smith or Honeycrisp work well)
- 2 cups granulated sugar
- 1/4 cup light corn syrup
- 1/2 cup water
- 1/2 teaspoon vanilla extract
- Green and red food coloring
- Candy eyeballs
- Assorted candy decorations (gummy worms, licorice, etc.)
- 6 wooden sticks or skewers
Instructions:
1. Prepare the Apples: Wash and thoroughly dry the apples. Remove the stems and insert a wooden stick into the top of each apple, making sure it’s secure. Set the apples aside on a parchment-lined baking sheet.
2. Make the Candy Coating**: In a medium saucepan, combine the sugar, corn syrup, and water. Stir over medium heat until the sugar dissolves. Increase the heat to medium-high and bring the mixture to a boil without stirring. Use a candy thermometer** to monitor the temperature.
Once the mixture reaches 300°F (hard crack stage), remove the pan from the heat.
3. Add Flavor and Color: Quickly stir in the vanilla extract. Divide the candy mixture into two separate bowls. Add a few drops of green food coloring to one bowl and red to the other, stirring each until you achieve the desired color.
4. Coat the Apples: Carefully dip each apple into the candy mixture, turning to coat evenly. Allow any excess to drip off before placing the apple back on the parchment-lined sheet. Repeat this process until all apples are coated.
5. Decorate Your Monsters: While the candy coating is still slightly warm and sticky, press candy eyeballs and other decorations into the apples to create monster faces. Be creative with gummy worms, licorice, or any other candy to add features like hair or horns.
6. Let Them Set: Allow the candy coating to harden completely at room temperature. This should take about 30 minutes. Once set, your Candy Apple Monsters are ready to serve!
Extra Tips:
To guarantee your candy coating sticks well, make sure the apples are completely dry before dipping. If you have trouble with the candy setting too quickly, work with one apple at a time to prevent the mixture from hardening before you’ve finished decorating.
If you’d like softer candy, you can reduce the cooking temperature slightly, but be aware this may affect how well the coating stays on the apple. Finally, use caution while working with hot candy as it can cause burns if it comes into contact with your skin.