
Planning a kid-friendly Halloween party is such a thrill, especially when you have the perfect treats to charm the little ghosts and ghouls. I’ve gathered some enchanting food ideas that will captivate the tiny witches and wizards at your gathering. From Spooky Spider Pizzas to delightful Jack-o’-Lantern Orange Bowls, these imaginative dishes will add a sprinkle of magic to your celebration. Are you ready to make your party an unforgettable, fun-filled haunt for everyone? Let’s get started on this bewitching culinary adventure!
Spooky Spider Pizzas
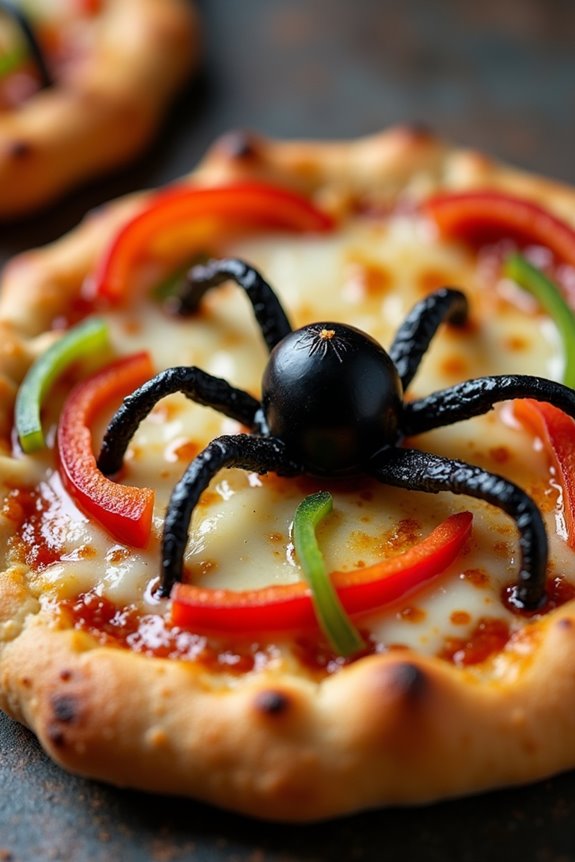
The best part about Spooky Spider Pizzas is that they’re easy to make and can be customized to suit personal tastes. You and your little ghouls can have fun arranging the toppings to create edible spider masterpieces.
Plus, these pizzas are small and manageable, making them a great option for little hands. With a serving size meant for 4-6 people, everyone will be able to enjoy these ghastly goodies without too much fuss.
Ingredients (serving size: 4-6 people)
- 6 mini pizza crusts (store-bought or homemade)
- 1 cup pizza sauce
- 2 cups shredded mozzarella cheese
- 24 black olives
- 1 green bell pepper
- 1 red bell pepper
- Olive oil spray (optional)
Cooking Instructions
- Preheat the Oven: Begin by preheating your oven to 400°F (200°C). This will guarantee that your pizzas cook evenly and the cheese melts perfectly.
- Prepare the Pizza Crusts: Lay out the mini pizza crusts on a large baking sheet. If desired, lightly spray each crust with olive oil for added crispiness.
- Spread the Sauce: Use a spoon to spread a generous amount of pizza sauce over each mini crust, leaving a small border around the edge for the crust.
- Add the Cheese: Sprinkle shredded mozzarella cheese evenly over the sauce on each pizza. Make sure to cover the sauce well, as this will help hold the toppings in place.
- Create Olive Spiders: Slice the black olives in half lengthwise. Use one half for the spider body and slice the other half into thin strips for the legs. Arrange one body and eight legs on each pizza to form the spiders.
- Decorate with Peppers: Slice the green and red bell peppers into thin strips. Use these strips to add a pop of color around the spiders or create additional spider legs for a varied look.
- Bake the Pizzas: Place the baking sheet in the preheated oven and bake the pizzas for about 10-12 minutes, or until the cheese is melted and bubbly, and the crust is golden brown.
- Cool and Serve: Remove the pizzas from the oven and let them cool for a few minutes before serving. This will make them easier to handle and less likely to burn little mouths.
Extra Tips
When making Spooky Spider Pizzas, feel free to experiment with different toppings to create a variety of spooky creatures.
For example, you can use pepperoni slices for spider bodies and add mushrooms or onions for extra eerie details. If you’re looking for a healthier option, whole wheat or cauliflower mini crusts work just as well.
Involving kids in the decorating process can turn this meal into a fun family activity, allowing them to express their creativity and enjoy the results of their handiwork.
Monster Mash Meatballs
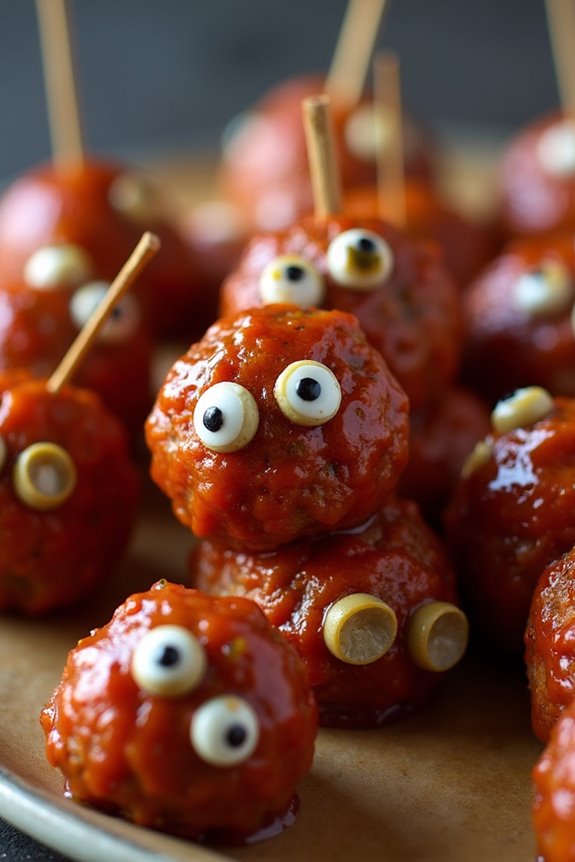
Looking to add a spooky twist to your Halloween party menu? Then you’ve come to the right place with Monster Mash Meatballs! These fun and delicious meatballs aren’t only a hit with kids but also a creative way to get them involved in the kitchen.
With their ghoulish appearance and delightful taste, Monster Mash Meatballs will be the star of your Halloween spread. Whether you’re hosting a party or just enjoying a festive dinner with the family, these meatballs are sure to bring smiles to everyone’s faces.
Monster Mash Meatballs are simple to prepare and can be customized with your favorite seasonings and sauces. The recipe combines ground meat with flavorful ingredients to create juicy meatballs that are perfect for dipping in a spooky sauce.
Kids will love helping to shape the meatballs and decorate them with edible eyes, turning them into adorable little monsters. This dish isn’t only a treat for the taste buds but also an exciting activity for the whole family to enjoy together.
Ingredients (serves 4-6 people):
- 1 ½ pounds ground beef or turkey
- ½ cup breadcrumbs
- 1 egg
- ¼ cup grated Parmesan cheese
- 2 cloves garlic, minced
- 1 teaspoon Italian seasoning
- Salt and pepper to taste
- 1 tablespoon olive oil
- 1 cup marinara or barbecue sauce
- Edible candy eyes or sliced olives for decoration
Cooking Instructions:
- Prepare the Meat Mixture: In a large bowl, combine ground beef or turkey, breadcrumbs, egg, Parmesan cheese, minced garlic, Italian seasoning, salt, and pepper. Mix the ingredients together until well combined, but be careful not to overwork the meat.
- Shape the Meatballs: Roll the meat mixture into small balls, about 1 ½ inches in diameter. You should have approximately 16-20 meatballs. Place them on a baking sheet lined with parchment paper.
- Cook the Meatballs: Heat olive oil in a large skillet over medium heat. Once hot, add the meatballs in batches, being careful not to overcrowd the pan. Cook the meatballs for about 6-8 minutes, turning occasionally, until they’re browned on all sides and cooked through.
- Simmer in Sauce: Pour the marinara or barbecue sauce into the skillet with the cooked meatballs. Reduce the heat to low and let the meatballs simmer in the sauce for about 10 minutes, allowing the flavors to meld together.
- Decorate the Meatballs: Once the meatballs are cooked and coated in sauce, remove them from the heat. Use edible candy eyes or sliced olives to decorate each meatball, giving them a fun and spooky monster appearance.
Extra Tips:
For extra flavor, consider adding finely chopped onions or bell peppers to the meat mixture. If you’re using candy eyes, be sure to add them just before serving to prevent them from melting in the sauce.
You can also serve the Monster Mash Meatballs with spaghetti for a more substantial meal or with toothpicks as a fun finger food at parties. Adjust the seasoning to your taste and feel free to experiment with different sauces for variety. Enjoy your creepy culinary creation!
Witch’s Broomstick Snacks

Halloween is a time filled with spooky stories, fun costumes, and of course, deliciously themed treats! One of the simplest yet most delightful snacks you can whip up for the occasion is Witch’s Broomstick Snacks. These charming little treats capture the essence of Halloween with their fun and creative design, while also being a hit with the kids for their taste and easy-to-eat nature.
Whether you’re hosting a Halloween party or just looking to surprise your little ones with a themed snack, Witch’s Broomstick Snacks are certain to be a crowd-pleaser.
These snacks aren’t only visually appealing but also incredibly easy to prepare, making them an ideal choice for busy parents. With just a few ingredients, you can create a whimsical treat that embodies the playful spirit of Halloween. The combination of savory cheese, crunchy pretzel sticks, and the fresh taste of chives brings together textures and flavors that kids will love.
Plus, they’re perfect for small hands and can be made in a matter of minutes, guaranteeing you have more time to enjoy the festivities.
Ingredients for 4-6 servings:
- 12 pretzel sticks
- 6 string cheese sticks
- Fresh chives (around 12 strands)
Cooking Instructions:
1. Prepare the Cheese:
Start by taking the string cheese sticks and cut each one into two equal halves. This will give you a total of 12 cheese pieces.
2. Create the Broom Bristles:
On one end of each cheese half, carefully make several thin cuts about halfway up towards the center. Make sure you don’t cut all the way through. These cuts will resemble the bristles of a broom.
3. Assemble the Broomsticks:
Insert a pretzel stick into the uncut end of each cheese piece. Push it in gently to make sure the cheese doesn’t crack but is held firmly in place.
4. Secure with Chives:
Take a strand of chive and wrap it around the top part of the cheese, just above the cuts. Tie it securely in a knot to hold the cheese and pretzel together, giving it the appearance of a tied broom.
5. Arrange and Serve:
Once all broomsticks are assembled, arrange them on a serving platter and get ready to delight your young guests with this enchanting treat.
Extra Tips:
For an added twist, consider using flavored string cheese, like jalapeño or garlic, to give your broomsticks a unique flavor profile.
If fresh chives are unavailable, you can substitute them with thin strips of green onion, which will also lend a fresh taste to the snacks. Additionally, make sure that the cheese is at room temperature before cutting to prevent it from cracking.
For a gluten-free option, look for gluten-free pretzel sticks available at most grocery stores. Remember, these snacks are best served fresh, so try to prepare them right before serving to maintain their texture and appeal.
Mummy Hot Dogs

Mummy Hot Dogs are a fun and spooky treat perfect for celebrating Halloween with kids. This easy-to-make dish is a playful twist on the classic hot dog, wrapped in crescent roll dough to resemble a mummy. The hot dogs are wrapped with strips of dough and then baked until golden brown, creating a delicious and festive snack that kids will love to eat.
With just a few simple ingredients, you can whip up this creative and tasty dish in no time.
These Mummy Hot Dogs are perfect for a Halloween party, an after-school snack, or as a fun dinner option leading up to the holiday. Not only are they simple to prepare, but they also involve minimal cleanup, making them ideal for busy parents looking to enjoy the Halloween festivities without spending too much time in the kitchen.
Plus, kids will enjoy helping to create their own edible mummies, making this a great family activity.
Ingredients (Serves 4-6 people):
- 8 hot dogs
- 1 can of crescent roll dough
- 2 tablespoons of mustard or ketchup (for eyes)
- Cooking spray or parchment paper
Cooking Instructions:
1. Preheat the Oven:
Preheat your oven to 375°F (190°C). This will make certain that your Mummy Hot Dogs cook evenly and become perfectly golden brown.
2. Prepare the Baking Sheet:
Line a baking sheet with parchment paper or spray it with cooking spray to prevent the dough from sticking.
3. Prepare the Dough:
Open the can of crescent roll dough and separate it into individual triangles. Cut each triangle into thin strips, about 1/4 inch wide. You’ll use these strips to wrap around the hot dogs like bandages.
4. Wrap the Hot Dogs:
Take one hot dog and begin wrapping it with the dough strips, leaving a small gap at the top where the face will be. Overlap the dough slightly to make it look like bandages. Repeat this process with the remaining hot dogs.
5. Bake the Mummy Hot Dogs:
Place the wrapped hot dogs on the prepared baking sheet, making sure they’re spaced evenly. Bake in the preheated oven for 12-15 minutes or until the dough is golden brown and fully cooked.
6. Add the Eyes:
Once the Mummy Hot Dogs are baked, remove them from the oven and let them cool slightly. Use a small drop of mustard or ketchup to create eyes on each mummy.
Extra Tips:
For a crispier texture, you can brush the dough with a little bit of melted butter before baking. If you want to add more flavor, consider adding a slice of cheese under the dough before wrapping the hot dogs.
Additionally, if you’re serving these at a party, keep them warm by placing them on a warming tray or serving immediately after baking. This dish is very versatile, so feel free to experiment with different types of sausages or add condiments to suit your taste preferences.
Ghostly Fruit Kabobs
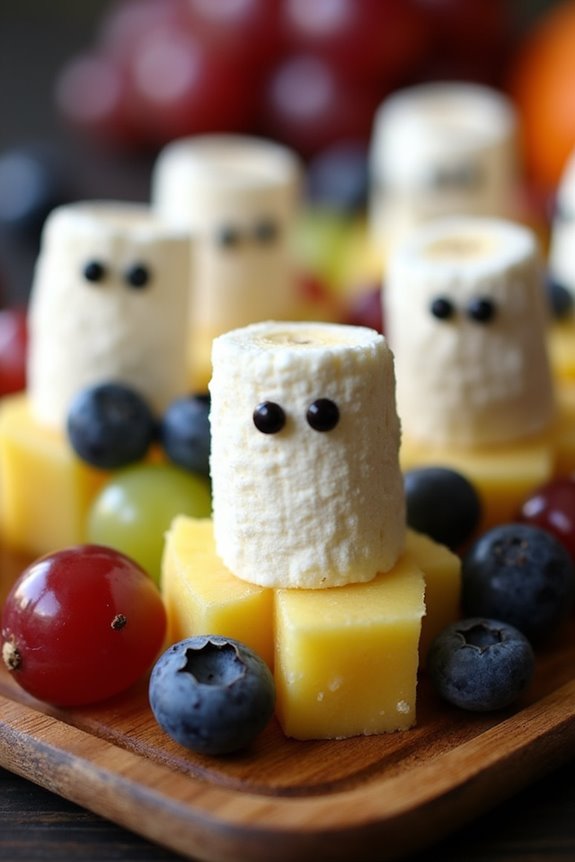
Halloween is the perfect time to get creative with food, and what better way than with some spooky yet healthy Ghostly Fruit Kabobs? Perfect as a fun and nutritious treat for kids, these kabobs aren’t only easy to make but also provide a delightful twist on traditional fruit skewers.
By using a variety of fresh fruits and a touch of imagination, you can create a plate of eerie ghostly figures that are sure to delight and satisfy your little monsters.
These Ghostly Fruit Kabobs are a fantastic way to incorporate more fruits into your child’s diet, while still keeping things festive and fun. Each skewer can be customized with your choice of fruits, and the addition of mini marshmallows provides a whimsical ghostly touch.
The kabobs are easy enough for kids to assemble themselves, making it a great activity for family fun. Here’s how you can prepare these spooky treats for a serving size of 4-6 people.
Ingredients:
- 2 bananas
- 1/2 cup mini marshmallows
- 1/2 cup blueberries
- 1 apple
- 1 cup pineapple chunks
- 1/2 cup grapes (green or red)
- 6 wooden skewers
Instructions:
- Prepare the Ingredients: Begin by peeling the bananas and slicing them into thick, round slices. Wash the apple thoroughly, then core and cut it into bite-sized chunks. Wash the blueberries and grapes thoroughly under running water, and verify the pineapple chunks are ready to use.
- Assemble the Ghosts: To create the ghostly effect, place a mini marshmallow on the tip of each skewer to form the “head” of the ghost. Below that, thread a round banana slice to serve as the “body” of the ghost. You can add a couple of blueberries to act as the ghost’s eyes.
- Add More Fruit: Continue to fill the skewer with a variety of apple chunks, pineapple chunks, and grapes. Alternate the fruits to create a colorful and appealing pattern. Leave a little space at the end of the skewer to hold.
- Finish the Kabobs: Once all the skewers are prepared, arrange them on a platter. Verify the mini marshmallow “heads” are facing upwards to maintain the ghostly appearance.
- Chill Before Serving: If time allows, refrigerate the kabobs for about 30 minutes before serving to make them extra invigorating.
Extra Tips:
To make the Ghostly Fruit Kabobs even more festive, consider using small edible marker pens to draw ghostly faces on the marshmallows for added character.
You can also substitute or add other fruits like strawberries or kiwi, depending on your preference and what’s in season. If using wooden skewers with sharp tips, be sure to supervise younger children closely to verify safety.
These kabobs are best enjoyed fresh, but they can be prepared a few hours in advance and kept in the fridge until party time.
Creepy Crawly Cupcakes

Creepy Crawly Cupcakes are a spooktacular treat guaranteed to thrill kids and adults alike at any Halloween gathering. These cupcakes aren’t only delicious but also a fun and creative way to engage young ones in the kitchen. With their eerie yet adorable appearance, they make the perfect centerpiece for any Halloween party.
The cupcakes are rich and chocolaty, topped with a creamy frosting and decorated with gummy worms and chocolate spiders, making them both creepy and delightful. The key to creating these Creepy Crawly Cupcakes is to focus on both flavor and presentation.
Start by preparing a batch of moist chocolate cupcakes. Once baked and cooled, frost them with a smooth layer of cream cheese frosting, which complements the chocolate base perfectly. The final touch involves decorating the cupcakes with gummy worms and chocolate spider webs, adding a touch of Halloween magic. With this easy-to-follow recipe, you’ll have a batch of cupcakes that’s as fun to make as it’s to eat.
Ingredients (Serving Size: 4-6 people)
- 1 cup all-purpose flour
- 1/2 cup unsweetened cocoa powder
- 1 cup granulated sugar
- 1 teaspoon baking powder
- 1/2 teaspoon baking soda
- 1/4 teaspoon salt
- 1/2 cup unsalted butter, melted
- 2 large eggs
- 1 teaspoon vanilla extract
- 1/2 cup buttermilk
- 1/4 cup hot water
- 1 cup cream cheese frosting
- 12 gummy worms
- 1/4 cup chocolate chips, melted for spider webs
Cooking Instructions
- Preheat the Oven: Begin by preheating your oven to 350°F (175°C). Line a 12-cup muffin tin with cupcake liners to prepare for baking.
- Mix Dry Ingredients: In a medium-sized bowl, whisk together the flour, cocoa powder, sugar, baking powder, baking soda, and salt until well combined.
- Combine Wet Ingredients: In a separate bowl, whisk the melted butter, eggs, and vanilla extract. Stir in the buttermilk until the mixture is smooth.
- Create the Batter: Gradually add the dry ingredients to the wet ingredients, mixing until just combined. Slowly stir in the hot water to create a smooth batter.
- Fill the Cupcake Liners: Distribute the batter evenly among the prepared cupcake liners, filling each about two-thirds full.
- Bake the Cupcakes: Place the muffin tin in the oven and bake for 18-20 minutes, or until a toothpick inserted in the center comes out clean. Allow the cupcakes to cool completely on a wire rack.
- Frost the Cupcakes: Once cooled, use a spatula or piping bag to spread a generous amount of cream cheese frosting on each cupcake.
- Decorate with Gummy Worms: Place two gummy worms on each cupcake, arranging them so they look like they’re crawling out of the frosting.
- Create Chocolate Spider Webs: Melt the chocolate chips and transfer the melted chocolate to a piping bag with a small tip. Pipe spider web designs on top of each cupcake for an added creepy touch.
Extra Tips
For the best Creepy Crawly Cupcakes, be sure to use room temperature ingredients when making your batter, as this helps everything mix together smoothly.
When melting the chocolate for the spider webs, confirm it’s not too hot, or it will be difficult to pipe. If you don’t have a piping bag, a resealable plastic bag with a small corner cut off will work as well.
Finally, let the kids help with the decoration; it’s a fun way to get them involved and let their creativity shine.
Frankenstein Rice Krispie Treats
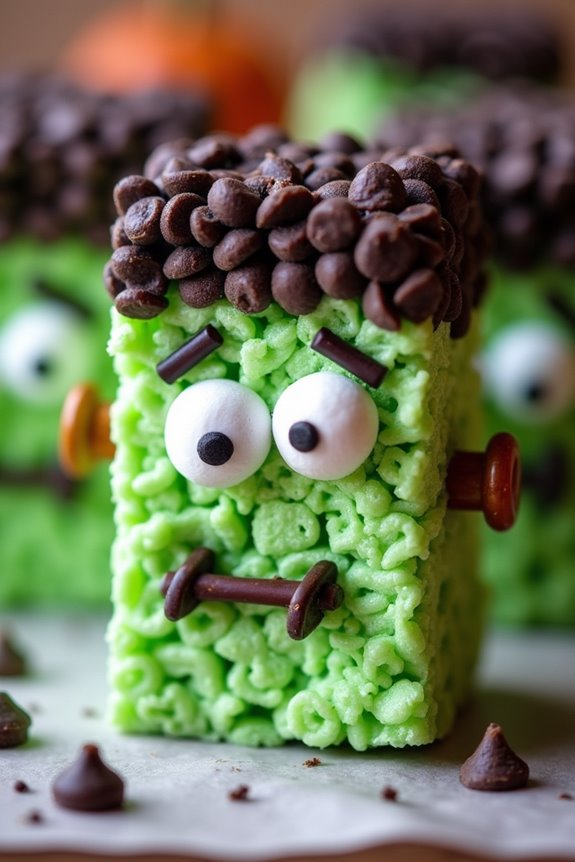
Frankenstein Rice Krispie Treats are a spooktacularly fun way to get into the Halloween spirit with your kids. These ghoulishly delightful treats combine the classic crunch of Rice Krispies with a creative twist that will make them the star of any Halloween party.
Perfect for little hands to help craft, these treats are both a fun activity and a delicious snack. The green Frankenstein faces can be customized with a variety of candies to make each one uniquely monstrous.
This recipe is simple and quick to prepare, making it ideal for a last-minute Halloween treat. With a serving size of 4-6 people, these Frankenstein Rice Krispie Treats are perfect for a small gathering or a family night in.
The best part is that you can easily double the recipe for a larger crowd or if you simply can’t get enough of these adorable monsters. Let’s get started on making these frightfully fun treats!
Ingredients (for 4-6 servings):
- 3 tablespoons unsalted butter
- 10 ounces marshmallows
- 5 cups Rice Krispies cereal
- Green food coloring
- 1 cup mini marshmallows (for decoration)
- 1/2 cup chocolate chips
- Black icing gel
- Candy eyes (optional)
- Pretzel sticks
Cooking Instructions:
- Melt the Butter and Marshmallows: In a large saucepan, melt the unsalted butter over low heat. Once melted, add the marshmallows and stir continuously until they’re completely melted and the mixture is smooth.
- Add Food Coloring: Once the marshmallow mixture is ready, remove the saucepan from heat. Add a few drops of green food coloring and stir well to achieve the desired Frankenstein green hue.
- Mix with Rice Krispies: Gradually fold in the Rice Krispies cereal, stirring until the cereal is evenly coated with the green marshmallow mixture.
- Shape the Treats: Pour the mixture into a greased 9×13 inch baking pan. Press down lightly with a greased spatula to level the mixture. Allow it to cool slightly but not completely set.
- Cut into Squares: Once the mixture is sufficiently cooled, cut it into rectangles or squares to form the base of Frankenstein’s head.
- Decorate the Faces: Use the mini marshmallows and chocolate chips to create Frankenstein’s hair. Place candy eyes or use the black icing gel to draw eyes. Use pretzel sticks inserted on the sides of the head as Frankenstein’s neck bolts.
- Add Final Details: Use the black icing gel to draw a mouth and any additional facial features like stitches or scars.
Extra Tips:
For a more personalized touch, consider letting the kids decorate their own Frankenstein faces. This not only makes the activity more engaging but also sparks creativity.
If you find the mixture too sticky to handle, try greasing your hands with a little butter or using wax paper to shape the treats. Also, make sure the treats are fully set before serving to avoid any gooey messes.
Enjoy these delightful and slightly spooky treats with your little monsters!
Eyeball Pasta Salad
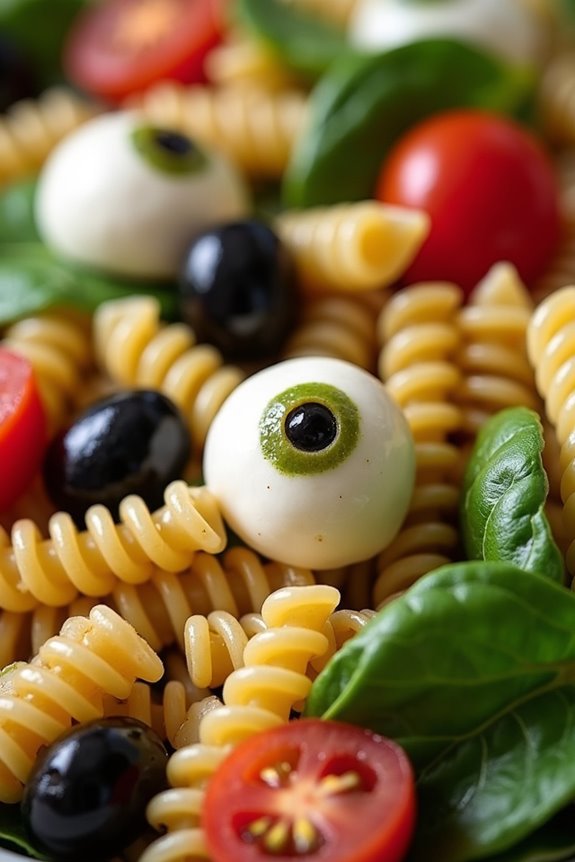
Halloween is the perfect time to get creative in the kitchen and serve up some spooky dishes that excite kids and adults alike. One such creepy yet delightful dish is the Eyeball Pasta Salad. This dish is a great way to incorporate fun into your Halloween party while guaranteeing the kids get a healthy dose of vegetables. The combination of pasta and “eyeballs” made from mozzarella and olives will surely capture the imagination of young trick-or-treaters.
The Eyeball Pasta Salad isn’t only visually appealing but also delicious and easy to make. The pasta salad is tossed with a tangy Italian dressing that complements the creamy mozzarella and the briny olives. The addition of colorful vegetables adds nourishment and a pop of color to the dish. This recipe serves 4-6 people, making it perfect for a small gathering or as part of a larger Halloween spread.
Ingredients:
- 12 oz rotini pasta
- 1 cup cherry tomatoes, halved
- 1 cup black olives, halved
- 1 cup baby spinach leaves
- 1 cup mozzarella balls (bocconcini)
- 1/2 cup sliced green olives
- 1/2 cup Italian dressing
- Salt and pepper to taste
Cooking Instructions:
- Cook the Pasta: Begin by cooking the rotini pasta according to the package instructions. Confirm the pasta is al dente to maintain a firm texture in the salad. Once cooked, drain the pasta and rinse it under cold water to cool it down quickly. This also helps to stop the cooking process and prevents the pasta from becoming mushy.
- Prepare the “Eyeballs”: While the pasta is cooling, prepare the mozzarella “eyeballs.” Take each mozzarella ball and gently press a sliced green olive into the center, confirming it sticks. Place a small piece of black olive in the middle of the green olive to create the “pupil” of the eyeball.
- Combine Ingredients: In a large bowl, combine the cooled pasta, cherry tomatoes, black olives, and baby spinach leaves. Toss them together to confirm they’re evenly distributed.
- Dress the Salad: Pour the Italian dressing over the pasta salad mixture and toss gently to coat all ingredients. Confirm the dressing covers everything evenly for maximum flavor.
- Add the Eyeballs: Carefully add the mozzarella “eyeballs” to the salad. Gently mix them into the salad, being careful not to disturb the placement of the olives in the mozzarella.
- Season and Serve: Season with salt and pepper to taste. Transfer the pasta salad to a serving dish and arrange the eyeball mozzarella balls on top for an extra spooky effect. Serve immediately or refrigerate until ready to serve.
Extra Tips:
When making the Eyeball Pasta Salad, consider using a variety of pasta shapes for added fun and texture. Additionally, you can customize the vegetables to suit your child’s taste preferences.
If you’re preparing the salad ahead of time, add the mozzarella “eyeballs” just before serving to confirm they maintain their shape and presentation. For an extra touch, you can use food coloring to tint the dressing orange or green, enhancing the Halloween theme.
Enjoy this creative dish that combines nutrition with a playful twist!
Haunted Veggie Cups
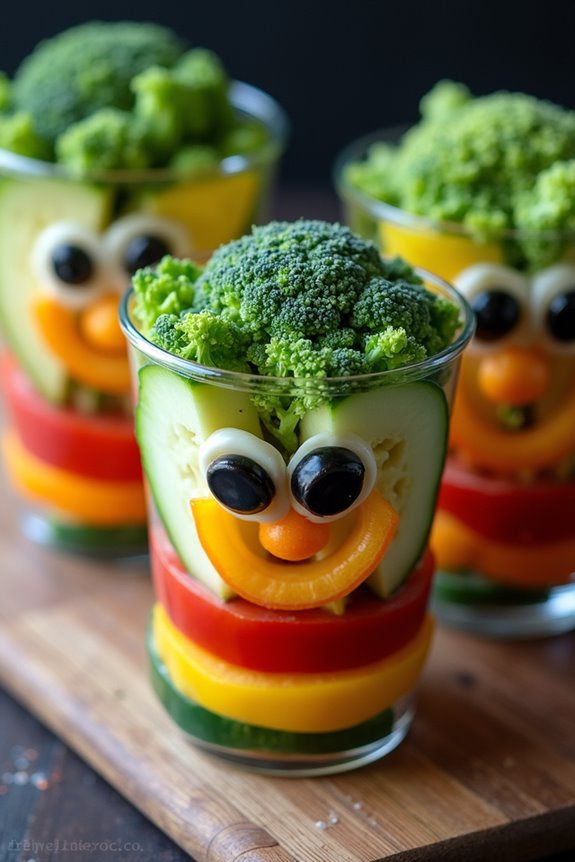
Halloween is the perfect time to mix fun with nutrition, and these Haunted Veggie Cups are a spooktacular way to do just that. Perfectly sized for little hands, these veggie cups resemble eerie haunted faces, making them not only delicious but also an exciting addition to your Halloween festivities. Packed with colorful vegetables, they offer a healthy snack option amidst the sugary treats that dominate the season.
The key to these Haunted Veggie Cups is creativity. You can use a variety of vegetables to create faces that are silly, spooky, or downright adorable. With a little imagination and a few handy tools, you can transform ordinary veggies into an extraordinary Halloween snack that will delight children and adults alike. Serve these at a Halloween party, or make them a fun kitchen activity for kids leading up to the big day.
Ingredients (Serving Size: 4-6 People):
- 2 cups cherry tomatoes
- 2 cups baby carrots
- 1 cucumber
- 1 yellow bell pepper
- 1 red bell pepper
- 1 cup broccoli florets
- 1 cup hummus
- 1 cup ranch dressing
- Black olives
- Toothpicks
- Clear plastic cups
Cooking Instructions:
- Prepare the Vegetables:
- Wash all the vegetables thoroughly. Slice the cucumber into thin rounds and the bell peppers into strips. Cut the cherry tomatoes in half and separate the broccoli into small florets.
- Use the cucumber rounds as the base for faces. Arrange them inside the clear plastic cups, with the flat side of the cucumber facing the outside of the cup.
- Use half cherry tomatoes and slices of black olives to make eyes. Carefully cut small pieces from the bell peppers to create mouths, and use broccoli florets to mimic hair on top of the cucumber rounds.
- Fill each cup with a spoonful of hummus and ranch dressing at the bottom to serve as a tasty dip. Carefully place the decorated cucumber rounds facing outward so they’re visible through the cup. Add a mix of baby carrots, additional cherry tomatoes, and bell pepper strips around the dip.
- Use toothpicks to help secure any loose pieces of vegetables, ensuring that the faces remain intact when serving.
- 6 medium oranges
- 1 cup diced pineapple
- 1 cup diced strawberries
- 1 cup blueberries
- 1 cup seedless grapes, halved
- 1 tablespoon honey (optional)
- 1 tablespoon lemon juice
Extra Tips:
When making Haunted Veggie Cups, feel free to get creative with your designs. You can use a small paring knife to carve more intricate features on the veggies if desired.
These cups are best served fresh, so prepare them close to serving time to maintain the crispness of the vegetables. If you want to add extra flavor, consider sprinkling a bit of seasoning on the hummus or ranch dressing before assembling the cups.
Encourage kids to participate in designing the faces to make this a fun and engaging activity.
Jack-o’-Lantern Orange Bowls
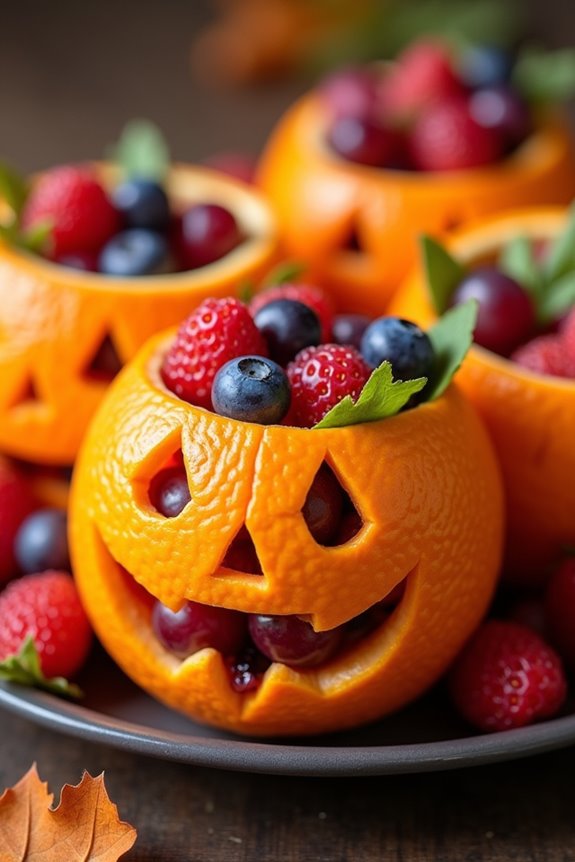
Celebrate Halloween with a fun and healthy treat that kids will love! Jack-o’-Lantern Orange Bowls are both visually appealing and delicious, making them the perfect addition to your spooky festivities. This dish combines the sweetness of fresh fruit with the creativity of carving, turning ordinary oranges into delightful mini jack-o’-lanterns. It’s an excellent way to promote kids to enjoy their fruits and engage in a fun Halloween activity.
These Jack-o’-Lantern Orange Bowls aren’t only simple to prepare but also a great way to get kids involved in the kitchen. They can assist with scooping out the oranges and decorating their jack-o’-lantern faces. Fill these edible bowls with a colorful fruit salad, yogurt, or even a small portion of candy for a delightful surprise. This recipe serves 4-6 people, making it an ideal choice for a small party or family gathering.
Ingredients:
Cooking Instructions:
- Prepare the Oranges: Start by washing the oranges thoroughly. Using a sharp knife, slice off the top quarter of each orange. With a spoon, gently scoop out the inside of the oranges, being careful not to puncture the peel. Set the orange flesh aside for later use.
- Carve the Faces: Using a small knife, carefully carve jack-o’-lantern faces into the orange peels. Let your creativity flow, making each face unique and fun. This step can be a delightful activity for kids under supervision.
- Prepare the Fruit Salad: In a large bowl, combine the diced pineapple, strawberries, blueberries, and halved grapes. Add the honey and lemon juice to the fruit mixture and gently stir to combine. You can also add some of the scooped-out orange segments for additional flavor.
- Assemble the Orange Bowls: Fill each carved orange bowl with the fruit salad mixture. Use a spoon to pack the fruit in tightly, promoting each bowl is full.
- Serve and Enjoy: Place the tops back on the oranges to cover the fruit salad. Arrange the Jack-o’-Lantern Orange Bowls on a serving platter and enjoy the festive and healthy treat!
Extra Tips:
When carving the faces on the oranges, promote the knife is sharp to make clean cuts. If you’re working with kids, consider using a paring knife or a pumpkin carving kit for safety.
If the fruit salad mixture is too juicy, drain it slightly before filling the orange bowls to prevent them from becoming soggy. For added flavor, you can sprinkle a bit of cinnamon on top of the fruit salad.
These Jack-o’-Lantern Orange Bowls can be prepared a few hours in advance and stored in the refrigerator until you’re ready to serve them.