
Halloween is just around the corner, and it’s the perfect time to add a little magic to your menu with adorable, kid-approved appetizers. Picture pumpkin-shaped cheese balls and mummy hot dogs charming the little ones with their whimsical designs. These festive delights, like ghostly breadsticks and witch’s broomstick pretzels, are sure to put a playful spin on any spooky gathering. Your young guests will be captivated by these creative culinary treats. Let’s make this Halloween unforgettable with these enchanting bites!
Pumpkin-Shaped Cheese Balls
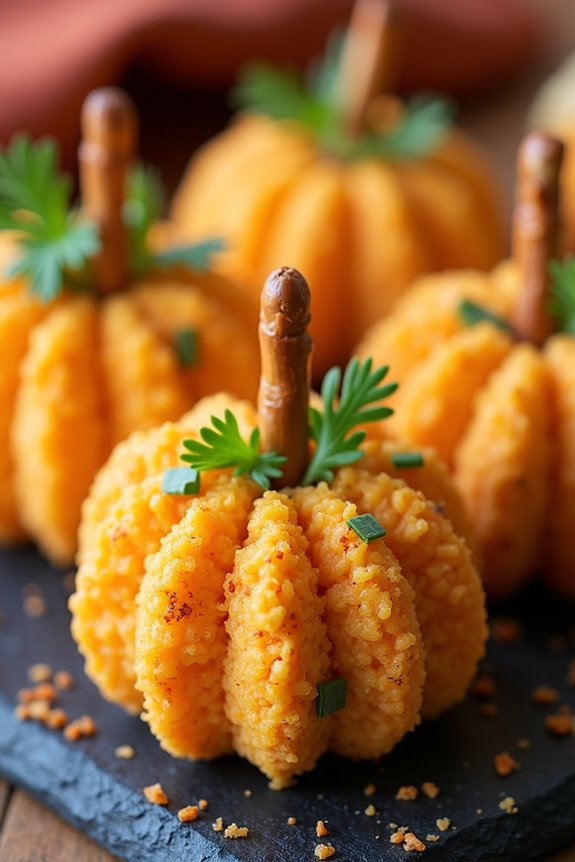
Pumpkin-Shaped Cheese Balls are a delightful and visually appealing appetizer that will make your Halloween gathering a hit, especially with the kids. These savory cheese balls aren’t only cute but also packed with flavor that will satisfy the taste buds of both children and adults alike. The creamy texture combined with the mild sharpness of cheddar cheese makes it an irresistible treat. Shaped like mini pumpkins, these cheese balls will add a festive touch to your Halloween spread.
This recipe is designed to cater to 4-6 people, making it perfect for a small party or family gathering. With a base of cream cheese and cheddar cheese, these appetizers are easy to prepare and require minimal effort. The addition of spices and herbs enhances the flavor, while the pretzel stick “stems” and bell pepper “leaves” bring the pumpkin theme to life. Not only do these cheese balls taste amazing, but they also make for an eye-catching centerpiece on your appetizer table.
Ingredients:
- 16 ounces cream cheese, softened
- 2 cups shredded cheddar cheese
- 1 teaspoon garlic powder
- 1 teaspoon onion powder
- 1 teaspoon smoked paprika
- 1/2 teaspoon salt
- 1/2 teaspoon black pepper
- 1/4 cup finely chopped green onions
- 1 cup crushed nacho cheese-flavored tortilla chips
- Pretzel sticks (for stems)
- Fresh parsley or bell pepper slices (for leaves)
Instructions:
- Prepare the Cheese Mixture: In a large mixing bowl, combine the softened cream cheese and shredded cheddar cheese. Mix well until the cheeses are fully integrated and the texture is smooth.
- Add Flavorings: Stir in the garlic powder, onion powder, smoked paprika, salt, and black pepper. Mix until all the spices are well distributed throughout the cheese mixture.
- Incorporate Green Onions: Fold in the finely chopped green onions, making sure they’re evenly spread throughout the mixture. This adds a nice hint of flavor and a pop of color to the cheese balls.
- Shape the Cheese Balls: Using your hands or a scoop, divide the cheese mixture into 4-6 equal portions, depending on your desired size. Roll each portion into a ball, then slightly flatten the top and bottom to give it a pumpkin shape.
- Coat with Crushed Chips: Spread the crushed nacho cheese-flavored tortilla chips on a plate. Roll each cheese ball in the crushed chips to coat them completely, pressing gently to confirm the chips adhere well.
- Add the Stems and Leaves: Insert a pretzel stick into the top center of each cheese ball to create a stem. For leaves, use fresh parsley or slice a bell pepper into small leaf shapes and place next to the stems.
- Refrigerate Before Serving: Place the prepared cheese balls in the refrigerator for at least 30 minutes to firm up before serving. This also allows the flavors to meld together nicely.
Extra Tips:
To guarantee the best results, make sure the cream cheese is adequately softened before mixing; otherwise, it mightn’t blend smoothly with the other ingredients.
If you want to save time, prepare the cheese mixture a day in advance, allowing the flavors to develop overnight in the refrigerator.
When serving, consider pairing the cheese balls with a variety of crackers or sliced vegetables to offer guests a range of dipping options.
Mummy Hot Dogs
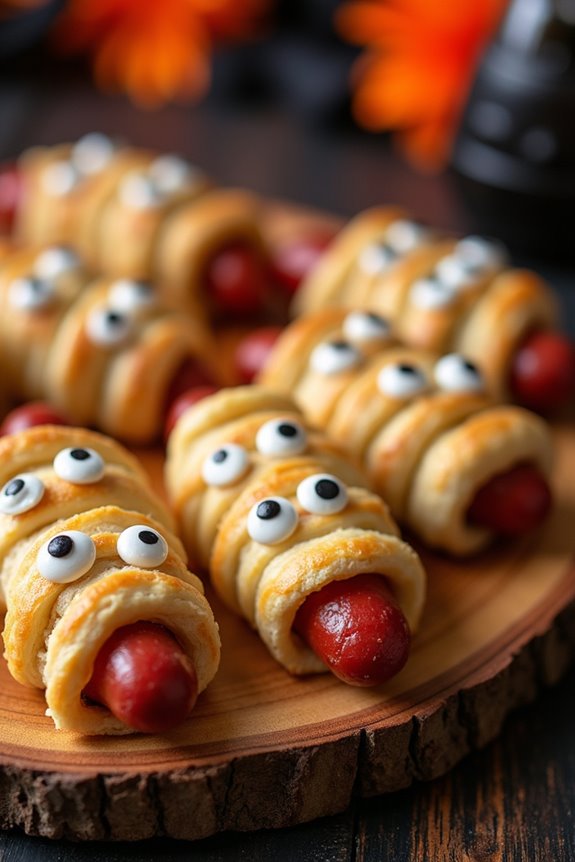
Mummy Hot Dogs are a spooky and delicious treat that will delight kids and adults alike at your Halloween gathering. These whimsical appetizers aren’t just fun to make but also a playful twist on the classic pigs in a blanket. Each hot dog is wrapped in crescent roll dough to resemble a mummy, complete with candy eyes to give them a lively appearance.
They’re perfect for a party as they’re easy to prepare and can be served as a savory snack or a light meal. These Mummy Hot Dogs are perfect for a serving size of 4-6 people, making them an ideal choice for a small gathering. Whether you’re hosting a Halloween bash or just looking to get into the festive spirit with your family, these appetizers are sure to be a hit.
The preparation is simple, and with some creativity, you can even involve your kids in the process to make it a fun family activity. Just a handful of ingredients are all you need to create these spooky snacks!
Ingredients:
- 1 package of crescent roll dough
- 8 hot dogs
- 16 candy eyes
- Mustard or ketchup, for serving
Cooking Instructions:
- Preheat the Oven: Begin by preheating your oven to 375°F (190°C). This will guarantee that the crescent roll dough bakes evenly and becomes golden brown.
- Prepare the Dough: Unroll the crescent roll dough onto a clean surface. Using a sharp knife or a pizza cutter, cut the dough into thin strips, approximately 1/4 inch wide.
- Wrap the Hot Dogs: Take one hot dog and start wrapping it with the dough strips, leaving small gaps to give the appearance of a mummy. Make sure to leave space at one end of the hot dog to place the eyes later. Repeat this process for all eight hot dogs.
- Bake the Mummies: Place the wrapped hot dogs on a baking sheet lined with parchment paper. Bake them in the preheated oven for about 12-15 minutes, or until the dough is golden brown and cooked through.
- Add the Eyes: Once baked, remove the hot dogs from the oven and let them cool slightly. Carefully place two candy eyes on each hot dog, using a dab of mustard or ketchup as “glue” if needed.
- Serve: Arrange the Mummy Hot Dogs on a serving platter and serve them with mustard and ketchup for dipping.
Extra Tips:
For a healthier twist, you can use whole wheat crescent roll dough or turkey hot dogs. If you prefer, you can also use slices of cheese under the dough for a gooey surprise.
When wrapping the dough, try to make the strips unevenly spaced to give a more authentic mummy look. Additionally, if you don’t have candy eyes, you can use small dots of mustard or ketchup for eyes.
Spider Crackers
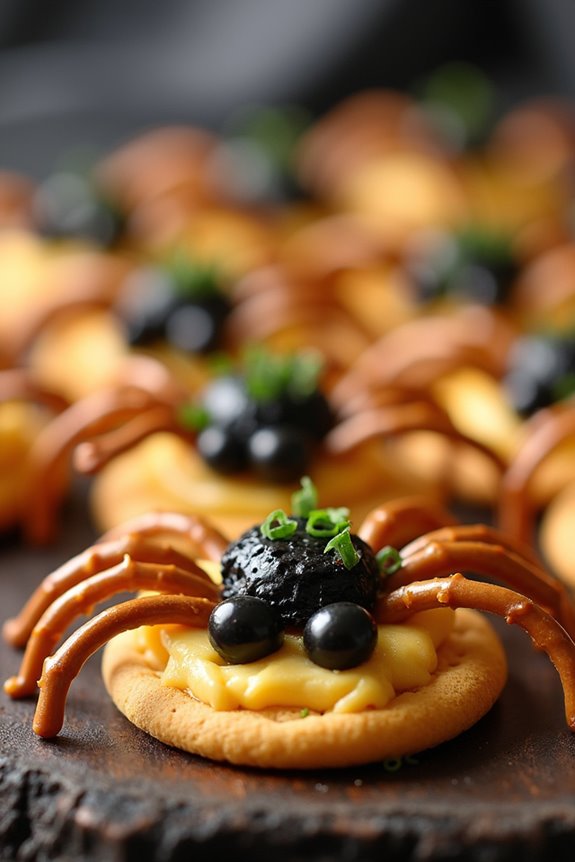
Spider Crackers are a fun and spooky appetizer perfect for your Halloween gatherings. These kid-approved snacks not only look adorable but are also incredibly easy to make. With a combination of crunchy crackers, creamy cheese, and a little bit of creativity, you can whip up a batch of these delightful treats in no time.
They’re sure to be a hit with children and adults alike, adding a playful touch to your Halloween spread. These Spider Crackers are customizable to suit various taste preferences, making them a versatile choice for any party. You’ll be using readily available ingredients, and the assembly process is simple enough for kids to join in on the fun.
Whether you’re hosting a Halloween party or a small family gathering, these appetizers are bound to add a festive flair to your table. Plus, they’re a great way to sneak in some healthy ingredients without sacrificing flavor.
Ingredients (Serves 4-6 people):
- 24 round crackers (such as Ritz)
- 1 cup cream cheese or cheese spread
- 24 black olives
- 48 pretzel sticks
- 24 small candy eyes or sliced black olives
- 1 tablespoon chives, finely chopped (optional)
Instructions:
- Prepare the Cheese Base: Start by spreading a generous amount of cream cheese or cheese spread on half of the crackers. This will act as the base to hold everything together.
- Create the Spider Legs: Break the pretzel sticks in half to form shorter pieces for the spider legs. Carefully insert four pretzel stick halves into the cream cheese on each side of the cracker, making sure they’re evenly spaced out. These will be the spider’s legs.
- Top with Another Cracker: Place another cracker on top of each to sandwich the pretzel legs between the crackers. Press gently to confirm they stick together without breaking the pretzels.
- Add the Eyes: For the spider’s eyes, use small candy eyes or cut small slices of black olive. Place two eyes on top of each cracker sandwich, using a dab of cream cheese to help them stick.
- Finish with Garnish: If you like, sprinkle finely chopped chives over the top for a touch of color and added flavor. This step is optional but adds to the overall presentation.
Extra Tips:
To make the Spider Crackers even more festive, consider using flavored cream cheese, such as chive or garlic, for an extra burst of flavor. If you’re serving these to a crowd of kids, letting them help assemble the spiders can be a fun activity.
Just confirm the pretzel sticks are broken gently to avoid crumbling. Additionally, if you need to prepare these appetizers ahead of time, store them in an airtight container in the refrigerator until ready to serve, confirming they remain fresh and crisp.
Ghostly Breadsticks

Transform your kitchen into a haunted bakery with these spine-chilling Ghostly Breadsticks, a perfect Halloween appetizer that will have kids and adults alike reaching for more.
These breadsticks aren’t only fun to make but also deliciously crisp and chewy, making them an ideal starter for your Halloween festivities. Shaped like spooky ghosts, they’re sure to become a highlight of your Halloween spread, adding a touch of ghostly charm to your celebrations.
Creating these Ghostly Breadsticks is a simple and enjoyable process, perfect for getting kids involved in the kitchen. Made with basic ingredients, the breadsticks can be whipped up in no time, leaving you with plenty of moments to enjoy the Halloween fun.
Serve these ghostly delights alongside your favorite dipping sauce for a snack that will disappear as quickly as a ghost in the night. This recipe serves 4-6 people, making it perfect for small gatherings or family events.
Ingredients:
- 1 package refrigerated pizza dough
- 2 tablespoons olive oil
- 1 teaspoon garlic powder
- 1 teaspoon dried oregano
- 1/2 teaspoon salt
- 1/4 cup grated Parmesan cheese
- Black olives (for eyes, sliced into small pieces)
- Marinara sauce (for dipping)
Instructions:
- Preheat the Oven: Begin by preheating your oven to 375°F (190°C). This guarantees that the breadsticks bake evenly and develop a nice golden crust.
- Prepare the Dough: Roll out the refrigerated pizza dough on a lightly floured surface into a rectangle, approximately 12×16 inches in size. Using a sharp knife or a pizza cutter, slice the dough into strips about 1 inch wide and 6 inches long.
- Shape the Ghosts: Using your hands, gently stretch and shape each strip into ghostly forms. Pinch one end to create a head and widen the other end for the body. Place them on a baking sheet lined with parchment paper.
- Season the Breadsticks: Brush each breadstick with olive oil using a pastry brush. Sprinkle the garlic powder, dried oregano, and salt evenly over the breadsticks. Finish by sprinkling grated Parmesan cheese on top.
- Add the Eyes: Press small pieces of black olives into the head of each ghost-shaped breadstick to create spooky eyes.
- Bake the Breadsticks: Place the baking sheet in the preheated oven and bake for 12-15 minutes, or until the breadsticks are golden brown and crisp.
- Serve and Enjoy: Remove the breadsticks from the oven and let them cool slightly. Serve warm with marinara sauce on the side for dipping.
Extra Tips:
For an added touch of flavor, consider sprinkling some red pepper flakes on the breadsticks before baking for a bit of heat.
If you don’t have black olives, you can use sesame seeds or poppy seeds to create the eyes.
Make sure to involve the kids in shaping the ghostly breadsticks; it’s a fun activity that they’ll love.
Additionally, verify that the dough isn’t too thick when rolled out, as this will help create a nice and crispy texture.
Enjoy these Ghostly Breadsticks as a fun and festive appetizer that perfectly complements the Halloween spirit!
Witch’s Broomstick Pretzels
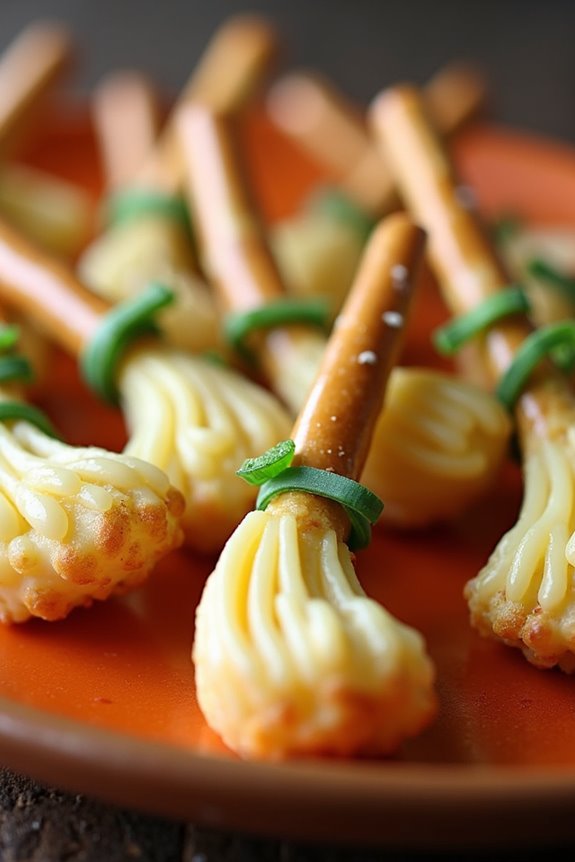
Witch’s Broomstick Pretzels are a fun and festive addition to any Halloween spread, sure to delight kids and adults alike. These whimsical snacks aren’t only visually appealing but also incredibly easy to make. Perfect for a spooky gathering or a family movie night, Witch’s Broomstick Pretzels combine the salty crunch of pretzels with the creamy goodness of string cheese, creating a snack that’s both delicious and entertaining.
This Halloween treat isn’t only simple to prepare but also customizable. You can get creative by using different types of cheese or adding edible decorations to enhance the broomstick look. With only a few ingredients and minimal preparation time, Witch’s Broomstick Pretzels are an excellent choice for busy hosts who want to impress without spending hours in the kitchen.
Get your kids involved in assembling these broomsticks for a fun family activity!
Ingredients (Servings: 4-6 people)
- 12 pretzel sticks
- 6 string cheese sticks
- Fresh chives or thinly sliced scallions (about 12 pieces)
Cooking Instructions
- Prepare the Cheese: Begin by unwrapping the string cheese sticks. Cut each cheese stick in half to make 12 pieces. Use a knife to gently slice the bottom half of each piece into thin strips, resembling the bristles of a broom. Be careful not to slice all the way through, leaving the top half intact.
- Assemble the Broomsticks: Insert one pretzel stick into the top of each cheese piece, ensuring it’s secure but not too deep as to break the cheese.
- Tie the Brooms: Take a piece of chive or scallion and wrap it around the top of the cheese, just below the pretzel stick. Tie the chive or scallion in a small knot to hold the “broom bristles” in place. Trim any excess chive with scissors if necessary.
- Serve and Enjoy: Arrange the Witch’s Broomstick Pretzels on a platter. These can be served immediately or refrigerated until ready to serve. Enjoy your spooky snack!
Extra Tips
To make tying the chives easier, you can briefly soak them in warm water, which will make them more pliable and less likely to break.
If you’re having trouble with knotting the chives or scallions, you can also use small strips of green bell pepper as an alternative.
For a twist, consider sprinkling some paprika or dried herbs on the broom bristles for added flavor and visual appeal.
And remember, involving your kids in the process can make for a fun and memorable activity, enhancing the Halloween spirit!
Monster Eyeball Meatballs
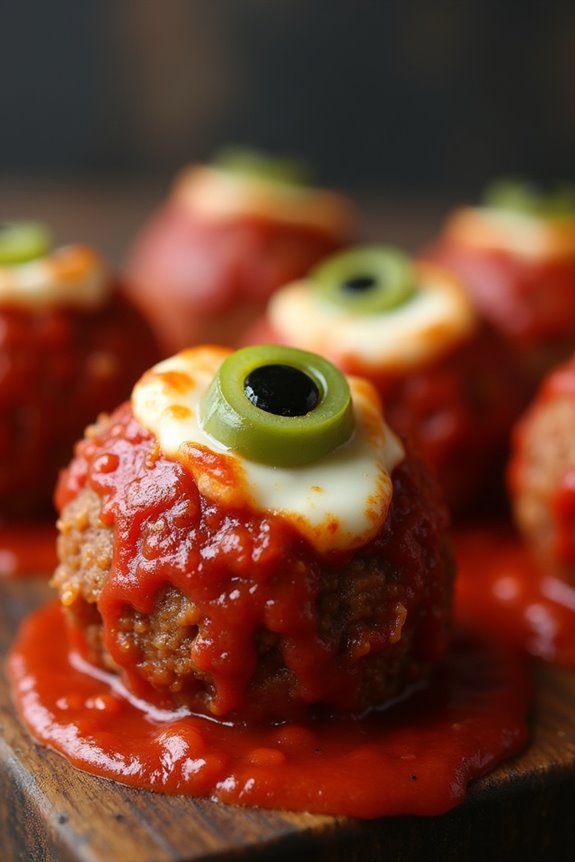
Halloween is a time for creativity and fun, especially when it comes to food. Monster Eyeball Meatballs are a spooky yet delicious appetizer that will surely be a hit at your Halloween gathering. These meatballs are designed to look eerie but taste fantastic, combining savory flavors with a creepy aesthetic. Perfect for a serving size of 4-6 people, they’re easy to prepare and certain to impress both kids and adults alike.
The appeal of Monster Eyeball Meatballs lies not only in their scary appearance but also in their delightful taste. Made from ground beef and seasoned to perfection, these meatballs are topped with a haunting olive “eyeball” that adds a fun twist. This recipe is ideal for those who want to add a little fright to their feast without sacrificing flavor.
Ingredients (for 4-6 servings):
- 1 pound ground beef
- 1/2 cup breadcrumbs
- 1/4 cup grated Parmesan cheese
- 1 egg
- 2 cloves garlic, minced
- 1 teaspoon dried Italian seasoning
- 1/2 teaspoon salt
- 1/4 teaspoon black pepper
- 1 cup marinara sauce
- 1/2 cup mozzarella cheese, shredded
- 12 pimento-stuffed green olives, sliced into rings
Instructions:
- Preheat the Oven: Begin by preheating your oven to 375°F (190°C). This guarantees that your meatballs cook evenly and thoroughly.
- Prepare the Meatball Mixture: In a large bowl, combine the ground beef, breadcrumbs, Parmesan cheese, egg, minced garlic, Italian seasoning, salt, and black pepper. Mix until all ingredients are well incorporated. Be careful not to over-mix as this can make the meatballs tough.
- Form the Meatballs: Using your hands, shape the mixture into 12 evenly sized meatballs. Place them on a baking sheet lined with parchment paper or lightly greased to prevent sticking.
- Bake the Meatballs: Place the baking sheet in the preheated oven and bake the meatballs for 18-20 minutes, or until they’re browned and cooked through.
- Add the Eyeballs: Remove the meatballs from the oven and spoon about a tablespoon of marinara sauce over each one. Sprinkle a bit of mozzarella cheese on top of the sauce, and then press a sliced olive ring into the center to create the “eyeball” effect.
- Melt the Cheese: Return the meatballs to the oven for an additional 5 minutes, or until the cheese is melted and bubbly.
- Serve: Once done, remove from the oven and allow to cool slightly before serving. Arrange them on a platter for a spooktacular presentation.
Extra Tips:
For the best flavor, use fresh ground beef and high-quality Parmesan cheese. If you want to make the dish ahead of time, prepare the meatballs and store them in the refrigerator until you’re ready to bake.
You can also experiment with different types of cheese or olives to suit your taste. For a spicier version, add a pinch of red pepper flakes to the mixture. Serve these meatballs with extra marinara sauce on the side for dipping, and watch as your guests delight in this creepy-crawly creation.
Jack-O’-Lantern Stuffed Peppers
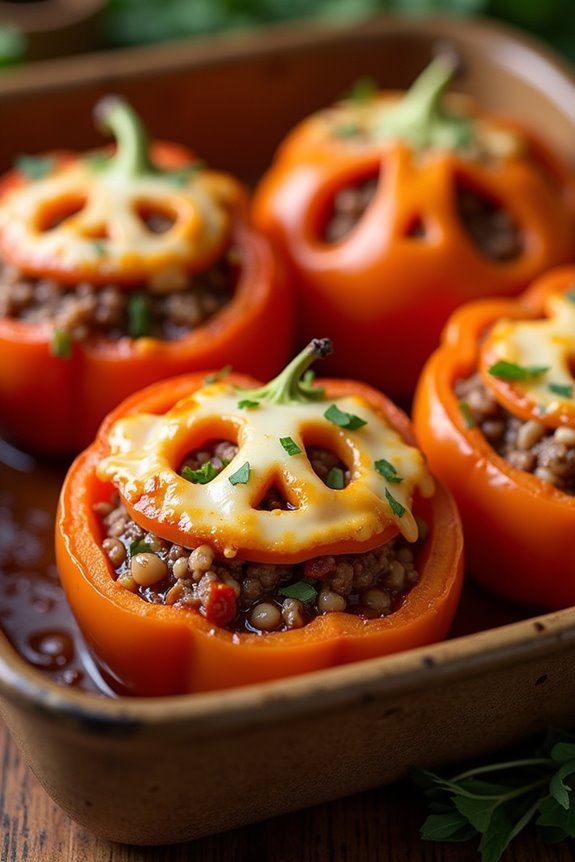
Get into the Halloween spirit with these festive Jack-O’-Lantern Stuffed Peppers. Perfect for a family gathering or a kid-friendly party, these peppers are as fun to make as they’re to eat. Each pepper is carved to resemble a classic jack-o’-lantern and stuffed with a savory mixture of beef, rice, and vegetables. The vibrant orange peppers not only add a pop of color to your table but also serve as a delicious, edible decoration that’s sure to impress both kids and adults alike.
These Jack-O’-Lantern Stuffed Peppers aren’t only visually appealing but also packed with nutrients, offering a balanced meal in a single dish. Ideal for serving 4-6 people, this recipe combines seasoned ground beef with hearty brown rice and a medley of vegetables, all baked to perfection inside hollowed-out bell peppers. This dish can easily be modified to cater to different tastes or dietary restrictions, making it a versatile choice for any Halloween celebration.
Ingredients:
- 4-6 large orange bell peppers
- 1 pound ground beef
- 1 cup cooked brown rice
- 1 small onion, diced
- 2 cloves garlic, minced
- 1 cup canned diced tomatoes, drained
- 1 cup shredded mozzarella cheese
- 1 tablespoon olive oil
- 1 teaspoon salt
- 1/2 teaspoon black pepper
- 1/2 teaspoon paprika
- 1/2 teaspoon dried oregano
Cooking Instructions:
- Prepare the Peppers: Preheat your oven to 375°F (190°C). Cut the tops off the bell peppers and remove the seeds and membranes. Using a small, sharp knife, carve jack-o’-lantern faces into one side of each pepper. Set aside.
- Cook the Beef: In a large skillet, heat olive oil over medium heat. Add the diced onion and garlic, and sauté until the onion becomes translucent, about 3-4 minutes. Add the ground beef, breaking it apart with a spoon, and cook until browned. Drain any excess fat from the skillet.
- Mix the Filling: Stir in the cooked rice, diced tomatoes, salt, black pepper, paprika, and oregano into the skillet with the beef. Cook for an additional 2-3 minutes until everything is well combined and heated through. Remove from heat and mix in half of the shredded mozzarella cheese.
- Stuff the Peppers: Place the hollowed peppers upright in a baking dish. Spoon the beef and rice mixture into each pepper, packing it down gently. Sprinkle the remaining mozzarella cheese on top of the filling in each pepper.
- Bake the Peppers: Cover the baking dish with foil and bake in the preheated oven for 25 minutes. Remove the foil and bake for an additional 10-15 minutes, or until the peppers are tender and the cheese is melted and bubbly.
- Serve: Allow the stuffed peppers to cool slightly before serving. Enjoy your spooky and delicious Jack-O’-Lantern Stuffed Peppers!
Extra Tips:
When carving the faces into the peppers, handle them gently to avoid tearing the sides. You can use a small cookie cutter to make the process easier.
For a vegetarian version, replace the ground beef with cooked lentils or black beans. Additionally, if you prefer a spicier kick, consider adding a pinch of cayenne pepper or red pepper flakes to the beef mixture.
These stuffed peppers can be prepared a day in advance and baked just before serving to save time on the day of your event.
Creepy Veggie Skeleton
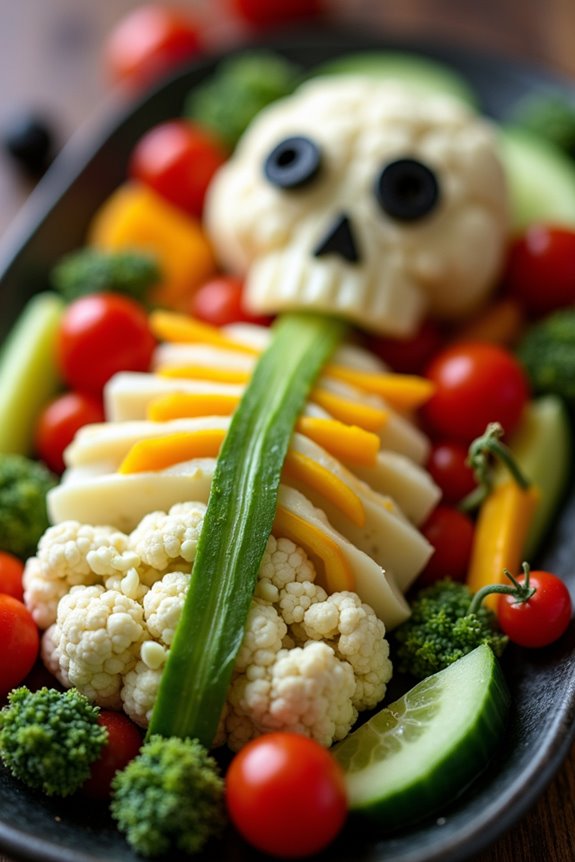
Creepy Veggie Skeleton is a fun and healthy way to get kids excited about eating their veggies this Halloween. This dish isn’t only visually appealing but also a great way to incorporate nutritious vegetables into your little ones’ diet. The Creepy Veggie Skeleton is a platter of fresh vegetables arranged to resemble a spooky skeleton, perfect for a Halloween party appetizer that will delight both kids and adults.
With its vibrant colors and creative presentation, the Creepy Veggie Skeleton makes eating veggies a thrilling experience. The best part is that you can customize it with your favorite vegetables, making it a versatile dish that caters to different tastes. Plus, it’s easy to assemble and doesn’t require any cooking, making it a convenient option for busy parents.
Ingredients (Serving Size: 4-6 people)
- 1 head of cauliflower
- 1 bunch of celery
- 1 red bell pepper
- 1 yellow bell pepper
- 1 cucumber
- 1 cup cherry tomatoes
- 2 black olives
- 1 small broccoli crown
- 1 cup hummus or ranch dressing for dipping
Instructions
- Prepare the Vegetables: Begin by washing all the vegetables thoroughly under running water. Pat them dry with a kitchen towel.
- Create the Skeleton Head: Cut the cauliflower head in half. Use one half to create the skeleton’s skull by arranging the florets in a rounded shape at the top of your serving platter.
- Make the Spine and Ribs: Slice the celery sticks into manageable lengths. Arrange them vertically beneath the cauliflower skull to form the spine. Use additional celery sticks cut into smaller segments to create the ribs, extending outwards from the spine.
- Add Arms and Legs: Cut the cucumber into thin slices for the arms and legs. Arrange them extending from the ribs and downwards from the spine to form the skeleton’s limbs.
- Position the Pelvis: Slice the yellow bell pepper in half and remove the seeds. Position one half of the pepper upside down at the base of the spine to represent the pelvis.
- Decorate with Color: Use slices of red bell pepper and cherry tomatoes to add color and details to the skeleton’s body. Arrange them creatively around the skeleton to mimic bones and joints.
- Finish the Face: Place the two black olives on the cauliflower skull to form the eyes. You can use a small piece of red bell pepper as a nose and arrange small broccoli florets as hair if desired.
- Serve with Dip: Place a small bowl of hummus or ranch dressing at the bottom of the platter for dipping. This adds a flavorful touch to the veggie skeleton.
Extra Tips
For a truly spooky effect, consider using a dark-colored platter or serving tray to contrast with the bright veggies and make them pop visually.
If you’re dealing with picky eaters, involve the kids in the assembly process, allowing them to choose and place the vegetable pieces. This interactive approach not only makes the dish more appealing but also encourages them to try new vegetables.
Additionally, feel free to swap out any of the vegetables for others that your family enjoys, such as carrots, snap peas, or radishes.
Dracula’s Dentures Cookies
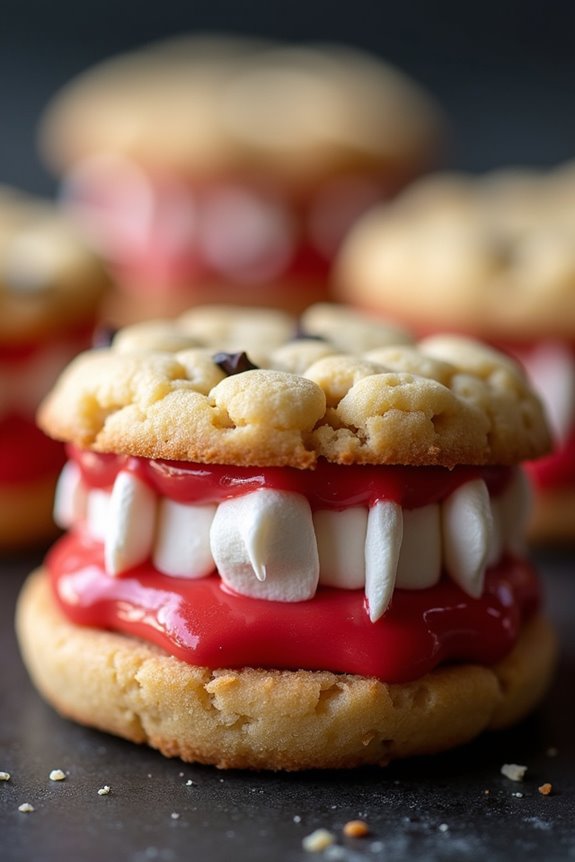
Looking to add a fun and spooky treat to your Halloween menu? Dracula’s Dentures Cookies are the perfect way to delight kids and adults alike. These creative and delicious cookies are designed to look like Dracula’s infamous teeth, with a sweet and slightly spooky twist. Not only are they visually intriguing, but they’re also utterly delicious, combining the flavors of classic chocolate chip cookies, marshmallows, and a hint of red frosting.
The best part? They’re super simple to make, making them a fantastic option for a Halloween gathering or a festive classroom treat.
Dracula’s Dentures Cookies aren’t only a treat for the taste buds but also a treat for the eyes. The ingredients are simple, making this recipe a quick and easy addition to your Halloween festivities. With a serving size of 4-6 people, these cookies are sure to provide enough spooky fun for a small party or family get-together.
Whether you’re preparing them with the kids or on your own, these cookies are a sure-fire way to get everyone into the Halloween spirit.
Ingredients (for 4-6 servings):
- 12 chocolate chip cookies
- 1 cup red frosting
- 1 cup mini marshmallows
- 12 slivered almonds
Cooking Instructions:
- Prepare the Cookies: Start by laying out the chocolate chip cookies on a clean work surface. These will serve as the base for Dracula’s dentures.
- Add the Frosting: Using a small spatula or butter knife, spread a generous layer of red frosting on the flat side of each cookie. The red frosting will act as the “gums” in your dentures.
- Create the Dentures: Place mini marshmallows along the curved edge of the frosting-covered side of half of the cookies. These will act as the “teeth” in Dracula’s dentures.
- Assemble the Dentures: Take the remaining cookies and carefully place them on top of the marshmallow-covered cookies, frosting side down, creating a sandwich. The cookies should slightly press down on the marshmallows, making them look like teeth.
- Add the Fangs: For the final touch, insert two slivered almonds into the marshmallows at the front of each cookie set. This will create the classic vampire fangs look.
Extra Tips:
When making Dracula’s Dentures Cookies, make certain that the frosting is thick enough to hold the marshmallows in place but not so thick that it oozes out excessively when the top cookie is placed.
You can make your own red frosting by adding red food coloring to vanilla frosting, or you can purchase pre-colored frosting for convenience. If the cookies are too hard, try microwaving them for a few seconds to soften them before assembling.
This will make it easier to press the marshmallows into place without cracking the cookies. Adjust the number of cookies and ingredients as needed to accommodate more guests or to create a larger batch. Enjoy your spooky, sweet creation!
Spooky Spider Pizzas
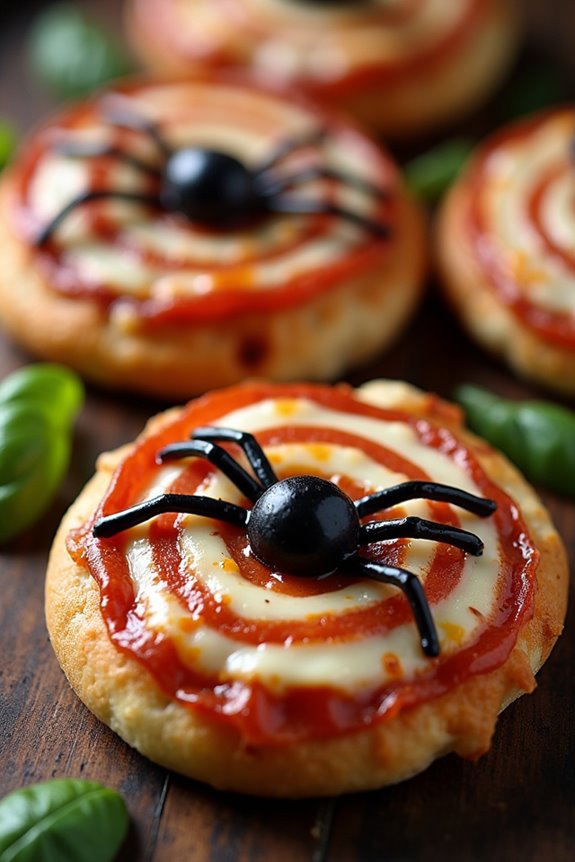
Looking for a fun and delicious way to celebrate Halloween with your little ghouls and goblins? These Spooky Spider Pizzas are a perfect treat that both kids and adults will love. With their creepy-crawly design and cheesy goodness, these mini pizzas aren’t only tasty but also a fun activity to make with your little ones.
They’re perfect for a Halloween party appetizer or a festive dinner that sets the mood for a spooky night.
The recipe for Spooky Spider Pizzas is simple and requires just a few ingredients that you likely already have in your pantry and fridge. Each mini pizza is topped with cheese, olives, and pepperoni to create a spider web pattern and creepy spider topping. This dish serves 4-6 people, making it ideal for small gatherings or family dinners.
Let’s get started on creating these frightfully fun pizzas!
Ingredients (for 4-6 people):
- 6 English muffins, split in half
- 1 cup pizza sauce
- 2 cups shredded mozzarella cheese
- 24 slices of pepperoni
- 1 can of black olives, sliced
- Olive oil
- Salt and pepper to taste
- Fresh basil leaves (optional, for garnish)
Cooking Instructions:
- Preheat the Oven: Set your oven to 375°F (190°C) and allow it to preheat while you prepare the pizzas.
- Prepare the English Muffins: Place the English muffin halves on a baking sheet, cut side up. Lightly brush each half with olive oil and season with a pinch of salt and pepper.
- Add the Sauce: Spread a generous tablespoon of pizza sauce on each muffin half. Make sure the sauce is evenly distributed.
- Layer the Cheese: Sprinkle a good layer of mozzarella cheese over the sauce on each muffin half, ensuring the sauce is completely covered.
- Create the Spider Web: Arrange 3-4 slices of pepperoni on each pizza in a circular pattern to mimic a spider web.
- Make the Spiders: For each pizza, place a whole black olive in the center for the spider’s body. Slice additional olives into thin strips to create legs, arranging them around the whole olive.
- Bake the Pizzas: Place the baking sheet in the preheated oven and bake for 10-12 minutes, or until the cheese is melted and bubbly, and the edges of the muffins are golden brown.
- Garnish and Serve: Remove the pizzas from the oven and let them cool slightly. If desired, garnish with fresh basil leaves for an extra pop of color and flavor.
Extra Tips:
To make the spider pizzas even more fun and customizable, consider using different toppings like green olives for a pop of color or red pepper strips for more “legs.”
You can also involve the kids in creating their own spider designs, making it a fun family activity. For a gluten-free version, substitute the English muffins with gluten-free bread or pizza crust.
Finally, if you prefer a crispier base, toast the English muffins lightly before adding the toppings.
Frankenstein Rice Krispie Treats
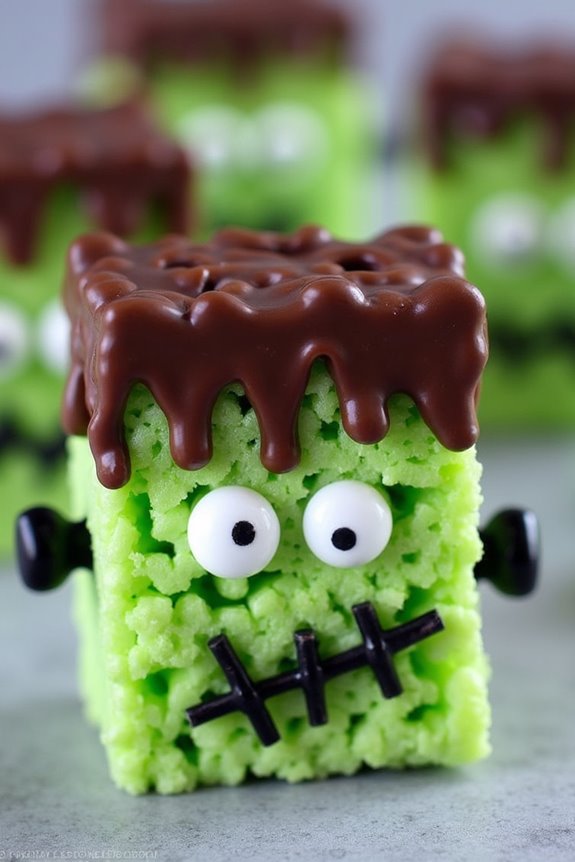
Frankenstein Rice Krispie Treats are a fun and spooky twist on the classic dessert, perfect for a Halloween gathering. These treats aren’t only deliciously sweet and gooey, but they also offer a creative activity for both kids and adults alike.
The combination of green marshmallow-coated cereal and chocolate decorations makes these treats resemble the iconic monster, delighting your little ghouls and goblins at any Halloween party.
The preparation of these treats is straightforward, making it a great project for young chefs under supervision. By using simple pantry ingredients and adding just a touch of creativity, you can bring to life a Halloween character that’s as fun to make as it’s to eat.
Whether you’re hosting a party or just want to surprise your family with a spooky snack, these Frankenstein Rice Krispie Treats are guaranteed to be a hit.
Ingredients (Serves 4-6):
- 6 cups Rice Krispies cereal
- 3 tablespoons butter
- 1 package (10 oz) mini marshmallows
- Green food coloring
- 1/2 cup chocolate chips (melted)
- Candy eyes
- Black licorice or chocolate sprinkles
- Parchment paper
Instructions:
- Prepare the Pan: Line a 9×13 inch baking pan with parchment paper. Make certain the parchment extends over the edges for easy removal later.
- Melt Butter and Marshmallows: In a large saucepan, melt the butter over low heat. Add the mini marshmallows and stir continuously until completely melted and smooth. This will take about 3-5 minutes.
- Add Color: Once the marshmallows are melted, remove the saucepan from the heat. Add green food coloring a few drops at a time, stirring until you achieve the desired shade of Frankenstein green.
- Mix with Cereal: Quickly add the Rice Krispies cereal to the marshmallow mixture. Stir until all the cereal is evenly coated with the green mixture.
- Press into Pan: Transfer the mixture into the prepared baking pan. Using a buttered spatula or wax paper, evenly press the mixture into the pan. Allow it to cool completely, which will take about 30 minutes.
- Cut and Decorate: Once cooled, lift the treats out of the pan using the parchment paper. Cut into squares. Melt the chocolate chips in a microwave-safe bowl, stirring every 20 seconds until smooth. Dip the top of each square into the melted chocolate to create Frankenstein’s hair. Place candy eyes below the chocolate hair and use black licorice or sprinkles to create a mouth.
- Set: Allow the chocolate to set before serving. You can speed up this process by placing the treats in the refrigerator for a few minutes.
Extra Tips:
For a more festive look, consider adding bolts to the sides of Frankenstein’s head using small candy pieces or pretzels.
Adjust the amount of green food coloring to achieve the perfect shade of green; remember that a little goes a long way. If you’re planning this activity with kids, have all decorating materials ready in advance to facilitate a smooth and enjoyable process.
These treats can be made a day in advance and stored in an airtight container to maintain their freshness.
Bat-Shaped Quesadillas

Halloween is the perfect time to get creative in the kitchen, especially with kid-friendly treats that are both fun and delicious. Bat-Shaped Quesadillas are a festive and easy appetizer that will delight children and adults alike. These cheesy, crispy bites are shaped like bats, making them a perfect addition to any Halloween party.
Not only are they simple to make, but they also require minimal ingredients, making them an ideal choice for busy parents looking to whip up something special with their little ones. This recipe yields a serving size of 4-6 people, making it great for small gatherings or family dinners.
The quesadillas can be filled with a variety of ingredients, but this version focuses on classic cheese and black beans for a flavorful and satisfying snack. Once you’ve gathered your ingredients and tools, you’ll find that these Bat-Shaped Quesadillas come together quickly, leaving you more time to enjoy the Halloween festivities.
Ingredients:
- 8 medium flour tortillas
- 1 ½ cups shredded cheddar cheese
- 1 cup canned black beans, drained and rinsed
- 1 tablespoon olive oil
- 1 teaspoon ground cumin
- ½ teaspoon garlic powder
- ½ teaspoon onion powder
- ½ teaspoon salt
- Cooking spray
- Salsa, for serving (optional)
Cooking Instructions:
- Prepare the Filling: In a mixing bowl, combine the shredded cheddar cheese, black beans, ground cumin, garlic powder, onion powder, and salt. Mix well to guarantee that the spices are evenly distributed throughout the filling.
- Cut the Tortillas: Using a bat-shaped cookie cutter, cut out bat shapes from the flour tortillas. You should be able to get about 2-3 bat shapes per tortilla depending on the size of your cutter.
- Assemble the Quesadillas: Lay half of the bat-shaped tortillas flat on a clean surface. Spoon about 2 tablespoons of the cheese and bean mixture onto each bat, spreading it evenly but leaving a small border around the edges. Top with another bat-shaped tortilla to form a sandwich.
- Cook the Quesadillas: Heat a nonstick skillet over medium heat and lightly coat with cooking spray. Place the assembled quesadillas in the skillet, cooking in batches if necessary. Cook for about 2-3 minutes on each side, or until the tortillas are golden brown and the cheese is melted.
- Serve: Remove the quesadillas from the skillet and let them cool slightly. Serve warm with salsa on the side for dipping if desired.
Extra Tips:
For an even spookier presentation, use whole wheat or spinach tortillas to create different colored bats. You can also experiment with adding other fillings like cooked chicken or sautéed vegetables for more variety.
If you don’t have a bat-shaped cookie cutter, you can use a knife to carefully cut out bat shapes by hand. Be sure to cook the quesadillas over medium heat to guarantee that the cheese melts thoroughly without burning the tortillas.
Enjoy these Bat-Shaped Quesadillas as a fun start to your Halloween celebrations!
Bloody Finger Pretzels
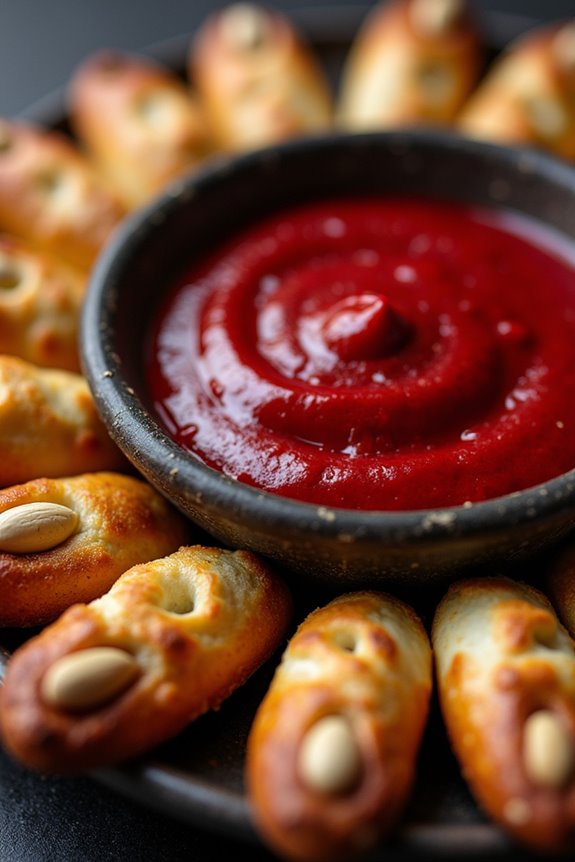
Halloween is a time for creative culinary delights, and Bloody Finger Pretzels are sure to be a spine-chilling hit with kids and adults alike. These eerie treats aren’t only visually enchanting but also delightfully delicious. The combination of savory pretzel dough and a bloody red dip makes them a perfect addition to any Halloween party spread.
With their realistic appearance and mouthwatering taste, Bloody Finger Pretzels are guaranteed to be a conversation starter among your guests. Crafting these creepy appetizers is easier than you might think, and they can be made in advance to save time on the day of your event.
The key to achieving the perfect finger-like texture is in the shaping of the pretzel dough and the use of almonds for creepy fingernails. The blood effect is achieved with a simple, sweet, and tangy dip that complements the salty pretzels beautifully. This recipe serves 4-6 people, making it ideal for small gatherings or as part of a larger Halloween feast.
Ingredients for Bloody Finger Pretzels (Serves 4-6):
- 1 package (16 oz) of refrigerated breadstick dough
- 1 egg, beaten
- 12 whole blanched almonds
- 1/4 cup melted butter
- Coarse sea salt
- 1/2 cup ketchup
- 2 tablespoons red food coloring
- 1 tablespoon honey
- 1 teaspoon Worcestershire sauce
Cooking Instructions:
- Preheat the Oven: Preheat your oven to 375°F (190°C). Line a baking sheet with parchment paper to prevent sticking.
- Shape the Fingers: Unroll the breadstick dough and cut each strip in half to create 12 pieces. Roll each piece into a thin cylinder, approximately 4-5 inches long, to resemble a finger. Gently press down at one end of each cylinder to create a nail bed.
- Add the Nails: Press a whole blanched almond into the nail bed of each pretzel finger to simulate a fingernail. Use a small knife to score lines into the dough to create knuckles and creases.
- Bake the Pretzels: Place the shaped fingers onto the prepared baking sheet. Brush each finger with the beaten egg to give them a golden appearance when baked. Sprinkle a little coarse sea salt over the fingers for flavor. Bake in the preheated oven for 15-18 minutes or until golden brown.
- Prepare the Bloody Dip: While the pretzels are baking, mix the ketchup, red food coloring, honey, and Worcestershire sauce in a small bowl to create the bloody dip. Adjust the food coloring to achieve the desired blood-red hue.
- Serve and Enjoy: Once the pretzels are baked, allow them to cool slightly. Serve the Bloody Finger Pretzels on a platter with a bowl of the bloody dip in the center for dipping.
Extra Tips:
For the most realistic effect, you can add additional food coloring to the pretzels themselves by brushing a mixture of red food coloring and water onto the finger creases before baking.
Make certain the almonds are securely pressed into the dough to prevent them from falling off during baking. If you’re preparing these ahead of time, store the baked pretzels in an airtight container and reheat them briefly in the oven before serving to maintain their crispness.
Adjust the amount of red food coloring in the dip according to your desired level of spookiness!