
As the autumn leaves crunch underfoot and the air fills with a crisp chill, it’s the perfect time to celebrate the spooky season with a Halloween potluck that will truly impress.
From Spooky Stuffed Bell Peppers to Ghostly Deviled Eggs, these fun and flavorful ideas are sure to delight your taste buds and bring smiles to everyone.
Let’s conjure up some culinary magic that will make your gathering unforgettable.
Are you ready to explore these eerie delights?
Spooky Stuffed Bell Peppers
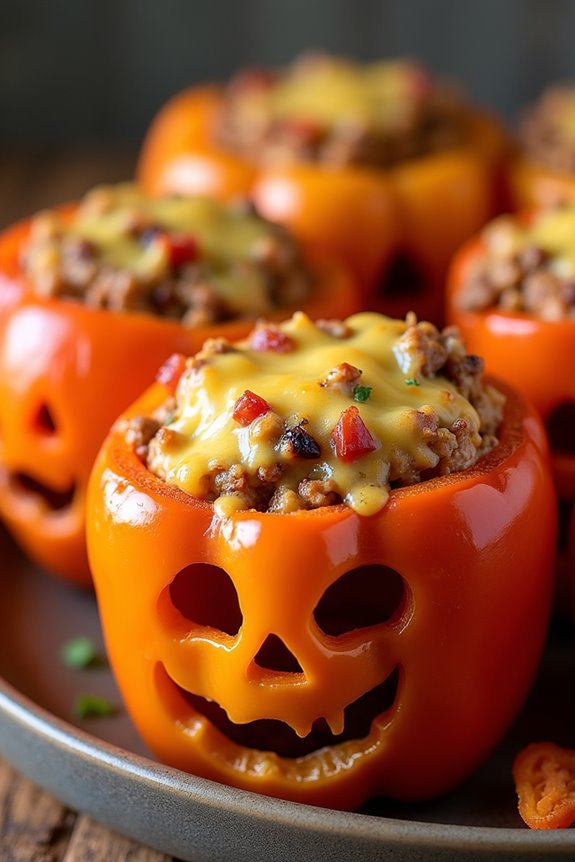
Halloween is the perfect time to get creative in the kitchen, and Spooky Stuffed Bell Peppers offer a delightful way to bring some eerie fun to your potluck spread. These peppers are carved to resemble jack-o’-lanterns, adding a festive touch to your table. The filling is a savory mix of seasoned ground meat, rice, and vegetables, making it not only fun but also a hearty and nutritious dish.
Whether you’re hosting a gathering or contributing to a potluck, these peppers are sure to be a hit with both kids and adults. The beauty of Spooky Stuffed Bell Peppers is that they allow you to get crafty while preparing a delicious meal. The bell peppers are hollowed out and carved with spooky faces, filled with a flavorful blend, and then baked to perfection.
This recipe serves 4-6 people, making it an ideal choice for small gatherings. The dish can be customized to your liking, whether with a vegetarian filling or by adjusting the spice level to suit your guests’ preferences.
Ingredients (Serves 4-6):
- 6 medium-sized orange bell peppers
- 1 pound ground beef or turkey
- 1 cup cooked rice
- 1 medium onion, diced
- 2 cloves garlic, minced
- 1 can (14.5 oz) diced tomatoes, drained
- 1 cup shredded cheese (cheddar or mozzarella)
- 1 teaspoon salt
- 1/2 teaspoon black pepper
- 1 teaspoon paprika
- 1 teaspoon dried oregano
- 1 tablespoon olive oil
Cooking Instructions:
- Preheat the Oven: Preheat your oven to 375°F (190°C) to guarantee it’s hot and ready for baking the stuffed peppers.
- Prepare the Bell Peppers: Cut the tops off the bell peppers and remove the seeds and membranes. Using a small paring knife, carve spooky faces into one side of each pepper, mimicking a jack-o’-lantern. Set aside.
- Cook the Filling: Heat the olive oil in a large skillet over medium heat. Add the diced onion and minced garlic, sautéing until the onion becomes translucent, about 3-4 minutes.
- Brown the Meat: Add the ground beef or turkey to the skillet. Cook, breaking it apart with a spatula, until the meat is browned and fully cooked. Drain any excess fat.
- Mix the Filling: Stir in the cooked rice, diced tomatoes, salt, black pepper, paprika, and oregano. Let the mixture simmer for about 5 minutes, allowing the flavors to meld together. Remove from heat and stir in half of the shredded cheese.
- Stuff the Peppers: Carefully fill each carved bell pepper with the meat and rice mixture, pressing down slightly to compact the filling. Place the stuffed peppers upright in a baking dish.
- Bake the Peppers: Sprinkle the remaining cheese on top of the stuffed peppers. Cover the baking dish with foil and bake in the preheated oven for 25-30 minutes. Remove the foil and bake for an additional 5-10 minutes, or until the cheese is bubbly and slightly browned.
- Serve and Enjoy: Allow the peppers to cool slightly before serving. Enjoy the spooky and delicious creation with friends and family.
Extra Tips:
When selecting bell peppers, choose ones that are relatively flat on the bottom so they can stand upright without tipping over. If you’re looking to add a bit more spice, consider adding a dash of cayenne pepper or some chopped jalapeños to the filling.
For a vegetarian option, substitute the meat with black beans or chopped mushrooms. Finally, if you’re preparing these ahead of time, the stuffed peppers can be assembled and refrigerated a day in advance, then baked just before serving.
Mummy Jalapeño Poppers
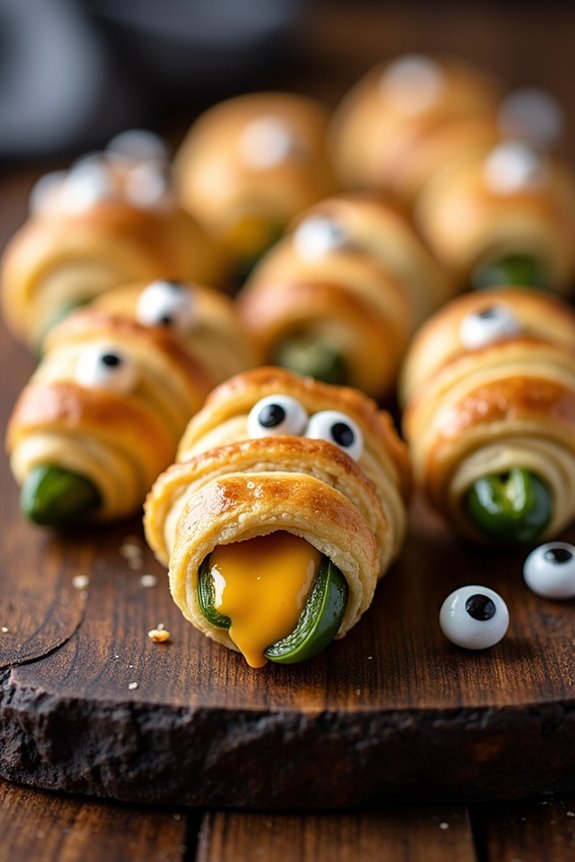
Looking for a spooky and delicious appetizer for your Halloween potluck? Try making Mummy Jalapeño Poppers! These fun and festive treats aren’t only visually appealing, but they also pack a punch of flavor that will delight your guests. Perfect for bringing a bit of Halloween spirit to the table, these poppers combine the creaminess of cheese with the heat of jalapeños, all wrapped up in a flaky crescent roll “bandage.”
Whether you’re hosting a Halloween party or just looking to impress friends at a casual gathering, Mummy Jalapeño Poppers are bound to be a hit. The key to these poppers is balancing the creamy filling with the spicy kick of the jalapeños. Each jalapeño is halved and filled with a savory mixture of cream cheese, cheddar cheese, and spices before being wrapped in thin strips of crescent roll dough to create a mummy-like appearance.
Once baked, the crescent rolls become golden brown and crispy, while the cheese inside melts to perfection. Serve these poppers warm for the best taste experience, and watch them disappear from the plate in no time.
Ingredients (serves 4-6 people):
- 6 large jalapeño peppers
- 8 oz cream cheese, softened
- 1 cup shredded cheddar cheese
- 1/2 teaspoon garlic powder
- 1/2 teaspoon onion powder
- Salt and pepper to taste
- 1 can refrigerated crescent roll dough (8 oz)
- 12 candy eyeballs for garnish (optional)
Cooking Instructions:
- Preheat the Oven: Start by preheating your oven to 375°F (190°C). This will guarantee that it’s ready to bake the poppers as soon as they’re assembled.
- Prepare the Jalapeños: Wash the jalapeños thoroughly. Slice each one in half lengthwise and remove the seeds and membranes using a small spoon, taking care to avoid touching your face or eyes.
- Make the Filling: In a medium bowl, combine the softened cream cheese, shredded cheddar cheese, garlic powder, onion powder, salt, and pepper. Mix until well combined and smooth.
- Fill the Jalapeños: Using a small spoon, fill each jalapeño half generously with the cheese mixture. Be sure to press the filling firmly into the jalapeños so it doesn’t spill out during baking.
- Wrap the Jalapeños: Unroll the crescent roll dough and separate it into four rectangles. Press the perforations to seal, then slice each rectangle into thin strips. Wrap each filled jalapeño half with the dough strips, leaving small gaps to resemble mummy bandages.
- Bake the Poppers: Place the wrapped jalapeños on a baking sheet lined with parchment paper. Bake in the preheated oven for 12-15 minutes, or until the crescent dough is golden brown and crispy.
- Add the Eyes (Optional): Remove the poppers from the oven and let them cool slightly. If desired, press two candy eyeballs into the cheese filling of each popper to create a spooky, mummy look.
- Serve: Transfer the poppers to a serving platter and serve warm. Enjoy the cheesy, spicy, and flaky goodness!
Extra Tips:
When working with jalapeños, consider wearing gloves to protect your hands from the spicy oils, which can cause irritation. If you prefer less heat, choose smaller jalapeños or remove more of the seeds and membranes.
You can also experiment with different cheeses, like pepper jack or mozzarella, for a twist on the traditional flavor. If you’re having trouble with the candy eyeballs sticking, a small dab of cream cheese can act as glue to hold them in place. Enjoy your Mummy Jalapeño Poppers as a fun and festive Halloween treat!
Witch’s Brew Soup
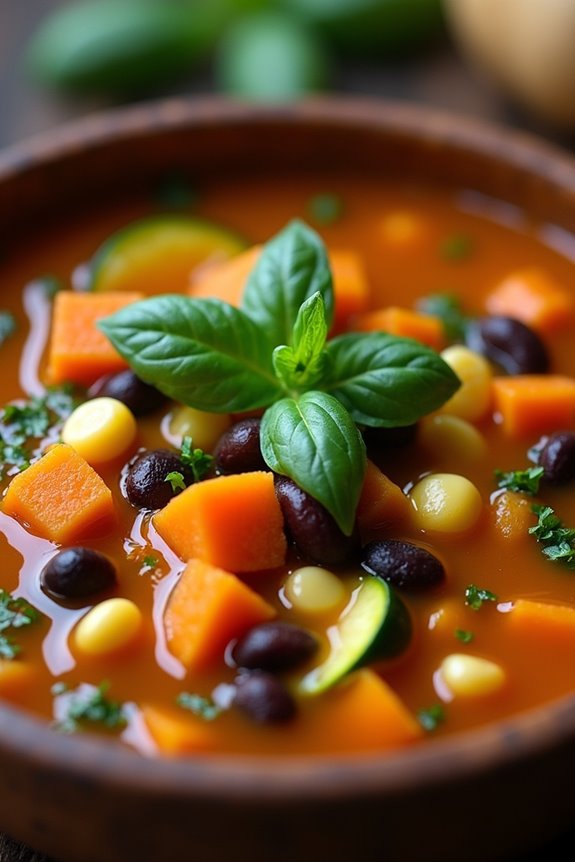
As the cool autumn air begins to settle in, there’s no better way to celebrate Halloween than with a warm and hearty Witch’s Brew Soup. This spooky, flavorful dish is perfect for a potluck, capturing the essence of the season with its rich, earthy ingredients and a hint of magic in every spoonful.
Designed to both delight and satisfy, this soup combines a medley of harvest vegetables, savory spices, and a touch of the unexpected to create a cauldron of comfort that will have your guests spellbound. Serve it as a main dish or a starter, paired with crusty bread or a side of your choice, and watch as it becomes a favorite among your Halloween potluck spread.
This Witch’s Brew Soup isn’t only delicious but also a breeze to prepare. With a serving size crafted for 4-6 people, it’s perfect for sharing with friends and family. Whether you’re hosting the potluck or attending as a guest, this soup will make a striking addition to the table.
Its bewitching aroma and vibrant colors are bound to attract both young and old, and the layered flavors will guarantee that it’s remembered long after the party is over. Now, gather your ingredients and let’s get brewing!
Ingredients (serves 4-6 people):
- 2 tablespoons olive oil
- 1 large onion, chopped
- 3 cloves garlic, minced
- 2 carrots, diced
- 2 celery stalks, diced
- 1 bell pepper, diced
- 1 zucchini, diced
- 1 sweet potato, peeled and diced
- 1 cup corn kernels
- 1 can (15 oz) black beans, drained and rinsed
- 1 can (14.5 oz) diced tomatoes, with juice
- 4 cups vegetable broth
- 1 teaspoon smoked paprika
- 1 teaspoon ground cumin
- Salt and pepper to taste
- 1/4 cup chopped fresh parsley
- 1/4 cup chopped fresh basil
Cooking Instructions:
- Prepare the Base: In a large pot, heat the olive oil over medium heat. Add the chopped onion and sauté for about 5 minutes until it becomes translucent. Stir in the minced garlic and cook for an additional minute until fragrant.
- Add Vegetables: Incorporate the diced carrots, celery, and bell pepper into the pot. Sauté the vegetables for about 7-8 minutes until they start to soften.
- Build Flavor: Add the diced zucchini, sweet potato, and corn kernels to the mixture. Stir well and let them cook for another 5 minutes, allowing the flavors to meld together.
- Introduce Liquids and Spices: Pour in the vegetable broth and the canned diced tomatoes with their juice. Stir in the smoked paprika, ground cumin, salt, and pepper. Bring the mixture to a boil, then reduce the heat to low and let it simmer for 20-25 minutes, or until the sweet potato is tender.
- Finish the Soup: Stir in the black beans and let the soup simmer for an additional 5 minutes to heat through. Taste and adjust seasoning as needed.
- Serve: Remove the pot from the heat and stir in the fresh parsley and basil. Ladle the Witch’s Brew Soup into bowls and serve hot, garnished with additional herbs if desired.
Extra Tips: For an extra touch of whimsy, consider serving the Witch’s Brew Soup in hollowed-out mini pumpkins or cauldrons for added Halloween flair. If you prefer a thicker consistency, use a potato masher or immersion blender to partially puree the soup.
This will give it a heartier texture while still retaining some of the chunky vegetable goodness. Additionally, feel free to customize the soup by adding your favorite seasonal vegetables or spices—this recipe is wonderfully adaptable.
Ghostly Deviled Eggs
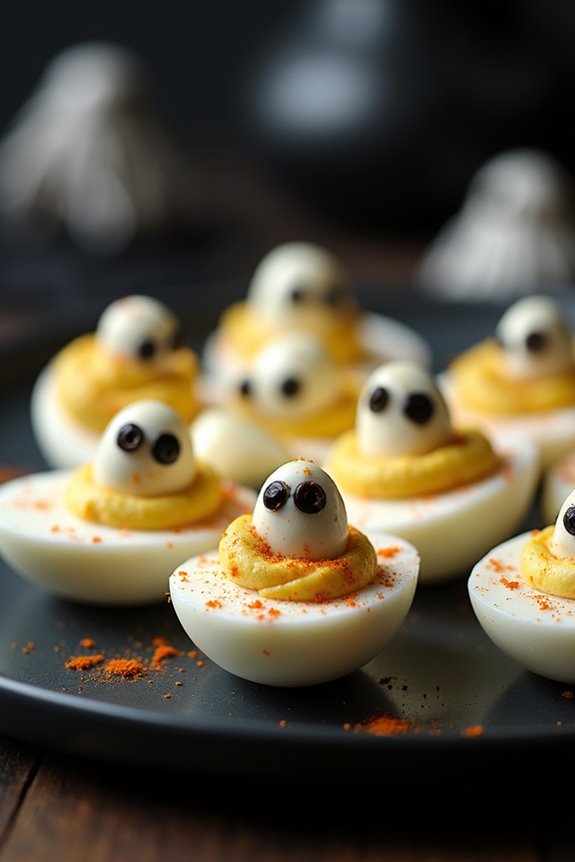
Ghostly Deviled Eggs are a playful twist on the classic deviled egg recipe, perfect for adding a spooky touch to your Halloween potluck. These little bites aren’t only delicious but also visually engaging, making them a hit among guests of all ages. By adding a few simple ingredients and some creative flair, you can transform ordinary deviled eggs into a fun and festive treat that fits perfectly with the Halloween theme.
This recipe serves 4-6 people and provides a great balance of flavor and presentation. The creamy yolk filling is enhanced with a touch of tanginess and spice, while the ghostly faces add an entertaining element to your spread. Whether you’re hosting a party or attending one, these Ghostly Deviled Eggs are sure to make a memorable impression.
Ingredients
- 6 large eggs
- 3 tablespoons mayonnaise
- 1 teaspoon Dijon mustard
- 1 teaspoon white vinegar
- Salt and pepper to taste
- Black olives (for decoration)
- Paprika (for decoration if desired)
Instructions
- Boil the Eggs: Place the eggs in a single layer in a saucepan and cover them with water. Bring the water to a boil over medium-high heat. Once boiling, cover the saucepan with a lid and remove it from the heat. Let the eggs sit in the hot water for about 10-12 minutes.
- Cool and Peel: After the eggs have cooked, transfer them to a bowl of ice water to cool completely. Once cooled, gently tap each egg on a hard surface and peel off the shell, starting at the larger end where there’s an air pocket.
- Prepare the Filling: Slice each egg in half lengthwise and carefully scoop out the yolks into a mixing bowl. Add mayonnaise, Dijon mustard, white vinegar, salt, and pepper to the yolks. Mix until the filling is smooth and creamy.
- Fill the Egg Whites: Using a spoon or a piping bag, fill each egg white half with the yolk mixture. Confirm the filling is mounded slightly over the egg white for a more appealing presentation.
- Decorate with Ghostly Faces: Cut small pieces of black olives to create eyes and mouths. Place these on the yolk filling to form ghostly faces. If desired, sprinkle a little paprika on top for added color and flavor.
- Chill Before Serving: Refrigerate the eggs for at least 30 minutes before serving to allow the flavors to meld and to provide a revitalizing taste.
Extra Tips
When boiling the eggs, adding a teaspoon of baking soda to the water can make peeling easier by helping to separate the egg whites from the shell.
For a more precise and tidy filling, use a piping bag with a star tip to fill the eggs. If you want to experiment with flavors, consider adding a dash of hot sauce or relish to the yolk mixture for an extra zing.
Finally, prepare the decorations ahead of time, so you can quickly assemble the ghostly faces just before serving.
Monster Meatball Sliders

Transform your Halloween potluck with these spooky yet delicious Monster Meatball Sliders. These sliders are perfect for adding a ghoulish flair to your gathering, combining savory meatballs with a creepy twist.
Whether you’re hosting a party or attending one, these sliders are sure to be a hit among both kids and adults. The meatballs are tender and flavorful, served with marinara sauce and melted cheese, all nestled in soft slider buns. What makes them “monster” is the fun addition of olive “eyes” and jagged cheese “fangs,” making them both a treat to eat and a feast for the eyes.
These sliders are simple to prepare and can be made ahead of time, allowing you to focus on other party preparations. They’re perfect for serving a group of 4-6 people, ensuring everyone gets a taste of the Halloween fun. The meatballs can be homemade or store-bought, depending on your preference and time constraints.
With minimal prep time and maximum impact, these Monster Meatball Sliders will certainly be the highlight of your Halloween spread.
Ingredients:
- 12 slider buns
- 1 pound ground beef
- 1/2 cup breadcrumbs
- 1/4 cup grated Parmesan cheese
- 1 egg
- 2 cloves garlic, minced
- 1 teaspoon dried oregano
- 1 teaspoon salt
- 1/2 teaspoon black pepper
- 1 cup marinara sauce
- 6 slices of mozzarella cheese
- 1/4 cup black olives, sliced
- 1 tablespoon olive oil
- 12 small toothpicks
Instructions:
- Preheat the Oven: Start by preheating your oven to 375°F (190°C).
- Prepare the Meatballs: In a large bowl, combine the ground beef, breadcrumbs, Parmesan cheese, egg, minced garlic, oregano, salt, and pepper. Mix until all ingredients are well incorporated.
- Shape the Meatballs: Roll the mixture into 12 evenly sized meatballs.
- Cook the Meatballs: In a large skillet, heat the olive oil over medium heat. Add the meatballs and cook for about 5-7 minutes, turning occasionally, until browned on all sides. Remove from heat and set aside.
- Bake the Meatballs: Place the browned meatballs in a baking dish and cover them with marinara sauce. Bake in the preheated oven for 15 minutes, or until the meatballs are cooked through.
- Prepare the Sliders: While the meatballs are baking, cut the mozzarella slices into jagged “fang” shapes and set aside.
- Assemble the Sliders: Once the meatballs are done, place each one on the bottom half of a slider bun. Spoon a little extra marinara sauce over each meatball, then top with a mozzarella “fang” slice. Place the top half of the bun over the cheese.
- Create Monster Faces: Use two olive slices for eyes on each slider, securing them with toothpicks.
- Serve: Arrange the sliders on a platter and serve warm.
Extra Tips:
For a juicier meatball, consider adding a tablespoon of milk to the meatball mixture. If you choose to use store-bought meatballs, simply heat them according to package instructions before proceeding with the marinara sauce and baking steps.
Feel free to get creative with your monster features; you can use red pepper flakes for “blood” or green bell pepper strips for an extra ghoulish touch. These sliders are best enjoyed fresh out of the oven, but they can be reheated in a low oven if necessary.
Vampire Bat Wings
If you’re looking to add a spooky touch to your Halloween potluck, Vampire Bat Wings are sure to be a crowd-pleaser. These deliciously eerie wings combine the tangy taste of barbecue sauce with the dark allure of soy sauce, creating a dish that looks as sinister as it’s tasty. Perfect for a gathering of 4-6 people, these wings aren’t only visually impressive but also packed with flavor, making them an ideal centerpiece for any Halloween spread.
The secret to achieving the signature ‘bat wing’ appearance lies in marinating the chicken wings in a dark, rich blend of sauces that gives them a hauntingly dark color. The marinade not only paints the wings with a spooky hue but also infuses them with intense flavor, ensuring that each bite is a delightful combination of sweet, savory, and smoky.
Once baked to perfection, these wings will have your guests coming back for more, leaving them spellbound by your culinary magic.
Ingredients for Vampire Bat Wings (Serving size: 4-6 people)
- 3 pounds of chicken wings
- 1 cup of barbecue sauce
- 1/2 cup of soy sauce
- 1/4 cup of balsamic vinegar
- 2 tablespoons of honey
- 2 tablespoons of olive oil
- 1 teaspoon of garlic powder
- 1 teaspoon of onion powder
- 1/2 teaspoon of smoked paprika
- 1/4 teaspoon of cayenne pepper
- Salt and black pepper to taste
- Sesame seeds for garnish (optional)
- Fresh parsley for garnish (optional)
Cooking Instructions
- Prepare the Marinade: In a large mixing bowl, combine the barbecue sauce, soy sauce, balsamic vinegar, honey, olive oil, garlic powder, onion powder, smoked paprika, cayenne pepper, salt, and black pepper. Stir thoroughly until all ingredients are well blended.
- Marinate the Wings: Place the chicken wings in a large resealable plastic bag or a shallow dish. Pour the marinade over the wings, ensuring they’re completely coated. Seal the bag or cover the dish, and refrigerate for at least 2 hours, or overnight for best results.
- Preheat the Oven: Preheat your oven to 400°F (200°C). Line a baking sheet with aluminum foil and place a wire rack on top. This will allow the wings to cook evenly and become crispy.
- Arrange the Wings: Remove the wings from the marinade and arrange them in a single layer on the wire rack. Discard any remaining marinade.
- Bake the Wings: Place the baking sheet in the preheated oven and bake for 30-35 minutes, flipping the wings halfway through, until they’re cooked through and have a crispy, darkened exterior.
- Serve: Once done, remove the wings from the oven and let them cool slightly. Garnish with sesame seeds and fresh parsley if desired before serving.
Extra Tips: For an extra crispy texture, you can broil the wings for an additional 2-3 minutes after baking. Be mindful not to leave them under the broiler for too long to avoid burning.
If you prefer a spicier kick, you can adjust the cayenne pepper to taste. Additionally, pairing these Vampire Bat Wings with a side of homemade ranch or blue cheese dressing can complement the flavors and provide a cooling contrast.
Frankenstein’s Guacamole

Frankenstein’s Guacamole is a monstrous twist on the classic guacamole recipe, perfect for spooking your guests at any Halloween potluck. This fun and festive dish isn’t only delicious but also visually thrilling, as it’s decorated to resemble the iconic monster, Frankenstein.
The guacamole itself is creamy and flavorful, made from ripe avocados, zesty lime, and fresh cilantro, creating a blend that pairs well with tortilla chips or vegetable sticks. The real charm, however, lies in the creative presentation—complete with a ghoulish face that will delight both kids and adults alike.
This recipe serves 4-6 people, making it an excellent choice for small gatherings or as part of a larger Halloween spread. The guacamole base is simple to prepare, while the decoration allows for some artistic flair. Whether you’re an experienced chef or a novice in the kitchen, this Frankenstein-themed dish is sure to impress. Gather your ingredients and let your imagination run wild as you bring this creepy creation to life!
Ingredients:
- 4 ripe avocados
- 2 limes, juiced
- 1 small red onion, finely chopped
- 2 Roma tomatoes, diced
- 1/4 cup fresh cilantro, chopped
- 1 jalapeño, seeded and minced (optional)
- Salt and pepper to taste
- 1/2 cup black olives, sliced
- 1/4 cup roasted red bell peppers, cut into strips
- Tortilla chips, for serving
Instructions:
1. Prepare the Avocados: Start by cutting the avocados in half, removing the pits, and scooping the flesh into a mixing bowl. Use a fork or a potato masher to mash the avocados until they reach your desired consistency—smooth or chunky.
2. Mix the Base Ingredients: Add the lime juice, finely chopped red onion, diced tomatoes, chopped cilantro, and minced jalapeño to the mashed avocados. Stir everything together until well combined. Season the mixture with salt and pepper to taste.
3. Assemble the Face: Transfer the guacamole to a serving platter and shape it into a rough rectangle to form Frankenstein’s head. Use the sliced black olives to create the monster’s hair, eyebrows, and stitches across the face.
Arrange the roasted red bell pepper strips to form a mouth, and use additional olive slices or bell peppers to create eyes. Be creative in your decoration to achieve the desired spooky look.
4. Serve and Enjoy: Serve your Frankenstein’s Guacamole with tortilla chips on the side, allowing your guests to plunge into this frightfully delicious dish.
Extra Tips:
When selecting avocados, look for ones that are ripe but still firm to the touch, as they’ll mash easily and have the best flavor. If you prefer a milder guacamole, you can omit the jalapeño or reduce the amount used.
Feel free to get creative with the face decorations—use what you have available, such as cherry tomatoes for eyes or string cheese for teeth. This dish is best served fresh to maintain its vibrant color and flavors, so try to prepare it close to serving time.
Pumpkin Patch Brownies

Pumpkin Patch Brownies are a delightful Halloween treat that combines the rich, fudgy texture of brownies with the subtly spiced flavor of pumpkin. Perfect for a festive potluck, these brownies are both visually appealing and incredibly delicious. The top layer features a creamy pumpkin swirl that not only enhances the taste but also gives the brownies a beautiful, marbled appearance reminiscent of a pumpkin patch.
These brownies are bound to be a hit among both kids and adults, making them an ideal addition to your Halloween spread. The recipe is designed to serve 4-6 people, making it a great choice for small gatherings or family events. The combination of chocolate and pumpkin creates a harmonious blend of flavors that will leave your guests craving more.
Whether you’re hosting a Halloween party or attending one, these Pumpkin Patch Brownies are a crowd-pleaser that will add a sweet and seasonal touch to any celebration.
Ingredients for 4-6 servings:
- 1 cup all-purpose flour
- 1/2 cup unsweetened cocoa powder
- 1/2 teaspoon baking powder
- 1/4 teaspoon salt
- 1/2 cup unsalted butter, melted
- 1 cup granulated sugar
- 2 large eggs
- 1 teaspoon vanilla extract
- 3/4 cup pumpkin puree
- 1/4 cup light brown sugar
- 1 teaspoon ground cinnamon
- 1/2 teaspoon ground nutmeg
- 1/4 teaspoon ground cloves
Cooking Instructions:
- Preheat the Oven: Begin by preheating your oven to 350°F (175°C). Line an 8×8-inch baking dish with parchment paper, allowing some overhang on the sides for easy removal of the brownies after baking.
- Prepare the Dry Ingredients: In a medium bowl, whisk together the flour, cocoa powder, baking powder, and salt. This step guarantees that the dry ingredients are evenly distributed, which helps in achieving a uniform texture in the brownies.
- Mix Wet Ingredients: In a large bowl, combine the melted butter and granulated sugar, beating until smooth. Add the eggs one at a time, mixing well after each addition, followed by the vanilla extract. This mixture should be smooth and creamy.
- Combine Mixtures: Gradually add the dry ingredients to the wet mixture, stirring until just combined. Be careful not to overmix, as this can result in tough brownies.
- Prepare Pumpkin Mixture: In a separate bowl, mix the pumpkin puree, brown sugar, cinnamon, nutmeg, and cloves. Stir until all the ingredients are well incorporated and the mixture is smooth.
- Layer the Batter: Pour the brownie batter into the prepared baking dish, spreading it evenly. Drop spoonfuls of the pumpkin mixture over the brownie layer. Use a knife or a skewer to gently swirl the two mixtures together, creating a marbled effect.
- Bake the Brownies: Place the baking dish in the preheated oven and bake for 30-35 minutes, or until a toothpick inserted into the center comes out mostly clean with a few moist crumbs attached.
- Cool and Serve: Allow the brownies to cool in the pan for about 10 minutes, then use the parchment overhang to lift them out and transfer to a wire rack to cool completely. Once cooled, cut into squares and serve.
Extra Tips:
For best results, make sure all your ingredients are at room temperature before you begin. This helps in achieving a smoother batter and more even baking.
If you prefer a more pronounced pumpkin flavor, you can increase the amount of pumpkin puree slightly, but be cautious as too much moisture can affect the texture of the brownies.
Additionally, these brownies can be made a day ahead and stored in an airtight container, making them a convenient option for busy holiday preparations. Enjoy your Pumpkin Patch Brownies with a glass of milk or a scoop of vanilla ice cream for an extra indulgent treat!
Eyeball Trifle Dessert
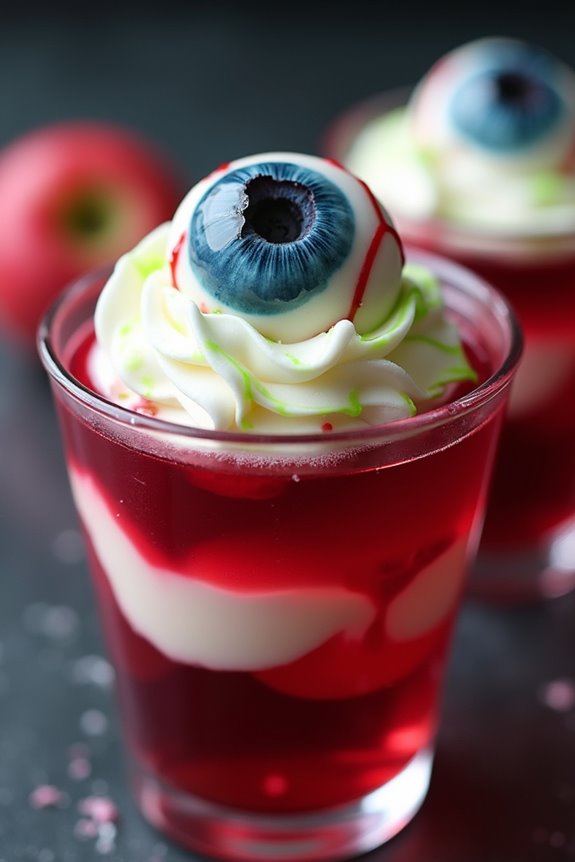
The Eyeball Trifle Dessert is a spooky yet scrumptious treat perfect for your Halloween potluck. This dessert combines layers of creamy pudding, colorful jelly, and cake pieces to create a deliciously eerie effect. The highlight of this dish is the edible eyeballs that float mysteriously in the trifle, certain to delight and frighten your guests in equal measure.
Not only is this dessert visually stunning, but it also offers a delightful mix of textures and flavors that everyone will enjoy. This dessert is designed to serve 4-6 people, making it ideal for a small gathering or as one of the many treats at a larger party. The recipe involves creating distinct layers that come together beautifully in clear glasses, showcasing the vibrant colors and creepy eyeballs.
The preparation is simple, requiring minimal cooking, and can be done in advance to leave you free to enjoy the festivities.
Ingredients:
- 1 package of instant vanilla pudding mix
- 2 cups of milk
- 1 package of strawberry or raspberry jelly mix
- 1 pound cake or sponge cake, cubed
- 1 cup of whipped cream
- 12-15 lychees, canned or fresh
- 12-15 blueberries
- Red food coloring
- Green food coloring
Cooking Instructions:
- Prepare the Jelly: Follow the instructions on the package to make the jelly. Add a few drops of red food coloring to enhance the blood-like appearance. Pour into a shallow dish and refrigerate until set.
- Make the Pudding: In a mixing bowl, combine the instant vanilla pudding mix with 2 cups of milk. Whisk until smooth and let it sit for about 5 minutes to thicken.
- Create Eyeballs: Drain the lychees if using canned. Insert a blueberry into the center of each lychee to create the appearance of an eyeball.
- Layer the Trifle: In clear glasses or a trifle dish, start by adding a layer of cubed pound cake. Next, add a layer of the prepared jelly, followed by the vanilla pudding. Repeat these layers until the glasses are almost full.
- Top with Whipped Cream: Finish each glass with a generous dollop of whipped cream.
- Add Eyeballs: Place 2-3 lychee eyeballs on top of the whipped cream in each glass to complete the spooky look.
- Color the Cream: For an extra eerie effect, you can gently fold a drop of green food coloring into the whipped cream before topping the trifle.
Extra Tips:
When preparing the eyeballs, ascertain that the blueberries are firmly placed inside the lychees to prevent them from falling out.
For a more intense look, you can use a toothpick dipped in red food coloring to draw veins on the lychees. Additionally, prepare the jelly and pudding layers in advance to allow them to set properly, ensuring a neat presentation.
If you want to add a bit of crunch, consider layering some crushed cookie crumbs between the layers of cake and jelly.
Graveyard Dirt Cups

Graveyard Dirt Cups are a fun and spooky treat, perfect for a Halloween potluck. These dessert cups aren’t only delicious but also visually appealing, capturing the essence of Halloween with their eerie graveyard theme. The combination of rich chocolate pudding, crumbly Oreo “dirt,” and creepy gummy decorations makes them a hit for both kids and adults alike.
This no-bake dessert is easy to prepare and can be made ahead of time, allowing you to focus on other Halloween festivities. The Graveyard Dirt Cups are versatile and can be customized with various toppings to suit your creative Halloween spirit. With a serving size of 4-6 people, this recipe is perfect for sharing at any Halloween gathering.
Ingredients (for 4-6 servings):
- 1 package (3.9 oz) instant chocolate pudding mix
- 2 cups cold milk
- 1 package (14.3 oz) Oreo cookies
- 1 cup whipped topping
- 6 gummy worms
- 6 chocolate sandwich cookies
- 6 small candy pumpkins
- 6 plastic or edible tombstones
Instructions:
- Prepare the Pudding: In a medium-sized mixing bowl, whisk together the instant chocolate pudding mix and cold milk. Continue whisking for about 2 minutes until the mixture is smooth and begins to thicken. Let it set for 5 minutes.
- Create the “Dirt”: While the pudding is setting, place the Oreo cookies in a food processor and pulse until they’re finely crushed, resembling dirt. If you don’t have a food processor, place the cookies in a sealed plastic bag and crush them with a rolling pin.
- Layer the Cups: Take 6 serving cups or small bowls and spoon an equal amount of chocolate pudding into each cup, filling them about halfway.
- Add the “Dirt” Layer: Sprinkle a generous layer of the crushed Oreo “dirt” over the pudding in each cup, covering the pudding completely.
- Decorate the Graveyard: Insert a gummy worm or two into the “dirt” of each cup, letting them peek out as if crawling from the ground. Place a candy pumpkin on top and insert a tombstone into each cup. You can use chocolate sandwich cookies to represent freshly dug graves.
- Finish with Whipped Topping: Add a dollop of whipped topping to each cup to give the appearance of ghostly mist hovering over the graveyard.
Extra Tips:
For an extra spooky effect, use edible marker to write spooky names or messages on the tombstones. If you’re preparing these dirt cups in advance, store them in the refrigerator and add the decorations just before serving to keep them fresh and crisp.
Feel free to get creative with additional toppings like crushed pretzels for tree branches or candy eyes peeking out from the dirt. This dessert is as much about presentation as it’s about taste, so have fun with it!