
Halloween is just around the corner, and I’ve got 12 easy potluck ideas that will make your gathering a hit without the stress. Mummy Hot Dogs and Witch’s Brew Cheese Dip are just the start of these spooky delights. Perfect for busy bees looking to impress, these treats are as quick as they are fun. Get ready for hauntingly simple recipes that’ll wow your guests. Curious about what’s next?
Mummy Hot Dogs
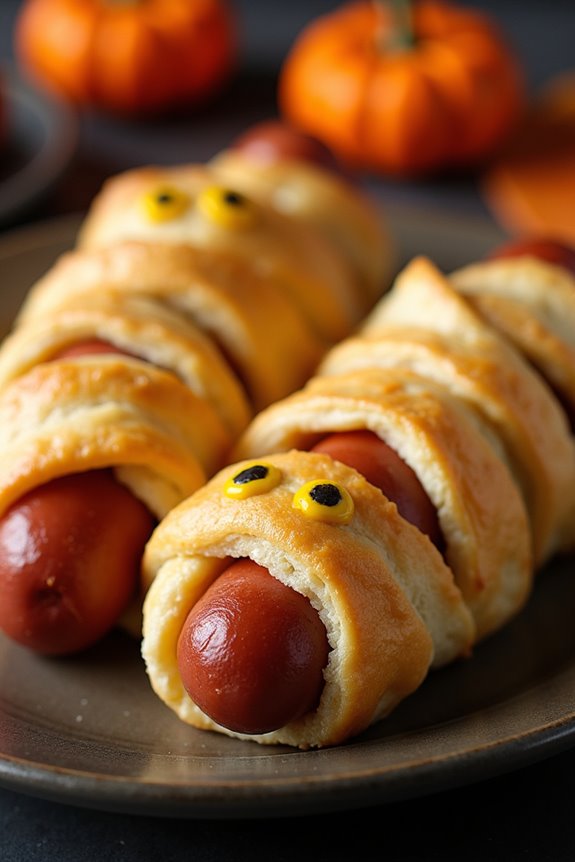
Mummy Hot Dogs are a creative and fun addition to any Halloween potluck. These spooky treats are fundamentally hot dogs wrapped in crescent roll dough to resemble mummies, complete with little mustard eyes peeking out. Not only do they look delightfully festive, but they’re also deliciously savory, making them a hit with both children and adults.
Easy to prepare and enjoyable to eat, Mummy Hot Dogs are the perfect blend of whimsy and flavor for your Halloween gathering. The beauty of Mummy Hot Dogs lies in their simplicity and adaptability. They can be prepared with standard hot dogs, or you can opt for chicken or veggie dogs to cater to different dietary preferences.
The crescent roll dough gives them a light, flaky texture that pairs perfectly with the juicy hot dogs inside. Adding a touch of mustard or ketchup for eyes not only enhances their mummy-like appearance but also adds a tangy taste. With minimal preparation time and ingredients, these Mummy Hot Dogs are sure to become a Halloween classic in your home.
Ingredients for 4-6 servings:
- 8 hot dogs
- 1 can of refrigerated crescent roll dough
- 1 tablespoon of mustard (for the eyes)
- Cooking spray or parchment paper
Cooking Instructions:
- Preheat the Oven: Preheat your oven to 375°F (190°C). This guarantees that the oven is at the right temperature for the crescent roll dough to bake evenly and achieve a nice golden-brown color.
- Prepare the Baking Sheet: Line a baking sheet with parchment paper or lightly spray it with cooking spray. This will prevent the Mummy Hot Dogs from sticking to the pan.
- Wrap the Hot Dogs: Unroll the crescent roll dough onto a clean surface. Use a sharp knife or pizza cutter to slice the dough into thin strips, about 1/4 inch wide. Take each hot dog and wrap the strips of dough around it, leaving a small gap near one end for the “face” of the mummy.
- Bake: Place the wrapped hot dogs on the prepared baking sheet. Bake in the preheated oven for 12-15 minutes, or until the dough is golden brown and cooked through.
- Add Mustard Eyes: Once baked, remove the hot dogs from the oven and let them cool slightly. Use a toothpick or a small piping bag to dot mustard onto the exposed part of the hot dogs to create eyes.
- Serve: Arrange the Mummy Hot Dogs on a platter and serve them warm. They can be enjoyed with additional mustard or ketchup for dipping, if desired.
Extra Tips:
For an extra touch of creativity, try using small pieces of olives for more realistic looking eyes or different types of dough, such as puff pastry, for a different texture.
If you’re preparing these for a large group, consider doubling the recipe. When wrapping the hot dogs, make sure the dough isn’t too thick in any one area to allow even cooking and prevent undercooked spots.
Finally, these can be prepared a few hours in advance and stored in the fridge until you’re ready to pop them in the oven, making them a stress-free option for your Halloween potluck.
Witch’s Brew Cheese Dip

Witch’s Brew Cheese Dip is the perfect spooky addition to any Halloween potluck. This creamy, savory dip is infused with flavors that are bound to enchant your guests. With a combination of rich cheeses and a hint of spice, this dish captures the essence of a bubbling cauldron, ready to be paired with an array of dippers like breadsticks, crackers, or fresh veggies.
The vibrant color and tantalizing aroma make it as visually appealing as it’s delicious, guaranteeing it will be a hit at the party.
The magic of Witch’s Brew Cheese Dip lies in its simplicity and the delightful mingling of cheese varieties. The blend of sharp cheddar, cream cheese, and a touch of blue cheese gives the dip a unique character, while the addition of jalapeños adds a subtle kick to awaken the taste buds.
Whether served hot from the oven or kept warm in a slow cooker, this dip is an excellent choice for entertaining. It allows you to enjoy the festivities without spending too much time in the kitchen.
Ingredients (serves 4-6):
- 2 cups sharp cheddar cheese, shredded
- 8 oz cream cheese, softened
- 1/4 cup crumbled blue cheese
- 1/4 cup mayonnaise
- 1/4 cup sour cream
- 2 cloves garlic, minced
- 1 tablespoon Worcestershire sauce
- 1 tablespoon Dijon mustard
- 1 jalapeño, seeded and finely chopped
- 1/2 teaspoon smoked paprika
- Salt and pepper to taste
Instructions:
- Preheat the Oven: Start by preheating your oven to 350°F (175°C). This guarantees that your dip will bake evenly and develop a nice crust on top.
- Mix the Cheeses: In a large mixing bowl, combine the shredded cheddar cheese, softened cream cheese, and crumbled blue cheese. Use a spatula or a hand mixer on low speed to blend until creamy and smooth.
- Add the Creamy Ingredients: Incorporate the mayonnaise and sour cream into the cheese mixture. Mix well until all components are thoroughly combined and no lumps remain.
- Flavor the Dip: Stir in the minced garlic, Worcestershire sauce, Dijon mustard, and chopped jalapeño. These ingredients will infuse the dip with a robust, savory flavor and a hint of heat.
- Season and Spice: Sprinkle in the smoked paprika, then add salt and pepper to taste. Stir well to make sure that the spices are evenly distributed throughout the mixture.
- Transfer to Baking Dish: Spoon the mixture into a lightly greased 8×8-inch baking dish or a similar-sized oven-safe dish, spreading it evenly with a spatula.
- Bake the Dip: Place the dish in the preheated oven and bake for 20-25 minutes, or until the dip is bubbly and the top is lightly golden.
- Serve: Carefully remove the dish from the oven. Let it cool for a few minutes before serving with your choice of dippers.
Extra Tips:
For an added layer of flavor, consider sprinkling some additional shredded cheddar cheese or chopped fresh herbs on top of the dip before baking.
If you prefer a stronger blue cheese flavor, you can increase the amount of blue cheese to taste. If hosting a larger party, this recipe can easily be doubled.
To keep the dip warm throughout the event, consider transferring it to a slow cooker on the “warm” setting after baking.
Finally, for a Halloween-themed presentation, serve the dip in a cauldron-style serving dish or garnish with edible Halloween decorations.
Pumpkin Deviled Eggs
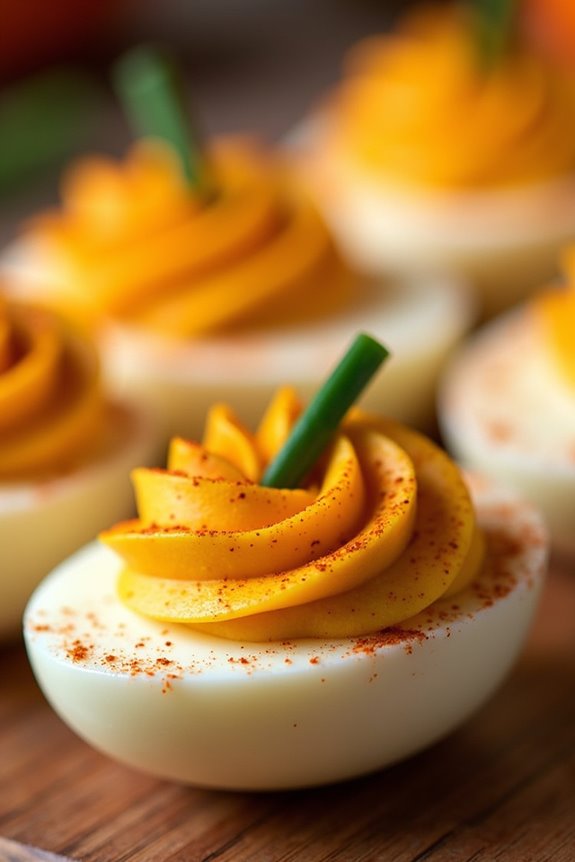
Pumpkin Deviled Eggs are a delightful twist on the classic deviled eggs, perfect for your Halloween potluck. These festive appetizers not only look like miniature pumpkins but also deliver a burst of flavor that your guests will love. The creamy filling is spiced to perfection, creating a balance of tanginess and heat, while the paprika adds a vibrant orange hue, giving these deviled eggs a seasonal makeover. Their whimsical appearance and savory taste make them a standout addition to any Halloween spread.
The process of making Pumpkin Deviled Eggs is straightforward and fun, perfect for getting into the Halloween spirit. You’ll start by hard-boiling the eggs, then transforming the yolks into a tasty filling enhanced with pumpkin puree, mustard, and mayonnaise. The filling is piped back into the egg whites and garnished with chives to resemble pumpkin stems. These bite-sized treats aren’t only visually appealing but also a delectable way to celebrate the spooky season.
Ingredients (Serving Size: 4-6 people):
- 6 large eggs
- 2 tablespoons mayonnaise
- 1 tablespoon pumpkin puree
- 1 teaspoon Dijon mustard
- 1/2 teaspoon apple cider vinegar
- 1/4 teaspoon salt
- 1/4 teaspoon black pepper
- 1/4 teaspoon smoked paprika (plus extra for garnish)
- Chives, cut into small pieces (for garnish)
Instructions:
- Hard-Boil the Eggs: Place the eggs in a single layer in a saucepan and cover with water. Bring the water to a boil over medium heat. Once boiling, remove from heat, cover, and let the eggs sit for 10-12 minutes.
- Prepare the Eggs: Transfer the eggs to a bowl of ice water to cool for at least 5 minutes. This will make them easier to peel. Once cooled, peel the eggs carefully and slice them in half lengthwise.
- Make the Filling: Remove the yolks from the egg halves and place them in a mixing bowl. Add mayonnaise, pumpkin puree, Dijon mustard, apple cider vinegar, salt, black pepper, and smoked paprika. Mash with a fork until smooth and creamy.
- Pipe the Filling: Transfer the yolk mixture into a piping bag fitted with a star tip or a plastic bag with a corner snipped off. Pipe the filling into the hollowed egg whites, creating a pumpkin-like texture.
- Garnish: Lightly dust the tops of the filled eggs with additional smoked paprika for color. Then, stick a small piece of chive into the center of each filled egg to resemble a pumpkin stem.
- Serve and Enjoy: Arrange the Pumpkin Deviled Eggs on a serving platter and refrigerate until ready to serve.
Extra Tips:
To make peeling the eggs easier, use eggs that are a few days old rather than fresh ones. This helps the shell come off more smoothly.
If you don’t have a piping bag, a resealable plastic bag with a small corner cut can serve as an effective alternative for piping the filling.
For an added touch of flavor, consider adding a pinch of cayenne pepper to the yolk mixture for a bit of heat.
Finally, verify your pumpkin puree is smooth and not too watery to maintain the right consistency for the filling.
Ghostly Pretzel Rods
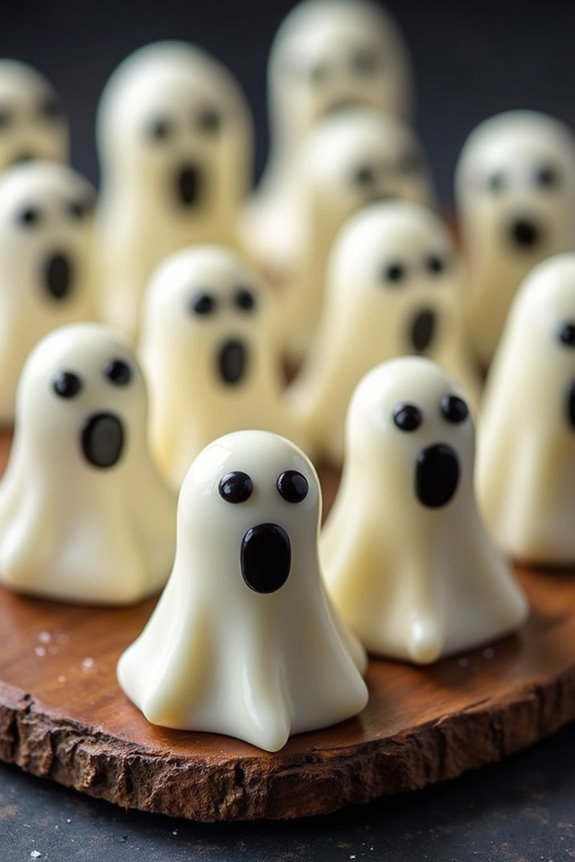
Ghostly Pretzel Rods are a spooktacular treat perfect for any Halloween potluck. These delightful snacks aren’t only fun to make but also a hit among both kids and adults. Dipped in creamy white chocolate and decorated with spooky faces, they add a touch of ghostly charm to any festive gathering.
The combination of sweet and salty flavors makes them an irresistible treat that everyone will want to try. Plus, they’re quick to assemble, making them an ideal last-minute addition to your Halloween spread.
Crafting these Ghostly Pretzel Rods is an enjoyable activity that can involve the whole family. Children will love dipping the pretzels into the melted chocolate and adding spooky faces with edible markers.
These ghostly snacks aren’t only delicious but also visually appealing, making them a perfect centerpiece for your Halloween table. Whether you’re hosting a party or attending a potluck, these ghostly treats are sure to impress your guests and add a touch of Halloween magic to the occasion.
Ingredients for 4-6 servings:
- 12 pretzel rods
- 2 cups white chocolate chips
- 1 tablespoon coconut oil (optional, for smoother chocolate)
- Edible black markers or black icing
- Wax paper
Cooking Instructions:
- Prepare the Workspace: Line a baking sheet with wax paper. This will prevent the pretzel rods from sticking and make them easier to move once decorated.
- Melt the Chocolate: In a microwave-safe bowl, combine the white chocolate chips with the coconut oil (if using). Microwave on medium power in 30-second intervals, stirring in between, until the chocolate is completely melted and smooth.
- Dip the Pretzels: Hold each pretzel rod by one end and dip it into the melted white chocolate, covering about two-thirds of the rod. Let the excess chocolate drip back into the bowl.
- Set the Pretzels: Place the dipped pretzel rods onto the lined baking sheet. Allow them to set at room temperature for about 10 minutes, or until the chocolate begins to harden.
- Add Spooky Faces: Once the chocolate has hardened, use edible black markers or black icing to draw ghostly faces on the coated portion of the pretzel rods.
- Cool Completely: Let the Ghostly Pretzel Rods set completely at room temperature or place them in the refrigerator for a quicker setting.
Extra Tips:
To guarantee your chocolate melts smoothly, avoid overheating it as this can cause the chocolate to seize. If you find the chocolate is too thick for dipping, you can add a bit more coconut oil to achieve a smoother consistency.
Store the Ghostly Pretzel Rods in an airtight container at room temperature to keep them fresh for several days. For an extra touch, consider adding sprinkles or edible glitter to make your ghostly treats even more festive.
Spooky Spider Web Taco Dip
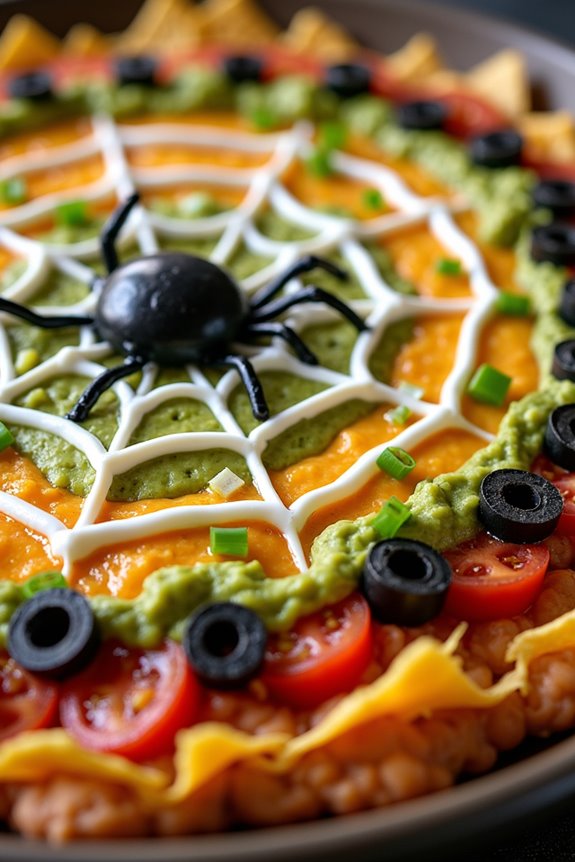
Spooky Spider Web Taco Dip is the perfect addition to your Halloween potluck spread. This delicious and festive dish combines layers of creamy refried beans, zesty taco seasoning, and fresh toppings, all tied together with a spooky spider web design made from sour cream.
It’s not only visually appealing but also packed with flavors that will leave your guests wanting more. Whether you’re hosting a big party or just a small gathering, this easy-to-make dip is bound to be a crowd-pleaser.
The creamy base of Spooky Spider Web Taco Dip offers a satisfying contrast to the crunchy tortilla chips you’ll serve alongside it. The layers of flavor, from the seasoned beans to the fresh veggies and cheese, create a delightful combination that everyone will enjoy.
Plus, the spider web decoration adds a touch of Halloween magic that’s both fun and festive. Perfect for serving 4-6 people, this dip is bound to become a staple at your Halloween celebrations.
Ingredients for 4-6 servings:
- 1 can (16 oz) refried beans
- 1 packet taco seasoning mix
- 1 cup sour cream (plus additional for decoration)
- 1 cup guacamole
- 1 cup salsa
- 1 cup shredded cheddar cheese
- 1 cup chopped tomatoes
- 1/2 cup sliced black olives
- 1/2 cup chopped green onions
- Tortilla chips for serving
Cooking Instructions:
- Prepare the Base Layer: In a medium bowl, mix the refried beans with the taco seasoning until well combined. Spread this mixture evenly across the bottom of a shallow serving dish or a pie plate. This will be the flavorful base of your dip.
- Add the Creamy Layers: Spread the cup of sour cream over the seasoned beans, followed by a layer of guacamole. Confirm each layer is evenly spread to create distinct layers when serving.
- Add the Salsa and Cheese: Gently spread the salsa over the guacamole layer. Sprinkle the shredded cheddar cheese evenly over the salsa to add a cheesy goodness to the dip.
- Top with Fresh Toppings: Scatter the chopped tomatoes, sliced black olives, and chopped green onions over the cheese layer to add a burst of color and freshness.
- Create the Spider Web Design: Place some sour cream in a small zip-top bag and snip a very small corner off to create a piping bag. Carefully draw concentric circles on top of the dip, starting from the center and moving outwards. Use a toothpick to drag lines from the center to the edge, creating a spider web effect.
- Chill Before Serving: Refrigerate the dip for at least 30 minutes to allow the flavors to meld together. Serve with plenty of tortilla chips for dipping.
Extra Tips:
When preparing Spooky Spider Web Taco Dip, consider using a glass dish to show off the beautiful layers you’ve created.
For an extra spooky touch, you can add plastic spiders on top of your web (make sure to remove them before eating!). If you prefer a spicier dip, consider adding jalapeños or a spicy salsa.
Confirm the sour cream you use for the web is thick enough to hold its shape for the best visual effect. Enjoy your Halloween celebration with this ghoulishly good dip!
Eyeball Caprese Bites
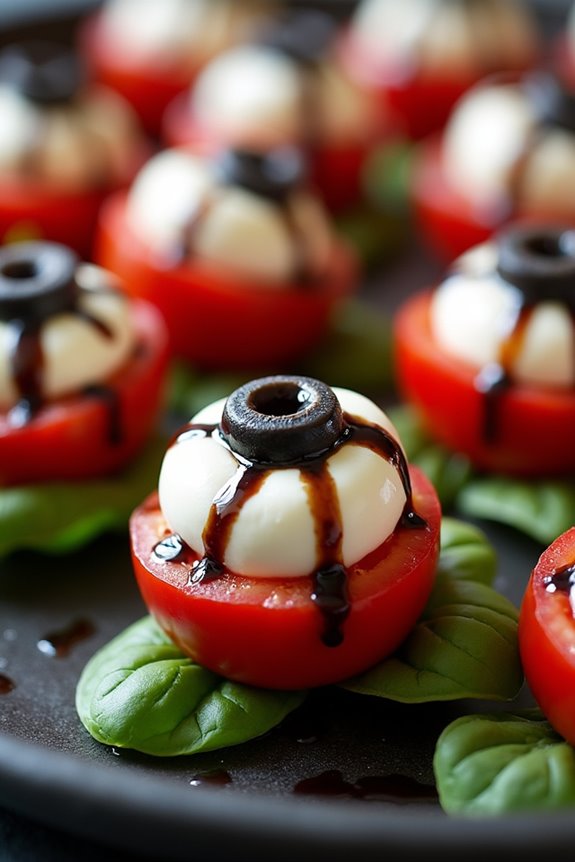
If you’re looking for a Halloween potluck dish that’s both spooky and sophisticated, seek no further than Eyeball Caprese Bites. These delightful appetizers put a creepy twist on the classic Italian Caprese salad by transforming mozzarella and tomatoes into eerie eyeballs, perfect for any festive gathering. Not only are they visually appealing, but they also offer the fresh, delicious flavors of mozzarella, tomatoes, and basil.
Eyeball Caprese Bites are incredibly easy to make, requiring minimal preparation time and no cooking, making them perfect for a quick addition to your Halloween spread. They offer a fun way to get into the Halloween spirit without having to sacrifice taste or nutrition. Whether served as an appetizer or a light snack, these bites are sure to be a hit with guests of all ages.
Ingredients for 4-6 People:
- 12 cherry tomatoes
- 12 small mozzarella balls (bocconcini)
- 12 fresh basil leaves
- 12 black olives, pitted
- 2 tablespoons balsamic glaze
- 1 tablespoon olive oil
- Salt and pepper to taste
- 12 toothpicks
Instructions:
- Prepare the Tomatoes: Start by rinsing the cherry tomatoes under cold water and drying them with a paper towel. Slice off the top of each tomato to create a flat surface for the mozzarella to rest on.
- Assemble the Eyeballs: Take a mozzarella ball and gently press it onto the cut side of the tomato. The mozzarella should stick slightly, forming the whites of the eyeball.
- Create the Pupil: Slice each black olive into thin rings. Place one olive ring in the center of each mozzarella ball to create the pupil of the eyeball.
- Add the Veins: Drizzle a small amount of balsamic glaze over the mozzarella and olive to resemble veins. Be careful not to overdo it, as you want the glaze to accent the eyeball, not overpower it.
- Finish Assembly: Place a fresh basil leaf under each tomato, then use a toothpick to secure the tomato, mozzarella, and olive together. The toothpick should go through the top of the tomato, holding all components in place.
- Season and Serve: Drizzle the assembled bites with olive oil and season with salt and pepper to taste. Arrange them on a platter and serve immediately.
Extra Tips:
For the best results, use fresh and high-quality ingredients, as the flavors will shine in this simple dish. If you can’t find bocconcini, you can use regular mozzarella and cut it into smaller pieces.
To maintain the freshness and vibrant colors, prepare the Eyeball Caprese Bites close to the time they’ll be served. If you need to make them in advance, store them in the refrigerator and add the balsamic glaze just before serving to prevent the bites from becoming soggy.
Monster Mash Popcorn

Monster Mash Popcorn is the perfect spooky treat to bring to your Halloween potluck. This delightful snack is a combination of sweet and salty flavors, with a touch of monster flair that will have both kids and adults reaching for more. The popcorn is coated in a deliciously gooey marshmallow mixture, then drizzled with chocolate and sprinkled with festive Halloween candies.
It’s not only a feast for the taste buds, but also a visual delight that adds a playful twist to your Halloween spread. This recipe is designed to serve 4-6 people, making it an ideal contribution to any gathering. The preparation is straightforward, allowing you to focus on other aspects of your party planning.
The Monster Mash Popcorn is a versatile dish that can be easily customized with different candies or colors to suit your Halloween theme. Whether you’re watching a scary movie or hosting a costume party, this popcorn will surely be a hit.
Ingredients:
- 12 cups popped popcorn
- 1/4 cup unsalted butter
- 1/4 cup light corn syrup
- 1/2 cup granulated sugar
- 1/2 teaspoon salt
- 1 teaspoon vanilla extract
- 1 cup mini marshmallows
- 1/2 cup candy corn
- 1/2 cup Halloween-themed M&Ms
- 1/4 cup white chocolate chips, melted
- 1/4 cup dark chocolate chips, melted
- Orange and green food coloring (optional)
Instructions:
- Prepare the Popcorn: Start by popping 12 cups of popcorn using your preferred method. Once popped, spread the popcorn evenly on a large baking sheet lined with parchment paper. Make sure to remove any unpopped kernels.
- Make the Marshmallow Mixture: In a medium saucepan, melt 1/4 cup of unsalted butter over medium heat. Add in 1/4 cup of light corn syrup, 1/2 cup of granulated sugar, and 1/2 teaspoon of salt. Stir continuously until the mixture comes to a boil.
- Add Marshmallows and Vanilla: Once boiling, remove the saucepan from heat and stir in 1 teaspoon of vanilla extract and 1 cup of mini marshmallows. Stir until the marshmallows are completely melted and the mixture is smooth.
- Color the Mixture (Optional): If desired, divide the marshmallow mixture into two separate bowls. Add a few drops of orange food coloring to one bowl and green food coloring to the other. Stir each bowl until the color is evenly distributed.
- Coat the Popcorn: Drizzle the colored marshmallow mixture evenly over the popcorn on the baking sheet. Use a spatula to gently toss the popcorn, ensuring it’s well coated.
- Add Candy and Drizzle Chocolate: Sprinkle 1/2 cup of candy corn and 1/2 cup of Halloween-themed M&Ms over the coated popcorn. Drizzle the melted white and dark chocolate chips over the top.
- Set and Serve: Allow the popcorn to set at room temperature for about 30 minutes, or until the chocolate is firm. Once set, break the popcorn into clusters and serve in a large bowl.
Extra Tips:
To make your Monster Mash Popcorn more festive, consider using different types of Halloween-themed candies or sprinkles. You can also adjust the colors of the marshmallow mixture to match your party’s color scheme.
If you want to make the popcorn ahead of time, store it in an airtight container to maintain its freshness. Additionally, for an extra crunch, you can add some pretzel pieces or nuts to the mix. Remember, the key to this recipe is to have fun and be creative, so feel free to experiment with different ingredients and decorations!
Creepy Crawly Brownie Bites
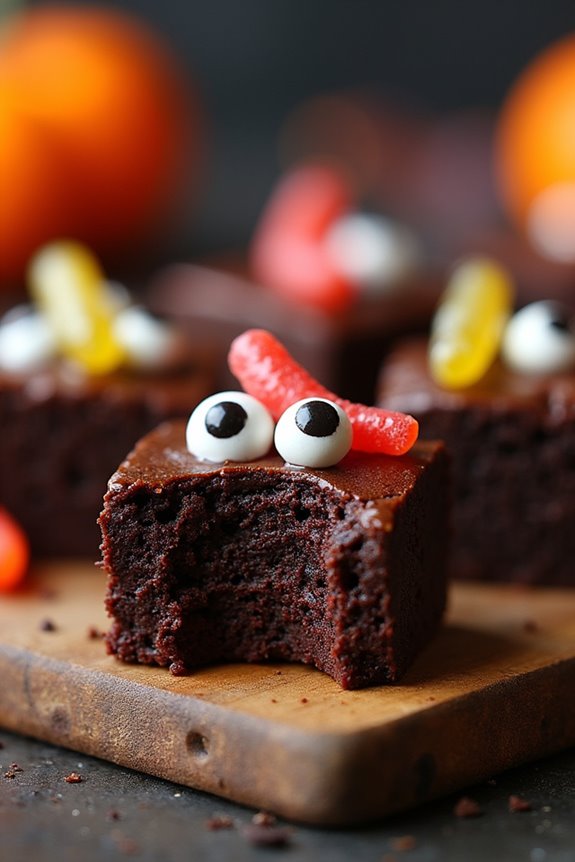
Creepy Crawly Brownie Bites are the perfect spooky treat for your Halloween potluck. These deliciously dark chocolate brownies are topped with creepy candy critters, adding a playful, eerie twist to a classic dessert. The rich, fudgy brownies serve as a delectable canvas for you to release your creativity with candy decorations, making them a standout addition to any Halloween spread. Not only are they visually fun, but they also pack a chocolatey punch that will satisfy any sweet tooth.
Designed to serve 4-6 people, Creepy Crawly Brownie Bites are easy to make and fun to decorate, making them an ideal choice for a festive gathering. Whether you’re hosting a family-friendly event or attending an adults-only party, these brownie bites are sure to impress. With a few simple ingredients and easy-to-follow instructions, you can whip up these spooky treats in no time, leaving you more time to enjoy the Halloween festivities.
Ingredients:
- 1/2 cup unsalted butter
- 1 cup granulated sugar
- 2 large eggs
- 1 teaspoon vanilla extract
- 1/3 cup unsweetened cocoa powder
- 1/2 cup all-purpose flour
- 1/4 teaspoon salt
- 1/4 teaspoon baking powder
- Candy eyes and gummy worms for decoration
- Optional: black or orange icing for extra decoration
Instructions:
- Preheat and Prepare: Preheat your oven to 350°F (175°C). Grease a mini muffin tin with butter or cooking spray to guarantee the brownie bites don’t stick.
- Melt Butter: In a medium-sized saucepan over low heat, melt the unsalted butter. Once melted, remove from heat and let it cool slightly.
- Mix Dry Ingredients: In a separate mixing bowl, combine the cocoa powder, flour, salt, and baking powder. Stir until all ingredients are well blended.
- Combine Wet Ingredients: In a large bowl, mix together the granulated sugar, eggs, and vanilla extract. Beat until the mixture is smooth and creamy.
- Combine Mixtures: Slowly add the dry ingredients to the wet ingredients, stirring continuously. Once combined, add the melted butter and mix until you have a smooth batter.
- Fill Muffin Tin: Spoon the brownie batter into the prepared mini muffin tin, filling each cup about 3/4 full.
- Bake: Place the muffin tin in the preheated oven and bake for about 15-20 minutes or until a toothpick inserted into the center of a brownie bite comes out clean.
- Cool and Decorate: Allow the brownie bites to cool in the pan for a few minutes before transferring them to a wire rack. Once they’re completely cool, use candy eyes and gummy worms to decorate each brownie bite, creating a creepy crawly effect. Use black or orange icing to enhance the spooky theme if desired.
Extra Tips: When melting the butter, make sure it doesn’t get too hot, as excessively hot butter can cook the eggs when combined. For easy removal, use a non-stick mini muffin tin or line the tin with mini paper liners.
If you want to get creative with decorations, consider using a variety of Halloween-themed candies or colored sprinkles to add more color and fun to your Creepy Crawly Brownie Bites. These treats can be made a day ahead and stored in an airtight container, making them a convenient option for busy Halloween preparations.
Jack-O’-Lantern Stuffed Peppers

Jack-O’-Lantern Stuffed Peppers are a festive and delicious addition to any Halloween potluck. Transform ordinary bell peppers into spooky, edible jack-o’-lanterns by carving fun faces into them and stuffing them with a savory mixture of rice, vegetables, and ground meat. This dish not only looks impressive but is also packed with flavors that will delight your guests.
It’s a creative way to serve a balanced meal while embracing the Halloween spirit.
These stuffed peppers are versatile and can be easily customized to suit different dietary preferences. Whether you want to make them vegetarian by omitting the meat or add a spicy kick with some jalapeños, the possibilities are endless. Serve these Jack-O’-Lantern Stuffed Peppers as a main course or a hearty side dish for a crowd of 4-6 people, and get ready to receive compliments on your clever culinary creation.
Ingredients (for 4-6 servings):
- 6 large orange bell peppers
- 1 pound ground beef or turkey
- 1 cup cooked rice
- 1 small onion, finely chopped
- 2 cloves garlic, minced
- 1 can (14.5 ounces) diced tomatoes
- 1 cup shredded cheddar cheese
- 1 teaspoon Italian seasoning
- Salt and pepper to taste
- Olive oil for sautéing
Cooking Instructions:
- Prepare the Peppers: Start by preheating your oven to 375°F (190°C). Cut the tops off the bell peppers and remove the seeds and membranes. Use a small knife to carve jack-o’-lantern faces into the sides of each pepper, being careful not to cut all the way through the bottom.
- Cook the Filling: In a large skillet, heat a tablespoon of olive oil over medium heat. Add the chopped onion and minced garlic, and sauté until the onion becomes translucent. Add the ground beef or turkey, cooking until fully browned. Drain any excess fat.
- Combine Ingredients: Stir in the diced tomatoes, cooked rice, Italian seasoning, salt, and pepper. Let the mixture simmer for about 5 minutes, allowing the flavors to meld together. Remove from heat and mix in half of the shredded cheddar cheese.
- Stuff the Peppers: Carefully fill each carved pepper with the meat and rice mixture. Place the filled peppers in a baking dish, making certain they’re sitting upright. Sprinkle the remaining cheese over the top of each pepper.
- Bake the Peppers: Cover the baking dish with aluminum foil and bake in the preheated oven for 25-30 minutes. Remove the foil and bake for an additional 10 minutes, or until the cheese is melted and bubbly.
- Serve and Enjoy: Once cooked, remove the peppers from the oven and let them cool slightly before serving. Arrange them on a platter for a festive presentation.
Extra Tips: For an even richer flavor, try using a mix of different cheeses, such as mozzarella or Monterey Jack, in place of or alongside cheddar. If you prefer a vegetarian version, substitute the meat with black beans or lentils, and consider adding some chopped mushrooms for added texture.
To save time, you can prepare the filling a day in advance and store it in the refrigerator, then stuff and bake the peppers on the day of your event. Finally, be careful when carving the peppers to guarantee they maintain their shape and don’t fall apart while baking.
Bloodshot Eyeball Punch
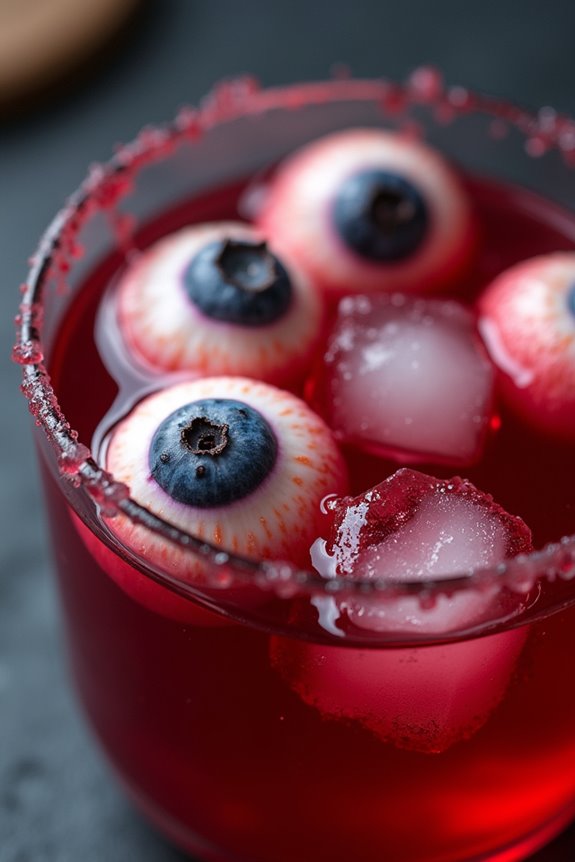
Get ready to spook your guests with a chilling beverage that’s perfect for your Halloween potluck: Bloodshot Eyeball Punch. This spine-tingling drink not only looks eerily realistic but also tastes deliciously invigorating. It combines the flavors of tart blood orange juice, sweet cherry syrup, and fizzy lemon-lime soda to create a punch that will haunt your taste buds.
The highlight, however, is the creepy “eyeballs” made from lychees and blueberries, which float ominously in the punch bowl, giving an eerie, bloodshot effect.
This punch is ideal for a crowd, serving 4-6 people, and can be easily doubled for larger gatherings. The Bloodshot Eyeball Punch isn’t only a visual treat but also incredibly easy to prepare, making it a perfect addition to your Halloween spread.
The combination of flavors guarantees that it’s palatable for both adults and kids, while the spooky presentation adds a fun, festive touch to your party table.
Ingredients:
- 1 cup lychees, canned or fresh
- 1/2 cup blueberries
- 2 cups blood orange juice
- 1 cup cherry syrup
- 3 cups lemon-lime soda
- 1 cup ice cubes
Instructions:
- Prepare the Eyeballs: Drain the lychees if using canned ones, and pat them dry with a paper towel. Insert a blueberry into the hollow center of each lychee, making sure it fits snugly. These will form your bloodshot eyeballs.
- Mix the Punch: In a large punch bowl, combine the blood orange juice and cherry syrup. Stir well to guarantee the flavors are mixed evenly.
- Add the Fizz: Pour in the lemon-lime soda and gently stir again. Be careful not to stir too vigorously to maintain the fizz of the soda.
- Add Ice and Eyeballs: Add the ice cubes to the punch to keep it chilled. Gently place the prepared eyeballs into the punch; they should float on the surface, creating a spooky effect.
- Serve: Ladle the punch into glasses, making sure each serving has at least one eyeball for the full spooky effect. Enjoy this chilling beverage with your guests!
Extra Tips:
To enhance the bloodshot effect, you can use a bit of red food coloring to paint veins on the lychees before inserting the blueberries.
If you want an alcoholic version, you can add a splash of vodka or rum to the mix. For the best presentation, prepare the lychee eyeballs a few hours in advance and keep them refrigerated until you’re ready to serve the punch.
This will help them maintain their shape and guarantee they’re nice and chilled when added to the drink.
Frankenstein Rice Krispie Treats

Frankenstein Rice Krispie Treats are a fun and spooky twist on the classic dessert, perfect for a Halloween potluck. These treats, shaped and decorated to resemble Frankenstein’s monster, are sure to be a hit with both kids and adults.
They’re easy to make, requiring only a few additional ingredients to transform the traditional Rice Krispie Treats into a festive Halloween snack.
These treats not only look great but also taste delicious, combining the classic sweetness of marshmallow with the crunch of crisp rice cereal. The addition of green food coloring gives them their signature Frankenstein hue, while chocolate and candy eyes complete the monster’s face.
With a serving size of 4-6 people, this recipe is ideal for a small gathering or a family Halloween celebration.
Ingredients (serving size: 4-6 people):
- 3 tablespoons of unsalted butter
- 10 ounces of mini marshmallows
- 6 cups of Rice Krispies cereal
- Green food coloring
- 1 cup of chocolate chips
- Candy eyes
- Black decorating gel
- Pretzel sticks
Instructions:
- Prepare the Pan: Start by greasing a 9×13-inch baking dish with butter or non-stick spray. This will prevent the treats from sticking to the dish.
- Melt the Butter and Marshmallows: In a large saucepan over low heat, melt the unsalted butter. Once melted, add the mini marshmallows and stir continuously until the marshmallows are fully melted and the mixture is smooth.
- Add Food Coloring: Remove the pan from heat and add a few drops of green food coloring to the melted marshmallow mixture. Stir until the color is evenly distributed, adding more food coloring as needed to achieve the desired shade of green.
- Mix in the Cereal: Gradually add the Rice Krispies cereal to the green marshmallow mixture, stirring until the cereal is completely coated.
- Spread the Mixture: Quickly transfer the mixture to the prepared baking dish. Use a buttered spatula or wax paper to press the mixture evenly into the dish.
- Cool and Cut: Allow the mixture to cool and set for about 30 minutes. Once set, cut the treats into rectangles to resemble Frankenstein’s head.
- Decorate: Melt the chocolate chips in a microwave-safe bowl in 30-second intervals, stirring in between until smooth. Dip the tops of each rectangle into the melted chocolate to create Frankenstein’s hair. Attach candy eyes using a small amount of melted chocolate, and use black decorating gel to draw a mouth and any facial scars.
Break pretzel sticks into small pieces and insert them into the sides of the treats to resemble Frankenstein’s neck bolts.
Extra Tips: For best results, work quickly when spreading the marshmallow mixture into the pan, as it tends to harden as it cools. If you have difficulty with the cereal sticking to your hands or tools, lightly coat them with butter or non-stick spray.
When decorating, feel free to get creative with additional details like using colored gels for extra features or adding different candies for variety. These treats can be stored in an airtight container for up to 3 days, making them a convenient make-ahead option for your Halloween potluck.
Bat Wing Chicken Wings
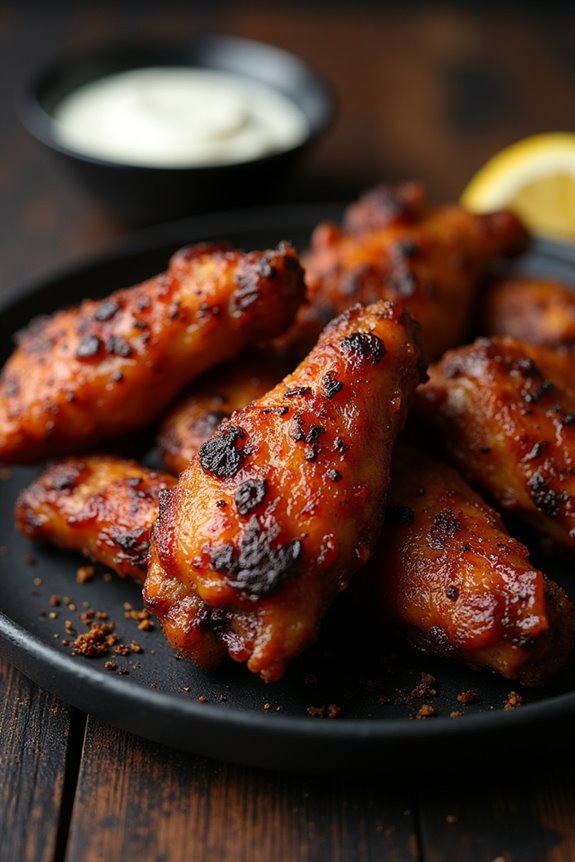
Bat Wing Chicken Wings are the perfect spooky addition to any Halloween potluck. These deliciously dark, flavorful wings are coated in a savory black marinade that gives them an eerie bat-like appearance. The combination of soy sauce, balsamic vinegar, and a hint of black food coloring guarantees not only a visually haunting dish but also one that’s packed with flavor.
Whether served as an appetizer or a main dish, these wings are sure to be a hit among guests of all ages.
To make Bat Wing Chicken Wings, you’ll start by marinating the wings overnight to allow the flavors to fully develop. The marinade uses simple ingredients that you likely already have in your pantry, enhanced with black food coloring to achieve that signature spooky look.
When cooked, the wings have a crispy, caramelized exterior with tender, juicy meat inside. Served with your choice of dipping sauce, these wings will fly off the plate faster than you can say “trick or treat!”
Ingredients (Serves 4-6):
- 2 pounds chicken wings
- 1/2 cup soy sauce
- 1/4 cup balsamic vinegar
- 2 tablespoons honey
- 1 tablespoon olive oil
- 1 teaspoon garlic powder
- 1 teaspoon onion powder
- 1 teaspoon smoked paprika
- 1/2 teaspoon black pepper
- 1/4 teaspoon salt
- A few drops of black food coloring
Cooking Instructions:
- Prepare the Marinade: In a large mixing bowl, combine the soy sauce, balsamic vinegar, honey, olive oil, garlic powder, onion powder, smoked paprika, black pepper, and salt. Stir until well combined. Add a few drops of black food coloring and mix until the marinade is uniformly black.
- Marinate the Wings: Place the chicken wings in a large zip-top bag or a shallow dish. Pour the marinade over the wings, making sure they’re fully coated. Seal the bag or cover the dish and refrigerate for at least 4 hours, preferably overnight, to let the flavors penetrate the meat.
- Preheat the Oven: When ready to cook, preheat your oven to 400°F (200°C). Line a baking sheet with aluminum foil and place a wire rack on top. Lightly grease the rack with cooking spray to prevent sticking.
- Arrange and Bake: Remove the wings from the marinade, allowing excess marinade to drip off, and arrange them in a single layer on the prepared wire rack. Bake for 40-45 minutes, flipping halfway through, until the wings are crispy and cooked through.
- Serve: Allow the wings to rest for a few minutes before serving. Serve with your choice of dipping sauce, such as ranch or blue cheese, for added flavor.
Extra Tips:
For the crispiest wings, make sure they’re well-drained before baking, as excess marinade can prevent the skin from crisping up.
If you prefer a smokier flavor, consider adding a few drops of liquid smoke to the marinade. Adjust the black food coloring to achieve your desired shade of “bat wing” darkness.
Finally, if you want to add a touch of heat, mix a teaspoon of cayenne pepper into the marinade. Enjoy your spooky creation!