

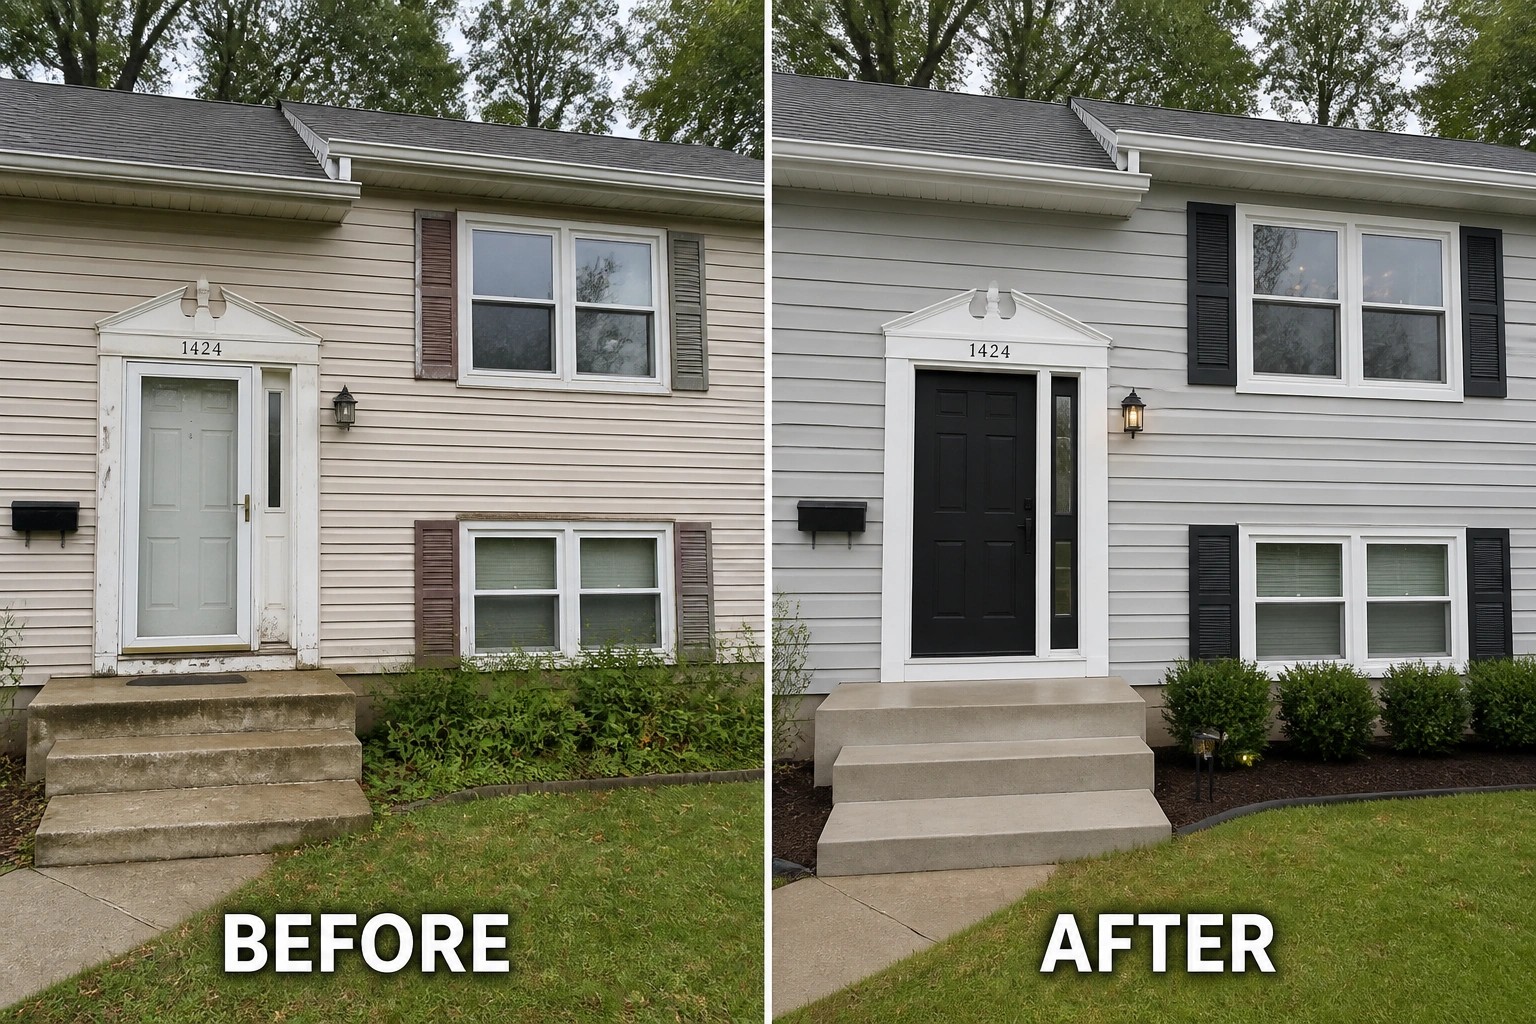
Split-level houses can feel chopped into awkward pockets where good light and traffic patterns get lost, so small decisions about paint, lighting, and furniture placement make a surprising difference.
I often start by opening sightlines and swapping harsh overhead fixtures for layered lighting to help low ceilings and small landings feel purposeful.
It does not take a renovation to make a space work better.
A fresh coat of paint, a reworked entry area, better storage under the stairs, or a simple flooring change can cure the most common split-level headaches and leave rooms feeling more useful.
I’ve saved a handful of ideas I plan to test first because small, low-cost tries usually show which fixes deserve a permanent place in a home.
Give A Bare Porch A Clear Purpose
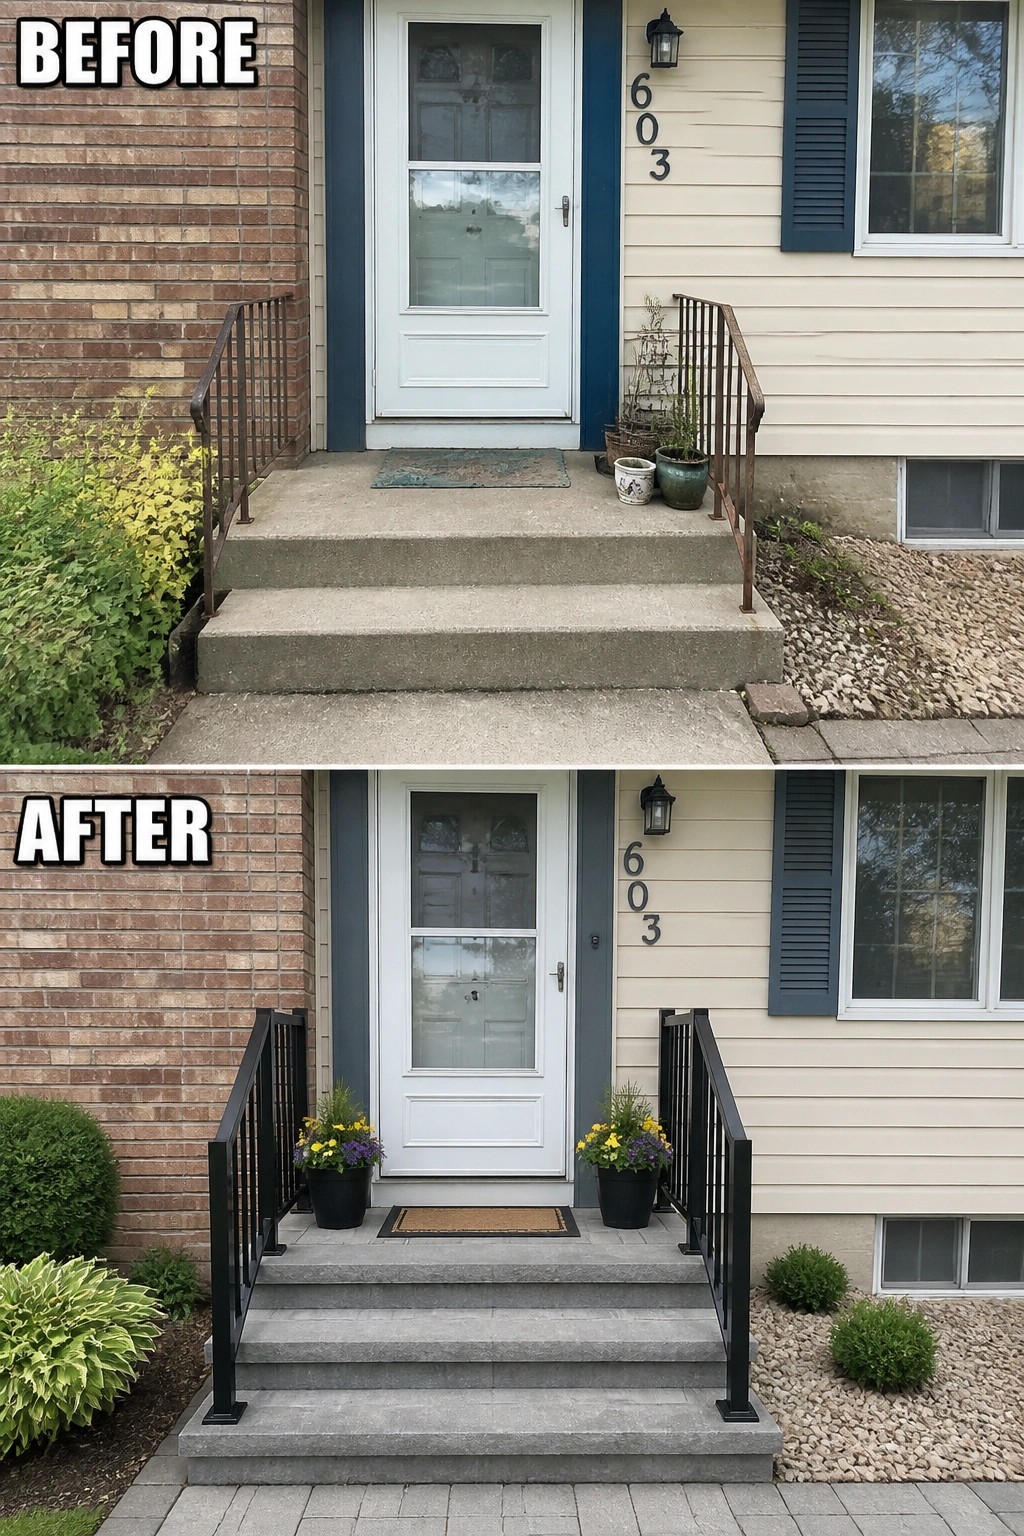
A small, plain front step can feel like wasted space. Replacing the worn concrete with defined stone treads and swapping flimsy railings for a simple black metal pair turns the entry into a proper porch you can actually style. That single change makes the doorway read as intentional instead of an afterthought.
Use scale and repetition to keep it simple. Choose durable steps that match your house proportions, add one or two matching planters to frame the door, and pick a weatherproof mat so the area looks finished without getting crowded. This works especially well on split-level homes and small stoops where modest upgrades give a clear, usable entry without major construction.
Improve Curb Appeal With An Updated Garage Door
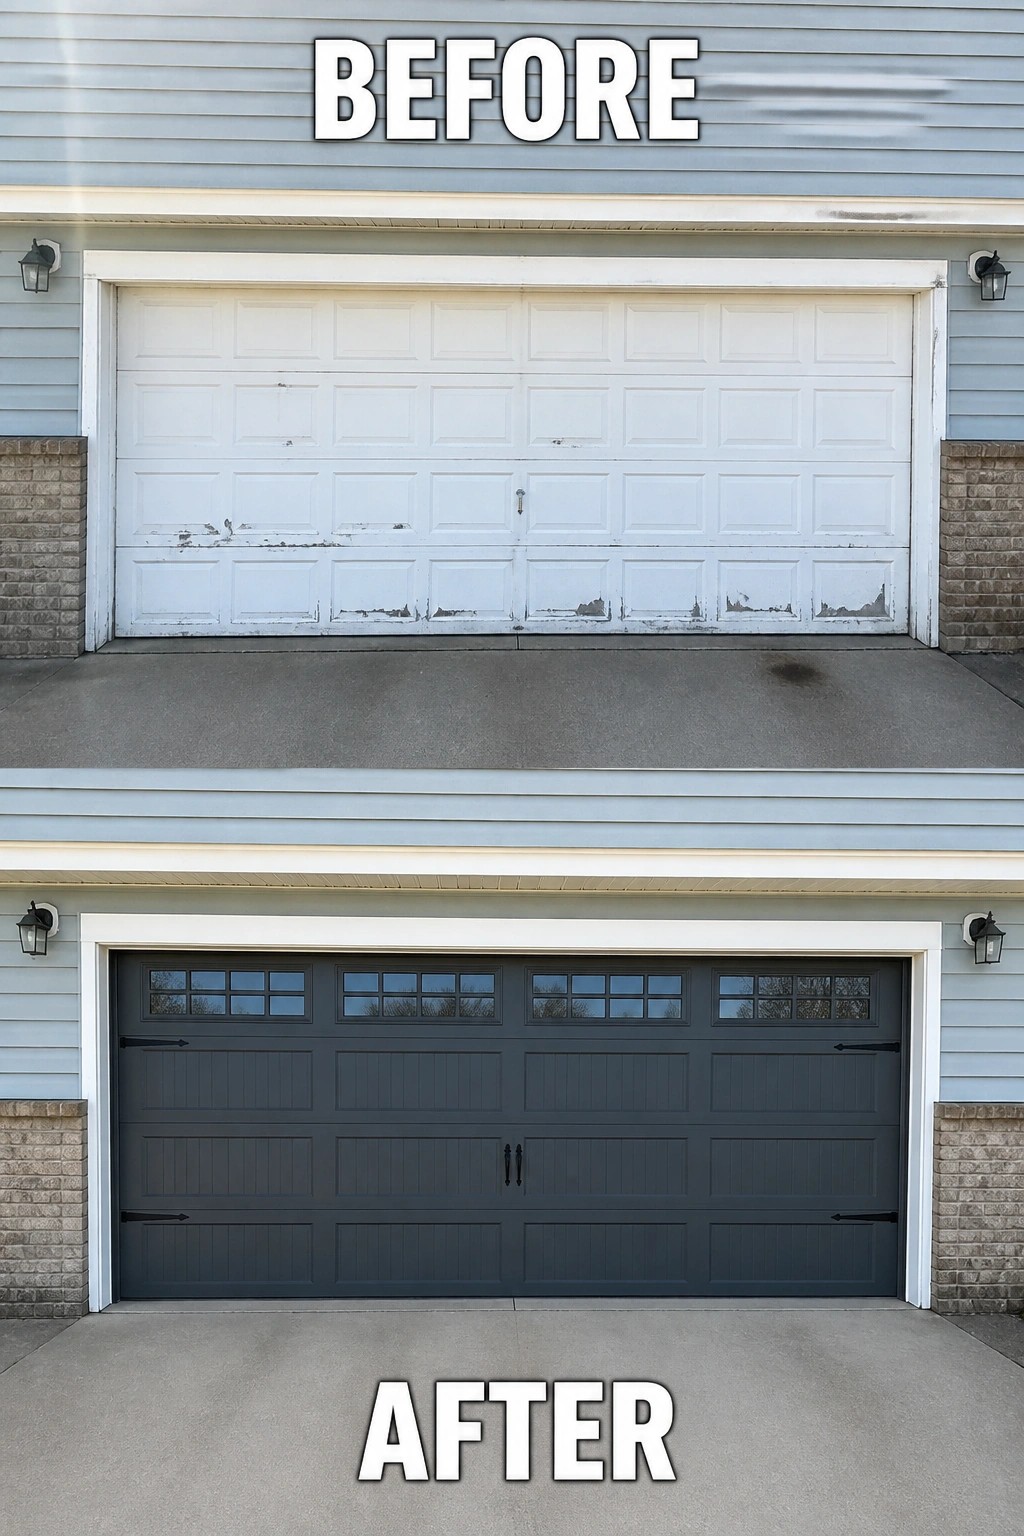
A garage door is one of the biggest visible surfaces on a split level, so changing its color and style gives the whole facade an instant lift. Swapping a peeling, plain door for a darker carriage-style model with window panels and simple hardware (or repainting and adding new trim and handles) modernizes the front without moving a wall. It fixes the worn look and makes the house feel cared for.
Do a quick check before you start: repaint if the panels are sound, replace if there is warping or rust. Pick a door color that complements your siding and brick, test a sample patch first, and consider adding small window inserts or faux hinges for personality. This works well on narrow driveways and modest facades — you get a noticeable return on a relatively small budget and effort.
Refresh A Staircase With A New Runner
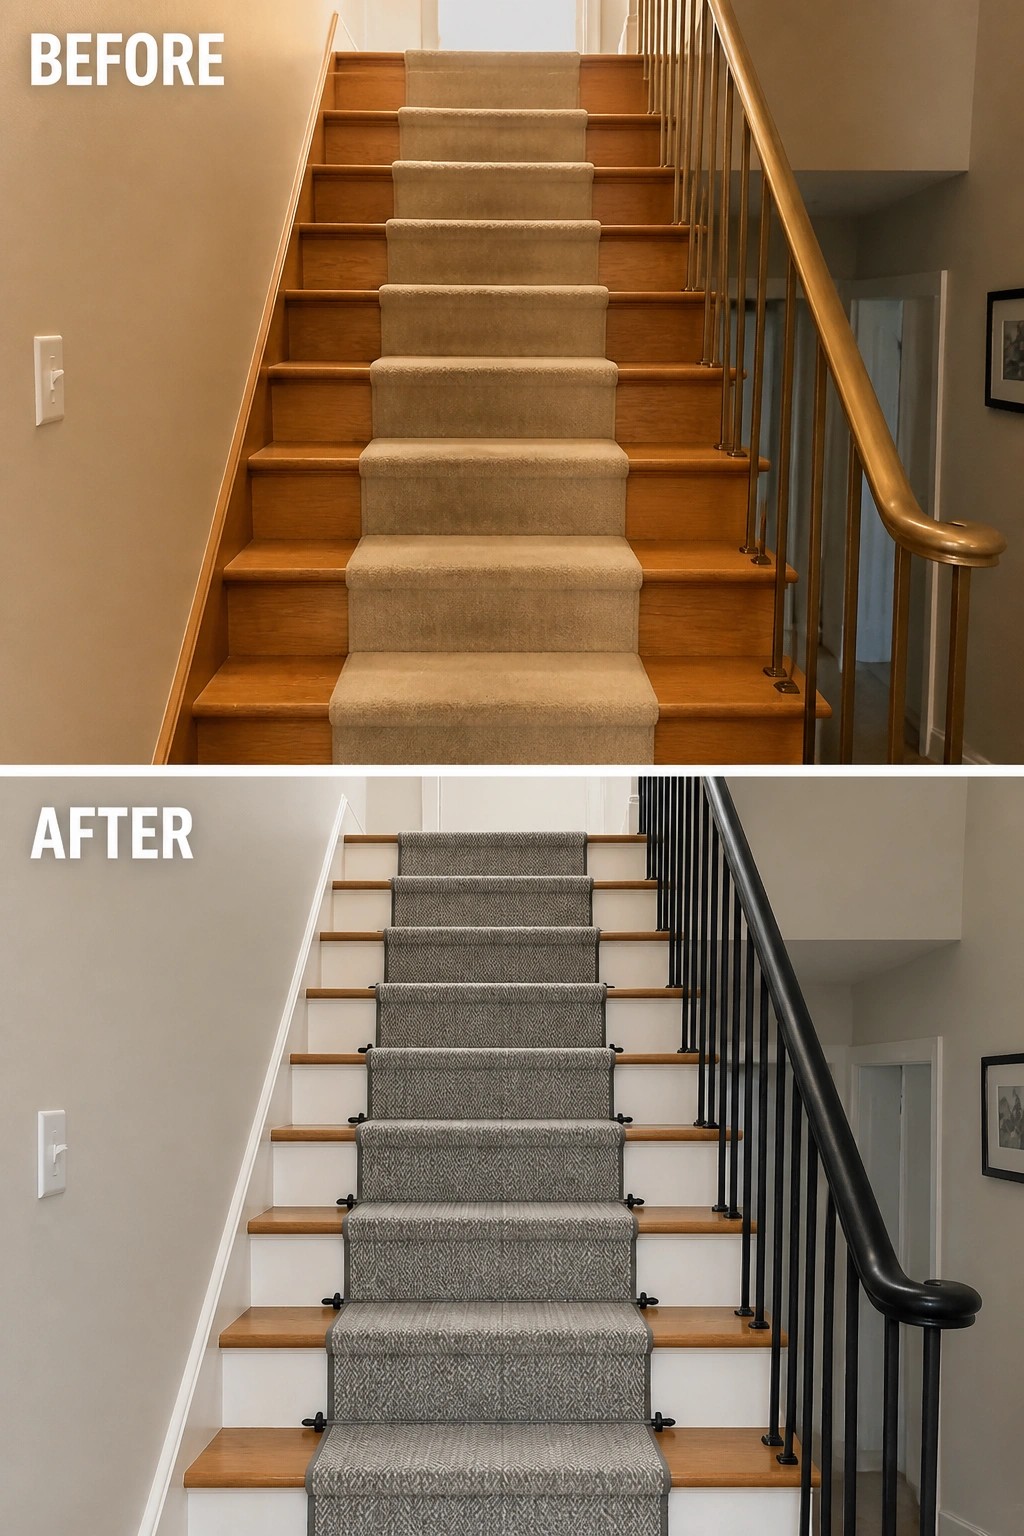
Swapping an old beige carpet runner for a slimmer, patterned runner and painting the risers is an easy way to modernize a split-level stair without touching structure. The new grey runner and contrasting black hardware in the after photo show how much a fresh textile and a bit of paint can change the whole feel while keeping the original treads intact.
This works best on narrow staircases where you want a cleaner, more current look without removing wood. Pick a durable, low-pile runner in a pattern or neutral tone that hides wear, use proper stair pads or non-slip tape, and paint risers or spindles for contrast. Add simple metal stair rods or swap the handrail finish to tie the look together (it’s an inexpensive update) and keep the scale and safety in mind when choosing materials.
Use Layered Lighting To Make A Basement Feel Finished
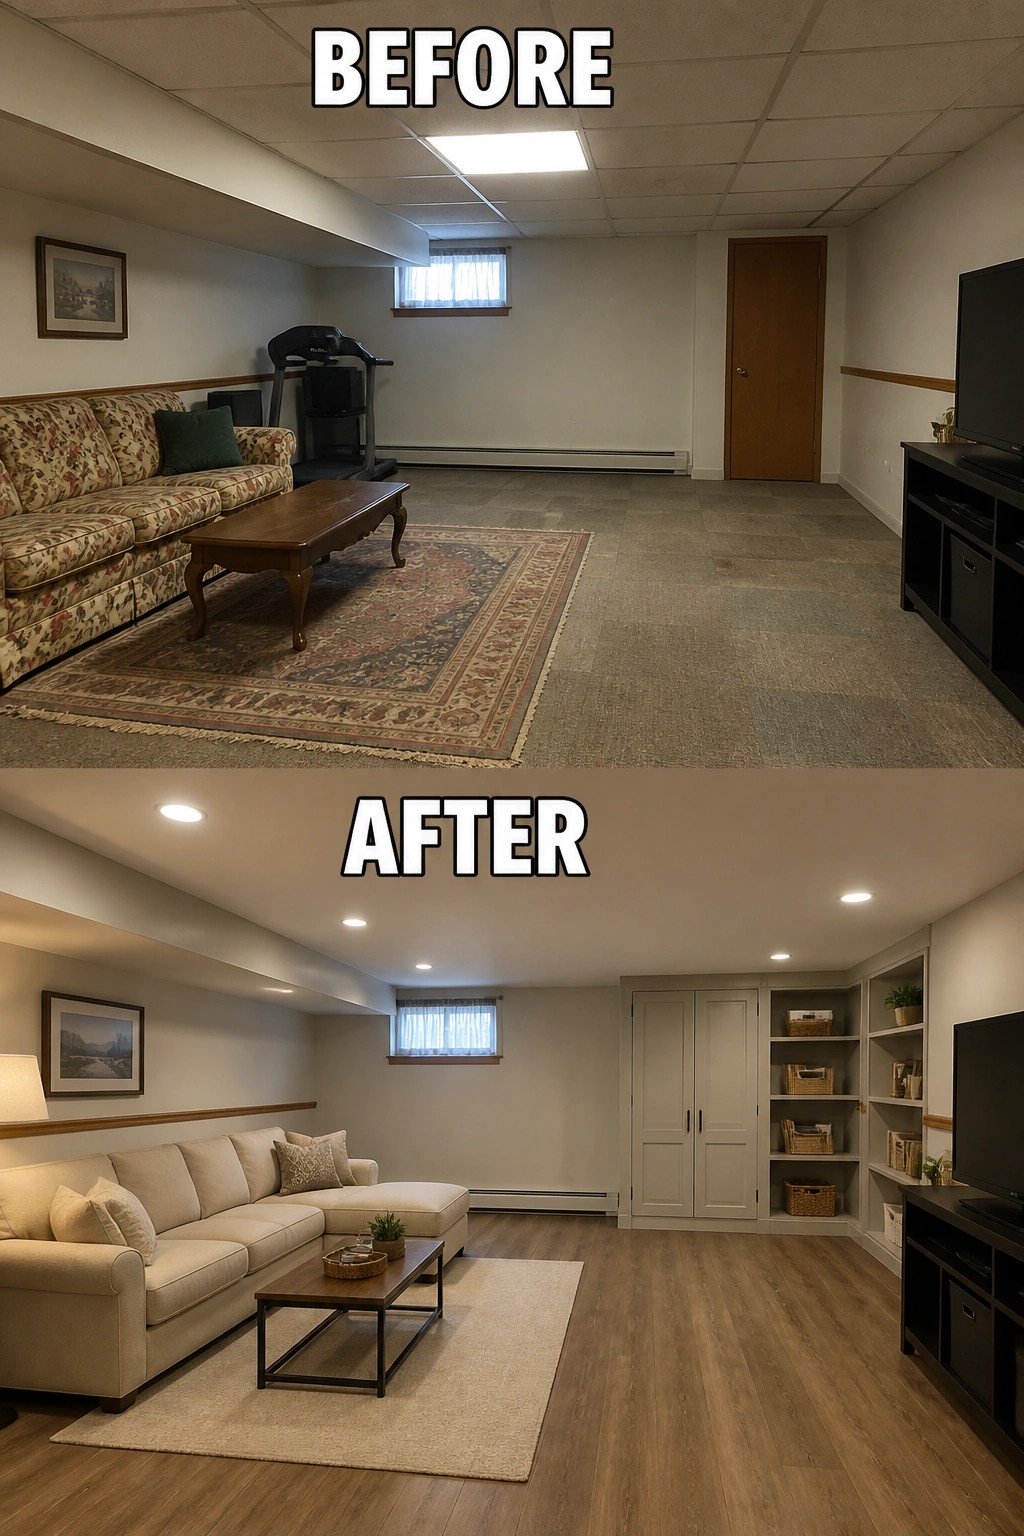
A single, harsh ceiling fixture makes a basement feel like a storage room. Swapping that lone panel for recessed ceiling lights and adding a few softer sources around the seating instantly makes the space read as a proper living area. In this example the new recessed lights (and the updated plank flooring) help the room feel intentional instead of leftover.
To copy it at home, plan three layers: ambient recessed lights on a dimmer, a floor or table lamp for task light where people sit, and a small accent light for shelves or artwork. Choose warm-color LEDs and low-profile fixtures so you keep every inch of headroom (low ceilings especially benefit). Finish with a rug and furniture scaled to the room so the light falls where people actually use the space.
Refresh Kitchen With Dark Painted Cabinets And Wood Counters
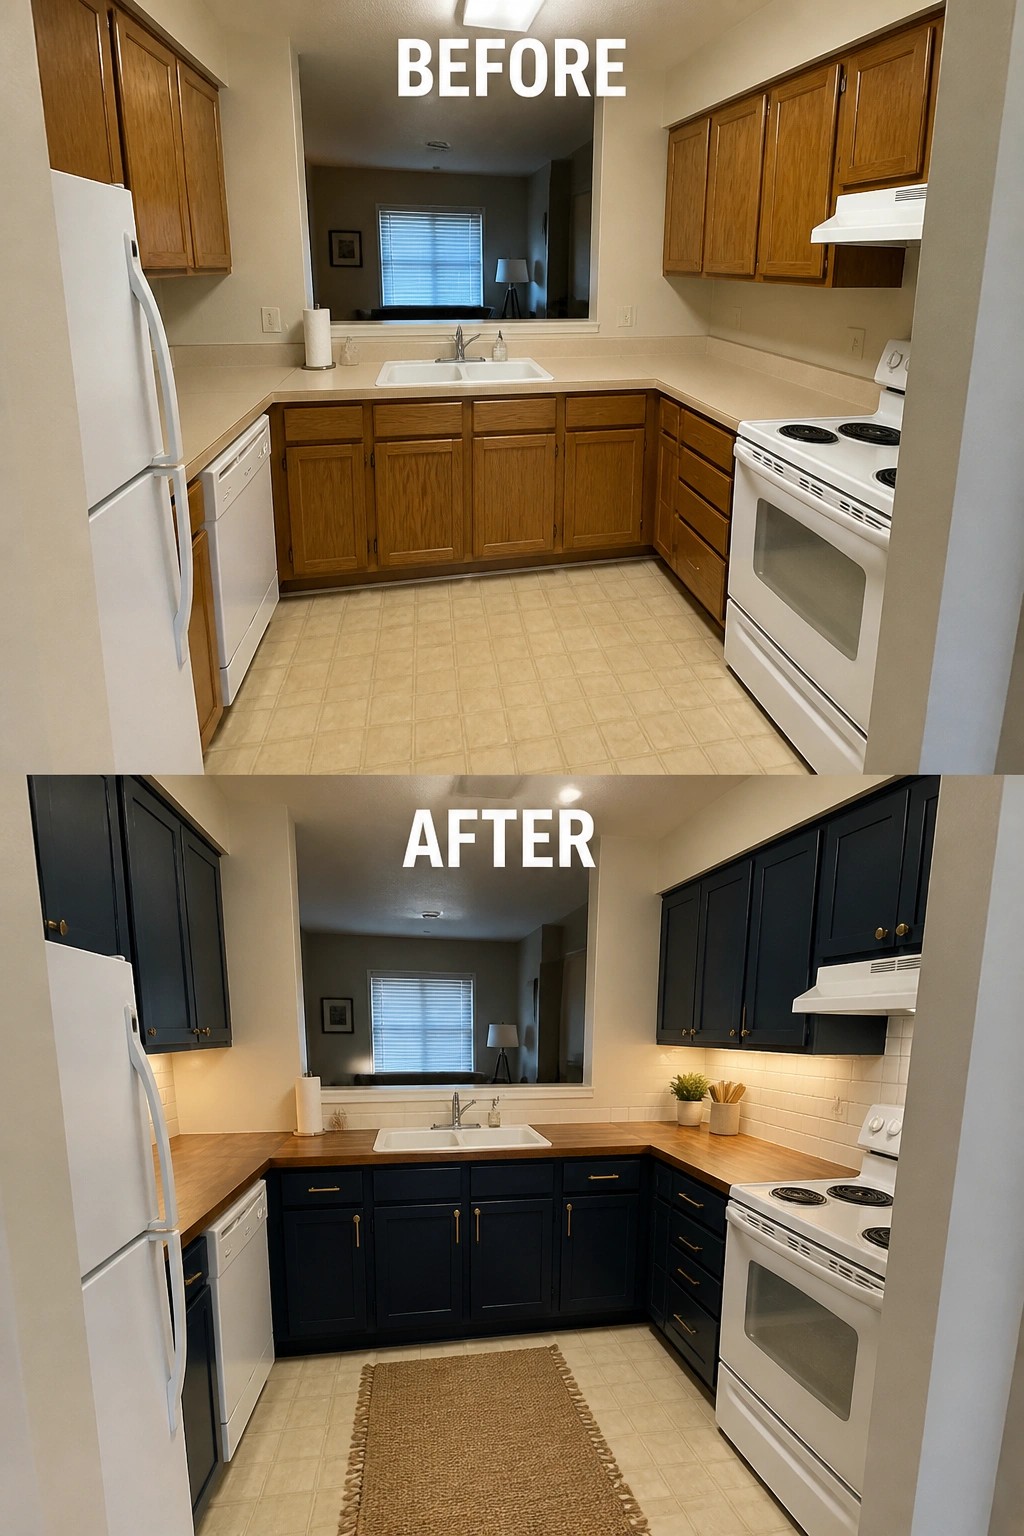
A quick, high-impact update is to paint your existing cabinets a rich, dark color and replace the countertop with a wood surface. Switching the oak cabinet faces to a deep navy and laying in a warm wood top gives a small galley kitchen a more intentional, finished look without moving plumbing or knocking down walls. The contrast helps hide scuffs and gives the room a stronger, more modern feel.
Do the work in stages: clean and lightly sand cabinet faces, prime, then use a durable cabinet paint for an even finish. Pick a wood or wood-look counter that fits your routine and seal it if it’s real wood. Finish with simple hardware that contrasts the paint and a sample patch first so you can judge the color in your light—this approach works well in older split-level kitchens where layout changes aren’t realistic.
Swap A Bulky Vanity For A Wall-Mounted Unit
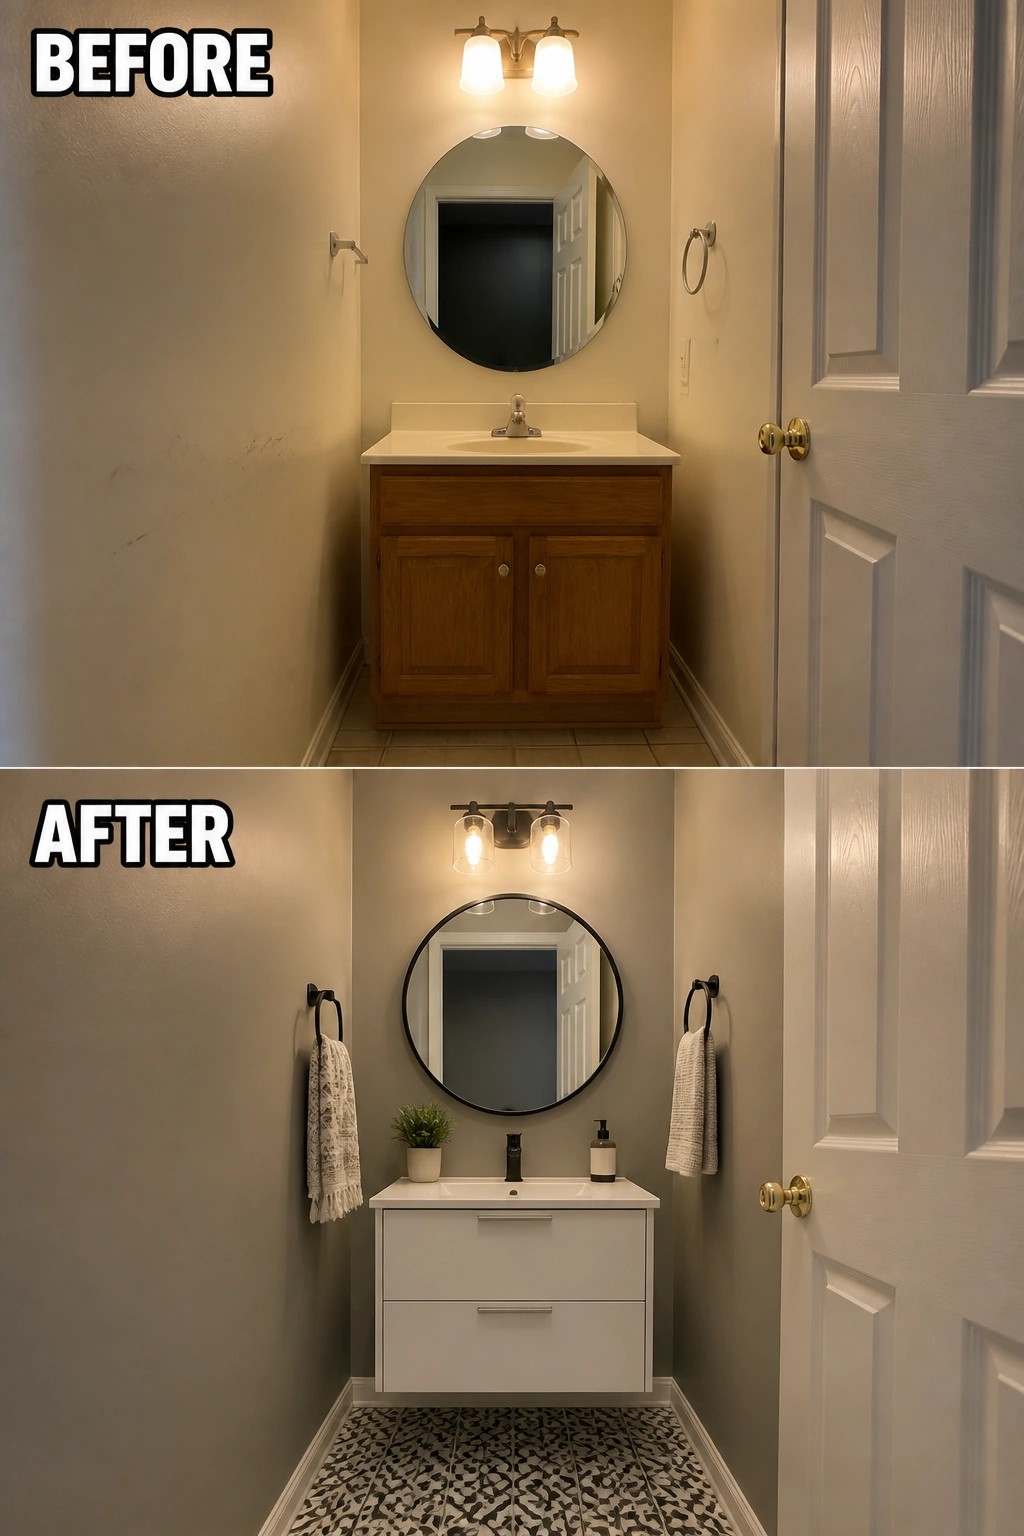
Replacing a heavy floor-standing vanity with a slim, wall-mounted unit instantly opens tight bathrooms. The visual lift comes from cleared floor space and cleaner sightlines, so a narrow powder room feels larger without moving plumbing. In this example the oak cabinet was replaced by a floating white vanity and a simple round mirror, which together make the whole end wall read lighter and more intentional.
This works best in small halls, guest baths, or any spot where walking space is tight. Measure for depth and stud placement before you buy, and choose a unit rated for the weight you need. Pair the vanity with a pared-back mirror and compact lighting (and consider patterned tile or a small rug) to add personality without crowding the room. Less clutter. More room to move.
Make A Plain Bedroom Feel Finished
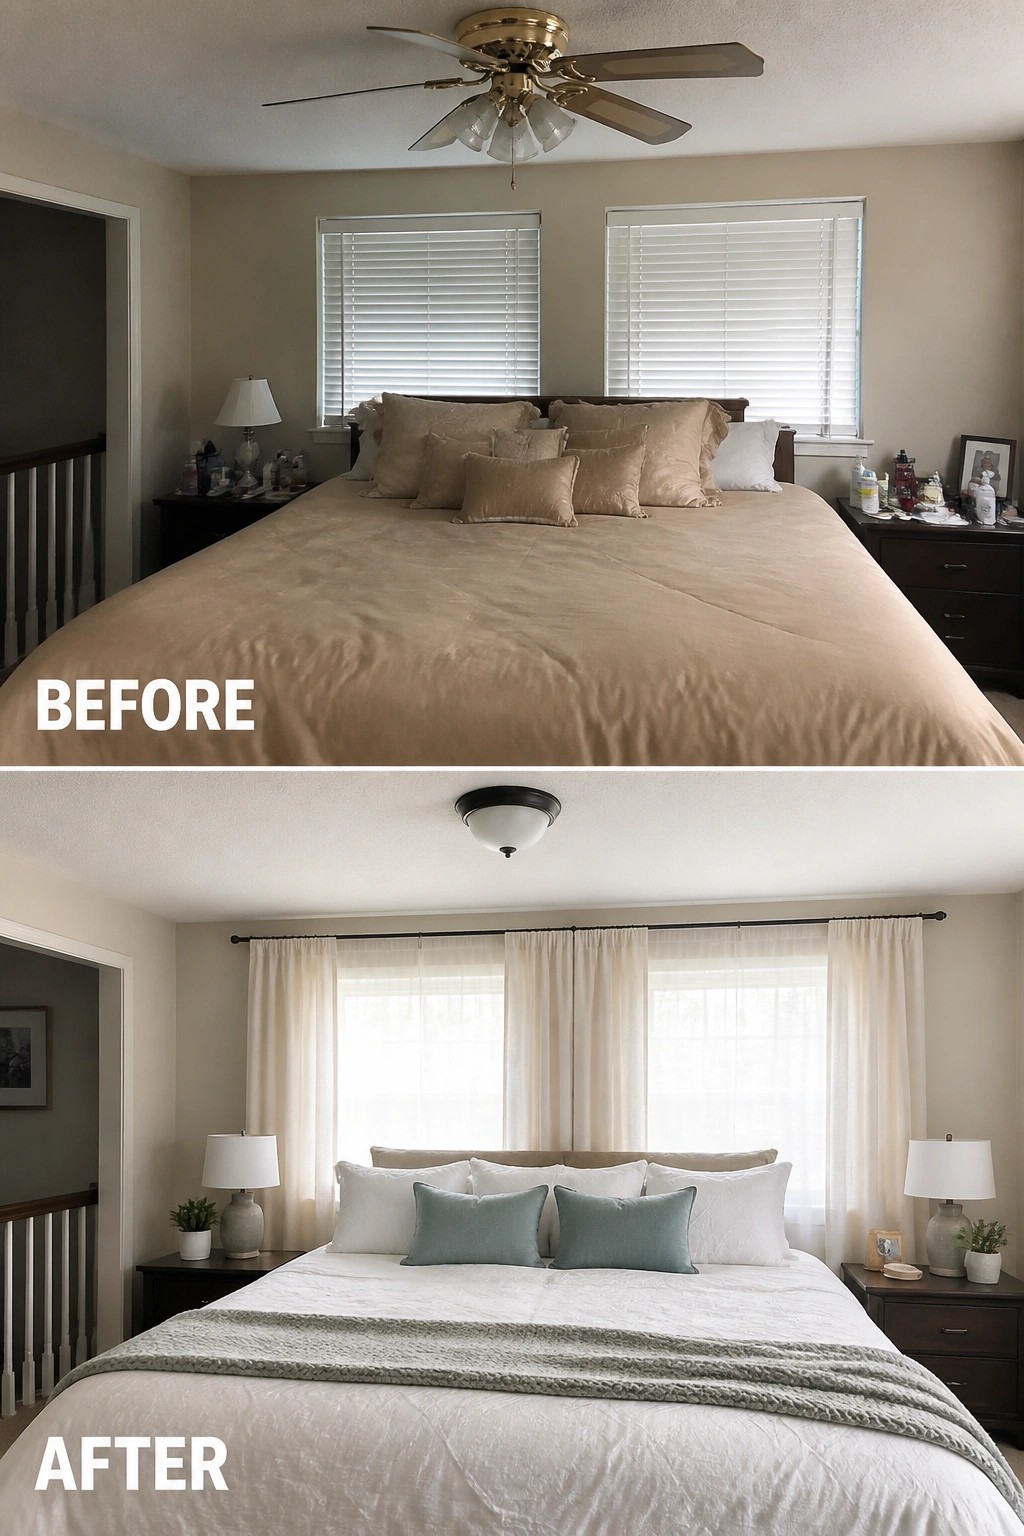
A handful of soft textiles and lighter bedding can turn a tired bedroom into a calm, put-together room. In this refresh, adding floor-to-ceiling curtains and replacing heavy, monotone bedding with crisp white layers and a couple of accent pillows immediately brightened the space and made the windows read larger.
To copy the idea, hang a slim rod a few inches above the trim and let panels graze the floor (it lifts the ceiling visually). Pick neutral, washable bedding and layer a textured throw or two, then streamline bedside surfaces with matching lamps and a small plant or tray—simple, non-structural changes that work especially well in older split-level bedrooms where you want more polish without a remodel.
Brighten A Narrow Hallway With Paint And Better Lighting
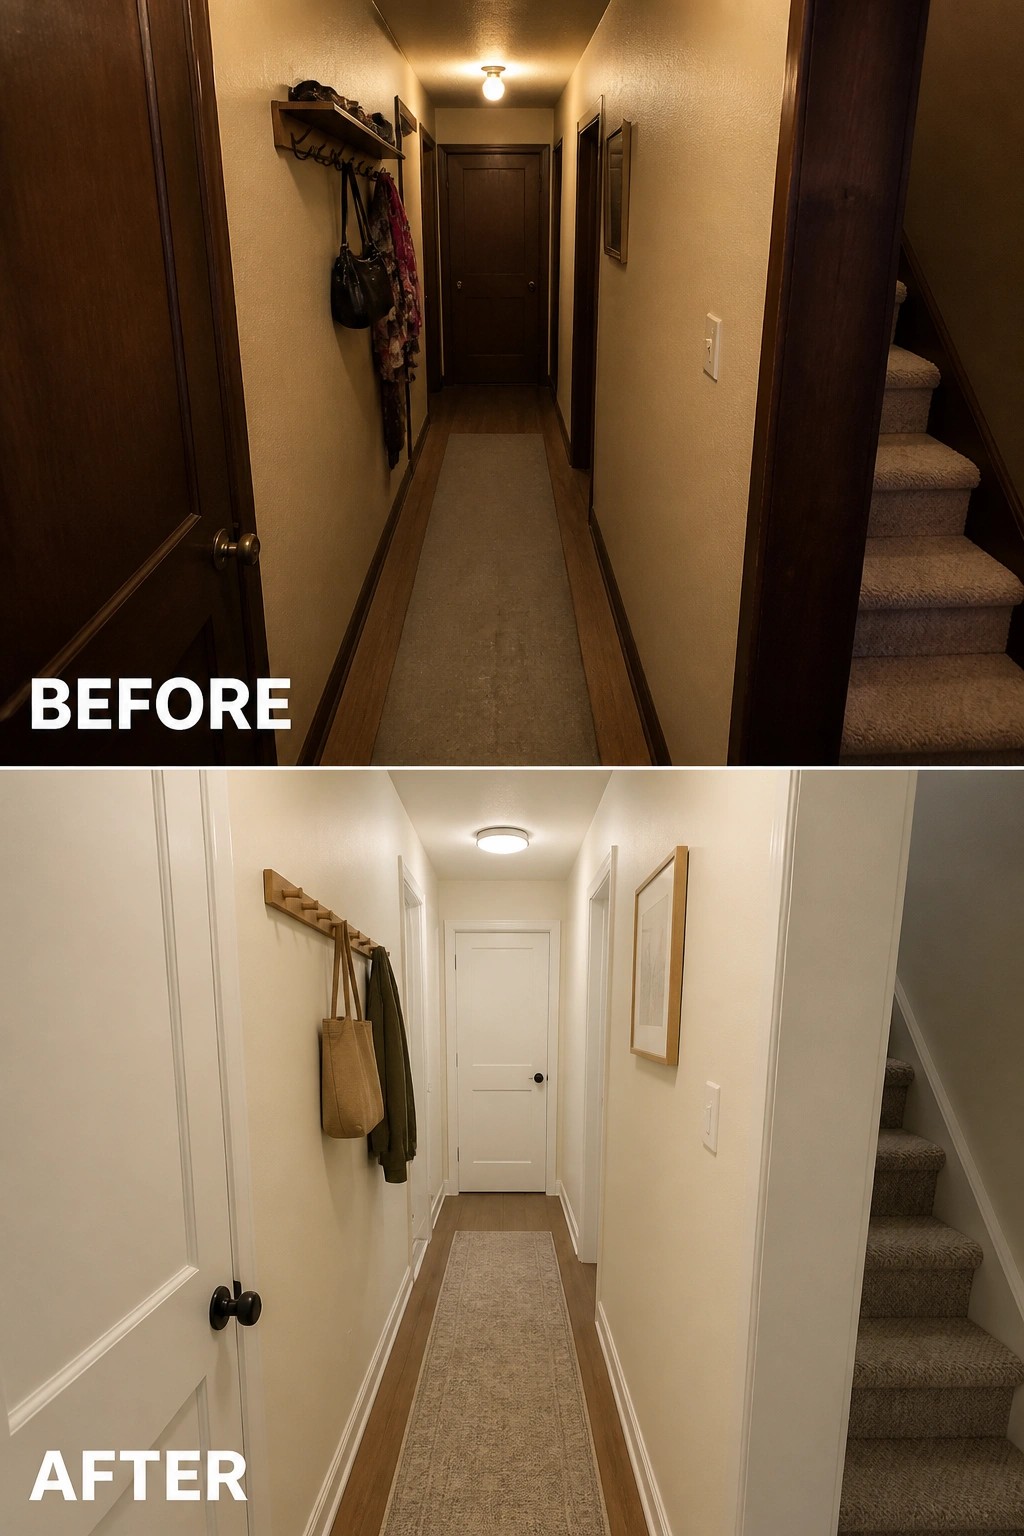
A quick way to open up a cramped, dark corridor is to lighten the finishes and upgrade the overhead light. In this example the heavy dark trim and doors were painted white and the old bare bulb was replaced with a low-profile flush fixture, and the space instantly reads wider, cleaner, and easier to move through. Those two moves change how the whole hall feels without touching the layout.
You can copy this in any split-level or older home where trim and small fixtures dominate the look. Paint the doors and trim the same light color (eggshell or satin for easy cleaning) to reduce visual clutter, pick a bright warm LED flush light to avoid shadows, and keep floor runners and hooks slim so the path stays clear. Small, inexpensive updates like these make narrow spaces feel less cramped and more finished.
Make A Small Laundry Nook Work With Open Shelves And Baskets
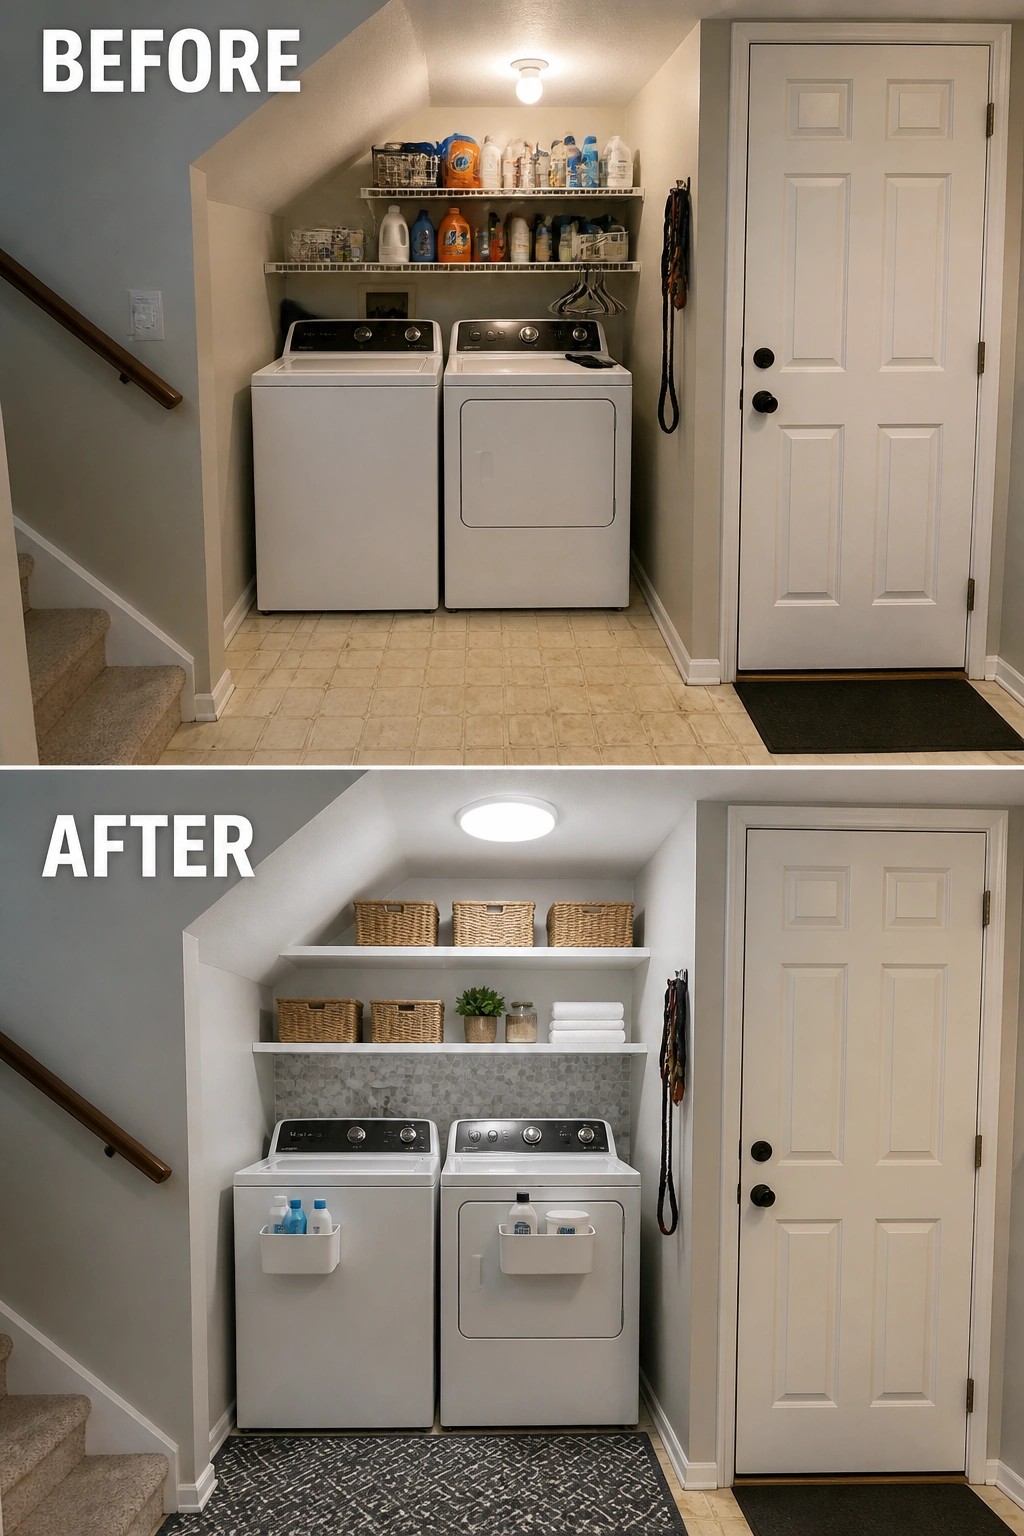
A crowded under-stair laundry can feel unfinished and useless. Installing a couple of sturdy floating shelves, swapping those mismatched bottles for uniform baskets, and adding a brighter flush light immediately makes the space look tidy and purposeful. One or two shelf-height adjustments and a simple rug or caddy on the machines are enough to change how the space functions.
This approach works best in tight nooks where you cannot add cabinets. Measure shelf depth so doors still open and keep baskets shallow for easy reach. Use a few labeled baskets for detergents, rags, and pet items, add a flat caddy on the washer or dryer for daily supplies, and choose a low-profile light to brighten the area. Small changes, low cost, real payoff.
Make The Fireplace Wall The Main Feature
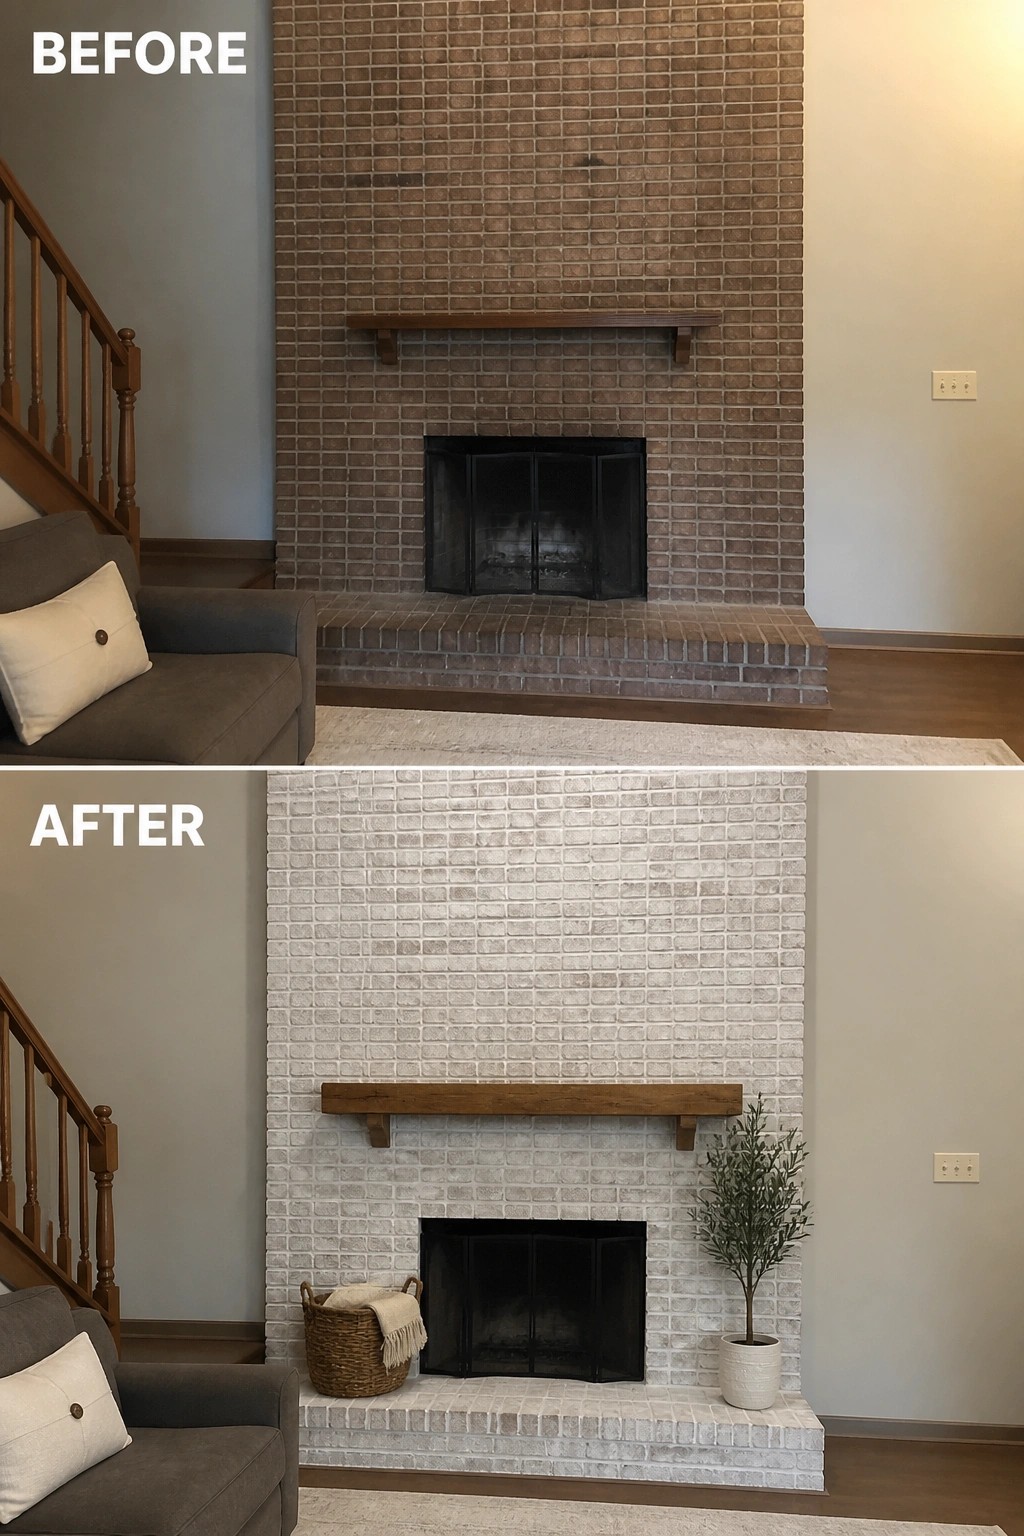
A quick way to refresh a dated living room is to lighten the brick and keep the styling simple. In this before-and-after the dark brick was painted or whitewashed and a modest wood shelf was added so the hearth reads as a single, bright feature rather than a heavy, confusing wall. The change is small but it makes the whole room feel more current and calmer.
Start by cleaning the brick and testing paint or a limewash on a hidden patch (do a small test first). Use a product rated for masonry and heat exposure, and consider thinning white paint for a subtle whitewash so the mortar and texture still show. Finish with a straight, warm wood mantel and one or two accessories at the same scale—a basket and a potted plant are all you need—to keep the focus on the refreshed fireplace without crowding the space.
Make A Small Entry Functional With A Bench
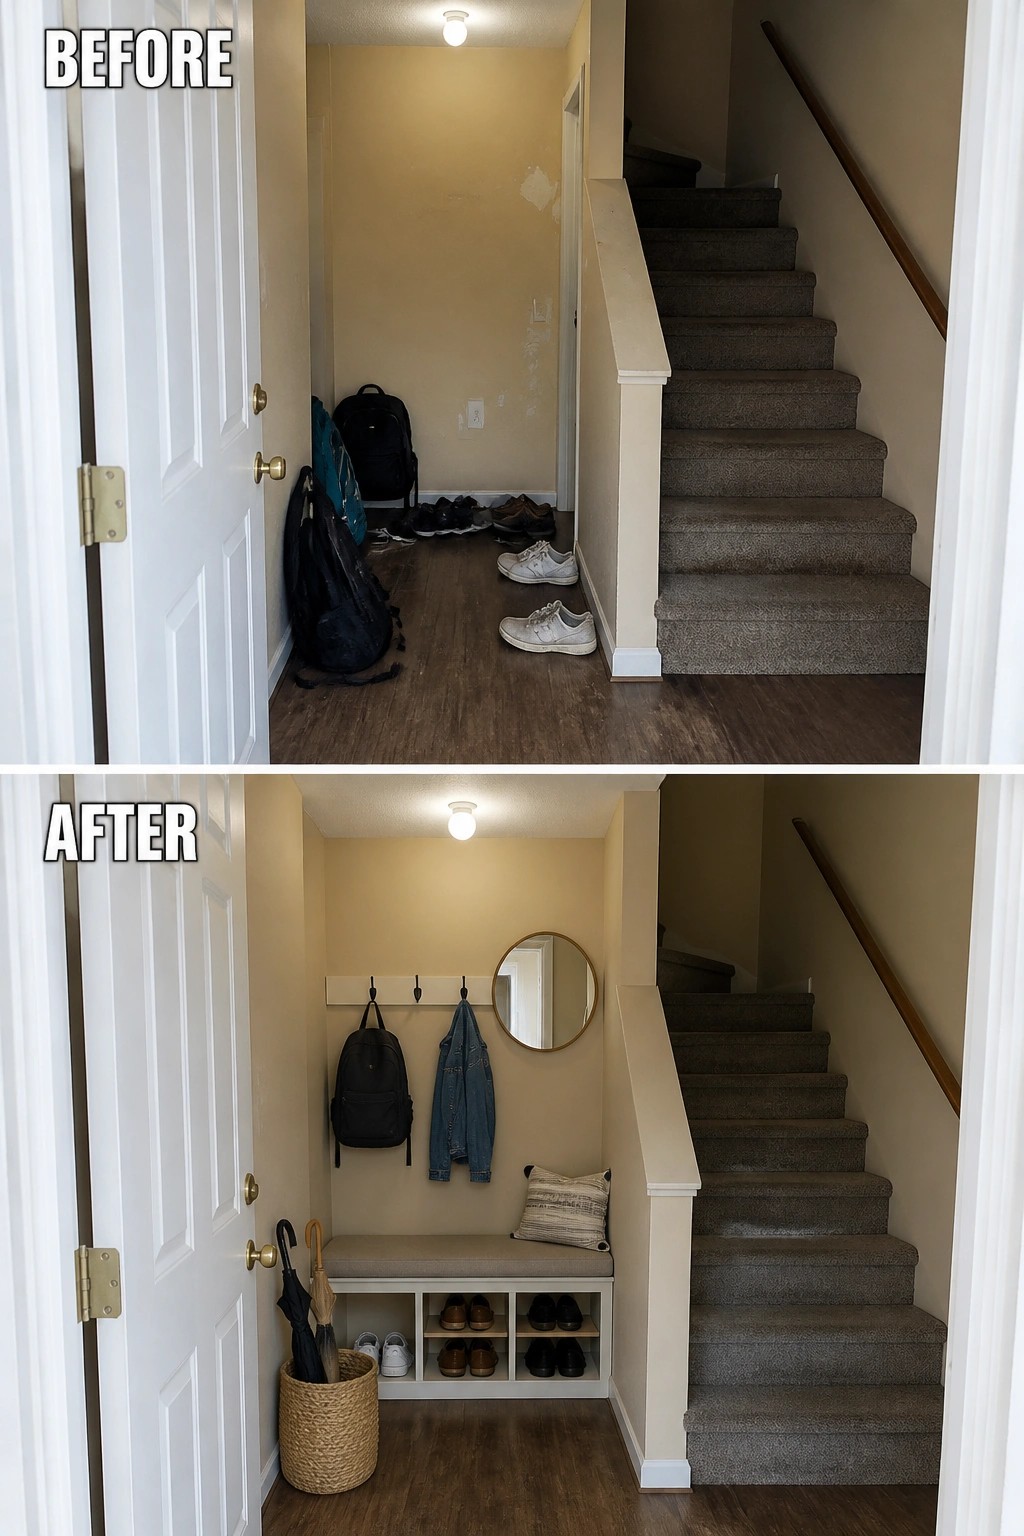
A tiny, unused entry can become useful without changing walls or stairs. In this redo a slim bench with built-in cubbies, a row of hooks, and a small round mirror turn a bare alcove into a tidy drop zone. The single idea here is simple: give people a place to sit, store shoes, and hang coats so clutter stops spreading across the floor.
To copy it, measure the nook and pick a bench that leaves room for the door and stairs to open. Choose open cubbies or baskets for shoes so things stay visible and easy to grab. Mount a narrow board with hooks at shoulder height and add a small mirror and a basket for umbrellas to keep items contained. Keep the scale modest and repeat one or two neutral colors so the spot feels calm and not crowded.
Define Garden Beds To Refresh A Split-Level Front Yard
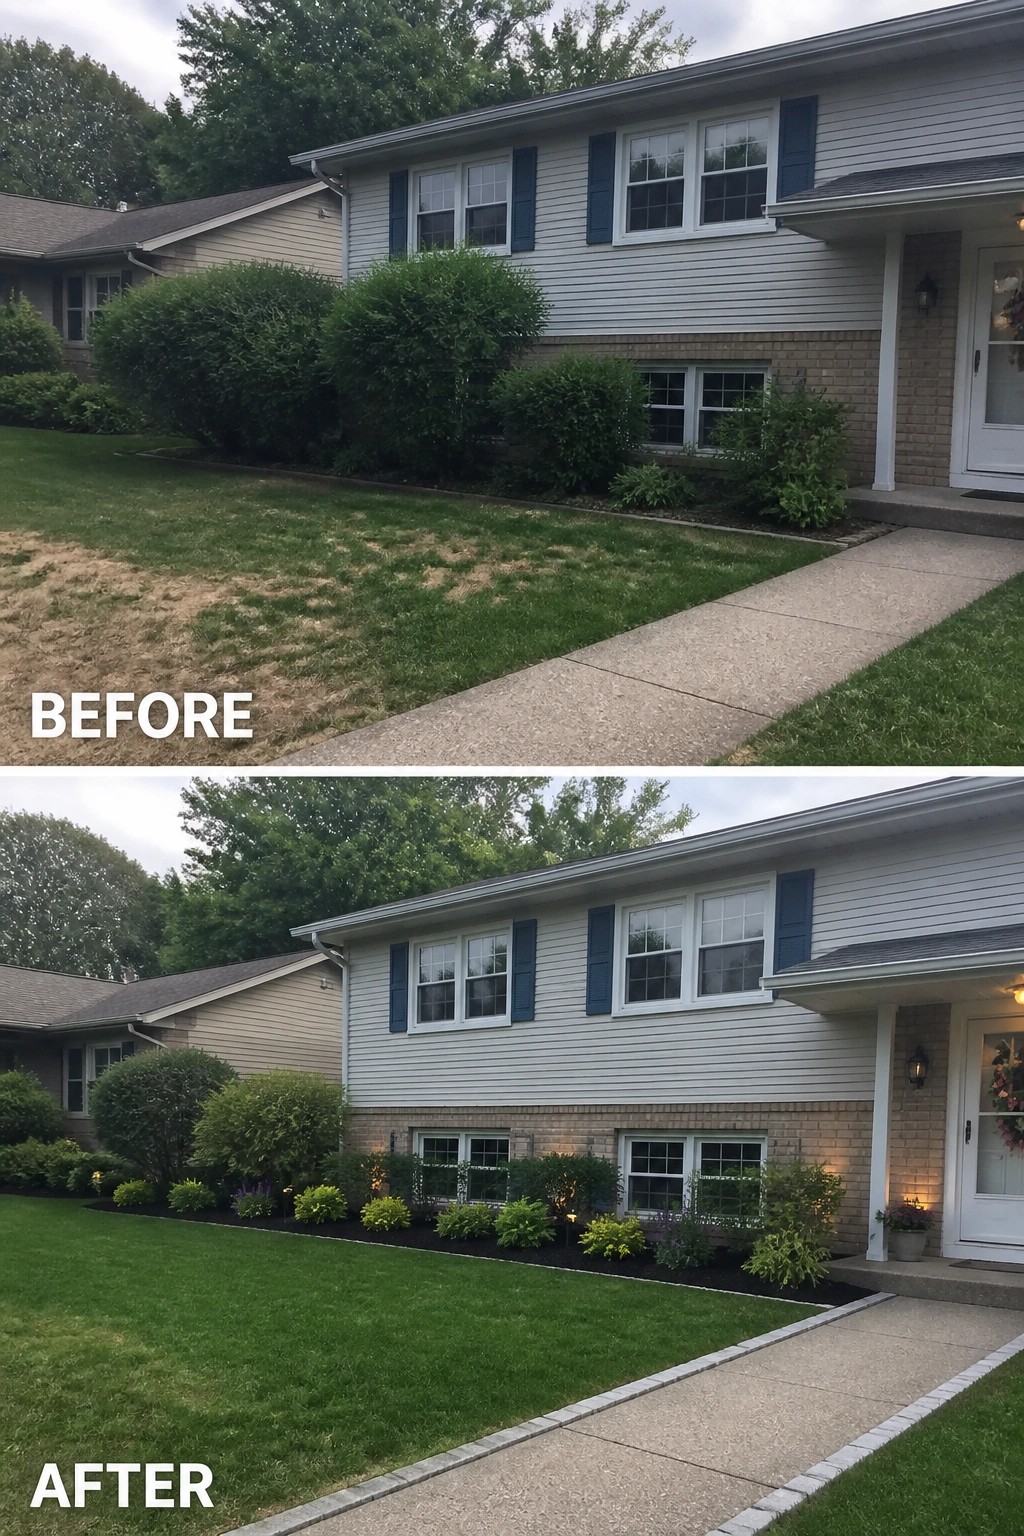
Clearing out oversized foundation shrubs and replacing them with a low, layered planting bed instantly tidies a split-level facade. In the after photo the tall, shapeless hedges were pared back and swapped for repeatable smaller shrubs, dark mulch, crisp edging, and a few pathway lights to open up the windows and give the house a cleaner, more deliberate look.
Start by removing or heavily pruning one or two dominant bushes, then install a simple border—stone, paver, or metal—to hold fresh mulch and create a neat edge. Choose two or three plant varieties you can repeat along the bed at staggered heights, add a touch of low lighting for evening curb appeal, and leave enough room to mow and maintain. This approach works well on older split levels where you want to show more siding and windows without major construction.
Make A Plain Entry Feel Welcoming
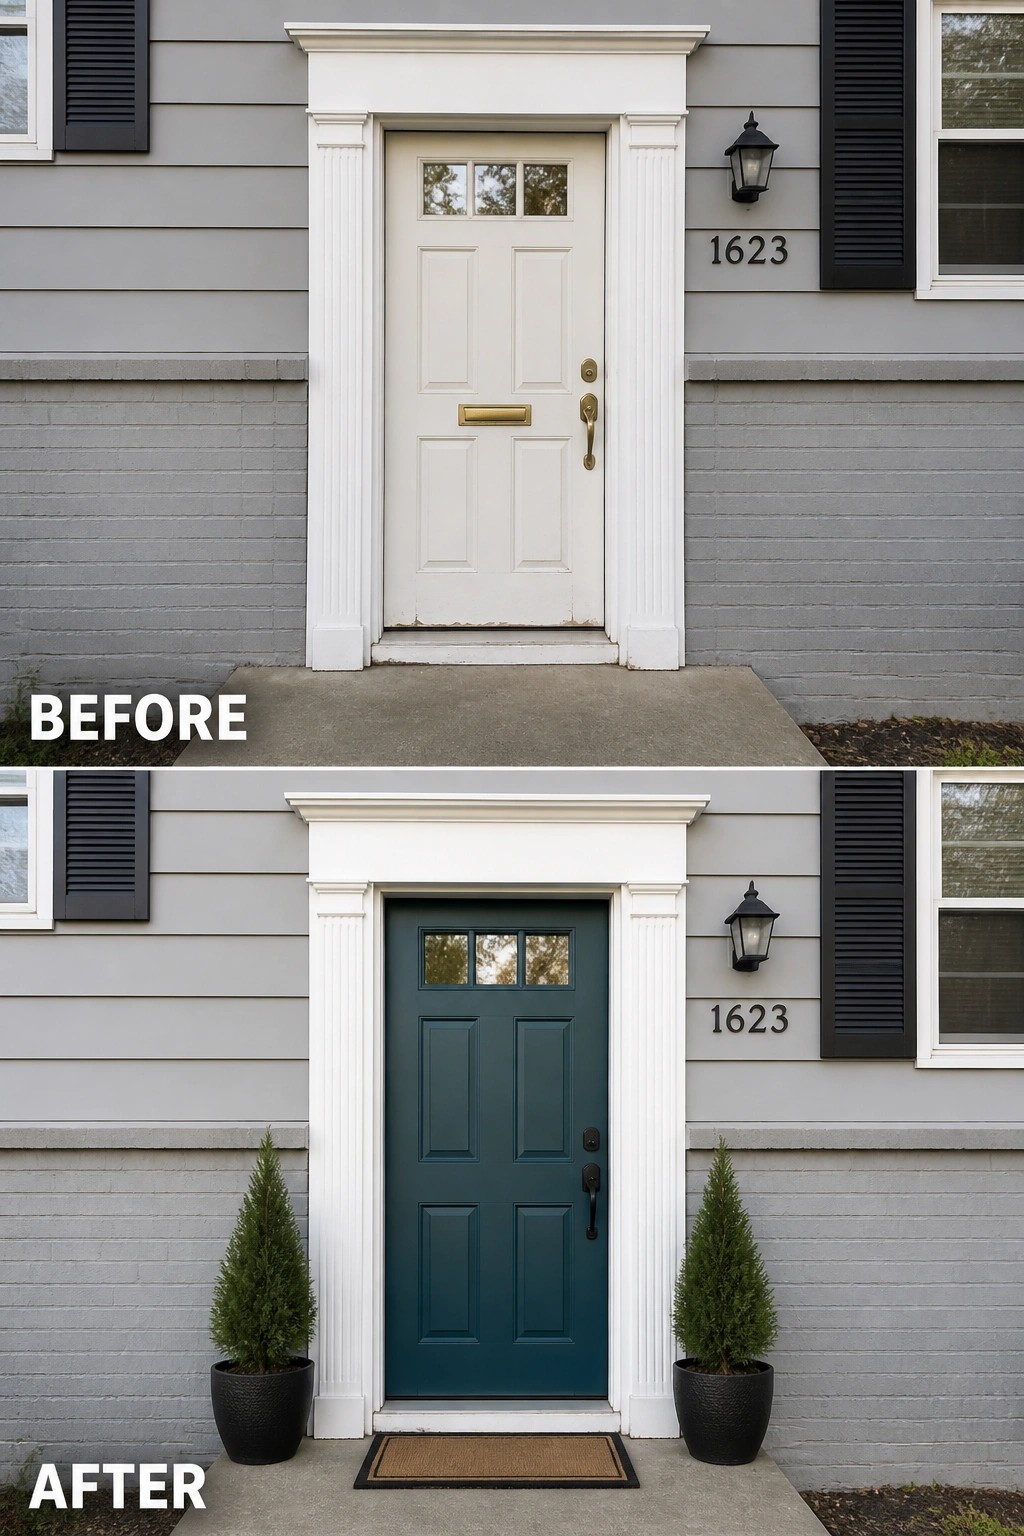
A painted door plus a few simple accents gives a small stoop an instant purpose. Swapping a faded white for a richer color and adding matching planters and a doormat creates a clear focal point, while new hardware finishes the look without a big budget or construction.
Pick a door color that contrasts with your siding and repeat that hue in pots or a rug to keep things cohesive. Keep pieces small-scale so the path stays clear, choose low-maintenance plants, and prep and prime the door before painting (clean, sand, primer). This approach works well on modest split-level fronts — quick, effective, and reversible.
Create A Defined Planting Bed Along The Driveway
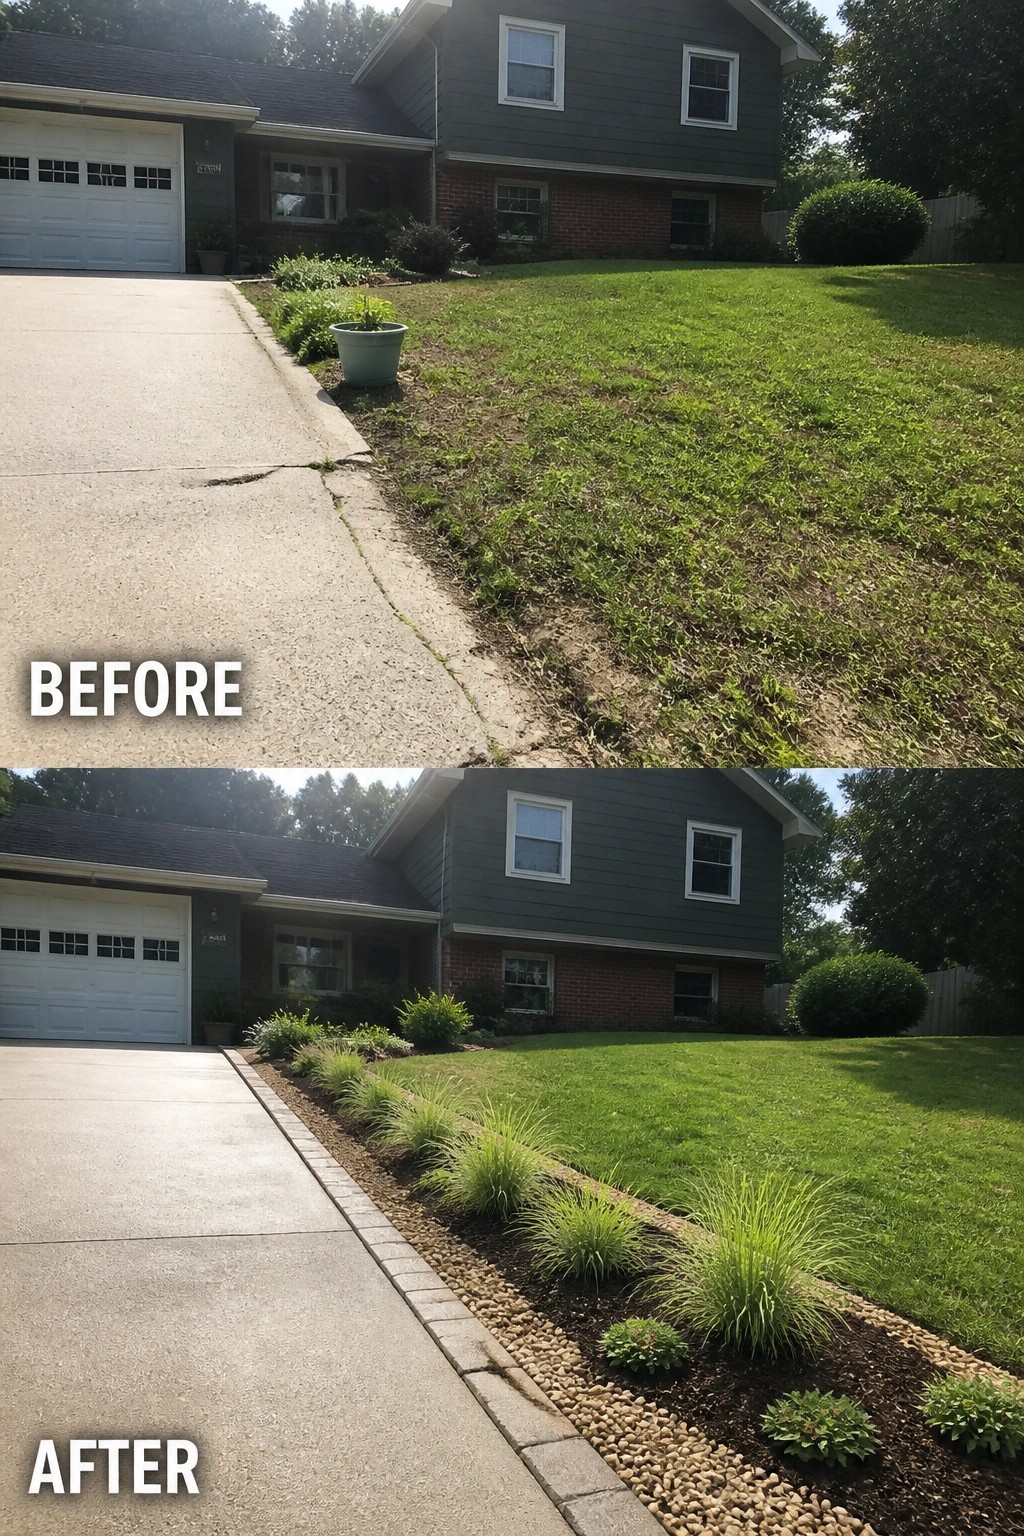
A narrow, planted bed with a clean paver edge instantly tidies a sloppy lawn edge and gives the front yard purpose. In this example the homeowner replaced a ragged strip of grass with a row of ornamental grasses, a gravel mulch band, and a simple paver border to hide the cracked concrete and make the driveway feel finished. The result is neat, low-key, and much easier to maintain than trying to perfect the grass.
To copy this, start by clearing the strip and laying a straight edge of pavers or bricks to separate lawn from bed. Keep the plant palette simple—repeat one or two low-maintenance species like ornamental grasses and a small perennial—and use gravel or bark to suppress weeds and define the line. Leave enough room for your mower, prep the soil so plants establish quickly, and scale the bed width to your yard (even a narrow 18–24 inch band makes a big difference).
Make A Narrow Side Alley Functional With Vertical Storage
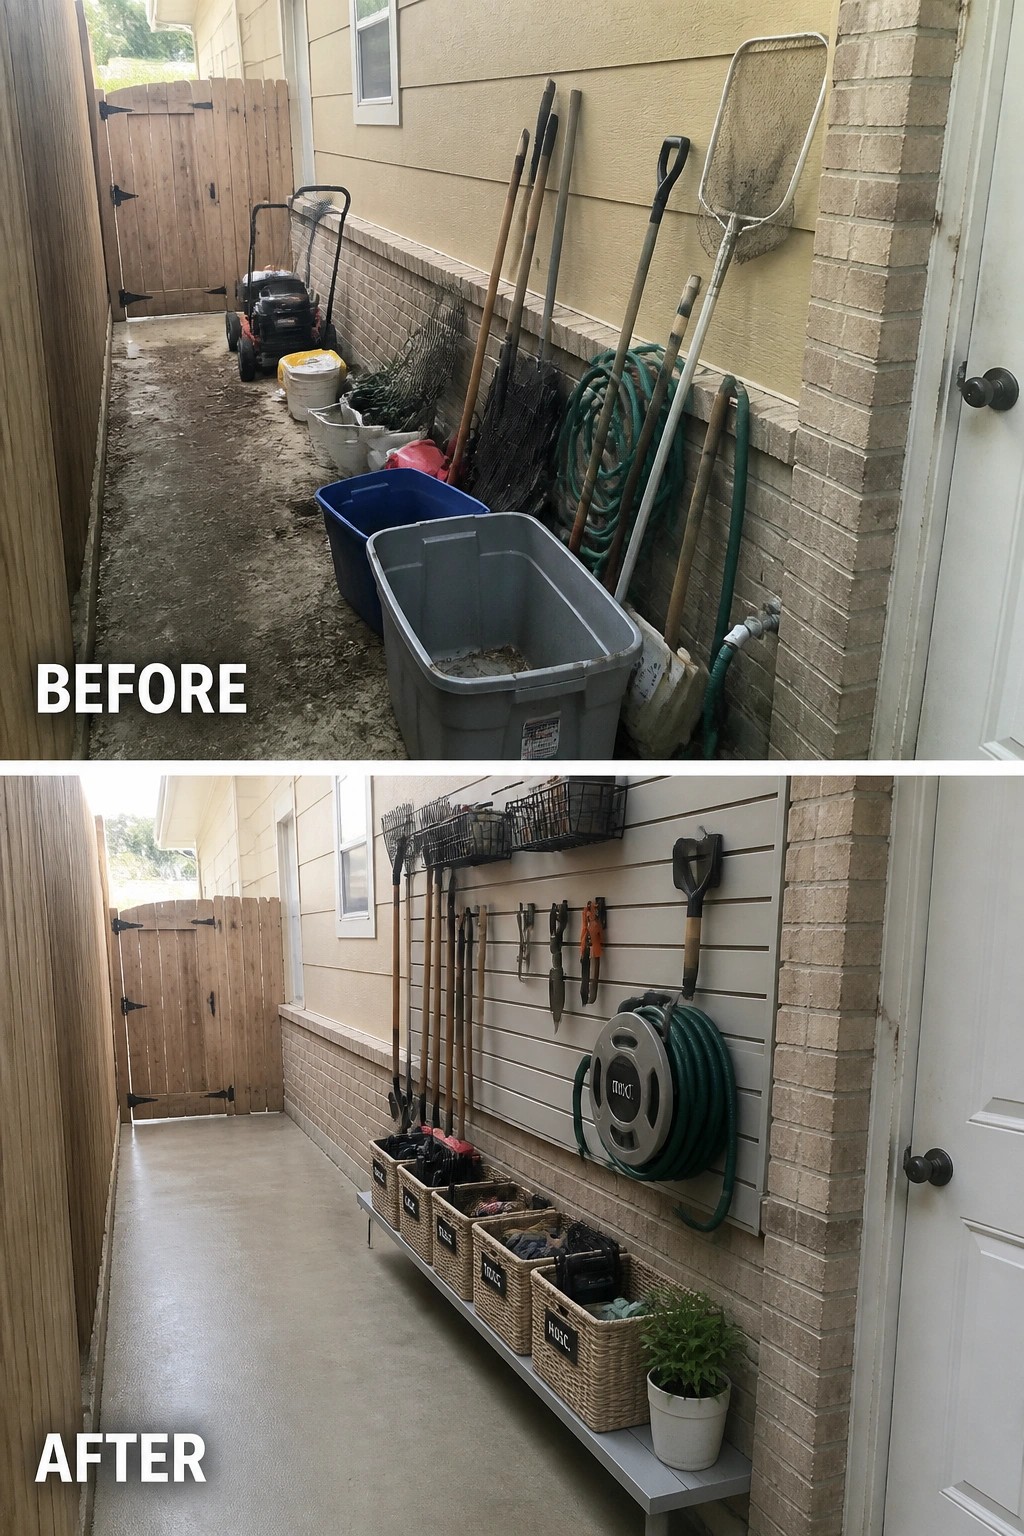
A slim side passage doesn’t need to be a catchall. Clearing the floor and mounting a slatboard with hooks, a hose reel, and a low shelf for baskets turns wasted space into orderly tool storage while keeping the path usable. The change works because most yard gear can be stored vertically, which frees up floor space and makes everything easier to reach.
To copy this, start by decluttering and sweeping the area, then add a wall system or pegboard sized to the wall you have. Choose shallow baskets and a narrow shelf so you still have room to walk, label baskets for quick finds, and use weatherproof hooks for heavier items. Simple and practical.
Add A Window Box To Boost Curb Appeal
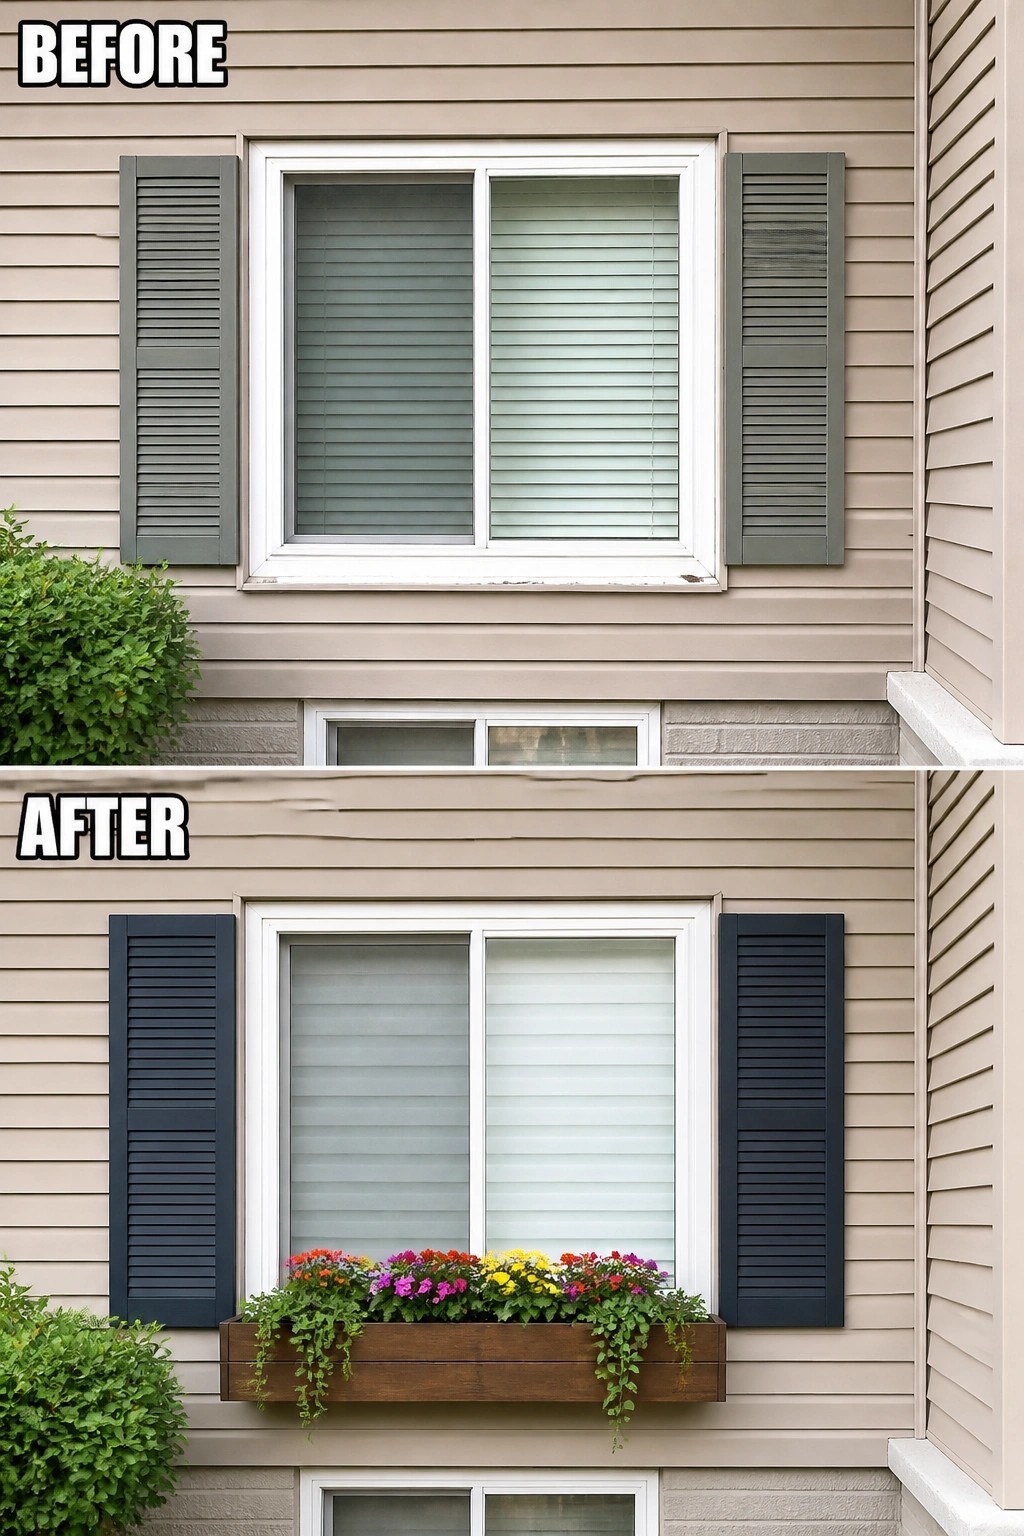
A simple wooden window box planted with colorful annuals makes an otherwise plain facade look cared-for and lived-in. Pairing that pop of color with darker shutters gives the eye a clear focal point, so the front of the house reads as intentional instead of neglected.
Keep it practical: pick a box sized to your window, use rot-resistant material or a metal liner, and allow for drainage and secure mounting into studs or a ledger board. Choose a mix of showy annuals and a trailing plant for spillover, water regularly, and swap in seasonal bulbs or evergreens for winter interest so the effort pays off year-round.
Frequently Asked Questions
Q: How can I make my split-level feel more open without moving walls?
A: Pick a light, consistent paint palette across the connected levels and keep flooring tones similar to blur the transitions. Open up railings or swap bulky balusters for slimmer ones, and rearrange furniture so sightlines flow from one level to the next. Add taller lighting and a few mirrors to bounce light into lower areas.
Q: My staircase looks dated — what quick updates actually make a difference?
A: Refinish or paint the treads and risers, add a new runner, and change out the handrail or balusters for a cleaner look (super affordable and fast). Swapping the light fixture over the stairs also refreshes the whole area without a big budget.
Q: The step between my living room and dining area is awkward — how do I make it feel intentional?
A: Treat the change in level like a design feature: define each zone with different rugs, lighting, or a slight change in texture rather than competing colors. Keep trim and baseboard styles consistent so the shift reads as deliberate instead of sloppy.
Q: Can I do these refreshes while living in the house, and how long will they take?
A: Yes — many updates like painting, swapping fixtures, or reflooring small areas can happen while you live there if you plan work in stages and set up temporary living zones. Expect a few days for one room, a week for multiple rooms, and a couple of weeks for whole-house refreshes; noisy work is easiest to schedule on separate days.